注解
请确认您正在阅读的文档和您使用的软件版本相匹配。左边的导航栏顶部可以看到版本标志。您可以使用导航栏下边的选择器切换版本。
一个企业级区块链平台
企业级授权分布式账本平台为大多数行业的应用场景提供模块化和广泛的支持。
我们是谁
本文档由超级账本中国技术工作组(TWGC,Technical Working Group China)组织翻译,翻译工作都是由工作组成员工作之余贡献的,并非专业翻译人员,当前版本为 v2.2.0(Hyperledger Fabric 仓库中 v2.2.0 标签所对应的 docs 目录中的文档),中文翻译如有不妥之处,请在文档翻译仓库中提交 PR,文档翻译规则请参考 wiki 页面,参与过贡献的成员请将名字留在这里,如有问题可以联系这里的任意一位社区成员,大家都会热心解答。
当前 TWGC i18n 负责人:程阳(Yang Cheng) email:chengyang418@163.com 微信:yycheng418
Fabric 的后续版本以及超级账本下其他项目的文档,我们也会逐步进行翻译。
文档翻译日志
Fabric Commit Hash : 5ea85bc541c410b80ab9585d64f5ba13567c162b (tag v2.2.0) Jul 9, 2020
介绍
一般来说,区块链是一个由分布式网络中的节点维护的不可篡改的账本。这些节点通过执行被共识协议验证过的交易来各自维护一个账本的副本,账本以区块的形式存在,每个区块通过哈希和之前的区块相连。
第一个被广为人知的区块链应用是加密货币比特币,而其他应用都是从它衍生出来的。以太坊是另一种加密货币,它采用了不同方法,整合了许多类似比特币的特征,但是新增了智能合约为分布式应用创建了一个平台。比特币和以太坊属于同一类区块链,我们将其归类为公共非许可(Public Permissionless)区块链技术。这些基本上都是公共网络,允许任何人在上面匿名互动。
随着比特币、以太坊和其他一些衍生技术的普及,越来越多的人想要将区块链基础技术、分布式账本和分布式应用平台用到企业业务中去。但是,许多企业业务对性能要求较高,目前非许可区块链技术无法达到。此外,在许多业务中,对参与者身份要求比较严格,如在金融交易业务中,必须遵循“了解客户(Know-Your-Customer,KYC)”和“反洗钱(Anti-Money Laundering,AML)”的相关法规。
对于企业应用,我们需要考虑以下要求:
- 参与者必须是已认证的或者可识别的
- 网络需要获得许可
- 高交易吞吐量性能
- 交易确认低延迟
- 与商业交易有关的交易和数据的隐私和机密性
当前许多早期的区块链平台正在为企业应用做调整,而 Hyperledger Fabric 从一开始就设计为企业用途。下面的部分描述了 Hyperledger Fabric(Fabric)与其他区块链平台的不同,并讲解了其架构设计的一些理念。
Hyperledger Fabric
Hyperledger Fabric 是一个开源的企业级许可分布式账本技术(Distributed Ledger Technology,DLT)平台,专为在企业环境中使用而设计,与其他流行的分布式账本或区块链平台相比,它有一些主要的区别。
一个主要区别是 Hyperledger 是在 Linux 基金会下建立的,该基金会本身在开放式治理的模式下培育开源项目的历史悠久且非常成功,发展了强大的可持续社区和繁荣的生态系统。Hyperledger 由多元化的技术指导委员会进行管理,Hyperledger Fabric 项目由多个组织的不同的维护人员管理。从第一次提交以来,它的开发社区已经发展到超过35个组织和近200个开发人员。
Fabric 具有高度模块化和可配置的架构,可为各行各业的业务提供创新性、多样性和优化,其中包括银行、金融、保险、医疗保健、人力资源、供应链甚至数字音乐分发。
Fabric 是第一个支持通用编程语言编写智能合约(如 Java、Go 和 Node.js)的分布式账本平台,不受限于特定领域语言(Domain-Specific Languages,DSL)。这意味着大多数企业已经拥有开发智能合约所需的技能,并且不需要额外的培训来学习新的语言或特定领域语言。
Fabric 平台也是许可的,这意味着它与公共非许可网络不同,参与者彼此了解而不是匿名的或完全不信任的。也就是说,尽管参与者可能不会完全信任彼此(例如,同行业中的竞争对手),但网络可以在一个治理模式下运行,这个治理模式是建立在参与者之间确实存在的信任之上的,如处理纠纷的法律协议或框架。
该平台最重要的区别之一是它支持可插拔的共识协议,使得平台能够更有效地进行定制,以适应特定的业务场景和信任模型。例如,当部署在单个企业内或由可信任的权威机构管理时,完全拜占庭容错的共识可能是不必要的,并且大大降低了性能和吞吐量。在这种的情况下,崩溃容错(Crash Fault-Tolerant,CFT)共识协议可能就够了,而在去中心化的场景中,可能需要更传统的拜占庭容错(Byzantine Fault Tolerant,BFT)共识协议。
Fabric 可以利用不需要原生加密货币的共识协议来激励昂贵的挖矿或推动智能合约执行。不使用加密货币会降低系统的风险,并且没有挖矿操作意味着可以使用与任何其他分布式系统大致相同的运营成本来部署平台。
这些差异化设计特性的结合使 Fabric 成为当今交易处理和交易确认延迟方面性能较好的平台之一,并且它实现了交易的隐私和保密以及智能合约(Fabric 称之为“链码”)。
让我们更详细地探索这些区别。
模块化
Hyperledger Fabric 被专门设计为模块化架构。无论是可插拔的共识、可插拔的身份管理协议(如 LDAP 或 OpenID Connect)、密钥管理协议还是加密库,该平台的核心设计旨在满足企业业务需求的多样性。
总体来看,Fabric 由以下模块化的组件组成:
- 可插拔的排序服务对交易顺序建立共识,然后向节点广播区块;
- 可插拔的成员服务提供者负责将网络中的实体与加密身份相关联;
- 可选的P2P gossip 服务通过排序服务将区块发送到其他节点;
- 智能合约(“链码”)隔离运行在容器环境(例如 Docker)中。它们可以用标准编程语言编写,但不能直接访问账本状态;
- 账本可以通过配置支持多种 DBMS;
- 可插拔的背书和验证策略,每个应用程序可以独立配置。
业界一致公认,没有“可以一统天下的链(one blockchain to rule them all)”。Hyperledger Fabric 可以通过多种方式进行配置,以满足不同行业应用的需求。
许可和非许可区块链
在一个非许可区块链中,几乎任何人都可以参与,每个参与者都是匿名的。在这样的情况下,区块链状态达到不可变的区块深度前不存在信任。为了弥补这种信任的缺失,非许可区块链通常采用“挖矿”或交易费来提供经济激励,以抵消参与基于“工作量证明(PoW)”的拜占庭容错共识形式的特殊成本。
另一方面,许可区块链在一组已知的、已识别的且经常经过审查的参与者中操作区块链,这些参与者在产生一定程度信任的治理模型下运作。许可区块链提供了一种方法来保护具有共同目标,但可能彼此不完全信任的一组实体之间的交互。通过依赖参与者的身份,许可区块链可以使用更传统的崩溃容错(CFT)或拜占庭容错(BFT)共识协议,而不需要昂贵的挖掘。
另外,在许可的情况下,降低了参与者故意通过智能合约引入恶意代码的风险。首先,参与者彼此了解对方以及所有的操作,无论是提交交易、修改网络配置还是部署智能合约都根据网络中已经确定的背书策略和相关交易类型被记录在区块链上。与完全匿名相比,可以很容易地识别犯罪方,并根据治理模式的条款进行处理。
智能合约
智能合约,在 Fabric 中称之为“链码”,作为受信任的分布式应用程序,从区块链中获得信任,在节点中达成基本共识。它是区块链应用的业务逻辑。
有三个关键点适用于智能合约,尤其是应用于平台时:
- 多个智能合约在网络中同时运行,
- 它们可以动态部署(很多情况下任何人都可以部署),
- 应用代码应视为不被信任的,甚至可能是恶意的。
大多数现有的具有智能合约能力的区块链平台遵循顺序执行架构,其中共识协议:
- 验证并将交易排序,然后将它们传播到所有的节点,
- 每个节点按顺序执行交易。
几乎所有现有的区块链系统都可以找到顺序执行架构,从非许可平台,如 Ethereum(基于 PoW 共识)到许可平台,如 Tendermint、Chain 和 Quorum 。
采用顺序执行架构的区块链执行智能合约的结果一定是确定的,否则,可能永远不会达成共识。为了解决非确定性问题,许多平台要求智能合约以非标准或特定领域的语言(例如 Solidity)编写,以便消除非确定性操作。这阻碍了平台的广泛采用,因为它要求开发人员学习新语言来编写智能合约,而且可能会编写错误的程序。
此外,由于所有节点都按顺序执行所有交易,性能和规模被限制。事实上系统要求智能合约代码要在每个节点上都执行,这就需要采取复杂措施来保护整个系统免受恶意合约的影响,以确保整个系统的弹性。
一种新方法
针对交易 Fabric 引入了一种新的架构,我们称为执行-排序-验证。为了解决顺序执行模型面临的弹性、灵活性、可伸缩性、性能和机密性问题,它将交易流分为三个步骤:
- 执行一个交易并检查其正确性,从而给它背书,
- 通过(可插拔的)共识协议将交易排序,
- 提交交易到账本前先根据特定应用程序的背书策略验证交易
这种设计与顺序执行模式完全不同,因为 Fabric 在交易顺序达成最终一致前执行交易。
在 Fabric 中,特定应用程序的背书策略可以指定需要哪些节点或多少节点来保证给定的智能合约正确执行。因此,每个交易只需要由满足交易的背书策略所必需的节点的子集来执行(背书)。这样可以并行执行,从而提高系统的整体性能和规模。第一阶段也消除了任何非确定性,因为在排序之前可以过滤掉不一致的结果。
因为我们已经消除了非确定性,Fabric 是第一个能使用标准编程语言的区块链技术。
隐私和保密性
正如我们所讨论的,在一个公共的、非许可的区块链网络中,利用 PoW 作为其共识模型,交易在每个节点上执行。这意味着合约本身和他们处理的交易数据都不保密。每个交易以及实现它的代码,对于网络中的每个节点都是可见的。在这种情况下,我们得到了基于 PoW 的拜占庭容错共识却牺牲了合约和数据的保密性。
对于许多商业业务而言,缺乏保密性就会有问题。例如,在供应链合作伙伴组成的网络中,作为巩固关系或促进额外销售的手段,某些消费者可能会获得优惠利率。如果每个参与者都可以看到每个合约和交易,在一个完全透明的网络中就不可能维持这种商业关系,因为每个消费者都会想要优惠利率。
第二个例子考虑到证券行业,无论一个交易者建仓(或出仓)都会不希望她的竞争对手知道,否则他们将会试图入局,进而影响交易者的策略。
为了解决缺乏隐私和机密性的问题来满足企业业务需求,区块链平台采用了多种方法。所有方法都需要权衡利弊。
加密数据是提供保密性的一种方法;然而,在利用 PoW 达成共识的非许可网络中,加密数据位于每个节点上。如果有足够的时间和计算资源,加密可能会被破解。对于许多企业业务而言,不能接受信息可能受损的风险。
零知识证明(Zero Knowledge Proofs,ZKP)是正在探索解决该问题的另一个研究领域。目前这里的权衡是计算 ZKP 需要相当多的时间和计算资源。因此,在这种情况下需要权衡资源消耗与保密性能。
如果可以使用其他共识,或许可以探索将机密信息限制于授权节点内。
Hyperledger Fabric 是一个许可平台,通过其通道架构和 私有数据特性实现保密。在通道方面,Fabric 网络中的成员组建了一个子网络,在子网络中的成员可以看到其所参与到的交易。因此,参与到通道的节点才有权访问智能合约(链码)和交易数据,以此保证了隐私性和保密性。私有数据通过在通道中的成员间使用集合,实现了和通道相同的隐私能力并且不用创建和维护独立的通道。
可插拔共识
交易的排序被委托给模块化组件以达成共识,该组件在逻辑上与执行交易和维护帐本的节点解耦。具体来说,就是排序服务。由于共识是模块化的,可以根据特定部署或解决方案的信任假设来定制其实现。这种模块化架构允许平台依赖完善的工具包进行 CFT(崩溃容错)或 BFT(拜占庭容错)的排序。
Fabric 目前提供了一种基于etcd 库 中 Raft 协议 的 CFT 排序服务的实现。更多当前可用的排序服务请查阅排序服务概念文档。
另外,请注意,这些并不相互排斥。一个 Fabric 网络中可以有多种排序服务以支持不同的应用或应用需求。
性能和可扩展性
一个区块链平台的性能可能会受到许多因素的影响,例如交易大小、区块大小、网络大小以及硬件限制等。Hyperledger Fabric 性能和规模工作组 正在开发一个叫 Hyperledger Caliper的基准测试框架。
已经发表了一些研究和测试 Hyperledger Fabric 性能的文章。最新的一篇是 将 Fabric 扩展到 20000 笔交易每秒(Scaled Fabric to 20,000 transactions per second)。
结论
任何对区块链平台严谨的评估都应该在其名单中包含 Hyperledger Fabric。
而且,Fabric 的这些特性使其成为一个高度可扩展的系统,该平台是支持灵活的信任假设的许可区块链,因此能够支持从政府、金融、供应链物流到医疗保健等各种的行业应用。
Hyperledger Fabric 是 Hyperledger 中最活跃的项目。围绕平台的社区建设正在稳步增长,每一个连续发布的版本所带来的创新都远远超过其他任何一个企业区块链平台。
致谢
前面的内容源自同行审阅的”Hyperledger Fabric: A Distributed Operating System for Permissioned Blockchains”(“Hyperledger Fabric:一个许可区块链的分布式操作系统”) - Elli Androulaki,Artem Barger,Vita Bortnikov,Christian Cachin,Konstantinos Christidis,Angelo De Caro,David Enyeart,Christopher Ferris,Gennady Laventman,Yacov Manevich,Srinivasan Muralidharan,Chet Murthy,Binh Nguyen,Manish Sethi,Gari Singh,Keith Smith,Alessandro Sorniotti,Chrysoula Stathakopoulou,Marko Vukolic,Sharon Weed Cocco,Jason Yellick
Hyperledger Fabric v2.0 更新说明
v1.0 是 Hyperledger Fabric 的第一个主版本,Fabric v2.0 为用户和运营商提供了重要的新特性,包括对新应用程序和隐私模式的支持,增强了对智能合约的管理和对节点操作的新选项。
在 v2.0 上的每一个 v2.x 次要发行版本都有少量特性更新、改进和 bug 修复。
下面我们就来看看 Fabric v2.0 发布的一些亮点······
智能合约的去中心化治理
Fabric v2.0 引入了智能合约的去中心化治理,它为您在 Peer 节点上安装和启动链码提供了一个新的流程。新的 Fabric 链码生命周期支持多个组织在链码和账本交互之前协商链码的参数,例如链码背书策略。和以前的生命周期相比,新的模式有几个改进:
- 多个组织必须认同链码参数 在 Fabric 1.x 版本中,一个组织可以为通道中的所有其他成员设置链码的参数(例如背书策略),这些成员只能拒绝安装链码,因此不能参与和该链码相关的交易。新的 Fabric 链码生命周期更加灵活,它既支持中心化的信任模型(如以前的生命周期模型),也支持去中心化的模型,去中心化的模型要求在链码在通道上变为活动状态之前,要有足够数量的组织就背书策略和其他细节达成一致意见。
- 更周密的链码升级过程 在以前的链码生命周期中,升级交易可能由单个组织发起,这会给尚未安装新链码的通道成员带来风险。新的模式要求只有在足够数量的组织批准升级后才能升级链码。
- 更简单的背书策略和私有数据集合更新 Fabric 生命周期支持在不重新打包或重新安装链码的情况下,更改背书策略或私有数据集合配置。用户还可以利用新的默认背书策略,该策略要求获得通道上大多数组织的背书。在通道中添加或删除组织时,会自动更新此策略。
- 可查验的链码包 Fabric 生命周期将链码封装在可读性更强的 tar 文件中。这使得检查链码包和跨多个组织协调安装变得更加容易。
- 使用一个包在通道上启动多个链码 以前的生命周期在安装链码包时,会使用打包时指定的名称和版本定义通道上的链码。您现在可以使用同一个链码包,以不同的名称在同一通道或不同通道上多次部署它。例如,如果您想在链码的“副本”中跟踪不同类型的资产。
- 通道成员之间的链码包不需要为同一个 组织可以自己扩展链码,例如为了他们组织的利益执行不同的验证。只要有所需数量的组织的链码执行结果匹配并为交易背书,该交易就会被验证并提交到帐本中。这还允许组织按照自己的时间单独推出小的修补程序,而不需要整个网络同步进行。
使用新的链码生命周期
对于现有的 Fabric 部署,您可以继续使用 Fabric v2.0 之前的链码生命周期。新的链码生命周期只有在通道应用程序功能更新到 v2.0 时才会生效。关于新的链码生命周期完整细节教程请参考 chaincode4noah
用于协作和共识的新链码应用程序模式
支持新的链码生命周期管理的相同的去中心化的达成协议的方法也可以用于您自己的链码应用程序中,以确保组织在数据交易被提交到帐本之前同意它们。
- 自动检查 如上所述,组织可以在链码功能中添加自动检查,以便在背书交易提案之前验证附加信息。
- 去中心化协议 人们的决定可以通过链码中的多个交易来建模。链码可能要满足来自不同组织的参与者在账本交易中的协议和条件。然后,最终的链码提案可以验证所有交易者的条件是否得到满足,并最终“解决”所有通道成员之间业务交易。有关私有条件的具体示例,请参见资产转移场景文档 私有数据。
私有数据增强
Fabric v2.0 还启用了使用和共享私有数据的新模式,不需要为所有想要进行交易的通道成员组合创建私有数据集合。具体地说,您不是在多个成员的集合中共享私有数据,而是可能想要跨集合共享私有数据,其中每个集合可能包括单个组织,也可能是带有一个监管者或审计师的组织。
Fabric v2.0 中的几个增强使得这些新的私有数据模式成为可能:
- 共享和验证私有数据 当私有数据与不是集合成员的通道成员共享时,或者与包含一个或多个通道成员的另一个私有数据集合共享时(通过向该集合写入密钥),接收方可以利用链码的 GetPrivateDataHash() API 验证私有数据是否与以前交易中创建的私有数据在链上哈希相匹配。
- 集合级别的背书策略 现在可以选择使用背书策略来定义私有数据集合,该背书策略会覆盖集合内键的链码级的背书策略。该特性可用于限制哪些组织可以将数据写入集合,并且正是它启用了前面提到的新的链码生命周期和链码应用程序模式。例如,您可能有一个链码背书策略,该策略要求大多数组织背书,但对于任何给定的交易,您可能需要两个交易处理组织在它们自己的私有数据集合中单独背书它们的协议。
- 每个组织的隐式集合 如果您想利用每个组织的私有数据模式,那么在 Fabric v2.0 中部署链码时甚至不需要定义集合。不需要任何前期定义就可以使用隐式的特定组织集合。
了解更多关于新的私有数据模式请看 私有数据 (概念文档)。更多关于私有数据集合配置和隐式集合请看 私有数据 (参考文档)。
外部链码启动器
外部链码启动器功能使运营者能够使用他们选择的技术构建和启动链码。默认构建和运行链码的方式与之前的版本相同,都是使用 Docker API,但是使用外部构建器和启动器就不必这样了。
- 消除 Docker 守护进程依赖 Fabric 以前的版本要求 Peer 节点能够访问 Docker 守护进程,以便构建和启动链码,但是 Peer 节点进程所需的特权在生产环境中可能是不合适的。
- 容器的替代品 不再要求链码在 Docker 容器中运行,可以在运营者选择的环境(包括容器)中执行。
- 可执行的外部构建器 操作员可以提供一组可执行的外部构建器,以覆盖 Peer 节点构建和启动链码方式。
- 作为外部服务的链码 传统上,链码由 Peer 节点启动,然后连接回 Peer 节点。现在可以将链码作为外部服务运行,例如在 Kubernetes pod 中,Peer 节点可以连接到该 pod,并利用该 pod 执行链码。了解更多信息请查看 将链码作为外部服务 。
了解更多关于外部链码启动功能请查看 外部构建器和启动器 。
用于提高 CouchDB 性能的状态数据库缓存
- 在使用外部 CouchDB 状态数据库时,背书和验证阶段的读取延迟历来是性能瓶颈。
- 在 Fabric v2.0 中,用快速的本地缓存读取取代了 Peer 节点中那些耗费资源的查找操作。可以使用 core.yaml 文件中的属性
cachesize来配置缓存大小。
基于 Alpine 的 docker 镜像
从 v2.0 开始,Hyperledger Fabric Docker 镜像将使用 Alpine Linux 作为基础镜像,这是一个面向安全的轻量级 Linux 发行版。这意味着现在的 Docker 镜像要小得多,这就提供了更快的下载和启动时间,以及占用主机系统上更少的磁盘空间。Alpine Linux 的设计从一开始就考虑到了安全性,Alpine 发行版的最小化特性大大降低了安全漏洞的风险。
示例测试网络
fabric-samples 仓库现在包括一个新的 Fabric 测试网络。测试网络被构建为模块化的和用户友好的示例 Fabric 网络,这使测试您的应用程序和智能合约变得容易。除了 cryptogen 之外,该网络还支持使用 CA(Certificate Authorities) 部署网络。
了解更多关于这个网络的信息,请查看 使用Fabric的测试网络 。
升级到 Fabric v2.0
一个主版本的新发布带来了一些额外的升级注意事项。不过请放心,我们支持从 v1.4.x 到 v2.0 的滚动升级,因此可以每次升级一个网络组件而不会停机。
我们扩展和修改了升级文档,现在在文档中有了一个独立的主页 升级到最新版本。这里您将会发现文档 Upgrading your components 和 Updating the capability level of a channel,以及对升级到 v2.0 的注意事项的具体了解, Considerations for getting to v2.0。
发行说明
版本说明为迁移到新版本的用户提供了更多细节。可以具体地看一看新的 Fabric v2.0 版本中变动和废弃的内容。
关键概念
介绍
Hyperledger Fabric 是分布式账本解决方案的平台,采用模块化架构,提供高安全性、弹性、灵活性和可扩展性。它被设计为支持以可插拔方式实现不同组件,并适应复杂的经济生态系统。
我们建议新用户先浏览本文后面的内容,以熟悉区块链的工作方式以及 Hyperledger Fabric 的特性和组件。
当你熟悉区块链和 Hyperledger Fabric 后请转到 入门 ,然后查看那里的示例、技术规范、API等。
什么是区块链?
一个分布式账本
区块链网络的核心是一个分布式账本,记录网络上发生的所有交易。
区块链账本通常被描述为 去中心化的 ,因为它会被复制到许多网络参与者中,每个参与者都在 协作 维护账本。我们将看到去中心化和协作是强大的属性,反映了企业在现实世界中交换商品和服务的方式。
除了分散和协作之外,信息仅能以附加的方式记录到区块链上,并使用加密技术保证一旦将交易添加到账本就无法修改。这种“不可修改”的属性简化了信息的溯源,因为参与者可以确定信息在记录后没有改变过。这就是为什么区块链有时被描述为 证明系统 。
智能合约
为了支持以同样的方式更新信息,并实现一整套账本功能(交易,查询等),区块链使用 智能合约 来提供对账本的受控访问。

智能合约不仅是在网络中封装和简化信息的关键机制,它还可以被编写成自动执行参与者的特定交易的合约。
例如,可以编写智能合约以规定运输物品的成本,其中运费根据物品到达的速度而变化。根据双方同意并写入账本的条款,当收到物品时,相应的资金会自动转手。
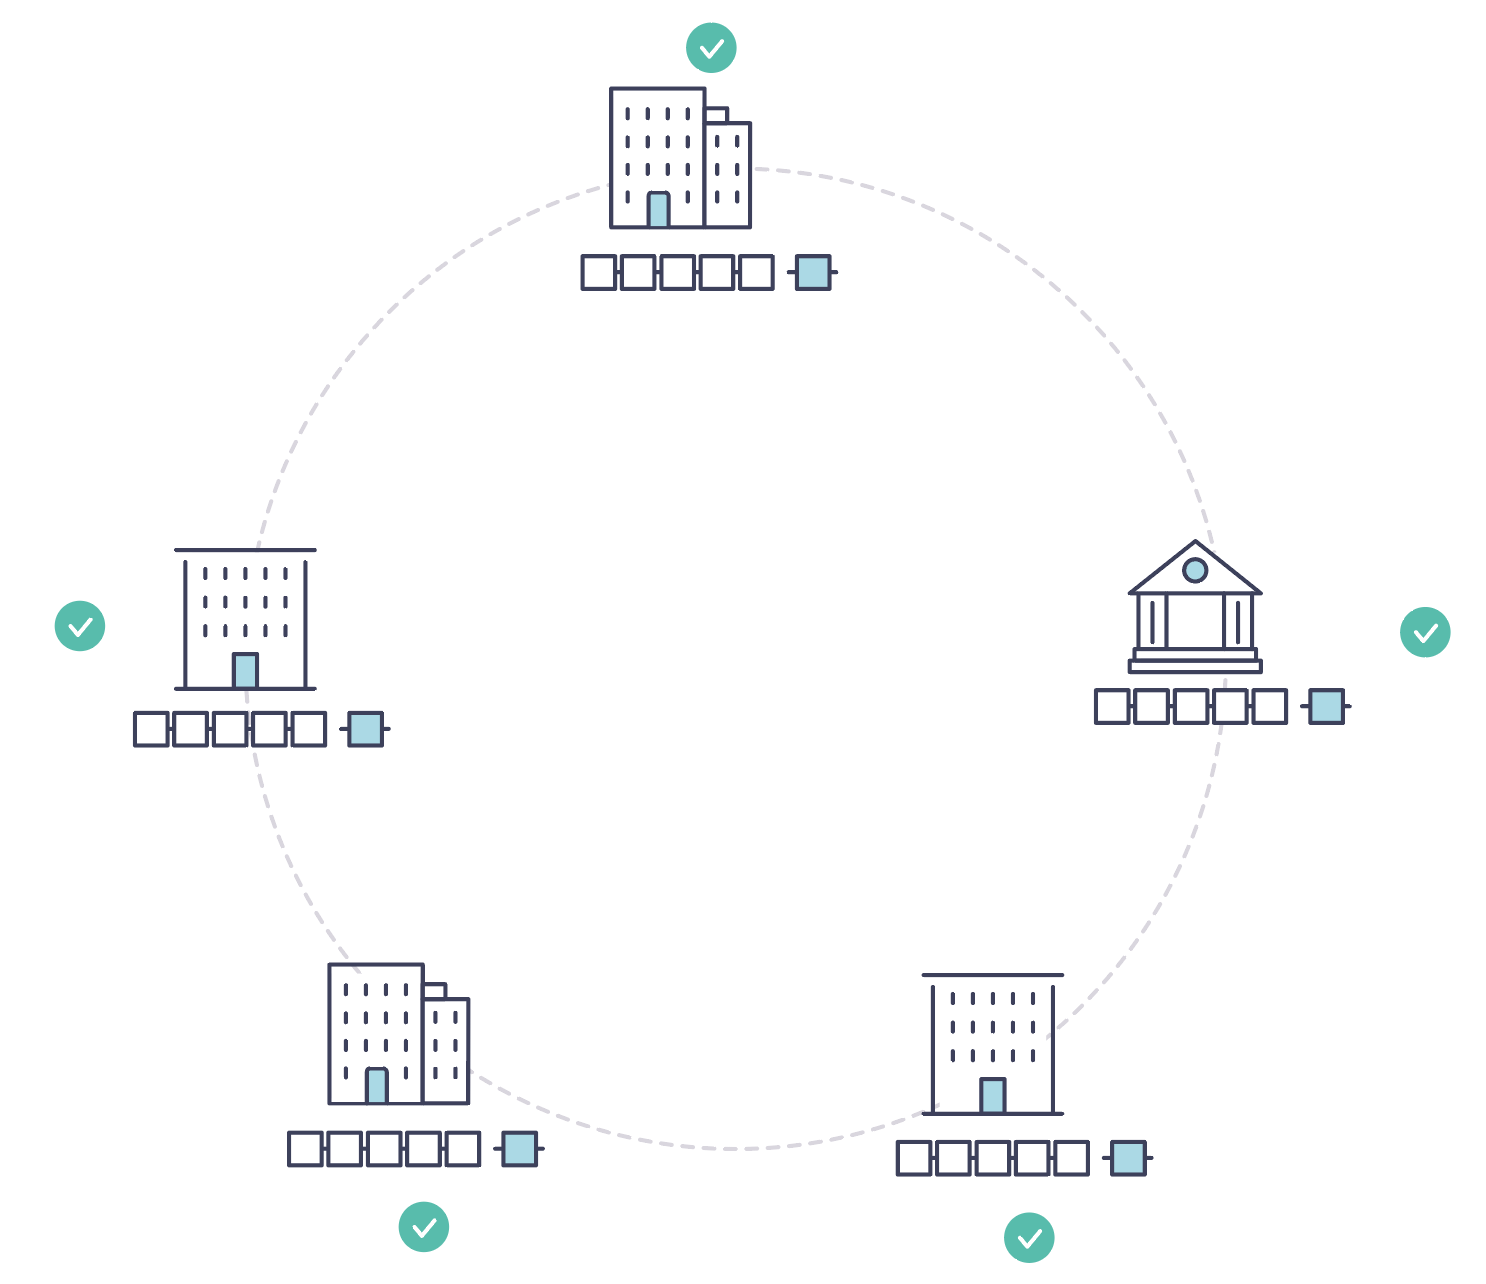
共识
保持账本在整个网络中同步的过程称为 共识 。该过程确保账本仅在交易被相应参与者批准时更新,并且当账本更新时,它们以相同的顺序更新相同的交易。
稍后您将学习更多关于账本,智能合约和共识的知识。目前,将区块链视为共享的复制交易系统就足够了,该系统通过智能合约进行更新,并通过称为共识的协作流程来保持一致。
为什么区块链有用?
现在的记录系统
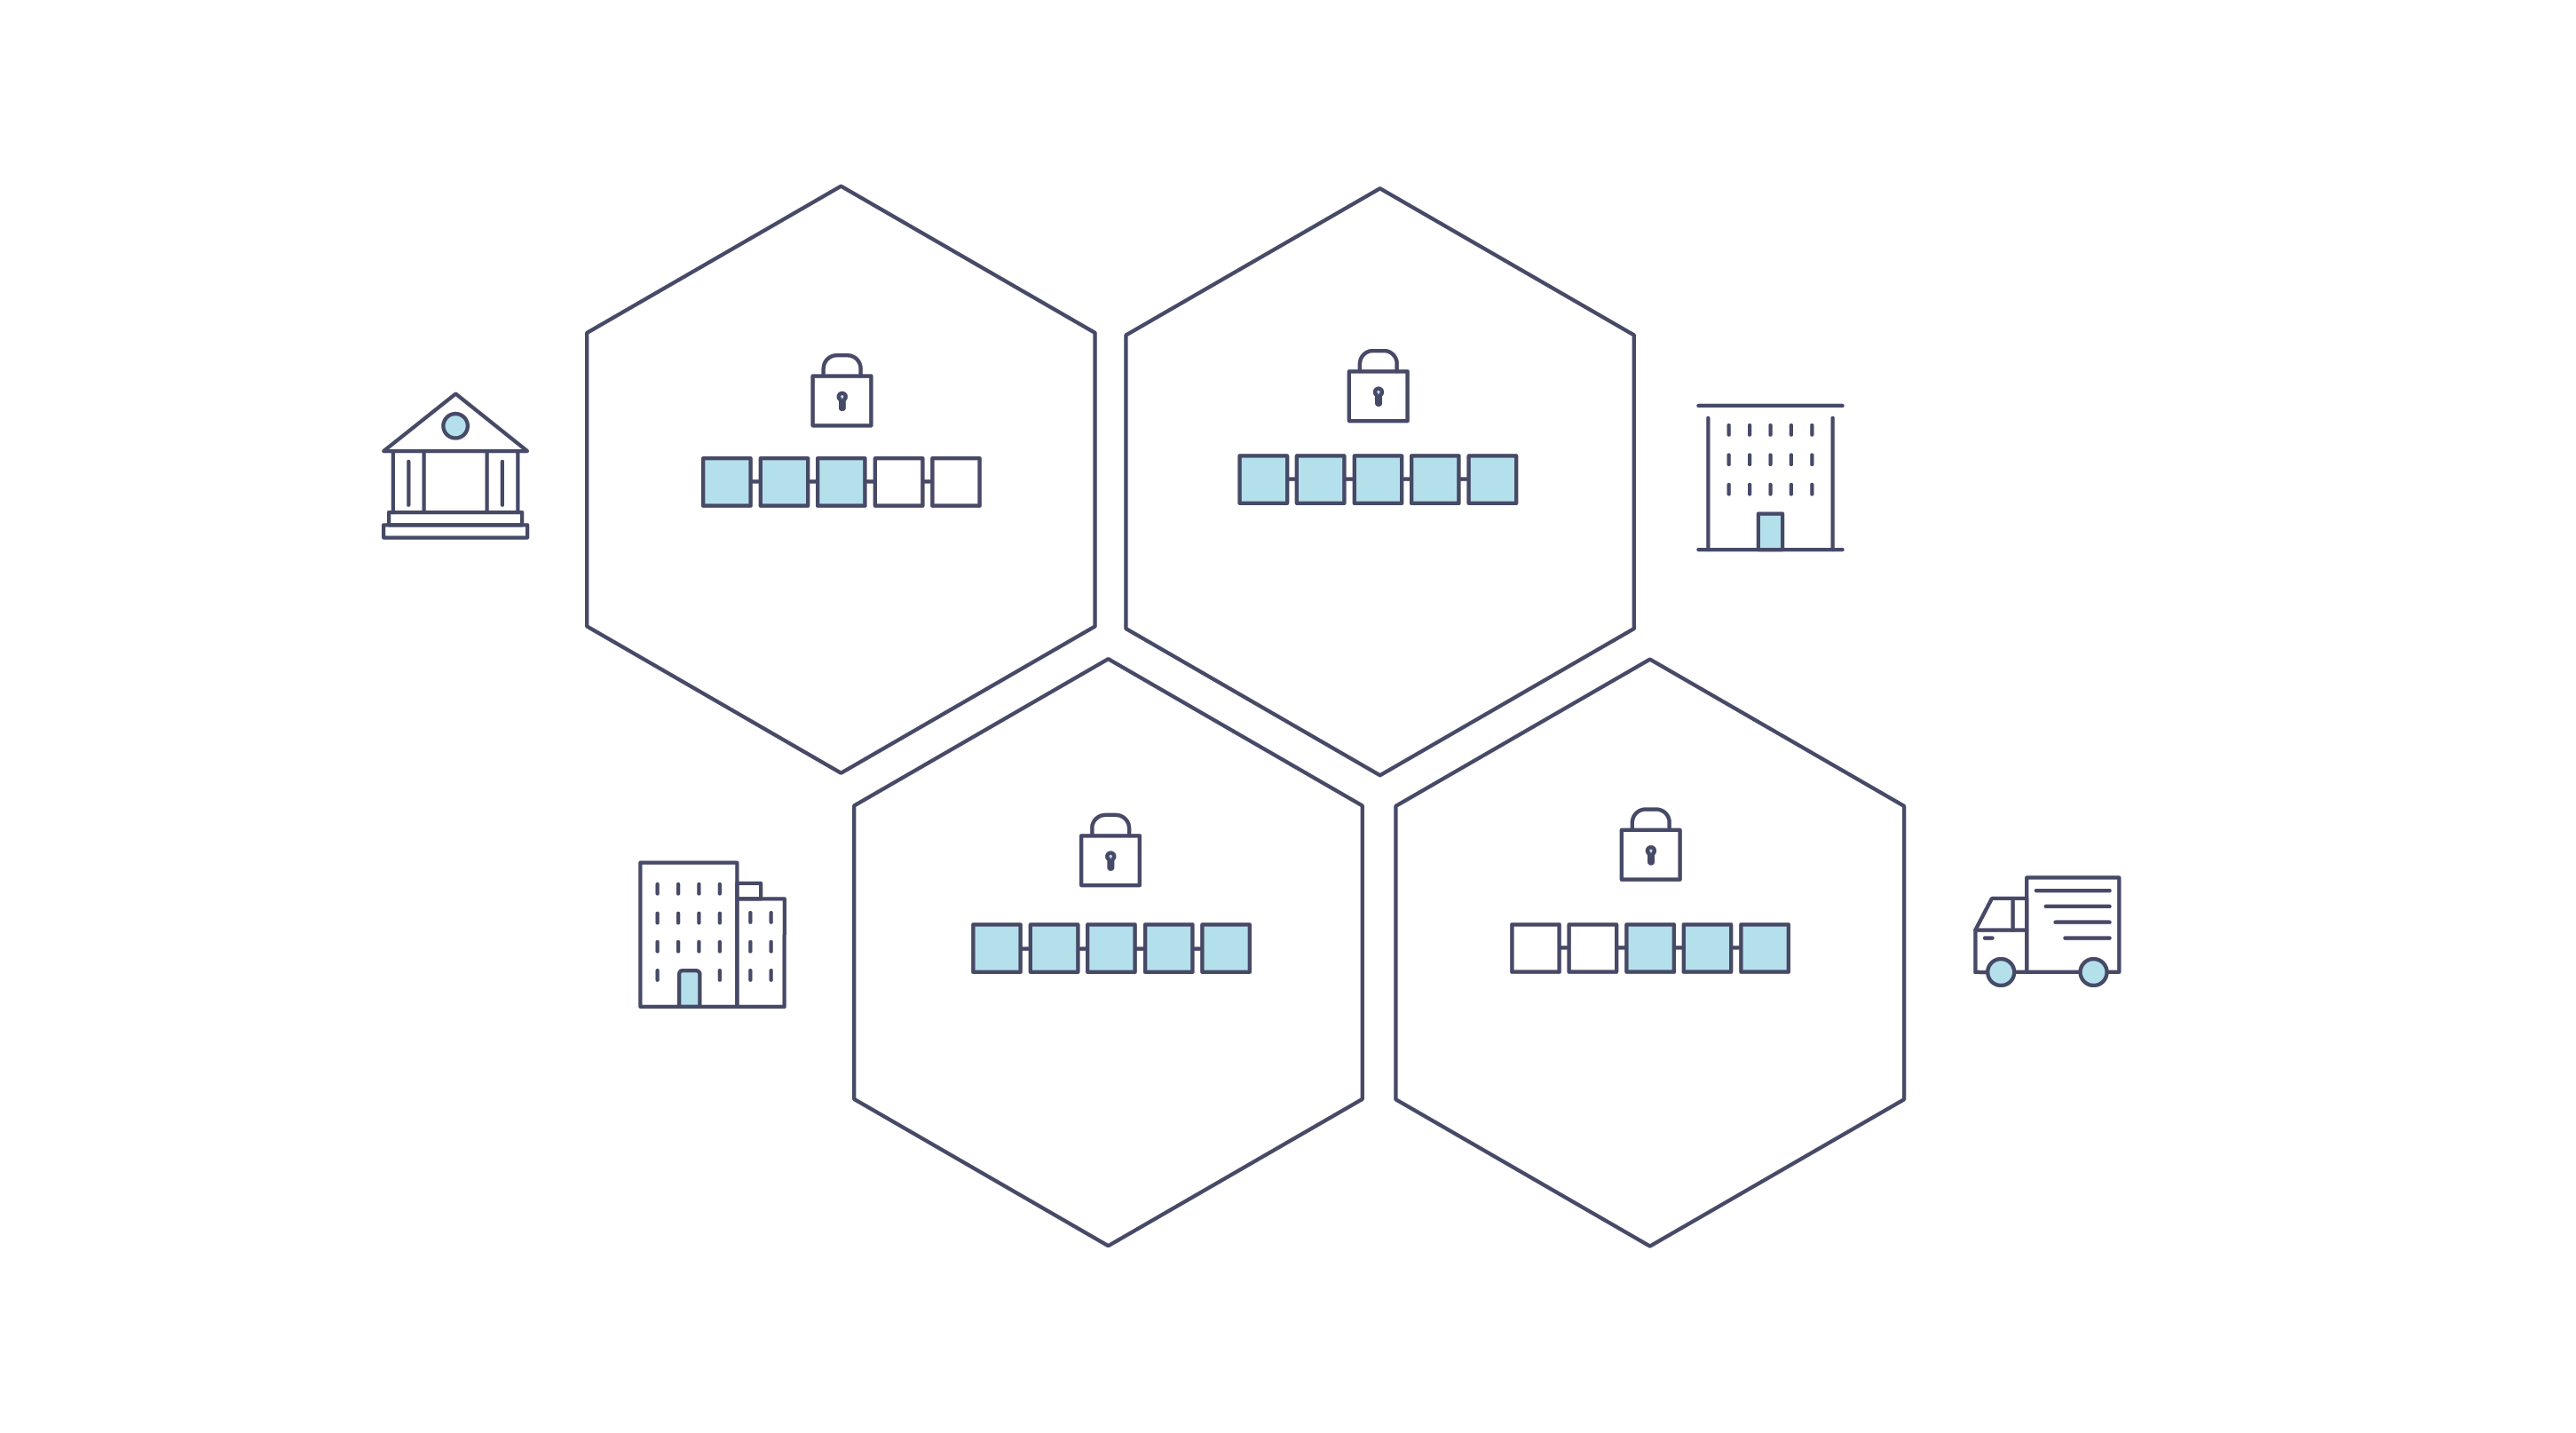
现在的交易网络只不过是已存在的业务记录保存网络的升级版本。 业务网络 中的成员彼此交易,但他们分别维护各自的交易记录。他们所交易的东西,无论是16世纪的佛兰芒挂毯还是今天的证券,必须在每次出售时确定其来源,以确保出售物品的企业拥有的所有权。
你得到的是一个如下所示的商业网络:

现代技术已经从石碑和纸质文件夹演变为硬盘驱动器和云平台,但底层结构是相同的。因为没有管理网络参与者身份的统一系统,因而溯源非常费力,需要数天才能清理证券交易(其世界交易量以数万亿美元计算),合同必须手动签署和执行,而且系统中的每个数据库的信息都是孤立的,这也意味着单点故障。
即使可见性和信任的需求很明确,但在如今支离破碎的信息和流程共享方法下,不可能构建一个跨业务网络的记录系统。
区块链的不同
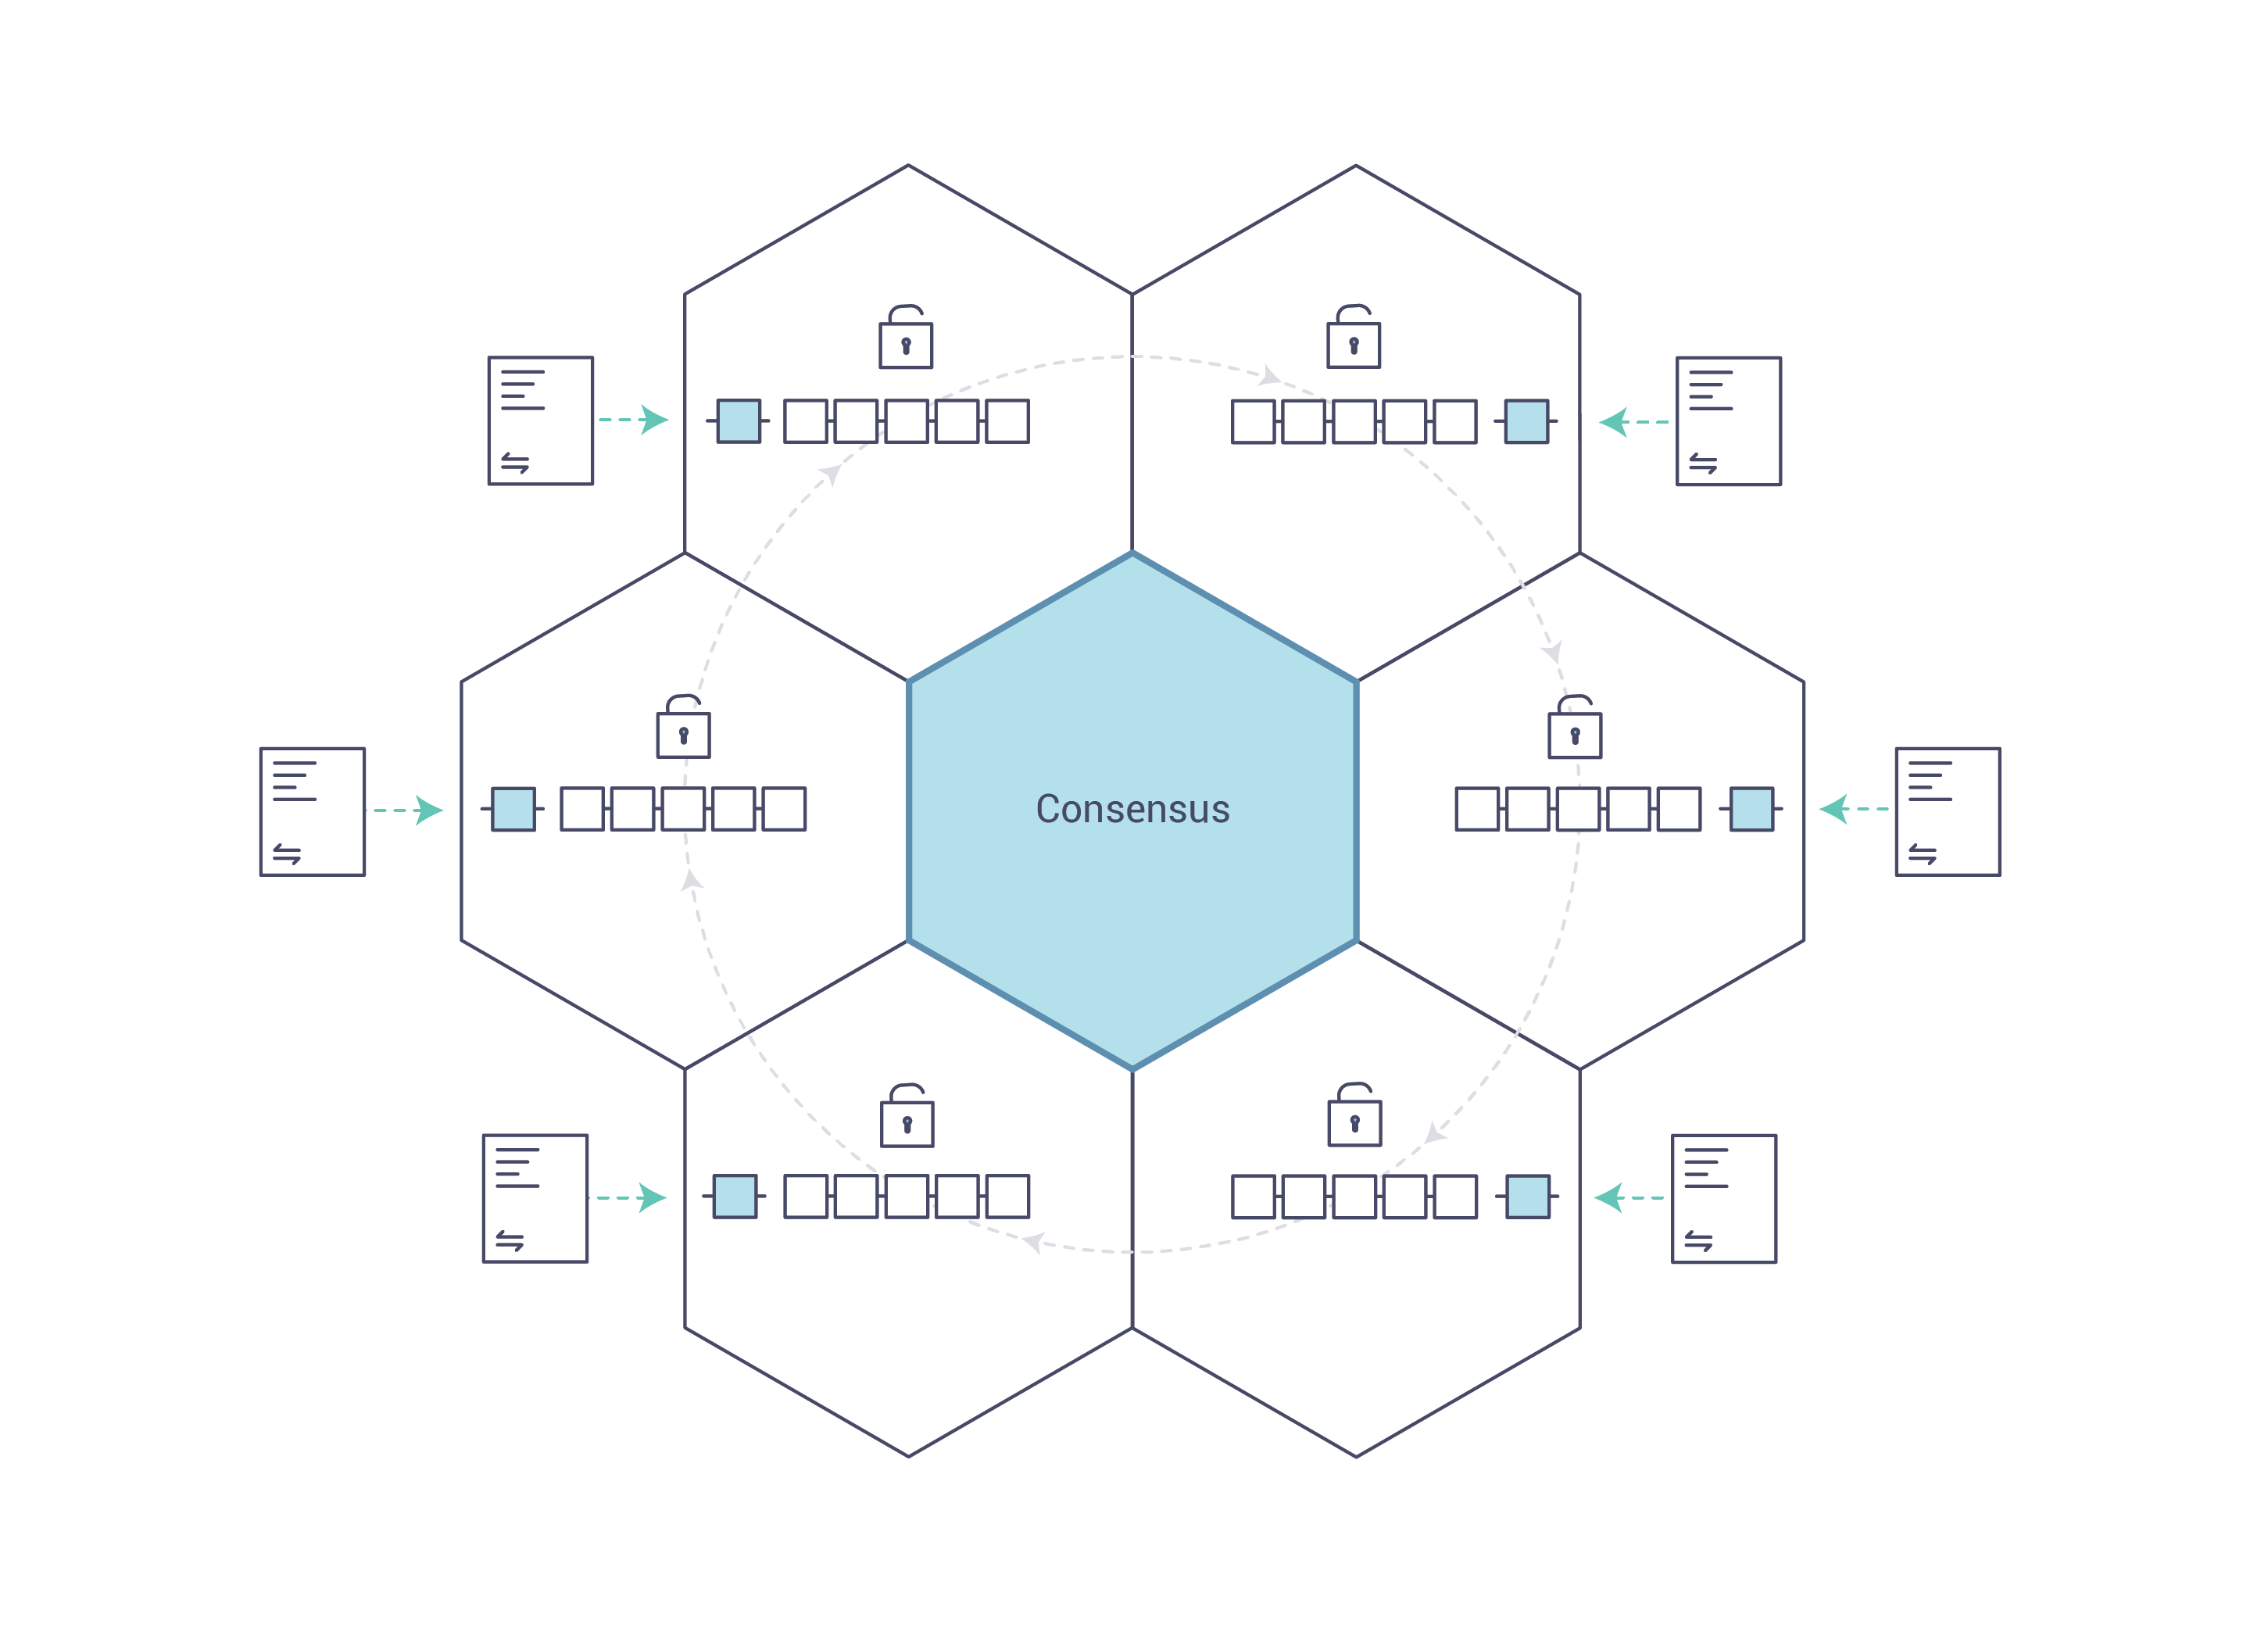
如果业务网络不是由“现代”交易系统代表的效率低下的老鼠窝(译者注:老鼠窝,指乱七八糟的系统),而是有一套在网络上建立身份,执行交易和存储数据的标准方法,那会怎么样?如果资产来源可以通过查看交易列表来确定,此列表一旦写入,无法更改,因此可信任,那会怎么样?
该业务网络看起来更像是这样的:
这就是一个区块链网络,其中每个参与者都有自己的账本副本。除了共享账本信息之外,还共享更新账本的过程。与今天使用参与者的 私人 程序更新其 私人 账本的系统不同,区块链系统具有 共享 程序来更新 共享 账本。
利用共享账本协调其业务网络的能力,区块链网络可以减少与处理私人信息相关的时间、成本和风险,同时提高信任和可见性。
你现在已经知道区块链是什么,以及为什么它有用。还有许多其他重要的细节,但它们都与信息和流程共享的这些基本思想有关。
什么是Hyperledger Fabric?
Linux 基金会于2015年创建了 Hyperledger(超级账本)项目,以推进跨行业的区块链技术。它不是用来宣布一个区块链标准,而是鼓励通过社区流程开发区块链技术的协作方法,其中包括鼓励开放式开发、和随着时间的推移采用关键标准的知识产权。
Hyperledger Fabric 是 Hyperledger 中的区块链项目之一。与其他区块链技术一样,它有一个账本,使用智能合约,是一个参与者管理交易的系统。
Hyperledger Fabric 与其他区块链系统不同的地方是 私有 和 许可 。与允许未知身份参与网络的开放式非许可系统(需要诸如“工作量证明”之类的协议来验证交易并保护网络)不同,Hyperledger Fabric 网络的成员需要从可信赖的 成员服务提供者(MSP) 注册。
Hyperledger Fabric 还提供多种可插拔选项。账本数据可以以多种格式存储,共识机制可以交换替换,并且支持不同的MSP。
Hyperledger Fabric 还提供创建 通道 的功能,允许一组参与者创建各自的交易账本。对于某些网络而言,这是一个特别重要的选择。这些网络中,一些参与者可能是竞争对手,并且不希望他们做出的每笔交易都被每个参与者知晓,例如,他们只向某些参与者提供的特殊价格,而其他人不是。如果两个参与者组成一个通道,那么只有这两个参与者拥有该通道的账本副本,而其他参与者没有。
共享账本
Hyperledger Fabric 有一个账本子系统,包括两个组件: 世界状态 和 交易日志 。每个参与者都拥有他们所属的每个 Hyperledger Fabric 网络的账本副本。
世界状态组件描述了在给定时间点的账本的状态。它是账本的数据库。交易日志组件记录产生世界状态中当前值的所有交易;这是世界状态的更新历史。然后,账本包括世界状态数据库和交易日志历史记录。
账本中世界状态的数据存储是可替换的。默认情况下,这是 LevelDB 键值存储数据库。交易日志不需要是可插拔的。它只记录区块链网络使用账本数据库前后的值。
智能合约
Hyperledger Fabric 智能合约用 链码 编写,当该应用程序需要与账本交互时,由区块链外部的应用程序调用。在大多数情况下,链码只与账本的数据库、世界状态(例如,查询)交互,而不与交易日志交互。
链码可以用几种编程语言实现。目前支持 Go 和 Node。
隐私
根据网络的需求,企业对企业(B2B)网络中的参与者可能对他们共享的信息量非常敏感。对于其他网络,隐私不是最受关注的问题。
Hyperledger Fabric 支持私有网络(使用通道)是很重要的,因为网络是相对开放的。
共识
交易必须按照发生的顺序写入账本,即使它们可能位于网络中不同的参与者集合之中。为此,必须建立交易的顺序,且必须采用一种方法来拒绝错误(或恶意)插入到账本中的非法交易。
这是一个彻底的计算机科学研究领域,且有很多方法可以实现它,每个方法都有不同的权衡。例如,PBFT(实用拜占庭容错算法)可以为文件副本提供一种机制,使其能够保持各个副本的一致性,即使在发生损坏的情况下也是如此。或者,在比特币中,通过称为挖矿的过程进行排序,其中竞争计算机竞相解决加密难题,该难题定义所有过程随后构建的顺序。
Hyperledger Fabric 被设计为允许网络启动者选择最能代表参与者间存在的关系的共识机制。与隐私一样,有一系列需求;从他们的关系高度结构化的网络,到更加点对点的网络。
Hyperledger Fabric 模型
本节讲述了 Hyperledger Fabric 的关键设计特性,实现了全方位、可定制的企业级区块链解决方案:
- 资产 — 资产是可以通过网络交换的几乎所有具有价值的东西,从食品到古董车、货币期货。
- 链码 — 链码执行与交易排序分离,限制了跨节点类型所需的信任和验证级别,并优化了网络可扩展性和性能。
- 账本特性 — 不可变的共享账本为每个通道编码整个交易历史记录,并包括类似 SQL 的查询功能,以便高效审计和解决争议。
- 隐私 — 通道和私有数据集合实现了隐私且机密的多边交易,这些交易通常是在共同网络上交换资产的竞争企业和受监管行业所要求的。
- 安全和成员服务 — 许可成员资格提供可信的区块链网络,参与者知道所有交易都可以由授权的监管机构和审计员检测和跟踪。
- 共识 — 达成共识的独特方法可实现企业所需的灵活性和可扩展性。
资产
资产的范围可以从有形(房地产和硬件)到无形资产(合同和知识产权)。Hyperledger Fabric 提供使用链码交易来修改资产的功能。
资产在 Hyperledger Fabric 中表示为键值对的集合,状态更改记录为 Channel 账本上的交易。资产可以用二进制或 JSON 格式表示。
链码
链码是定义单项或多项资产的软件,和能修改资产的交易指令;换句话说,它是业务逻辑。链码强制执行读取或更改键值对或其他状态数据库信息的规则。链码函数针对账本的当前状态数据库执行,并通过交易提案启动。链码执行会产生一组用于写入的键值对(写集),可以被提交到网络并应用于所有节点的账本。
账本特性
账本是 Fabirc 中所有状态转换的有序的防篡改的记录。状态转换是参与方提交的链码调用(“交易”)的结果。每个交易都会生成一组资产键值对,这些键值对以创建、更新或删除形式提交到账本。
账本由区块链(“链”)组成,用于以区块的形式存储不可变的顺序记录,以及用于维护当前 Fabirc 状态的状态数据库。每个通道有一个账本。每个节点为其所属的每个通道维护一个账本的副本。
Fabric 账本的一些特点:
- 使用基于键的查找、范围查询和组合键查询来查询和更新账本
- 使用富查询语言进行只读查询(如果使用 CouchDB 作为状态数据库)
- 只读历史记录查询(查询一个键的账本历史记录)用于支持数据溯源场景
- 交易包括链码读取键/值(读集)的版本以及链码写入键/值(写集)的版本
- 交易包含每个背书节点的签名,并被提交给排序服务
- 交易按顺序打包到区块,并被排序服务“分发”到通道上的节点
- 节点根据背书策略验证交易并执行策略
- 在附加一个区块之前,会执行一次版本检查,以确保被读取的资产的状态自链码执行以来未发生更改
- 一旦交易被验证并提交,就具有不变性
- 一个通道的账本包含一个配置区块,用于定义策略、访问控制列表和其他相关信息
- 通道包含 Membership Service Provider 的实例,允许从不同的证书颁发机构(CA)生成加密材料
查看 账本 主题来更深地了解数据库、存储结构和 “查询能力”。
隐私
Hyperledger Fabric 在每个通道上使用不可变的账本,以及可操纵和修改资产当前状态(即更新键值对)的链码。账本存在于通道范围内,它可以在整个网络中共享(假设每个参与者都在同一个公共通道上),也可以被私有化,仅包括一组特定的参与者。
在后一种情况下,这些参与者将创建一个单独的通道,从而隔离他们的交易和账本。为了想在完全透明和隐私之间获得平衡的场景,可以仅在需要访问资产状态以执行读取和写入的节点上安装链码(换句话说,如果未在节点上安装链码,它将无法与账本正确连接)。
当该通道上的组织子集需要对其交易数据保密时,私有数据集合用于将此数据隔离在私有数据库中,在逻辑上与通道账本分开,只有经授权的组织子集才能访问。
因此,通道在更广泛的网络上保持交易的私密性,而集合则在通道上的组织子集之间保持数据的私密性。
为了进一步模糊数据,在将交易发送到排序服务并将区块附加到账本之前,可以使用诸如 AES 之类的通用加密算法对链码内的值进行加密(部分或全部)。一旦加密数据被写入账本,它就只能由拥有用于生成密文的相应密钥的用户解密。
有关如何在区块链网络上实现隐私的更多详细信息,请参阅 私有数据 主题。
安全和成员服务
Hyperledger Fabric 支持一个交易网络,在这个网络中,所有参与者都拥有已知的身份。公钥基础设施用于生成与组织、网络组件以及终端用户或客户端应用程序相关联的加密证书。因此,可以在更广泛的网络和通道级别上操纵和管理数据访问控制。Hyperledger Fabric 的这种“许可”概念,加上通道的存在和功能,有助于解决隐私和机密性要求较高的场景。
请参阅 成员服务提供者 (MSP) 主题,以更好地了解加密实现,以及 Hyperledger Fabric 中使用的签名、验证、身份认证方法。
共识
最近,在分布式账本技术中,共识已成为单个函数内特定算法的同义词。然而,共识不仅包括简单地就交易顺序达成一致,Hyperledger Fabric 通过其在整个交易流程中的基本角色,从提案和背书到排序、验证和提交,突出了这种区别。简而言之,共识被定义为组成区块的一组交易的正确性的闭环验证。
当区块中交易的顺序和结果满足明确的策略标准检查时,最终会达成共识。这些制衡措施是在交易的生命周期内进行的,包括使用背书策略来规定哪些特定成员必须背书某个交易类别,以及使用系统链码来确保这些策略得到执行和维护。在提交之前,节点将使用这些系统链码来确保存在足够的背书,并且它们来自适当的实体。此外,在将包含交易的任何区块附加到账本之前,将进行版本检查,以确保在此期间,账本的当前状态是能与交易中的信息达成共识的。该最终检查可防止双重花费操作和可能危及数据完整性的其他威胁,并允许针对非静态变量执行功能。
除了众多的背书、验证和版本检查外,交易流的各个方向上还会发生持续的身份验证。访问控制列表是在网络的分层上实现的(排序服务到通道),并且当一个交易提议通过不同的架构组件时,有效负载会被反复签名、验证和认证。总而言之,共识并不仅仅局限于一批交易的商定顺序;相反,它的首要特征是交易从提案到提交的过程中不断进行核查而附带实现的。
查看 交易流程 以获得共识的直观表示。
区块链网络
这个话题会在概念层面上描述 Hyperledger Fabric 是如何让组织间以区块链网络的形式进行合作的。如果你是一个架构师,管理员或者开发者,你可以通过这个话题来理解在 Hyperledger Fabric 区块链网络中的主要结构和处理组件。这个话题会使用一个可管理的工作的例子来介绍在一个区块链网络中的主要组件。理解了本例之后你可以阅读更多关于这些组件的详细信息,或者尝试 构建一个示例网络。
当阅读完这个话题并且理解策略的概念后,你就能够完全理解组织在建立管控一个部署的 Hyperledger Fabric 网络而需要做的决策。你也能够理解组织是如何使用定义的策略来管理网络的演变的,策略是 Hyperledger Fabric 的一个重要特点。简言之,你会理解 Hyperledger Fabric 的主要技术组件以及组织对于他们所要做的决策。
什么是区块链网络
区块链网络是一个为应用程序提供账本及智能合约(chaincode)服务的技术基础设施。首先,智能合约被用来生成交易,接下来这些交易会被分发给网络中的每个节点,这些交易会被记录在他们的账本副本上并且是不可篡改的。这个应用程序的用户可能是使用客户端应用的终端用户,或者是一个区块链网络的管理员。
在大多数的额情况下,多个组织 会聚集到一起作为一个联盟 来形成一个网络,并且他们的权限是由一套在网络最初配置的时候联盟成员都同意的规则来决定的。并且,网络的规则可以在联盟中的组织同意的情况下随时地被改变,就像当我们讨论 修改规则 概念的时候将要发现的那样。
示例网络
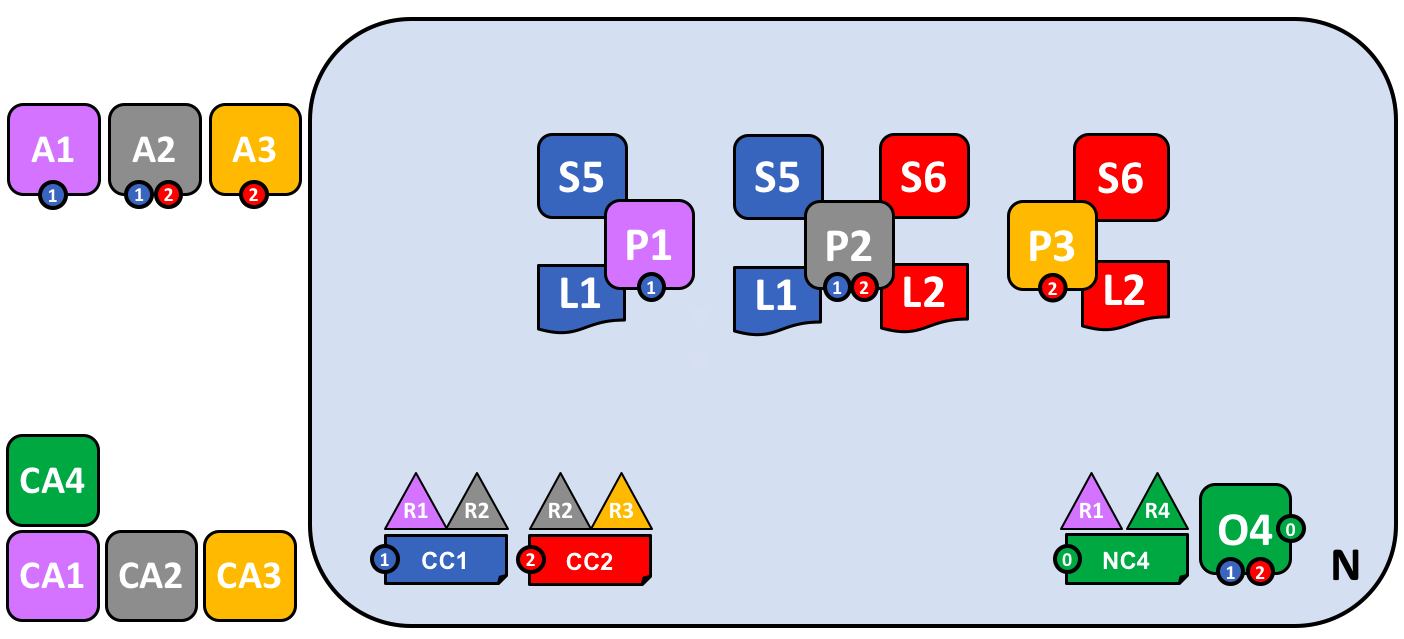
在我们开始前,让我们来展示一下我们最终要做的东西吧!这是一个图表展示了我们示例网络的 最终状态。
不必担心这个看起来非常复杂!在我们学习这个话题的过程中,我们会一点一点地构建起这个网络,所以你能够了解组织 R1、R2、R3 和 R4 是如何为网络提供基础设施并且从中获益。这个基础设施实现了区块链网络,并且它是由来自网络中的组织都同意的规则来管理的,比如谁可以添加新的组织。你会发现应用程序是如何消费账本以及区块链网络所提供的智能合约服务。

四个组织 R1、R2、R3 和 R4,他们共同决定,并且达成了一个协议,他们将会设置并开发一个 Hyperledger Fabric 网络。R4 被分配作为网络的初始者,它有权设置网络的初始版本。R4 不会在网络中去进行任何的业务交易。R1 和 R2 在整个网络中有进行私有通信的需求,R2 和 R3 也是。组织 R1 有一个客户端的应用能够在通道 C1 中进行业务的交易。组织 R2 有一个客户端应用可以在通道 C1 和 C2 中进行类似的工作。组织 R3 可以在通道 C2 中做这样的工作。节点 P1 维护了 C1 的账本 L1 的副本。节点 P2 维护了 C1 的账本 L1 和 C2 的账本 L2 的副本。节点 P3 维护了 C2 的账本 L2 的副本。这个网络是根据在网络配置 NC4 中指定的规则来进行管理的,整个网络由组织 R1 和 R4 管理。通道 C1 是根据在通道配置 CC1 中指定的规则来管理的,这个通道由组织 R1 和 R2 管理。通道 C2 是根据在 通道配置 CC2 中指定的规则来管理的,这个通道由组织 R2 和 R3 管理。这有一个排序服务 O4 作为这个网络 N 的一个网络管理员节点,并且使用系统通道。排序服务同时也支持应用通道 C1 和 C2,来对交易进行排序、加入区块然后分发。每个组织都有一个首选的 CA。
创建网络
让我们从头开始来创建网络的基础:
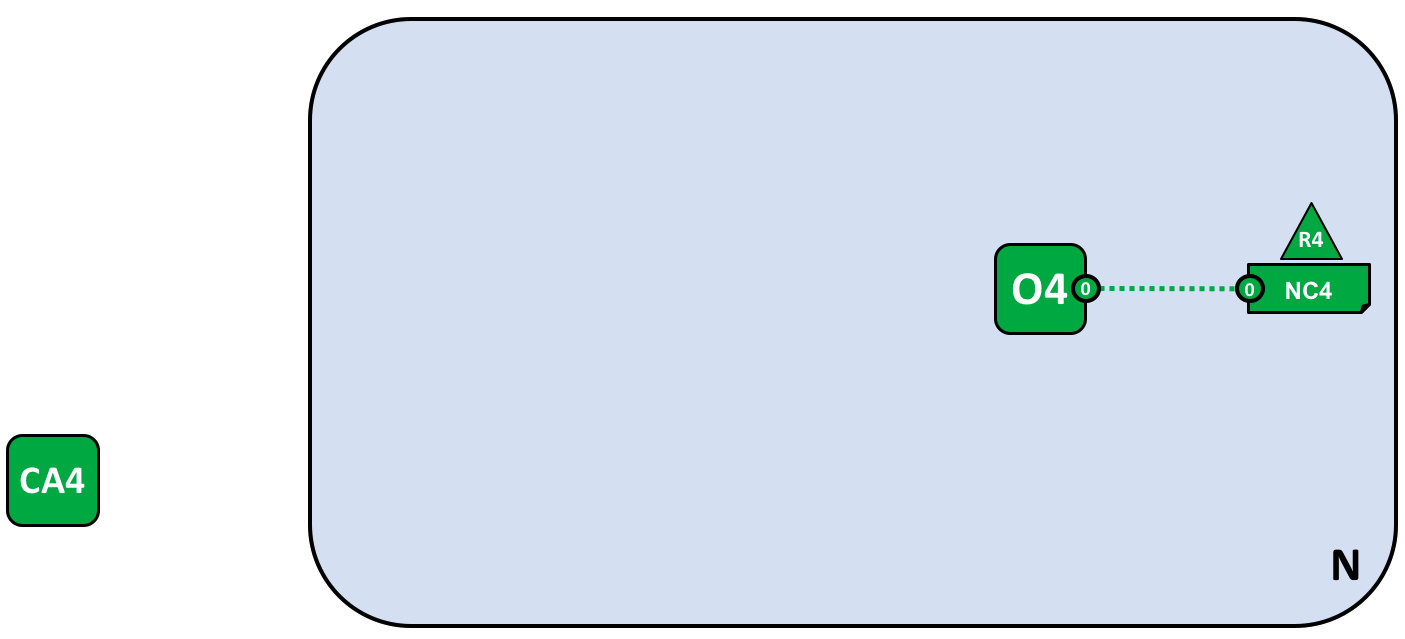
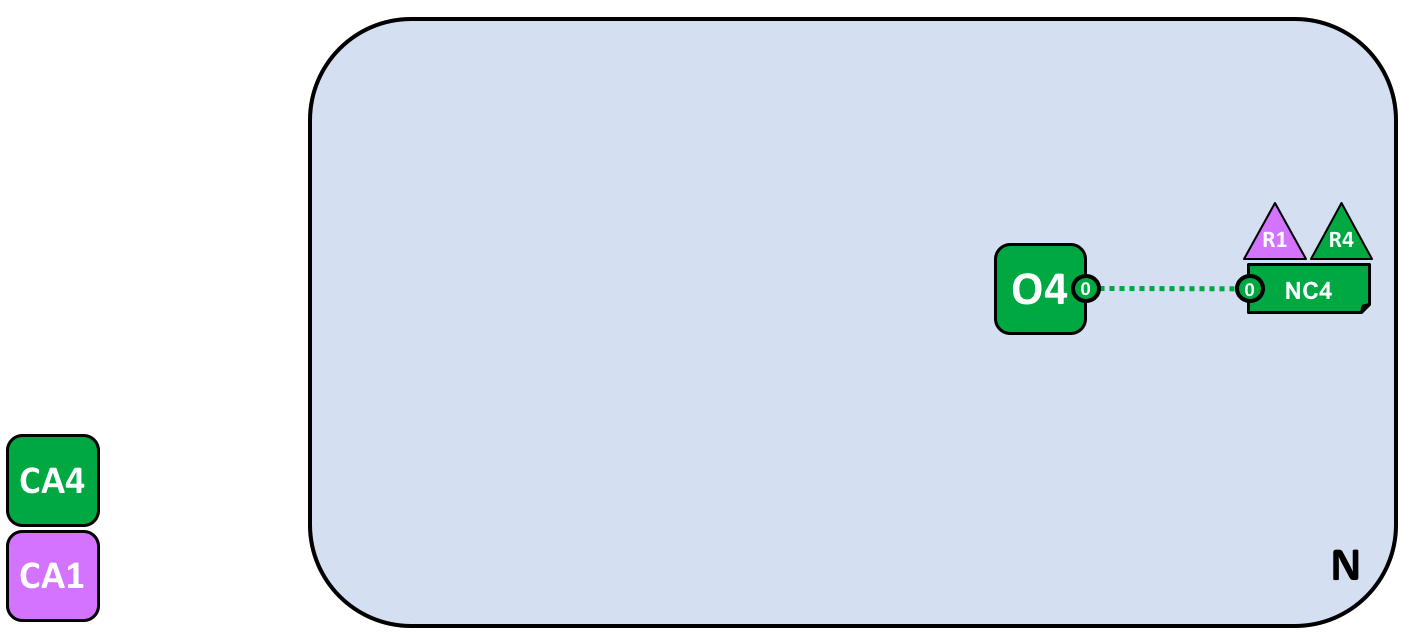
当一个排序服务启动后就形成了这样的一个网络。在我们的示例网络 N 中,排序服务 O4 由一个单独的节点组成,是根据一个网络配置 NC4 来进行配置的。在网络层面上,证书颁发机构 CA4 被用来向管理员和组织 R4 的网络节点分配身份信息。
我们能够看到,在定义 网络 N 的时候,第一件事情就是定义一个 排序服务, O4。对于一个网络在最初就考虑以管理员节点的形式定义这个排序服务是非常有帮助的。就像在之前同意的,O4 最初被配置并且由组织 R4 的一个管理员来启动,并且由 R4 管理。配置 NC4 包含了描述网络管理能力初始集合的规则。最初在网络中集合仅赋予了 R4 这个权利。这个在将来会变化,我们稍后会看到,但是目前 R4 是这个网络中唯一的一个成员。
证书颁发机构(Certificate Authorities,CA)
你也能够看到一个证书颁发机构,CA4,它会被用来给管理者和网络节点颁发证书。CA4 在我们的网络中扮演着重要的角色,因为它会分配 X.509 证书,这个证书能够用来识别属于组织 R4 的组件。由 CA 颁发的证书也可以用来为交易提供签名,来表明一个组织对交易的结果进行背书,背书是一笔交易可以被接受并记录到账本上的前提条件。让我们对有关 CA 的两个方面更详细的介绍一下。
首先,在区块链网络中的不同组件之间,彼此是使用证书来标识自己是来自于特定组织的。这就是为什么通常会有多个 CA 来支持一个区块链网络,因为不同的组织通常会使用不同的 CA。在我们的网络中,我们会使用 4 个 CA,每个组织会有一个 CA。事实上,CA 是非常重要的,所以 Hyperledger Fabric 提供给你一个内置的 CA(被称为 Fabric-CA)以方便使用,尽管在实际当中,组织会选择使用它们自己的 CA。
将证书同成员组织进行匹配是通过一个称为成员服务提供者(Membership Service Provider, MSP)的结构来实现的。网络配置 NC4 使用一个已命名的 MSP 来识别由 CA4 颁发的证书的属性,这些证书会关联到组织 R4 下的证书持有者。NC4 接下来会使用在策略中的这个 MSP 名字来分配在网络资源上的特殊权利。这个策略的一个例子就是,在 R4 中识别管理员,这个管理员可以向网络中添加新的成员组织。我们没有在这些图标中显示 MSP,因为他们会很杂乱,但是他们是非常重要的。
第二点,接下来我们会看到由 CA 签发的证书是如何在交易的生成和验证的流程中处于核心位置的。特别的,X.509 证书被用于客户端应用的交易提案和智能合约的交易响应,来对交易进行数字签名。接下来持有账本副本的网络节点在接受将交易更新到账本之前会验证交易签名是否有效。
让我们重新整理一下我们的区块链网络示例的基本结构。这有一个资源,网络 N,有一些用户能够访问这个网络,这些用户是由一个证书颁发机构 CA4 定义的,他们具有网络配置 NC4 中包含的规则中所描述的在网络 N 中的权利。当我们配置和启动排序服务节点 O4 的时候上边讲的事情都会发生。
添加网络管理员
NC4 最初被配置为仅仅允许 R4 用户在网络中具有管理的权限。在接下来的阶段,我们会允许组织 R1 用户也具有管理的权限。让我们来看看网络是如何演变的:
组织 R4 更新了网络配置来使组织 R1 也成为了管理员。现在 R1 和 R4 在网络配置中便具有了相同的权限。
我们看到了新的组织 R1 变成了管理员,R1 和 R4 现在在网络中具有了相同的权限。我们看到证书颁发机构 CA1 也被添加进来了,他用来标识 R1 组织的用户。现在从 R1 和 R4 来的用户就已经是网络的管理员了。
尽管排序节点 O4 是运行在 R4 的基础设施上的,如果 R1 能够访问到的话就可以共享管理的权限。也就是说 R1 或者 R4 可以更新这个网络配置 NC4 来允许组织 R2 进行网络维护中的部分功能。通过这种方式,尽管 R4 运行着排序服务,但是 R1 在其中也具有着全部的管理员权限,R2 具有有限的创建新联盟的权限。
在这个最简单的模式中,排序服务在网络中是一个独立的节点,就像你在例子中看到的。排序服务通常是多节点的,也可以被配置为在不同组织中的不同节点上。比如,我们可能会在 R4 中运行 O4 并连接到 O2,O2 是在组织 R1 中的另一个排序节点。通过这种方式,我们就有了一个多节点、多组织的管理结构。
我们会在后边讨论更多关于排序服务的话题,但是目前只需要把排序服务当成是一个管理者,它给不同的组织提供了对于网络的管理的权限。
定义联盟
尽管这个网络当前可以被 R1 和 R4 管理,但是只有这些还是太少了。我们需要做的第一件事就是定义一个联盟。这个词表示“具有着共同命运的一个群组”,也就是在一个区块链网络中合理地选择出来的一些组织。
让我们来看看如何定义一个联盟:
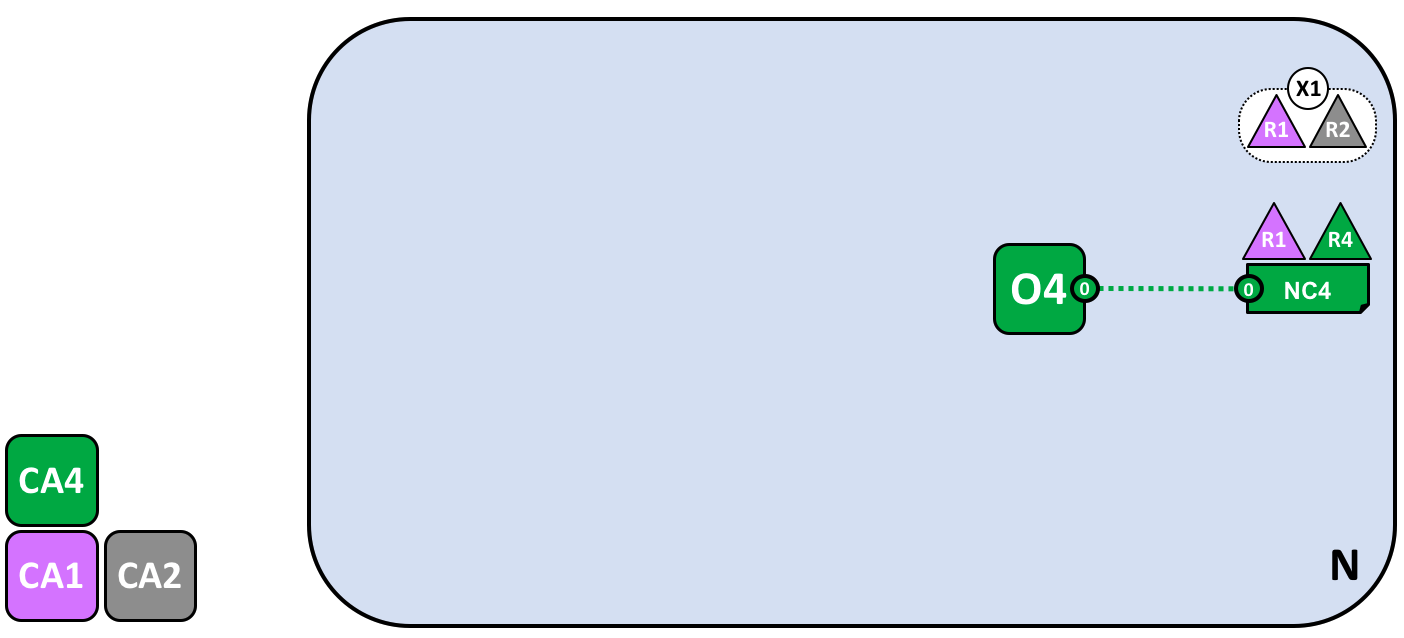
网络管理员定义了一个包含两个成员的联盟 X1,包含组织 R1 和 R2。这个联盟的定义被存储在了网络配置 NC4 中,会在接下来的网络开发中被使用。CA1 和 CA2 是这两个组织对应的证书颁发机构。
由于 NC4 的配置方式,只有 R1 和 R4 能够创建新的联盟。这个图标显示了一个新的联盟 X1,它定义了 R1 和 R2 是它的联盟组织。我们也看到了 CA2 也被添加进来标识来自 R2 的用户。注意一个联盟可以包含任意数量的组织,这里我们仅包含了两个组织作为一个最简单的配置。
为什么联盟这么重要?我们能够看到联盟定义了网络中的一部分组织,他们共享了彼此能够交易的需求,在这个示例中就是 R1 和 R2 能够进行交易。这对于一组有着共同的目标的组织来说是有意义的。
这个网络虽然最初仅包含一个组织,现在已经由多个组织来管理了。我们将从 R1、R2 和 R4 共享管控权的方式开始,这样的构成更容易被理解。
现在我们要使用联盟 X1 创建一个对于 Hyperledger Fabric 区块链非常重要的部分——通道。
为联盟创建通道
现在让我们来创建对于 Fabric 区块链网络的关键部分——通道。通道是一个联盟中的成员彼此进行通信的主要机制。在一个网络中可能会有多个通道,但是现在让我们从一个通道开始。
让我们来看下第一个通道是如何被添加到这个网络中的:
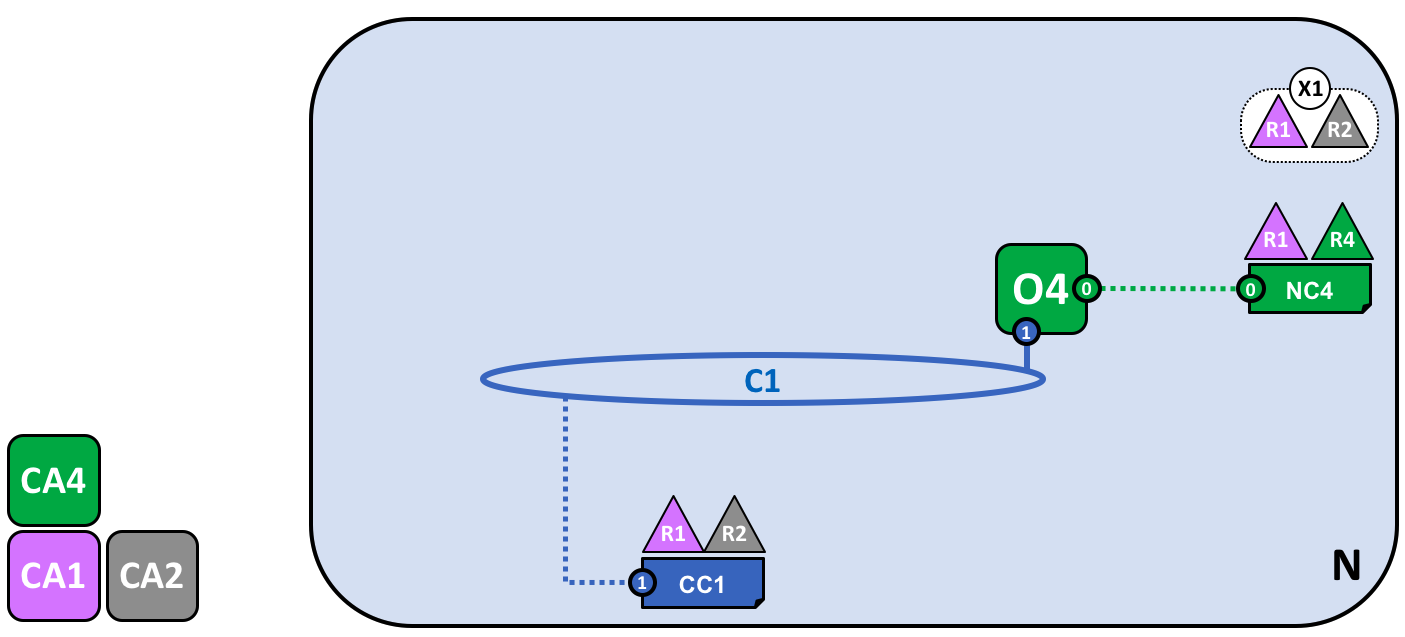
使用联盟 X1 为 R1 和 R2 创建的的通道 C1。这个通道通过通道配置 CC1 来进行管理,完全独立于网络配置。CC1 是由 R1 和 R2 管理的,他们在 C1 上具有同等的权利。R4 在 CC1 中是没有任何权利的。
通道 C1 为联盟 X1 提供了一个私有的通信机制。我们能够看到通道 C1 已经关联到了排序服务 O4 但是这并没有附带任何功能。在网络开发的下一个阶段,我们将会连接不同的组件,比如客户端应用和 Peer 节点。但是到目前为止,一个通道就代表了将来要进行连接的可能性。
尽管 C1 是网络 N 中的一部分,它还是跟这个网络非常不同的。同时也要注意到组织 R3 和 R4 并没有在这个通道中,因为这个通道仅仅是为了处理在 R1 和 R2 之间进行的交易的。在上一步中,我们看到了 R4 是如何能够为 R1 分配权限来创建新的联盟。R4 同样也允许 R1 来创建通道。在这个图中,组织 R1 和 R4 创建了通道 C1。再次强调,一个通道可以包含任意数量的组织,但是我们目前只包含了两个组织,这是一个最简单的配置。
需要注意的是通道 C1 如何具有一个同网络配置 NC4 完全分开的配置 CC1。CC1 包含了赋予 R1 和 R2 在通道 C1 上的权利的规则,就像我们看到的那样,R3 和 R4 在这个通道中没有权限。R3 和 R4 只有被 R1 或 R2 添加到通道配置 CC1 中的规则后才能够跟 C1 进行交互。这样做的一个例子是定义谁能够向通道中添加新的组织。特别要注意的是 R4 是不能够将它自己添加到通道 C1 中的,这个只能由 R1 或者 R2 来授权添加。
为什么通道会如此重要?通道非常有用,因为提供了一个联盟成员之间进行私有通信和私有数据的机制。通道提供了与其他通道以及整个网络的隐私性。Hyperledger Fabric 在这一点上是很强悍的,因为它允许组织间共享基础设施的同时又保持了私有性。这里并不矛盾,网络中不同的联盟之间会需要将不同的信息和流程进行适合的共享,通道为之提供了有效的机制。通道提供了一个有效的基础设施共享,同时保持了数据和通信的隐私性。
我们也能够看到一旦通道被创建之后,它会真正地代表了“从网络中解放出来”。从现在开始和未来,只有在通道配置中指定的组织才能够控制它。同样的,从现在开始,之后的对于网络配置 NC4 的任何改动都不会对通道配置 CC1 造成任何直接的影响。比如如果联盟定义 X1 被改动了,它不会影响通道 C1 的成员。所以通道是有用的,因为他们允许构成通道的组织间进行私有的沟通。并且在通道中的数据跟网络中的其他部分是完全隔离的,包括其他的通道。
同时,这里还有一个被排序服务使用的特殊的系统通道。它跟常规的通道是完全一样的方式运行的,因此常规的通道有时候又被称为应用通道。我们通常不会关心这个通道,但是以后我们会更详细的讨论它。
节点和账本
现在,让我们开始使用通道来将这个区块链网络以及组织的组件关联到一起吧。在网络开发的下一个阶段,我们能够看到我们的网络 N 又新增了两个组件,称作 Peer 节点 P1 和账本实例 L1。
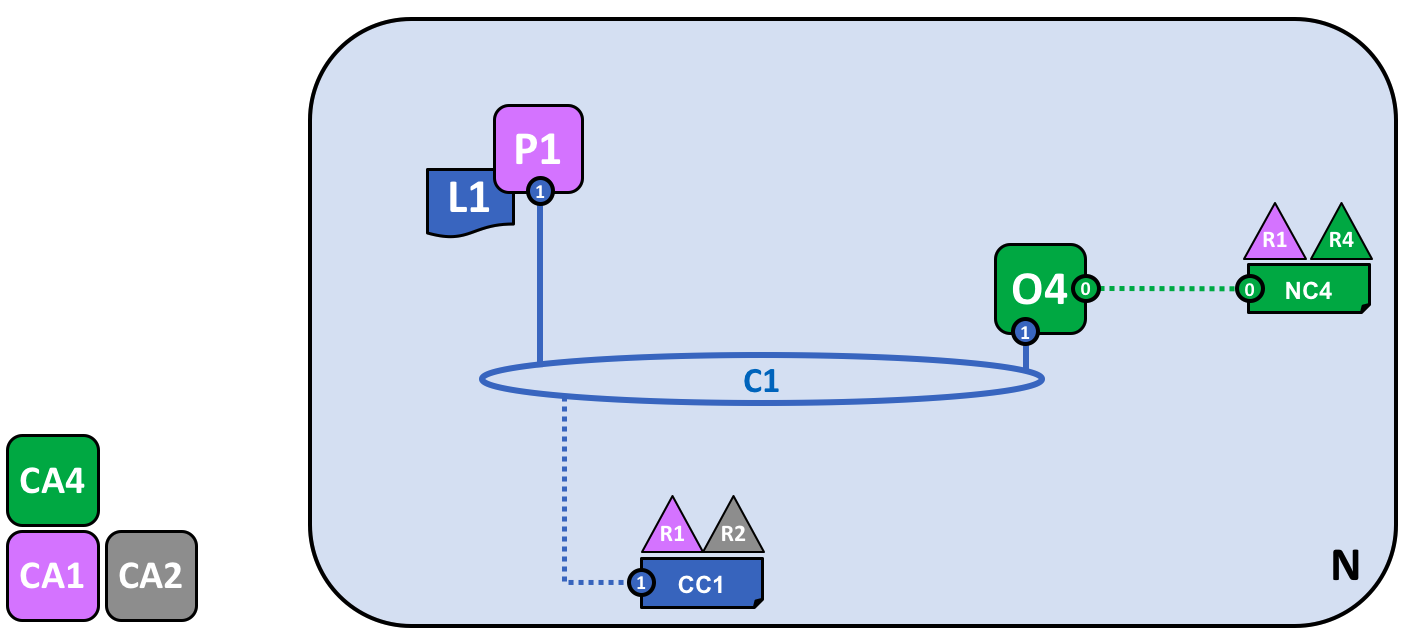
一个 Peer 节点 P1 加入了通道 C1。物理上 P1 会存储账本 L1 的副本。P1 和 O4 可以使用通道 C1 来进行通信。
Peer 节点是存储区块链账本副本的网络组件。至少,我们已经开始看到了一些区块链标志性的组件了!P1 在这个网络中的目的是单纯地放置被其他人访问的账本 L1 的副本。我们可以想象 L1 会被物理地存储在 P1 上,但是 逻辑上 是存储在通道 C1 上。当我们向通道中添加更多的节点之后,我们对这些就会更加清楚。
P1 的配置中一个关键部分就是一个由 CA1 颁发的 X.509 身份信息,它将 P1 和组织 R1 关联了起来。当 P1 启动之后,它就可以使用排序 O4 加入通道C1。当 O4 收到这个加入请求,它会使用通道配置 CC1 来决定 P1 在这个通道中的权限。比如,CC1 决定 P1 是否能够向账本 L1 中读取或写入信息。
注意节点是如何通过所在组织加入到通道的,尽管我们仅仅加了一个节点,我们将会看到如何在网络中将多个节点加入通道。我们也会在后边的部分看到节点能够扮演的不同的角色。
应用程序和智能合约链码
现在通道 C1 拥有了一个账本,我们可以连接客户端应用来使用由 Peer 节点提供的服务了。
注意网络是如何变化的:
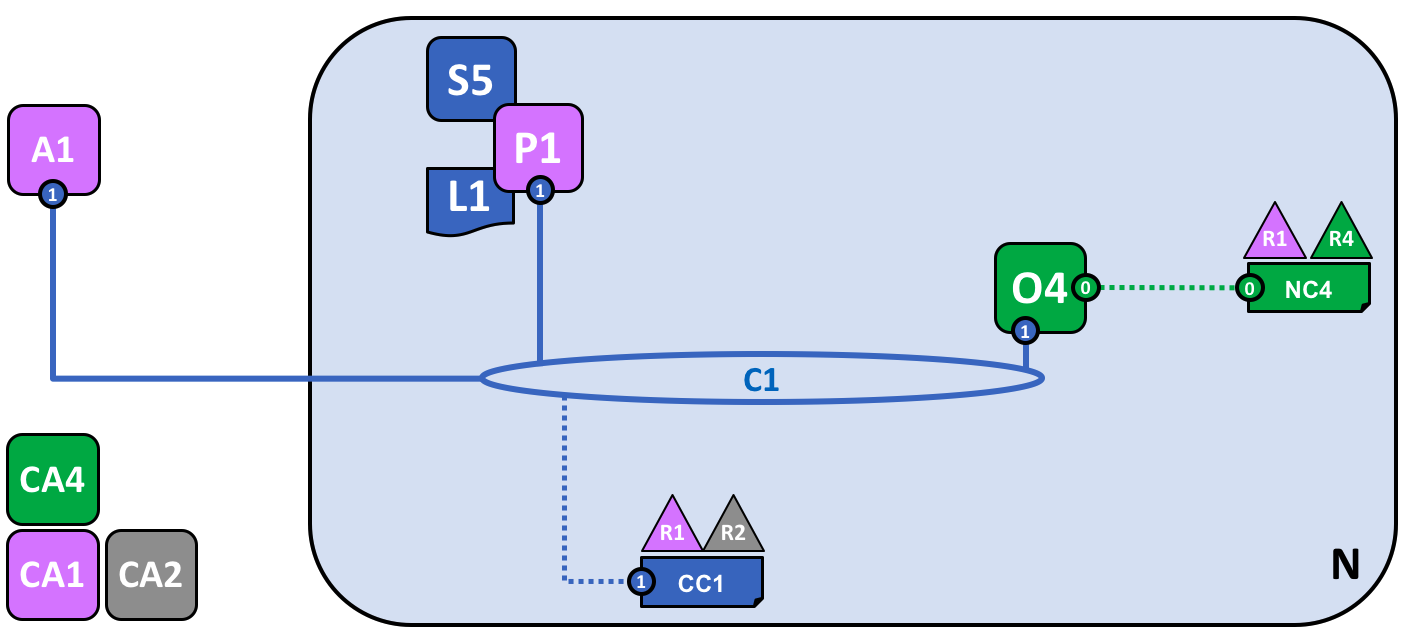
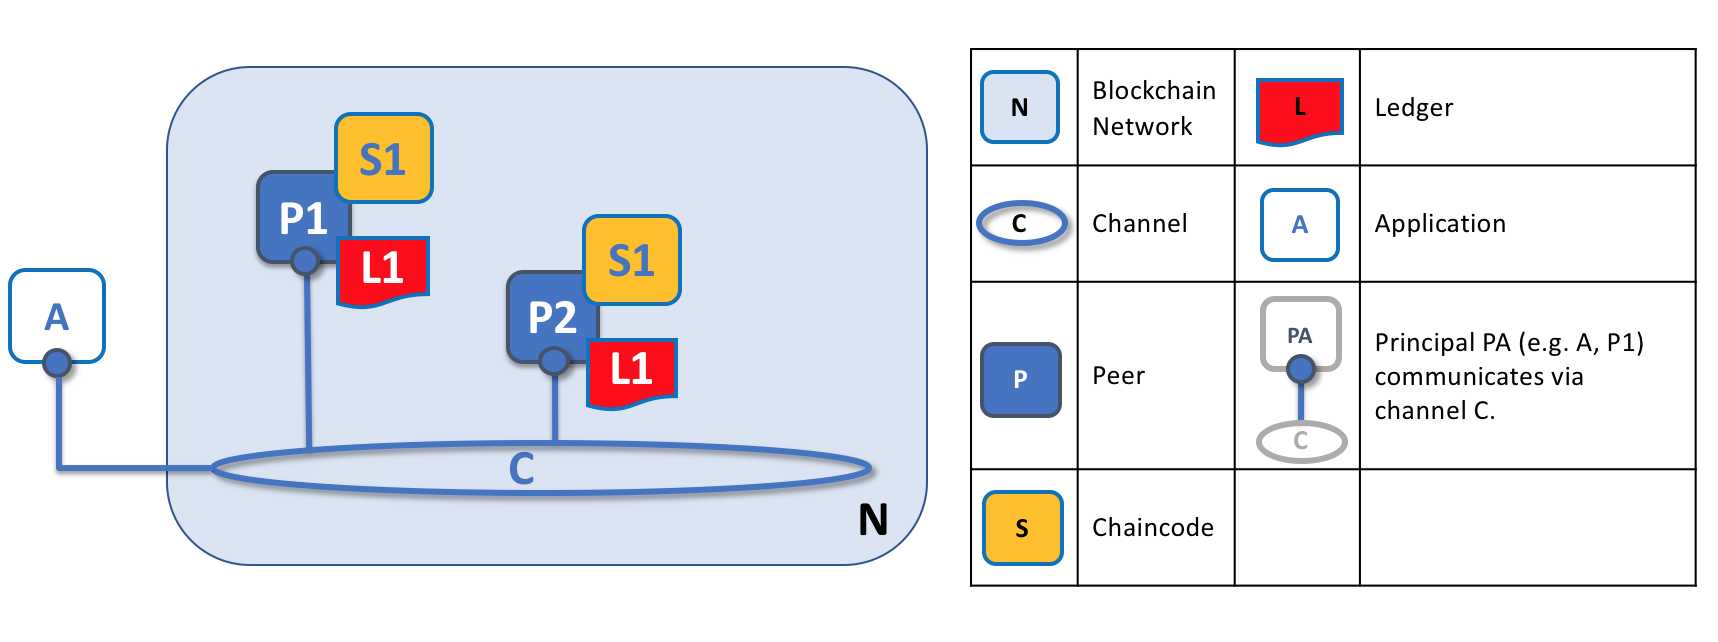
智能合约 S5 被安装在了 P1 上。在组织 R1 中的客户端应用 A1 可以通过 Peer 节点 P1 使用 S5 来访问账本。A1、P1 和 O4 都加入了通道 C1,他们都可以使用由这个通道提供的通信设施。
在网络开发的下一个阶段,我们可以看到客户端应用 A1 能够使用通道 C1 来连接指定的网络资源,在这个示例中,A1 能够连接 Peer 节点 P1 和排序节点 O4。再次注意,看看通道是如何处在网络和组织的组件的通信中心的。就像 Peer 节点和排序节点一样,客户端应用也会有一个使它和组织相关联的身份信息。在我们的例子中,客户端应用 A1 是跟组织 R1 相关联的,尽管它处在 Fabric 区块链网络的外边,但它是可以通过通道 C1 跟网络相连的。
现在我们能够清楚地看到 A1 能够通过 P1 直接访问账本 L1,但是事实上,所有的访问都是由一个称为智能合约链码 S5 的特殊程序来管理的。将 S5 理解为定义访问账本的常规模式,S5 提供了一套完整的定义来对账本 L1 进行查询及更新。简言之,客户端应用 A1 需要通过智能合约 S5 来获得账本 L1。
智能合约可以被每个组织的应用开发者创建来实现一个在联盟成员间共享的业务流程。智能合约被用来帮助生成被分发到网络中每个节点的交易。我们接下来会详细讨论。当网络变得更大了之后,这个会更容易理解。现在,需要理解的重要的事情是,为了达到这一点,需要对智能合约执行两项操作,它必须被安装,然后在通道中被定义。
Hyperledger Fabric 用户经常会在内部使用名词智能合约和链码。大体上来说,一个智能合约定义了交易逻辑,它控制了在世界状态中包含的一个业务对象的生命周期。然后它会被打包进一个链码中,这个链码会被部署到一个区块链网络中。可以把智能合约想象为管理交易,链码则管理着智能合约应该如何被打包部署。
安装链码包
在智能合约 S5 被开发完之后,组织 R1 中的管理员必须要把它安装到节点 P1 上。这是一个很简单的操作。当完成之后,P1 就完全了解了 S5。特别地,P1 能够看到 S5 的实现逻辑(用来访问账本 L1 的程序代码)。我们将这个同 S5 的接口进行对比,接口只是描述了 S5 的输入和输出,但是没有它的实现。
当一个组织在一个通道中有多个 Peer 节点时,可以选择在哪个节点安装智能合约,而不需要每个 Peer 节点上都安装。
定义链码
尽管链码会被安装在组织的 Peer 节点上,但是它是在一个通道范围内被管理和维护的。每个组织需要批准一个链码定义,和一系列参数来定义在一个通道中链码应该被如何使用。一个组织必须要批准一个链码定义,才能使用已经安装的智能合约来查询账本和为交易背书。在我们的例子中,只有一个单独的 Peer 节点 P1,一个组织中的管理员 R1 必须要批准 S5 的链码定义。
在链码定义能够被提交到通道并且用来同通道账本进行互动之前,需要有效数量的组织来批准一个链码的定义(默认为大多数)。因为通道中只有一个成员,R1 的管理员可以提交 S5 的链码定义到通道 C1。当这个定义提交后,S5 就可以被客户端应用 A1 调用了!
注意,虽然在这个通道上的每个组件现在都可以访问 S5,但是他们是不能够看到它的程序逻辑的。这对于安装了这个智能合约的节点还是保持隐私性的,在我们的示例中指的是 P1。从概念上讲,这意味着实际上是定义并提交了智能合约的接口到通道,而不是安装了智能合约的实现。为了强调这个想法,安装智能合约展示了我们是如何将它物理地存储在 Peer 节点上,而实例化智能合约展示了我们是如何将它逻辑地存储在通道中。
背书策略
在链码定义提供的信息中最重要的部分就是背书策略。它描述了在交易被其他的组织接受并存储在他们的账本副本上之前,哪些组织必须要同意此交易。在我们的示例网络中,只有当 R1 和 R2 对交易进行背书之后,交易才能够被接受并存储到账本 L1 中。
将链码定义提交到通道的同时背书策略也会被放置在通道账本上,通道中的每个成员都可以访问该策略。你可以在交易流程话题中阅读更多关于背书策略的内容。
调用智能合约
当智能合约被安装在 Peer 节点并且在通道上定义之后,它就可以被客户端应用调用了。客户端应用是通过发送交易提案给智能合约背书策略所指定的 Peer 的节点方式来调用智能合约的。这个交易的提案会作为智能合约的输入,智能合约会使用它来生成一个背书交易响应,这会由 Peer 节点返回给客户端应用。
这些交易的响应会和交易的提案打包到一起形成一个完整的经过背书的交易,他们会被分发到整个网络。我们会在之后更详细的了解,现在理解应用是如何调用智能合约来生成经过背书的交易就已经足够了。
在网络开发的这个阶段,我们能够看到组织 R1 完整参与了这个网络。它的应用,从 A1 开始,通过智能合约 S5 访问账本 L1,并生成将要被 R1 背书的交易,最后会被接受并添加到账本中,因为这满足了背书策略。
完成网络
我们的目标是为联盟 X1(由组织 R1 和 R2 构成)创建一个通道。网络开发的下一个阶段是将组织 R2 的基础设施添加到网络中。
让我们看一下网络是如何演进的:
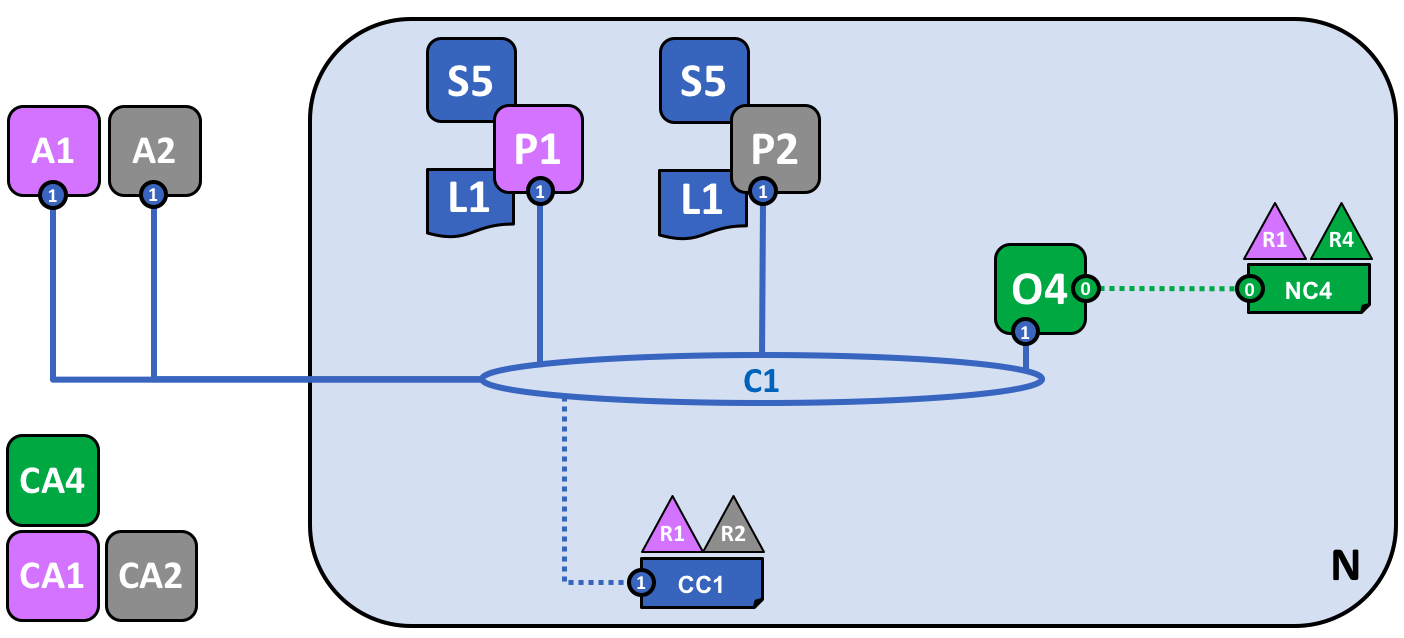
这个网络通过增加新组织 R2 的基础设施变得更大了。具体来说,R2 添加了 Peer 节点 P2,它会存有账本 L1 的一个副本,和链码 S5。R2 像 R1 一样批准了相同的链码定义。P2 也加入了通道 C1,也有一个客户端应用 A2。A2 和 P2 使用由 CA2 颁发的证书来标识 A2 和 P2。所有这些都说明了 A1 和 A2 能够使用 Peer 节点 P1 或者 P2 来调用在 C1 上的 S5。
我们能够看到组织 R2 在通道 C1 上添加了 Peer 节点 P2。P2 也存储了账本 L1 和智能合约 S5 的副本。R2 也添加了客户端应用 A2,它能够通过通道 C1 连接到网络。为了达到这个目的,组织 R2 的管理员添加了 Peer 节点 P2 并且将它加入到通道 C1,就像 R1 的管理员一样。管理员也必须要像 R1 那样批准相同的链码定义。
我们创建了第一个可运行的网络!目前,我们定义了一个通道,在这个通道中组织 R1 和 R2 能够彼此进行交易。特别地,这意味着 A1 和 A2 能够使用在通道 C1 上的智能合约 S5 和账本 L1 来生成交易。
生成并接受交易
相较于经常会存有账本副本的 Peer 节点,我们能够看到两种类型的 Peer 节点,一类是存储智能合约而另一类则不存。在我们的网络中,每个 Peer 节点都会存储智能合约的副本,但是在一个更大的网络中,会存在更多的 Peer 节点并且没有存储智能合约的副本。节点只有在安装了智能合约之后才能够运行它,但是这个 Peer 节点可以通过连接到通道来获取一个智能合约的接口信息。
对于没有安装智能合约的 Peer 节点,我们不应该认为他们在某种程度上是较差的。更多情况下,带有智能合约的 Peer 节点通常会拥有一个特殊的能力——帮助生成交易。需要注意的是所有的 Peer 节点都可以验证并接受或者拒绝交易存入他们的账本 L1 的副本中。然而,只有安装了智能合约的 Peer 节点才能够参与交易背书的流程,这是生成一笔有效交易的核心。
我们不需要关心交易生成的详细信息、分发和被接受的,只需知道我们有一个区块链网络,在这个网络中组织 R1 和 R2 能够共享由账本记录的交易信息和流程就够了。我们会在其他的部分学习更多关于交易、账本以及智能合约。
Peer 节点的类型
在 Hyperledger Fabric 中,所有的 Peer 节点都是一样的,基于这个网络的配置,Peer 节点能够担当多个角色。我们现在对于描述这些角色的典型网络拓扑已经有足够的理解了。
提交节点。通道中的每个 Peer 节点都是一个提交节点。他们会接收生成的区块,在这些区块被验证之后会以附加的方式提交到 Peer 节点的账本副本中。
背书节点。每个安装了智能合约的 Peer 节点都可以作为一个背书节点。然而,想要成为一个真正的背书节点,节点上的智能合约必须要被客户端应用使用,来生成一个被签名的交易响应。背书节点的术语就是这样来的。
智能合约的背书策略明确了在交易被接受并且记录到提交节点的账本之前,需要哪些组织的 Peer 节点为交易签名。
这是 Peer 节点的两个主要类型,一个 Peer 节点还可以担任的两种其他的角色:
主节点。当组织在通道中具有多个 Peer 节点的时候,会有一个主节点,它负责将交易从排序节点分发到该组织中其他的提交节点。一个节点可以选择参与静态或者动态的领导选举。
这是很有用的,从管理者的角度来考虑的话会有两套节点,一套是静态选择的主节点,另一套是动态选举的主节点。对于静态选择,0个或者多个节点可以被配置为主节点。对于动态选举,一个节点会被选举成为主节点。另外,在动态选举主节点中,如果一个主节点出错了,那么剩下的节点将会重新选举一个主节点。
这意味着一个组织的节点可以有一个或者多个主节点连接到排序服务。这有助于改进需要处理大量交易的大型网络的弹性以及可扩展性。
锚节点。如果一个 Peer 节点需要同另一个组织的 Peer 节点通信的话,它可以使用对方组织通道配置中定义的锚节点。一个组织可以拥有0个或者多个锚节点,并且一个锚节点能够帮助很多不同的跨组织间的通信。
需要注意的是,一个 Peer 节点可以同时是一个提交节点、背书节点、主节点和锚节点。在实际情况中只有锚节点是可选的,一般都会有一个主节点,至少一个背书节点和一个提交节点。
向通道中添加组织和节点
当 R2 加入到通道的时候,组织必须要向它的 Peer 节点 P2 上安装智能合约 S5。这很明显,如果应用 A1 或者 A2 想要使用 Peer 节点 P2 上的 S5 来生成交易,节点 P2 就必须安装了智能合约 S5。现在,Peer 节点 P2 有了智能合约和账本的物理的副本,像 P1 一样,它可以生成并接受交易到它的账本 L1 的副本上了。
R2 必须要像 R1 那样批准相同的链码定义才能够使用智能合约 S5。因为链码定义已经被组织 R1 提交到了通道,当 R2 的组织批准了链码定义并且安装了链码包之后,R2 就可以使用链码了。提交的交易只需要发生一次。通道中新的组织批准了通道中其他成员已经同意的链码参数之后就可以使用链码了。因为链码定义的批准是发生在组织级别的,所以 R2 只需要批准链码定义一次,然后就可以将多个节点加入到安装了链码包的通道。然而,如果 R2 想改变链码的定义,那么 R1 和 R2 需要为他们的组织批准一个新的定义,然后其中的一个组织需要将定义提交到通道。
在我们的网路中,我们能够看到通道 C1 连接了两个客户端应用、两个 Peer 节点和一个排序服务。因为这里只有一个通道,也就只有一个跟这个通道组件交互的逻辑账本。Peer 节点 P1 和 P2 具有相同的账本 L1 的副本。智能合约 S5 的副本通常会使用相同的编程语言来进行相同的实现,如果语言不同,他们也必须有相同的语义。
我们能够看到,在网络精心的增加节点有助于提升吞吐量、稳定性以及弹性。比如,网络中有更多的节点将允许更多的应用来连接这个网络,并且当组织中有多个节点发生计划内和计划外停机的时候可以提供额外的弹性。
这意味着可以通过配置网络拓扑来支持不同的目的,网络的大小是没有理论上限的。并且,一个组织内节点的发现和通信的技术机制,gossip 协议,可以容纳大量的 Peer 节点来支持这样的拓扑。
网络和通道策略的精心使用可以很好的管理庞大的网络。组织可以随意地向网络中添加 Peer 节点,只要他们满足了网络的策略。网络及通道的策略在描绘去中心化网络中的自主和管控之间创建了平衡。
简化视觉词汇表
我们现在要简化一下我们示例区块链网络的视觉词汇表。随着网络的增长,之前帮助我们理解通道的连线将会变得越发笨拙。设想一下如果我们添加了另外一个 Peer 节点或者客户端应用,又或者另外一个通道的话,我们的图表将会变得有多复杂。
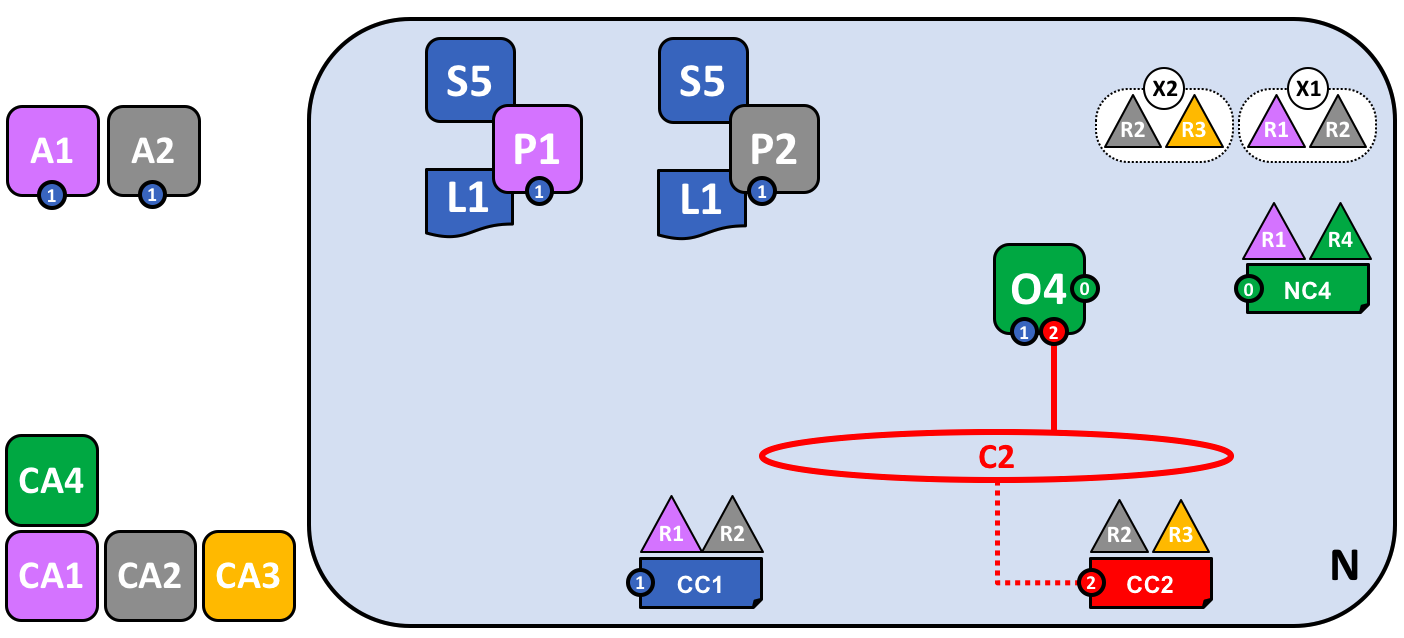
我们接下来要为网络中添加更多内容,在我们做这个之前,让我们来一起简化一下视觉词汇表吧。下边是我们目前开发的网络的简图:
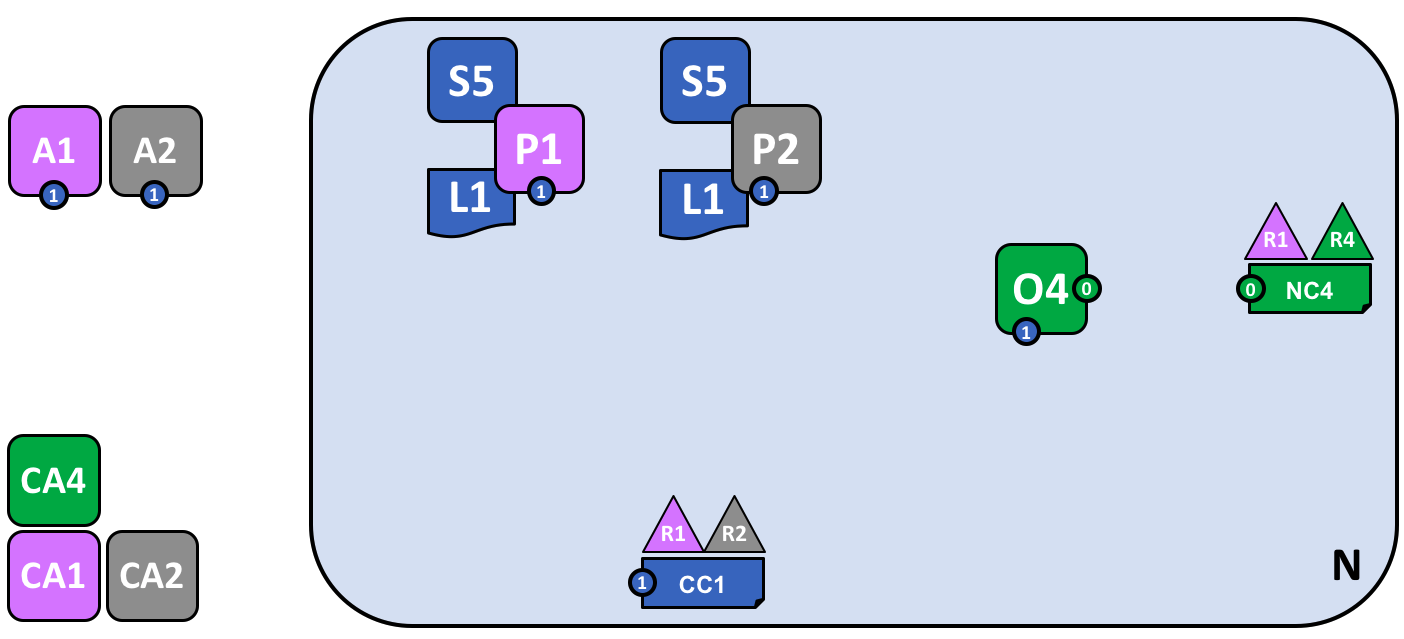
这个图表展示了在网络 N 中和通道 C1 的相关内容:客户端应用 A1 和 A2 能够通过节点 P1 和 P2 以及排序节点 O4 使用通道 C1 来进行通信。Peer 节点 P1 和 P2 可以使用通道 C1 的通信服务。排序服务 O4 可以使用通道 C1 的通信服务。通道配置 CC1 应用于通道 C1。
注意,这个网络的图表通过将通道连线替换成了连接点的方式进行了简化,连接点显示为一个蓝色的圆圈,里边包含了通道数字。没有任何的信息丢失。这种展现方式更加的可扩展,因为它去除了交叉的连接线。这个让我们能够更清晰地展现更大的网络。我们通过更加关注组件和通道之间的连接点,而不是通道本身的方式实现了这样的简化。
添加另外一个联盟定义
在网络开发的下一个阶段,我们引入了组织 R3。我们将会给 R2 和 R3 一个新的独立的应用通道,以便他们互相进行交易。这个应用通道会同之前定义的通道完全分离开来,所以 R2 和 R3 的交易信息会对他们保持良好的隐私性。
让我们回到网络级别并且为 R2 和 R3 定义一个新的联盟 X2:
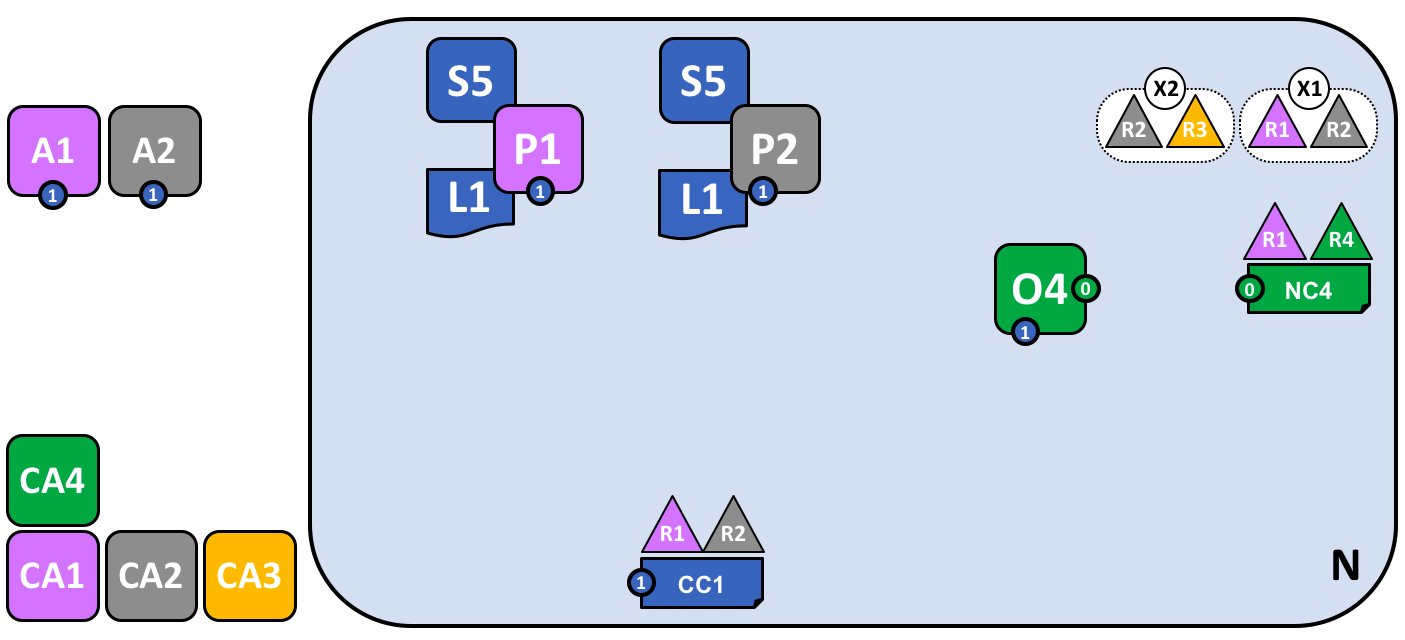
来自 R1 或者 R4 的网络管理员添加了一个新的联盟定义 X2,其中包含了 R2 和 R3。这将会被用来为 X2 定义一个新的通道。
注意到现在网络中已经有两个联盟被定义了:组织 R1 和 R2 的联盟 X1,以及组织 R2 和 R3 的联盟 X2。引入联盟 X2 是为了给 R2 和 R3 创建一个新的通道。
新通道只能够由网络配置策略 NC4 中指定的组织比如 R1 或者 R4 来创建,因为只有他们才有相关的权限。这是一个区分在网络级别和通道级别谁能管理资源的策略的例子。在工作中观察这些策略能够帮助我们理解为什么 Hyperledger Fabric 具有一个复杂的层级的策略结构。
实际上,联盟定义 X2 已经被添加进了网络配置 NC4。我们会在文档的其他部分讨论具体的技术细节。
添加一个新的通道
让我们使用这个新的联盟定义 X2 来创建一个新的通道 C2。为了帮助加强你对于简单通道符号的理解,我们会使用两种视觉样式:通道 C1,使用蓝色的圆圈来表示;通道C2,使用红色的连接线表示:
一个使用联盟定义 X2 为 R2 和 R3 的创建的新通道 C2。这个通道具有通道配置 CC2,完全同网络配置 NC4 以及通道配置 CC1 分离。通道 C2 由 R2 和 R3 来管理,他们两个就像 CC2 中的一个策略定义的那样具有相同的权利。R1 和 R4 在 CC2 中是没有任何权利的。
通道 C2 为联盟 X2 提供了一个私有的通信机制。这里,需要注意的是联盟将组织统一到一起的方式就是通道。通道配置 CC2 现在包含了管理通道资源的策略,通过通道C2 来向组织分配管理权限。这由 R2 和 R3 唯一管理,R1 和 R4 在通道 C2 中是没有权力的。比如可以更新通道配置 CC2 来添加新的组织以支持网络的增长,但是这个只能由 R2 或者 R3 来完成。
注意,通道配置 CC1 和 CC2 以及网络配置 NC4 是彼此完全分离的。我们也看到了一个 Hyperledger Fabric 网络的去中心化的特质,一旦通道 C2 被创建后,它是由组织 R2 和 R3 来管理的,独立于网络中的其他元素。通道的策略通常是保持彼此分离的,并且只能由通道中授权的组织来进行改动。
随着网络和通道的发展,网络和通道的配置也会升级。这里有一个以可控形式实现的流程——引入包含配置变更的配置交易。每次配置的改变会生成一个新的配置区块,在后边的话题中,我们会看到这些区块是如何被验证和接受,并更新相关网络及通道的配置。
网络和通道配置
在我们的示例网络中,我们看到了网络和通道配置的重要性。这些配置很重要,是因为他们封装了网络成员同意的策略,这提供了对网络资源访问控制的共享参考。网络和通道配置也包含了有关网络和通道组成的一些情况,比如联盟的名字以及它所包含的组织。
比如,当使用排序服务节点 O4 首次组建网络的时候,它的行为是由网络配置 NC4 来管理的。NC4 的初始配置中只包含了允许组织 R4 来管理网络资源的策略。NC4 接下来被变更为也允许 R1 来管理网络资源。一旦这个改动生效后,任何来自于组织 R1 或者 R4 的管理员连接到 O4 都将具有网络管理的权限,因为这是网络配置 NC4 中的策略所允许的。在内部来说,在排序服务中的每个节点都记录着网络配置中的每个通道,所以在网络级别中每个通道被创建时都会有一条记录。
这就意味着,尽管排序服务节点 O4 创建了联盟 X1 和 X2 以及通道 C1 和 C2,网络配置 NC4 中包含了 O4 遵守的这个网络的智慧。只要 O4 是一个好的参与者,并且在它处理网络资源的任何时候都能够正确的实现在 NC4 中定义的策略的话,那么我们的网络就会按照所有的组织一致同意的方式工作。在很多方面 NC4 被认为要比 O4 更重要,因为最终是它来管控网络的访问。
与 Peer 节点同样的概念也可以应用到通道配置。在我们的网络中,P1 和 P2 是很类似的角色。当 Peer 节点 P1 和 P2 同客户端应用程序 A1 或者 A2 进行交互的时候,他们使用了在通道配置中定义的策略来管理对通道 C1 资源的访问。
比如,如果 A1 想要访问在 Peer 节点 P1 或者 P2 上的智能合约链码 S5 的话,每个 Peer 节点会使用它的 CC1 的副本来决定 A1 能够进行哪些操作。比如根据在 CC1 中定义的策略,A1 可能被允许从账本 L1 上读取或者写入数据。后边我们会看到在通道和通道配置 CC2 中对操作者相同的模式。我们能够看到尽管 Peer 节点和应用程序在网络中是关键的操作者,他们在一个通道中的行为更多的是由通道配置的策略来决定的。
最后,理解网络和通道配置是如何在物理上来实现的是非常重要的。我们能够看到网络和通道的配置在逻辑上是独立的,网络会有一个配置,每个通道也会有一个配置。这一点非常重要,任何访问网络或者通道的组件必须对不同组织的授权有共同的理解。
尽管在逻辑上是独立的配置,实际上它会被复制到组成网络或者通道的每个节点,并保持一致。比如,在我们的网络中,节点 P1 和 P2 都有通道配置 CC1 的副本,在这个网络完成的时候,节点 P2 和 P3 也会有通道配置 CC2 的副本。类似的,排序服务节点 O4 有网络配置的副本,但是在多节点配置中,每个排序服务节点都会有他们自己的关于网络配置的副本。
网络和通道的配置使用了和用户交易所使用的相同的区块链技术来保持一致,只是被叫做配置的交易。想要改变网络或者通道的配置,管理员必须要提交一个配置交易来改变网络或者通道的配置。该交易必须被对应策略中指定的组织签名,这些组织负责配置的改变。这个策略被称为mod_policy 我们稍后讨论。
实际上,排序服务节点运行着一个小型的区块链,通过我们前边提到过的系统通道连接。使用系统通道排序服务节点分发网络配置交易。这些交易被用来维护每个排序服务节点间网络配置副本的一致性。类似的,应用程序通道中的 Peer 节点分发通道配置交易。同样,这些交易被用来维护每个 Peer 节点通道配置的一致性。
这种对象在逻辑上独立,却在物理分发上平衡,这在 Hyperledger Fabric 中是一种常见的模式。像网络配置这样的对象,逻辑上是独立的,但在一些排序服务节点间被物理复制。对于通道配置、账本及智能合约,我们也看到了这样的情况,他们被安装在了多个地方,但是在逻辑上他们的接口是在通道级别上的。这种模式你会在 Hyperledger Fabric 中重复地看到多次,这使 Hyperledger Fabric 变得既去中心化,有能够在同一时间进行管理。
添加另外一个 Peer 节点
现在组织 R3 能够完全地参与到通道 C2 中了,让我们来把它的基础设施组件添加到通道中。我们不会每次只加一个组件,我们将会一次性地将 Peer 节点、它的账本本地副本、智能合约以及客户端应用程序都加进来。
让我们看一下添加了组织 R3 的组件的网络是什么样:
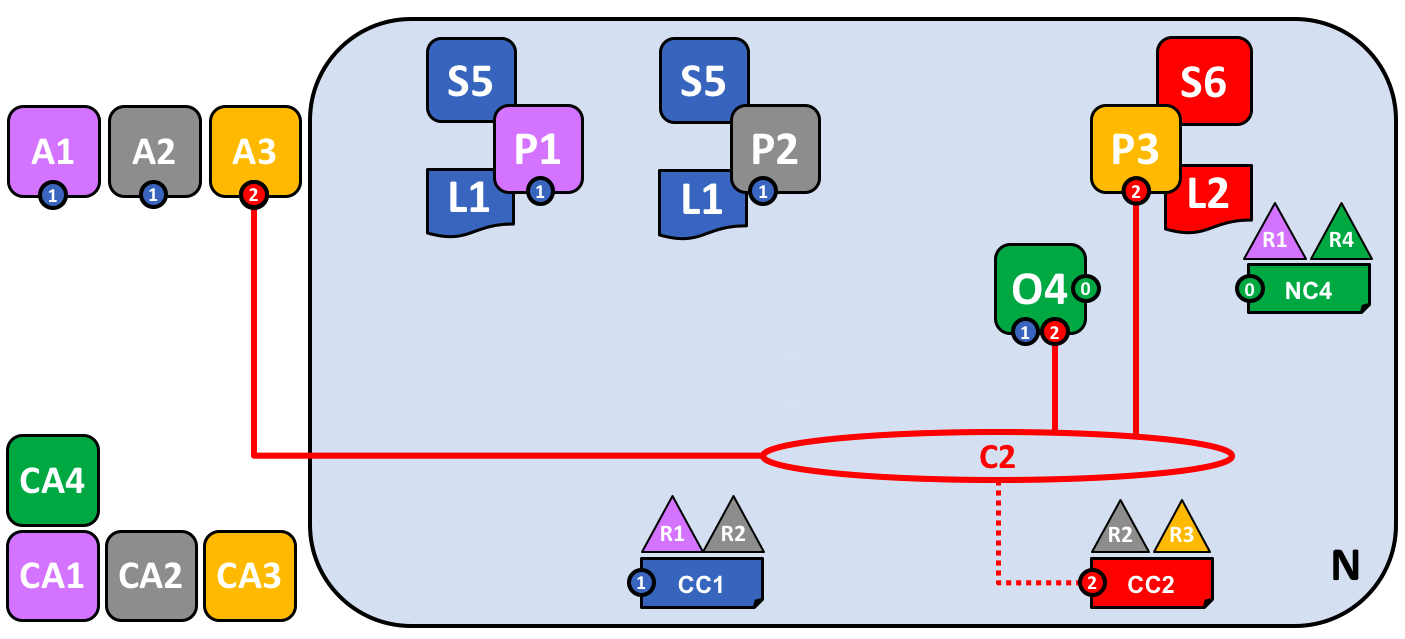
这个图展示了在网络 N 中关于通道 C1 和 C2 的以下内容:客户端应用程序 A1 和 A2 可以使用通道 C1 来同节点 P1 和 P2,以及排序服务 O4 进行通信。客户端应用程序 A3 能够使用 C2 同节点 P3 和排序服务 O4 进行通信。排序服务 O4 可以使用通道 C1 和 C2 的通信服务。通道配置 CC1 应用到了通道 C1 上,CC2 应用到了通道 C2 上。
首先,要注意的是因为 Peer 节点 P3 连接到了通道 C2,所以它有一个和使用通道 C1 的节点不同的账本 L2。账本 L2 被有效地控制在了通道 C2 中。账本 L1 是完全独立的,它被限制在了通道 C1。这么做是有意义的,通道 C2 的目的是为联盟 X2 的成员提供私有通信,并且账本 L2 是他们的交易的私有存储。
同样的方式,智能合约 S6 安装在 Peer 节点 P3,定义在通道 C2 上,用来为账本 L2 提供可控的访问。应用程序 A3 现在能够使用通道 C2 来调用智能合约 S6 提供的服务来生成交易,这些交易会在网络中被每个账本的副本所接受。
到目前为止,我们有一个独立的网络,其中定义了两个完全独立的通道。这些通道为组织提供了独立的管理设施来彼此交易。这是在工作中的去中心化,我们在管控和自制之间具有着一个平衡。这是通过应用到通道的策略来实现的,这些通道由不同的组织控制,而通道又会影响这些组织。
把一个 Peer 节点添加到多个通道中
在网络开发的最后一个阶段,让我们把焦点再转回组织 R2。我们可以通过把 R2 加入到多个通道中的方式来让它成为两个联盟 X1 和 X2 的成员。
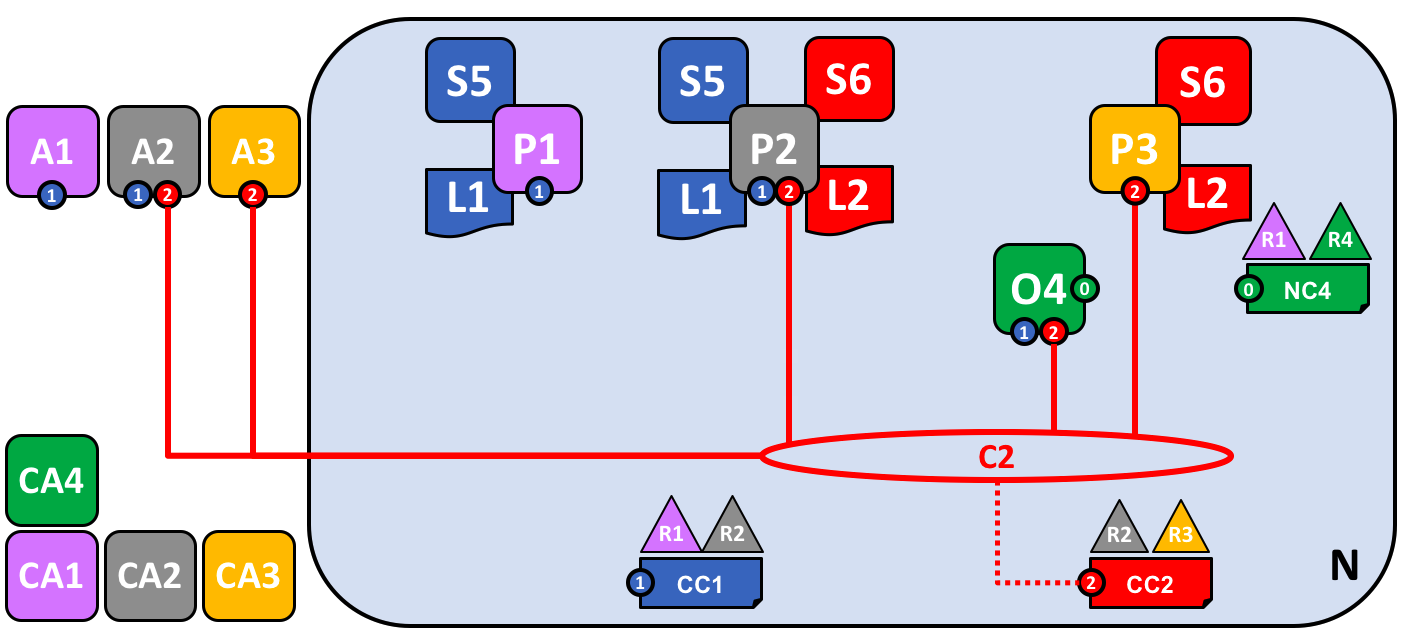
这个图展示了在网络 N 中关于通道 C1 和 C2 的以下内容:客户端应用程序 A1 能够使用通道 C1 与节点 P1 和 P2 以及排序服务 O4 进行通信。客户端应用程序 A2 可以使用通道 C1 与节点 P1 和 P2 进行通信,以及使用通道 C2 与节点 P2 和 P3 以及排序服务 O4 进行通信。客户端应用程序 A3 能够使用通道 C2 与节点 P3 和 P2 和排序服务 O4 进行通信。排序服务 O4 能够使用通道 C1 和 C2 的通信服务。通道配置 CC1 应用在了通道 C1 中,CC2 应用在了通道 C2 中。
我们能够看到,R2 在网络中是一个特别的组织,因为它是唯一一个同时属于两个通道成员的组织!它能够在通道 C1 上跟组织 R1 进行交易,也能够同时使用另外一个通道 C2 来跟组织 R3 进行交易。
注意,节点 P2 将智能合约 S5 安装在通道 C1 中,将智能合约 S6 安装在通道 C2 中。节点 P2 同时是两个通道的成员,并且通过不同的智能合约来处理不同的账本。
通道是一个非常强大的概念,既提供了组织间的分离,又提供了组织间进行合作的机制。总的来说,这个基础设施是由一系列独立的组织来提供的,并且在这些组织间进行共享。
重点需要注意的是,在不同通道上交易时 Peer 节点 P2 的行为受到不同的约束。特别地,在通道配置 CC1 中包含的策略决定了 P2 在通道 C1 中进行交易的时候的操作,这也是通道配置 CC2 中的策略对 P2 在通道 C2 中的控制。
这是值得的,R2 和 R1 同意了通道 C1 的规则,R2 和 R3 同意了通道 C2 的规则。这些规则包含在对应的通道策略中,它们能够且必须要在通道里被用来强制执行正确的操作,就像当初同意的一样。
类似的,我们能够看到客户端应用程序 A2 现在能够在通道 C1 和 C2 上进行交易。同样,它也会按照在相关通道配置中的策略来进行管理。另外,注意客户端应用程序 A2 和 Peer 节点 P2 在使用一个混合的视觉词汇表,既包括线也包括连接点。你能够看到他们是等价的,他们在视觉上是同义词。
排序服务
善于观察的读者可能已经注意到排序服务看起来像是一个中心化的组件,它最初被用来创建这个网络,然后连接到了网络中的每个通道。即使我们添加 R1 和 R4 到了管理排序服务的网络配置策略 NC4,这个排序节点依旧是运行在 R4 的基础设施上。在一个去中心化的世界中,这个看起来是错误的!
不必担心!我们的示例网络显示的是一个最简单的排序服务配置,为了帮助你从网络管理员的角度来理解。事实上,排序服务本身可以是完全去中心化的!我们之前提到过一个排序服务可以包含很多单独的由不同组织所有的节点,让我们看一下在我们的网络中应该怎么做。
让我们看一个更加真实的排序服务节点配置:
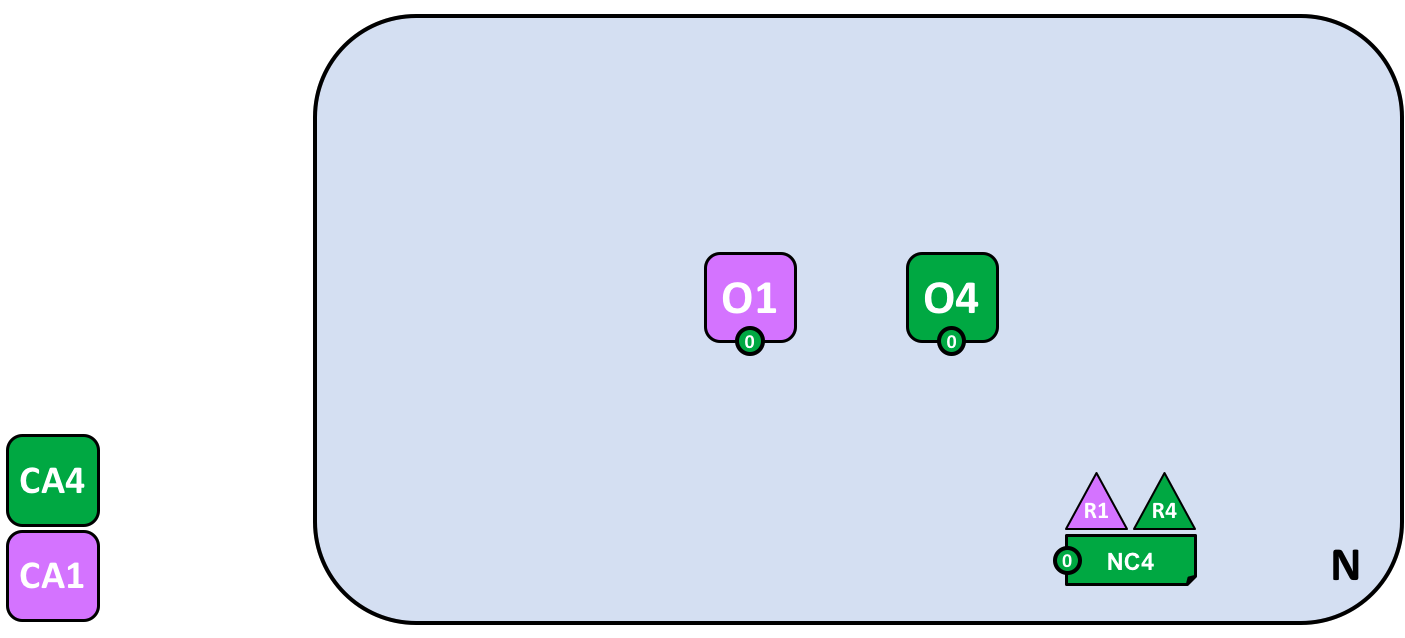
一个多组织的排序服务。排序服务包括排序服务节点 O1 和 O4。O1 是由组织 R1 提供的,O4 是由组织 R4 提供的。网络配置 NC4 中定义了来自 R1 和 R4 的操作者的网络资源权限。
我们能够看到这个排序服务是完全去中心化的,它在组织 R1 和 R4 中运行。网络配置策略 NC4 赋予了 R1 和 R4 对于网络资源相同的权限。R1 和 R4 的客户端应用程序和 Peer 节点可以通过连接 O1 或者 O4 来管理网络资源,就像在网络配置 NC4 中定义的策略一样,两个节点是用相同的方式来操作的。在实际中,组织的操作者愿意使用自己组织提供的基础设施,但是显然并不总是这样的。
去中心化的交易分发
跟作为网络的管理点一样,排序服务同样提供了另外一个关键的设施——交易的分发点。排序服务是一个从应用程序搜集背书过的交易的组件,然后它会把这些交易进行排序并放进区块中,这些区块会被分发到通道中的每个 Peer 节点。在每个这样的提交节点中,交易不管是有效的还是无效的都会被记录下来,并且他们本地账本副本也会更新。
注意这里,排序服务节点 O4 在通道 C1 扮演着和网络 N 不同的角色。当在通道级别操作时,O4 的角色是搜集交易并在通道中分发区块。它依据通道配置 CC1 中定义的策略来操作。当在网络级别操作时,O4 的角色是提供对网络资源的管理,这是根据网络配置 NC4 中定义的策略来操作的。我们应该注意这些不同的角色是如何在通道和网络的配置中定义的。这个会加强你对 Hyperledger Fabric 中基于配置的可声明策略的重要性的印象。两种策略都被定义并且用来管控联盟中的每个成员都同意的行为。
我们能够看到排序服务和 Hyperledger Fabric 中的其他组件一样,是一个完全去中心化的组件。不管是作为一个网络的管理点,还是作为一个通道中的分发节点,它的节点都可以依据在一个网络中的多个组织的要求被分散地运行。
修改策略
经过我们对于这个示例网络的解析,我们看到了在这个系统中使用策略对不同操作者行为控制的重要性。我们仅仅讨论了一些可用的策略,还有很多不同方面管控行为的定义。这些单独的策略会在文档的其他部分讨论。
最重要的一点,Hyperledger Fabric 提供了一个独特的强大的策略来允许网络和通道管理员自己来管理策略的变更!底层的理论是:策略的变更是一个常量,无论它是发生在不同的组织间,还是由外部的监管者加进来的。比如一个新的组织想要加入一个通道或者一些已经存在的组织想要增加或减少他们的权限。让我们来详细的看一下在 Hyperledger Fabric 中修改策略是如何实现的。
理解这个的关键点是一个策略的变化是由策略中的策略来管理的。那就是修改策略,或者简称mod_poicy,它是在管理变化的网络或者通道配置中的头等策略。关于我们是如何已经使用了 mod_policy 来管理网络中的变化,我们提供了两个简单的示例。
第一个例子是创建网络初始的时候。这时,只有组织 R4 被允许管理网络。在实际当中,这个是通过在网络配置 NC4 中把 R4 定义为唯一一个有权限来管理网络资源的组织来实现的。并且对于 NC4 的 mod_policy 也仅仅提到了组织 R4,因此只有 R4 被允许改变这个配置。
我们接下来将网络 N 进行了演进,同时允许组织 R1 来管理网络。R4 通过将 R1 添加到通道创建和联盟创建的策略中来实现。因为这个改动,R1 就可以定义联盟 X1 和 X2 了,并且可以创建通道 C1 和 C2。R1 在网络配置中对于通道和联盟策略具有了同样的管理权限。
R4 甚至可以通过网络配置来给 R1 赋予更大的权限!R4 可以将 R1 添加到 mod_poicy,这样 R1 就同样可以管理这个网络中的变更了。
第二个权利要比第一个权利大的多,因为现在 R1 具有了在网络配置 NC4 上的所有权限!这意味着,R1 能够移除 R4 在这个网络的管理权限。在实际当中,R4 会将 mod_policy 配置成对这样的改动需要 R4 批准,或者需要所有在 mod_policy 中定义的组织批准。这里有很大的灵活性来使 mod_policy 根据需要来定义任何更改流程。
这就是在实际工作中的 mod_policy,它允许一个基本的配置被优雅地演进为一个成熟的配置。这些演进都需要所有被引入的组织的同意。mod_policy 像在一个网络或者通道配置中的每一个其他的策略一样,它定义了一系列的组织,这些组织被允许自己来修改这个 mod_policy。
我们仅仅在这个部分了解了策略以及 mod_policy 的表面的内容。这会在策略的话题中有更详细的讨论,但是现在让我们回到这个已经完成的网络!
网路已经完全形成了
让我们使用一个统一的视觉词典来回顾一下我们的网络应该是什么样。我们使用更加紧凑的视觉语法来稍微重新组织一下这个网络,因为它能够更好地适应更大的一个拓扑结构:
在这个图中,我们看到了这个 Fabric 区块链网络包括了两个应用程序通道以及一个排序通道。组织 R1 和 R4 负责排序通道,R1 和 R2 负责蓝色的应用程序通道,R2 和 R3 负责红色的应用程序通道。客户端应用程序 A1 是组织 R1 的元素,CA1 是它的证书颁发机构。注意到组织 R2 的节点 P2 可以使用蓝色的通信设施,也可以使用红色的应用程序通道。每个应用程序通道具有它自己的通道配置,这里是 CC1 和 CC2。系统通道的通道配置是网络配置 NC4 的一部分。
我们已经在概念上构建了一个 Hyperledger Fabric 区块链网络实例的最后一部分了。我们创建了一个有四个组织的网络,带有两个通道和三个 Peer 节点,两个智能合约和一个排序服务。并由四个证书颁发机构来支撑。它为三个客户端应用程序提供了账本及智能合约服务,这些应用程序可以通过两个通道与账本和智能合约进行交互。花些时间来仔细看看这个图中网络的详细内容,并且随时回来阅读这个部分来加强你的理解,或者查看其它更详细的话题。
网络总结
在本主题中,我们了解了不同的组织如何共享它们的基础设施来提供一个集成的 Hyperledger Fabric 区块链网络。我们看到了如何将集体基础设施组织成提供独立管理的私有通信机制的通道。我们也已经看到了如何通过使用来自各自证书认证机构的证书来识别来自不同组织的参与者,比如客户端应用程序、管理员、节点和排序服务。反过来,我们也看到了策略的重要性,它定义了这些组织参与者在网络和通道资源上拥有的一致同意的权限。
身份
什么是身份?
区块链网络中的不同参与者包括 Peer 节点、排序节点、客户端应用程序、管理员等。每一个参与者(网络内部或外部能够使用服务的活动元素)都具有封装在 X.509 数字证书中的数字身份。这些身份确实很重要,因为它们确定了对资源的确切权限以及对参与者在区块链网络中拥有的信息的访问权限。
此外,数字身份还具有 Fabric 用于确定权限的一些其他属性,并且它为身份和关联属性的并集提供了特殊名称——主体 。主体就像 userID 或 groupID,但更灵活一点,因为它们可以包含参与者的身份的各种属性,例如参与者的组织,组织单位,角色甚至是参与者的特定身份。当我们谈论主体时,它们是决定其权限的属性。
要使身份可以被验证,它必须来自可信任的权威机构。成员服务提供者(Membership Service Provider,MSP)是 Fabirc 中可以信任的权威机构。具体地说,一个 MSP 是定义管理该组织有效身份规则的组件。Fabric 中默认的 MSP 实现使用 X.509 证书作为身份,采用传统的公钥基础结构(Public Key Infrastructure,PKI)分层模型(稍后将详细介绍PKI)。
一个简单的场景来解释身份的使用
想象你去超市购买一些杂货。在结账时,你会看到一个标志,表明只接受 Visa,Mastercard 和 AMEX 卡。如果你尝试使用其他卡付款(我们称之为“想象卡”)无论该卡是否真实、或你的帐户中是否有足够的资金,都无关紧要。它不会被接受。
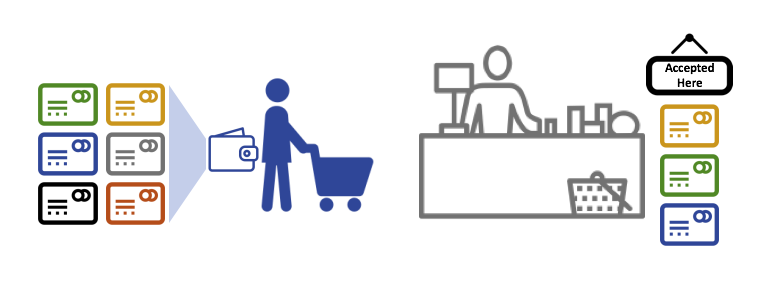
拥有有效的信用卡是不够的,它也必须被商店接受!PKI 和 MSP 以相同的方式协同工作,PKI提供身份列表,MSP说哪些是参与网络的给定组织的成员。
PKI 证书和 MSP 提供了类似的功能组合。PKI 就像一个卡片提供商,它分配了许多不同类型的可验证身份。另一方面,MSP 类似于商店接受的卡提供商列表,确定哪些身份是商店支付网络的可信成员(参与者)。MSP 将可验证的身份转变为区块链网络的成员 。
让我们更详细地深入研究这些概念。
什么是 PKI?
公钥基础结构(PKI)是一组互联网技术,可在网络中提供安全通信。是 PKI 将 S 放在 HTTPS 中,如果你在网页浏览器上阅读这个文档,你可能正使用 PKI 来确保它来自一个验证过的来源。
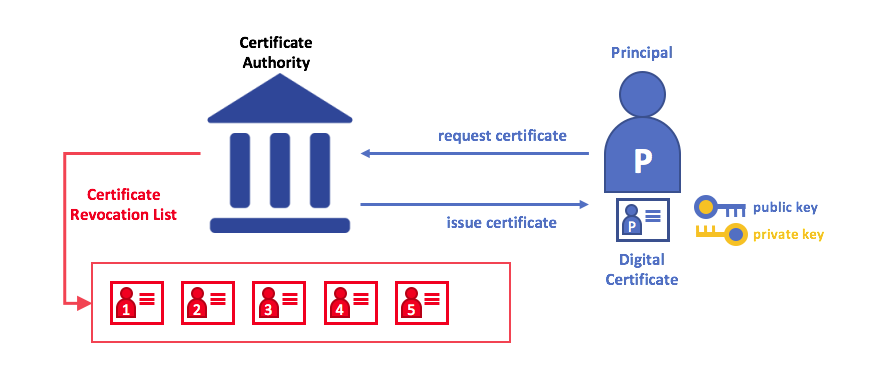
公钥基础结构(PKI)的元素。PKI 由向各方(例如,服务的用户,服务提供者)发布数字证书的证书授权中心组成,然后使用它们在与其环境交换的消息中对自己进行身份验证。CA 的证书撤销列表(CRL)构成不再有效的证书的参考。证书的撤销可能由于多种原因而发生。例如,因为与证书相关联的加密私有材料已被公开,所以证书可能被撤销。
虽然区块链网络不仅仅是一个通信网络,但它依赖于 PKI 标准来确保各个网络参与者之间的安全通信,并确保在区块链上发布的消息得到适当的认证。因此,了解 PKI 的基础知识以及为什么 MSP 是非常重要的。
PKI 有四个关键要素:
- 数字证书
- 公钥和私钥
- 证书授权中心
- 证书撤销列表
让我们快速描述这些 PKI 基础知识,如果你想了解更多细节,维基百科是一个很好的起点。
数字证书
数字证书是包含与证书持有者相关的属性的文档。最常见的证书类型是符合 X.509标准的证书,它允许在其结构中编码一些用于身份识别的信息。
例如,密歇根州底特律的 Mitchell 汽车的制造部门的 Mary Morris 可能有一个带有 SUBJECT 属性为 C=US, ST=Michigan, L=Detroit, O=Mitchell Cars, OU=Manufacturing, CN=Mary Morris /UID=123456 的数字证书。Mary 的证书类似于她的身份证(提供了 Mary 的信息),她可以用来证明关于她的重要事实。X.509 证书中还有许多其他属性,但现在让我们专注于这些。
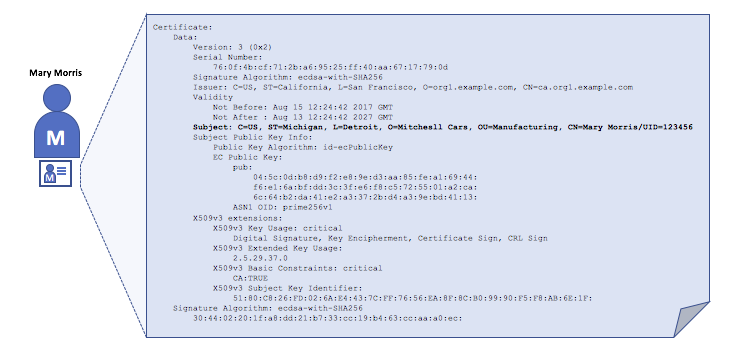
描述一个名为 Mary Morris 的组织的数字证书。Mary 是证书的 SUBJECT,突出显示的 SUBJECT 文本显示了关于 Mary 的重要事实。如你所见,证书还包含更多信息。最重要的是,Mary 的公钥是在她的证书中分发的,而她的私人签名密钥则不是。此签名密钥必须保密。
重要的是,Mary 的所有属性都可以使用称为密码学(字面意思,“ 秘密书写 ”)的数学技术进行记录,这样篡改将使证书无效。只要对方信任证书颁发者,即证书授权中心(CA),密码学就允许 Mary 将证书提交给其他人以证明其身份。只要 CA 安全地保存某些加密信息(CA 的私钥),任何阅读证书的人都可以确定有关 Mary 的信息没有被篡改,它将始终具有 Mary Morris 的特定属性。将 Mary 的 X.509 证书视为无法改变的数字身份证。
授权,公钥和私钥
身份验证和消息完整性是安全通信中的重要概念。身份验证要求确保交换消息的各方创建特定消息的身份。对于具有“完整性”的消息意味着在其传输期间不能被修改。例如,你可能希望确保与真正的 Mary Morris 而不是模仿者进行沟通。或者,如果 Mary 向你发送了一条消息,你可能希望确保其在传输过程中没有被其他任何人篡改过。
传统的身份验证机制依赖于数字签名,顾名思义,它允许一方对其消息进行数字签名。数字签名还可以保证签名消息的完整性。
从技术上讲,数字签名机制要求每一方保存两个加密连接的密钥:广泛可用的公钥和充当授权锚的私钥,以及用于在消息上产生数字签名的私钥 。数字签名消息的接收者可以通过检查附加签名在预期发送者的公钥下是否有效来验证接收消息的来源和完整性。
私钥和公钥的唯一关系是保证安全通信的加密魔法。密钥之间唯一的数学关系使得私钥在消息上的签名,只有对应公钥在相同的消息上才可以与之匹配。
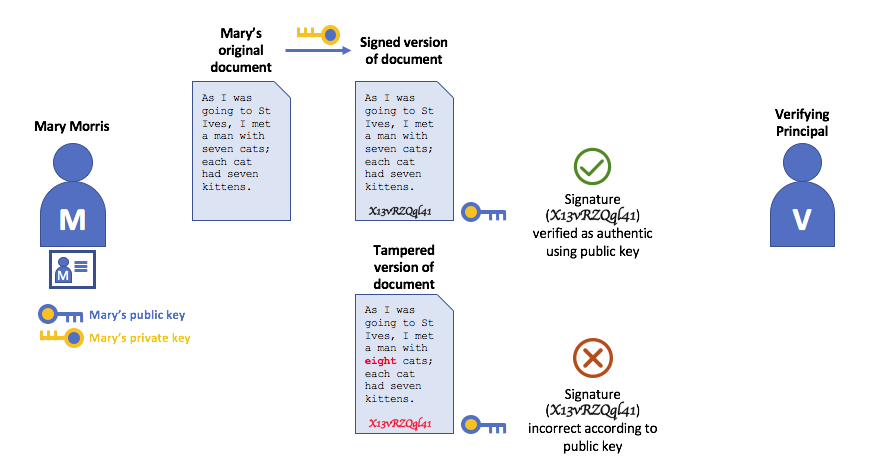
在上面的示例中,Mary 使用她的私钥对邮件进行签名。任何使用她的公钥查看签名消息的人都可以验证签名。
证书授权中心
如你所见,人员或节点能够通过由系统信任的机构为其发布的数字身份参与区块链网络。在最常见的情况下,数字身份(或简称身份)的形式为,符合 X.509 标准并由证书授权中心(CA)颁发的经加密验证的数字证书。
CA 是互联网安全协议的常见部分,你可能已经听说过一些比较流行的协议:Symantec(最初是 Verisign),GeoTrust,DigiCert,GoDaddy 和 Comodo 等。
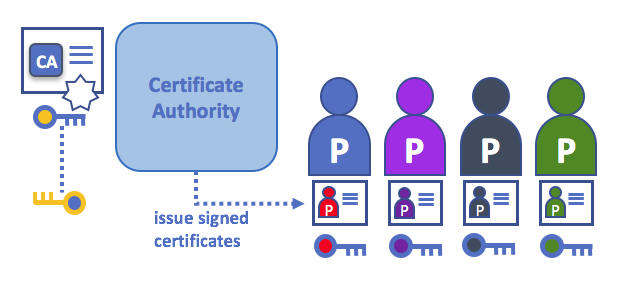
证书授权中心向不同的参与者颁发证书。这些证书由 CA 进行签名,并将参与者的公钥绑定在一起(并且可选是否具有全部属性列表)。因此,如果一个成员信任 CA(并且知道其公钥),则可以信任与参与者绑定的证书中包含的公钥,并通过验证参与者证书上的 CA 签名来获取所包含的属性。
证书可以广泛传播,因为它们既不包括参与者也不包括 CA 的私钥。因此,它们可以用作信任的锚,用于验证来自不同参与者的消息。
CA 也有一个证书,它们可以广泛使用。这就可以让从给定 CA 获取身份证书的消费者验证自己的身份,因为只有对应的私钥才可以生成该证书。
在区块链设置中,希望与网络交互的每个参与者都需要一个身份。在此设置中,你可能会说使用一个或多个 CA 从数字角度定义了组织的成员 。CA 是为组织的参与者提供可验证的数字身份的基础。
根 CA,中间 CA 和信任链
CA 有两种形式:根 CA和中间 CA 。因为根 CA(Symantec,Geotrust等)必须安全地向互联网用户颁发数亿个证书,所以将这个过程分散到所谓的中间 CA 中是很有用的。这些中间 CA 具有由根 CA 或其他中间 CA 颁发的证书,允许为链中的任何 CA 颁发的任何证书建立“信任链”。追溯到根 CA 的能力不仅让 CA 的功能在仍然提供安全性的同时进行扩展(允许使用证书的组织充满信心地使用中间 CA),还限制了根 CA 的暴露,如果根 CA 受到损害,将会危及整个信任链。另一方面,如果中间 CA 受到损害,则曝光量会小得多。
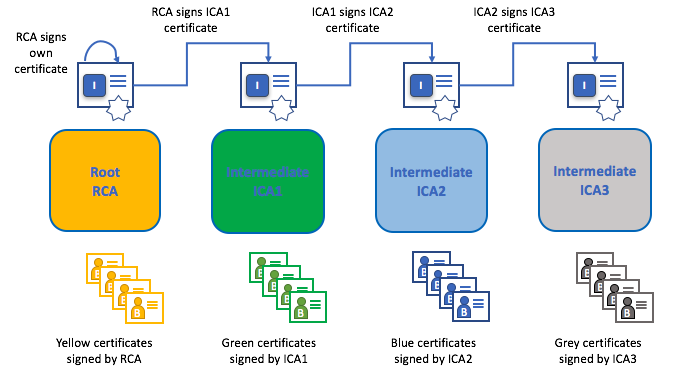
只要每个中间 CA 的证书的颁发 CA 是根 CA 本身或具有对根 CA 的信任链,就在根 CA 和一组中间 CA 之间建立信任链。
中间 CA 在跨多个组织颁发证书时提供了巨大的灵活性,这在许可的区块链系统(如Fabric)中非常有用。例如,你将看到不同的组织可能使用不同的根 CA,或者使用具有不同中间 CA 的相同根 CA,这取决于网络的需求。
Fabric CA
因为 CA 非常重要,Fabric 提供了一个内置的 CA 组件,允许在你的区块链网络中创建 CA。此组件称为 Fabric CA ,是一个私有根 CA 提供者,能够管理具有 X.509 证书形式的 Fabric 参与者的数字身份。由于 Fabric CA 是针对 Fabric 的根 CA 需求的自定义 CA,因此它本身无法为浏览器中的常规或自动使用提供 SSL 证书。但是,由于一些 CA 必须用于管理身份(即使在测试环境中),因此可以使用 Fabric CA 来提供和管理证书。使用公共或商业的根或中间 CA 来提供识别也是可以的,并且完全合适。
如果你有兴趣,你可以在 CA 文档部分阅读有关 Fabric CA 的更多信息。
证书撤销列表
证书撤销列表(Certificate Revocation List,CRL)很容易理解,它是 CA 知道由于某些原因而被撤销的证书的引用列表。如果你回想商店场景,CRL 就像被盗信用卡列表一样。
当第三方想要验证另一方的身份时,它首先检查颁发 CA 的 CRL 以确保证书尚未被撤销。验证者不是必须要检查 CRL,但如果不检查,则他们冒着接受无效身份的风险。
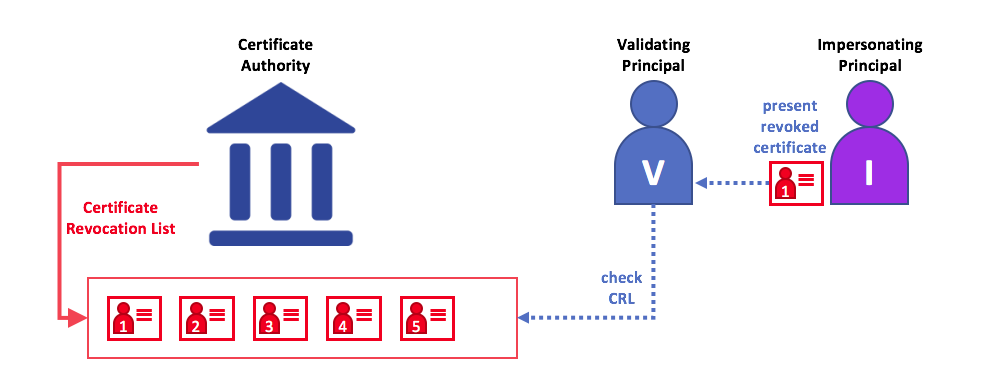
使用 CRL 检查证书是否仍然有效。如果模仿者试图将无效的数字证书传递给验证者,则可以首先检查颁发证书的 CA 的 CRL,以确保其未被列为无效。
请注意,被撤销的证书与证书过期非常不同。撤销的证书尚未过期,按其他方式来说,它们是完全有效的证书。有关 CRL 的更多深入信息,请单击 此处。
现在你已经了解了 PKI 如何通过信任链提供可验证的身份,下一步是了解如何使用这些身份来代表区块链网络的可信成员。这就是 MSP 发挥作用的地方——它确定了区块链网络特定组织的成员。
要了解有关成员的更多信息,请查看有关 MSP的概念文档。
Membership Service Provider (MSP)
Why do I need an MSP?
Because Fabric is a permissioned network, blockchain participants need a way to prove their identity to the rest of the network in order to transact on the network. If you’ve read through the documentation on Identity you’ve seen how a Public Key Infrastructure (PKI) can provide verifiable identities through a chain of trust. How is that chain of trust used by the blockchain network?
Certificate Authorities issue identities by generating a public and private key which forms a key-pair that can be used to prove identity. Because a private key can never be shared publicly, a mechanism is required to enable that proof which is where the MSP comes in. For example, a peer uses its private key to digitally sign, or endorse, a transaction. The MSP on the ordering service contains the peer’s public key which is then used to verify that the signature attached to the transaction is valid. The private key is used to produce a signature on a transaction that only the corresponding public key, that is part of an MSP, can match. Thus, the MSP is the mechanism that allows that identity to be trusted and recognized by the rest of the network without ever revealing the member’s private key.
Recall from the credit card scenario in the Identity topic that the Certificate Authority is like a card provider — it dispenses many different types of verifiable identities. An MSP, on the other hand, determines which credit card providers are accepted at the store. In this way, the MSP turns an identity (the credit card) into a role (the ability to buy things at the store).
This ability to turn verifiable identities into roles is fundamental to the way Fabric networks function, since it allows organizations, nodes, and channels the ability establish MSPs that determine who is allowed to do what at the organization, node, and channel level.
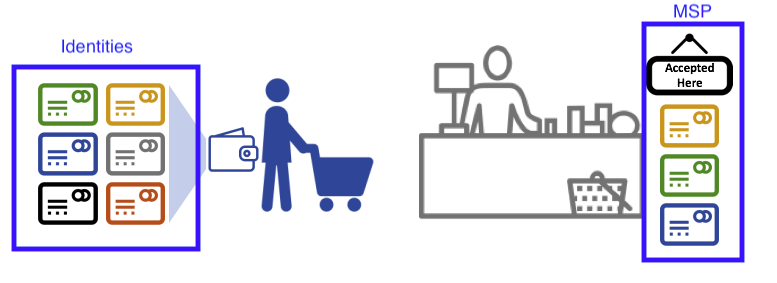
Identities are similar to your credit cards that are used to prove you can pay. The MSP is similar to the list of accepted credit cards.
Consider a consortium of banks that operate a blockchain network. Each bank operates peer and ordering nodes, and the peers endorse transactions submitted to the network. However, each bank would also have departments and account holders. The account holders would belong to each organization, but would not run nodes on the network. They would only interact with the system from their mobile or web application. So how does the network recognize and differentiate these identities? A CA was used to create the identities, but like the card example, those identities can’t just be issued, they need to be recognized by the network. MSPs are used to define the organizations that are trusted by the network members. MSPs are also the mechanism that provide members with a set of roles and permissions within the network. Because the MSPs defining these organizations are known to the members of a network, they can then be used to validate that network entities that attempt to perform actions are allowed to.
Finally, consider if you want to join an existing network, you need a way to turn your identity into something that is recognized by the network. The MSP is the mechanism that enables you to participate on a permissioned blockchain network. To transact on a Fabric network a member needs to:
- Have an identity issued by a CA that is trusted by the network.
- Become a member of an organization that is recognized and approved by the network members. The MSP is how the identity is linked to the membership of an organization. Membership is achieved by adding the member’s public key (also known as certificate, signing cert, or signcert) to the organization’s MSP.
- Add the MSP to either a consortium on the network or a channel.
- Ensure the MSP is included in the policy definitions on the network.
What is an MSP?
Despite its name, the Membership Service Provider does not actually provide anything. Rather, the implementation of the MSP requirement is a set of folders that are added to the configuration of the network and is used to define an organization both inwardly (organizations decide who its admins are) and outwardly (by allowing other organizations to validate that entities have the authority to do what they are attempting to do). Whereas Certificate Authorities generate the certificates that represent identities, the MSP contains a list of permissioned identities.
The MSP identifies which Root CAs and Intermediate CAs are accepted to define the members of a trust domain by listing the identities of their members, or by identifying which CAs are authorized to issue valid identities for their members.
But the power of an MSP goes beyond simply listing who is a network participant or member of a channel. It is the MSP that turns an identity into a role by identifying specific privileges an actor has on a node or channel. Note that when a user is registered with a Fabric CA, a role of admin, peer, client, orderer, or member must be associated with the user. For example, identities registered with the “peer” role should, naturally, be given to a peer. Similarly, identities registered with the “admin” role should be given to organization admins. We’ll delve more into the significance of these roles later in the topic.
In addition, an MSP can allow for the identification of a list of identities that have been revoked — as discussed in the Identity documentation — but we will talk about how that process also extends to an MSP.
MSP 域
在区块链网络中,MSP 出现在两个位置:
- 在参与者节点本地(本地 MSP)
- 在通道配置中(通道 MSP)
The key difference between local and channel MSPs is not how they function – both turn identities into roles – but their scope. Each MSP lists roles and permissions at a particular level of administration.
Local MSPs
Local MSPs are defined for clients and for nodes (peers and orderers). Local MSPs define the permissions for a node (who are the peer admins who can operate the node, for example). The local MSPs of clients (the account holders in the banking scenario above), allow the user to authenticate itself in its transactions as a member of a channel (e.g. in chaincode transactions), or as the owner of a specific role into the system such as an organization admin, for example, in configuration transactions.
Every node must have a local MSP defined, as it defines who has administrative or participatory rights at that level (peer admins will not necessarily be channel admins, and vice versa). This allows for authenticating member messages outside the context of a channel and to define the permissions over a particular node (who has the ability to install chaincode on a peer, for example). Note that one or more nodes can be owned by an organization. An MSP defines the organization admins. And the organization, the admin of the organization, the admin of the node, and the node itself should all have the same root of trust.
An orderer local MSP is also defined on the file system of the node and only applies to that node. Like peer nodes, orderers are also owned by a single organization and therefore have a single MSP to list the actors or nodes it trusts.
Channel MSPs
In contrast, channel MSPs define administrative and participatory rights at the channel level. Peers and ordering nodes on an application channel share the same view of channel MSPs, and will therefore be able to correctly authenticate the channel participants. This means that if an organization wishes to join the channel, an MSP incorporating the chain of trust for the organization’s members would need to be included in the channel configuration. Otherwise transactions originating from this organization’s identities will be rejected. Whereas local MSPs are represented as a folder structure on the file system, channel MSPs are described in a channel configuration.
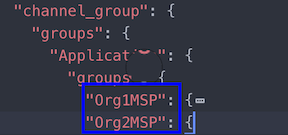
Snippet from a channel config.json file that includes two organization MSPs.
Channel MSPs identify who has authorities at a channel level. The channel MSP defines the relationship between the identities of channel members (which themselves are MSPs) and the enforcement of channel level policies. Channel MSPs contain the MSPs of the organizations of the channel members.
Every organization participating in a channel must have an MSP defined for it. In fact, it is recommended that there is a one-to-one mapping between organizations and MSPs. The MSP defines which members are empowered to act on behalf of the organization. This includes configuration of the MSP itself as well as approving administrative tasks that the organization has role, such as adding new members to a channel. If all network members were part of a single organization or MSP, data privacy is sacrificed. Multiple organizations facilitate privacy by segregating ledger data to only channel members. If more granularity is required within an organization, the organization can be further divided into organizational units (OUs) which we describe in more detail later in this topic.
The system channel MSP includes the MSPs of all the organizations that participate in an ordering service. An ordering service will likely include ordering nodes from multiple organizations and collectively these organizations run the ordering service, most importantly managing the consortium of organizations and the default policies that are inherited by the application channels.
Local MSPs are only defined on the file system of the node or user to which they apply. Therefore, physically and logically there is only one local MSP per node. However, as channel MSPs are available to all nodes in the channel, they are logically defined once in the channel configuration. However, a channel MSP is also instantiated on the file system of every node in the channel and kept synchronized via consensus. So while there is a copy of each channel MSP on the local file system of every node, logically a channel MSP resides on and is maintained by the channel or the network.
The following diagram illustrates how local and channel MSPs coexist on the network:
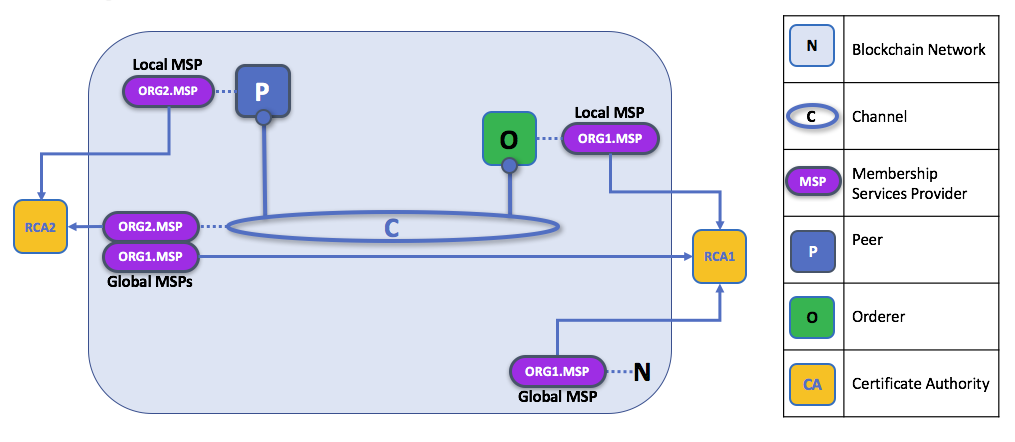
The MSPs for the peer and orderer are local, whereas the MSPs for a channel (including the network configuration channel, also known as the system channel) are global, shared across all participants of that channel. In this figure, the network system channel is administered by ORG1, but another application channel can be managed by ORG1 and ORG2. The peer is a member of and managed by ORG2, whereas ORG1 manages the orderer of the figure. ORG1 trusts identities from RCA1, whereas ORG2 trusts identities from RCA2. It is important to note that these are administration identities, reflecting who can administer these components. So while ORG1 administers the network, ORG2.MSP does exist in the network definition.
What role does an organization play in an MSP?
An organization is a logical managed group of members. This can be something as big as a multinational corporation or a small as a flower shop. What’s most important about organizations (or orgs) is that they manage their members under a single MSP. The MSP allows an identity to be linked to an organization. Note that this is different from the organization concept defined in an X.509 certificate, which we mentioned above.
The exclusive relationship between an organization and its MSP makes it sensible to name the MSP after the organization, a convention you’ll find adopted in most policy configurations. For example, organization ORG1 would likely have an MSP called something like ORG1-MSP. In some cases an organization may require multiple membership groups — for example, where channels are used to perform very different business functions between organizations. In these cases it makes sense to have multiple MSPs and name them accordingly, e.g., ORG2-MSP-NATIONAL and ORG2-MSP-GOVERNMENT, reflecting the different membership roots of trust within ORG2 in the NATIONAL sales channel compared to the GOVERNMENT regulatory channel.
Organizational Units (OUs) and MSPs
An organization can also be divided into multiple organizational units, each of which has a certain set of responsibilities, also referred to as affiliations. Think of an OU as a department inside an organization. For example, the ORG1 organization might have both ORG1.MANUFACTURING and ORG1.DISTRIBUTION OUs to reflect these separate lines of business. When a CA issues X.509 certificates, the OU field in the certificate specifies the line of business to which the identity belongs. A benefit of using OUs like this is that these values can then be used in policy definitions in order to restrict access or in smart contracts for attribute-based access control. Otherwise, separate MSPs would need to be created for each organization.
Specifying OUs is optional. If OUs are not used, all of the identities that are part of an MSP — as identified by the Root CA and Intermediate CA folders — will be considered members of the organization.
Node OU Roles and MSPs
Additionally, there is a special kind of OU, sometimes referred to as a Node OU, that can be used to confer a role onto an identity. These Node OU roles are defined in the $FABRIC_CFG_PATH/msp/config.yaml file and contain a list of organizational units whose members are considered to be part of the organization represented by this MSP. This is particularly useful when you want to restrict the members of an organization to the ones holding an identity (signed by one of MSP designated CAs) with a specific Node OU role in it. For example, with node OU’s you can implement a more granular endorsement policy that requires Org1 peers to endorse a transaction, rather than any member of Org1.
In order to use the Node OU roles, the “identity classification” feature must be enabled for the network. When using the folder-based MSP structure, this is accomplished by enabling “Node OUs” in the config.yaml file which resides in the root of the MSP folder:
NodeOUs:
  Enable: true
  ClientOUIdentifier:
    Certificate: cacerts/ca.sampleorg-cert.pem
    OrganizationalUnitIdentifier: client
  PeerOUIdentifier:
    Certificate: cacerts/ca.sampleorg-cert.pem
    OrganizationalUnitIdentifier: peer
  AdminOUIdentifier:
    Certificate: cacerts/ca.sampleorg-cert.pem
    OrganizationalUnitIdentifier: admin
  OrdererOUIdentifier:
    Certificate: cacerts/ca.sampleorg-cert.pem
    OrganizationalUnitIdentifier: orderer
In the example above, there are 4 possible Node OU ROLES for the MSP:
- client
- peer
- admin
- orderer
This convention allows you to distinguish MSP roles by the OU present in the CommonName attribute of the X509 certificate. The example above says that any certificate issued by cacerts/ca.sampleorg-cert.pem in which OU=client will identified as a client, OU=peer as a peer, etc. Starting with Fabric v1.4.3, there is also an OU for the orderer and for admins. The new admins role means that you no longer have to explicitly place certs in the admincerts folder of the MSP directory. Rather, the admin role present in the user’s signcert qualifies the identity as an admin user.
These Role and OU attributes are assigned to an identity when the Fabric CA or SDK is used to register a user with the CA. It is the subsequent enroll user command that generates the certificates in the users’ /msp folder.
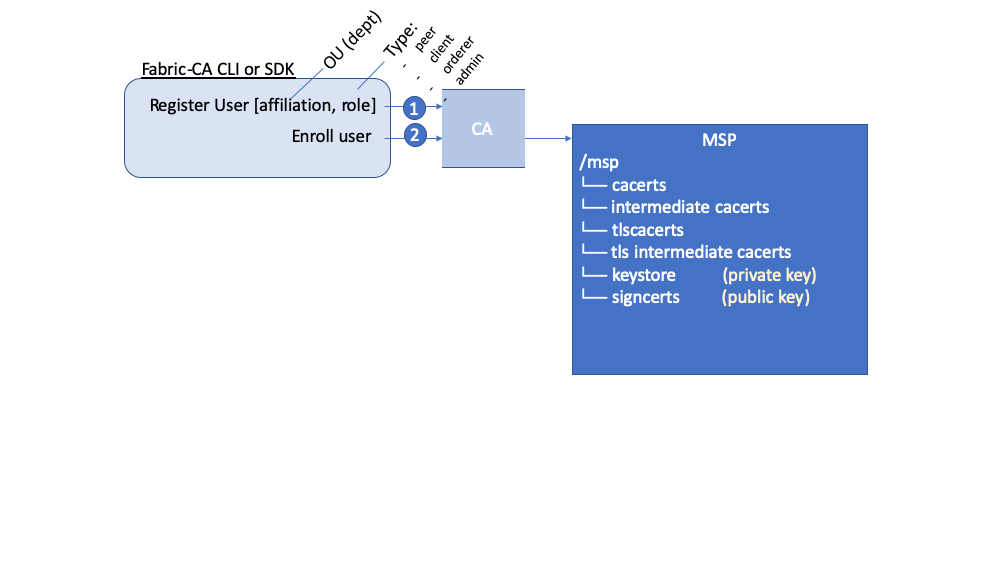
The resulting ROLE and OU attributes are visible inside the X.509 signing certificate located in the /signcerts folder. The ROLE attribute is identified as hf.Type and refers to an actor’s role within its organization, (specifying, for example, that an actor is a peer). See the following snippet from a signing certificate shows how the Roles and OUs are represented in the certificate.
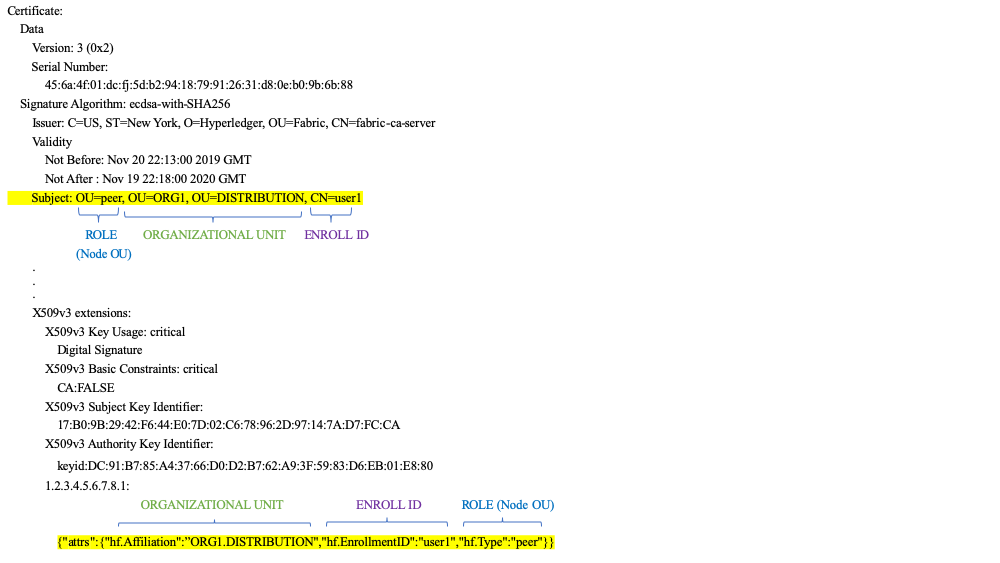
Note: For Channel MSPs, just because an actor has the role of an administrator it doesn’t mean that they can administer particular resources. The actual power a given identity has with respect to administering the system is determined by the policies that manage system resources. For example, a channel policy might specify that ORG1-MANUFACTURING administrators, meaning identities with a role of admin and a Node OU of ORG1-MANUFACTURING, have the rights to add new organizations to the channel, whereas the ORG1-DISTRIBUTION administrators have no such rights.
Finally, OUs could be used by different organizations in a consortium to distinguish each other. But in such cases, the different organizations have to use the same Root CAs and Intermediate CAs for their chain of trust, and assign the OU field to identify members of each organization. When every organization has the same CA or chain of trust, this makes the system more centralized than what might be desirable and therefore deserves careful consideration on a blockchain network.
MSP Structure
Let’s explore the MSP elements that render the functionality we’ve described so far.
A local MSP folder contains the following sub-folders:

The figure above shows the subfolders in a local MSP on the file system
config.yaml: Used to configure the identity classification feature in Fabric by enabling “Node OUs” and defining the accepted roles.
cacerts: This folder contains a list of self-signed X.509 certificates of the Root CAs trusted by the organization represented by this MSP. There must be at least one Root CA certificate in this MSP folder.
This is the most important folder because it identifies the CAs from which all other certificates must be derived to be considered members of the corresponding organization to form the chain of trust.
intermediatecerts: This folder contains a list of X.509 certificates of the Intermediate CAs trusted by this organization. Each certificate must be signed by one of the Root CAs in the MSP or by any Intermediate CA whose issuing CA chain ultimately leads back to a trusted Root CA.
An intermediate CA may represent a different subdivision of the organization (like
ORG1-MANUFACTURINGandORG1-DISTRIBUTIONdo forORG1), or the organization itself (as may be the case if a commercial CA is leveraged for the organization’s identity management). In the latter case intermediate CAs can be used to represent organization subdivisions. Here you may find more information on best practices for MSP configuration. Notice, that it is possible to have a functioning network that does not have an Intermediate CA, in which case this folder would be empty.Like the Root CA folder, this folder defines the CAs from which certificates must be issued to be considered members of the organization.
admincerts (Deprecated from Fabric v1.4.3 and higher): This folder contains a list of identities that define the actors who have the role of administrators for this organization. In general, there should be one or more X.509 certificates in this list.
Note: Prior to Fabric v1.4.3, admins were defined by explicitly putting certs in the
admincertsfolder in the local MSP directory of your peer. With Fabric v1.4.3 or higher, certificates in this folder are no longer required. Instead, it is recommended that when the user is registered with the CA, that theadminrole is used to designate the node administrator. Then, the identity is recognized as anadminby the Node OU role value in their signcert. As a reminder, in order to leverage the admin role, the “identity classification” feature must be enabled in the config.yaml above by setting “Node OUs” toEnable: true. We’ll explore this more later.And as a reminder, for Channel MSPs, just because an actor has the role of an administrator it doesn’t mean that they can administer particular resources. The actual power a given identity has with respect to administering the system is determined by the policies that manage system resources. For example, a channel policy might specify that
ORG1-MANUFACTURINGadministrators have the rights to add new organizations to the channel, whereas theORG1-DISTRIBUTIONadministrators have no such rights.keystore: (private Key) This folder is defined for the local MSP of a peer or orderer node (or in a client’s local MSP), and contains the node’s private key. This key is used to sign data — for example to sign a transaction proposal response, as part of the endorsement phase.
This folder is mandatory for local MSPs, and must contain exactly one private key. Obviously, access to this folder must be limited only to the identities of users who have administrative responsibility on the peer.
The channel MSP configuration does not include this folder, because channel MSPs solely aim to offer identity validation functionalities and not signing abilities.
Note: If you are using a Hardware Security Module(HSM) for key management, this folder is empty because the private key is generated by and stored in the HSM.
signcert: For a peer or orderer node (or in a client’s local MSP) this folder contains the node’s signing key. This key matches cryptographically the node’s identity included in Node Identity folder and is used to sign data — for example to sign a transaction proposal response, as part of the endorsement phase.
This folder is mandatory for local MSPs, and must contain exactly one public key. Obviously, access to this folder must be limited only to the identities of users who have administrative responsibility on the peer.
Configuration of a channel MSP does not include this folder, as channel MSPs solely aim to offer identity validation functionalities and not signing abilities.
tlscacerts: This folder contains a list of self-signed X.509 certificates of the Root CAs trusted by this organization for secure communications between nodes using TLS. An example of a TLS communication would be when a peer needs to connect to an orderer so that it can receive ledger updates.
MSP TLS information relates to the nodes inside the network — the peers and the orderers, in other words, rather than the applications and administrations that consume the network.
There must be at least one TLS Root CA certificate in this folder. For more information about TLS, see Securing Communication with Transport Layer Security (TLS).
tlsintermediatecacerts: This folder contains a list intermediate CA certificates CAs trusted by the organization represented by this MSP for secure communications between nodes using TLS. This folder is specifically useful when commercial CAs are used for TLS certificates of an organization. Similar to membership intermediate CAs, specifying intermediate TLS CAs is optional.
operationscerts: This folder contains the certificates required to communicate with the Fabric Operations Service API.
A channel MSP includes the following additional folder:
Revoked Certificates: If the identity of an actor has been revoked, identifying information about the identity — not the identity itself — is held in this folder. For X.509-based identities, these identifiers are pairs of strings known as Subject Key Identifier (SKI) and Authority Access Identifier (AKI), and are checked whenever the certificate is being used to make sure the certificate has not been revoked.
This list is conceptually the same as a CA’s Certificate Revocation List (CRL), but it also relates to revocation of membership from the organization. As a result, the administrator of a channel MSP can quickly revoke an actor or node from an organization by advertising the updated CRL of the CA. This “list of lists” is optional. It will only become populated as certificates are revoked.
如果你读过这个文档以及我们关于身份的文档,你应该对身份和成员在 Hyperledger Fabric 中的作用有了很好的理解。您了解了如何使用 PKI 和 MSP 来识别在区块链网络中协作的参与者。您学习了证书、公钥、私钥和信任根的工作原理,以及 MSP 的物理和逻辑结构。
策略
受众: 架构师,应用和智能合约开发者,管理员
本主题将包含:
什么是策略
从根本上来说,策略是一组规则,用来定义如何做出决策和实现特定结果。为此,策略一般描述了谁和什么,比如一个人对资产访问或者权限。我们可以看到,在我们的日常生活中策略也在保护我们的资产数据,比如汽车租金、健康、我们的房子等。
例如,购买保险时,保险策略定义了条件、项目、限制和期限。该策略经过了策略持有者和保险公司的一致同意,定义了各方的权利和责任。
保险策略用于风险管理,在 Hyperledger Fabric 中,策略是基础设施的管理机制。Fabric 策略表示成员如何同意或者拒绝网络、通道或者智能合约的变更。策略在网络最初配置的时候由联盟成员一致同意,但是在网络演化的过程中可以进行修改。例如,他们定义了从通道中添加或者删除成员的标准,改变区块格式或者指定需要给智能合约背书的组织数量。所有这些定义谁可以干什么的行为都在策略中描述。简单来说,你在 Fabric 网络中的所有想做的事情,都要受到策略的控制。
为什么需要策略
策略是使 Hyperledger Fabric 不同于其他区块链系统(比如 Ethereum 或者 Bitcoin)的内容之一。在其他系统中,交易可以在网络中的任意节点生成和验证。治理网络的策略可以在任何时间及时修复,并且只可以使用和治理代码相同的方式进行变更。因为 Fabric 是授权区块链,用户由底层基础设施识别,所以用户可以在启动前决定网络的治理方式,以及改变正在运行的网络的治理方式。
策略决定了那些组织可以访问或者更新 Fabric 网络,并且提供了强制执行这些决策的机制。策略包含了有权访问给定资源的组织列表,比如一个用户或者系统链码。他们同样指定了需要多少组织同意更新资源的提案,比如通道或者智能合约。一旦策略被写入,他们就会评估交易和提案中的签名,并验证签名是否满足网络治理规则。
Fabric是如何实现策略的
策略实现在 Fabric 网络的不同层次。每个策略域都管理着网络操作的不同方面。
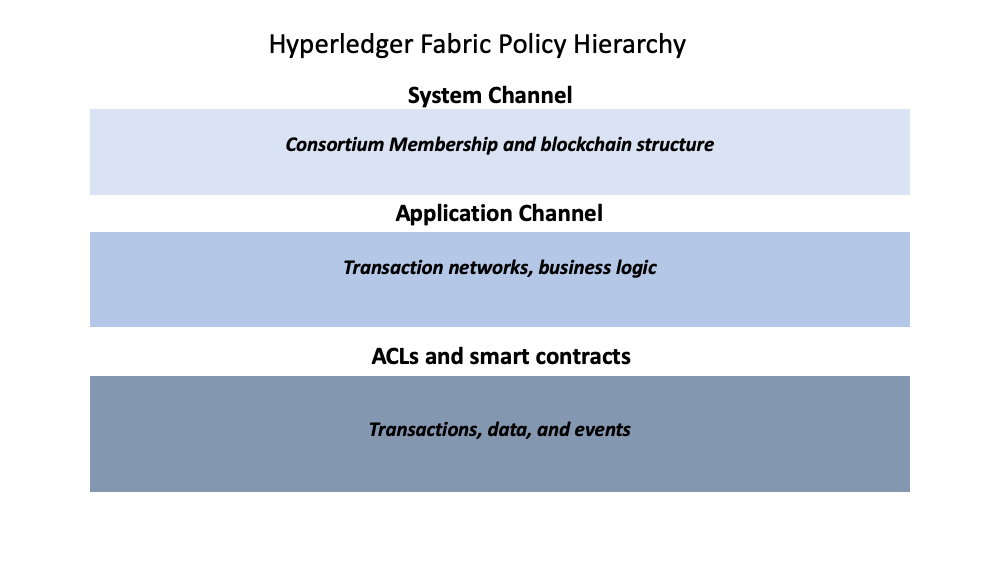 Fabric 策略层级图。
系统通道配置
每个网络都从排序服务系统通道开始。网络中必须有至少一个排序服务的排序系统通道,它是第一个被创建的通道。该通道也包含着谁是排序服务(排序服务组织)以及在网络中交易(联盟组织)的成员。
排序系统通道配置区块中的策略治理着排序服务使用的共识,并定义了新区块如何被创建。系统通道也治理着联盟中的哪些成员可以创建新通道。
应用通道配置
应用 通道 用于向联盟中的组织间提供私有通信机制。
应用通道中的策略治理着从通道中添加和删除成员的能力。应用通道也治理着使用 Fabric 链码生命周期在链码定义和提交到通道前需要哪些组织同意。当系统通道初始创建时,它默认继承了排序系统通道的所有排序服务参数。同时,这些参数(包括治理它们的策略)可以被每个通道自定义。
权限控制列表(ACL)
网络管理员可能对 Fabric 中 ACL 的使用更感兴趣,ACL 通过将资源和已有策略相关联的方式提供了资源访问配置的能力。“资源”可以是系统链码中的方法(例如,“qscc”中的“GetBlockByNumber”)或者其他资源(例如,谁可以获取区块事件)。ACL 参考应用通道配置中定义的策略并将它们扩展到了其他资源的控制。Fabric ACL 的默认集合在 configtx.yaml 文件的 Application: &ApplicationDefaults 部分,但是它们可以也应该在生产环境中被重写。configtx.yaml 中定义的资源列表是 Fabric 当前定义的所有内部资源的完整集合。
该文件中,ACL 以如下格式表示:
# ACL policy for chaincode to chaincode invocation
peer/ChaincodeToChaincode: /Channel/Application/Writers
peer/ChaincodeToChaincode 表示该资源是被保护的,相关的交易必须符合 /Channel/Application/Writers 引用侧策略才能被认为是有效的。
关于 ACL 更深入的信息,请参考操作指南中的 ACL 主题。
智能合约背书策略
链码包中的每一个智能合约都有一个背书策略,该策略指明了需要通道中多少不同组织的成员根据指定智能合约执行和验证交易才能使一笔交易有效。因此,背书策略定义了必须“背书”(批准)提案执行的组织(的 Peer 节点)。
修改策略
还有一个对 Fabric 的策略工作有重要作用的策略类型,修改(Modification)策略。修改策略指明了需要签名所有配置 更新 的一组身份。它是定义如何更新策略的策略。因此,每个通道配置元素都包含这一个治理它的变更的策略的引用。
策略作用域
虽然 Fabric 的策略很灵活地配置以适应网络需要,但是策略的结构天然地隔离了由不同排序服务组织或者不同联盟成员治理的域。下边的图中,你可以看到默认策略是如何实现对 Fabric 策略域的控制的。
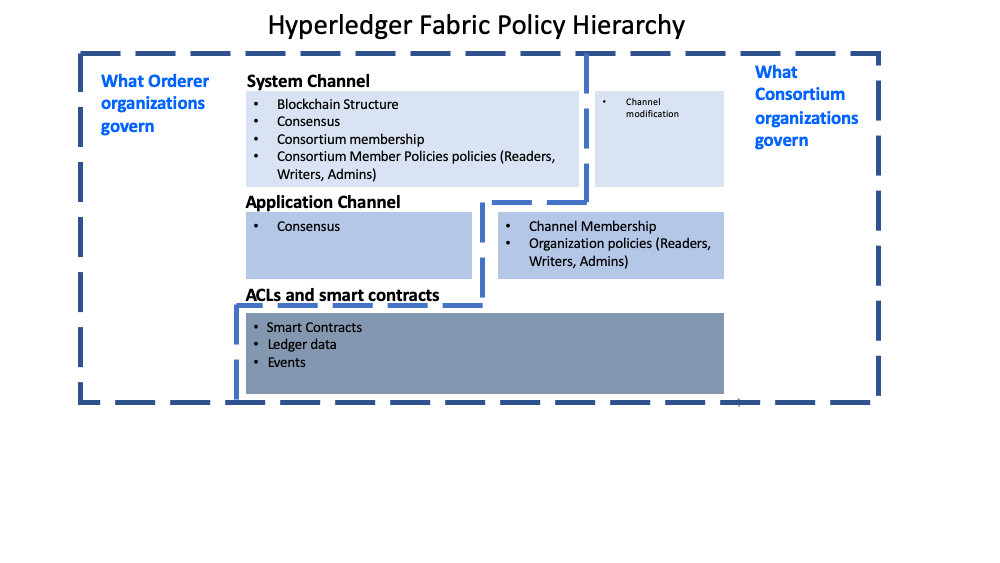 排序组织和联名组织治理的策略域的详细视图。
一个完整的 Fabric 网络可以由许多不同职能的组织组成。通过支持排序服务创建者建立初始规则和联盟成员的方式,域提供了向不同组织扩展不同的优先级和角色的能力。还支持联盟中的组织创建私有应用通道、治理他们自己的商业逻辑以及限制网络中数据的访问权限。
系统通道配置和每个应用通道配置部分提供了排序组织对哪些组织是联盟成员、区块如何分发到通道以及排序服务节点使用的共识机制的控制。
系统通道配置为联盟成员提供了创建通道的能力。应用通道和 ACL 是联盟组织用来从通道中添加或删除成员以及限制通道中智能合约和数据访问的机制。
在Fabric中如何写策略
如果你想修改 Fabric 的任何东西,和资源相关的策略都描述了谁需要批准它,可以是来自个人的一个显式签名,也可以是组的一个隐式签名。在保险领域,一个明确的签名可以是业主保险代理集团中的一员。而一个隐含的签名类似于需要业主保险代理集团中的大多数管理成员批准。这很重要,因为集团中的成员可以在不更新策略的情况下变动。在 Hyperledger Fabric 中,策略中明确的签名使用 Signature 语法,隐含的签名使用 ImplicitMeta 语法。
签名策略
Signature 策略定义了要满足策略就必须签名的特定用户类型,比如 Org1.Peer OR Org2.Peer。策略是很强大的,应为它可以构造复杂的规则,比如“组织 A 和 2 个其他管理员,或者 6 个组织的管理员中的 5 个”。语法支持 AND、 OR 和 NOutOf 的任意组合。例如,一个策略可以简单表达为使用 AND (Org1, Org2) ,表示满足该策略就同时需要 Org1 中的一个成员和 Org2 中的一个成员的签名。
隐元(ImplicitMeta)策略
隐元策略只在通道配置上下文中有效,通道配置在配置树策略中是基于分层的层次结构。隐元策略聚合了由签名策略最终定义的配置树深层的结果。它们是隐藏的,因为它们基于通道配置中的当前组织隐式构建,它们是元信息,因为它们的评测不依赖于特定 MSP 规范,而是依赖于配置树中它们的其他子策略。
下边的图例说明了应用通道分层的策略结构,并演示了隐元通道配置管理策略(称为 /Channel/Admins)是如何处理的,也就是说,当满足配置层级中它的 Admins 子策略时,就代表也满足了其子策略的子策略条件。
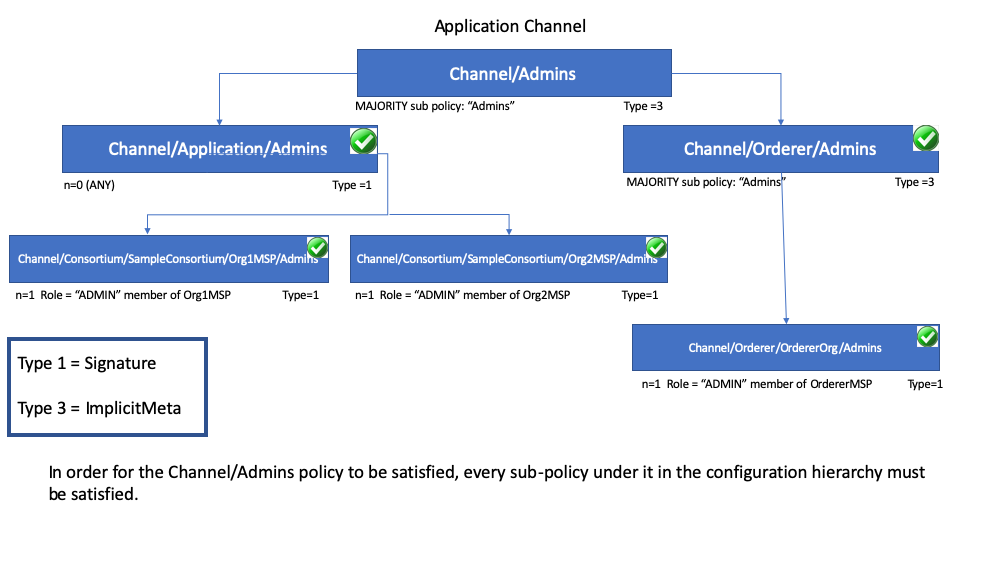
正如你在上图看到的,隐元策略,Type = 3,使用了一种不同的语法 "<ANY|ALL|MAJORITY> <SubPolicyName>",例如:
`MAJORITY sub policy: Admins`
上边的图表展示了一个在配置树中所有 Admins 策略都引用了的 Admin 子策略。你可以创建你自己的子策略并随意命名,并且可以定义在你的每一个组织中。
正如上边提到的,隐元策略比如 MAJORITY Admins 的主要优势在于当你向通道添加新组织的时候,你不必更新通道策略。因此隐元策略就像联盟成员变更一样灵活。联盟中成员的新增或者退出只要联盟成员一致同意即可,不需要更新策略。重申一下,隐元策略最终处理的是如图所示的配置树中它们之下的签名子策略。
你也可以定义一个应用级别的隐策略来进行跨组织操作,例如在通道中,需要 ANY (任意)、 ALL (全部)或者 MAJORITY (大多数)组织来满足。这个格式有更好、更自然的默认值,因此组织可以决定有效背书的含义。
你可以通过在组织定义中引入 NodeOUs 来实现进一步的粒度和控制。OU (Organization Units,组织单元)定义在 Fabric CA 客户端配置文件中,当创建身份的时候就会与之关联。在 Fabric 中, NodeOUs 提供为数字证书层级分类的功能。例如,一个指定了 NodeOUs 的组织可以让一个 ‘Peer’ 签名合法背书,或者组织也可以简单设置为任何成员都可以签名。
示例:通道配置策略
背书策略的理解要从 configtx.yaml 开始, configtx.yaml 里边定义了通道策略。我们可以查看 BYFN(first-network) 教程中的 configtx.yaml 来查看这两种策略语法类型的示例。请导航至 fabric-samples/first-network 目录查看 BYFN 中的 configtx.yaml 文件。
文件的第一部分(Organizations)定义了网络中的组织。在每个组织的定义中设置了默认策略,Readers, Writers, Admins, and Endorsement,但是你可以任意定义策略命名。每个策略都有一个 Type 和 Rule, Type 描述了策略的表达式类型(Signature 或 ImplicitMeta)。
下边的 BYFN 示例展示了组织 Org1 在系统通道中的定义,其中策略的 Type 是 Signature 背书策略规则定义为 "OR('Org1MSP.peer')",表示需要 Org1MSP 成员中的 peer 来签名。正是这些签名策略形成了隐元策略指向的子策略。
Click here to see an example of an organization defined with signature policies
 - &Org1
        # DefaultOrg defines the organization which is used in the sampleconfig
        # of the fabric.git development environment
        Name: Org1MSP

        # ID to load the MSP definition as
        ID: Org1MSP

        MSPDir: crypto-config/peerOrganizations/org1.example.com/msp

        # Policies defines the set of policies at this level of the config tree
        # For organization policies, their canonical path is usually
        #   /Channel/<Application|Orderer>/<OrgName>/<PolicyName>
        Policies:
            Readers:
                Type: Signature
                Rule: "OR('Org1MSP.admin', 'Org1MSP.peer', 'Org1MSP.client')"
            Writers:
                Type: Signature
                Rule: "OR('Org1MSP.admin', 'Org1MSP.client')"
            Admins:
                Type: Signature
                Rule: "OR('Org1MSP.admin')"
            Endorsement:
                Type: Signature
                Rule: "OR('Org1MSP.peer')"
The next example shows the ImplicitMeta policy type used in the Application
section of the configtx.yaml. These set of policies lie on the
/Channel/Application/ path. If you use the default set of Fabric ACLs, these
policies define the behavior of many important features of application channels,
such as who can query the channel ledger, invoke a chaincode, or update a channel
config. These policies point to the sub-policies defined for each organization.
The Org1 defined in the section above contains Reader, Writer, and Admin
sub-policies that are evaluated by the Reader, Writer, and Admin ImplicitMeta
policies in the Application section. Because the test network is built with the
default policies, you can use the example Org1 to query the channel ledger, invoke a
chaincode, and approve channel updates for any test network channel that you
create.
Click here to see an example of ImplicitMeta policies
################################################################################
#
#   SECTION: Application
#
#   - This section defines the values to encode into a config transaction or
#   genesis block for application related parameters
#
################################################################################
Application: &ApplicationDefaults

    # Organizations is the list of orgs which are defined as participants on
    # the application side of the network
    Organizations:

    # Policies defines the set of policies at this level of the config tree
    # For Application policies, their canonical path is
    #   /Channel/Application/<PolicyName>
    Policies:
        Readers:
            Type: ImplicitMeta
            Rule: "ANY Readers"
        Writers:
            Type: ImplicitMeta
            Rule: "ANY Writers"
        Admins:
            Type: ImplicitMeta
            Rule: "MAJORITY Admins"
        LifecycleEndorsement:
            Type: ImplicitMeta
            Rule: "MAJORITY Endorsement"
        Endorsement:
            Type: ImplicitMeta
            Rule: "MAJORITY Endorsement"
Fabric链码生命周期
Fabric 2.0 发布版本中,介绍了一个新的链码生命周期过程,这是一个在网络中更民主的治理链码的过程。新的过程允许多个组织在链码应用到通道之前如何操作进行投票。这个很重要,因为这是新生命周期过程和策略的融合,策略是在过程中指定的决定着网络的安全性。关于该流程的更多细节在 操作者的链码 教程中,但是为了本主题的目的,你应该理解策略在流程中的使用。新的流程指定策略包含两步,当链码被组织成员批准的时候,以及当它被提交到通道后。
configtx.yaml 文件中 Application 部分包含了默认的链码生命周期背书策略。在生产环境中你应该为你的用例自定义这个。
################################################################################
#
#   SECTION: Application
#
#   - This section defines the values to encode into a config transaction or
#   genesis block for application related parameters
#
################################################################################
Application: &ApplicationDefaults

    # Organizations is the list of orgs which are defined as participants on
    # the application side of the network
    Organizations:

    # Policies defines the set of policies at this level of the config tree
    # For Application policies, their canonical path is
    #   /Channel/Application/<PolicyName>
    Policies:
        Readers:
            Type: ImplicitMeta
            Rule: "ANY Readers"
        Writers:
            Type: ImplicitMeta
            Rule: "ANY Writers"
        Admins:
            Type: ImplicitMeta
            Rule: "MAJORITY Admins"
        LifecycleEndorsement:
            Type: ImplicitMeta
            Rule: "MAJORITY Endorsement"
        Endorsement:
            Type: ImplicitMeta
            Rule: "MAJORITY Endorsement"
LifecycleEndorsement策略控制需要谁 批准链码定义 。Endorsement策略是 链码的默认背书策略 。更多细节请继续阅读。
链码背书策略
当使用 Fabric 链码生命周期链码被批准并提交到通道时会指定一个背书策略(这个背书策略会覆盖与该链码相关的所有状态)。背书策略可以引用通道配置中的背书策略或者明确指定签名策略。
如果在批准阶段没有明确指明背书策略,就默认使用 Endorsement 策略 "MAJORITY Endorsement",意味着要想使交易生效就需要大多数不同通道成员(组织)的执行并验证交易。默认策略允许加入通道的组织自动加入链码背书策略。如果你不想使用默认背书策略,你可以使用签名策略格式来指定更复杂的背书策略(这样就需要链码先被通道中的一个组织签名,然后让其他组织签名)。
签名策略也允许你包含主角(principals),这是匹配角色和身份的一种简单方式。主角类似用户 ID 或者 组 ID,但是更广泛,因为它们可以包含更大范围演员身份的属性,比如演员的组织、组织单元、角色,甚至演员指定的身份。我们讨论的主角是决定他们权限的属性。主角被描述为 ‘MSP.ROLE’,MSP 表示需要的 MSP ID(组织),ROLE 表示一下四种可接受的角色之一:Member、 Admin、 Client 和 Peer。角色在用户使用 CA 登记(enroll)的时候与之关联。你可以在 Fabric CA 中自定义可用的角色列表。
一些有效的主角:
- ‘Org0.Admin’: Org0 MSP 的一个管理员
- ‘Org1.Member’: Org1 MSP 的一个成员
- ‘Org1.Client’: Org1 MSP 的一个客户端
- ‘Org1.Peer’: Org1 MSP 的一个 Peer 节点
- ‘OrdererOrg.Orderer’: OrdererOrg MSP 的一个排序节点
有一些场景可能需要一些特殊的状态(特殊的键-值对,或这其他的)有不同的背书策略。基于状态的背书可以指定与默认链码级别背书策略不同的键的背书策略。
如何写一个背书策略的更多信息请参考操作指南中的 背书策略 主题。
注意: 不同版本 Fabric 的策略有所不同:
- 在 Fabric 2.0 之前,链码的背书策略可以在链码实例化或者使用链码生命周期命令时更新。如果没有在实例化时指明,默认背书策略是“通道中组织的任意成员”。例如。在有 “Org1” 和 “Org2” 的通道中,将有一个 “OR(‘Org1.member’, ‘Org2.member’)” 的默认策略。
- 从 Fabric 2.0 开始,Fabric 提出了一个新的链码生命周期过程,允许多组织同意在链码应用到通道之前如何操作。新的过程需要组织同意链码定义的参数,比如名字、版本以及链码背书策略。
Peer 节点
区块链网络主要由 Peer 节点(或者简单称之为 Peer)组成。Peer 是网络的基本元素,因为他们存储了账本和智能合约。之前我们说过账本不可篡改地保存着智能合约生成的所有交易(在 Hyperledger Fabric 中智能合约包含在链码中,稍后会详细介绍)。智能合约和账本将网络中共享的流程和信息对应地封装起来。Peer 节点的这些功能使它成为了理解 Fabric 网络很好的起点。
区块链网络中的其他部分当然也非常重要:账本和智能合约、排序节点、策略、通道、应用程序、组织、身份和成员关系等,你可以在其他的文档中了解更多。这个部分会集中在 Peer 节点上,以及他们和 Hyplerledger Fabric 网络中的其他要素的关系。
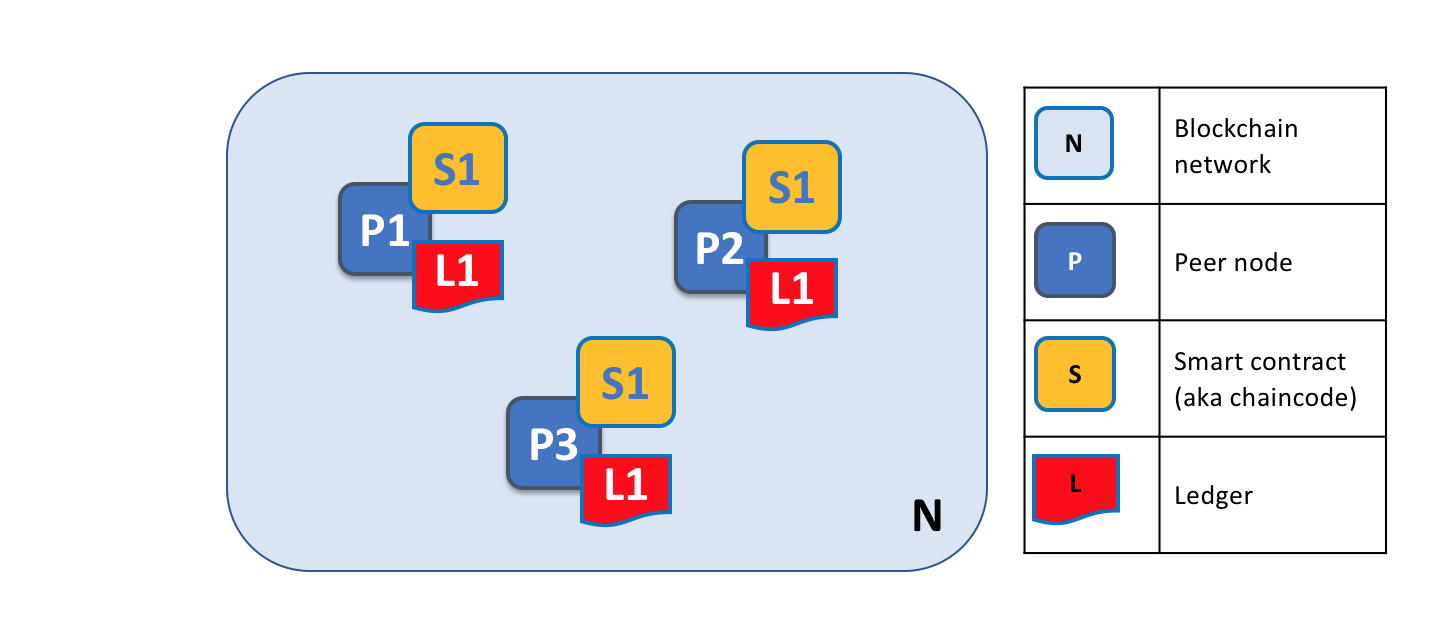
区块链网络是由 Peer 节点组成的,每个节点都保存着账本和智能合约的副本。在这个例子中,网络 N 是由节点 P1、P2 和 P3 组成的,每个节点都维护这他们自己的分布式账本 L1。P1、P2 和 P3 使用相同的链码 S1 来访问他们的分布式账本的副本。
Peer 节点可以被创建、启动、停止、重新配置甚至删除。他们暴露了一系列的 API,这就可以让管理者和应用程序同这些 API 提供的服务互动。我们会在这里学习更多关于这些服务的知识。
一个术语
Fabric 是使用一个被称为链码的技术概念来实现智能合约 的,就是使用已支持的编程语言编写的一段简单的代码来访问账本。在这个话题中,我们会经常使用名词链码,但是如果你更习惯于使用智能合约的话,你也可以将它读成智能合约。他们是相同的概念!如果你想了解更多关于链码和智能合约的话,查看我们的智能合约和链码文档
账本和链码
让我们更详细地了解一下 Peer 节点。我们能够看到其实是 Peer 节点在维护账本和链码。确切地说,Peer 节点维护的是账本及链码的实例。请注意这其实是在 Fabric 网络中故意提供了冗余,因为这样可以避免单点失效。我们会在接下来的章节中了解更多有关区块链网络的分布式和去中心化的特点。
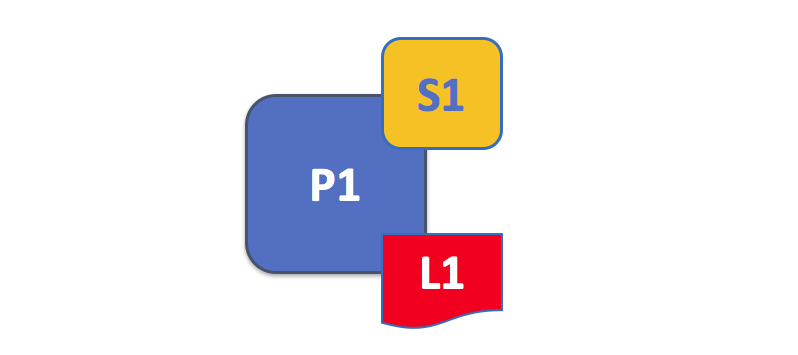
Peer 节点维护着账本及链码的实例。在这个例子中,P1 维护着账本 L1 和链码 S1 的实例。也可以多个账本及链码维护在一个独立的 Peer 节点上。
Peer 节点是账本及链码的宿主,应用程序及管理员如果想要访问这些资源,他们必须要和 Peer 节点进行交互。这就是为什么 Peer 节点被认为是 Hyperledger Fabric 网络最基本的组成模块。当 Peer 节点被第一次创建的时候,它并没有账本也没有链码。我们接下来会看到 Peer 节点的上账本是如何被创建的,以及链码是如何被安装的。
多账本
一个 Peer 节点可以维护多个账本,这是很有用的,因为它能够进行很灵活的系统设计。最简单的配置就是一个 Peer 节点管理一个账本,但是当需要的时候,一个 Peer 节点维护两个或者更多的账本也是非常适合的。
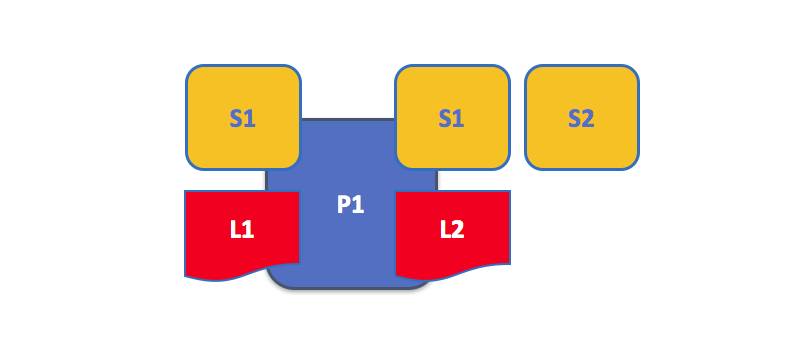
一个 Peer 节点维护多个账本。Peer 节点维护着一个或者多个账本,并且每个账本具有零个或者多个链码使用账本。在这个例子中,我们能够看到 Peer 节点 P1 维护着账本 L1 和 L2。账本 L1 通过链码 S1 来访问。账本 2 通过链码 S1 和 S2 访问。
尽管一个 Peer 节点只维护一个账本的实例而不运行任何访问账本的链码是完全可能的,但是很少有 Peer 节点会像这样来进行配置。大多数的 Peer 节点将会至少安装一个链码,用来查询或更新 Peer 节点的账本实例。有必要说明一下,无论用户是否安装了外部应用使用的链码,Peer 节点总是会有一个特殊的系统链码。这个不会在这个章节中进行讨论。
多链码
账本数量和访问账本的链码的数量之间没有固定的关系。一个 Peer 节点可能会有很多链码和账本。
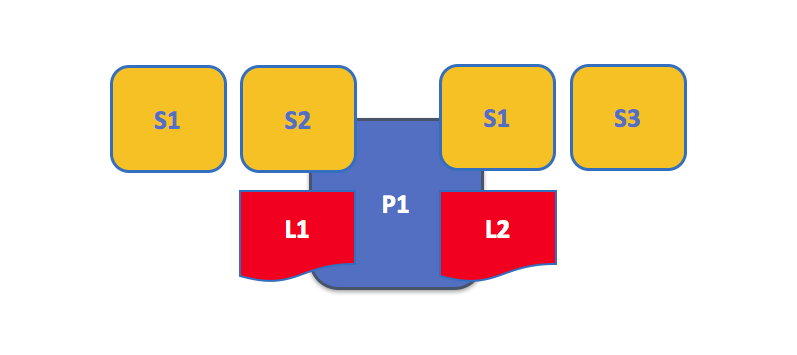
这是一个运行着多个链码的 Peer 节点。每个账本可以拥有多个访问它的链码。在这个例子中,我们能够看到 Peer 节点 P1 维护着账本 L1 和 L2,L1 可以通过链码S1 和 S2 来访问,账本 L2 可以由 S1 和 S3 来访问。我们能够看到链码 S1 既能访问 L1 也能访问 L2。
稍后我们会看到在 Hyperledger Fabric 中,为什么当 Peer 节点维护多个账本或多个链码的时候,通道的概念就会很重要。
应用程序和 Peer 节点
现在我们要展示应用程序是如何通过跟 Peer 节点交互来访问账本的。查询账本的操作涉及到应用程序和 Peer 节点之间的一个简单的三步对话;更新账本的操作会涉及到更多的步骤,需要额外的两步。我们将简化这些步骤来帮助你了解 Hyperledger Fabric,不要担心,你需要理解的最重要的部分是应用程序和 Peer 节点之间进行查询账本和更新账本交易的不同。
当应用程序需要访问账本和链码的时候,他们总是需要连接到 Peer 节点。Hyperledger Fabric SDK 将这个操作变得非常简单,它的 API 使应用程序能够连接到 Peer 节点,调用链码生成交易,提交交易到网络,在网络中交易会被排序并且提交到分布式账本中,并且在这个流程结束的时候接收到事件。
通过连接 Peer 节点,应用程序能够执行链码来查询或者更新账本。对账本的查询结果马上会返回,但是对账本的更新会在应用程序、Peer 节点以及排序节点之间有更复杂的交互。让我们更详细地研究一下。

Peer 节点和排序节点,确保了账本在每个 Peer 节点上都具有最新的账本。在这个例子中,应用程序 A 连接到了 P1 并且调用了链码 S1 来查询或者更新账本 L1。P1 调用了链码 S1 来生成提案响应,这个响应包含了查询结果或者账本更新的提案。应用程序 A 接收到了提案的响应,对于查询来说,流程到这里就结束了。对于更新来说,应用程序 A 会从所有的响应中创建一笔交易,它会把这笔交易发送给排序节点 O1 进行排序。O1 会搜集网络中的交易并打包到区块中,然后将这些区块分发到所有 Peer 节点上,包括 P1。P1 在把交易提交到账本 L1 之前对交易进行验证。当 L1 被更新之后,P1 会生成一个事件,该事件会被 A 接收到,来标识这个过程结束了。
Peer 节点可以马上将查询的结果返回给应用程序,因为满足这个查询的所有信息都保存在 Peer 节点本地的账本副本中。Peer 节点从来不会为了应用程序的查询返回结果而去询问其他 Peer 节点的。但是应用程序还是能够连接到一个或者多个 Peer 节点来执行一个查询;比如,为了协调在多个 Peer 节点间的一个结果,或者当怀疑数据不是最新的时候,需要从不同的 Peer 节点获得更新的结果。在这个图标中,你能够看到账本查询是一个简单的三步流程。
更新交易和查询交易起点相同,但是有两个额外的步骤。尽管更新账本的应用程序也会连接到 Peer 节点来调用链码,但是不像查询账本的应用程序,一个独立的 Peer 节点目前是不能进行账本更新的,因为其他的 Peer 节点必须首先要同意这个变动(即达成共识)。因此,Peer 节点会返回给应用程序一个被提案过的更新,这个 Peer 节点会依据其他节点之前的协议来应用这个更新。第一个额外的步骤,也就是第四步,要求应用程序将响应的提案过的更新发送到网络中,网络中的 Peer 节点会将交易提交到它们相应的账本中。应用程序会收到排序节点打包了交易的区块,然后将他们分发到网络中所有的 Peer 节点,在区块被更新到每个 Peer 节点本地账本的副本中之前,这些区块都需要被验证。排序流程需要一定时间来完成 (数秒钟),因此应用程序会被异步通知,像步骤五中展示的那样。
在这个部分的后边,你将会了解到更多关于排序流程的信息。如果你想更详细地了解一下这个流程,你可以阅读Transaction Flow话题。
Peer 节点和通道
尽管该部分更关注 Peer 节点而不是通道,但是花一些时间来理解 Peer 节点是如何通过应用程序,使用通道彼此进行交互还是值得的,这是区块链网络中组件能够进行交流和私密交易的机制。
这些组件通常是 Peer 节点、排序节点和应用程序,并且通过加入通道的方式,表明他们同意在那个通道中通过互相合作来共享以及管理完全一致的账本副本。概念上来说,你可以把通道想象为类似于一个由朋友组成的群组一样(尽管一个通道中的成员不需要是朋友!)。一个人可能会有很多个群组,在每个群组中他们会共同地进行一些活动。这些群组可能是完全独立的(一个工作伙伴的群组和一个兴趣爱好伙伴的群组),或者群组间可能会有交叉的部分。然而,每个群组都是它自己的实体,具备某种”规则”。
通道允许区块链网络中特定的一些 Peer 节点以及应用程序来彼此交互。在这个例子中,应用程序 A 能够直接同 Peer 节点 P1 和 P2 使用通道 C 进行沟通。你可以把通道想象为在某些应用程序和 Peer 节点之间进行通信的小路。(排序节点没有显示在这个图中,但是在工作网络中它必须存在。)
我们可以看到通道和 Peer 节点是以不同的方式存在的,将通道理解为由物理的 Peer 节点的组成的逻辑结构更合适一些。理解这一点很重要,因为 Peer 节点提供了对通道访问和管理的控制。
Peer 节点和组织
现在你已经理解了 Peer 节点以及它们同账本、链码和通道间的关系,你将会看到多个组织是如何走到一起来构成一个区块链网络的。
区块链网络是由多个组织来管理的,而不是单个组织。对于如何构建这种类型的分布式网络,Peer 节点是核心,因为他们是由这些组织所有,也是这些组织同这个网络的连接点。
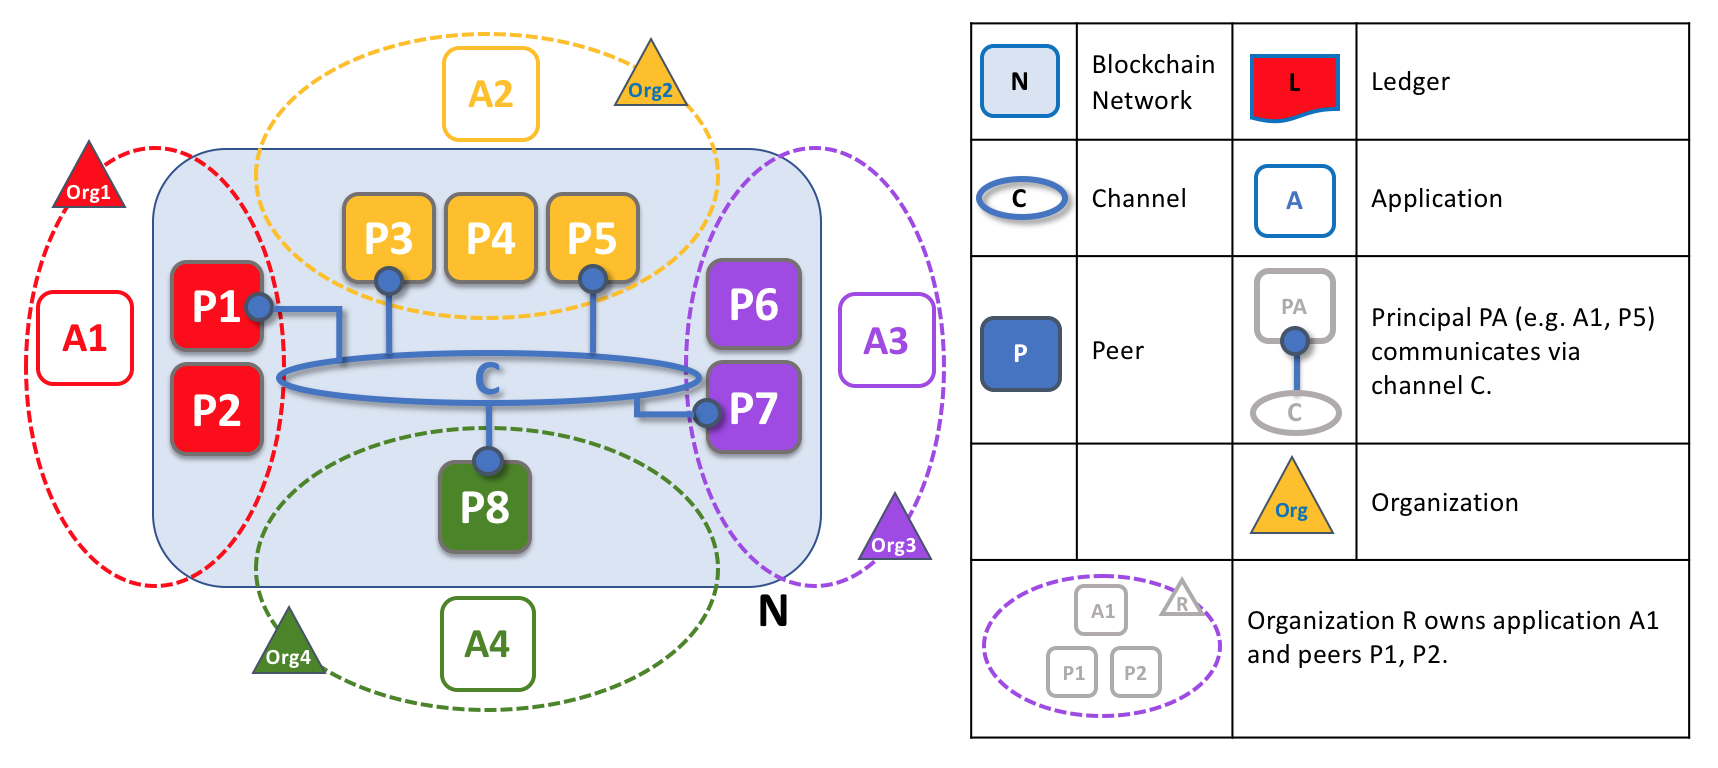
区块链网络中的 Peer 节点和多个组织。区块链网络是由不同的组织所拥有并贡献的 Peer 节点构成的。在这个例子中,我们看到由四个组织贡献了八个 Peer 节点组成一个网络。在网络 N 中,通道 C 连接了这些 Peer 节点中的五个:P1、P3、P5、P7 和 P8。这些组织拥有的其他节点并没有加入该通道,但是通常会加入至少一个其他通道。某个组织开发的应用程序将会连接到他们自己组织的 Peer 节点,其他组织也一样。为了简化,排序节点没有在这个图中表示出来。
真正重要的是,你能够看到在形成一个区块链网络的时候都发生了什么。这个网络是由多个组织来组成并维护的,这些组织向这个网络贡献资源。Peer 节点是我们在这个话题中正在讨论的资源,但是一个组织提供的资源不仅仅是 Peer 节点。这里有一个工作原则:如果组织不为这个网络贡献他们的资源,这个网络是不会存在的。更关键的是,这个网络会随着这些互相合作的组织提供的资源而增长或者萎缩。
在 上边的例子 中,你能够看到(除了排序服务),这里没有中心化的资源,如果这些组织不贡献他们的节点的话,网络 N 是不会存在的。这反映了一个事实,除非并且直到组织贡献了他们的资源才会形成这样一个网络,否则这个网络没有存在的意义。另外,这个网络不依赖于任何一个单独的组织,只要还存在一个组织,网络就会继续存在,不管其他的组织加入或者离开。这就是去中心化网络的核心。
就像上边的例子,在不同的组织中的应用程序可能相同也可能不同。这完全取决于组织想要他们的应用程序如何处理他们的 Peer 节点的账本副本。这意味着应用程序和展示逻辑可能在不同组织间有很大的不同,尽管他们的 Peer 节点维护着完全相同的账本数据。
应用程序会连接到他们组织的 Peer 节点或者其他组织的 Peer 节点,取决于账本交互的需求。对于查询账本的交互,应用程序通常会连接到他们自己组织的 Peer 节点。对于更新账本的交互,之后我们会看到为什么应用程序需要连接到多个 Peer 节点,这些节点是每一个要为账本更新进行背书的组织的代表。
Peer 节点和身份
现在你已经看到了来自于不同组织的 Peer 节点是如何组合到一起形成区块链网络的,花费一些时间来理解 Peer 节点是如何被他们的管理者分配到相关的组织是非常值得的。
Peer 节点会有一个身份信息被分给他们,这是通过一个特定的证书认证机构颁发的数字证书来实现的。你可以在本指南的其他地方阅读更多的关于 X.509 数字证书是如何工作的,但是,现在,就把数字证书看成是能够为 Peer 节点提供可验证信息的身份证。在网络中的每个 Peer 节点都会被所属组织的管理员分配一个数字证书。
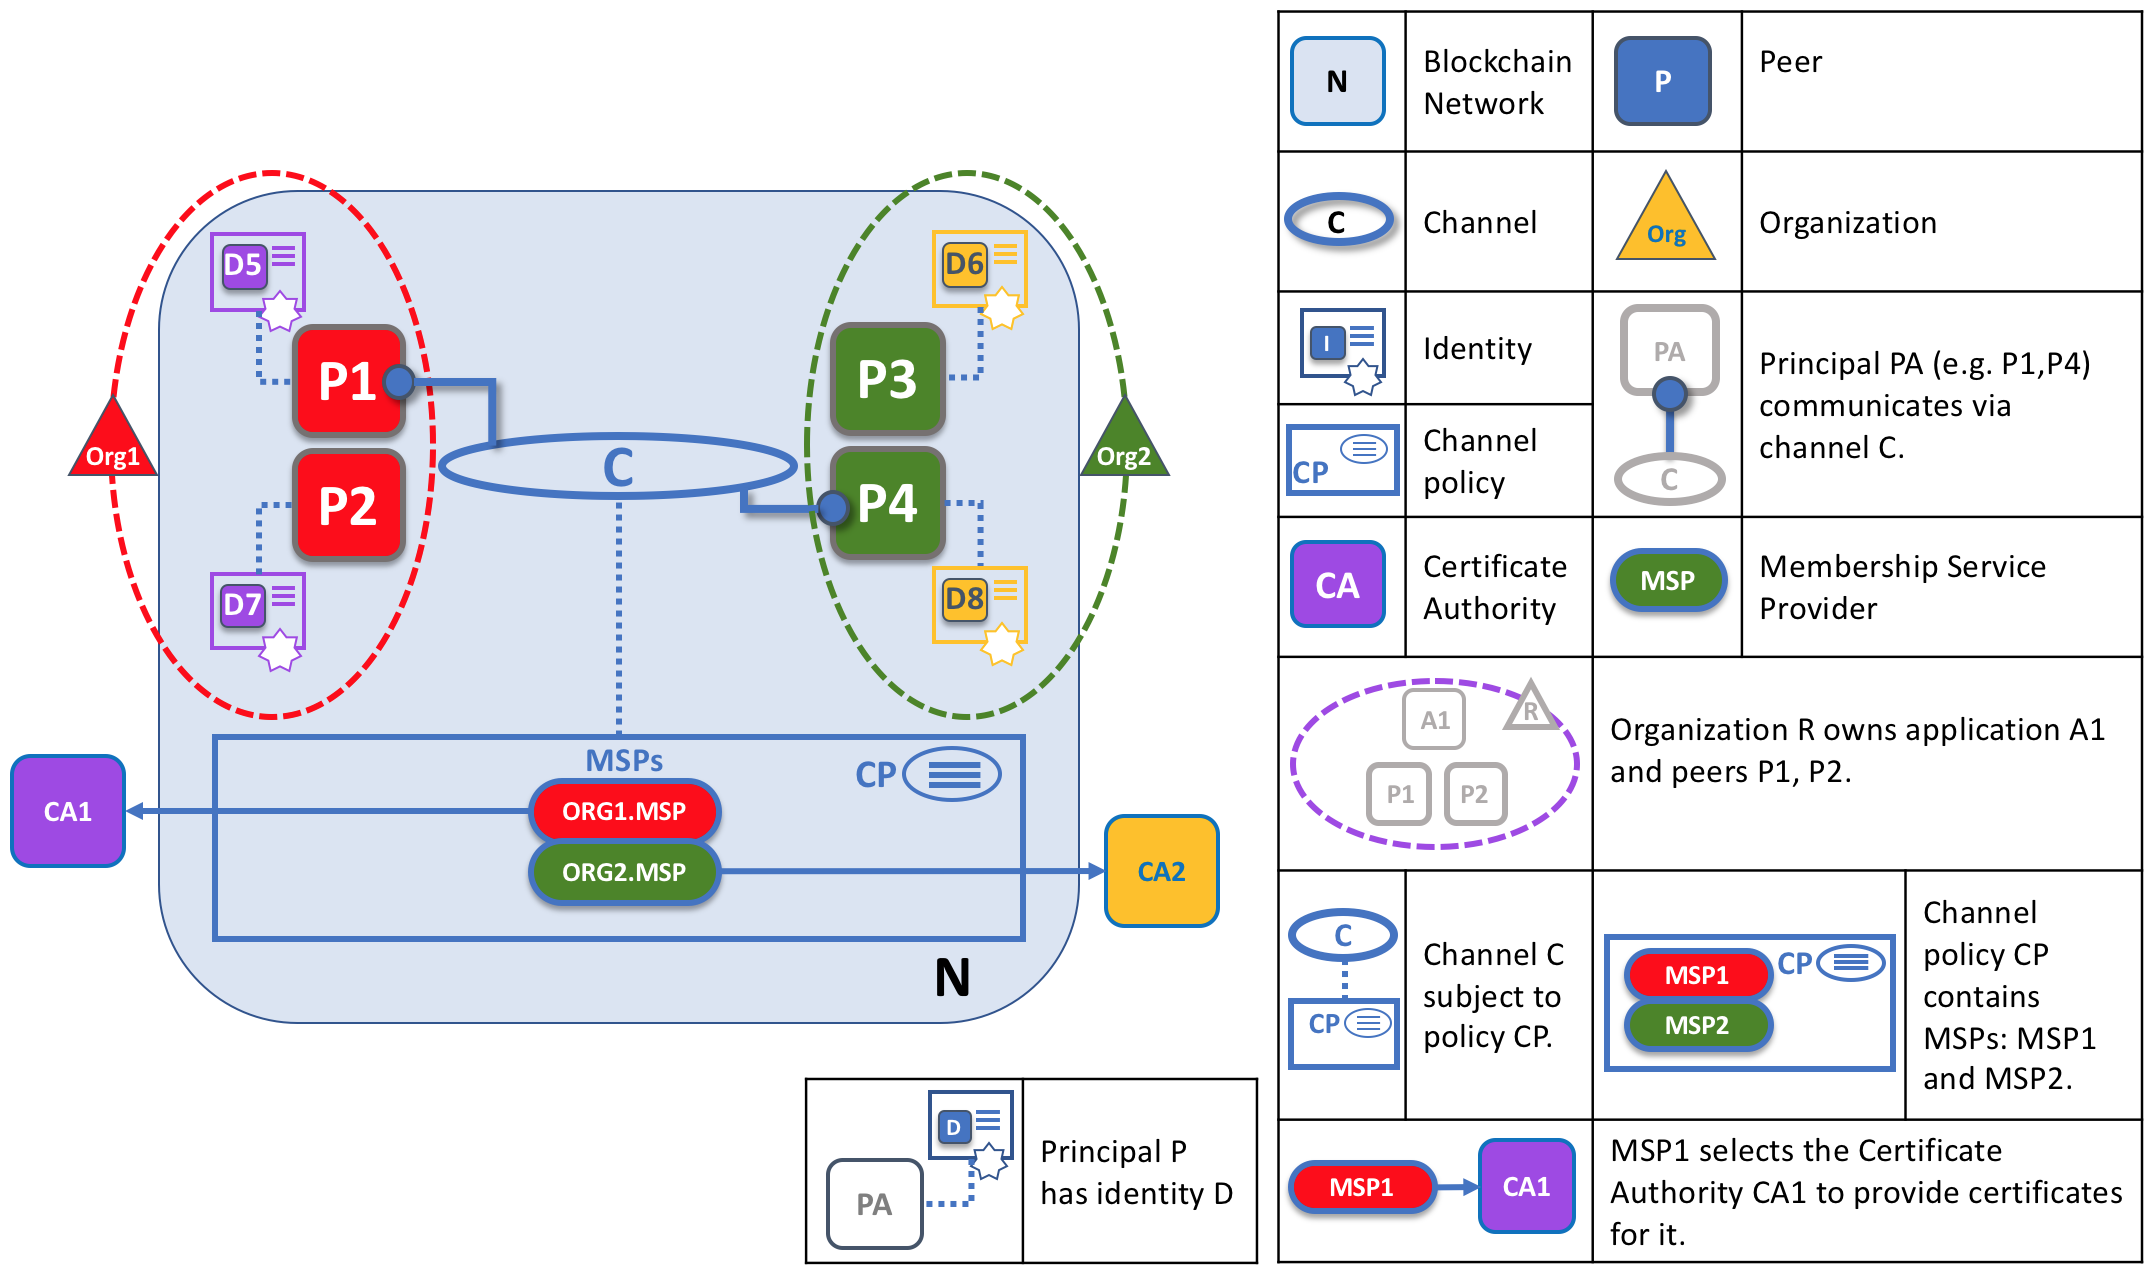
当 Peer 节点连接到一个通道的时候,它的数字证书会通过通道 MSP 来识别它的所属组织。在这个例子中,P1 和 P2 具有由 CA1 颁发的身份信息。通道 C 通过在它的通道配置中的策略来决定来自 CA1 的身份信息应该使用 ORG1.MSP 被关联到 Org1。类似的,P3 和 P4 由 ORG2.MSP 识别为 Org2 的一部分。
当 Peer 节点使用通道连接到一个区块链网络的时候,在通道配置中的策略会使用 Peer 节点的身份信息来确定它的权利。关于身份信息和组织的映射是由成员服务提供者(MSP)来提供的,它决定了一个 Peer 节点如何在指定的组织中分配到特定的角色以及得到访问区块链资源的相关权限。更多的是,一个 Peer 节点只能被一个组织所有,因此也就只能被关联到一个单独的 MSP。我们会在本部分的后边学习更过关于 Peer 节点的访问控制,并且在本指南中还有关于 MSP 和访问控制策略的部分。目前,可以把 MSP 看作在区块链网络中,为一个独立的身份信息和一个特定的组织角色之间提供了关联。
稍微讨论一个额外的话题,Peer 节点以及同一个区块链网络进行交互的每件事情都会从他们的数字证书和 MSP 来得到他们的组织的身份信息。Peer 节点、应用程序、终端用户、管理员以及排序节点如果想同一个区块链网络进行交互的话,必须要有一个身份信息和一个相关联的 MSP。我们使用身份信息来为每个跟区块链网络进行交互的实体提供一个名字——一个主角(principal)。 你可以在本指南中其他部分学习到更多的关于主角和组织的知识,但是现在你已经有足够的知识来继续你对 Peer 节点的理解了!
最后,请注意 Peer 节点物理上在哪真的不重要——它可以放在云中,或者是由一个组织所有的数据中心中,或者在一个本地机器中——是与它相关联的数字证书信息来识别出它是由哪个组织所有的。在我们上边的例子中,P3 可以运行在 Org1 的数据中心中,只要与它相关联的数字证书是由 CA2 颁发的,那么它就是 Org2 所拥有的。
Peer 节点和排序节点
我们已经看到了 Peer 节点构成了一个基本的区块链网络,维护着账本和智能合约,连接到 Peer 节点的应用程序进行查询及更新。但是,应用程序和 Peer 节点彼此互相交互来确保每个 Peer 节点的账本永远保持一致是通过以排序节点作为中心媒介的一种特殊机制,我们现在会关注这些节点。
一个更新的交易和一个查询的交易区别很大,因为一个单独的 Peer 节点不能够由它自己来更新账本——更新需要网络中其他节点的同意。在一个账本的更新被应用到 Peer 节点的本地账本之前, Peer 节点会请求网络中的其他 Peer 节点来批准这次更新。这个过程被称为共识,这会比一个简单的查询花费更长的时间来完成。但是当所有被要求提供批准的节点都提供了批准,并且这笔交易被提交到账本的时候,Peer 节点会通知它连接的应用程序账本已经更新了。在这个章节中你将会看到 Peer 节点和排序节点是如何管理这个共识流程的详细内容。
特别的是,想要更新账本的应用程序会被引入到一个三阶段的流程,这确保了在一个区块链网络中所有的 Peer 节点都彼此保持着一致的账本。
- 在第一个阶段,应用程序会跟背书节点的子集一起工作,其中的每个节点都会向应用程序为提案的账本更新提供背书,但是不会将提案的更新应用到他们的账本副本上。
- 在第二个阶段,这些分散的背书会被搜集到一起当做交易被打包进区块中。
- 在最后一个阶段,这些区块会被分发回每个 Peer 节点,在这些 Peer 节点上每笔交易在被应用到 Peer 节点的账本副本之前会被验证。
就像你将会看到的,排序节点在这个流程中处于中心地位,所以让我们稍微详细一点地研究一下应用程序和 Peer 节点对于一个分布式的和重复的账本是如何使用排序节点来生成账本更新的。
第一阶段:提案
交易流程的第一阶段会引入在应用程序和一系列的 Peer 节点之间的交互——它并没有涉及到排序节点。第一阶段只在乎应用程序询问不同组织的背书节点同意链码调用的提案结果。
为了开始第一阶段,应用程序会生成一笔交易的提案,它会把这个提案发送给一系列的被要求的节点来获得背书。其中的每一个背书节点接下来都会独立地使用交易提案来执行链码,以此来生成这个交易提案的响应。这并没有将这次更新应用到账本上,只是简单地为它提供签名然后将它返回给应用程序。当应用程序接收到有效数量的被签过名的提案响应之后,交易流程中的第一个阶段就结束了。让我们对这个阶段做更详细地研究。
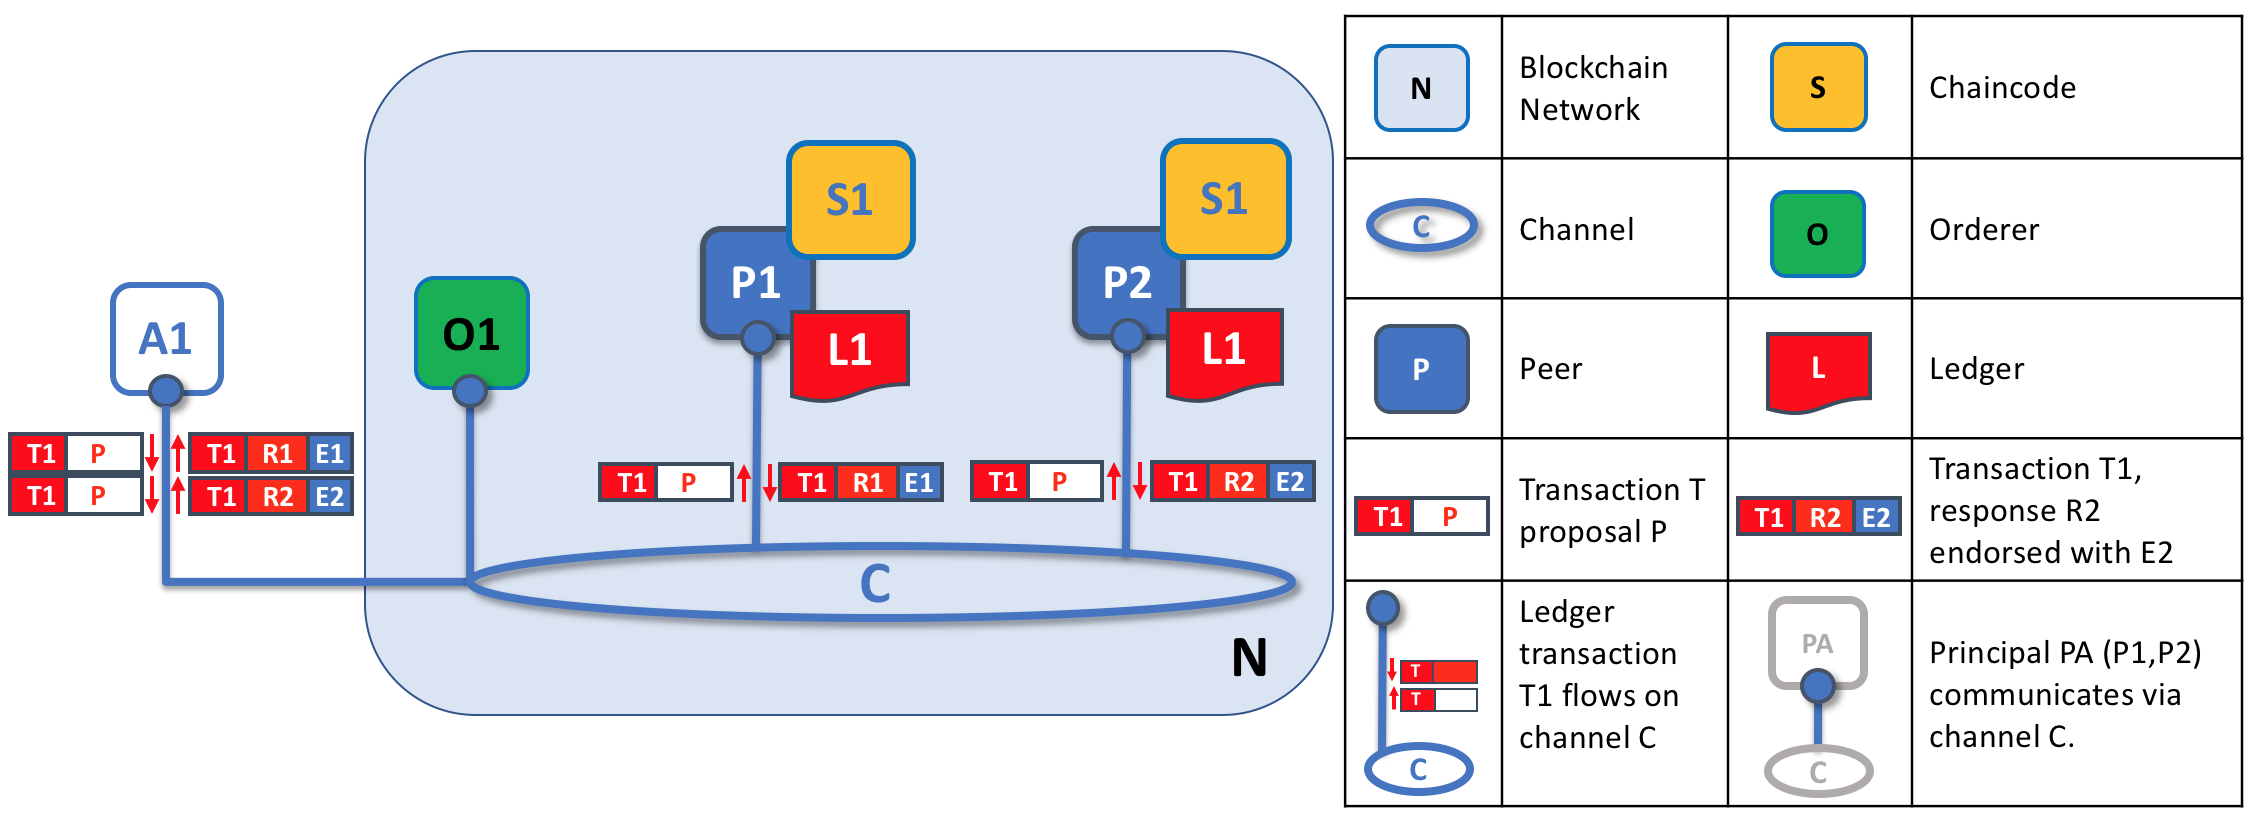
交易提案会被 Peer 节点独立地执行,Peer 节点会返回经过背书的提案响应。在这个例子中,应用程序 A1 生成了交易 T1 和提案 P,应用程序会将交易及提案发送给通道 C 上的 Peer 节点 P1 和 Peer 节点 P2。P1 使用交易 T1 和 提案 P 来执行链码 S1,这会生成对交易 T1 的响应 R1,它会提供背书 E1。P2 使用交易 T1 提案 P 执行了链码 S1,这会生成对于交易 T1 的响应 R2,它会提供背书 E2。应用程序 A1 对于交易 T1 接收到了两个背书响应,称为 E1 和 E2。
最初,应用程序会选择一些 Peer 节点来生成一套关于账本更新的提案。应用程序会选择哪些 Peer 节点呢?这取决于背书策略(这是为链码定义的),这个策略定义了在一个账本提案能够被网络所接受之前,都需要哪些 Peer 节点需要对这个账本变更提案进行背书。这很明显就是为了实现共识——每一个需要的组织必须对账本更新的提案在被各个 Peer 节点同意更新到他们的账本之前,对这个提案进行背书。
Peer 节点通过向提案的响应添加自己的数字签名的方式提供背书,并且使用它的私钥为整个的负载提供签名。然后这个背书会被用于证明这个组织的 Peer 节点生成了一个特殊的响应。在我们的例子中,如果 Peer 节点 P1 是属于组织 Org1 的话,背书 E1 就相当于一个数字证明——”在账本 L1 上的交易 T1 的响应 R1 已经被 Org1 的 Peer 节点 P1 同意了!”。
第一阶段在当应用程序从足够多的有效的 Peer 节点那里收到了签过名的提案响应的时候就结束了。我们注意到了不同的 Peer 节点能够返回不同的响应,因此对于同一个交易提案应用程序可能会接收到不同的交易响应。这可能简简单单地因为这个结果是在不同的时间,不同的 Peer 节点以及基于不同状态的账本所产生的,在这个情况下,一个应用程序可以请求一个更新的提案响应。不太可能但是却非常严重的是,结果的不同可能会是因为链码是非确定性的。非确定性是链码和账本的敌人,并且如果它真的发生了的话,这代表着这个提案的交易存在一个很严重的问题,因为非一致的结果很明显是不能够被应用到账本上的。一个单独的 Peer 节点是无法知道他们的交易结果是非确定性的——在非确定性问题被发现之前,交易的响应必须要被搜集到一起来进行比较。(严格地说,尽管这个还不够,但是我们会把这个话题放在交易的部分来讨论,在那里非确定性会被讨论。)
在第一阶段的最后,应用程序可以自由地放弃不一致的交易响应,如果他们想这么做的话,就可以在早期有效地终结这个交易流程。我们接下来会看到如果应用程序尝试使用不一致的交易响应来更新账本的时候,这会被拒绝。
阶段2:排序和将交易打包到区块
交易流程的第二个阶段是打包阶段。排序节点是这个过程的关键——它接收交易,这些交易中包含了来自很多个应用的已经背书过的交易提案,并且将交易排序并打包进区块。关于排序和打包阶段的更多详细信息,查看我们的排序阶段的概念信息.
阶段3:验证和提交
在第二阶段末尾,我们看到了排序节点需要负责这个简单但是重要的搜集提案的交易变更,将他们排序,并且打包到区块中,让他们准备好分发给 Peer 节点的整个流程。
这个交易流程的最后一个阶段是分发以及接下来的对于从排序节点发送给 Peer 节点的区块的验证工作,这些区块最终会提交到账本中。具体来说,在每个 Peer 节点上,区块中的每笔交易都会被验证,以确保它在被提交到账本之前,已经被所有相关的组织一致地背书过了。失败的交易会被留下来方便审计,但是不会被提交到账本中。
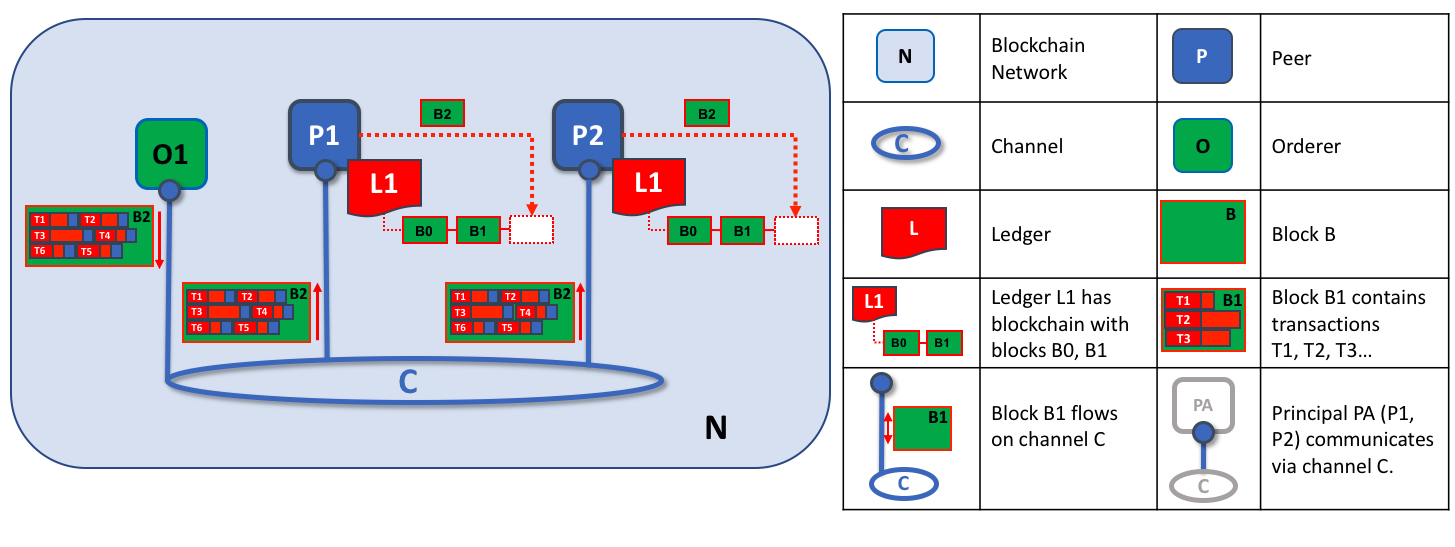
排序节点的第二个角色是将区块分发给 Peer 节点。在这个例子中,排序节点 O1 将区块 B2 分发给了 Peer 节点 P1 和 Peer 节点 P2。Peer P1 处理了区块 B2,产生了一个会被添加到 P1 的账本 L1 中的新区块。同时,peer P2 处理了区块 B2,产生了一个会被添加到 P2 的账本 L1 中的新区块。当这个过程结束之后,账本 L1 就会被一致地更新到了 Peer 节点 P1 和 P2 上,他们也可能会通知所连接的应用程序关于这笔交易已经被处理过的消息。
阶段三是从排序节点将区块分发到所有与它连接的 Peer 节点开始的。Peer 节点会和通道中的排序节点相连,所有跟这个排序节点相连的 Peer 节点将会收到一个新的区块的副本。每个 Peer 节点会独立处理这个区块,但是会跟这个通道上的每一个其他 Peer 节点使用完全一致的方式处理。通过这种方式,我们会看到账本是会始终保持一致的。不是每个 Peer 节点都需要连接到排序节点——Peer 节点可以使用 gossip 协议将区块的信息发送给其他 Peer 节点,其他 Peer 节点也可以独立地处理这些区块。但是让我们把这个话题放在其他的时间来讨论吧!
当接到区块的时候,Peer 节点会按照区块中的顺序处理每笔交易。对于每一笔交易,每个 Peer 节点都会确认这笔交易已经根据产生这笔交易的链码中定义的背书策略由要求的组织进行过背书了。比如,在一些交易被认为是有效之前,这些交易可能仅仅需要一个组织的背书,但是其他的交易可能会需要多个背书。这个验证的流程确认了所有相关的组织已经生成了相同的产出或者结果。也需要注意到的是,这次的验证跟在阶段 1 中进行的背书检查是不同的,应用程序从背书节点那里接收到了交易的响应,然后做了决定来发送交易提案。如果应用程序违反了背书策略发送了错误的交易,那么 Peer 节点还是能够在阶段 3 中的验证流程里拒绝这笔交易。
如果一笔交易被正确的背书,Peer 节点会尝试将它应用到账本中。为了做这个,Peer 节点必须要进行账本一致性检查来验证当前账本中的状态同应用了更新提案后的账本是能够兼容的。这可能不是每次都是有可行的,即使交易已经被完整地背书过了。比如,另外一笔交易可能会更新账本中的同一个资产,这样的话交易的更新就不会是有效的了,因此也就不会被应用。通过这种方式,账本在通道中的每个 Peer 节点都是保持一致的,因为他们中每个都在遵守相同的验证规则。
当 Peer 节点成功地验证每笔单独的交易之后,它就会更新账本了。失败的交易是不会应用到账本中的,但是他们会被保留为之后的审计使用,就像成功的交易那样。这意味着 Peer 节点中的区块几乎会跟从排序节点收到的区块是一样的,除了在区块中每笔交易中会带有有效或者无效的指示符。
我们也注意到了第三阶段并没有要求执行链码——那只会在第一阶段执行,这是很重要的。这意味着链码仅仅需要在背书节点中有效,而不需要在区块链网络的所有部分都要有。这个通常是很有帮助的,因为这保持了链码逻辑的机密性只有背书组织了解。这个同链码的输出(交易提案的响应)恰恰相反,这个输出会被分享给通道中的所有 Peer 节点,不管这些 Peer 节点是否为这交易提供背书。这个关于背书节点的特殊性是被设计用来帮助扩展性和保密性的。
最终,每次当区块被提交到 Peer 节点的账本的时候,那个 Peer 节点会生成一个合适的事件。区块事件包括了整个区块的内容,然而区块交易事件仅仅包含了概要信息,比如是否在区块中的每笔交易是有效的还是无效的。链码已经被执行的链码事件也可以在这个时候公布出去。应用程序可以对这些事件类型进行注册,所以在这些事件发生的时候他们能够被通知到。这些通知结束了交易流程的第三以及最后的阶段。
总结来说,在第三阶段中看到了由排序节点生成的区块被一致地应用到了账本中。将交易严格地排序到区块中让每个 Peer 节点都来验证交易更新,并一致地应用到区块链网络中。
排序节点和共识
整个交易处理流程被称为共识,因为所有 Peer 节点在由排序节点提供的流程中对交易的排序及内容都达成了一致。共识是一个多步骤的流程,并且应用程序只会在这个流程结束的时候通知账本更新——这个在不同的 Peer 节点上可能在不同的时间会发生。
我们会在之后的排序节点话题中更详细地讨论排序节点,但是到目前为止,可以把排序节点理解为这样一些节点,它们从应用程序收集和分发账本更新提案以供 Peer 节点验证并写入账本中。
这就是所有内容了!我们完成了 Peer 节点以及在 Hyperledger Fabric 中他们相关联的其他组件的学习。我们看到了 Peer 节点在很多方面都是最基础的元素——他们构成了网络,维护链码和账本,处理交易提案和响应,并且通过一致地将交易更新到账本上来保持一个始终包含最新内容的账本。
智能合约和链码
受众 :架构师、应用程序和智能合约开发者、管理员。
从应用程序开发人员的角度来看,智能合约与账本一起构成了 Hyperledger Fabric 区块链系统的核心。账本包含了与一组业务对象的当前和历史状态有关的事实,而智能合约定义了生成这些被添加到账本中的新事实的可执行逻辑。管理员通常使用链码将相关的智能合约组织起来进行部署,并且链码也可以用于 Fabric 的底层系统编程。在本主题中,我们将重点讨论为什么存在智能合约和链码,以及如何和何时使用它们。
在本主题中,我们将讨论:
智能合约
在各业务彼此进行交互之前,必须先定义一套通用的合约,其中包括通用术语、数据、规则、概念定义和流程。将这些合约放在一起,就构成了管理交易各方之间所有交互的业务模型。
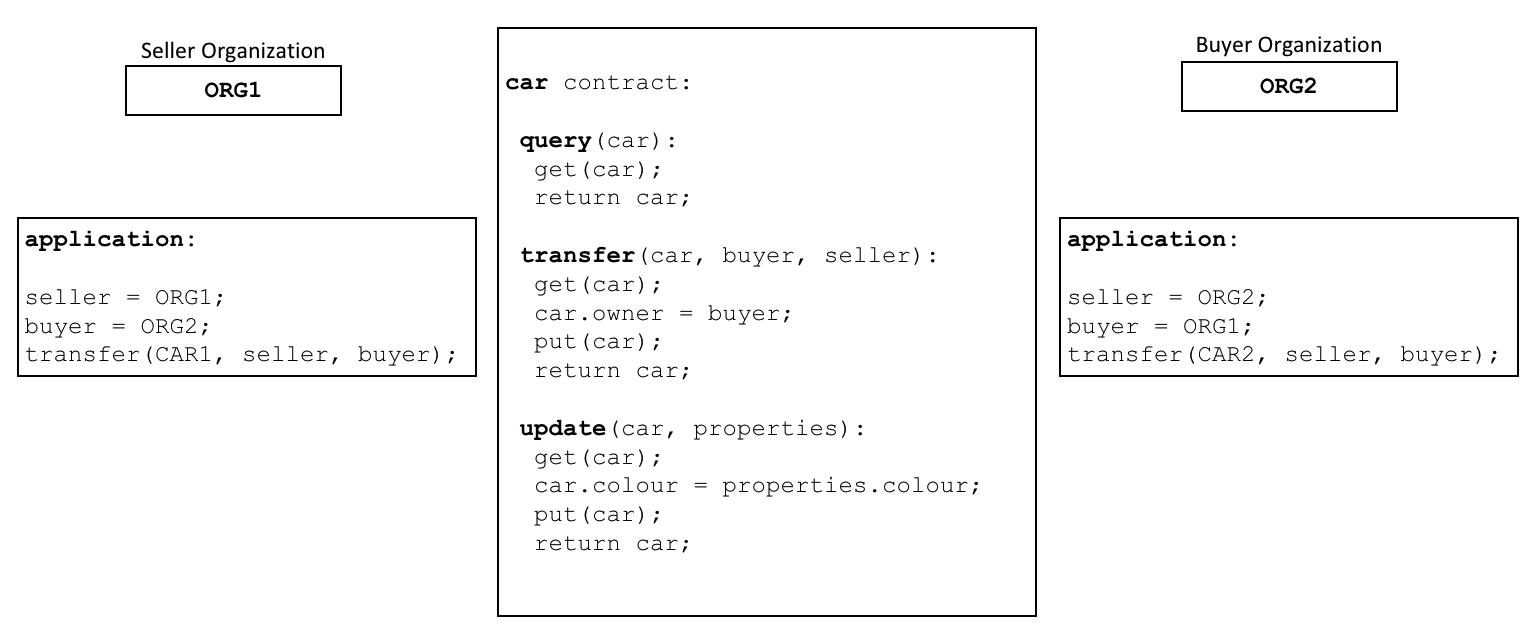 智能合约用可执行的代码定义了不同组织之间的规则。应用程序调用智能合约来生成被记录到账本上的交易。
使用区块链网络,我们可以将这些合约转换为可执行程序(业内称为智能合约),从而实现了各种各样的新可能性。这是因为智能合约可以为任何类型的业务对象实现治理规则,以便在执行智能合约时自动执行这些规则。例如,一个智能合约可能会确保新车在指定的时间内交付,或者根据预先安排的条款释放资金,前者可改善货物流通,而后者可优化资本流动。然而最重要的是,智能合约的执行要比人工业务流程高效得多。
在上图中,我们可以看到组织 ORG1 和 ORG2 是如何通过定义一个 car 智能合约来实现 查询、转移 和 更新 汽车的。来自这些组织的应用程序调用此智能合约执行业务流程中已商定的步骤,例如将特定汽车的所有权从 ORG1 转移到 ORG2。
术语
Hyperledger Fabric 用户经常交替使用智能合约和链码。通常,智能合约定义的是控制世界状态中业务对象生命周期的交易逻辑,随后该交易逻辑被打包进链码,紧接着链码会被部署到区块链网络中。可以将智能合约看成交易的管理者,而链码则管理着如何将智能合约打包以便用于部署。
 一个智能合约定义在一个链码中。而多个智能合约也可以定义在同一个链码中。当一个链码部署完毕,该链码中的所有智能合约都可供应用程序使用。
从上图中我们可以看到,vehicle 链码包含了以下三个智能合约:cars、boats 和 trucks;而 insurance 链码包含了以下四个智能合约:policy、liability、syndication 和 securitization。以上每种智能合约都涵盖了与车辆和保险有关的业务流程的一些关键点。在本主题中,我们将以 car 智能合约为例。我们可以看到,智能合约是一个特定领域的程序,它与特定的业务流程相关,而链码则是一组相关智能合约安装和实例化的技术容器。
账本
以最简单的方式来说,区块链记录着更新账本状态的交易,且记录不可篡改。智能合约以编程方式访问账本两个不同的部分:一个是区块链(记录所有交易的历史,且记录不可篡改),另一个是世界状态(保存这些状态当前值的缓存,是经常需要用到的对象的当前值)。
智能合约主要在世界状态中将状态写入(put)、读取(get)和删除(delete),还可以查询不可篡改的区块链交易记录。
- 读取(get) 操作一般代表的是查询,目的是获取关于交易对象当前状态的信息。
- 写入(put) 操作通常生成一个新的业务对象或者对账本世界状态中现有的业务对象进行修改。
- 删除(delete) 操作代表的是将一个业务对象从账本的当前状态中移除,但不从账本的历史中移除。
智能合约有许多可用的 API。但重要的是,在任意情况下,无论交易创建、读取、更新还是删除世界状态中的业务对象,区块链都包含了这些操作的记录,且记录不可更改 。
开发
智能合约是应用程序开发的重点,正如我们所看到的,一个链码中可定义一个或多个智能合约。将链码部署到网络中以后,网络上的组织就都可以使用该链码中的所有智能合约。这意味着只有管理员才需要考虑链码;其他人都只用考虑智能合约。
智能合约的核心是一组 交易 定义。例如,在 fabcar.js 中,你可以看到一个创建了一辆新车的智能合约交易:
async createCar(ctx, carNumber, make, model, color, owner) {

    const car = {
        color,
        docType: 'car',
        make,
        model,
        owner,
    };

    await ctx.stub.putState(carNumber, Buffer.from(JSON.stringify(car)));
}
在编写您的第一个应用程序 教程中,您可以了解更多关于 Fabcar 智能合约的信息。
智能合约几乎可以描述所有与多组织决策中数据不可变性相关的业务案例。智能合约开发人员的工作是将一个现有的业务流程(可能是管理金融价格或交付条件)用 JavaScript、GOLANG 或 Java 等编程语言来表示成一个智能合约。将数百年的法律语言转换为编程语言需要法律和技术方面的技能,智能合约审核员们不断地实践着这些技能。您可以在开发应用程序主题中了解如何设计和开发智能合约。
背书
每个链码都有一个背书策略与之相关联,该背书策略适用于此链码中定义的所有智能合约。背书策略非常重要,它指明了区块链网络中哪些组织必须对一个给定的智能合约所生成的交易进行签名,以此来宣布该交易有效。
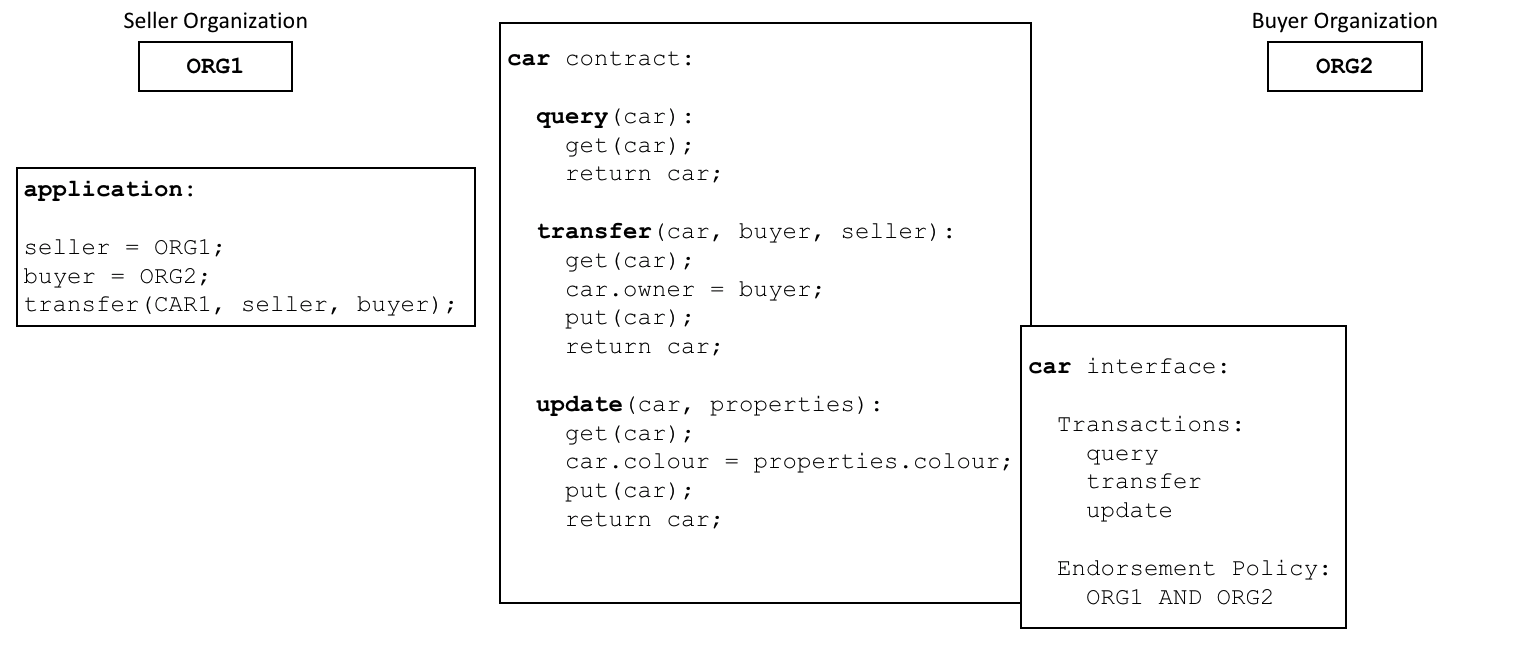 每个智能合约都有一个与之关联的背书策略。这个背书策略定义了在智能合约生成的交易被认证为有效之前,哪些组织必须同意该交易。
一个示例背书策略可能这样定义:参与区块链网络的四个组织中有三个必须在交易被认为有效之前签署该交易。所有的交易,无论是有效的还是无效的,都会被添加到分布式账本中,但只有有效交易会更新世界状态。
如果一项背书策略指定了必须有不止一个组织来签署交易,那么只有当足够数量的组织都执行了智能合约,才能够生成有效交易。在上面的示例中,要使用于车辆 transfer 的智能合约交易有效,需要 ORG1 和 ORG2 都执行并签署该交易。
背书策略是 Hyperledger Fabric 与以太坊(Ethereum)或比特币(Bitcoin)等其他区块链的区别所在。在这些区块链系统中,网络上的任何节点都可以生成有效的交易。而 Hyperledger Fabric 更真实地模拟了现实世界;交易必须由 Fabric 网络中受信任的组织验证。例如,一个政府组织必须签署一个有效的 issueIdentity 交易,或者一辆车的 买家 和 卖家 都必须签署一个 车辆 转移交易。背书策略的设计旨在让 Hyperledger Fabric 更好地模拟这些真实发生的交互。
最后,背书策略只是 Hyperledger Fabric 中策略的一个例子。还可以定义其他策略来确定谁可以查询或更新账本,或者谁可以在网络中添加或删除参与者。总体来说,虽然区块链网络中的组织联盟并非一成不变,但是它们需要事先商定好策略。实际上,策略本身可以定义对自己进行更改的规则。虽然现在谈论这个主题有点早,但是在 Fabric 提供的规则基础上来定义自定义背书策略的规则也是可能实现的。
有效交易
当智能合约执行时,它会在区块链网络中组织所拥有的节点上运行。智能合约提取一组名为交易提案的输入参数,并将其与程序逻辑结合起来使用以读写账本。对世界状态的更改被捕获为交易提案响应(或简称交易响应),该响应包含一个读写集,其中既含有已读取的状态,也含有还未书写的新状态(如果交易有效的话)。注意,在执行智能合约时世界状态没有更新!
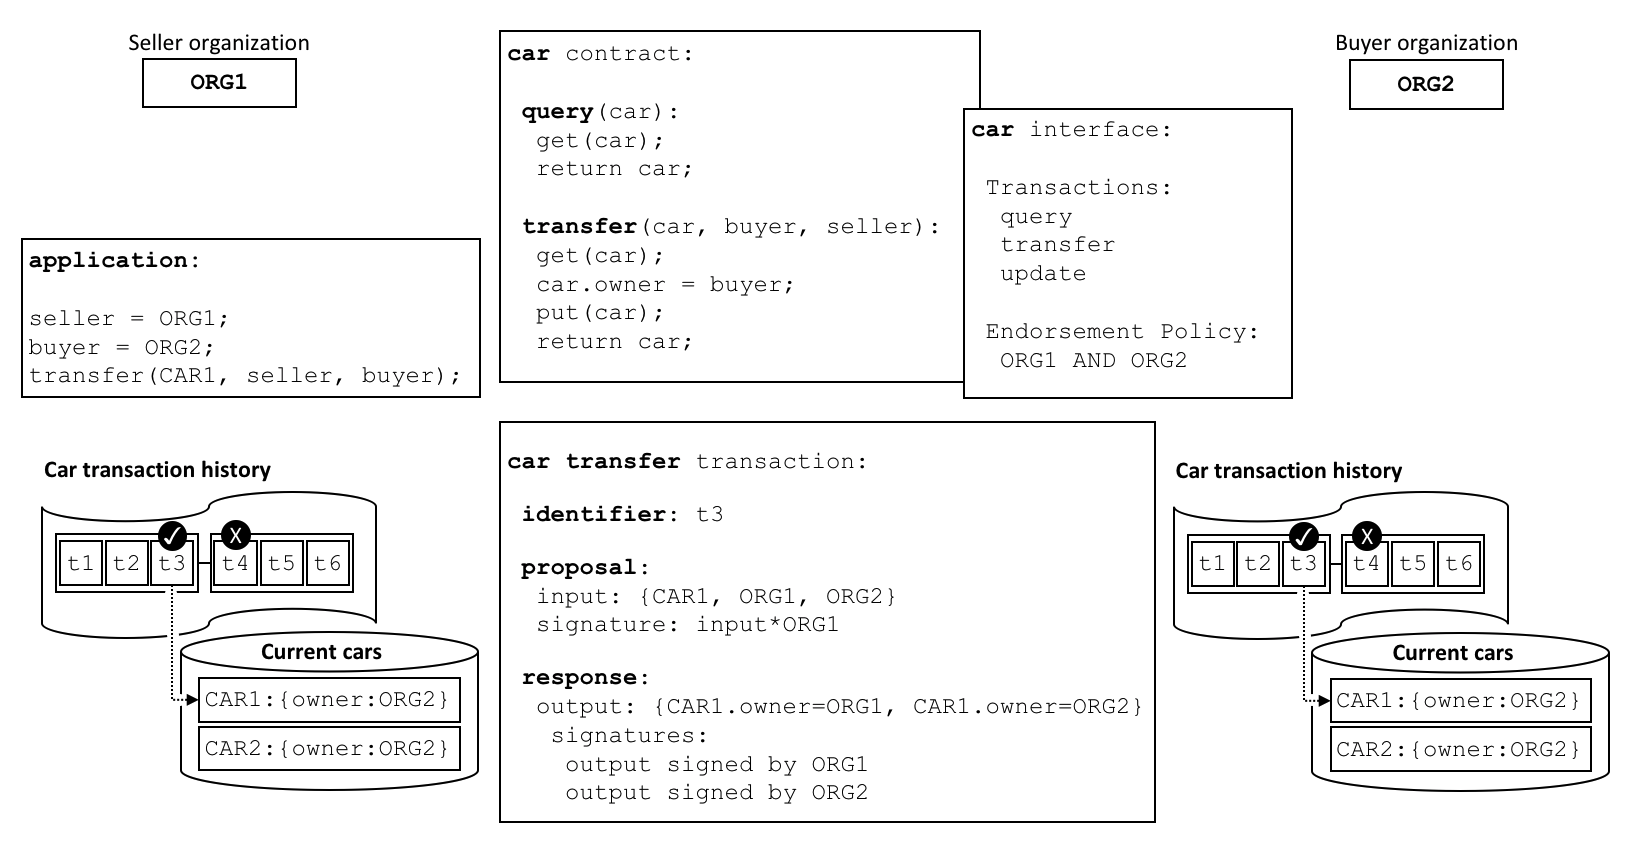 所有的交易都有一个识别符、一个提案和一个被一群组织签名的响应。所有交易,无论是否有效,都会被记录在区块链上,但仅有效交易会更新世界状态。
检查 车辆转移 交易。您可以看到 ORG1 和 ORG2 之间为转移一辆车而进行的交易 t3。看一下交易是如何通过输入 {CAR1,ORG1,ORG2} 和输出 {CAR1.owner=ORG1,CAR1.owner=ORG2} 来表示汽车的所有者从 ORG1 变为了 ORG2。注意输入是如何由应用程序的组织 ORG1 签名的,输出是如何由背书策略标识的两个组织( ORG1 和 ORG2 )签名的。这些签名是使用每个参与者的私钥生成的,这意味着网络中的任何人都可以验证网络中的所有参与者是否在交易细节上达成了一致。
一项交易被分发给网络中的所有节点,各节点通过两个阶段对其进行验证。首先,根据背书策略检查交易,确保该交易已被足够的组织签署。其次,继续检查交易,以确保当该交易在受到背书节点签名时它的交易读集与世界状态的当前值匹配,并且中间过程中没有被更新。如果一个交易通过了这两个测试,它就被标记为有效。所有交易,不管是有效的还是无效的,都会被添加到区块链历史中,但是仅有效的交易才会更新世界状态。
在我们的示例中,t3 是一个有效的交易,因此 CAR1 的所有者已更新为 ORG2。但是 t4 (未显示)是无效的交易,所以当把它记录在账本上时,世界状态没有更新,CAR2 仍然属于 ORG2 所有。
最后,要了解如何通过世界状态来使用智能合约或链码,请阅读链码命名空间主题。
通道
Hyperledger Fabric 允许一个组织利用通道同时参与多个、彼此独立的区块链网络。通过加入多个通道,一个组织可以参与一个所谓的网络的网络。通道在维持数据和通信隐私的同时还提供了高效的基础设施共享。通道是足够独立的,可以帮助组织将自己的工作与其他组织的分开,同时它还具有足够的协调性,在必要时能够协调各个独立的活动。
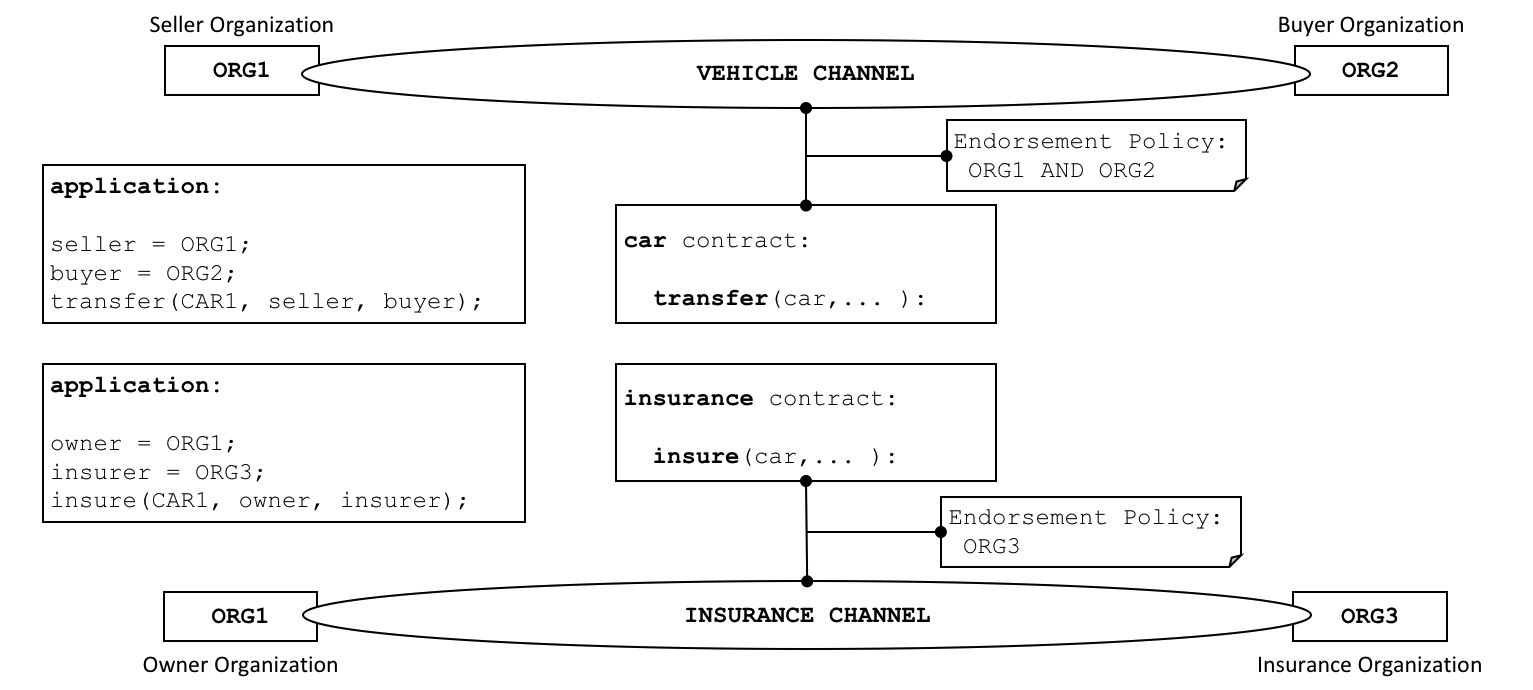 通道在一群组织之间提供了一种完全独立的通信机制。当链码定义被提交到通道上时,该通道上所有的应用程序都可以使用此链码中的智能合约。
虽然智能合约代码被安装在组织节点的链码包内,但是只有等到链码被定义在通道上之后,该通道上的成员才能够执行其中的智能合约。链码定义是一种包含了许多参数的结构,这些参数管理着链码的运行方式,包含着链码名、版本以及背书策略。各通道成员批准各自组织的一个链码定义,以表示其对该链码的参数表示同意。当足够数量(默认是大多数)的组织都已批准同一个链码定义,该定义可被提交至这些组织所在的通道。随后,通道成员可依据该链码定义中指明的背书策略来执行其中的智能合约。这个背书策略可同等使用于在相同链码中定义的所有智能合约。
在上面的示例中,car 智能合约被定义在 VEHICLE 通道上,insurance 智能合约被定义在 INSURANCE 通道上。car 的链码定义明确了以下背书策略:任何交易在被认定为有效之前必须由 ORG1 和 ORG2 共同签名。insurance 智能合约的链码定义明确了只需要 ORG3 对交易进行背书即可。ORG1 参与了 VEHICLE 通道和 INSURANCE 通道这两个网络,并且能够跨网络协调与 ORG2 和 ORG3 的活动。
链码的定义为通道成员提供了一种他们在通道上使用智能合约来交易之前,同意对于一个链码的管理的方式。在上边的例子中,ORG1 和 ORG2 想要为调用 car 智能合约的交易背书。因为默认的背书策略要求主要的组织需要批准一个链码的定义,双方的组织需要批准一个 AND{ORG1,ORG2} 的背书策略。否则的话,ORG1 和 ORG2 将会批准不同的链码定义,并且最终不能够将链码定义提交到通道。这个流程确保了一个来自于 car 智能合约的交易需要被两个组织批准。
互通
一个智能合约既可以调用同通道上的其他智能合约,也可以调用其他通道上的智能合约。这样一来,智能合约就可以读写原本因为智能合约命名空间而无法访问的世界状态数据。
这些都是智能合约彼此通信的限制,我们将在链码命名空间主题中详细描述。
系统链码
链码中定义的智能合约为一群区块链组织共同认可的业务流程编码了领域相关规则。然而,链码还可以定义低级别程序代码,这些代码符合无关于领域的系统交互,但与业务流程的智能合约无关。
以下是不同类型的系统链码及其相关缩写:
- **_生命周期** 在所有 Peer 节点上运行,它负责管理节点上的链码安装、批准组织的链码定义、将链码定义提交到通道上。 你可以了解更多
_生命周期是如何实现 Fabric 链码声明周期过程的。 - 生命周期系统链码(LSCC) 负责为 1.x 版本的 Fabric 管理链码生命周期。该版本的生命周期要求在通道上实例化或升级链码。你可以阅读更多关于 LSCC 如何实现这一过程。如果你的 V1_4_x 或更低版本设有通道应用程序的功能,那么你也可以使用 LSCC 来管理链码。
- 配置系统链码(CSCC) 在所有 Peer 节点上运行,以处理通道配置的变化,比如策略更新。你可以在这里阅读更多 CSCC 实现的内容。
- 查询系统链码(QSCC) 在所有 Peer 节点上运行,以提供账本 API(应用程序编码接口),其中包括区块查询、交易查询等。你可以在交易场景主题中查阅更多这些账本 API 的信息。
- 背书系统链码(ESCC) 在背书节点上运行,对一个交易响应进行密码签名。你可以在这里阅读更多 ESCC 实现的内容。
- 验证系统链码(VSCC) 验证一个交易,包括检查背书策略和读写集版本。你可以在这里阅读更多 VSCC 实现的内容。
底层的 Fabric 开发人员和管理员可以根据自己的需要修改这些系统链码。然而,系统链码的开发和管理是一项专门的活动,完全独立于智能合约的开发,通常没有必要进行系统链码的开发和管理。系统链码对于一个 Hyperledger Fabric 网络的正常运行至关重要,因此必须非常小心地处理系统链码的更改。例如,如果没有正确地开发系统链码,那么有可能某个 Peer 节点更新的世界状态或区块链备份与其他 Peer 节点的不同。这种缺乏共识的现象是账本分叉的一种形式,是极不理想的情况。
账本
受众:架构师、应用程序开发者和智能合约开发者、管理员
账本是 Hyperledger Fabric 中的一个重要概念,它存储了有关业务对象的重要事实信息,其中既包括对象属性的当前值,也包括产生这些当前值的交易的历史。
在这个主题中,我们将谈到:
什么是账本?
账本记录着业务的当前状态,它就像一个交易日记。欧洲和中国最早的账本可以追溯到近 1000 年前,苏美尔人在 4000 年前就已经有石制账本了,不过我们还是从离我们最近的例子开始讲吧!
你可能已经习惯查看你的银行账户了。对你来说,最重要的是账户余额,它是你当时就能花的钱。如果你想看看你的余额是如何产生的,可以浏览一下相关的交易收入和支出。这是现实生活中的一个账本的示例——一个状态(您的银行余额)和一组促成该状态的有序交易(收入和支出)。Hyperledger Fabric 也致力于这两个方面,它旨在呈现一组账本状态的当前值,同时记录下促成了以上账本状态的交易的历史。
账本、事实和状态
账本储存的其实并不是业务对象本身,而是与业务对象相关的事实信息。当我们说“我们在账本中存储一个业务对象”时,其实是说我们正在记录与一个业务对象当前状态有关的事实,以及与促成这一当前状态的交易历史相关的事实。在一个日益数字化的世界里,我们感觉自己正在看的是一个物体本身,而不是关于这个物体的一些事实。对于数字对象来说,它可能位于一个外部数据库,但通过我们储存在账本中有关该对象的事实就能够识别出该数字对象的所在位置以及其他与之相关的关键信息。
虽然与业务对象当前状态相关的事实可能会发生改变,但是与之相关的事实历史是不可变的,我们可以在事实历史上增加新的事实,但无法更改历史中已经存在的事实。我们将看到,如果把区块链看作是与业务对象有关的事实历史,且该历史是不可更改的,那么我们就能够很轻松、高效地理解区块链。
现在我们来深入探讨一下 Hyperledger Fabric 的账本结构!
账本
Hyperledger Fabric 中的账本由“世界状态“和”区块链“这两部分组成,它们彼此不同但却相互关联。二者都代表了与业务对象有关的一些事实。
首先,世界状态是一个数据库,它存储了一组账本状态的当前值。通过世界状态,程序可以直接访问一个账本状态的当前值,不需要遍历整个交易日志来计算当前值。默认情况下,账本状态是以键值对的方式来表示的,稍后我们将看到 Hyperledger Fabric 如何提供这一方面的灵活性。因为我们可以创建、更新和删除状态,所以世界状态能够频繁更改。
其次,区块链是交易日志,它记录了促成当前世界状态的所有改变。交易被收集在附加到区块链的区块中,能帮助我们理解所有促成当前世界状态的改变的历史。区块链数据结构与世界状态相差甚远,因为一旦把数据写入区块链,就无法修改,它是不可篡改的。
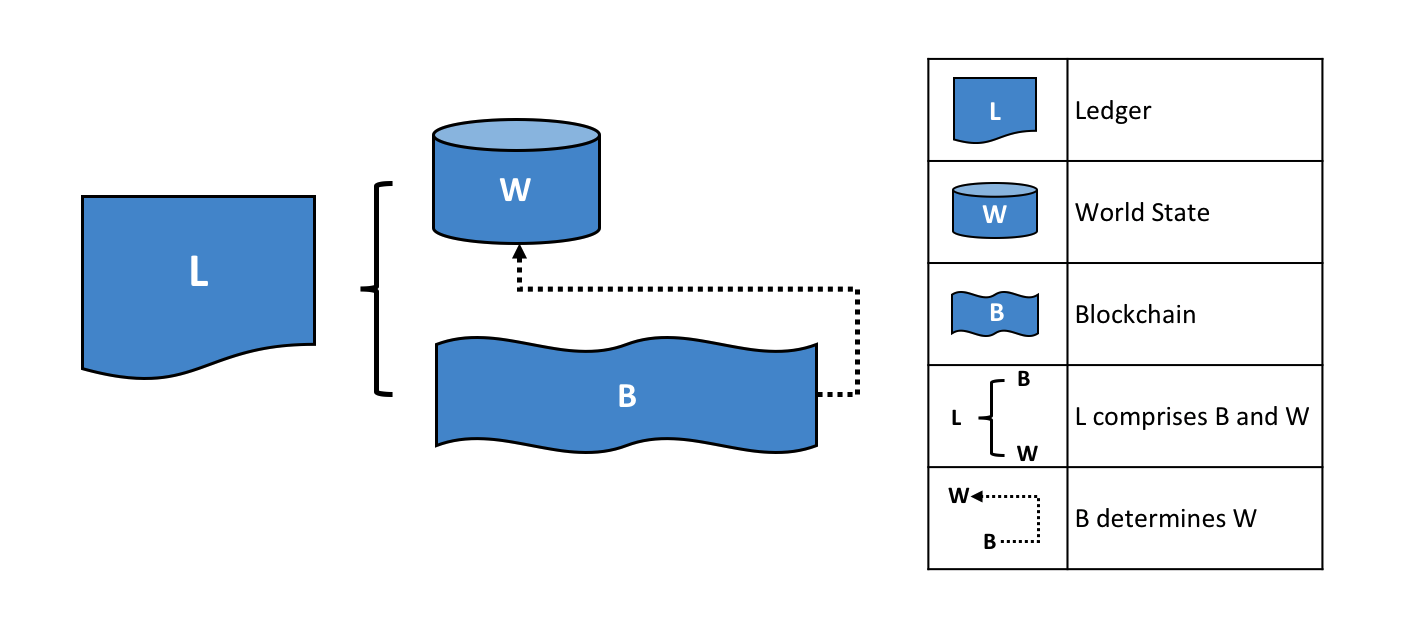 账本 L 由区块链 B 和世界状态 W 组成,其中世界状态 W 由区块链 B 决定。我们也可以说世界状态 W 是源自区块链 B。
为帮助理解,可以这样认为:Hyperledger Fabric 网络中存在一个逻辑账本。实际上,Fabric 网络维护着一个账本的多个副本,这些副本通过名为共识的过程来与其他副本保持一致。分布式账本技术(DLT)这个术语经常与这种账本联系在一起,这种账本在逻辑上是单个的,但是在整个网络中却分布着许多彼此一致的副本。
现在让我们更细致地研究一下世界状态和区块链数据结构。
世界状态
世界状态将业务对象属性的当前值保存为唯一的账本状态。这很有用,因为程序通常需要对象的当前值,如果遍历整个区块链来计算对象的当前值会很麻烦——从世界状态中可以直接获取当前值。
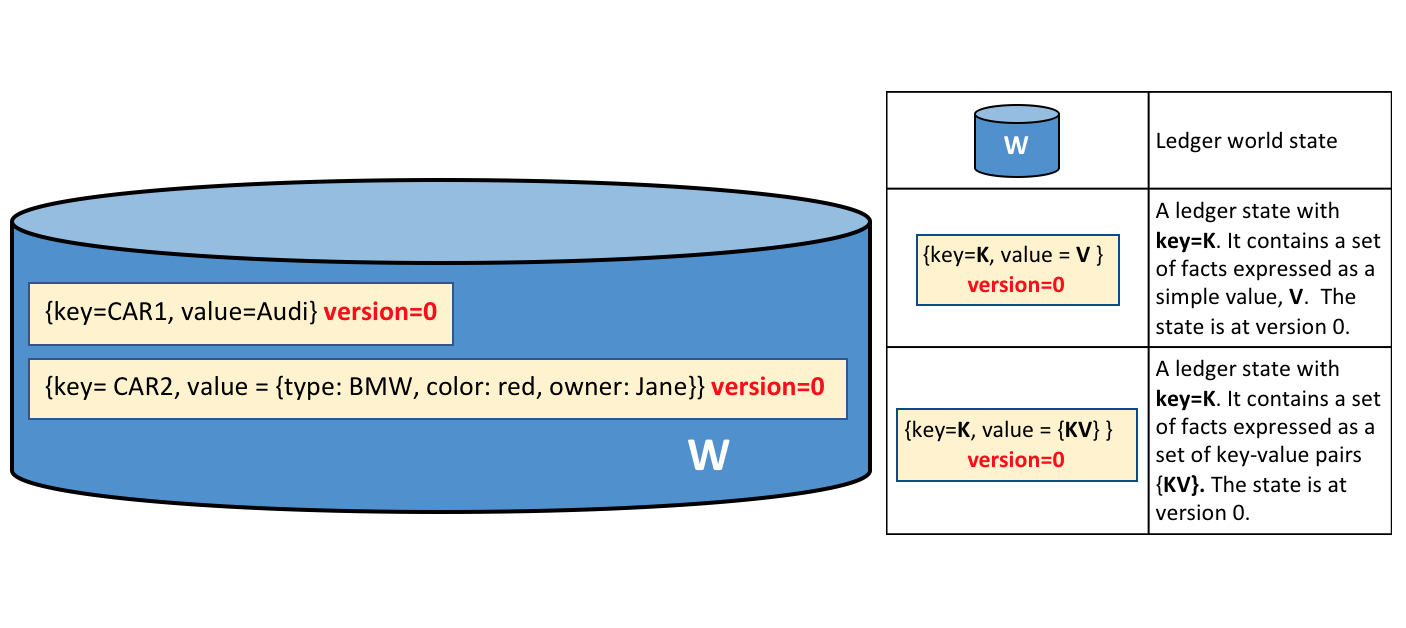 一个账本世界状态包含两个状态。第一个状态是: key=CAR1 和 value=Audi。第二个状态中有一个更复杂的值:key=CAR2 和 value={model:BMW, color=red, owner=Jane} 。两个状态的版本都是0。
账本状态记录了一组与特定业务对象有关的事实。我们的示例展示的是 CAR1 和 CAR2 这两辆车的账本状态,二者都各有一个值和一个键。应用程序可以调用智能合约,该合约使用简单的账本 API 来获取、写入和删除状态。注意状态值可以是简单值(Audi…),也可以是复合值(type:BMW…)。经常会通过查询世界状态来检索具有某些特定属性的对象,例如查找所有红色宝马汽车。
世界状态被作为数据库来实现。这一点很有意义,因为数据库为有效存储和状态检索提供了充分的算子。稍后我们将看到,我们可以将 Hyperledger Fabric 配置为使用不同的世界状态数据库来满足以下需求:不同类型的状态值,应用程序所需的访问模式,例如,当遇到复杂查询的情况时。
应用程序提交那些会更改世界状态的交易,这些交易最终被提交到账本区块链上。应用程序无法看到 Hyperledger Fabric SDK(软件开发工具包)设定的共识机制的细节内容,它们能做的只是调用智能合约以及在交易被收进区块链时收到通知(所有被提交的交易,无论有效与否,都会被收进区块链)。Hyperledger Fabric 的关键设计在于,只有那些受到相关背书组织签名的交易才会更新世界状态。如果一个交易没有得到足够背书节点的签名,那么它不会更新世界状态。您可以阅读更多关于应用程序如何使用智能合约以及如何开发应用程序的信息。
您还会注意到,每个状态都有一个版本号,在上面的图表中,状态 CAR1 和 CAR2 都处于它们的初始版本 0。版本号是供 Hyperledger Fabric 内部使用的,并且每次状态更改时版本号会发生递增。每当更新状态时,都会检查该状态的版本,以确保当前状态与背书时的版本相匹配。这就确保了世界状态是按照预期进行更新的,没有发生并发更新。
最后,首次创建账本时,世界状态是空的。因为区块链上记录了所有代表有效世界状态更新的交易,所以任何时候都可以从区块链中重新生成世界状态。这样一来就变得非常方便,例如,创建节点时会自动生成世界状态。此外,如果某个节点发生异常,重启该节点时能够在接受交易之前重新生成世界状态。
区块链
现在让我们把注意力从世界状态转移到区块链上。世界状态存储了与业务对象当前状态相关的事实信息,而区块链是一种历史记录,它记录了这些业务对象是如何到达各自当前状态的相关事实。区块链记录了每个账本状态之前的所有版本以及状态是如何被更改的。
区块链的结构是一群相互链接的区块的序列化日志,其中每个区块都包含一系列交易,各项交易代表了一个对世界状态进行的查询或更新操作。我们在其他地方讨论了排序交易的确切机制;其中重要的是区块排序以及区块内的交易排序,这一机制是在 Hyperledger Fabric 的排序服务组件首次创建区块时被建立起来的。
每个区块的头部都包含区块交易的一个哈希,以及前一个区块头的哈希。这样一来,账本上的所有交易都被按序排列,并以密码方式连接在一起。这种哈希和链接使账本数据变得非常安全。即使某个保存账本的节点被篡改了,该节点也无法让其他节点相信自己拥有“正确的”区块链,这是因为账本被分布在一个由独立节点组成的网络中。
区块链总是以文件实现,而与之相反的是,世界状态以数据库实现。这是一个明智的设计,因为区块链数据结构高度偏向于非常小的一组简单操作。第一项操作被放在区块链的末尾,就目前来说,查询操纵相对少见。
让我们更详细地看看区块链的结构。
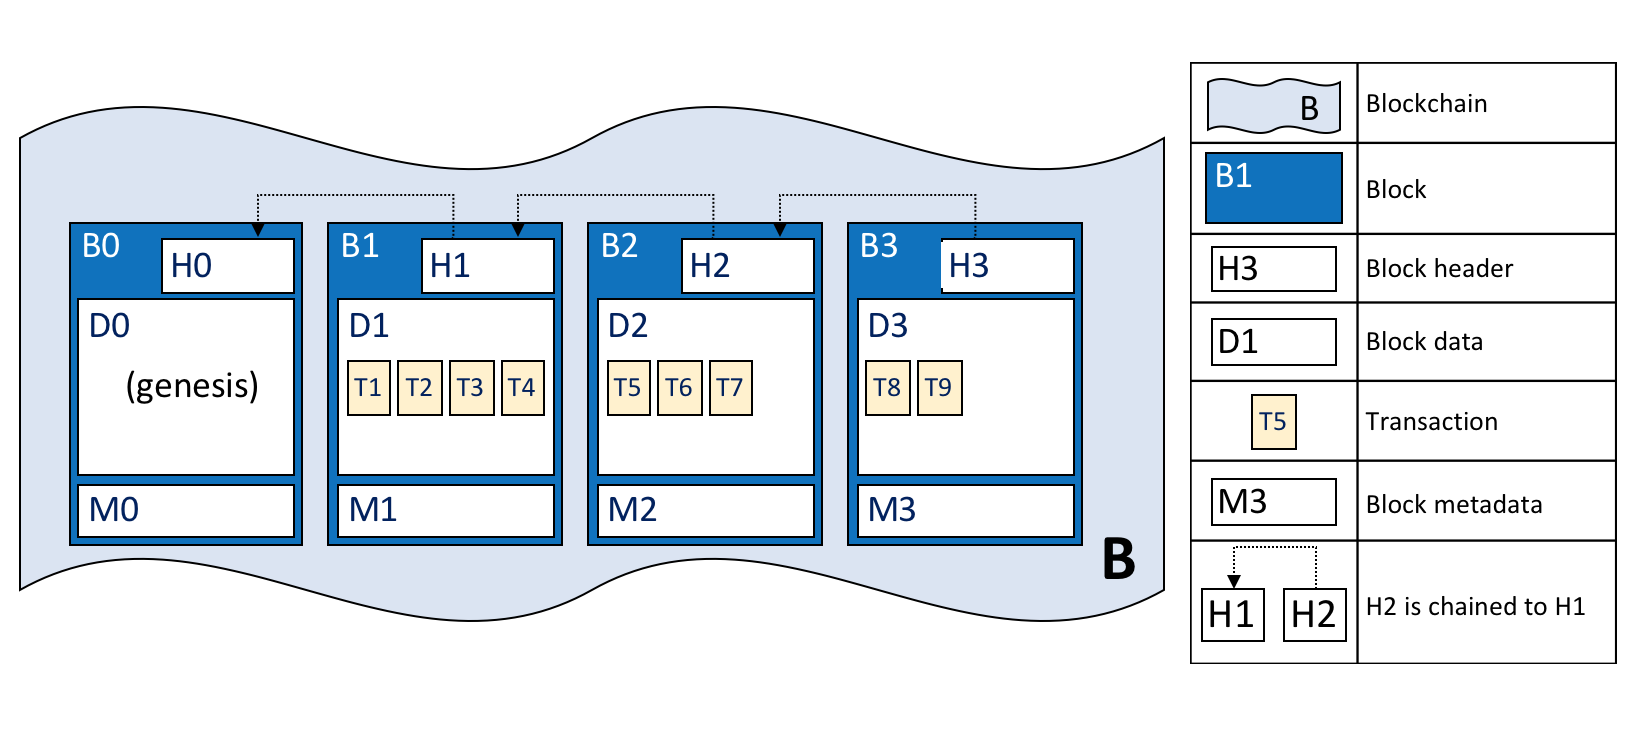 区块链 B 包含了 B0、B1、B2、B3这四个区块。B0 是该区块链的第一个区块,也叫创世区块。
在上面的图中我们可以看到,区块 B2 有一个区块数据 D2,该数据包含了 B2 的所有交易:T5、T6、T7。
最重要的是,B2 有一个区块头 H2,H2 包含了 D2 中所有交易的加密哈希以及前一个区块中 H1 的一个哈希。这样一来,所有区块彼此紧密相连,不可篡改,术语区块链很好地描述了这一点!
最后,如图所示,区块链中的第一个区块被称为创世区块。虽然它并不包含任何用户交易,但却是账本的起始点。相反的,创世区块包含了一个配置交易,该交易含有网络配置(未显示)的初始状态。我们将会在讨论区块链网络和通道 时更详细地探讨初始区块。
区块
让我们仔细看看区块的结构。它由三个部分组成
区块头
这个部分包含三个字段,这些字段是在创建一个区块时候被写入的。
- 区块编号:编号从0(初始区块)开始,每在区块链上增加一个新区块,编号的数字都会加1。
- 当前区块的哈希值:当前区块中包含的所有交易的哈希值。
- 前一个区块头的哈希值:区块链中前一个区块头的哈希值。
这些字段是通过在内部对区块数据进行加密哈希而生成的。它们确保了每一个区块和与之相邻的其他区块紧密相连,从而组成一个不可更改的账本。
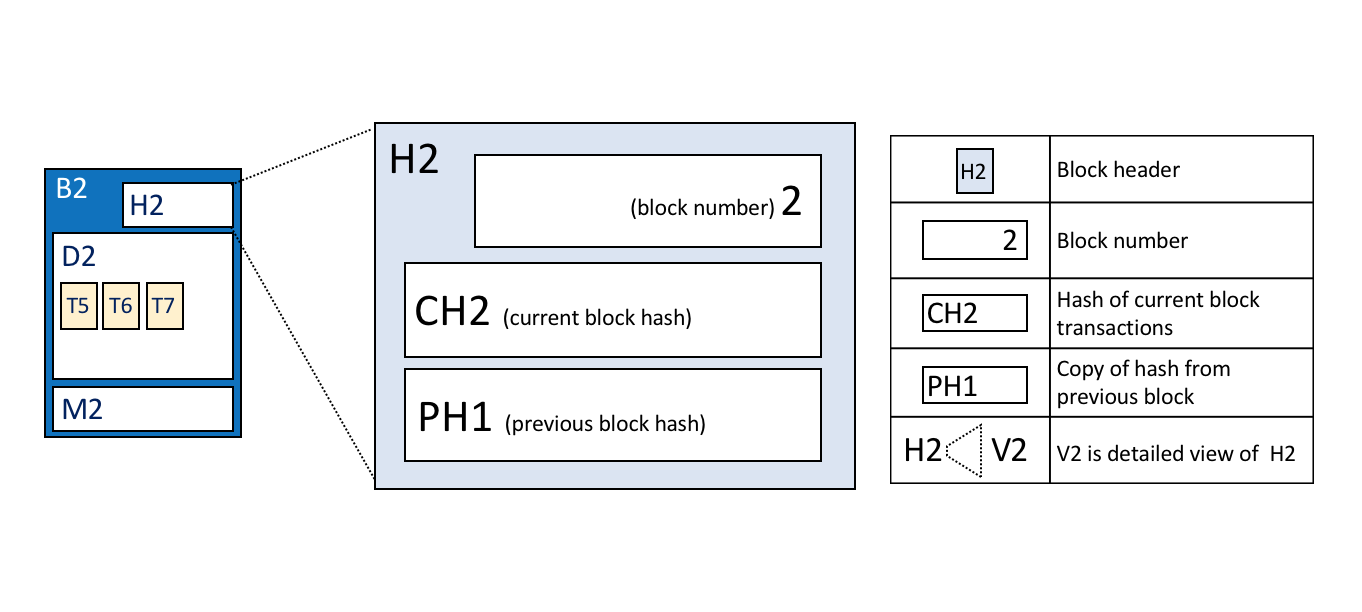 区块头详情:区块 B2 的区块头 H2 包含了区块编号 2,当前区块数据 D2 的哈希值 CH2,以及前一个区块头 H1 的哈希值。
区块数据
这部分包含了一个有序的交易列表。区块数据是在排序服务创建区块时被写入的。这些交易的结构很复杂但也很直接,我们会在后边进行讲解。
区块元数据
这个部分包含了区块被写入的时间,还有区块写入者的证书、公钥以及签名。随后,区块的提交者也会为每一笔交易添加一个有效或无效的标记,但由于这一信息与区块同时产生,所以它不会被包含在哈希中。
交易
正如我们所看到的,交易记录了世界状态发生的更新。让我们来详细了解一下这种把交易包含在区块中的区块数据结构。
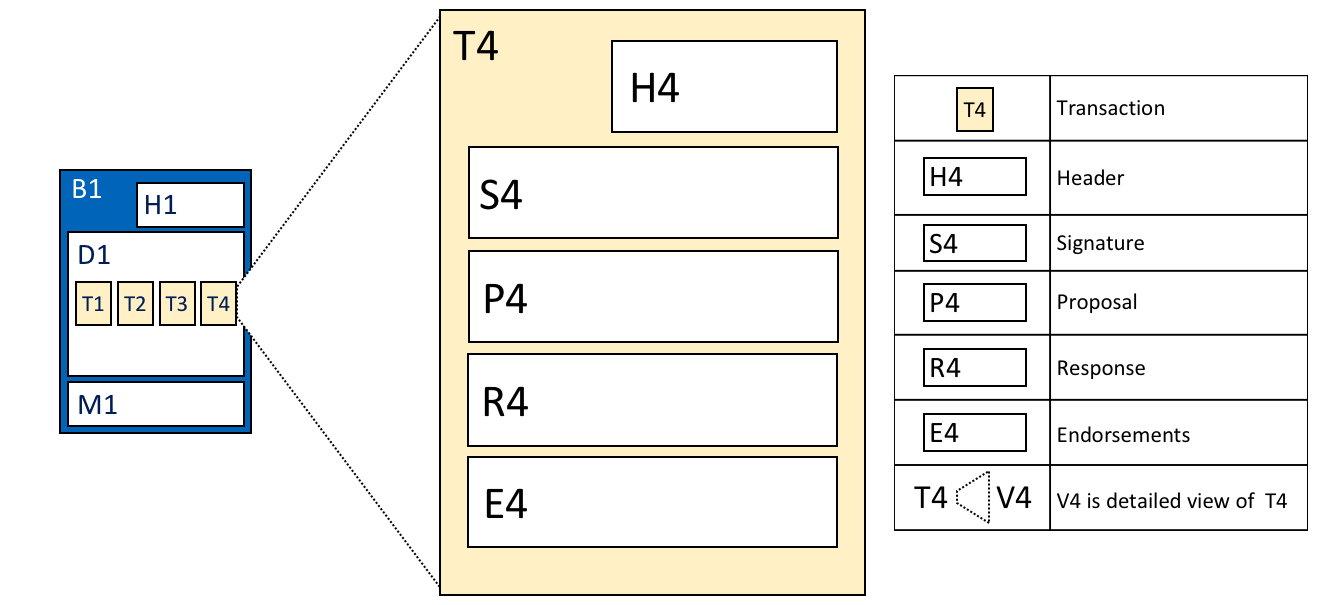 交易详情:交易 T4 位于区块 B1 的区块数据 D1 中,T4包括的内容如下:交易头 H4,一个交易签名 S4,一个交易提案 P4,一个交易响应 R4 和一系列背书 E4。
在上面的例子中,我们可以看到以下字段:
头
这部分用 H4 表示,它记录了关于交易的一些重要元数据,比如,相关链码的名字以及版本。
签名
这部分用 S4 表示,它包含了一个由客户端应用程序创建的加密签名。该字段是用来检查交易细节是否未经篡改,因为交易签名的生成需要用到应用程序的私钥。
提案
这部分用 P4 表示,它负责对应用程序供给智能合约的输入参数进行编码,随后该智能合约生成提案账本更新。在智能合约运行时,这个提案提供了一套输入参数,这些参数同当前的世界状态一起决定了新的账本世界状态。
响应
这部分用 R4 表示,它是以读写集 (RW-set)的形式记录下世界状态之前和之后的值。交易响应是智能合约的输出,如果交易验证成功,那么该交易会被应用到账本上,从而更新世界状态。
背书
就像 E4 显示的那样,它指的是一组签名交易响应,这些签名都来自背书策略规定的相关组织,并且这些组织的数量必须满足背书策略的要求。你会注意到,虽然交易中包含了多个背书,但它却只有一个交易响应。这是因为每个背书都对组织特定的交易响应进行了有效编码,那些不完全满足背书的交易响应肯定会遭到拒绝、被视为无效,而且它们也不会更新世界状态,所以没必要放进交易中。
在交易中只包含一个交易响应,但是会有多个背书。这是因为每个背书包含了它的组织特定的交易响应,这意味着不需要包含任何没有有效的背书的交易响应,因为它会被作为无效的交易被拒绝,并且不会更新世界状态。
以上总结了交易的一些主要字段,其实还有其他字段,但是上述几种是您需要了解的基本字段,便于您对账本数据结构有一个很好的了解。
世界状态数据库选项
世界状态是以数据库的形式实现的,旨在提供简单有效的账本状态存储和检索。正如我们所看到的,账本状态可包含简单值或复合值,为了适应这一点,世界状态数据库可以多种形式实现,从而对这些值进行有效实现。目前,世界状态数据库的选项包括 LevelDB 和 CouchDB 。
LevelDB 是世界状态数据库的默认选项,当账本状态是简单的键值对时,使用 LevelDB 非常合适。LevelDB 数据库与 peer 节点位于相同位置,它被嵌入与 peer 节点相同的操作系统进程中。
当账本状态结构为 JSON 文档时,以 CouchDB 来实现世界状态非常合适,这是因为业务交易涉及的数据类型通常十分丰富,而 CouchDB 可支持对这些数据类型进行各种形式的查询和更新。在实现方面,CouchDB 是在单独的操作系统进程中运行的,但是节点和 CouchDB 实例之间仍然存在1:1的关系。智能合约无法看到上述任何内容。有关 CouchDB 的更多信息,请参见 CouchDB 作为状态数据库。
在 LevelDB 和 CouchDB 中,我们看到了 Hyperledger Fabric 的一个重要方面——它是可插拔的。世界状态数据库可以是关系数据存储、图形存储或时态数据库。这极大提升了可被有效访问的账本状态类型的灵活性,使得 Hyperledger Fabric 能够处理多种不同类型的问题。
示例账本fabcar
关于账本的讨论即将结束,让我们来看一个示例账本。如果您已经运行了 fabcar 示例应用程序,那么您就已经创建了这个账本。
fabcar 示例应用程序创建了 10 辆车,每辆车都有独一无二的身份;它们有不同的颜色,制造商,型号和拥有者。以下是前四辆车创建后的账本。
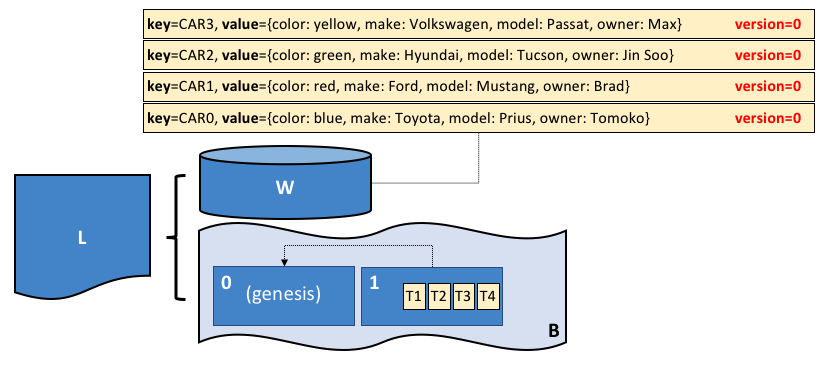 账本 L包含了一个世界状态 W 和一个区块链 B。其中 W 包含了四个状态,各状态的键分别是:CAR0,CAR1,CAR2 和 CAR3 。而 B 包含了两个区块 0和 1。区块1包含了四笔交易:T1,T2,T3,T4。
我们可以看到世界状态包含了对应于 CAR0、CAR1、CAR2 和 CAR3 的状态。CAR0 中包含的值表明了这是一辆蓝色的丰田普锐斯(Toyota Prius),目前车主是 Tomoko,其他车辆的的状态和值也与此类似。此外,我们还可以看到所有车辆状态的版本号都是0,这是它们的初始版本号,也就是说这些车辆状态自创建以来一直没有被更新过。
我们还可以看到区块链包含两个区块。其中区块0是创世区块,但它并不包含任何与汽车相关的交易。而区块1包含交易 T1、T2、T3、T4,这些交易与生成世界状态中 CAR0 到 CAR3 这四辆车初始状态的交易相符。同时区块1与区块0是相连的。
我们没有介绍区块或交易中的其他字段,特别是(区块/交易)头和哈希,如果你对这部分内容感兴趣的话,可以阅读文件中的其他部分。读完后你会对整个区块和交易有更加透彻的认识,但现在,你对 Hyperledger Fabric 账本的概念已经足够了解了。很好!
命名空间
上文中我们讨论账本时,似乎它只包括一个世界状态和一条区块链,但这显然过于简单化了。实际上,每个链码都有自己的世界状态,并且与所有其他链码的世界状态分离。世界状态位于一个命名空间中,因此只有位于同一链码中的智能合约才能访问一个给定的命名空间。
区块链没有命名空间。它包含来自许多不同智能合约命名空间的交易。您可以在此主题中阅读更多关于链码命名空间的信息。
现在让我们看看命名空间的概念是如何被应用到 Hyperledger Fabric 通道中的。
通道
在 Hyperledger Fabric 中,每个通道都有一个完全独立的账本。这意味着完全独立的区块链和完全独立的世界状态,包括命名空间。应用程序和智能合约可以在通道之间通信,以便在通道间访问账本信息。
在本主题中,您可以阅读更多关于账本如何与通道一起工作的信息。
更多信息
要深入了解交易流程、并发控制和世界状态数据库,请查阅交易流程、读写集语义和 CouchDB 作为状态数据库主题。
排序服务
受众:架构师、排序服务管理员、通道创建者
本主题将概念性的介绍排序的概念、排序节点是如何与 Peer 节点交互的、它们在交易流程中如何所发挥作用以及当前可用的排序服务的实现方式,尤其关注建议的 Raft 排序服务实现。
什么是排序?
许多分布式区块链,如以太坊(Ethereum)和比特币(Bitcoin),都是非许可的,这意味着任何节点都可以参与共识过程,在共识过程中,交易被排序并打包成区块。因此,这些系统依靠概率共识算法最终保证账本一致性高的概率,但仍容易受到不同的账本(有时也称为一个账本“分叉”),在网络中不同的参与者对于交易顺序有不同的观点。
Hyperledger Fabric 的工作方式不同。它有一种称为排序节点的节点使交易有序,并与其他排序节点一起形成一个排序服务。因为 Fabric 的设计依赖于确定性的共识算法,所以 Peer 节点所验证的区块都是最终的和正确的。账本不会像其他分布式的以及无需许可的区块链中那样产生分叉。
除了促进确定性之外,排序节点还将链码执行的背书(发生在节点)与排序分离,这在性能和可伸缩性方面给 Fabric 提供了优势,消除了由同一个节点执行和排序时可能出现的瓶颈。
排序节点和通道配置
除了排序角色之外,排序节点还维护着允许创建通道的组织列表。此组织列表称为“联盟”,列表本身保存在“排序节点系统通道”(也称为“排序系统通道”)的配置中。默认情况下,此列表及其所在的通道只能由排序节点管理员编辑。请注意,排序服务可以保存这些列表中的几个,这使得联盟成为 Fabric 多租户的载体。
排序节点还对通道执行基本访问控制,限制谁可以读写数据,以及谁可以配置数据。请记住,谁有权修改通道中的配置元素取决于相关管理员在创建联盟或通道时设置的策略。配置交易由排序节点处理,因为它需要知道当前的策略集合,并根据策略来执行其基本的访问控制。在这种情况下,排序节点处理配置更新,以确保请求者拥有正确的管理权限。如果有权限,排序节点将根据现有配置验证更新请求,生成一个新的配置交易,并将其打包到一个区块中,该区块将转发给通道上的所有节点。然后节点处理配置交易,以验证排序节点批准的修改确实满足通道中定义的策略。
排序节点和身份
与区块链网络交互的所有东西,包括节点、应用程序、管理员和排序节点,都从它们的数字证书和成员服务提供者(MSP)定义中获取它们的组织身份。
有关身份和 MSP 的更多信息,请查看我们关于身份和成员的文档。
与 Peer 节点一样,排序节点属于组织。也应该像 Peer 节点一样为每个组织使用单独的证书授权中心(CA)。这个 CA 是否将作为根 CA 发挥作用,或者您是否选择部署根 CA,然后部署与该根 CA 关联的中间 CA,这取决于您。
排序节点和交易流程
阶段一:提案
从我们对 Peer 节点的讨论中,我们已经看到它们构成了区块链网络的基础,托管账本,应用程序可以通过智能合约查询和更新这些账本。
具体来说,更新账本的应用程序涉及到三个阶段,该过程确保区块链网络中的所有节点保持它们的账本彼此一致。
在第一阶段,客户端应用程序将交易提案发送给一组节点,这些节点将调用智能合约来生成一个账本更新提案,然后背书该结果。背书节点此时不将提案中的更新应用于其账本副本。相反,背书节点将向客户端应用程序返回一个提案响应。已背书的交易提案最终将在第二阶段经过排序生成区块,然后在第三阶段分发给所有节点进行最终验证和提交。
要深入了解第一个阶段,请参阅Peer 节点主题。
For an in-depth look at the first phase, refer back to the Peers topic.
阶段二:将交易排序并打包到区块中
在完成交易的第一阶段之后,客户端应用程序已经从一组节点接收到一个经过背书的交易提案响应。现在是交易的第二阶段。
在此阶段,应用程序客户端把包含已背书交易提案响应的交易提交到排序服务节点。排序服务创建交易区块,这些交易区块最终将分发给通道上的所有 Peer 节点,以便在第三阶段进行最终验证和提交。
排序服务节点同时接收来自许多不同应用程序客户端的交易。这些排序服务节点一起工作,共同组成排序服务。它的工作是将提交的交易按定义好的顺序安排成批次,并将它们打包成区块。这些区块将成为区块链的区块!
区块中的交易数量取决于区块的期望大小和最大间隔时间相关的通道配置参数(确切地说,是 BatchSize 和 BatchTimeout 参数)。然后将这些区块保存到排序节点的账本中,并分发给已经加入通道的所有节点。如果此时恰好有一个 Peer 节点关闭,或者稍后加入通道,它将在重新连接到排序服务节点或与另一个 Peer 节点通信之后接收到这些区块。我们将在第三阶段看到节点如何处理这个区块。
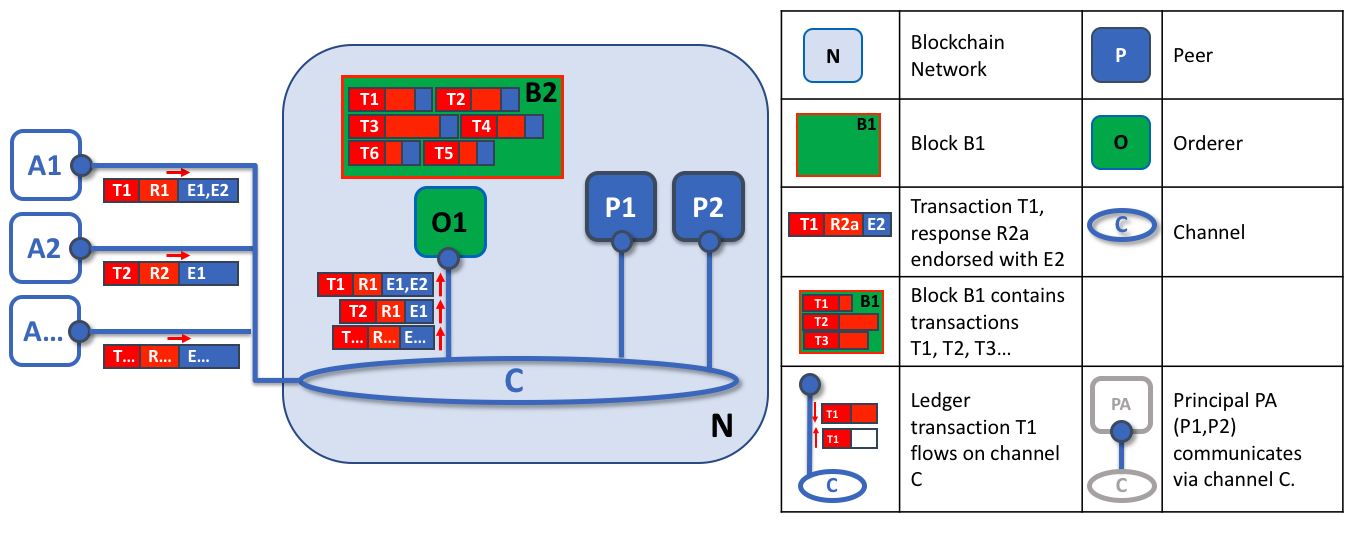
排序节点的第一个角色是打包提案的账本更新。在本例中,应用程序 A1 向排序节点 O1 发送由 E1 和 E2 背书的交易 T1。同时,应用程序 A2 将 E1 背书的交易 T2 发送给排序节点 O1。O1 将来自应用程序 A1 的交易 T1 和来自应用程序 A2 的交易 T2 以及来自网络中其他应用程序的交易打包到区块 B2 中。我们可以看到,在 B2 中,交易顺序是 T1、T2、T3、T4、T6、T5,但这可能不是这些交易到达排序节点的顺序!(这个例子显示了一个非常简单的排序服务配置,只有一个排序节点。)
值得注意的是,一个区块中交易的顺序不一定与排序服务接收的顺序相同,因为可能有多个排序服务节点几乎同时接收交易。重要的是,排序服务将交易放入严格的顺序中,并且 Peer 节点在验证和提交交易时将使用这个顺序。
区块内交易的严格排序使得 Hyperledger Fabric 与其他区块链稍有不同,在其他区块链中,相同的交易可以被打包成多个不同的区块,从而形成一个链。在 Hyperledger Fabric 中,由排序服务生成的区块是最终的。一旦一笔交易被写进一个区块,它在账本中的地位就得到了保证。正如我们前面所说,Hyperledger Fabric 的最终性意味着没有账本分叉,也就是说,经过验证的交易永远不会被重写或删除。
我们还可以看到,虽然节 Peer 点执行智能合约并处理交易,而排序节点不会这样做。到达排序节点的每个授权交易都被机械地打包在一个区块中,排序节点不判断交易的内容(前面提到的通道配置交易除外)。
在第二阶段的最后,我们看到排序节点负责一些简单但重要的过程,包括收集已提案的交易更新、排序并将它们打包成区块、准备分发。
阶段三:验证和提交
交易工作流的第三个阶段涉及到从排序节点到 Peer 节点的区块的分发和随后的验证,这些区块可能会被提交到账本中。
第三阶段排序节点将区块分发给连接到它的所有 Peer 节点开始。同样值得注意的是,并不是每个 Peer 节点都需要连接到一个排序节点,Peer 节点可以使用 gossip 协议将区块关联到其他节点。
每个节点将独立地以确定的方式验证区块,以确保账本保持一致。具体来说,通道中每个节点都将验证区块中的每个交易,以确保得到了所需组织的节点背书,也就是节点的背书和背书策略相匹配,并且不会因最初认可该事务时可能正在运行的其他最近提交的事务而失效。无效的交易仍然保留在排序节点创建的区块中,但是节点将它们标记为无效,并且不更新账本的状态。

排序节点的第二个角色是将区块分发给 Peer 节点。在本例中,排序节点 O1 将区块 B2 分配给节点 P1 和 P2。节点 P1 处理区块 B2,在 P1 上的账本 L1 中添加一个新区块。同时,节点 P2 处理区块 B2,从而将一个新区块添加到 P2 上的账本 L1中。一旦这个过程完成,节点 P1 和 P2 上的账本 L1 就会保持一致的更新,并且每个节点都可以通知与之连接的应用程序交易已经被处理。
总之,第三阶段看到的是由排序服务生成的区块一致地应用于账本。将交易严格地按区块排序,允许每个节点验证交易更新是否在整个区块链网络上一致地应用。
要更深入地了解阶段三,请参阅节点主题。
排序服务实现
虽然当前可用的每个排序服务都以相同的方式处理交易和配置更新,但是仍然有几种不同的实现可以在排序服务节点之间就严格的交易排序达成共识。
有关如何建立排序节点(无论该节点将在什么实现中使用)的信息,请参阅关于建立排序节点的文档。
Raft (推荐)
作为 v1.4.1 的新特性,Raft 是一种基于
etcd中 Raft 协议实现的崩溃容错(Crash Fault Tolerant,CFT)排序服务。Raft 遵循“领导者跟随者”模型,这个模型中,在每个通道上选举领导者节点,其决策被跟随者复制。Raft 排序服务会比基于 Kafka 的排序服务更容易设置和管理,它的设计允许不同的组织为分布式排序服务贡献节点。Kafka (在 v2.0 中被弃用)
和基于 Raft 的排序类似,Apache Kafka 是一个 CFT 的实现,它使用“领导者和跟随者”节点配置。Kafka 利用一个 ZooKeeper 进行管理。基于 Kafka 的排序服务从 Fabric v1.0 开始就可以使用,但许多用户可能会发现管理 Kafka 集群的额外管理开销令人生畏或不受欢迎。
Solo (在 v2.0 中被弃用)
排序服务的 Solo 实现仅仅是为了测试,并且只包含了一个单一的排序节点。它已经被弃用了,可能会在将来的版本中被完全移除。既存的 Solo 用户应该迁移到一个单一节点的 Raft 网络获得同样的功能。
Raft
有关如何配置 Raft 排序服务的信息,请参阅有关配置 Raft 排序服务的文档。
对于将用于生产网络的排序服务,Fabric 实现了使用“领导者跟随者”模型的 Raft 协议,领导者是在一个通道的排序节点中动态选择的(这个集合的节点称为“共识者集合(consenter set)”),领导者将信息复制到跟随者节点。Raft 被称为“崩溃容错”是因为系统可以承受节点的损失,包括领导者节点,前提是要剩余大量的排序节点(称为“法定人数(quorum)”)。换句话说,如果一个通道中有三个节点,它可以承受一个节点的丢失(剩下两个节点)。如果一个通道中有五个节点,则可以丢失两个节点(剩下三个节点)。
从它们提供给网络或通道的服务的角度来看,Raft 和现有的基于 Kafka 的排序服务(我们将在稍后讨论)是相似的。它们都是使用领导者跟随者模型设计的 CFT 排序服务。如果您是应用程序开发人员、智能合约开发人员或节点管理员,您不会注意到基于 Raft 和 Kafka 的排序服务之间的功能差异。然而,有几个主要的差异值得考虑,特别是如果你打算管理一个排序服务:
- Raft 更容易设置。虽然 Kafka 有很多崇拜者,但即使是那些崇拜者也(通常)会承认部署 Kafka 集群及其 ZooKeeper 集群会很棘手,需要在 Kafka 基础设施和设置方面拥有高水平的专业知识。此外,使用 Kafka 管理的组件比使用 Raft 管理的组件多,这意味着有更多的地方会出现问题。Kafka 有自己的版本,必须与排序节点协调。使用 Raft,所有内容都会嵌入到您的排序节点中。
- Kafka 和 Zookeeper 并不是为了在大型网络上运行。Kafka 是 CFT,它应该在一组紧密的主机中运行。这意味着实际上,您需要有一个组织运行 Kafka 集群。考虑到这一点,在使用 Kafka 时,让不同组织运行排序节点不会给您带来太多的分散性,因为这些节点都将进入同一个由单个组织控制的 Kafka 集群。使用 Raft,每个组织都可以有自己的排序节点参与排序服务,从而形成一个更加分散的系统。
- Raft 是原生支持的,这就意味着用户需要自己去获得所需的镜像并且学习应该如何使用 Kafka 和 Zookeeper。同样,对 Kafka 相关问题的支持是通过 Apache 来处理的,Apache 是 Kafka 的开源开发者,而不是 Hyperledge Fabric。另一方面,Fabric Raft 的实现已经开发出来了,并将在 Fabric 开发人员社区及其支持设备中得到支持。
- Kafka 使用一个服务器池(称为“Kafka 代理”),而且排序组织的管理员要指定在特定通道上使用多少个节点,但是 Raft 允许用户指定哪个排序节点要部署到哪个通道。通过这种方式,节点组织可以确保如果他们也拥有一个排序节点,那么这个节点将成为该通道的排序服务的一部分,而不是信任并依赖一个中心来管理 Kafka 节点。
- Raft 是向开发拜占庭容错(BFT)排序服务迈出的第一步。正如我们将看到的,Fabric 开发中的一些决策是由这个驱动的。如果你对 BFT 感兴趣,学习如何使用 Raft 应该可以慢慢过渡。
由于所有这些原因,在 Fabric v2.0 中,对于基于 Kafka 的排序服务正在被弃用。
注意:与 Solo 和 Kafka 类似,在向客户发送回执后 Raft 排序服务也可能会丢失交易。例如,如果领导者和跟随者提供回执时同时崩溃。因此,应用程序客户端应该监听节点上的交易提交事件,而不是检查交易的有效性。但是应该格外小心,要确保客户机也能优雅地容忍在配置的时间内没有交易提交超时。根据应用程序的不同,在这种超时情况下可能需要重新提交交易或收集一组新的背书。
Raft 概念
虽然 Raft 提供了许多与 Kafka 相同的功能(尽管它是一个简单易用的软件包)但它与 Kafka 的功能却大不相同,它向 Fabric 引入了许多新的概念,或改变了现有的概念。
日志条目(Log entry)。 Raft 排序服务中的主要工作单元是一个“日志条目”,该项的完整序列称为“日志”。如果大多数成员(换句话说是一个法定人数)同意条目及其顺序,则我们认为条目是一致的,然后将日志复制到不同排序节点上。
共识者集合(Consenter set)。主动参与给定通道的共识机制并接收该通道的日志副本的排序节点。这可以是所有可用的节点(在单个集群中或在多个集群中为系统通道提供服务),也可以是这些节点的一个子集。
有限状态机(Finite-State Machine,FSM)。Raft 中的每个排序节点都有一个 FSM,它们共同用于确保各个排序节点中的日志序列是确定(以相同的顺序编写)。
法定人数(Quorum)。描述需要确认提案的最小同意人数。对于每个共识者集合,这是大多数节点。在具有五个节点的集群中,必须有三个节点可用,才能有一个法定人数。如果节点的法定人数因任何原因不可用,则排序服务集群对于通道上的读和写操作都不可用,并且不能提交任何新日志。
领导者(Leader)。这并不是一个新概念,正如我们所说,Kafka 也使用了领导者,但是在任何给定的时间,通道的共识者集合都选择一个节点作为领导者,这一点非常重要(我们稍后将在 Raft 中描述这是如何发生的)。领导者负责接收新的日志条目,将它们复制到跟随者的排序节点,并在认为提交了某个条目时进行管理。这不是一种特殊类型的排序节点。它只是排序节点在某些时候可能扮演的角色,而不是由客观环境决定的其他角色。
跟随者(Follower)。再次强调,这不是一个新概念,但是理解跟随者的关键是跟随者从领导者那里接收日志并复制它们,确保日志保持一致。我们将在关于领导者选举的部分中看到,跟随者也会收到来自领导者的“心跳”消息。如果领导者在一段可配置的时间内停止发送这些消息,跟随者将发起一次领导者选举,它们中的一个将当选为新的领导者。
交易流程中的 Raft
每个通道都在 Raft 协议的单独实例上运行,该协议允许每个实例选择不同的领导者。这种配置还允许在集群由不同组织控制的排序节点组成的用例中进一步分散服务。虽然所有 Raft 节点都必须是系统通道的一部分,但它们不一定必须是所有应用程序通道的一部分。通道创建者(和通道管理员)能够选择可用排序节点的子集,并根据需要添加或删除排序节点(只要一次只添加或删除一个节点)。
虽然这种配置以冗余心跳消息和线程的形式产生了更多的开销,但它为 BFT 奠定了必要的基础。
在 Raft 中,交易(以提案或配置更新的形式)由接收交易的排序节点自动路由到该通道的当前领导者。这意味着 Peer 节点和应用程序在任何特定时间都不需要知道谁是领导者节点。只有排序节点需要知道。
当排序节点检查完成后,将按照我们交易流程的第二阶段的描述,对交易进行排序、打包成区块、协商并分发。
架构说明
Raft 是如何选举领导者的
尽管选举领导者的过程发生在排序节点的内部过程中,但是值得注意一下这个过程是如何工作的。
节点总是处于以下三种状态之一:跟随者、候选人或领导者。所有节点最初都是作为跟随者开始的。在这种状态下,他们可以接受来自领导者的日志条目(如果其中一个已经当选),或者为领导者投票。如果在一段时间内没有接收到日志条目或心跳(例如,5秒),节点将自己提升到候选状态。在候选状态中,节点从其他节点请求选票。如果候选人获得法定人数的选票,那么他就被提升为领导者。领导者必须接受新的日志条目并将其复制到跟随者。
要了解领导者选举过程的可视化表示,请查看数据的秘密生活。
快照
如果一个排序节点宕机,它如何在重新启动时获得它丢失的日志?
虽然可以无限期地保留所有日志,但是为了节省磁盘空间,Raft 使用了一个称为“快照”的过程,在这个过程中,用户可以定义日志中要保留多少字节的数据。这个数据量将决定区块的数量(这取决于区块中的数据量。注意,快照中只存储完整的区块)。
例如,假设滞后副本 R1 刚刚重新连接到网络。它最新的区块是100。领导者 L 位于第 196 块,并被配置为快照20个区块。R1 因此将从 L 接收区块 180,然后为区块 101 到 180 区块 分发 请求。然后180 到 196 的区块将通过正常 Raft 协议复制到 R1。
Kafka (在 v2.0中被弃用)
Fabric 支持的另一个容错崩溃排序服务是对 Kafka 分布式流平台的改写,将其用作排序节点集群。您可以在 Apache Kafka 网站上阅读更多关于 Kafka 的信息,但是在更高的层次上,Kafka 使用与 Raft 相同概念上的“领导者跟随者”配置,其中交易(Kafka 称之为“消息”)从领导者节点复制到跟随者节点。就像 Raft 一样,在领导者节点宕机的情况下,一个跟随者成为领导者,排序可以继续,以此来确保容错。
Kafka 集群的管理,包括任务协调、集群成员、访问控制和控制器选择等,由 ZooKeeper 集合及其相关 API 来处理。
Kafka 集群和 ZooKeeper 集合的设置是出了名的棘手,所以我们的文档假设您对 Kafka 和 ZooKeeper 有一定的了解。如果您决定在不具备此专业知识的情况下使用 Kafka,那么在试验基于 Kafka 的排序服务之前,至少应该完成 Kafka 快速入门指南的前六个步骤。您还可以参考 这个示例配置文件 来简要解释 Kafka 和 ZooKeeper 的合理默认值。
要了解如何启动基于 Kafka 的排序服务,请查看我们关于 Kafka 的文档。
私有数据
什么是私有数据?
如果一个通道上的一组组织需要对该通道上的其他组织保持数据私有,则可以选择创建一个新通道,其中只包含需要访问数据的组织。但是,在每种情况下创建单独的通道会产生额外的管理开销(维护链码版本、策略、MSP等),并且不能在保留一部分数据私有的同时,可以让所有通道参与者看到该事务。
这就是为什么从v1.2开始,Fabric 提供了创建私有数据集合的功能,它允许在通道上定义的组织子集能够背书、提交或查询私有数据,而无需创建单独的通道。
什么是私有数据集合?
集合是两个元素的组合:
- 实际的私有数据,通过 Gossip 协议点对点地发送给授权可以看到它的组织。私有数据保存在被授权的组织的节点上的私有数据库上,它们可以被授权节点的链码访问。排序节点不能影响这里也不能看到私有数据。注意,由于 gossip 以点对点的方式向授权组织分发私有数据,所以必须设置通道上的锚节点,也就是每个节点上的 CORE_PEER_GOSSIP_EXTERNALENDPOINT 配置,以此来引导跨组织的通信。
- 该数据的 hash 值,该 hash 值被背书、排序之后写入通道上每个节点的账本。Hash 值作为交易的证明用于状态验证,并可用于审计。
下面的图表分别说明了被授权和未被授权拥有私有数据的节点的账本内容。
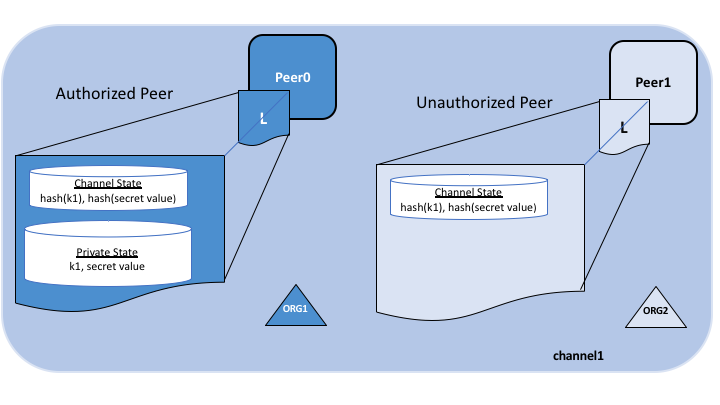
如果集合成员陷入争端,或者他们想把资产转让给第三方,他们可能决定与其他参与方共享私有数据。然后,第三方可以计算私有数据的 hash,并查看它是否与通道账本上的状态匹配,从而证明在某个时间点,集合成员之间存在该状态。
有些情况,你可能选择每个组织会有一套集合。比如一个组织可能会将私有数据记录到他们自己的集合中,之后可以共享给其他的通道成员并且在链码中引用。我们会在下边的共享私有数据部分看到一些例子。
什么时候使用一个通道内的组织集合,什么时候使用单独的通道
- 当必须将整个账本在属于通道成员的组织中保密时,使用通道比较合适。
- 当账本必须共享给一些组织,但是只有其中的部分组织可以在交易中使用这些数据的一部分或者全部时,使用集合比较合适。此外,由于私有数据是点对点传播的,而不是通过块传播的,所以在交易数据必须对排序服务节点保密时,应该使用私有数据集合。
解释集合的用例
设想一个通道上的五个组织,他们从事农产品贸易:
- 农民在国外售卖他的货物
- 分销商将货物运往国外
- 托运商负责参与方之间的货物运输
- 批发商向分销商采购商品
- 零售商向托运人和批发商采购商品
分销商可能希望与农民和托运商进行私下交易,以对批发商和零售商保密交易条款(以免暴露他们收取的加价)。
分销商还可能希望与批发商建立单独的私人数据关系,因为它收取的价格低于零售商。
批发商可能还想与零售商和托运商建立私有数据关系。
相比于为每一个特殊关系建立各种小的通道来说,更好的做法是,可以定义多个私有数据集合 (PDC),在以下情况下共享私有数据:
- PDC1: 分销商, 农民 和 托运商
- PDC2:分销商 和 批发商
- PDC3:批发商, 零售商 和 托运商
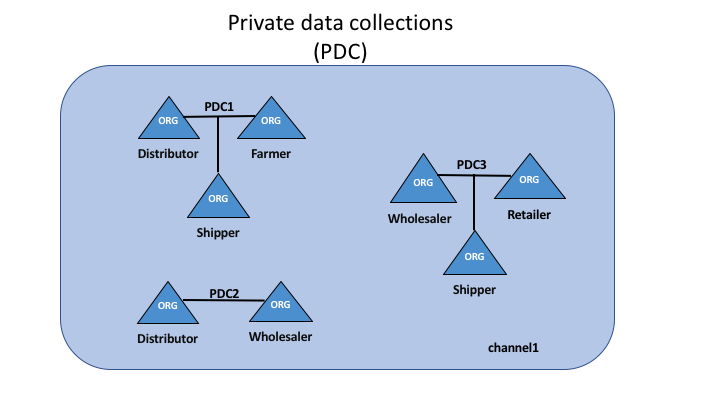
使用此示例,属于分销商的节点将在其账本中包含多个私有的私有数据库,其中包括来自分销商、农民和托运商子集合关系和分销商和批发商子集合关系的私有数据。
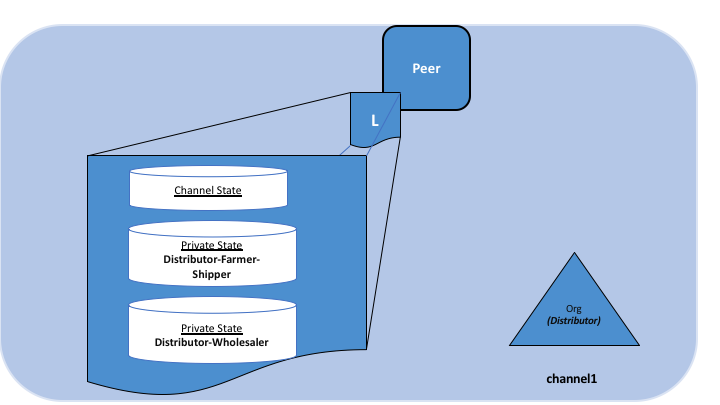
使用私有数据的交易流
当在链码中引用私有数据集合时,交易流程略有不同,以便在交易被提案、背书并提交到账本时保持私有数据的机密性。
关于不使用私有数据的交易流程的详细信息,请参阅我们的交易流程的文档。
- 客户端应用程序提交一个提案请求,让属于授权集合的背书节点执行链码函数(读取或写入私有数据)。
私有数据,或用于在链码中生成私有数据的数据,被发送到提案的
transient(瞬态)字段中。 - 背书节点模拟交易,并将私有数据存储在
瞬态数据存储( transient data store ,节点的本地临时存储)中。它们根据组织集合的策略将私有数据通过gossip分发给授权的 Peer 节点。 - 背书节点将提案响应发送回客户端。提案响应中包含经过背书的读写集,这其中包含了公共数据,还包含任何私有数据键和值的 hash。私有数据不会被发送回客户端。更多关于带有私有数据的背书的信息,请查看这里。
- 客户端应用程序将交易(包含带有私有数据 hash 的提案响应)提交给排序服务。带有私有数据 hash 的交易同样被包含在区块中。带有私有数据 hash 的区块被分发给所有节点。这样,通道中的所有节点就可以在不知道真实私有数据的情况下,用同样的方式来验证带有私有数据 hash 值的交易。
- 在区块提交的时候,授权节点会根据集合策略来决定它们是否有权访问私有数据。如果节点有访问权,它们会先检查自己的本地
瞬态数据存储,以确定它们是否在链码背书的时候已经接收到了私有数据。如果没有的话,它们会尝试从其他已授权节点那里拉取私有数据,然后对照公共区块上的 hash 来验证私有数据并提交交易和区块。当验证或提交结束后,私有数据会被移动到这些节点私有数据库和私有读写存储的副本中。随后瞬态数据存储中存储的这些私有数据会被删除。
共享私有数据
在多数情况下,一个私有数据集合中的私有数据键或值可能需要与其他通道成员或者私有数据集合共享,例如,当你需要和一个通道成员或者一组通道成员交易私有数据,而初始私有数据集合中并没有这些成员时。私有数据的接收方一般都会在交易过程中对照链上的 hash 来验证私有数据。
私有数据集合的以下几个方面促成了私有数据的共享和验证:
- 首先,只要符合背书策略,尽管你不是私有数据集的成员也可以为集合写入键。可以在链码层面,键层面(用基于状态的背书)或者集合层面(始于 Fabric v2.0)上定义背书策略。
- 其次,从 v1.4.2 开始出现了链码 API GetPrivateDataHash() ,它支持非集合成员节点上的链码读取一个私有键的 hash。下文中你将发现这是一个十分重要的功能,因为它允许链码对照之前交易中私有数据生成的链上 hash 来验证私有数据。
当设计应用程序和相关私有数据集合时需要考虑这种共享和验证私有数据的能力。您当然可以创建出几组多边私有数据集合以供多个通道成员组合之间共享数据,但是这样做的话你就需要定义大量私有数据集合。或者你也可以考虑使用少量私有数据集合(例如,每个组织用一个集合,或者每对组织用一个集合),然后和其他通道成员共享私有数据,有需要时还可以和其他集合共享私有数据。从 Fabric v2.0 开始,隐含的组织特定集合可供所有链码使用,这样一来部署链码的时候你就不用定义每个组织中的私有数据集合。
私有数据共享模式
为各组织的私有数据集合构建模型时,有多种模式可被用来共享或传输私有数据,且无需费力定义多个多边集合。以下是链码应用程序中可以使用的一些共享模式:
- 使用相应的公钥来追踪公共状态:您可以选择使用一个相应的公钥来追踪特定的公共状态(例如:资产性质,当前所有权等公共状态),对于每个需要拥有资产相应私有数据访问权的组织,您可以在它们的私有数据集合中创建一个私有秘钥或值。
- 链码访问控制:您可以在您的链码中执行访问控制,指明什么客户端应用程序能够查询私有数据集合中的私有数据。例如,为一个或多个私有数据集合键存储一个访问控制列表,然后在链码中获取客户端应用程序提交者的证书(使用 GetCreator() 链码 API 或 CID 库 API GetID() or GetMSPID() 来获取),并在返回私有数据之前验证这些证书。同样,为了访问私有数据,您可以要求客户端将密码短语传送到链码中,且该短语必须与存储在秘钥级别的密码短语相匹配。注意,这种模式也可用于限制客户端对公共状态数据的访问权。
- 使用带外数据来共享私有数据:这是一种链下选项,您可以同其他组织以带外数据的形式共享私有数据,这些组织可使用 GetPrivateDataHash() 链码 API 将键或值转换成 hash 以验证其是否与链上 hash 匹配。例如,如果一个组织想要购买一份你的资产,那么在同意购买之前它会检查链上 hash,以验证如下事项:该资产的属性;你是否为该资产的合法所有人。
- 与其他集合共享私有数据:您可以同链码在链上共享私有数据,该链码在其他组织的私有数据集合中生成一个相应的键或值。你将通过临时字段把私有数据键或值传送给链码,收到私有数据后该链码使用 GetPrivateDataHash() 验证此私有数据的 hash 是否与您集合中的链上 hash 一致,随后将该私有数据写入其他组织的私有数据集合中。
- 将私有数据传送给其他集合:您可以使用链码来”分发“私有数据,该链码把您集合中的私有数据键删除,然后在其他组织的集合中生成。与上述方法相同,这里在调用链码时使用临时字段传输私有数据,并且在链码中用 GetPrivateDataHash() 来验证你的私有数据集合中是否存在该数据,验证成功之后再把你的集合中该数据删除,并在其他组织的集合中生成该键。为确保每次操作都会从一个集合中删除一项交易并在另一个集合中添加该交易,你可能需要获得一些额外组织的背书,如监管者或审计者。
- 使用私有数据进行交易确认:如果您想在交易完成之前获得竞争对手的批准(即竞争对手同意以某价钱购买一项资产这一链上记录),链码会在竞争对手或您自己的私有数据集合中写入一个私有数据(链码随后将使用 GetPrivateDataHash() 来验证该数据),从而要求竞争对手”率先批准“这项交易。事实上,嵌入式生命周期系统链码就是使用这种机制来确保链码定义在被提交到通道之前已经获得通道上各组织的同意。这种私有数据共享模式从从 Fabric v2.0 开始凭借集合层面的背书策略变得越来越强大,确保在集合拥有者自己的信任节点上执行、背书链码。或者,您也可以使用具有秘钥层面背书策略、共同商定的秘钥,随后该秘钥被预先批准的条款更新,并且在指定组织的节点上获得背书。
- 使交易者保密:对上一种共享模式进行些许变化还可以实现指定交易的交易者不被暴露。例如,买方表示同意在自己的私有数据集合上进行购买,随后在接下来的交易中卖方会在自己的私有数据集合中引用该买方的私有数据。带有 hash 过的引用的交易证据被记录在链上,只有出售者和购买者知道这些是交易,但是如果需要需要知道的原则的话,他们可以暴漏原像,比如在一个接下来的跟其他的伙伴进行交易时,对方就能够验证这个 hash 了。
结合以上几种模式,我们可以发现,私有数据的交易和普通的通道状态数据交易情况类似,特别是以下几点:
- 重要级别交易访问控制 - 您可以在私有数据值中加入 所有权证书,这样一来,后续发生的交易就能够验证数据提交者是否具有共享和传输数据的所有权。在这种情况下,链码会获取数据提交者的证书(例如:使用 GetCreator() 链码 API or CID library API GetID() or GetMSPID() ),将此证书与链码收到的其他私有数据合并,
- 重要级别背书策略 - 和正常的通道状态数据一样,您可以使用基于状态的背书策略来指明哪些组织必须对共享或转移私有数据的交易做出背书,使用 SetPrivateDataValidationParameter() 链码 API 来进行一些操作,例如,指明必须对上述交易作出背书的仅包括一个拥有者的组织节点,托管组织的节点或者第三方组织。
样例场景:使用私有数据集合的资产交易
将上述私有数据共享模式结合起来能够赋能基于链码的应用程序。例如,思考一下如何使用各组织私有数据集合来实现资产转移场景:
- 在公共链码状态使用 UUID 键可以追踪一项资产。所记录信息只包括资产的所属权,没有其他信息。
- 链码要求:所有资产转移请求必须源自拥有者客户端,并且关键在于需要有基于状态的背书,要求从所有者的组织和一个监管者的组织的一个 Peer 必须要为所有的交易请求背书。
- 资产拥有者的私有数据集合包含了有关该资产的私有信息,用一个 UUID 的 hash 作为键值。其他的组织和排序服务将会只能看到资产详细的 hash 。
- 假定监管者是各私有数据集合的一员,因此它一直维护着私有数据,即使他并没必要这么做。
一项资产交易的进行情况如下:
- 链下,资产所有者和意向买家同意以某一特定价格交易该资产。
- 卖家通过以下方式提供资产所有权证明:利用带外数据传输私有信息;或者出示证书以供买家在其自身节点或管理员节点上查询私有数据。
- 买家验证私有信息的 hash 是否匹配链上公共 hash。
- 买家通过调取链码来在其自身私有数据集合中记录投标细节信息。一般在买家自己的节点上调取链码,但如果集合背书策略有相关规定,则也可能会在管理员节点上调取链码。
- 当前的资产所有者(卖家)调取链码来卖出、转移资产,传递私有信息和投标信息。在卖家、买家和管理员的节点上调用链码,以满足公钥的背书策略以及买家和买家私有数据集合的背书策略。
- 链码验证交易发送方是否为资产拥有者,根据卖家私有数据集合中的 hash 来验证私有细节信息,同时还会根据买家私有数据集合中的 hash 来验证投标细节信息。随后链码为公钥书写提案更新(将资产拥有者设定为买家,将背书策略设定为买家和管理员),把私有细节信息写入买家的私有数据集合中,以上步骤成功完成后链码会把卖家私有数据集合中的相关私有细节信息删除。在最终背书之前,背书节点会确保已将私有数据分布给卖家和管理员的所有授权节点。
- 卖家提交交易等待排序,其中包括了公钥和私钥 hash,随后该交易被分布到区块中的所有通道节点上。
- 每个节点的区块验证逻辑都将一致性地验证背书策略是否得到满足(买家、卖家和管理员都作出背书),同时还验证链码中已读取的公钥和私钥自链码执行以来未被任何其他交易更改。
- 所有节点提交的交易都是有效的,因为交易已经通过验证。如果买家和管理员节点在背书时未收到私有数据的话,它们将会从其他授权节点那里获取这些私有数据,并将这些数据保存在自己的私有数据状态数据库中(假定私有数据与交易的 hash 匹配)。
- 交易完成后,资产被成功转移,其他对该资产感兴趣的通道成员可能会查询公钥的历史以了解该资产的来历,但是它们无法访问任何私有细节信息,除非资产拥有者在须知的基础上共享这些信息。
以上是最基本的资产转移场景,我么可以对其进行扩展,例如,资产转移链码可能会验证一项付款记录是否可用于满足付款和交付要求,或者可能会验证一个银行是否在执行资产转移链码之前已经提交了信用证。交易各方并不直接维护节点,而是通过那些运行节点的托管组织来进行交易。
清除私有数据
对于非常敏感的数据,即使是共享私有数据的各方可能也希望(或者应政府相关法规要求必须)定期“清除”节点上的数据,仅把这些敏感数据的 hash 留在区块链上,作为私有数据不可篡改的证据。
在某些情况下,私有数据只需要在其被复制到节点区块链外部的数据库之前存在于该节点的私有数据库中。而数据或许也只需要在链码业务流程结束之前存在于节点上(交易结算、合约履行等)。
为了支持这些用户案例,如果私有数据已经持续 N 个块都没有被修改,则可以清除该私有数据,N 是可配置的。链码中无法查询已被清除的私有数据,并且其他节点也请求不到。
Channel capabilities
Audience: Channel administrators, node administrators
Note: this is an advanced Fabric concept that is not necessary for new users or application developers to understand. However, as channels and networks mature, understanding and managing capabilities becomes vital. Furthermore, it is important to recognize that updating capabilties is a different, though often related, process to upgrading nodes. We’ll describe this in detail in this topic.
Note: this is an advanced Fabric concept that is not necessary for new users or application developers to understand. However, as channels and networks mature, understanding and managing capabilities becomes vital. Furthermore, it is important to recognize that updating capabilities is a different, though often related, process to upgrading nodes. We’ll describe this in detail in this topic.
Because Fabric is a distributed system that will usually involve multiple organizations, it is possible (and typical) that different versions of Fabric code will exist on different nodes within the network as well as on the channels in that network. Fabric allows this — it is not necessary for every peer and ordering node to be at the same version level. In fact, supporting different version levels is what enables rolling upgrades of Fabric nodes.
What is important is that networks and channels process things in the same way, creating deterministic results for things like channel configuration updates and chaincode invocations. Without deterministic results, one peer on a channel might invalidate a transaction while another peer may validate it.
To that end, Fabric defines levels of what are called “capabilities”. These capabilities, which are defined in the configuration of each channel, ensure determinism by defining a level at which behaviors produce consistent results. As you’ll see, these capabilities have versions which are closely related to node binary versions. Capabilities enable nodes running at different version levels to behave in a compatible and consistent way given the channel configuration at a specific block height. You will also see that capabilities exist in many parts of the configuration tree, defined along the lines of administration for particular tasks.
As you’ll see, sometimes it is necessary to update your channel to a new capability level to enable a new feature.
Node versions and capability versions
If you’re familiar with Hyperledger Fabric, you’re aware that it follows the typical semantic versioning pattern: v1.1, v1.2.1, v2.0, etc. These versions refer to releases and their related binary versions.
If you’re familiar with Hyperledger Fabric, you’re aware that it follows a typical versioning pattern: v1.1, v1.2.1, v2.0, etc. These versions refer to releases and their related binary versions.
Capabilities follow the same semantic versioning convention. There are v1.1 capabilities and v1.2 capabilities and 2.0 capabilities and so on. But it’s important to note a few distinctions.
Capabilities follow the same versioning convention. There are v1.1 capabilities and v1.2 capabilities and 2.0 capabilities and so on. But it’s important to note a few distinctions.
- There is not necessarily a new capability level with each release. The need to establish a new capability is determined on a case by case basis and relies chiefly on the backwards compatibility of new features and older binary versions. Adding Raft ordering services in v1.4.1, for example, did not change the way either transactions or ordering service functions were handled and thus did not require the establishment of any new capabilities. Private Data, on the other hand, could not be handled by peers before v1.2, requiring the establishment of a v1.2 capability level. Because not every release contains a new feature (or a bug fix) that changes the way transactions are processed, certain releases will not require any new capabilities (for example, v1.4) while others will only have new capabilities at particular levels (such as v1.2 and v1.3). We’ll discuss the “levels” of capabilities and where they reside in the configuration tree later.
- Nodes must be at least at the level of certain capabilities in a channel. When a peer joins a channel, it reads all of the blocks in the ledger sequentially, starting with the genesis block of the channel and continuing through the transaction blocks and any subsequent configuration blocks. If a node, for example a peer, attempts to read a block containing an update to a capability it doesn’t understand (for example, a v1.4.x peer trying to read a block containing a v2.0 application capability), the peer will crash. This crashing behavior is intentional, as a v1.4.x peer should not attempt validate or commit any transactions past this point. Before joining a channel, make sure the node is at least the Fabric version (binary) level of the capabilities specified in the channel config relevant to the node. We’ll discuss which capabilities are relevant to which nodes later. However, because no user wants their nodes to crash, it is strongly recommended to update all nodes to the required level (preferably, to the latest release) before attempting to update capabilities. This is in line with the default Fabric recommendation to always be at the latest binary and capability levels.
If users are unable to upgrade their binaries, then capabilities must be left at their lower levels. Lower level binaries and capabilities will still work together as they’re meant to. However, keep in mind that it is a best practice to always update to new binaries even if a user chooses not to update their capabilities. Because capabilities themselves also include bug-fixes, it is always recommended to update capabilities once the network binaries support them.
Capability configuration groupings
As we discussed earlier, there is not a single capability level encompassing an entire channel. Rather, there are three capabilities, each representing an area of administration.
- Orderer: These capabilities govern tasks and processing exclusive to the ordering service. Because these capabilities do not involve processes that affect transactions or the peers, updating them falls solely to the ordering service admins (peers do not need to understand orderer capabilities and will therefore not crash no matter what the orderer capability is updated to). Note that these capabilities did not change between v1.1 and v1.4.2. However, as we’ll see in the channel section, this does not mean that v1.1 ordering nodes will work on all channels with capability levels below v1.4.2.
- Application: These capabilities govern tasks and processing exclusive to the peers. Because ordering service admins have no role in deciding the nature of transactions between peer organizations, changing this capability level falls exclusively to peer organizations. For example, Private Data can only be enabled on a channel with the v1.2 (or higher) application group capability enabled. In the case of Private Data, this is the only capability that must be enabled, as nothing about the way Private Data works requires a change to channel administration or the way the ordering service processes transactions.
- Channel: This grouping encompasses tasks that are jointly administered by the peer organizations and the ordering service. For example, this is the capability that defines the level at which channel configuration updates, which are initiated by peer organizations and orchestrated by the ordering service, are processed. On a practical level, this grouping defines the minimum level for all of the binaries in a channel, as both ordering nodes and peers must be at least at the binary level corresponding to this capability in order to process the capability.
The orderer and channel capabilities of a channel are inherited by default from the ordering system channel, where modifying them are the exclusive purview of ordering service admins. As a result, peer organizations should inspect the genesis block of a channel prior to joining their peers to that channel. Although the channel capability is administered by the orderers in the orderer system channel (just as the consortium membership is), it is typical and expected that the ordering admins will coordinate with the consortium admins to ensure that the channel capability is only upgraded when the consortium is ready for it.
Because the ordering system channel does not define an application capability, this capability must be specified in the channel profile when creating the genesis block for the channel.
Take caution when specifying or modifying an application capability. Because the ordering service does not validate that the capability level exists, it will allow a channel to be created (or modified) to contain, for example, a v1.8 application capability even if no such capability exists. Any peer attempting to read a configuration block with this capability would, as we have shown, crash, and even if it was possible to modify the channel once again to a valid capability level, it would not matter, as no peer would be able to get past the block with the invalid v1.8 capability.
For a full look at the current valid orderer, application, and channel capabilities check out a sample configtx.yaml file, which lists them in the “Capabilities” section.
For a full look at the current valid orderer, application, and channel capabilities check out a sample configtx.yaml file, which lists them in the “Capabilities” section.
For more specific information about capabilities and where they reside in the channel configuration, check out defining capability requirements.
入门
准备阶段
在我们开始之前,如果您还没有这样做,您可能希望检查以下所有先决条件是否已安装在您将开发区块链应用程序或运行 Hyperledger Fabric 的平台上。
注解
以下准备阶段是针对Fabric用户推荐的。如果你是Fabric开发者,你应该参考设置开发环境文档 Setting up the development environment.
安装 cURL
如果尚未安装 cURl 或在服务器上运行 curl 命令出错时请下载最新版本的 cURL 工具。
注解
如果你是在 Windows 上的话,请查看下边的 Windows附加功能 里的特殊说明。
Docker 和 Docker Compose
您将需要在将要运行或基于 Hyperledger Fabric 开发(或开发 Hyperledger Fabric)的平台上安装以下内容:
- MacOSX, *nix 或 Windows 10: 要求 Docker 版本 17.06.2-ce 及以上。
- 较旧版本的 Windows:Docker Toolbox - 要求 Docker 版本 17.06.2-ce 及以上。
您可以通过执行以下命令来检查已安装的 Docker 的版本:
docker --version
注解
下边的适用于运行 systemd 的 linux 系统。
确保 docker daemon 是在运行着的。
sudo systemctl start docker
可选:如果你希望 docker daemon 在系统启动的时候会自动启动的话,使用下边的命令:
sudo systemctl enable docker
将你的用户添加到 docker 组。
sudo usermod -a -G docker <username>
注解
在 Mac 或 Windows 以及 Docker Toolbox 中安装 Docker,也会安装 Docker Compose。如果您已安装 Docker,则应检查是否已安装 Docker Compose 版本 1.14.0 或更高版本。如果没有,我们建议您安装最新版本的 Docker。
您可以通过执行以下命令来检查已安装的 Docker Compose 的版本:
docker-compose --version
Windows附加功能
在 Windows 10 上,你应该使用本地 Docker 发行版,并且可以使用 Windows PowerShell。但是你仍需要可用的 uname 命令以便成功运行 二进制 命令。你可以通过 Git 来得到它,但是只支持 64 位的版本。
在运行任何``git clone``命令前,运行如下命令:
git config --global core.autocrlf false
git config --global core.longpaths true
你可以通过如下命令检查这些参数的设置:
git config --get core.autocrlf
git config --get core.longpaths
它们必须分别是 false 和 true 。
Git 和 Docker Toolbox 附带的 curl 命令很旧,无法正确处理 入门 中使用的重定向。因此要确保你从 cURL 下载页 安装并使用的是较新版本。
注解
如果你有本文档未解决的问题,或遇到任何有关教程的问题,请访问 仍有问题? 页面,获取有关在何处寻求其他帮助的一些提示。
安装示例、二进制和 Docker 镜像
在我们为 Hyperledger Fabric 二进制文件开发真正的安装程序的同时,我们提供了一个脚本,可以下载并安装示例和二进制文件到您的系统。我们认为您会发现安装的示例应用程序可以帮助您去了解 Hyperledger Fabric 有关的功能和运维的更多信息。
注解
如果您在 Windows 上运行示例,则需要使用 Docker 快速启动终端来执行下边的命令。如果您之前没有安装,请访问 准备阶段 。
如果您在 macOS 上使用 Docker Toolbox,您在安装和运行示例时需要使用到 /Users (macOS)目录下的路径。
如果您在 Mac 上使用 Docker,则需要使用到 /Users、 /Volumes、 /private、 或 /tmp 这些目录下的路径。 要使用其他路径,请参阅 Docker 文档以获取 文件共享 。
如果您在 Windows 下使用 Docker,请参阅 Docker 文档以获取 共享驱动器 ,并使用其中一个共享驱动器下的路径。
确定计算机上要放置 fabric-samples 仓存的位置,并在终端窗口中进入该目录。后面的命令将按以下步骤执行:
- 如果需要,请克隆 hyperledger/fabric-samples 仓库
- 检出适当的版本标签
- 将指定版本的 Hyperledger Fabric 平台特定二进制文件和配置文件安装到 fabric-samples 下的 /bin 和 /config 目录中
- 下载指定版本的 Hyperledger Fabric docker 镜像
当你准备好了之后,并且你也进入到了你将要安装 Fabric 示例和二进制的路径下,那么就开始执行命令来下载二进制文件和镜像吧。
注解
如果你想要最新的生产发布版本,忽略所有的版本标识符。
curl -sSL https://bit.ly/2ysbOFE | bash -s
注解
如果你想要一个指定的发布版本,传入一个 Fabric、Fabric-ca 和第三方 Docker 镜像的版本标识符。下边的命令显示了如何下载最新的生产发布版 - Fabric v2.2.0 和 Fabric CA v1.4.7 。
curl -sSL https://bit.ly/2ysbOFE | bash -s -- <fabric_version> <fabric-ca_version>
curl -sSL https://bit.ly/2ysbOFE | bash -s -- 2.2.0 1.4.7
注解
如果运行上述 curl 命令时出错,则可能是旧版本的 curl 不能处理重定向或环境不支持。
请访问 准备阶段 页面获取有有关在哪里可以找到最新版的 curl 并获得正确环境的其他信息。或者,您可以访问未缩写的 URL: https://raw.githubusercontent.com/hyperledger/fabric/master/scripts/bootstrap.sh
上面的命令下载并执行一个 bash 脚本,该脚本将下载并提取设置网络所需的所有特定于平台的二进制文件,并将它们放入您在上面创建的克隆仓库中。它检索以下特定平台的二进制文件:
configtxgen,configtxlator,cryptogen,discover,idemixgenorderer,peer,fabric-ca-client,fabric-ca-server
并将它们放在当前工作目录的子目录 bin 中。
你可能希望将其添加到 PATH 环境变量中,以便在不需要指定每个二进制文件的绝对路径的情况下获取这些命令。例如:
export PATH=<path to download location>/bin:$PATH
最后,该脚本会将从 Docker Hub 上下载 Hyperledger Fabric docker 镜像到本地 Docker 注册表中,并将其标记为 ‘latest’。
该脚本列出了结束时安装的 Docker 镜像。
查看每个镜像的名称;这些组件最终将构成我们的 Hyperledger Fabric 网络。你还会注意到,你有两个具有相同镜像 ID的 实例——一个标记为 “amd64-1.x.x”,另一个标记为 “latest”。在 1.2.0 之前,由 uname -m 命令结果来确定下载的镜像,并显示为“x86_64-1.x.x”。
注解
在不同的体系架构中,x86_64/amd64 将替换为标识你的体系架构的字符串。
注解
如果你有本文档未解决的问题,或遇到任何有关教程的问题,请访问 仍有问题? 页面,获取有关在何处寻求其他帮助的一些提示。
使用Fabric的测试网络
下载Hyperledger Fabric Docker镜像和示例后,您将可以使用以fabric-samples代码库中提供的脚本来部署测试网络。
您可以通过在本地计算机上运行节点来使用测试网络以了解Fabric。更有经验的开发人员可以使用
网络测试其智能合约和应用程序。该网络工具仅用作教育与测试目的。它不应该用作部署产品网络的模板。
该测试网络在Fabric v2.0中被引入作为first-network示例的长期替代。该示例网络使用Docker Compose部署了一个Fabric网络。
因为这些节点是隔离在Docker Compose网络中的,所以测试网络不配置为连接到其他正在运行的fabric节点。
注意: 这些指导已基于最新的稳定版Docker镜像和提供的tar文件中的预编译的安装软件进行验证。 如果您使用当前的master分支的镜像或工具运行这些命令,则可能会遇到错误。
开始之前
在运行测试网络之前,您需要克隆fabric-samples代码库并下载Fabric镜像。确保已安装
的 准备阶段 和 安装示例、二进制和 Docker 镜像.
启动测试网络
您可以在fabric-samples代码库的test-network目录中找到启动网络的脚本。
使用以下命令导航至测试网络目录:
cd fabric-samples/test-network
在此目录中,您可以找到带注释的脚本network.sh,该脚本在本地计算机上使用Docker镜像建立Fabric网络。
你可以运行./network.sh -h以打印脚本帮助文本:
Usage:
  network.sh <Mode> [Flags]
    <Mode>
      - 'up' - bring up fabric orderer and peer nodes. No channel is created
      - 'up createChannel' - bring up fabric network with one channel
      - 'createChannel' - create and join a channel after the network is created
      - 'deployCC' - deploy the fabcar chaincode on the channel
      - 'down' - clear the network with docker-compose down
      - 'restart' - restart the network

    Flags:
    -ca <use CAs> -  create Certificate Authorities to generate the crypto material
    -c <channel name> - channel name to use (defaults to "mychannel")
    -s <dbtype> - the database backend to use: goleveldb (default) or couchdb
    -r <max retry> - CLI times out after certain number of attempts (defaults to 5)
    -d <delay> - delay duration in seconds (defaults to 3)
    -l <language> - the programming language of the chaincode to deploy: go (default), java, javascript, typescript
    -v <version>  - chaincode version. Must be a round number, 1, 2, 3, etc
    -i <imagetag> - the tag to be used to launch the network (defaults to "latest")
    -cai <ca_imagetag> - the image tag to be used for CA (defaults to "1.4.6")
    -verbose - verbose mode
  network.sh -h (print this message)

 Possible Mode and flags
  network.sh up -ca -c -r -d -s -i -verbose
  network.sh up createChannel -ca -c -r -d -s -i -verbose
  network.sh createChannel -c -r -d -verbose
  network.sh deployCC -l -v -r -d -verbose

 Taking all defaults:
  network.sh up

 Examples:
  network.sh up createChannel -ca -c mychannel -s couchdb -i 2.0.0
  network.sh createChannel -c channelName
  network.sh deployCC -l javascript
在test-network目录中,运行以下命令删除先前运行的所有容器或工程:
./network.sh down
然后,您可以通过执行以下命令来启动网络。如果您尝试从另一个目录运行脚本,则会遇到问题:
./network.sh up
此命令创建一个由两个对等节点和一个排序节点组成的Fabric网络。
运行./network.sh up时没有创建任何channel,
虽然我们将在后面的步骤实现。
如果命令执行成功,您将看到已创建的节点的日志:
Creating network "net_test" with the default driver
Creating volume "net_orderer.example.com" with default driver
Creating volume "net_peer0.org1.example.com" with default driver
Creating volume "net_peer0.org2.example.com" with default driver
Creating orderer.example.com    ... done
Creating peer0.org2.example.com ... done
Creating peer0.org1.example.com ... done
CONTAINER ID        IMAGE                               COMMAND             CREATED             STATUS                  PORTS                              NAMES
8d0c74b9d6af        hyperledger/fabric-orderer:latest   "orderer"           4 seconds ago       Up Less than a second   0.0.0.0:7050->7050/tcp             orderer.example.com
ea1cf82b5b99        hyperledger/fabric-peer:latest      "peer node start"   4 seconds ago       Up Less than a second   0.0.0.0:7051->7051/tcp             peer0.org1.example.com
cd8d9b23cb56        hyperledger/fabric-peer:latest      "peer node start"   4 seconds ago       Up 1 second             7051/tcp, 0.0.0.0:9051->9051/tcp   peer0.org2.example.com
如果未得到此结果,请跳至故障排除 寻求可能出现问题的帮助。 默认情况下,网络使用 cryptogen工具来建立网络。 但是,您也可以 通过证书颁发机构建立网络。
测试网络的组成部分
部署测试网络后,您可能需要一些时间来检查其网络组件。
运行以下命令以列出所有正在您的计算机上运行的Docker容器。
您应该看到由network.sh脚本创建的三个节点:
docker ps -a
与Fabric网络互动的每个节点和用户都必须属于一个网络成员的组织。 Fabric网络成员的所有组织通常称为联盟(consortium)。 测试网络有两个联盟成员,Org1和Org2。 该网络还包括一个维护网络排序服务的排序组织。
Peer 节点 是任何Fabric网络的基本组件。 对等节点存储区块链账本并在进行交易之前对其进行验证。 同行运行包含业务用于管理区块链账本的智能合约上的业务逻辑。
网络中的每个对等方都必须属于该联盟的成员。
在测试网络里,每个组织各自运营一个对等节点,
peer0.org1.example.com和peer0.org2.example.com.
每个Fabric网络还包括一个排序服务。 虽然对等节点验证交易并将交易块添加到区块链账本,他们不决定交易顺序或包含他们进入新的区块。 在分布式网络上,对等点可能运行得很远彼此之间没有什么共同点,并且对何时创建事务没有共同的看法。 在交易顺序上达成共识是一个代价高昂的过程,为同伴增加开销。
排序服务允许对等节点专注于验证交易并将它们提交到账本。 排序节点从客户那里收到认可的交易后,他们就交易顺序达成共识,然后添加区块。 这些区块之后被分配给添加这些区块到账本的对等节点。 排序节点还可以操作定义Fabric网络的功能的系统通道,例如如何制作块以及节点可以使用的Fabric版本。 系统通道定义了哪个组织是该联盟的成员。
该示例网络使用一个单节点Raft排序服务,该服务由排序组织运行。
您可以看到在您机器上正在运行的排序节点orderer.example.com。
虽然测试网络仅使用单节点排序服务,一个真实的网络将有多个排序节点,由一个或多个多个排序者组织操作。
不同的排序节点将使用Raft共识算法达成跨交易顺序的共识网络。
创建一个通道
现在我们的机器上正在运行对等节点和排序节点, 我们可以使用脚本创建用于在Org1和Org2之间进行交易的Fabric通道。 通道是特定网络成员之间的专用通信层。通道只能由被邀请加入通道的组织使用,并且对网络的其他成员不可见。 每个通道都有一个单独的区块链账本。被邀请的组织“加入”他们的对等节点来存储其通道账本并验证交易。
您可以使用network.sh脚本在Org1和Org2之间创建通道并加入他们的对等节点。
运行以下命令以创建一个默认名称为“ mychannel”的通道:
./network.sh createChannel
如果命令成功执行,您将看到以下消息打印在您的日志:
========= Channel successfully joined ===========
您也可以使用channel标志创建具有自定义名称的通道。
作为一个例子,以下命令将创建一个名为channel1的通道:
./network.sh createChannel -c channel1
通道标志还允许您创建多个不同名称的多个通道。
创建mychannel或channel1之后,您可以使用下面的命令创建另一个名为channel2的通道:
./network.sh createChannel -c channel2
如果您想一步建立网络并创建频道,则可以使用up和createChannel模式一起:
./network.sh up createChannel
在通道启动一个链码
创建通道后,您可以开始使用智能合约与通道账本交互。 智能合约包含管理区块链账本上资产的业务逻辑。 由成员运行的应用程序网络可以在账本上调用智能合约创建,更改和转让这些资产。 应用程序还通过智能合约查询,以在分类帐上读取数据。
为确保交易有效,使用智能合约创建的交易通常需要由多个组织签名才能提交到通道账本。 多个签名是Fabric信任模型不可或缺的一部分。 一项交易需要多次背书,以防止一个通道上的单一组织使用通道不同意的业务逻辑篡改其对等节点的分类账本。 要签署交易,每个组织都需要调用并在其对等节点上执行智能合约,然后签署交易的输出。 如果输出是一致的并且已经有足够的组织签名,则可以将交易提交到账本。 该政策被称为背书政策,指定需要执行智能交易的通道上的已设置组织合同,针对每个链码设置为链码定义的一部分。
在Fabric中,智能合约作为链码以软件包的形式部署在网络上。 链码安装在组织的对等节点上,然后部署到某个通道,然后可以在该通道中用于认可交易和区块链账本交互。 在将链码部署到通道前,该频道的成员需要就链码定义达成共识,建立链码治理。 何时达到要求数量的组织同意后,链码定义可以提交给通道,并且可以使用链码了。
使用network.sh创建频道后,您可以使用以下命令在通道上启动链码:
./network.sh deployCC
deployCC子命令将在peer0.org1.example.com和peer0.org2.example.com上安装fabcar链码。
然后在使用通道标志(或mychannel如果未指定通道)的通道上部署指定的通道的链码。
如果您是第一次部署链码,脚本将安装链码的依赖项。 默认情况下,脚本安装Go版本的fabcar链码。
但是您可以使用语言标志-l,用于安装Java或javascript版本的链码。
您可以在fabric-samples目录的chaincode文件夹中找到Fabcar链码。
此文件夹包含用来突显Fabric特性教程示例的样例链码。
将fabcar链码定义提交给通道后,脚本通过调用init函数初始化链码,然后调用链码将一个初始汽车清单放到账本中。
然后脚本查询链码以验证是否已添加数据。
如果链码已正确安装,部署和调用,您应该在您的日志中打印中看到以下汽车列表:
[{"Key":"CAR0", "Record":{"make":"Toyota","model":"Prius","colour":"blue","owner":"Tomoko"}},
{"Key":"CAR1", "Record":{"make":"Ford","model":"Mustang","colour":"red","owner":"Brad"}},
{"Key":"CAR2", "Record":{"make":"Hyundai","model":"Tucson","colour":"green","owner":"Jin Soo"}},
{"Key":"CAR3", "Record":{"make":"Volkswagen","model":"Passat","colour":"yellow","owner":"Max"}},
{"Key":"CAR4", "Record":{"make":"Tesla","model":"S","colour":"black","owner":"Adriana"}},
{"Key":"CAR5", "Record":{"make":"Peugeot","model":"205","colour":"purple","owner":"Michel"}},
{"Key":"CAR6", "Record":{"make":"Chery","model":"S22L","colour":"white","owner":"Aarav"}},
{"Key":"CAR7", "Record":{"make":"Fiat","model":"Punto","colour":"violet","owner":"Pari"}},
{"Key":"CAR8", "Record":{"make":"Tata","model":"Nano","colour":"indigo","owner":"Valeria"}},
{"Key":"CAR9", "Record":{"make":"Holden","model":"Barina","colour":"brown","owner":"Shotaro"}}]
===================== Query successful on peer0.org1 on channel 'mychannel' =====================
与网络交互
在您启用测试网络后,可以使用peer CLI与您的网络进行交互。
peer CLI允许您调用已部署的智能合约,更新通道,或安装和部署新的智能合约。
确保您正在从test-network目录进行操作。
如果你按照说明安装示例,二进制文件和Docker映像,
您可以在fabric-samples代码库的bin文件夹中找到peer二进制文件。
使用以下命令将这些二进制文件添加到您的CLI路径:
export PATH=${PWD}/../bin:$PATH
您还需要将fabric-samples代码库中的FABRIC_CFG_PATH设置为指向其中的core.yaml文件:
export FABRIC_CFG_PATH=$PWD/../config/
现在,您可以设置环境变量,以允许您作为Org1操作peer CLI:
# Environment variables for Org1

export CORE_PEER_TLS_ENABLED=true
export CORE_PEER_LOCALMSPID="Org1MSP"
export CORE_PEER_TLS_ROOTCERT_FILE=${PWD}/organizations/peerOrganizations/org1.example.com/peers/peer0.org1.example.com/tls/ca.crt
export CORE_PEER_MSPCONFIGPATH=${PWD}/organizations/peerOrganizations/org1.example.com/users/Admin@org1.example.com/msp
export CORE_PEER_ADDRESS=localhost:7051
CORE_PEER_TLS_ROOTCERT_FILE和CORE_PEER_MSPCONFIGPATH环境变量指向Org1的organizations文件夹中的的加密材料。
如果您使用./network.sh deployCC安装和启动fabcar链码,您现在可以从CLI查询账本。
运行以下命令以获取已添加到通道账本中的汽车列表:
peer chaincode query -C mychannel -n fabcar -c '{"Args":["queryAllCars"]}'
如果命令成功,您将在运行脚本时看到日志中与已打印汽车相同的列表:
[{"Key":"CAR0", "Record":{"make":"Toyota","model":"Prius","colour":"blue","owner":"Tomoko"}},
{"Key":"CAR1", "Record":{"make":"Ford","model":"Mustang","colour":"red","owner":"Brad"}},
{"Key":"CAR2", "Record":{"make":"Hyundai","model":"Tucson","colour":"green","owner":"Jin Soo"}},
{"Key":"CAR3", "Record":{"make":"Volkswagen","model":"Passat","colour":"yellow","owner":"Max"}},
{"Key":"CAR4", "Record":{"make":"Tesla","model":"S","colour":"black","owner":"Adriana"}},
{"Key":"CAR5", "Record":{"make":"Peugeot","model":"205","colour":"purple","owner":"Michel"}},
{"Key":"CAR6", "Record":{"make":"Chery","model":"S22L","colour":"white","owner":"Aarav"}},
{"Key":"CAR7", "Record":{"make":"Fiat","model":"Punto","colour":"violet","owner":"Pari"}},
{"Key":"CAR8", "Record":{"make":"Tata","model":"Nano","colour":"indigo","owner":"Valeria"}},
{"Key":"CAR9", "Record":{"make":"Holden","model":"Barina","colour":"brown","owner":"Shotaro"}}]
当网络成员要转移或更改帐上的资产时,将调用链码。 使用以下命令调用fabcar链码来更改账本上汽车的所有者:
peer chaincode invoke -o localhost:7050 --ordererTLSHostnameOverride orderer.example.com --tls --cafile ${PWD}/organizations/ordererOrganizations/example.com/orderers/orderer.example.com/msp/tlscacerts/tlsca.example.com-cert.pem -C mychannel -n fabcar --peerAddresses localhost:7051 --tlsRootCertFiles ${PWD}/organizations/peerOrganizations/org1.example.com/peers/peer0.org1.example.com/tls/ca.crt --peerAddresses localhost:9051 --tlsRootCertFiles ${PWD}/organizations/peerOrganizations/org2.example.com/peers/peer0.org2.example.com/tls/ca.crt -c '{"function":"changeCarOwner","Args":["CAR9","Dave"]}'
如果命令成功,您应该看到以下响应:
2019-12-04 17:38:21.048 EST [chaincodeCmd] chaincodeInvokeOrQuery -> INFO 001 Chaincode invoke successful. result: status:200
注意:如果您部署了Java链码,请使用以下参数调用命令替代'{“ function”:“ changeCarOwner”,“ Args”:[“ CAR009”,“ Dave”]}'。
用Java编写的Fabcar链码使用与用Javascipt或Go编写的链码不同的索引。
因为fabcar链码的背书政策要求交易要由Org1和Org2签名,
链码调用命令需要同时指向peer0.org1.example.com和peer0.org2.example.com使用--peerAddresses标志。
由于已为网络启用TLS,因此该命令还需要为每个对等节点使用--tlsRootCertFiles标志来提供TLS证书。
调用链码后,我们可以使用另一个查询来查看调用如何更改了区块链账本上的资产。 由于我们已经查询过Org1对等节点,我们可以借此机会查询在Org2上运行链码的对等节点。 设置以下环境变量以作为Org2进行操作:
# Environment variables for Org2

export CORE_PEER_TLS_ENABLED=true
export CORE_PEER_LOCALMSPID="Org2MSP"
export CORE_PEER_TLS_ROOTCERT_FILE=${PWD}/organizations/peerOrganizations/org2.example.com/peers/peer0.org2.example.com/tls/ca.crt
export CORE_PEER_MSPCONFIGPATH=${PWD}/organizations/peerOrganizations/org2.example.com/users/Admin@org2.example.com/msp
export CORE_PEER_ADDRESS=localhost:9051
您现在可以查询运行在peer0.org2.example.com的fabcar链码:
peer chaincode query -C mychannel -n fabcar -c '{"Args":["queryCar","CAR9"]}'
结果将显示"CAR9"已转移到Dave:
{"make":"Holden","model":"Barina","colour":"brown","owner":"Dave"}
关停网络
使用完测试网络后,您可以使用以下命令关闭网络:
./network.sh down
该命令将停止并删除节点和链码容器,删除组织加密材料,并从Docker Registry移除链码镜像。
该命令还删除之前运行的通道项目和docker卷。如果您遇到任何问题,还允许您再次运行./ network.sh up。
下一步
既然您已经使用测试网络在您的本地计算机上部署了Hyperledger Fabric,您可以使用教程来开始开发自己的解决方案:
- 使用将智能合约部署到通道 教程了解如何来将自己的智能合约部署到测试网络。
- 访问编写您的第一个应用程序 教程了解如何从您的客户端程序使用Fabric SDK提供的API调用智能合约。
- 如果您准备将更复杂的智能合约部署到网络,请跟随商业票据教程 探索两个组织使用区块链网络进行商业票据交易的用例。
您可以在教程页上找到Fabric教程的完整列表。
使用认证机构建立网络
Hyperledger Fabric使用公钥基础设施(PKI)来验证所有网络参与者的行为。
每个节点,网络管理员和用户提交的交易需要具有公共证书和私钥以验证其身份。
这些身份必须具有有效的信任根源,该证书是由作为网络中的成员组织颁发的。
network.sh脚本在创建对等和排序节点之前创建所有部署和操作网络所有需要的加密材料。
默认情况下,脚本使用cryptogen工具创建证书和密钥。
该工具用于开发和测试,并且可以快速为具有有效根信任的Fabric组织创建所需的加密材料。
当您运行./network.sh up时,您会看到cryptogen工具正在创建Org1,Org2和Orderer Org的证书和密钥。
creating Org1, Org2, and ordering service organization with crypto from 'cryptogen'

/Usr/fabric-samples/test-network/../bin/cryptogen

##########################################################
##### Generate certificates using cryptogen tool #########
##########################################################

##########################################################
############ Create Org1 Identities ######################
##########################################################
+ cryptogen generate --config=./organizations/cryptogen/crypto-config-org1.yaml --output=organizations
org1.example.com
+ res=0
+ set +x
##########################################################
############ Create Org2 Identities ######################
##########################################################
+ cryptogen generate --config=./organizations/cryptogen/crypto-config-org2.yaml --output=organizations
org2.example.com
+ res=0
+ set +x
##########################################################
############ Create Orderer Org Identities ###############
##########################################################
+ cryptogen generate --config=./organizations/cryptogen/crypto-config-orderer.yaml --output=organizations
+ res=0
+ set +x
测试网络脚本还提供了使用证书颁发机构(CA)的网络的启动选项。 在产品网络中,每个组织操作一个CA(或多个中间CA)来创建属于他们的组织身份。 所有由该组织运行的CA创建的身份享有相同的组织信任根源。 虽然花费的时间比使用cryptogen多,使用CA建立测试网络,提供了在产品中部署网络的指导。 部署CA还可以让您注册Fabric SDK的客户端身份,并为您的应用程序创建证书和私钥。
如果您想使用Fabric CA建立网络,请首先运行以下命令关停所有正在运行的网络:
./network.sh down
然后,您可以使用CA标志启动网络:
./network.sh up -ca
执行命令后,您可以看到脚本启动了三个CA,每个网络中的组织一个。
##########################################################
##### Generate certificates using Fabric CA's ############
##########################################################
Creating network "net_default" with the default driver
Creating ca_org2    ... done
Creating ca_org1    ... done
Creating ca_orderer ... done
值得花一些时间检查/ network.sh脚本部署CA之后生成的日志。
测试网络使用Fabric CA客户端以每个组织的CA注册节点和用户身份。
之后这个脚本使用enroll命令为每个身份生成一个MSP文件夹。
MSP文件夹包含每个身份的证书和私钥,以及在运营CA的组织中建立身份的角色和成员身份。
您可以使用以下命令来检查Org1管理员用户的MSP文件夹:
tree organizations/peerOrganizations/org1.example.com/users/Admin@org1.example.com/
该命令将显示MSP文件夹的结构和配置文件:
organizations/peerOrganizations/org1.example.com/users/Admin@org1.example.com/
└── msp
    ├── IssuerPublicKey
    ├── IssuerRevocationPublicKey
    ├── cacerts
    │   └── localhost-7054-ca-org1.pem
    ├── config.yaml
    ├── keystore
    │   └── 58e81e6f1ee8930df46841bf88c22a08ae53c1332319854608539ee78ed2fd65_sk
    ├── signcerts
    │   └── cert.pem
    └── user
您可以在signcerts文件夹中找到管理员用户的证书,然后在keystore文件夹中找到私钥。
要了解有关MSP的更多信息,请参阅成员服务提供者概念主题。
cryptogen和Fabric CA都为每个组织在organizations文件夹中生成加密材料。
您可以在organizations/fabric-ca目录中的registerEnroll.sh脚本中找到用于设置网络的命令。
要了解更多有关如何使用Fabric CA部署Fabric网络的信息,请访问Fabric CA操作指南。
您可以通过访问identity和membership概念主题了解有关Fabric如何使用PKI的更多信息。
幕后发生了什么?
如果您有兴趣了解有关示例网络的更多信息,则可以调查test-network目录中的文件和脚本。
下面的步骤提供了有关在您发出./network.sh up命令时会发生什么情况的导览。
./ network.sh为两个对等组织和排序组织创建证书和密钥。 默认情况下,脚本利用cryptogen工具使用位于organizations/cryptogen文件夹中的配置文件。 如果使用-ca标志创建证书颁发机构,则脚本使用Fabric CA服务器配置文件和位于organizations/fabric-ca文件夹的registerEnroll.sh脚本。 cryptogen和Fabric CA均会在organisations文件夹创建所有三个组织中的加密资料和MSP文件夹。- 该脚本使用configtxgen工具创建系统通道生成块。
Configtxgen使用了
TwoOrgsOrdererGenesis通道配置文件中的configtx/configtx.yaml文件创建创世区块。 区块被存储在system-genesis-block文件夹中。 - 一旦组织的加密资料和系统通道的创始块生成后,
network.sh就可以启动网络的节点。 脚本使用docker文件夹中的docker-compose-test-net.yaml文件创建对等节点和排序节点。docker文件夹还包含docker-compose-e2e.yaml文件启动网络节点三个Fabric CA。 该文件旨在用于Fabric SDK 运行端到端测试。 请参阅Node SDK代码库有关运行这些测试的详细信息。 - 如果您使用
createChannel子命令,则./ network.sh使用提供的频道名称, 运行在scripts文件夹中的createChannel.sh脚本来创建通道。 该脚本使用configtx.yaml文件来创建通道创作事务,以及两个锚对等节点更新交易。 该脚本使用对等节点cli创建通道,加入peer0.org1.example.com和peer0.org2.example.com到频道, 以及使两个对等节点都成为锚对等节点。 - 如果执行
deployCC命令,./ network.sh会运行deployCC.sh脚本在两个对等节点上安装fabcar链码, 然后定义通道上的链码。 一旦将链码定义提交给通道,对等节点cli使用Init初始化链码并调用链码将初始数据放入账本。
故障排除
如果您对本教程有任何疑问,请查看以下内容:
您应该始终重新启动网络。 您可以使用以下命令删除先前运行的工件,加密材料,容器,卷和链码镜像:
./network.sh down
如果您不删除旧的容器,镜像和卷,将看到报错。
如果您看到Docker错误,请先检查您的Docker版本(Prerequisites), 然后尝试重新启动Docker进程。 Docker的问题是经常无法立即识别的。 例如,您可能会看到您的节点无法访问挂载在容器内的加密材料导致的错误。
如果问题仍然存在,则可以删除镜像并从头开始:
 docker rm -f $(docker ps -aq)
 docker rmi -f $(docker images -q)
如果您在创建,批准,提交,调用或查询命令时发现错误,确保您已正确更新通道名称和链码名称。 提供的示例命令中有占位符值。
如果您看到以下错误:
Error: Error endorsing chaincode: rpc error: code = 2 desc = Error installing chaincode code mycc:1.0(chaincode /var/hyperledger/production/chaincodes/mycc.1.0 exits)
您可能有先前运行中链码镜像(例如
dev-peer1.org2.example.com-fabcar-1.0或dev-peer0.org1.example.com-fabcar-1.0)。 删除它们并再次尝试。docker rmi -f $(docker images | grep dev-peer[0-9] | awk '{print $3}')如果您看到以下错误:
[configtx/tool/localconfig] Load -> CRIT 002 Error reading configuration: Unsupported Config Type ""
panic: Error reading configuration: Unsupported Config Type ""
那么您没有正确设置环境变量
FABRIC_CFG_PATH。configtxgen工具需要此变量才能找到configtx.yaml。 返回执行export FABRIC_CFG_PATH=$PWD/configtx/configtx.yaml,然后重新创建您的通道工件。如果看到错误消息指出您仍然具有“active endpoints”,请清理您的Docker网络。 这将清除您以前的网络,并以全新环境开始:
docker network prune
您将看到一下信息:
WARNING! This will remove all networks not used by at least one container.
Are you sure you want to continue? [y/N]
选
y。如果您看到类似下面的错误:
/bin/bash: ./scripts/createChannel.sh: /bin/bash^M: bad interpreter: No such file or directory
确保有问题的文件(在此示例中为createChannel.sh)为以Unix格式编码。 这很可能是由于未在Git配置中将
core.autocrlf设置为false(查看Windows Extras)。 有几种解决方法。 如果你有例如vim编辑器,打开文件:vim ./fabric-samples/test-network/scripts/createChannel.sh
然后通过执行以下vim命令来更改其格式:
:set ff=unix
如果您的排序者在创建时退出,或者您看到由于无法连接到排序服务创建通道命令失败, 请使用
docker logs命令从排序节点读取日志。 你可能会看到以下消息:PANI 007 [channel system-channel] config requires unsupported orderer capabilities: Orderer capability V2_0 is required but not supported: Orderer capability V2_0 is required but not supported
当您尝试使用Fabric 1.4.x版本docker镜像运行网络时,会发生这种情况。 测试网络需要使用Fabric 2.x版本运行。
如果您仍然发现错误,请在fabric-questions上共享您的日志 Hyperledger Rocket chat或StackOverflow。
在我们开始之前,如果您还没有这样做,您可能希望检查您是否已经在将要开发区块链应用程序或运行 Hyperledger Fabric 的平台上安装了所有 准备阶段 。
安装必备组件后,即可下载并安装 HyperLedger Fabric。在我们为Fabric 二进制文件开发真正的安装程序的同时,我们提供了一个脚本,可以将 安装示例、二进制和 Docker 镜像 到您的系统中。该脚本还将 Docker 镜像下载到本地注册表。
在你下载完 Fabric 示例以及 Docker 镜像到你本机之后,您就可以跟着 使用Fabric的测试网络 教程开始使用 Fabric 了。
Hyperledger Fabric 智能合约(链码) API
Hyperledger Fabric 提供了不同编程语言的 API 来支持开发智能合约(链码)。智能合约 API 可以使用 Go、Node.js 和 Java:
- Go 合约 API 。
- Node.js 合约 API and Node.js 合约 API 文档 。
- Java 合约 API and Java 合约 API 文档 。
Hyperledge Fabric 应用程序 SDK
Hyperledger Fabric 提供了许多 SDK 来支持各种编程语言开发应用程序。SDK 有支持 Node.js 和 Java 语言的:
- Node.js SDK and Node.js SDK 文档 。
- Java SDK and Java SDK 文档 。
此外,还有两个尚未正式发布的 SDK(Python 和 Go),但它们仍可供下载和测试:
目前,Node.js、Java 和 Go 支持 Hyperledge Fabric 1.4 提供的新的应用程序编程模型。
开发应用
场景
受众:架构师, 应用和智能合约开发者, 业务专家
在本主题中,我们将会描述一个涉及六个组织的业务场景,这些组织使用基于 Hyperledger Fabric 构建的商业票据网络 PaperNet 来发行,购买和兑换商业票据。我们将使用该场景概述参与组织使用的商业票据应用程序和智能合约的开发要求。
PaperNet 网络
PaperNet 是一个商业票据网络,允许适当授权的参与者发行,交易,兑换和估价商业票据。
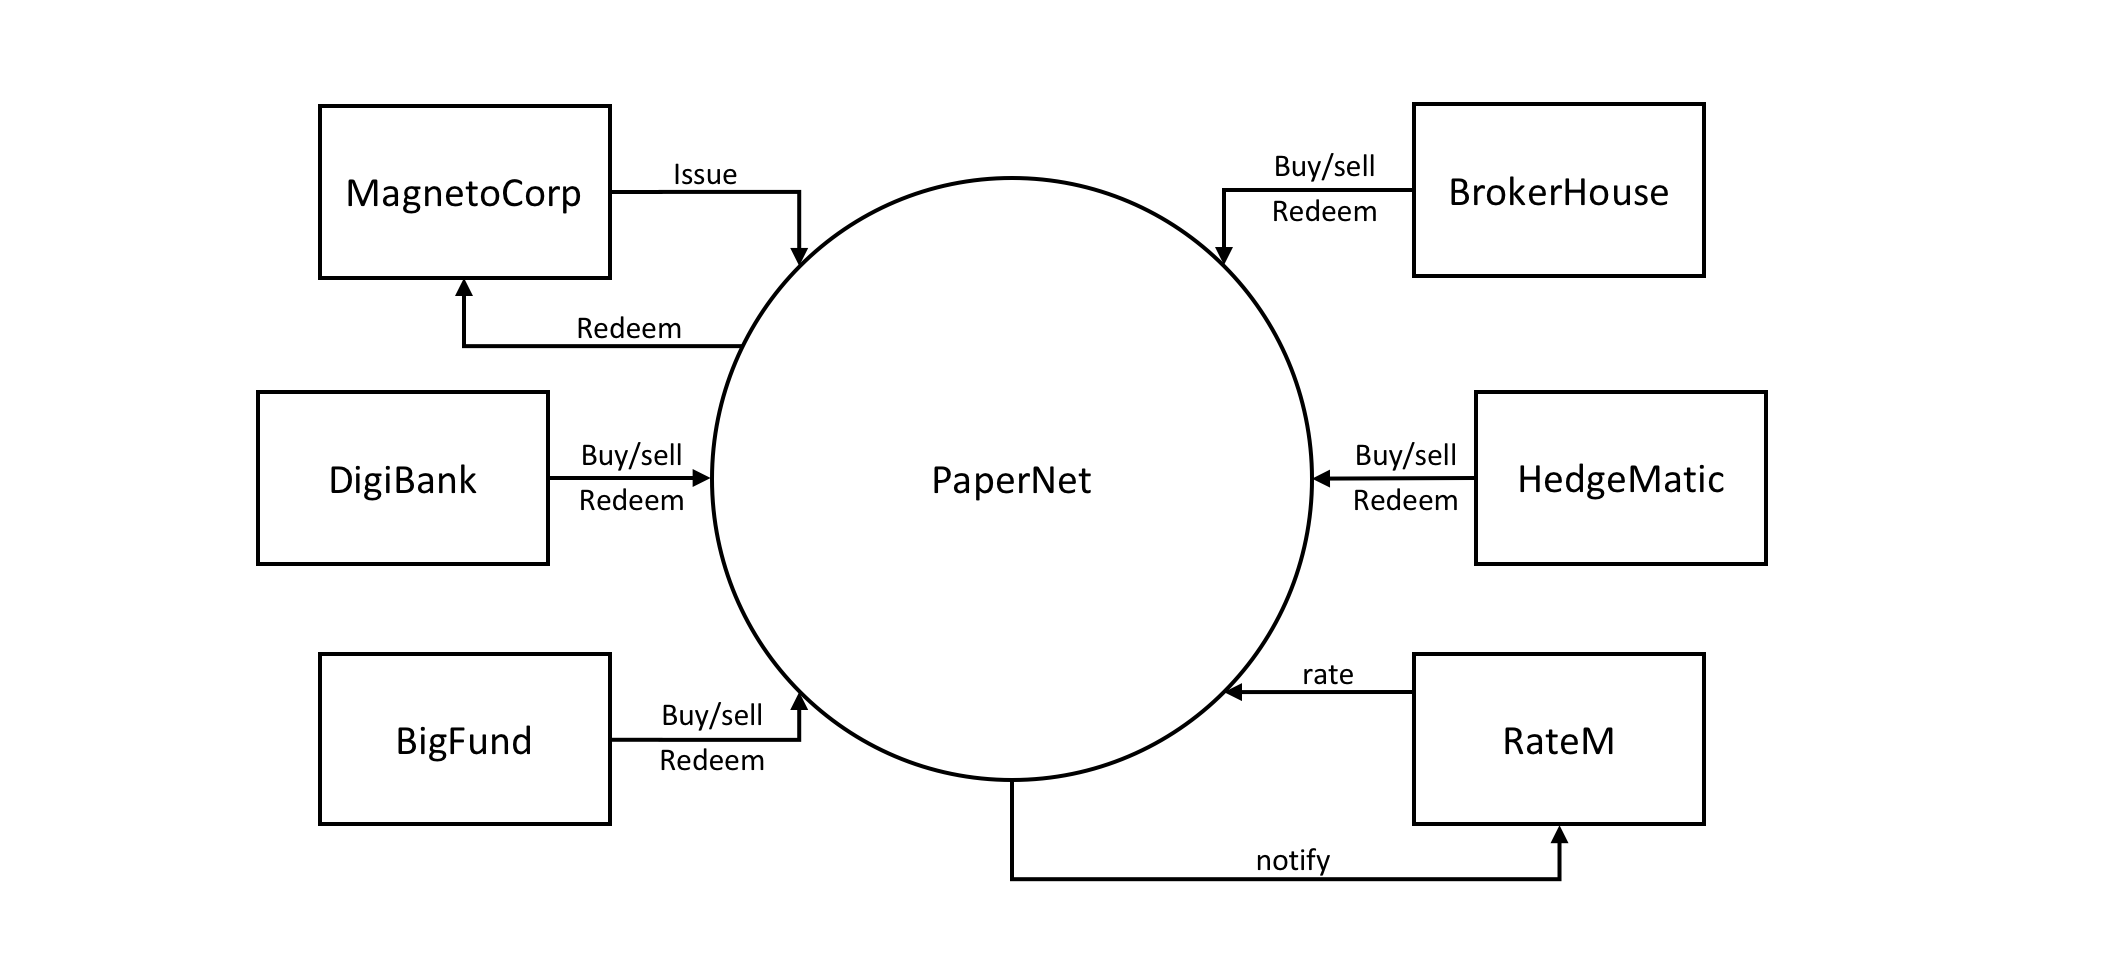
PaperNet 商业票据网络。六个组织目前使用 PaperNet 网络发行,购买,出售,兑换和估价商业票据。MagentoCorp 发行和兑换商业票据。 DigiBank, BigFund,BrokerHouse 和 HedgeMatic 互相交易商业票据。RateM 为商业票据提供各种风险衡量标准。
让我们来看一下 MagnetoCorp 如何使用 PaperNet 和商业票据来帮助其业务。
演员介绍
MagnetoCorp 是一家备受推崇的公司,生产自动驾驶电动车。在 2020 年 4 月初,MagnetoCorp 公司赢得了大量订单,为 Daintree 公司制造 10,000 辆 D 型车,Daintree 是个人运输市场的新进入者。尽管该订单代表了 MagnetoCorp 公司的重大胜利,但在 MagnetoCorp 和 Daintree 正式达成协议后六个月,Daintree 将于 11 月 1 日开始交付之前不需要支付车辆费用。
为了制造这些车辆,MagnetoCorp 公司将需要雇佣 1000 名工人至少 6 个月。这对它的财务状况造成了短期压力,– 每月需要额外 500 万美元来支付这些新员工。商业票据是为帮助 MagnetoCorp 公司克服短期融资需求而设计的,– 每月基于 Daintree 公司开始支付 D 型车辆费用时就会有充足现金的预期来满足工资单。
在五月底,MagnetoCorp 公司需要 500 万美元才能满足 5 月 1 日雇佣的额外工人。要做到这个,它会发行一张面值 500 万美元的商业票据,未来6个月到期 – 当预计看到 Daintree 现金流时。DigiBank 认为 MagnetoCorp 公司是值得信赖的,因此,不需要高于中央银行 2% 基准利率的溢价,这将会使得今天价值 495 万美元,在6个月时间后价值 500 万美元。所以它以 494 万美元的价格购买了MagnetoCorp 公司 6 个月到期的商业票据 – 与 495 万美元的价值相比略有折扣。DigiBank 完全预计它将能够在 6 个月内从 MagnetoCorp 赎回 500 万美元,因此承担与此商业票据相关的风险增加,使其获利 1 万美元。
在六月底,MagnetoCorp 公司发行一个 500 万美元的商业票据来支付六月份的工资单时,被 BigFund 以 494 万美元购买。这是因为六月的商业条件与五月大致相同,导致 BigFund 以与 DigiBank 五月份相同的价格对 MagnetoCorp 商业票据进行估值。
接下来的每个月,MagnetoCorp 公司可以发行新的商业票据来满足它的工资义务,这些票据可以被 DigiBank 或其他任何在 PaperNet 商业票据网络的参与者购买 – BigFund, HedgeMatic 或 BrokerHouse。这些组织可能会根据两个因素为商业票据支付更多或更少的费用 – 央行基准利率和与 MagnetoCorp 相关的风险。后者取决于各种因素,如 D 型车的生产,以及评级机构 RateM 评估的 MagnetoCorp 公司的信誉度。
在 PaperNet 中的组织具有不同的角色,MagnetoCorp 发行票据,DigiBank、BigFund、HedgeMatic 和 BrokerHouse 交易票据,并且 RateM 评估票据。具有相同角色的组织,比如 DigiBank、Bigfund、HedgeMatic 和 BrokerHouse 是竞争对手。不同角色的组织没有必要是竞争对手,但是可能还是具有不同的商业利益,比如 MagentoCorp 想要给它的票据一个高的评估来卖出高价,然而 DigiBank 会从一个低的评估来获利,因此他们可以以一个地的价钱买入。我们能够看到,像 PaperNet 这样一个非常简单的网络,也可以有非常复杂的关系。一个区块链能够在彼此是竞争对手或者具有相反的商业利益并且可能造成争议的组织间帮助创建信任。其中 Fabric 能够创建更细粒度的信任关系。
让我们暂停 MagnetoCorp 的故事,开发 PaperNet 用于发行,购买,出售和兑换商业票据的客户应用程序和智能合约以获取组织之间的信任关系。稍后我们将回到评级机构 RateM 的角色。
分析
受众: 架构师,应用和合约开发者,业务专家
让我们更详细的分析商业票据。MagnetoCorp 和 DigiBank 等 PaperNet 参与者使用商业票据交易来实现其业务目标 – 让我们检查商业票据的结构以及随着时间推移影响票据结构的交易。我们还将根据网络中组织之间的信任关系,考虑 PaperNet 中的哪些组织需要签署交易。稍后我们将关注买家和卖家之间的资金流动情况; 现在,让我们关注 MagnetoCorp 发行的第一个票据。
商业票据生命周期
票据 00001 是 5 月 31 号由 MagnetoCorp 发行的。花点时间来看看该票据的第一个状态,它具有不同的属性和值:
Issuer = MagnetoCorp
Paper = 00001
Owner = MagnetoCorp
Issue date = 31 May 2020
Maturity = 30 November 2020
Face value = 5M USD
Current state = issued
该票据的状态是 发行 交易的结果,它使得 MagnetoCorp 公司的第一张商业票据面世!注意该票据在今年晚些时候如何兑换面值 500 万美元。当票据 00001 发行后 Issuer 和 Owner 具有相同的值。该票据有唯一标识 MagnetoCorp00001——它是 Issuer 属性和 Paper 属性的组合。最后,属性 Current state = issued 快速识别了 MagnetoCorp 票据 00001 在它生命周期中的阶段。
发行后不久,该票据被 DigiBank 购买。花点时间来看看由于购买交易,同一个商业票据如何发生变化:
Issuer = MagnetoCorp
Paper = 00001
Owner = DigiBank
Issue date = 31 May 2020
Maturity date = 30 November 2020
Face value = 5M USD
Current state = trading
最重要的变化是 Owner 的改变——票据初始拥有者是 MagnetoCorp 而现在是 DigiBank。我们可以想象该票据后来如何被出售给 BrokerHouse 或 HedgeMatic,以及相应的变更为相应的 Owner。注意 Current state 允许我们轻松的识别该票据目前状态是 trading。
6 个月后,如果 DigiBank 仍然持有商业票据,它就可以从 MagnetoCorp 那里兑换:
Issuer = MagnetoCorp
Paper = 00001
Owner = MagnetoCorp
Issue date = 31 May 2020
Maturity date = 30 November 2020
Face value = 5M USD
Current state = redeemed
最终的兑换交易结束了这个商业票据的生命周期——它可以被认为票据已经终止。通常必须保留已兑换的商业票据的记录,并且 redeemed 状态允许我们快速识别这些。通过将 Owner 跟交易创建者的身份进行比较,一个票据的 Owner 值可以被用来在兑换交易上进行访问控制。Fabric 通过 getCreator() chaincode API来对此提供支持。如果使用 Go 语言的链码,
客户端身份链码库来获取交易创建者额外的属性。
交易
我们已经看到票据 00001 的生命周期相对简单——由于发行,购买和兑换交易,它在 issued, trading 和 redeemed 状态之间转移。
这三笔交易由 MagnetoCorp 和 DigiBank(两次)发起,并推动了 00001 票据的状态变化。让我们更详细地看一下影响票据的交易:
发行
检查 MagnetoCorp 发起的第一笔交易:
Txn = issue
Issuer = MagnetoCorp
Paper = 00001
Issue time = 31 May 2020 09:00:00 EST
Maturity date = 30 November 2020
Face value = 5M USD
观察发行交易是如何具有属性和值的结构的。这个交易的结构跟票据 00001 的结构是不同的但是非常匹配的。那是因为他们是不同的事情——票据 00001 反应了 PaperNet state,是作为发行交易的结果。这是在发行交易背后的逻辑(我们是看不到的),它带着这些属性并且创建了票据。因为交易创建了票据,着意味着在这些结构之间具有着非常密切的关系。
在这个发行的交易中唯一被引入的组织是 MagnetoCorp。很自然的,MagnetoCorp 需要对交易进行签名。通常,一个票据的发行者会被要求在发行一个新的票据的交易上提供批准。
购买
接下来,检查购买交易,将票据 00001 的所有权从 MagnetoCorp 转移到 DigiBank:
Txn = buy
Issuer = MagnetoCorp
Paper = 00001
Current owner = MagnetoCorp
New owner = DigiBank
Purchase time = 31 May 2020 10:00:00 EST
Price = 4.94M USD
看一下购买交易如何减少票据中最终的属性。因为交易只能修改该票据。只有 New owner = DigiBank 改变了;其他所有的都是相同的。这没关系——关于购买交易最重要的是所有权的变更,事实上,在这次交易中,有一份对该票据当前所有者 MagnetoCorp 的认可。
你可能会奇怪为什么 Purchase time 和 Price 属性没有在票据 00001 中体现? 这要回到交易和票据之间的差异。494 万美元的价格标签实际上是交易的属性,而不是票据的属性。花点时间来思考一下这两者的不同;它并不像它看上去的那么明显。稍后我们会看到账本会记录这些信息片段——影响票据的所有交易历史,和它最新的状态。清楚这些信息分离非常重要。
同样值得注意的是票据 00001 可能会被买卖多次。尽管在我们的场景中略微跳过了一点,我们来检查一下如果票据 00001 变更了所有者我们可能会看到什么。
如果 BigFund 购买:
Txn = buy
Issuer = MagnetoCorp
Paper = 00001
Current owner = DigiBank
New owner = BigFund
Purchase time = 2 June 2020 12:20:00 EST
Price = 4.93M USD
接着由 HedgeMatic 购买:
Txn = buy
Issuer = MagnetoCorp
Paper = 00001
Current owner = BigFund
New owner = HedgeMatic
Purchase time = 3 June 2020 15:59:00 EST
Price = 4.90M USD
看看票据所有者如何变化,以及在我们的例子中,价格如何变化。你能想到 MagnetoCorp 商业票据价格会降低的原因吗?
很显然,购买交易要求售卖组织和购买组织都要对该交易进行离线签名,这是证明参与交易的双方共同同意该交易的证据。
兑换
票据 00001 兑换交易代表了它生命周期的结束。在我们相对简单的例子中,HedgeMatic 启动将商业票据转回 MagnetoCorp 的交易:
Txn = redeem
Issuer = MagnetoCorp
Paper = 00001
Current owner = HedgeMatic
Redeem time = 30 Nov 2020 12:00:00 EST
再次注意兑换交易有更少的属性;票据 00001 所有更改都可以通过兑换交易逻辑计算数据:Issuer 将成为新的所有者,Current state 将变成 redeemed。在我们的例子中指定了 Current owner 属性,以便可以针对当前的票据持有者进行检查。
从信任的角度来说,跟购买交易一样,也可以应用到兑换交易中:参与交易的双方组织都需要对它离线签名。
账本
在本主题中,我们已经看到交易和产生的票据状态是 PaperNet 中两个重要的概念。的确,我们将会在任何一个 Hyperledger Fabric 分布式账本中看到这些基本元素——包含了当前所有对象最新状态的世界状态和记录了所有交易历史并能归集出最新世界状态的区块链。
在交易上必须的批准通过规则被强制执行,这个在一个交易被附加到账本之前被评估。只有当需要的签名被展示的时候,Fabric 才会接受一个交易作为有效的交易。
你现在处在一个很棒的地方,将这些想法转化为智能合约。如果您的编程有点生疏,请不要担心,我们将提供了解程序代码的提示和指示。掌握商业票据智能合约是设计自己的应用程序的第一个重要步骤。或者,你是一个有一点编程经验的业务分析师,不要害怕继续深入挖掘!
流程和数据设计
受众:架构师,应用程序和智能合约开发者,业务专家
本主题主要讨论在 PaperNet 中如何设计商业票据的流程和与它相关的数据结构。我们在 分析章节 中已经强调使用状态和交易对 PaperNet 建模提供了一种精确的方法来了解正在发生的事情。我们现在将详细阐述这两个强烈相关的概念,以帮助我们随后设计 PaperNet 的智能合约和应用程序。
生命周期
正如我们所见,在处理商业票据时有两个重要的概念:状态和交易。实际上,所有区块链用例都是如此;状态建模是重要的概念对象,其生命周期转换由交易描述。对状态和交易的有效分析是成功实施的重要起点。
我们可以用状态转移表来表示商业票据的生命周期:
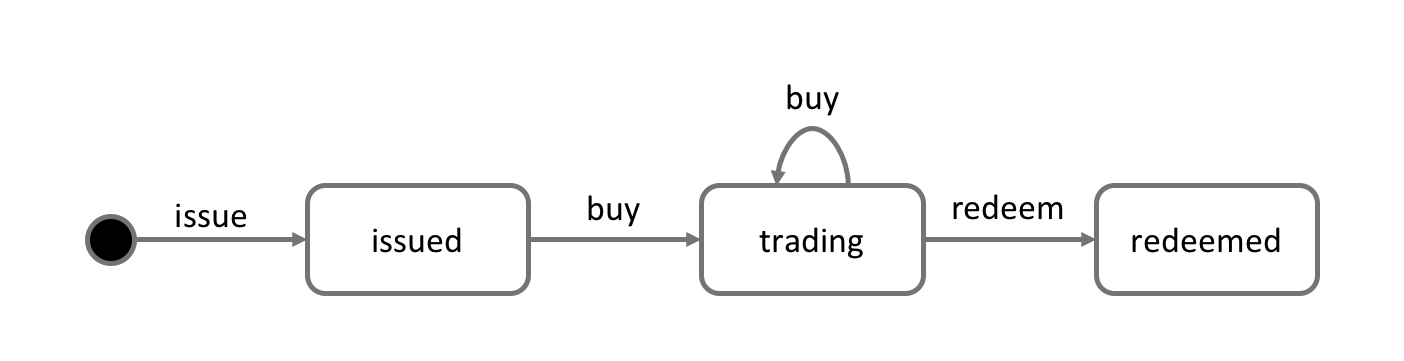 商业票据的状态转移表。商业票据通过发行,购买和兑换交易在已发行、交易中和已兑换之间进行状态转移。
了解状态图如何描述商业票据随着时间如何变化,以及特定交易如何控制生命周期转换。在 Hypledger Fabric 中,智能合约实现了在不同状态之间转换商业票据的交易逻辑。商业票据状态实际上是保存在帐本的世界状态中; 让我们来深入了解一下。
账本状态
回想一下商业票据的结构:
 商业票据可以被表示为属性集,每个属性都对应一个值。通常,这些属性的组合会为每个票据提供一个唯一键
商业票据的 Paper 属性的值是 00001,Face value 属性的值是 5M USD。更重要的是,
Current state 属性表示了商业票据是 issued 状态,trading 状态还是 redeemed 状态。
结合来看,属性的完整集合构成了商业票据的状态。此外,这些商业票据的全部集合构成了账本的
世界状态。
所有的账本状态都是这种形式;每个状态都是一个属性集,每个都有不同的值。状态的多属性是一个强大的特性——允许我们把 Fabric 的状态看做是一个向量而不是一个简单的标量。然后,我们把整个实际的对象当做独立的状态,随后由交易逻辑控制状态转换。Fabric 的状态是由键值对实现的,其中值以捕获对象的多个属性的格式编码对象属性,通常是 JSON 格式。根据这些属性,账本数据库 可以支持高级的查询操作,这对于复杂的对象检索非常有帮助。
查看 MagnetoCorp 的票据 00001 如何表示为一个状态向量,根据不同的交易刺激进行转换:
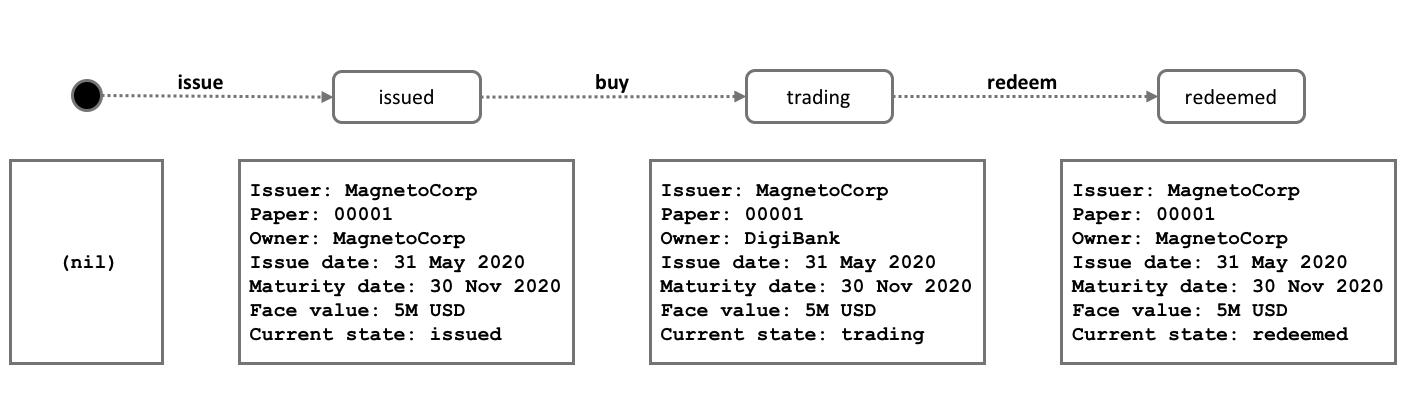 商业票据状态是由于不同的交易而产生和过渡的。Hyperledger Fabric 状态拥有多个属性,使他们成为向量而不是标量。
注意每个独立的票据都起于空状态,技术上被称作 nil,来表示票据不存在!通过发行交易,票据 00001 问世,然后由于购买和兑换交易而更新状态。
注意每个状态是如何自描述的;每个属性都有一个名字和值。尽管目前所有的商业票据都有相同的属性,这种情况不一定总是如此,而 Hyperledger Fabric 支持不同的状态有不同的属性。这允许相同的帐本世界状态包含相同资产的不同形式以及不同类型的资产。同样使得更新状态结构成为可能;试想有一个新的规则需要一个额外的数据字段。灵活的状态属性集支持数据演化的基本需求。
状态键值
大多数的实际应用中,状态会有一个属性组合在给定的上下文中唯一识别它——它就是主键。PaperNet 商业票据的主键是通过 Issuer 属性和 paper 属性拼接得到的;所以 MagnetoCorp 的第一个票据的主键就是 MagnetoCorp00001。
状态的主键允许我们唯一识别一个票据;它是通过发行交易创建的,然后由购买和兑换更新。Hyperledger Fabric 需要账本中的每个状态都有唯一的主键。
当唯一主键在可用的属性集中不能获得,应用决定的唯一键会被指定为交易的输入来创建状态。这个唯一键的形式一般是 UUID,尽管可读性不好,但是是一个很好的实践。最重要的是账本中每个独立的状态对象都必须有一个唯一键。
Note: 在主键中你应该避免使用 U+0000 (nil byte)。
多个状态
正如我们所见,PaperNet 中的商业票据作为状态向量被存储在账本中。能够从账本中查询不同的商业票据是合理的需求;比如,查询所有由 MagnetoCorp 发行的的票据,或者查询所有由 MagnetoCorp 发行且处在 redeemed 状态的票据。
为了满足不同类型的查询任务,把所有相关的商业票据按逻辑顺序排列在一起是很有帮助的。PaperNet 的设计包含了商业票据列表的思想——一个逻辑容器,每当商业票据发行或发生其他更改时,该容器都会更新。
逻辑表示
把所有的 PaperNet 商业票据放在一个商业票据列表中是有帮助的:
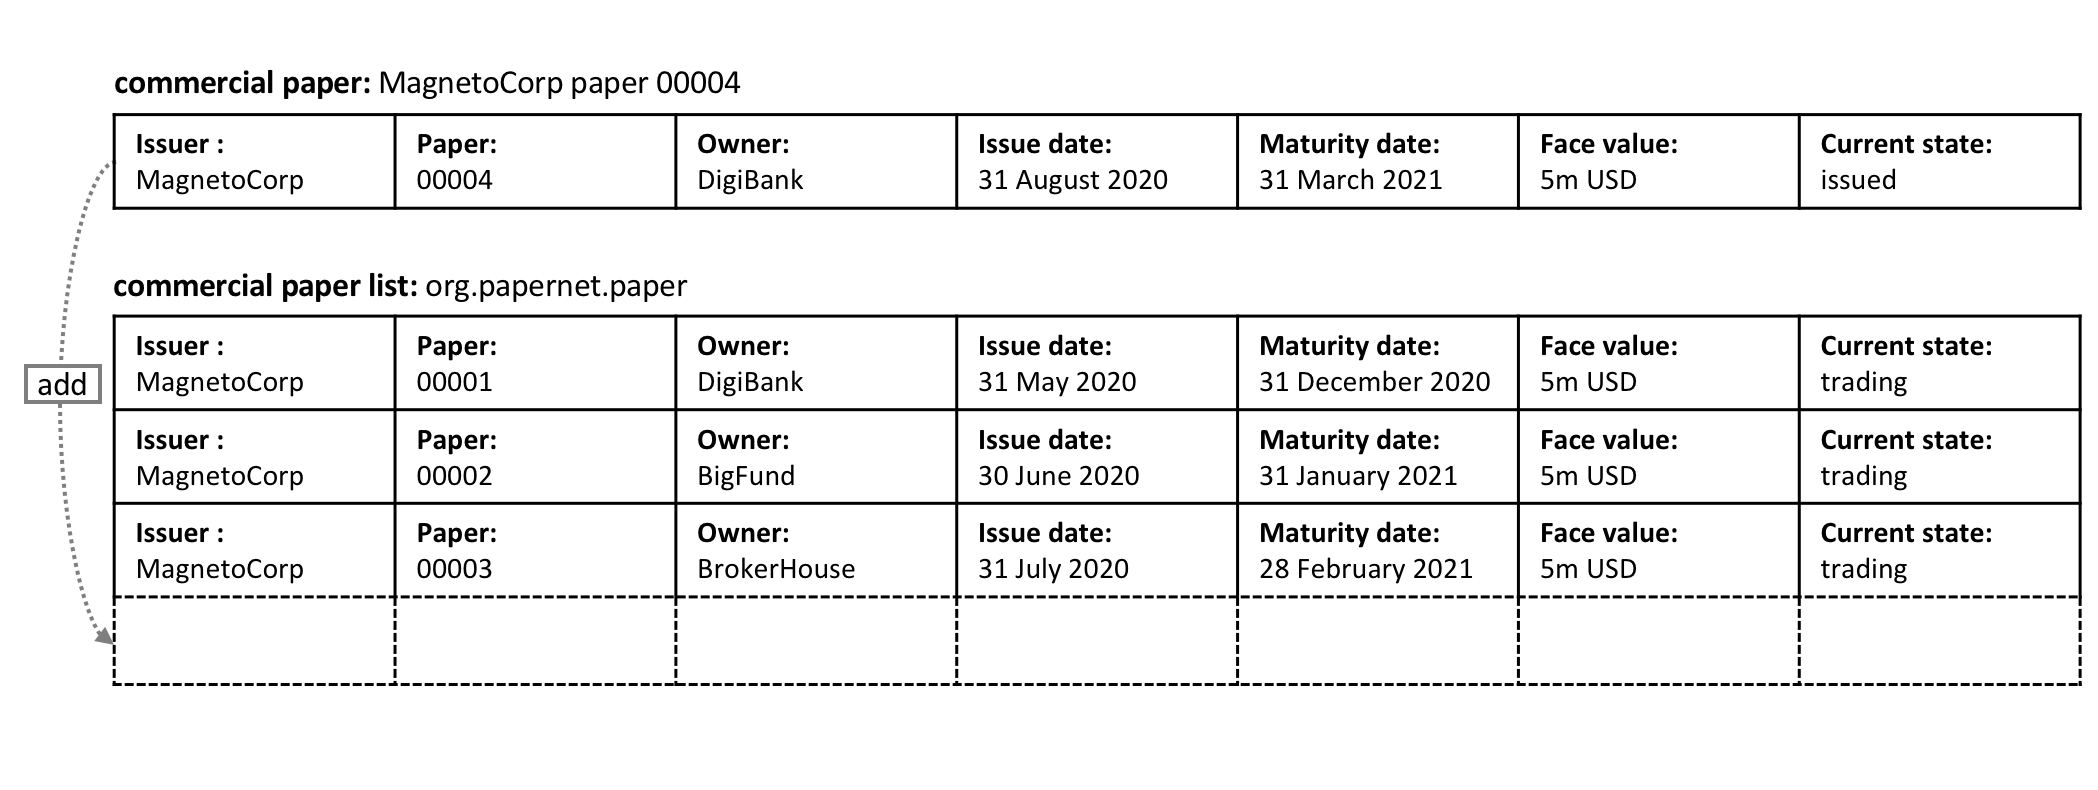 MagnetoCorp 新增加的票据 00004 被加入到已有的商业票据列表中。
新票据由于发行交易被加入到列表中,然后列表中已存在的票据因为购买交易和兑换交易可以被更新状态。列表有一个描述性的名称:org.papernet.papers;使用这种 DNS 名真的是一个好主意,因为适当的名称会让你的区块链设计对其他人来说是直观的。这种想法同样也适用于智能合约的名字。
物理表现
我们可以正确地想到 PaperNet 中的单个票据列表—— org.papernet.papers ——列表最好作为一组单独的 Fabric 状态来实现,其复合键将状态与其列表关联起来。这样,每个状态的复合键都是惟一的,并支持有效的列表查询。
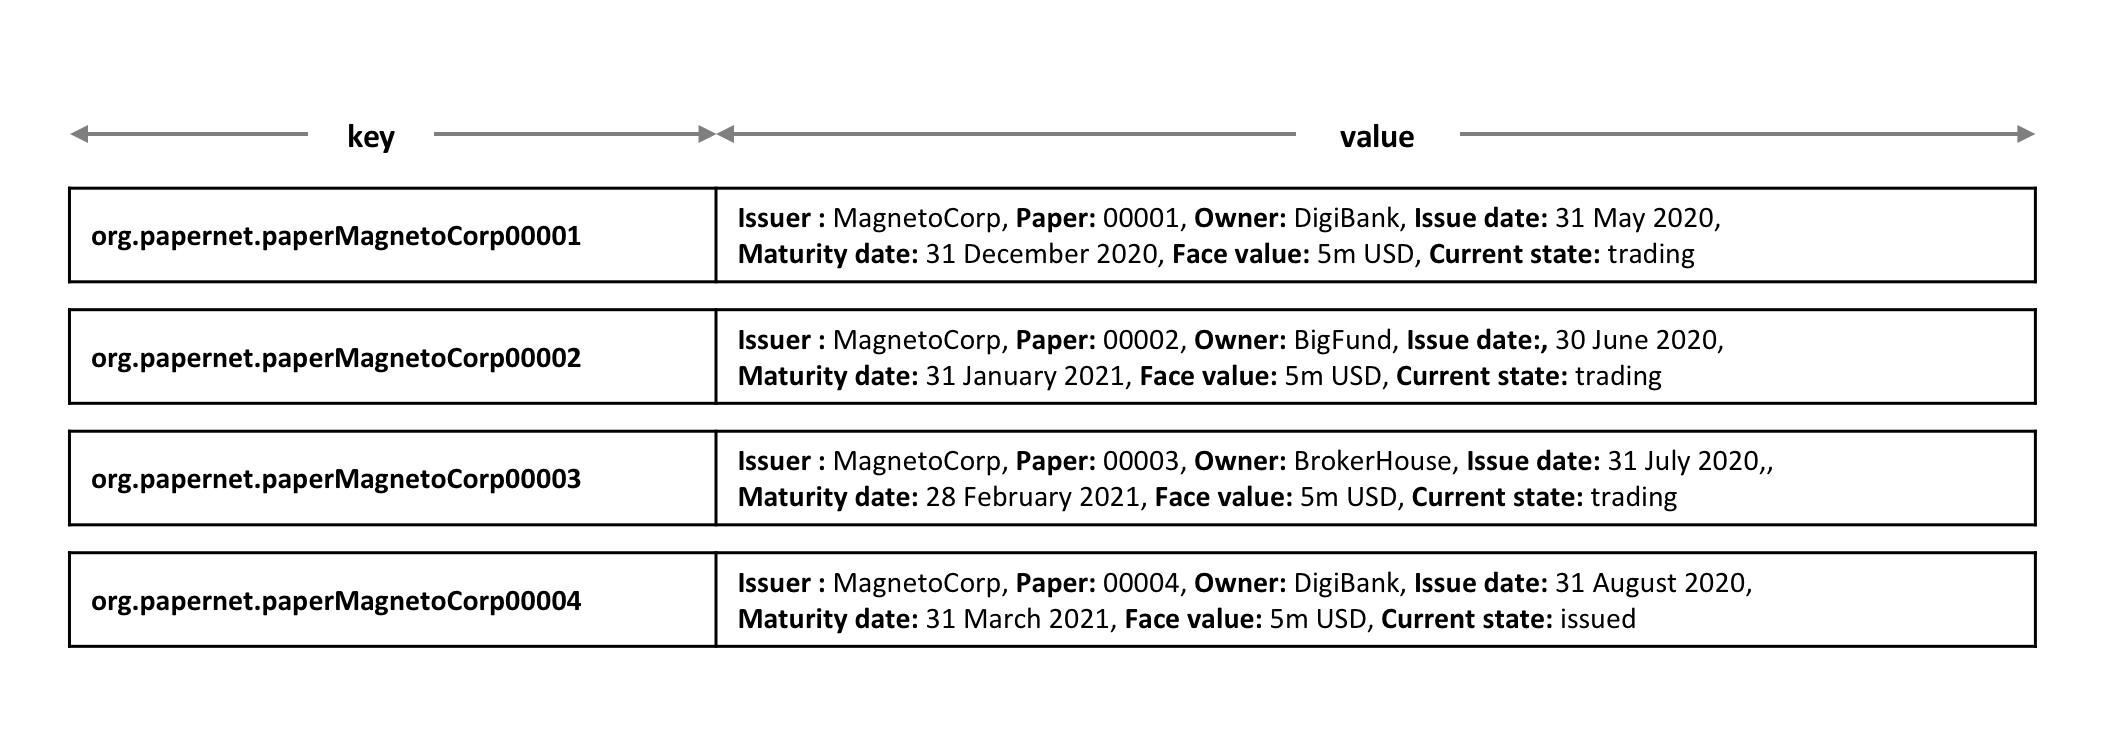 将 PaperNet 商业票据列表表示为一组不同的 Hyperledger Fabric 状态
注意列表中的每个票据都是如何用向量状态表示的,其中唯一的组合键是由 org.papernet.paper 的属性 Issuer 和 Paper 连接而成的。这种结构有两个好处:
- 允许我们检查账本中的任意状态向量在哪个列表中,不用引用到不同的列表。这类似于观察一群体育迷,通过他们穿的衬衫的颜色来判断他们支持哪支球队。体育迷们自我宣布他们的忠诚;我们不需要粉丝名单。
- Hyperlegder Fabric 内部使用了一个并发控制机制来更新账本,所以把票据保存在不同的状态向量中大大减少了共享状态碰撞的机会。这种碰撞需要交易重新提交,复杂化了应用设计,而且降低了性能。
第二点是 Hyperledger Fabric 的关键;状态向量的物理设计对于优化性能和行为非常重要。保持状态的独立!
信任关系
我们已经讨论了网络中的不同角色,如发行者,交易员或评级机构,以及不同的商业利益如何决定谁需要签署交易。在 Fabric 中,这些规则由所谓的背书策略捕获。这些规则可以在链码粒度上设置,也可以为单个状态键设置。
这意味着在 PaperNet 中,我们可以为整个命名空间设置一个规则,以确定哪些组织可以发行新票据。然后,可以为单个票据设置和更新规则,以捕获购买和兑换交易的信任关系。
在下一个主题中,我们将向您展示如何结合这些设计概念来实现 PaperNet 商业票据智能合约,然后是应用程序来使用它!
智能合约处理
受众:架构师、应用程序和智能合约开发人员
区块链网络的核心是智能合约。在 PaperNet 中,商业票据智能合约中的代码定义了商业票据的有效状态,以及将票据从一种状态状态转变为另一种状态的交易逻辑。在本主题中,我们将向您展示如何实现一个真实世界的智能合约,该合约管理发行、购买和兑换商业票据的过程。
我们将会介绍:
如果您愿意,可以下载示例,甚至可以在本地运行。它是用 JavaScript 和 Java 编写的,但逻辑与语言无关,因此您可以轻松地查看正在发生的事情!(该示例也可用于 Go。)
智能合约
智能合约定义业务对象的不同状态,并管理对象在不同状态之间变化的过程。智能合约很重要,因为它们允许架构师和智能合约开发人员定义在区块链网络中协作的不同组织之间共享的关键业务流程和数据。
在 PaperNet 网络中,智能合约由不同的网络参与者共享,例如 MagnetoCorp 和 DigiBank。 连接到网络的所有应用程序必须使用相同版本的智能合约,以便它们共同实现相同的共享业务流程和数据。
实现语言
支持两种运行时,Java 虚拟机和 Node.js。支持使用 JavaScript、TypeScript、Java 或其他可以运行在支持的运行时上其中一种语言。
在 Java 和 TypeScript 中,标注或者装饰器用来为智能合约和它的结构提供信息。这就更加丰富了开发体验——比如,作者信息或者强调返回类型。使用 JavaScript 的话就必须遵守一些规范,同时,对于什么可以自动执行也有一些限制。
这里给出的示例包括 JavaScript 和 Java 两种语言。
合约类
PaperNet 商业票据智能合约的副本包含在单个文件中。如果您已下载,请使用浏览器或在您喜欢的编辑器中打开它。
papercontract.js- JavaScript 版本CommercialPaperContract.java- Java 版本
您可能会从文件路径中注意到这是 MagnetoCorp 的智能合约副本。 MagnetoCorp 和 DigiBank 必须同意他们将要使用的智能合约版本。现在,你看哪个组织的合约副本无关紧要,它们都是一样的。
花一些时间看一下智能合约的整体结构; 注意,它很短!在文件的顶部,您将看到商业票据智能合约的定义:
JavaScript
class CommercialPaperContract extends Contract {...}
Java
@Contract(...)
@Default
public class CommercialPaperContract implements ContractInterface {...}
CommercialPaperContract 类中包含商业票据中交易的定义——发行,购买和兑换。这些交易带给了商业票据创建和在它们的生命周期中流动的能力。我们马上会查看这些交易,但是现在我们需要关注一下 JavaScript, CommericalPaperContract 扩展的 Hyperledger Fabric Contract 类。
在 Java 中,类必须使用 @Contract(...) 标注进行包装。它支持额外的智能合约信息,比如许可和作者。 @Default() 标注表明该智能合约是默认合约类。在智能合约中标记默认合约类在一些有多个合约类的智能合约中会很有用。
如果你使用 TypeScript 实现,也有类似 @Contract(...) 的标注,和 Java 中功能相似。
关于可用的标注的更多信息,请查看 API 文档:
我们先导入这些类、标注和 Context 类:
JavaScript
const { Contract, Context } = require('fabric-contract-api');
Java
import org.hyperledger.fabric.contract.Context;
import org.hyperledger.fabric.contract.ContractInterface;
import org.hyperledger.fabric.contract.annotation.Contact;
import org.hyperledger.fabric.contract.annotation.Contract;
import org.hyperledger.fabric.contract.annotation.Default;
import org.hyperledger.fabric.contract.annotation.Info;
import org.hyperledger.fabric.contract.annotation.License;
import org.hyperledger.fabric.contract.annotation.Transaction;
我们的商业票据合约将使用这些类的内置功能,例如自动方法调用,每个交易上下文,交易处理器,和类共享状态。
还要注意 JavaScript 类构造函数如何使用其超类通过一个命名空间来初始化自身:
constructor() {
    super('org.papernet.commercialpaper');
}
在 Java 类中,构造器是空的,合约名会通过 @Contract() 注解进行识别。如果不是就会使用类名。
最重要的是,org.papernet.commercialpaper 非常具有描述性——这份智能合约是所有 PaperNet 组织关于商业票据商定的定义。
通常每个文件只有一个智能合约(合约往往有不同的生命周期,这使得将它们分开是明智的)。但是,在某些情况下,多个智能合约可能会为应用程序提供语法帮助,例如 EuroBond、DollarBond、YenBond 但基本上提供相同的功能。在这种情况下,智能合约和交易可以消除歧义。
交易定义
在类中定位 issue 方法。
JavaScript
async issue(ctx, issuer, paperNumber, issueDateTime, maturityDateTime, faceValue) {...}
Java
@Transaction
public CommercialPaper issue(CommercialPaperContext ctx,
                             String issuer,
                             String paperNumber,
                             String issueDateTime,
                             String maturityDateTime,
                             int faceValue) {...}
Java 标注 @Transaction 用于标记该方法为交易定义;TypeScript 中也有等价的标注。
无论何时调用此合约来发行商业票据,都会调用该方法。回想一下如何使用以下交易创建商业票据 00001:
Txn = issue
Issuer = MagnetoCorp
Paper = 00001
Issue time = 31 May 2020 09:00:00 EST
Maturity date = 30 November 2020
Face value = 5M USD
我们已经更改了编程样式的变量名称,但是看看这些属性几乎直接映射到 issue 方法变量。
只要应用程序请求发行商业票据,合约就会自动调用 issue 方法。交易属性值通过相应的变量提供给方法。使用示例应用程序,了解应用程序如何使用应用程序主题中的 Hyperledger Fabric SDK 提交一笔交易。
您可能已经注意到 issue 方法中定义的一个额外变量 ctx。它被称为交易上下文,它始终是第一个参数。默认情况下,它维护与交易逻辑相关的每个合约和每个交易的信息。例如,它将包含 MagnetoCorp 指定的交易标识符,MagnetoCorp 可以发行用户的数字证书,也可以调用账本 API。
通过实现自己的 createContext() 方法而不是接受默认实现,了解智能合约如何扩展默认交易上下文:
JavaScript
createContext() {
  return new CommercialPaperContext()
}
Java
@Override
public Context createContext(ChaincodeStub stub) {
     return new CommercialPaperContext(stub);
}
此扩展上下文将自定义属性 paperList 添加到默认值:
JavaScript
class CommercialPaperContext extends Context {

  constructor() {
    super();
    // All papers are held in a list of papers
    this.paperList = new PaperList(this);
}
Java
class CommercialPaperContext extends Context {
    public CommercialPaperContext(ChaincodeStub stub) {
        super(stub);
        this.paperList = new PaperList(this);
    }
    public PaperList paperList;
}
我们很快就会看到 ctx.paperList 如何随后用于帮助存储和检索所有 PaperNet 商业票据。
为了巩固您对智能合约交易结构的理解,找到购买和兑换交易定义,看看您是否可以理解它们如何映射到相应的商业票据交易。
购买交易:
Txn = buy
Issuer = MagnetoCorp
Paper = 00001
Current owner = MagnetoCorp
New owner = DigiBank
Purchase time = 31 May 2020 10:00:00 EST
Price = 4.94M USD
JavaScript
async buy(ctx, issuer, paperNumber, currentOwner, newOwner, price, purchaseTime) {...}
Java
@Transaction
public CommercialPaper buy(CommercialPaperContext ctx,
                           String issuer,
                           String paperNumber,
                           String currentOwner,
                           String newOwner,
                           int price,
                           String purchaseDateTime) {...}
兑换交易:
Txn = redeem
Issuer = MagnetoCorp
Paper = 00001
Redeemer = DigiBank
Redeem time = 31 Dec 2020 12:00:00 EST
JavaScript
async redeem(ctx, issuer, paperNumber, redeemingOwner, redeemDateTime) {...}
Java
@Transaction
public CommercialPaper redeem(CommercialPaperContext ctx,
                              String issuer,
                              String paperNumber,
                              String redeemingOwner,
                              String redeemDateTime) {...}
在两个案例中,注意商业票据交易和智能合约方法调用之间 1:1 的关系。
所有 JavaScript 方法都使用 async 和 await
关键字。
交易逻辑
现在您已经了解了合约的结构和交易的定义,下面让我们关注智能合约中的逻辑。
回想一下第一个发行交易:
Txn = issue
Issuer = MagnetoCorp
Paper = 00001
Issue time = 31 May 2020 09:00:00 EST
Maturity date = 30 November 2020
Face value = 5M USD
它导致 issue 方法被传递调用:
JavaScript
async issue(ctx, issuer, paperNumber, issueDateTime, maturityDateTime, faceValue) {

   // create an instance of the paper
  let paper = CommercialPaper.createInstance(issuer, paperNumber, issueDateTime, maturityDateTime, faceValue);

  // Smart contract, rather than paper, moves paper into ISSUED state
  paper.setIssued();

  // Newly issued paper is owned by the issuer
  paper.setOwner(issuer);

  // Add the paper to the list of all similar commercial papers in the ledger world state
  await ctx.paperList.addPaper(paper);

  // Must return a serialized paper to caller of smart contract
  return paper.toBuffer();
}
Java
@Transaction
public CommercialPaper issue(CommercialPaperContext ctx,
                              String issuer,
                              String paperNumber,
                              String issueDateTime,
                              String maturityDateTime,
                              int faceValue) {

    System.out.println(ctx);

    // create an instance of the paper
    CommercialPaper paper = CommercialPaper.createInstance(issuer, paperNumber, issueDateTime, maturityDateTime,
            faceValue,issuer,"");

    // Smart contract, rather than paper, moves paper into ISSUED state
    paper.setIssued();

    // Newly issued paper is owned by the issuer
    paper.setOwner(issuer);

    System.out.println(paper);
    // Add the paper to the list of all similar commercial papers in the ledger
    // world state
    ctx.paperList.addPaper(paper);

    // Must return a serialized paper to caller of smart contract
    return paper;
}
逻辑很简单:获取交易输入变量,创建新的商业票据 paper,使用 paperList 将其添加到所有商业票据的列表中,并将新的商业票据(序列化为buffer)作为交易响应返回。
了解如何从交易上下文中检索 paperList 以提供对商业票据列表的访问。issue()、buy() 和 redeem() 不断重新访问 ctx.paperList 以使商业票据列表保持最新。
购买交易的逻辑更详细描述:
JavaScript
async buy(ctx, issuer, paperNumber, currentOwner, newOwner, price, purchaseDateTime) {

  // Retrieve the current paper using key fields provided
  let paperKey = CommercialPaper.makeKey([issuer, paperNumber]);
  let paper = await ctx.paperList.getPaper(paperKey);

  // Validate current owner
  if (paper.getOwner() !== currentOwner) {
      throw new Error('Paper ' + issuer + paperNumber + ' is not owned by ' + currentOwner);
  }

  // First buy moves state from ISSUED to TRADING
  if (paper.isIssued()) {
      paper.setTrading();
  }

  // Check paper is not already REDEEMED
  if (paper.isTrading()) {
      paper.setOwner(newOwner);
  } else {
      throw new Error('Paper ' + issuer + paperNumber + ' is not trading. Current state = ' +paper.getCurrentState());
  }

  // Update the paper
  await ctx.paperList.updatePaper(paper);
  return paper.toBuffer();
}
Java
@Transaction
public CommercialPaper buy(CommercialPaperContext ctx,
                           String issuer,
                           String paperNumber,
                           String currentOwner,
                           String newOwner,
                           int price,
                           String purchaseDateTime) {

    // Retrieve the current paper using key fields provided
    String paperKey = State.makeKey(new String[] { paperNumber });
    CommercialPaper paper = ctx.paperList.getPaper(paperKey);

    // Validate current owner
    if (!paper.getOwner().equals(currentOwner)) {
        throw new RuntimeException("Paper " + issuer + paperNumber + " is not owned by " + currentOwner);
    }

    // First buy moves state from ISSUED to TRADING
    if (paper.isIssued()) {
        paper.setTrading();
    }

    // Check paper is not already REDEEMED
    if (paper.isTrading()) {
        paper.setOwner(newOwner);
    } else {
        throw new RuntimeException(
                "Paper " + issuer + paperNumber + " is not trading. Current state = " + paper.getState());
    }

    // Update the paper
    ctx.paperList.updatePaper(paper);
    return paper;
}
在使用 paper.setOwner(newOwner) 更改拥有者之前,理解交易如何检查 currentOwner 并检查该 paper 应该是 TRADING 状态的。基本流程很简单:检查一些前提条件,设置新拥有者,更新账本上的商业票据,并将更新的商业票据(序列化为 buffer )作为交易响应返回。
为什么不看一下你否能理解兑换交易的逻辑?
对象的表示
我们已经了解了如何使用 CommercialPaper 和 PaperList 类定义和实现发行、购买和兑换交易。让我们通过查看这些类如何工作来结束这个主题。
定位到 CommercialPaper 类:
JavaScript
In the
paper.js file:
class CommercialPaper extends State {...}
Java
In the CommercialPaper.java file:
@DataType()
public class CommercialPaper extends State {...}
该类包含商业票据状态的内存表示。了解 createInstance 方法如何使用提供的参数初始化一个新的商业票据:
JavaScript
static createInstance(issuer, paperNumber, issueDateTime, maturityDateTime, faceValue) {
  return new CommercialPaper({ issuer, paperNumber, issueDateTime, maturityDateTime, faceValue });
}
Java
public static CommercialPaper createInstance(String issuer, String paperNumber, String issueDateTime,
        String maturityDateTime, int faceValue, String owner, String state) {
    return new CommercialPaper().setIssuer(issuer).setPaperNumber(paperNumber).setMaturityDateTime(maturityDateTime)
            .setFaceValue(faceValue).setKey().setIssueDateTime(issueDateTime).setOwner(owner).setState(state);
}
回想一下发行交易如何使用这个类:
JavaScript
let paper = CommercialPaper.createInstance(issuer, paperNumber, issueDateTime, maturityDateTime, faceValue);
Java
CommercialPaper paper = CommercialPaper.createInstance(issuer, paperNumber, issueDateTime, maturityDateTime,
        faceValue,issuer,"");
查看每次调用发行交易时,如何创建包含交易数据的商业票据的新内存实例。
需要注意的几个要点:
这是一个内存中的表示; 我们稍后会看到它如何在帐本上显示。
CommercialPaper类扩展了State类。State是一个应用程序定义的类,它为状态创建一个公共抽象。所有状态都有一个它们代表的业务对象类、一个复合键,可以被序列化和反序列化,等等。当我们在帐本上存储多个业务对象类型时,State可以帮助我们的代码更清晰。检查state.js文件中的State类。票据在创建时会计算自己的密钥,在访问帐本时将使用此密钥。密钥由
issuer和paperNumber的组合形成。constructor(obj) { super(CommercialPaper.getClass(), [obj.issuer, obj.paperNumber]); Object.assign(this, obj); }
票据通过交易而不是票据类变更到
ISSUED状态。那是因为智能合约控制票据的状态生命周期。例如,import交易可能会立即创建一组新的TRADING状态的票据。
CommercialPaper 类的其余部分包含简单的辅助方法:
getOwner() {
    return this.owner;
}
回想一下智能合约如何使用这样的方法来维护商业票据的整个生命周期。例如,在兑换交易中,我们看到:
if (paper.getOwner() === redeemingOwner) {
  paper.setOwner(paper.getIssuer());
  paper.setRedeemed();
}
访问账本
现在在 paperlist.js 文件中找到 PaperList 类:
class PaperList extends StateList {
此工具类用于管理 Hyperledger Fabric 状态数据库中的所有 PaperNet 商业票据。PaperList 数据结构在架构主题中有更详细的描述。
与 CommercialPaper 类一样,此类扩展了应用程序定义的 StateList 类,该类为一系列状态创建了一个通用抽象——在本例中是 PaperNet 中的所有商业票据。
addPaper() 方法是对 StateList.addState() 方法的简单封装:
async addPaper(paper) {
  return this.addState(paper);
}
您可以在 StateList.js 文件中看到 StateList 类如何使用 Fabric API putState() 将商业票据作为状态数据写在帐本中:
async addState(state) {
  let key = this.ctx.stub.createCompositeKey(this.name, state.getSplitKey());
  let data = State.serialize(state);
  await this.ctx.stub.putState(key, data);
}
帐本中的每个状态数据都需要以下两个基本要素:
- 键(Key):
键由createCompositeKey()使用固定名称和state密钥形成。在构造PaperList对象时分配了名称,state.getSplitKey()确定每个状态的唯一键。 - 数据(Data):
数据只是商业票据状态的序列化形式,使用State.serialize()方法创建。State类使用 JSON 对数据进行序列化和反序列化,并根据需要使用 State 的业务对象类,在我们的例子中为CommercialPaper,在构造PaperList对象时再次设置。
注意 StateList 不存储有关单个状态或状态总列表的任何内容——它将所有这些状态委托给 Fabric 状态数据库。这是一个重要的设计模式 – 它减少了 Hyperledger Fabric 中账本 MVCC 冲突的机会。
StateList getState() 和 updateState() 方法以类似的方式工作:
async getState(key) {
  let ledgerKey = this.ctx.stub.createCompositeKey(this.name, State.splitKey(key));
  let data = await this.ctx.stub.getState(ledgerKey);
  let state = State.deserialize(data, this.supportedClasses);
  return state;
}
async updateState(state) {
  let key = this.ctx.stub.createCompositeKey(this.name, state.getSplitKey());
  let data = State.serialize(state);
  await this.ctx.stub.putState(key, data);
}
了解他们如何使用 Fabric APIs putState()、 getState() 和 createCompositeKey() 来存取账本。我们稍后将扩展这份智能合约,以列出 paperNet 中的所有商业票据。实现账本检索的方法可能是什么样的?
是的!在本主题中,您已了解如何为 PaperNet 实现智能合约。您可以转到下一个子主题,以查看应用程序如何使用 Fabric SDK 调用智能合约。
应用
受众:架构师、应用程序和智能合约开发人员
应用程序可以通过将交易提交到帐本或查询帐本内容来与区块链网络进行交互。本主题介绍了应用程序如何执行此操作的机制; 在我们的场景中,组织使用应用程序访问 PaperNet,这些应用程序调用定义在商业票据智能合约中的发行、购买和兑换交易。尽管 MagnetoCorp 的应用发行商业票据是基础功能,但它涵盖了所有主要的理解点。
在本主题中,我们将介绍:
为了帮助您理解,我们将参考 Hyperledger Fabric 提供的商业票据示例应用程序。您可以下载 并在本地运行它。它是用 JavaScript 和 Java 编写的,但逻辑与语言无关,因此您可以轻松地查看正在发生的事情!(该示例也适用于 Go。)
基本流程
应用程序使用 Fabric SDK 与区块链网络交互。 以下是应用程序如何调用商业票据智能合约的简化图表:
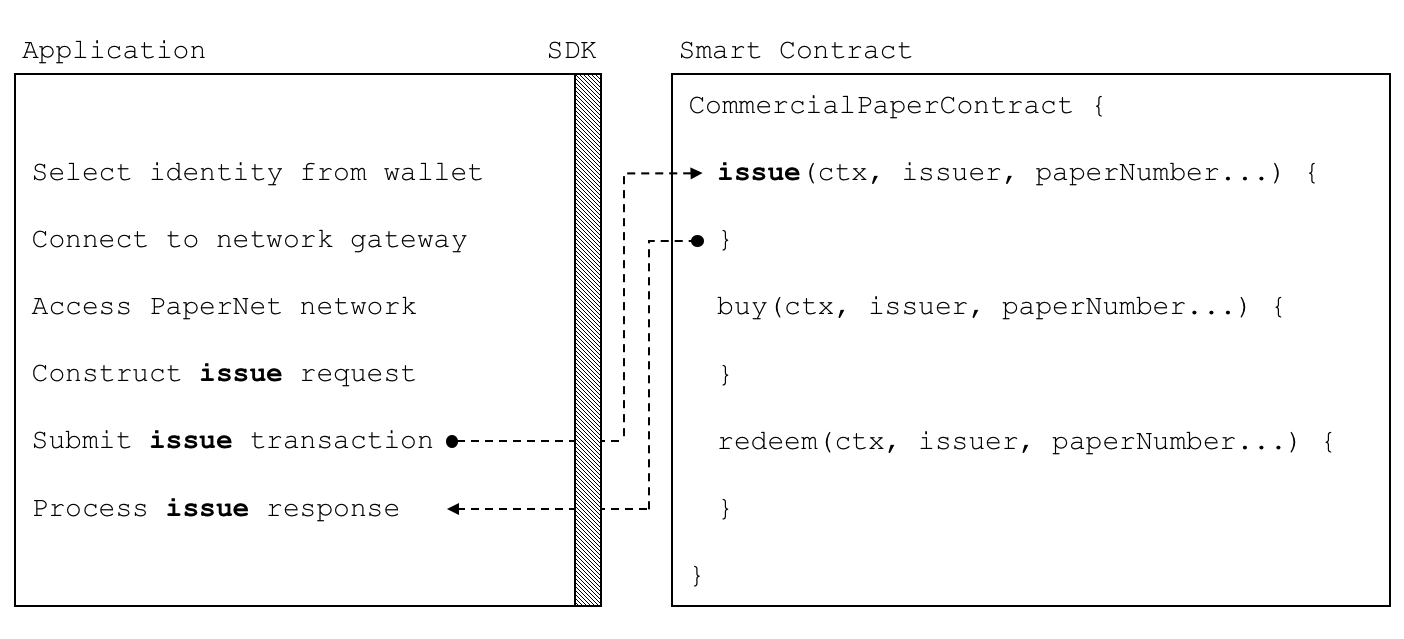 PaperNet 应用程序调用商业票据智能合约来提交发行交易请求。
应用程序必须遵循六个基本步骤来提交交易:
- 从钱包中选择一个身份
- 连接到网关
- 访问所需的网络
- 构建智能合约的交易请求
- 将交易提交到网络
- 处理响应
您将看到典型应用程序如何使用 Fabric SDK 执行这六个步骤。 您可以在 issue.js 文件中找到应用程序代码。请在浏览器中查看,如果您已下载,请在您喜欢的编辑器中打开它。 花一些时间看一下应用程序的整体结构; 尽管有注释和空白,但是它只有100行代码!
钱包
在 issue.js 的顶部,您将看到两个 Fabric 类导入代码域:
const { Wallets, Gateway } = require('fabric-network');
您可以在node SDK 文档中了解 fabric-network 类,但是现在,让我们看看如何使用它们将 MagnetoCorp 的应用程序连接到 PaperNet。该应用程序使用 Fabric Wallet 类,如下所示:
const wallet = await Wallets.newFileSystemWallet('../identity/user/isabella/wallet');
了解 wallet 如何在本地文件系统中找到钱包。从钱包中检索到的身份显然适用于使用 issue 应用程序的 Isabella 用户。钱包拥有一组身份——X.509 数字证书——可用于访问 PaperNet 或任何其他 Fabric 网络。如果您运行该教程,并查看此目录,您将看到 Isabella 的身份凭证。
想想一个钱包里面装着政府身份证,驾照或 ATM 卡的数字等价物。其中的 X.509 数字证书将持有者与组织相关联,从而使他们有权在网络通道中获得权利。例如, Isabella 可能是 MagnetoCorp 的管理员,这可能比其他用户更有特权——来自 DigiBank 的 Balaji。 此外,智能合约可以在使用交易上下文的智能合约处理期间检索此身份。
另请注意,钱包不持有任何形式的现金或代币——它们持有身份。
网关
第二个关键类是 Fabric Gateway。最重要的是,网关识别一个或多个提供网络访问的 Peer 节点——在我们的例子中是 PaperNet。了解 issue.js 如何连接到其网关:
await gateway.connect(connectionProfile, connectionOptions);
gateway.connect() 有两个重要参数:
- connectionProfile:连接配置文件的文件系统位置,用于将一组 Peer 节点标识为 PaperNet 的网关
- connectionOptions:一组用于控制
issue.js与 PaperNet 交互的选项
了解客户端应用程序如何使用网关将自身与可能发生变化的网络拓扑隔离开来。网关负责使用连接配置文件和连接选项将交易提案发送到网络中的正确 Peer 节点。
花一些时间检查连接配置文件 ./gateway/connectionProfile.yaml。它使用YAML,易于阅读。
它被加载并转换为 JSON 对象:
let connectionProfile = yaml.safeLoad(file.readFileSync('./gateway/connectionProfile.yaml', 'utf8'));
现在,我们只关注 channels: 和 peers: 配置部分:(我们稍微修改了细节,以便更好地解释发生了什么。)
channels:
  papernet:
    peers:
      peer1.magnetocorp.com:
        endorsingPeer: true
        eventSource: true

      peer2.digibank.com:
        endorsingPeer: true
        eventSource: true

peers:
  peer1.magnetocorp.com:
    url: grpcs://localhost:7051
    grpcOptions:
      ssl-target-name-override: peer1.magnetocorp.com
      request-timeout: 120
    tlsCACerts:
      path: certificates/magnetocorp/magnetocorp.com-cert.pem

  peer2.digibank.com:
    url: grpcs://localhost:8051
    grpcOptions:
      ssl-target-name-override: peer1.digibank.com
    tlsCACerts:
      path: certificates/digibank/digibank.com-cert.pem
看一下 channel: 如何识别 PaperNet: 网络通道及其两个 Peer 节点。MagnetoCorp 拥有 peer1.magenetocorp.com,DigiBank 拥有 peer2.digibank.com,两者都有背书节点的角色。通过 peers: 键链接到这些 Peer 节点,其中包含有关如何连接它们的详细信息,包括它们各自的网络地址。
连接配置文件包含大量信息——不仅仅是 Peer 节点——而是网络通道,网络排序节点,组织和 CA,因此如果您不了解所有信息,请不要担心!
现在让我们将注意力转向 connectionOptions 对象:
let connectionOptions = {
    identity: userName,
    wallet: wallet,
    discovery: { enabled:true, asLocalhost: true }
};
了解它如何指定应使用 identity、userName 和 wallet、wallet 连接到网关。 这些是在代码中分配值较早的。
应用程序可以使用其他连接选项来指示 SDK 代表它智能地执行操作。 例如:
let connectionOptions = {
  identity: userName,
  wallet: wallet,
  eventHandlerOptions: {
    commitTimeout: 100,
    strategy: EventStrategies.MSPID_SCOPE_ANYFORTX
  },
}
这里, commitTimeout 告诉 SDK 等待100秒以监听是否已提交交易。 strategy:EventStrategies.MSPID_SCOPE_ANYFORTX 指定 SDK 可以在单个 MagnetoCorp Peer 节点确认交易后通知应用程序,与 strategy: EventStrategies.NETWORK_SCOPE_ALLFORTX 相反,strategy: EventStrategies.NETWORK_SCOPE_ALLFORTX 要求 MagnetoCorp 和 DigiBank 的所有 Peer 节点确认交易。
如果您愿意,请阅读更多 有关连接选项如何允许应用程序指定面向目标的行为而不必担心如何实现的信息。
网络通道
在网关 connectionProfile.yaml 中定义的 Peer 节点提供 issue.js 来访问 PaperNet。 由于这些 Peer 节点可以连接到多个网络通道,因此网关实际上为应用程序提供了对多个网络通道的访问!
了解应用程序如何选择特定通道:
const network = await gateway.getNetwork('PaperNet');
从这一点开始, network 将提供对 PaperNet 的访问。 此外,如果应用程序想要访问另一个网络,BondNet,同时,它很容易:
const network2 = await gateway.getNetwork('BondNet');
现在,我们的应用程序可以访问第二个网络 BondNet,同时可以访问 PaperNet!
我们在这里可以看到 Hyperledger Fabric 的一个强大功能——应用程序可以通过连接到多个网关 Peer 节点来加入网络中的网络,每个网关 Peer 节点都连接到多个网络通道。 根据 gateway.connect() 提供的钱包标识,应用程序将在不同的通道中拥有不同的权限。
构造请求
该应用程序现在准备发行商业票据。要做到这一点,它将再次使用 CommercialPaperContract,它可以非常直接地访问这个智能合约:
const contract = await network.getContract('papercontract', 'org.papernet.commercialpaper');
请注意应用程序如何提供名称——papercontract——以及可选的合约命名空间: org.papernet.commercialpaper! 我们看到如何从包含许多合约的 papercontract.js 链码文件中选出一个合约名称。在 PaperNet 中,papercontract.js 已安装并使用名称 papercontract 部署到了通道,如果您有兴趣,请如何部署包含多个智能合约的链代码。
如果我们的应用程序同时需要访问 PaperNet 或 BondNet 中的另一个合约,这将很容易:
const euroContract = await network.getContract('EuroCommercialPaperContract');

const bondContract = await network2.getContract('BondContract');
在这些例子中,注意我们是如何不使用一个有效的合约名字——每个文件我们只有一个智能合约,并且 getContract() 将会使用它找到的第一个合约。
回想一下 MagnetoCorp 用于发行其第一份商业票据的交易:
Txn = issue
Issuer = MagnetoCorp
Paper = 00001
Issue time = 31 May 2020 09:00:00 EST
Maturity date = 30 November 2020
Face value = 5M USD
我们现在将此交易提交给 PaperNet!
提交交易
提交一个交易是对 SDK 的单个方法调用:
const issueResponse = await contract.submitTransaction('issue', 'MagnetoCorp', '00001', '2020-05-31', '2020-11-30', '5000000');
了解 submitTransaction() 参数如何与交易请求匹配。它们的值将传递给智能合约中的 issue() 方法,并用于创建新的商业票据。回想一下它的签名:
async issue(ctx, issuer, paperNumber, issueDateTime, maturityDateTime, faceValue) {...}
那可能会显示一个智能合约会在应用程序触发了 submitTransaction() 之后很快地收到控制,但是并不是那样的。在外表下,SDK 使用了 connectionOptions 和 connectionProfile 来将交易提案发送给网络中正确的节点,从那里可以得到所需的背书。但是应用程序并不用担心——它仅仅是触发了 submitTransaction 然后 SDK 会除了接下来所有的事情!
我们注意到,submitTransaction API 包含了监听交易提交的一个流程。监听提交是必须的,因为如果没有它的话,你将不会知道你的交易是否被成功地排序了,验证了并且提交到了账本上。
现在让我们将注意力转向应用程序如何处理响应!
处理响应
回想一下 papercontract.js 如何发行交易返回一个商业票据响应:
return paper.toBuffer();
您会注意到一个轻微的怪癖——新票据需要在返回到应用程序之前转换为缓冲区。请注意 issue.js 如何使用类方法 CommercialPaper.fromBuffer() 将响应缓冲区重新转换为商业票据:
let paper = CommercialPaper.fromBuffer(issueResponse);
这样可以在描述性完成消息中以自然的方式使用票据:
console.log(`${paper.issuer} commercial paper : ${paper.paperNumber} successfully issued for value ${paper.faceValue}`);
了解如何在应用程序和智能合约中使用相同的 paper 类——如果您像这样构建代码,它将真正有助于可读性和重用。
与交易提案一样,智能合约完成后,应用程序可能会很快收到控制权,但事实并非如此。SDK 负责管理整个共识流程,并根据策略连接选项在应用程序完成时通知应用程序。 如果您对 SDK 的内容感兴趣,请阅读详细的交易流程。
就是这样!在本主题中,您已了解如何通过检查 MagnetoCorp 的应用程序如何在 PaperNet 中发行新的商业票据,从示例应用程序调用智能合约。现在检查关键账本和智能合约数据结构是由它们背后的架构主题设计的。
应用程序设计元素
本节详细介绍了 Hyperledger Fabric 中的客户端应用程序和智能合约开发的主要功能。对功能的充分理解将帮助您设计和实现高效且有效的解决方案。
合约名称
受众:架构师、应用程序与合约开发者、管理员
链码(Chaincode)是一种用于部署代码到 Hyperledger Fabric 区块链网络中的通用容器。链码中定义一个或多个相关联的智能合约。每个智能合约在链码中有一个唯一的标识名。应用程序通过合约名称去访问已经实例化的链码内指定的智能合约。
在本主题中,我们将会讲到:
链码
在开发应用主题中,我们能够看到 Fabric SDK 如何提供了高级的编程抽象,从而能够帮助那些应用程序和智能合约的开发者们聚焦在他们的业务问题上,而不是将目光放在如何与 Fabric 网络交互的这些细节中。
智能合约(Smart Contract)是一种高级编程抽象的例子,可以在链码容器中定义智能合约。当一个链码被安装到 Peer 节点并部署到通道后,链码内所有的智能合约对你的应用来说都是可用的。
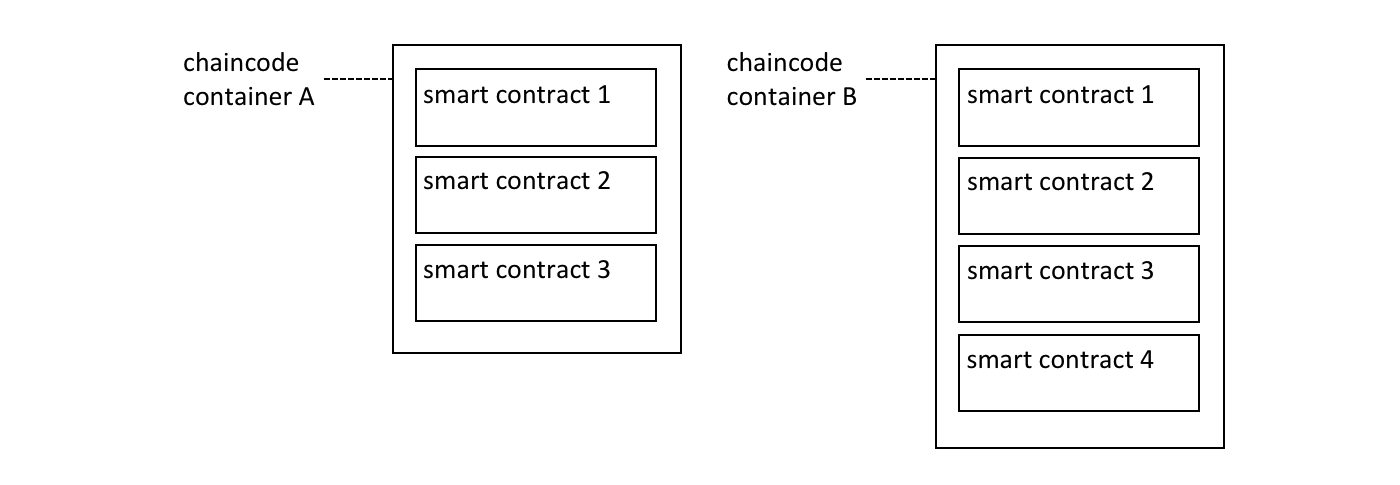 多个智能合约能够被定义在同一个链码内。每一个智能合约都通过链码内的名字而被唯一标识。
在上图中,链码 A 中定义了三个智能合约,然而链码 B 中有四个智能合约。看一下链码名称如何被用于限定一个特定的智能合约。
账本结构由一组已经部署的智能合约所定义。那是因为账本包括了一些有关网络所感兴趣的业务对象(例如 PaperNet 内的商业票据),并且这些业务对象通过智能合约内定义的交易功能在其生命周期(例如:发行,购买,赎回)中移动。
在大多数情况下,一个链码内仅仅只定义了一个智能合约。然而,将相关联的智能合约放在一个链码中是有意义的。比如,以不同货币计价的商业票据中,可能有 EuroPaperContract, DollarPaperContract, YenPaperContract,这些智能合约在部署他们的通道内可能要互相保持同步。
命名
链码里的每一个智能合约都通过合约名称被唯一标识。当智能合约可以在构造类时显示分配这个名称,或者让 Contract 类隐式分配一个默认名称。
查看 papercontract.js 链码文件:
class CommercialPaperContract extends Contract {

    constructor() {
        // Unique name when multiple contracts per chaincode file
        super('org.papernet.commercialpaper');
    }
看一下 CommercialPaperContract 构造函数是如何将合约名称指定为 org.papernet.commercialpaper 的。结果是:在 papercontract 链码内,这个智能合约现在与合约名 org.papernet.commercialpaper 相关联。
如果没有明确指定一个合约名,则会分配一个默认的名字——类名。在我们的例子中,默认的合约名是 CommercialPaperContract。
细心地选择你的名字。不仅仅每一个智能合约必须有一个唯一的名字,而且一个精心挑选的名字也是很有启发性的。特别地,建议使用显式的 DNS 样式命名方法,对组织清晰、有意义的名称有帮助; org.papernet.commercialpaper 表达了 PaperNet 网络已经定义了一个标准的商业票据智能合约。
在一个给定链码内,合约名称也有利于消除具有相同名字的不同合约方法交易函数之间的歧义。当智能合约紧密联系的时候,这种歧义就容易发生;他们的交易名称往往倾向于一致。我们能够看到,通过链码和智能合约的名字的组合,一个交易被唯一地定义在通道内。
合约名称在链码文件内必须是唯一的。在部署前,一些代码编辑器将会检测是否存在具有相同类名的多个定义的情况。如果存在多个类使用了相同的合约名,无论是显式还是隐式指定,链码都将会返回错误。
应用程序
一旦链码安装在一个 Peer 节点而且部署在一个通道上,链码里的智能合约对于应用程序来说是可访问的:
const network = await gateway.getNetwork(`papernet`);

const contract = await network.getContract('papercontract', 'org.papernet.commercialpaper');

const issueResponse = await contract.submitTransaction('issue', 'MagnetoCorp', '00001', '2020-05-31', '2020-11-30', '5000000');
看一下应用程序如何通过 network.getContract() 方法访问智能合约。papercontract 链码的名 org.papernet.commercialpaper 返回了一个引用,此引用使用 contract.submitTransaction() 接口去提交发布商业票据的交易。
默认合约
被定义在链码内的第一个智能合约被成为默认合约。这个默认是有用的,因为链码内往往有一个被定义的智能合约;这个默认的智能合约允许应用程序直接地访问这些交易,而不需要特殊指定合约名称。
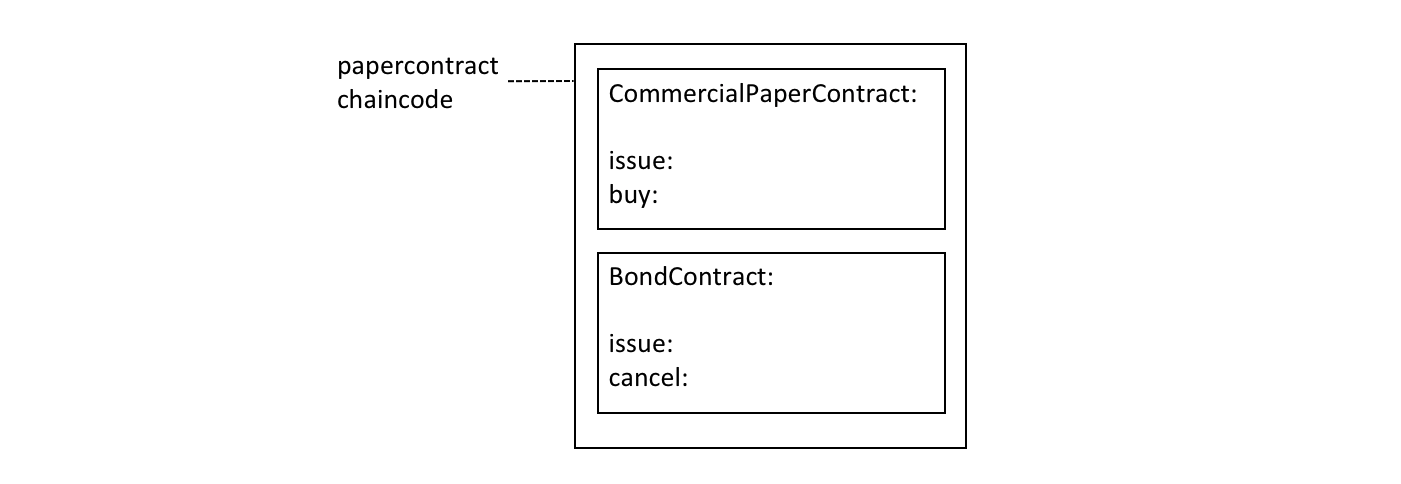 一个默认地智能合约是第一个被定义在链码的智能合约。
在这个图表中,CommercialPaperContract 就是那个默认的智能合约。即使我们有两个智能合约,默认的智能合约让我们当前的例子更加容易去编写。
const network = await gateway.getNetwork(`papernet`);

const contract = await network.getContract('papercontract');

const issueResponse = await contract.submitTransaction('issue', 'MagnetoCorp', '00001', '2020-05-31', '2020-11-30', '5000000');
在 papercontract 链码内,CommercialPaperContract 就是那个默认的智能合约,同时它有一个 issue 交易。注意,在 BondContract 内发布的交易事务仅仅能通过显示地寻址指来调用。同样地,即使 cancel 交易是唯一的(因为 BondContract 不是默认的智能合约),它也必须要显示地寻址。
在大多数情况下,一个链码仅仅只包括一个单一的智能合约,所以对链码仔细命名,能够降低开发者将链码视为概念来关注的需求。在上述代码例子中,感觉 papercontract 像是一个智能合约。
总而言之,在一个给定的链码内,合约名称是一些简单的机制去标识独自的智能合约。合约名称让应用程序更加容易的发现特定的智能合约而且更方便地使用它访问账本。
链码命名空间
本文面向的读者是: 架构师,应用程序和智能合约开发人员,管理员
链码命名空间允许其保持自己的世界状态与其他链码的不同。具体来说,同链码的智能合约对相同的世界状态都拥有直接的访问权,而不同链码的智能合约无法直接访问对方的世界状态。如果一个智能合约需要访问其他链码的世界状态,可通过执行链码-对-链码的调用来完成。最后,区块链可以包含涉及了不同世界状态的交易。
本文我们将讲述以下内容:
动机
命名空间是一个常见的概念。我们知道虽然公园街道,纽约和帕克街道,西雅图这些属于不同街道,但是他们有共同的名字。城市为公园街提供了一个命名空间,同时赋予了它自由度和清晰度。
在电脑系统中也是如此。命名空间实现了让不同用户在不影响其他方操作的情况下对一个共享系统的不同部分进行编程和操作。许多编程语言都有命名空间,这就使得程序可以轻松地分配独特的识别符,如变量名,而无须担心其他程序也在进行相同操作。下文中会介绍到Hyperledger Fabric通过命名空间使得智能合约可以保持自己的账本世界状态与其他智能合约的不同。
情景
让我们通过下面的图表来看一下账本世界状态如何管理对通道组织很重要的商业对象的相关事实。无论对象是商业票据,债券,还是车牌号码,无论这些对象位于生命周期的什么位置,它们都会被作为状态维持在账本数据状态数据库中。智能合约通过与账本(世界状态和区块链)交互来管理这些商业对象,而多数情况下这一过程会涉及到智能合约查询或更新账本世界状态。
账本世界状态是通过访问该状态的智能合约的链码来进行划分的,理解这一点至关重要 。这种划分或者命名空间对架构师、管理员和程序员来说是一点非常重要的设计考虑。
 账本世界状态根据访问其状态的链码被分成不同命名空间。在一个给定通道上,相同链码的智能合约共享相同世界状态,不同链码的智能合约无法直接访问对方的世界状态。同样的道理,区块链可以包含与不同链码世界状态相关的交易。
在我们的示例中可以看到两种不同的链码中定义了四种智能合约,每个都位于它们自己的链码容器里。 euroPaper 和yenPaper 智能合约被定义在 papers 链码中。 euroBond 和 yenBond 智能合约的情况也类似——它们被定义在bonds链码中。该设计可帮助应用程序员们理解他们的工作对象,是商业票据还是欧元或日元的债券,因为各金融产品的规则不会受货币种类影响,这就使得用相同链码管理这些金融产品的部署成为可能。
上图 还展示了这一部署选择的结果。数据库管理系统为 papers 和 bonds 链码以及各自其中包含的智能合约创建了不同的世界状态数据库。 World state A 和 world state B 被分别放在不同的数据库中;其中的数据也被分隔开,从而使得一个单独的世界状态查询(比如)不会同时访问两个世界状态。据说世界状态根据其链码进行了命名空间设定。
看看 world state A 是如何包含两个列表的商业票据 paperListEuro 和 paperListYen 。状态 PAP11 和PAP21 分别是由 euroPaper 和 yenPaper 智能合约管理的每个票据的示例。由于这些智能合约共享同样的链码命名空间,因此它们的key(PAPxyz) 必须在 papers 链码的命名空间里是唯一的。要注意怎样能在papers 链码上写一个能对所有商业票据(无论是欧元还是日元)执行汇总计算的智能合约,因为这些商业票据共享相同的命名空间。债券的情况也类似——债券保存在 world state B 中, world state B 与另一个bonds 数据库形成映射,它们的key必须都是唯一的。
同样重要的一点是,命名空间意味着 euroPaper 和 yenPaper 无法直接访问 world state B ,也意味着 euroBond 和 yenBond 无法直接访问 world state A 。这样的分隔是有帮助的,因为商业票据和债券是相差很大的两种金融工具,它们各有不同的属性和规定。同时命名空间还意味着 papers 和 bonds 可以有相同的key,因为它们在不同的命名空间。这是有帮助的,因为它为命名提供了足够大的自由空间。以此来为不同的商业对象命名。
最重要的一点是,我们可以看到区块链是与在特定通道上运行的节点相关的,它包括了影响 world state A 和 world state B 的交易。这就解释了为什么区块链是节点中最基础的数据结构。因为世界状态集是区块链交易的汇总结构,所以它总是能从区块链中重新创建。世界状态通常仅要求该状态的当前值,所以它可以简化智能合约,提升智能合约的效率。通过命名空间来让世界状态彼此各不相同,这能帮助智能合约将各自逻辑从其他智能合约中隔离出来,而不需要担心那些与不同世界状态通信的交易。例如, bonds 合约不需要担心 paper 交易,因为该合约无法看到由它所造成的世界状态。
同样值得注意的是,节点,链码容器和数据库管理系统(DBMS)在逻辑上来说都是不同的过程。节点和其所有的链码容器始终位于不同的操作系统进程中,但是 DBMS 可被配置为嵌入或分离,这取决于它的类型。对于 LevelDB 来说,DBMS 整体被包含在节点中,但是对于 CouchDB 来说,这是另外一个操作系统进程。
要记住,该示例中命名空间的选择是商业上要求共享不同币种商业票据的结果,但是要将商业票据与债券区别开,这一点很重要。想想如何对命名空间的结果进行修改以满足保持每个金融资产等级互不相同这一商业需求,或者来共享所有商业票据和债券。
通道
如果一个节点加入了多个通道,那么将会为每个通道创建、管理一条新的区块链。而且每当有链码部署在一条新通道上,就会为其创建一个新的世界状态数据库。这就意味着通道还可以随着链码命名空间来为世界状态生成一种命名空间。
然而,相同的节点和链码容器流程可同时加入多个通道,与区块链和世界状态数据库不同,这些流程不会随着加入的通道数而增加。
例如,如果链码 papers 和 bonds 在一个新的通道上被部署了,将会有一个完全不同的区块链和两个新的世界状态数据库被创建出来。但是,节点和链码容器不会随之增加;它们只会各自连接到更多相应的通道上。
使用
让我们来用商业票据的例子讲解一个应用程序是如何使用带有命名空间的智能合约的。值得注意的是应用程序与节点交互,该节点将请求发送到对应的链码容器,随后,该链码容器访问DBMS。请求的传输是由下图中的节点核心组件完成的。
以下是使用商业票据和债券的应用程序代码,以欧元和日元定价。该代码可以说是不言自明的:
const euroPaper = network.getContract(papers, euroPaper);
paper1 = euroPaper.submit(issue, PAP11);

const yenPaper = network.getContract(papers, yenPaper);
paper2 = yenPaper.submit(redeem, PAP21);

const euroBond = network.getContract(bonds, euroBond);
bond1 = euroBond.submit(buy, BON31);

const yenBond = network.getContract(bonds, yenBond);
bond2 = yenBond.submit(sell, BON41);
看一下应用程序是怎么:
- 访问
euroPaper和yenPaper合约,用getContract()API指明paper的链码。看交互点1a和2a。 - 访问
euroBond和yenBond合约,用getContract()API指明bonds链码。看交互点3a和4a。 - 向网络提交一个
issue交易,以使PAP11票据使用euroPaper合约。看交互点1a。这就产生了由world state A中的PAP11状态代表的商业票据;交互点1b。这一操作在交互点1c上被捕获为区块链的一项交易。 - 向网络发送一个
redeem交易,让商业票据PAP21来使用yenPaper合约。看交互点2a。这就产生了由world state A中PAP21代表的一个商业票据;交互点2b。该操作在交互点2c被捕获为区块链的一项交易。 - 向网络发送一个
buy交易,让债券BON31来使用euroBond合约。看交互点3a。这就产生了由world state B中BON31代表的一个商业票据;交互点3b。该操作在交互点3c被捕获为区块链的一项交易。 - 向网络发送一个
sell交易,让债券BON41来使用yenBond合约。看交互点4a。这就产生了由world state B中BON41代表的一个商业票据;交互点4b。该操作在交互点4c被捕获为区块链的一项交易。
我们来看看智能合约是如何与世界状态交互的:
euroPaper和yenPaper合约可直接访问world state A,但无法直接访问world state B。world state A储存在与papers链码相对应的数据库管理系统中的papers数据库里面。euroBond和yenBond合约可以直接访问world state B,但是无法直接访问world state A。world state B储存在与bonds链码相对应的数据库管理系统中的bonds数据库里面。
看看区块链是如何为所有世界状态捕获交易的:
- 与交易相对应的交互点1c和2c分别创建和更新商业票据
PAP11和PAP21。它们都包含在world state A中。 - 与交易相对应的交互点3c和4c都会对
BON31和BON41进行更新。它们都包含在world state B中。 - 如果
world state A或world state B因任何原因被破坏,可通过重新进行区块链上的所有交易来重新创建world state A或world state B。
跨链码访问
如 情景中的示例可见, euroPaper 和 yenPaper 无法直接访问world state B。这是因为我们对链码和智能合约进行了设置,使得这些链码和世界状态各自之间保持不同。不过,我们来想象一下 euroPaper 需要访问 world state B。
为什么会发生这种情况呢?想象一下当发行商业票据时,智能合约想根据到期日相似的债券的当前收益情况来对票据进行定价。这种情况时,需要 euroPaper 合约能够在 world state B中查询债券价格。看以下图表来研究一下应该如何设计交互的结构。
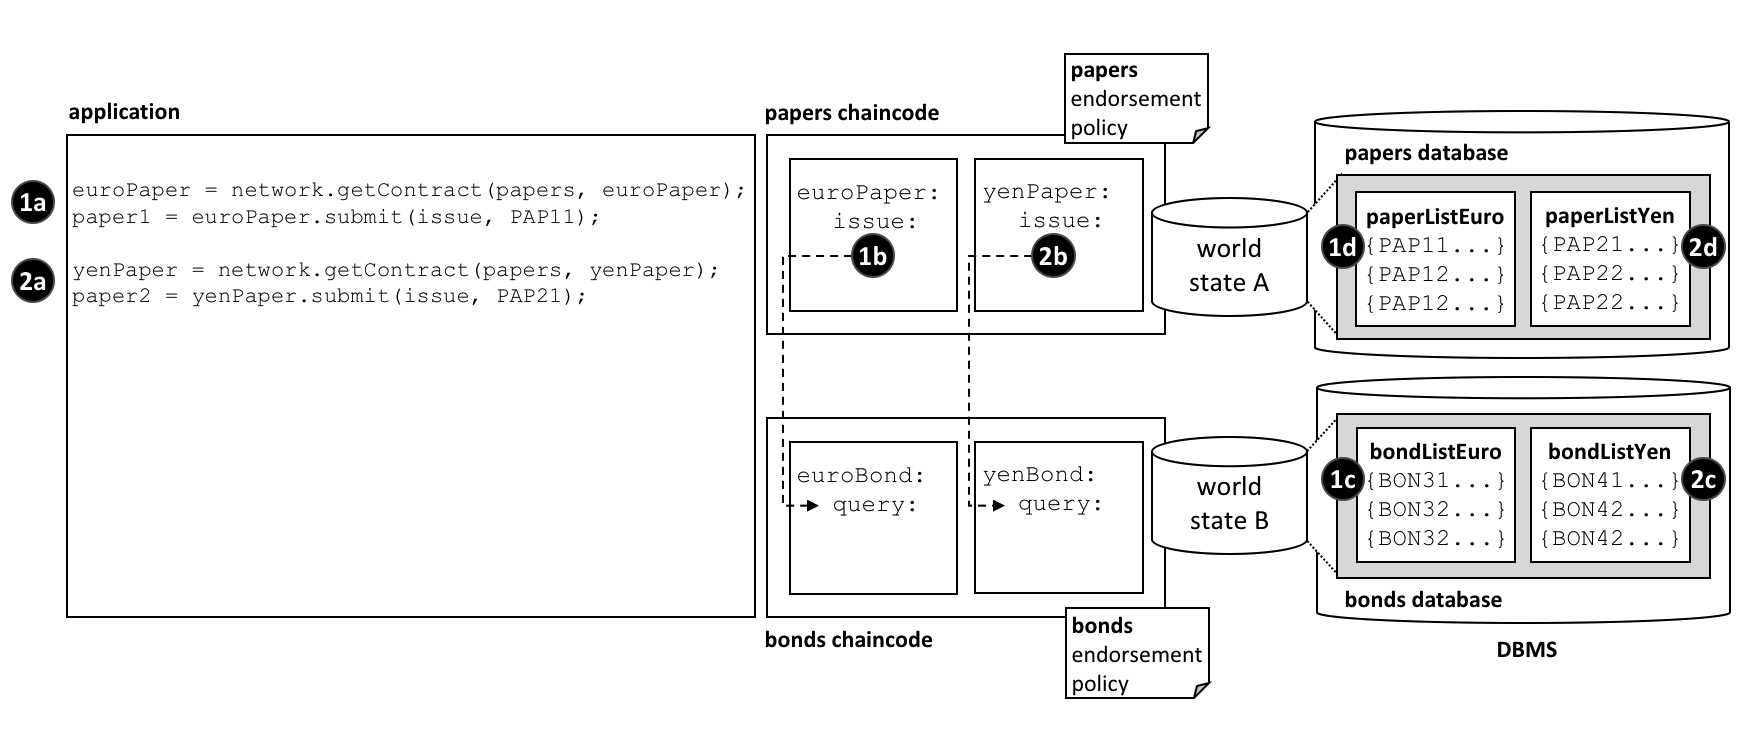 链码和智能合约如何能够直接访问其他世界状态——通过自己的链码。
注意如何:
- 应用程序在
euroPaper智能合约中发送issue交易来颁布PAP11。看交互点 1a。 euroPaper智能合约中的issue交易在euroBond智能合约中调用query交易。看交互点 1b。euroBond中的query从world state B中索取信息。看交互点 1c。- 当控制返回到
issue交易,它可利用响应中的信息对票据定价,并使用信息来更新world state A。看交互点 1d。 - 发行以日元定价的商务票据的控制流程也是一样的。看交互点 2a,2b,2c 和 2d。
链码间的控制传递是利用 invokeChiancode()
API来实现的。
该 API 将控制权从一个链码传递到另一个链码。
虽然我们在示例中只谈论了查询交易,但是用户也能够调用一个将更新所谓链码世界状态的智能合约。请参考下面的 思考 部分。
思考
- 大体上来说,每各链码都包含一个智能合约。
- 若多个智能合约之间关系紧密,应该把它们部署在同一链码中。通常,只有当这些智能合约共享相同的世界状态时才需要这样做。
- 链码命名空间将不同的世界状态分隔开来。这大体上会将彼此不相关的数据区分开。注意,命名空间是由 Hyperledger Fabric 分配并直接映射到链码名字的,用户无法选择。
- 对于使用
invokeChaincode()API 的链码间交互,必须将这两个链码安装在相同节点上。- 对于仅需要查询被调用链码的世界状态的交互,该调用可发生在与调用发起者链码不同的通道上。
- 对于需要更新背调用链码世界状态的交互,调用必须发生在与调用发起者链码相同的通道上。
Transaction context
Audience: Architects, application and smart contract developers
A transaction context performs two functions. Firstly, it allows a developer to define and maintain user variables across transaction invocations within a smart contract. Secondly, it provides access to a wide range of Fabric APIs that allow smart contract developers to perform operations relating to detailed transaction processing. These range from querying or updating the ledger, both the immutable blockchain and the modifiable world state, to retrieving the transaction-submitting application’s digital identity.
A transaction context is created when a smart contract is deployed to a channel and made available to every subsequent transaction invocation. A transaction context helps smart contract developers write programs that are powerful, efficient and easy to reason about.
- Why a transaction context is important
- How to use a transaction context
- What’s in a transaction context
- Using a context
stub - Using a context
clientIdentity
Scenario
In the commercial paper sample, papercontract initially defines the name of the list of commercial papers for which it’s responsible. Each transaction subsequently refers to this list; the issue transaction adds new papers to it, the buy transaction changes its owner, and the redeem transaction marks it as complete. This is a common pattern; when writing a smart contract it’s often helpful to initialize and recall particular variables in sequential transactions.
In the commercial paper sample, papercontract initially defines the name of the list of commercial papers for which it’s responsible. Each transaction subsequently refers to this list; the issue transaction adds new papers to it, the buy transaction changes its owner, and the redeem transaction marks it as complete. This is a common pattern; when writing a smart contract it’s often helpful to initialize and recall particular variables in sequential transactions.
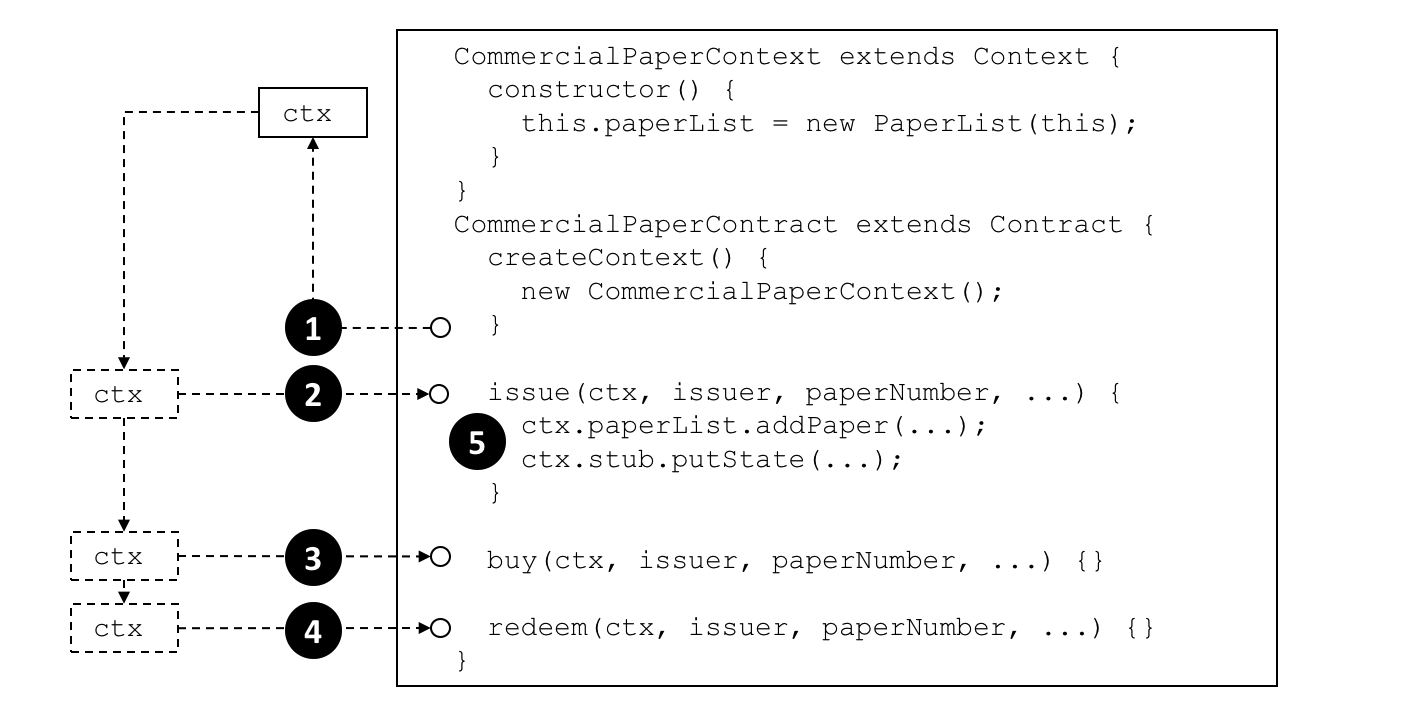 A smart contract transaction
context allows smart contracts to define and maintain user variables across
transaction invocations. Refer to the text for a detailed explanation.
A smart contract transaction
context allows smart contracts to define and maintain user variables across
transaction invocations. Refer to the text for a detailed explanation.
Programming
When a smart contract is constructed, a developer can optionally override the
built-in Context class createContext method to create a custom context:
createContext() {
    new CommercialPaperContext();
}
In our example, the CommercialPaperContext is specialized for
CommercialPaperContract. See how the custom context, addressed through this,
adds the specific variable PaperList to itself:
CommercialPaperContext extends Context {
    constructor () {
        this.paperList = new PaperList(this);
    }
}
When the createContext() method returns at point (1) in the diagram
above, a custom context ctx has been created which contains
paperList as one of its variables.
Subsequently, whenever a smart contract transaction such as issue, buy or redeem
is called, this context will be passed to it. See how at points (2), (3)
and (4) the same commercial paper context is passed into the transaction
method using the ctx variable.
See how the context is then used at point (5):
ctx.paperList.addPaper(...);
ctx.stub.putState(...);
Notice how paperList created in CommercialPaperContext is available to the
issue transaction. See how paperList is similarly used by the redeem and
buy transactions; ctx makes the smart contracts efficient and easy to
reason about.
You can also see that there’s another element in the context – ctx.stub –
which was not explictly added by CommercialPaperContext. That’s because stub
and other variables are part of the built-in context. Let’s now examine the
structure of this built-in context, these implicit variables and how to use
them.
You can also see that there’s another element in the context – ctx.stub –
which was not explicitly added by CommercialPaperContext. That’s because
stub and other variables are part of the built-in context. Let’s now examine
the structure of this built-in context, these implicit variables and how to
use them.
Structure
As we’ve seen from the example, a transaction context can
contain any number of user variables such as paperList.
The transaction context also contains two built-in elements that provide access to a wide range of Fabric functionality ranging from the client application that submitted the transaction to ledger access.
ctx.stubis used to access APIs that provide a broad range of transaction processing operations fromputState()andgetState()to access the ledger, togetTxID()to retrieve the current transaction ID.ctx.clientIdentityis used to get information about the identity of the user who submitted the transaction.
We’ll use the following diagram to show you what a smart contract can do using
the stub and clientIdentity using the APIs available to it:
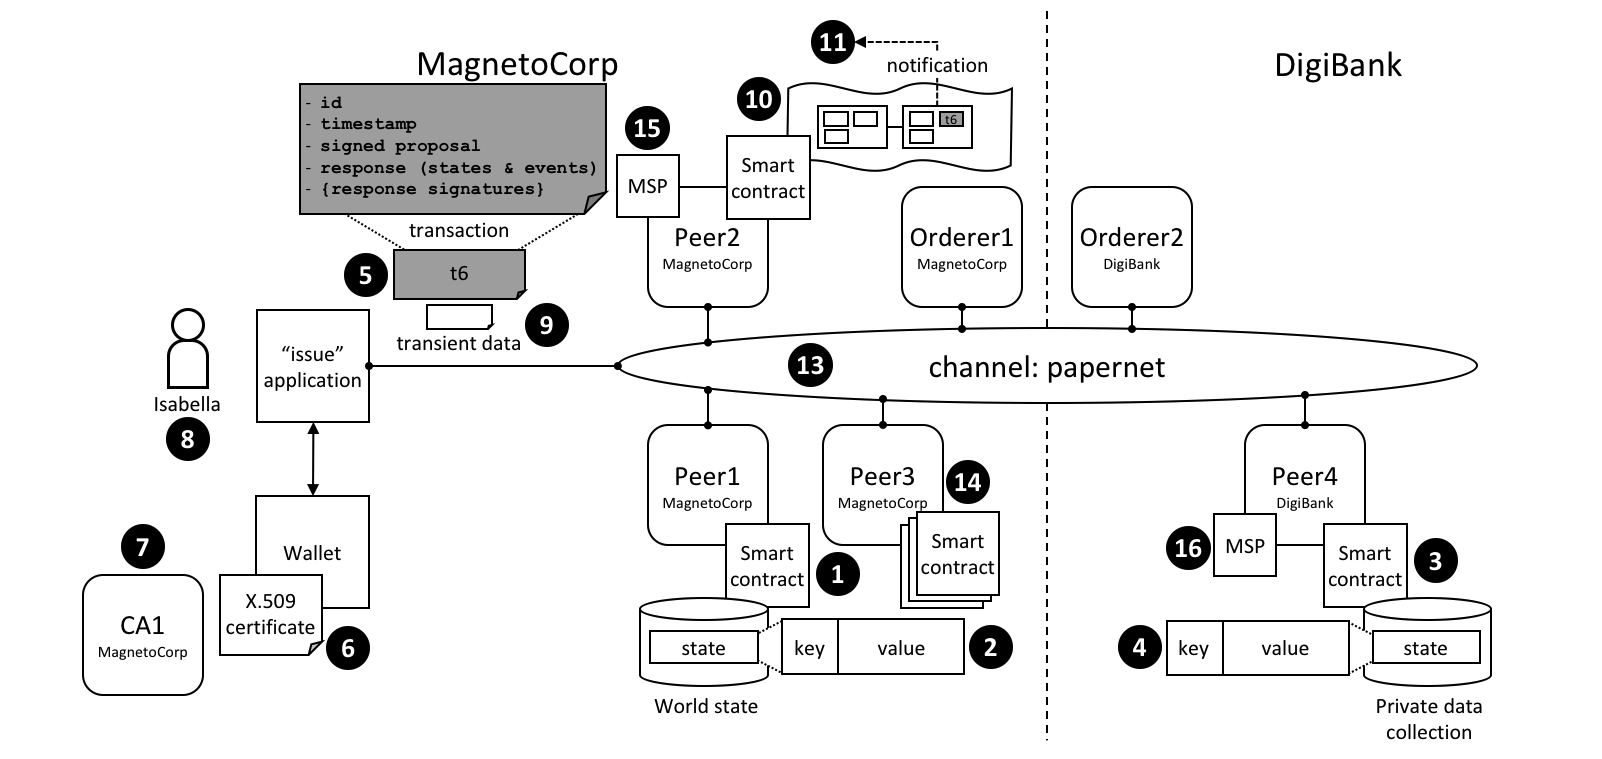 A smart contract can access a
range of functionality in a smart contract via the transaction context
A smart contract can access a
range of functionality in a smart contract via the transaction context stub
and clientIdentity. Refer to the text for a detailed explanation.
Stub
The APIs in the stub fall into the following categories:
World state data APIs. See interaction point (1). These APIs enable smart contracts to get, put and delete state corresponding to individual objects from the world state, using their key:
These basic APIs are complemented by query APIs which enable contracts to retrieve a set of states, rather than an individual state. See interaction point (2). The set is either defined by a range of key values, using full or partial keys, or a query according to values in the underlying world state database. For large queries, the result sets can be paginated to reduce storage requirements:- getStateByRange()
- getStateByRangeWithPagination()
- getStateByPartialCompositeKey()
- getStateByPartialCompositeKeyWithPagination()
- getQueryResult()
- getQueryResultWithPagination()
- getStateByRange()
- getStateByRangeWithPagination()
- getStateByPartialCompositeKey()
- getStateByPartialCompositeKeyWithPagination()
- getQueryResult()
- getQueryResultWithPagination()
Private data APIs. See interaction point (3). These APIs enable smart contracts to interact with a private data collection. They are analogous to the APIs for world state interactions, but for private data. There are APIs to get, put and delete a private data state by its key:
Private data APIs. See interaction point (3). These APIs enable smart contracts to interact with a private data collection. They are analogous to the APIs for world state interactions, but for private data. There are APIs to get, put and delete a private data state by its key:
- getPrivateData()
- putPrivateData()
- deletePrivateData()
- getPrivateData()
- putPrivateData()
- deletePrivateData()
This set is complemented by set of APIs to query private data (4). These APIs allow smart contracts to retrieve a set of states from a private data collection, according to a range of key values, either full or partial keys, or a query according to values in the underlying world state database. There are currently no pagination APIs for private data collections.
This set is complemented by set of APIs to query private data (4). These APIs allow smart contracts to retrieve a set of states from a private data collection, according to a range of key values, either full or partial keys, or a query according to values in the underlying world state database. There are currently no pagination APIs for private data collections.Transaction APIs. See interaction point (5). These APIs are used by a smart contract to retrieve details about the current transaction proposal being processed by the smart contract. This includes the transaction identifier and the time when the transaction proposal was created.
* [getTxID()](https://hyperledger.github.io/fabric-chaincode-node/master/api/fabric-shim.ChaincodeStub.html#getTxID__anchor)
  returns the identifier of the current transaction proposal **(5)**.
* [getTxTimestamp()](https://hyperledger.github.io/fabric-chaincode-node/master/api/fabric-shim.ChaincodeStub.html#getTxTimestamp__anchor)
  returns the timestamp when the current transaction proposal was created by
  the application **(5)**.
* [getCreator()](https://hyperledger.github.io/fabric-chaincode-node/master/api/fabric-shim.ChaincodeStub.html#getCreator__anchor)
  returns the raw identity (X.509 or otherwise) of the creator of
  transaction proposal. If this is an X.509 certificate then it is often
  more appropriate to use [`ctx.ClientIdentity`](#clientidentity).
* [getSignedProposal()](https://hyperledger.github.io/fabric-chaincode-node/master/api/fabric-shim.ChaincodeStub.html#getSignedProposal__anchor)
  returns a signed copy of the current transaction proposal being processed
  by the smart contract.
* [getBinding()](https://hyperledger.github.io/fabric-chaincode-node/master/api/fabric-shim.ChaincodeStub.html#getBinding__anchor)
  is used to prevent transactions being maliciously or accidentally replayed
  using a nonce. (For practical purposes, a nonce is a random number
  generated by the client application and incorporated in a cryptographic
  hash.) For example, this API could be used by a smart contract at **(1)**
  to detect a replay of the transaction **(5)**.
* [getTransient()](https://hyperledger.github.io/fabric-chaincode-node/master/api/fabric-shim.ChaincodeStub.html#getTransient__anchor)
  allows a smart contract to access the transient data an application passes
  to a smart contract. See interaction points **(9)** and **(10)**.
  Transient data is private to the application-smart contract interaction.
  It is not recorded on the ledger and is often used in conjunction with
  private data collections **(3)**.
Transaction APIs. See interaction point (5). These APIs are used by a smart contract to retrieve details about the current transaction proposal being processed by the smart contract. This includes the transaction identifier and the time when the transaction proposal was created.
- getTxID() returns the identifier of the current transaction proposal (5).
- getTxTimestamp() returns the timestamp when the current transaction proposal was created by the application (5).
- getCreator()
returns the raw identity (X.509 or otherwise) of the creator of
transaction proposal. If this is an X.509 certificate then it is often
more appropriate to use
ctx.ClientIdentity. - getSignedProposal() returns a signed copy of the current transaction proposal being processed by the smart contract.
- getBinding() is used to prevent transactions being maliciously or accidentally replayed using a nonce. (For practical purposes, a nonce is a random number generated by the client application and incorporated in a cryptographic hash.) For example, this API could be used by a smart contract at (1) to detect a replay of the transaction (5).
- getTransient() allows a smart contract to access the transient data an application passes to a smart contract. See interaction points (9) and (10). Transient data is private to the application-smart contract interaction. It is not recorded on the ledger and is often used in conjunction with private data collections (3).
Key APIs are used by smart contracts to manipulate state key in the world state or a private data collection. See interaction points 2 and 4.
The simplest of these APIs allows smart contracts to form and split composite keys from their individual components. Slightly more advanced are the
ValidationParameter()APIs which get and set the state based endorsement policies for world state (2) and private data (4). Finally,getHistoryForKey()retrieves the history for a state by returning the set of stored values, including the transaction identifiers that performed the state update, allowing the transactions to be read from the blockchain (10).Key APIs are used by smart contracts to manipulate state key in the world state or a private data collection. See interaction points 2 and 4.
- createCompositeKey()
- splitCompositeKey()
- setStateValidationParameter()
- getStateValidationParameter()
- getPrivateDataValidationParameter()
- setPrivateDataValidationParameter()
- getHistoryForKey()
The simplest of these APIs allows smart contracts to form and split composite keys from their individual components. Slightly more advanced are the
ValidationParameter()APIs which get and set the state based endorsement policies for world state (2) and private data (4). Finally,getHistoryForKey()retrieves the history for a state by returning the set of stored values, including the transaction identifiers that performed the state update, allowing the transactions to be read from the blockchain (10).Event APIs are used to manage event processing in a smart contract.
Event APIs are used manage event processing in a smart contract.
Smart contracts use this API to add user events to a transaction response.
See interaction point **(5)**. These events are ultimately recorded on the
blockchain and sent to listening applications at interaction point
**(11)**.
Smart contracts use this API to add user events to a transaction response.
See interaction point **(5)**. These events are ultimately recorded on the
blockchain and sent to listening applications at interaction point
**(11)**.
Utility APIs are a collection of useful APIs that don’t easily fit in a pre-defined category, so we’ve grouped them together! They include retrieving the current channel name and passing control to a different chaincode on the same peer.
Utility APIs are a collection of useful APIs that don’t easily fit in a pre-defined category, so we’ve grouped them together! They include retrieving the current channel name and passing control to a different chaincode on the same peer.
See interaction point **(13)**.  A smart contract running on any peer can
use this API to determined on which channel the application invoked the
smart contract.
-
See interaction point (13). A smart contract running on any peer can use this API to determined on which channel the application invoked the smart contract.
-
See interaction point (14). Peer3 owned by MagnetoCorp has multiple smart contracts installed on it. These smart contracts are able to call each other using this API. The smart contracts must be collocated; it is not possible to call a smart contract on a different peer.
See interaction point (14). Peer3 owned by MagnetoCorp has multiple smart contracts installed on it. These smart contracts are able to call each other using this API. The smart contracts must be collocated; it is not possible to call a smart contract on a different peer.
Some of these utility APIs are only used if you’re using low-level chaincode, rather than smart contracts. These APIs are primarily for the detailed manipulation of chaincode input; the smart contractContractclass does all of this parameter marshalling automatically for developers.
Some of these utility APIs are only used if you’re using low-level chaincode, rather than smart contracts. These APIs are primarily for the detailed manipulation of chaincode input; the smart contractContractclass does all of this parameter marshalling automatically for developers.
ClientIdentity
In most cases, the application submitting a transaction will be using an X.509
certificate. In the example, an X.509 certificate (6) issued
by CA1 (7) is being used by Isabella (8) in her application to sign
the proposal in transaction t6 (5).
ClientIdentity
ClientIdentity takes the information returned by getCreator() and puts a set
of X.509 utility APIs on top of it to make it easier to use for this common use
case.
In most cases, the application submitting a transaction will be using an X.509
certificate. In the example, an X.509 certificate (6) issued
by CA1 (7) is being used by Isabella (8) in her application to sign
the proposal in transaction t6 (5).
- getX509Certificate() returns the full X.509 certificate of the transaction submitter, including all its attributes and their values. See interaction point (6).
- getAttributeValue()
returns the value of a particular X.509 attribute, for example, the
organizational unit
OU, or distinguished nameDN. See interaction point (6). - assertAttributeValue()
returns
TRUEif the specified attribute of the X.509 attribute has a specified value. See interaction point (6). - getID()
returns the unique identity of the transaction submitter, according to their
distinguished name and the issuing CA’s distinguished name. The format is
x509::{subject DN}::{issuer DN}. See interaction point (6). - getMSPID() returns the channel MSP of the transaction submitter. This allows a smart contract to make processing decisions based on the submitter’s organizational identity. See interaction point (15) or (16).
ClientIdentity takes the information returned by getCreator() and puts a set
of X.509 utility APIs on top of it to make it easier to use for this common use
case.
- getX509Certificate() returns the full X.509 certificate of the transaction submitter, including all its attributes and their values. See interaction point (6).
- getAttributeValue()
returns the value of a particular X.509 attribute, for example, the
organizational unit
OU, or distinguished nameDN. See interaction point (6). - assertAttributeValue()
returns
TRUEif the specified attribute of the X.509 attribute has a specified value. See interaction point (6). - getID()
returns the unique identity of the transaction submitter, according to their
distinguished name and the issuing CA’s distinguished name. The format is
x509::{subject DN}::{issuer DN}. See interaction point (6). - getMSPID() returns the channel MSP of the transaction submitter. This allows a smart contract to make processing decisions based on the submitter’s organizational identity. See interaction point (15) or (16).
交易处理器
受众:架构师,应用和智能合约开发者
交易处理器允许智能合约开发人员在应用程序和智能合约交互期间的关键点上定义通用处理。交易处理器是可选的,但是如果定义了,它们将在调用智能合约中的每个交易之前或之后接收控制权。还有一个特定的处理器,当请求调用未在智能合约中定义的交易时,该处理程序接收控制。
这里是一个商业票据智能合约示例的交易处理器的例子:
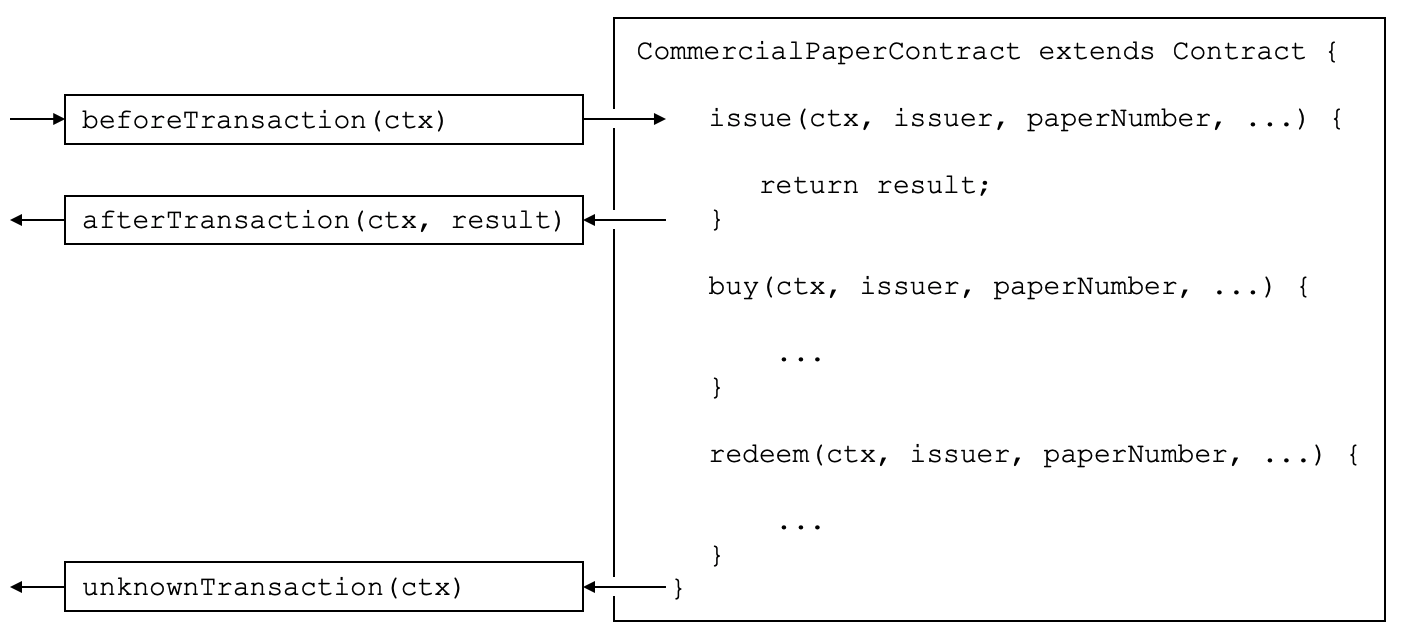
前置、后置和未知交易处理器。在这个例子中,beforeTransaction() 在 issue, buy 和 redeem 交易之前被调用。afterTransaction() 在 issue, buy 和 redeem 交易之后调用。UnknownFunction() 当请求调用未在智能合约中定义的交易时调用。(通过不为每个交易重复 beforeTransaction 和 afterTransaction 框来简化该图)
处理器类型
有三种类型的交易处理器,它们涵盖应用程序和智能合约之间交互的不同方面:
- 前置处理器:在每个智能合约交易执行之前调用。该处理器通常用来改变交易使用的交易上下文。处理器可以访问所有 Fabric API;如,可以使用
getState()和putState()。 - 后置处理器:在每个智能合约交易执行之后调用。处理器通常会对所有的交易执行通用的后置处理,同样可以访问所有的 Fabric API。
- 未知处理器:试图执行未在智能合约中定义的交易时被调用。通常,处理器将记录管理员后续处理的失败。处理器可以访问所有的 Fabric API。
Defining a transaction handler is optional; a smart contract will perform correctly without handlers being defined. A smart contract can define at most one handler of each type.
定义处理器
交易处理器作为具有明确定义名称的方法添加到智能合约中。这是一个添加每种类型的处理器的示例:
CommercialPaperContract extends Contract {

    ...

    async beforeTransaction(ctx) {
        // Write the transaction ID as an informational to the console
        console.info(ctx.stub.getTxID());
    };

    async afterTransaction(ctx, result) {
        // This handler interacts with the ledger
        ctx.stub.cpList.putState(...);
    };

    async unknownTransaction(ctx) {
        // This handler throws an exception
        throw new Error('Unknown transaction function');
    };

}
交易处理器定义的形式对于所有处理程序类型都是类似的,但请注意 afterTransaction(ctx,result) 如何接收交易返回的任何结果。API 文档 展示了这些处理器的准确格式。
处理器处理
一旦处理器添加到智能合约中,它可以在交易处理期间调用。在处理期间,处理器接收 ctx ,即交易上下文,会执行一些处理,完成后返回控制权。继续如下的处理:
- 前置处理器:如果处理器成功完成,使用更新后的上下文调用交易。如果处理器抛出异常,不会调用交易,智能合约失败并显示异常错误消息。
- 后置处理器:如果处理器成功完成,则智能合约将按调用的交易确定完成。如果处理程序抛出异常,则交易将失败并显示异常错误消息。
- 未知处理器:处理器应该通过抛出包含所需错误消息的异常来完成。如果未指定未知处理器,或者未引发异常,则存在合理的默认处理;智能合约将以未知交易错误消息失败。
如果处理器需要访问函数和参数,这很容易做到:
async beforeTransaction(ctx) {
    // Retrieve details of the transaction
    let txnDetails = ctx.stub.getFunctionAndParameters();


    console.info(`Calling function: ${txnDetails.fcn} `);
    console.info(util.format(`Function arguments : %j ${stub.getArgs()} ``);
}
See how this handler uses the utility API getFunctionAndParameters via the
transaction context.
多处理器
It is only possible to define at most one handler of each type for a smart contract. If a smart contract needs to invoke multiple functions during before, after or unknown handling, it should coordinate this from within the appropriate function.
背书策略
本节内容所面向的读者包括:架构师,应用程序和智能合约开发人员
背书策略定义了要背书一项交易使其生效所需要的最小组织集合。要想对一项交易背书,组织的背书节点需要运行与该交易有关的智能合约,并对结果签名。当排序服务将交易发送给提交节点,节点们将各自检查该交易的背书是否满足背书策略。如果不满足的话,交易被撤销,不会对世界状态产生影响。
背书策略从以下两种不同的维度来发挥作用:既可以被设置为整个命名空间,也可被设置为单个状态键。它们是使用诸如 AND 和 OR 这样的逻辑表述来构成的。例如,在 PaperNet 中可以这样来用: MagnetoCorp 将一篇论文卖给 DigiBank,其背书策略可被设定为 AND(MagnetoCorp.peer, DigiBank.peer),这就要求任何对该论文做出的改动需被 MagnetoCorp 和 DigiBank 同时背书。
连接配置文件
受众:架构师、应用程序和智能合约开发人员
连接配置文件描述了一组组件,包括 Hyperledger Fabric 区块链网络中的 Peer 节点、排序节点以及 CA。它还包含与这些组件相关的通道和组织信息。连接配置文件主要由应用程序用于配置处理所有网络交互的网关,从而使其可以专注于业务逻辑。连接配置文件通常由了解网络拓扑的管理员创建。
在本主题中,我们将介绍:
情景
连接配置文件用于配置网关。网关很重要,很多原因,主要是简化应用程序与网络通道的交互。
 两个应用程序,发行和购买,使用配置有连接配置文件1和2的网关1和2。每个配置文件描述了 MagnetoCorp 和 DigiBank 网络组件的不同子集。每个连接配置文件必须包含足够的信息,以便网关代表发行和购买应用程序与网络进行交互。有关详细说明,请参阅文本。
连接配置文件包含网络视图的描述,以技术语法表示,可以是 JSON 或 YAML。在本主题中,我们使用 YAML 表示,因为它更容易阅读。静态网关需要比动态网关更多的信息,因为后者可以使用服务发现来动态增加连接配置文件中的信息。
连接配置文件不应该是网络通道的详尽描述;它只需要包含足够的信息,足以满足使用它的网关。在上面的网络中,连接配置文件1需要至少包含背书组织和用于 issue 交易的 Peer 节点,以及识别将交易提交到帐本上时会通知网关的 Peer 节点。
最简单的方法是将连接配置文件视为描述网络的视图。这可能是一个综合观点,但由于以下几个原因,这是不现实的:
- 根据需求添加和删除 Peer 节点、排序节点、CA、通道和组织。
- 组件可以启动或停止,或意外失败(例如断电).
- 网关不需要整个网络的视图,只需要成功处理交易提交或事件通知所需的内容。
- 服务发现可以扩充连接配置文件中的信息。具体来说,动态网关可以配置最少的 Fabric 拓扑信息;其余的都可以被发现。
静态连接配置文件通常由详细了解网络拓扑的管理员创建。这是因为静态配置文件可能包含大量信息,管理员需要在相应的连接配置文件中获取到这些信息。相比之下,动态配置文件最小化所需的定义数量,因此对于想要快速掌握的开发人员或想要创建响应更快的网关的管理员来说,这是更好的选择。使用编辑器以 YAML 或 JSON 格式创建连接配置文件。
用法
我们将看到如何快速定义连接配置文件;让我们首先看看 MagnetoCorp 示例的 issue 程序如何使用它:
const yaml = require('js-yaml');
const { Gateway } = require('fabric-network');

const connectionProfile = yaml.safeLoad(fs.readFileSync('../gateway/paperNet.yaml', 'utf8'));

const gateway = new Gateway();

await gateway.connect(connectionProfile, connectionOptions);
加载一些必需的类后,查看如何从文件系统加载 paperNet.yaml 网关文件,使用 yaml.safeLoad() 方法转换为 JSON 对象,并使用其 connect() 方法配置网关。
通过使用此连接配置文件配置网关,发行应用程序为网关提供应用于处理交易的相关网络拓扑。这是因为连接配置文件包含有关 PaperNet 通道、组织、Peer 节点或排序节点和 CA 的足够信息,以确保可以成功处理交易。
连接配置文件为任何给定的组织定义多个 Peer 节点是一种比较好的做法,它可以防止单点故障。这种做法也适用于动态网关; 为服务发现提供多个起点。
DigiBank 的 buy 程序通常会为其网关配置类似的连接配置文件,但有一些重要的区别。一些元素将是相同的,例如通道;一些元素将重叠,例如背书节点。其他元素将完全不同,例如通知 Peer 节点或 CA。
传递给网关的 connectionOptions 补充了连接配置文件。它们允许应用程序声明网关如何使用连接配置文件。它们由 SDK 解释以控制与网络组件的交互模式,例如选择要连接的标识或用于事件通知的节点。了解可用连接选项列表以及何时使用它们。
结构
为了帮助您了解连接配置文件的结构,我们将逐步介绍上面显示的网络示例。其连接配置文件基于 PaperNet 商业票据样例,并存储在 GitHub 仓库中。为方便起见,我们在下面复制了它。您会发现在现在阅读它时,将它显示在另一个浏览器窗口中会很有帮助:
第9行:
name: "papernet.magnetocorp.profile.sample"这是连接配置文件的名称。尝试使用 DNS 风格名称;它们是传达意义的一种非常简单的方式。
第16行:
x-type: "hlfv1"用户可以添加自己的“特定于应用程序”的
x-属性,就像 HTTP 头一样。它们主要供未来使用。第20行:
description: "Sample connection profile for documentation topic"连接配置文件的简短描述。尽量让这对第一次看到这个的读者有所帮助!
第25行:
version: "1.0"此连接配置文件的架构版本。目前仅支持版本1.0,并且未设想此架构将经常更改。
第32行:
channels:这是第一个非常重要的行。
channels:标识以下内容是此连接配置文件描述的所有通道。但是,最好将不同的通道保存在不同的连接配置文件中,特别是如果它们彼此独立使用。第36行:
papernet:papernet详细信息将是此连接配置文件中的第一个通道。第41行:
orderers:有关
papernet的所有排序节点的详细信息如下。您可以在第45行看到此通道的排序节点是orderer1.magnetocorp.example.com。这只是一个逻辑名称;稍后在连接配置文件(第134-147行)中,将会有如何连接到此排序节点的详细信息。请注意orderer2.digibank.example.com不在此列表中;应用程序使用自己组织的排序节点,而不是来自不同组织的排序节点,这是有道理的。第49行:
peers:下边将介绍
papernet所有 Peer 节点的详细信息。您可以看到 MagnetoCorp 列出的三个 Peer 节点:
peer1.magnetocorp.example.com、peer2.magnetocorp.example.com和peer3.magnetocorp.example.com。没有必要列出 MagnetoCorp 中的所有 Peer 节点,就像这里所做的那样。您只能看到 DigiBank 中列出的一个 Peer 节点:peer9.digibank.example.com; 包括这个 Peer 节点开始隐含背书策略要求 MagnetoCorp和DigiBank 背书交易,正如我们现在要确认的。最好有多个 Peer 节点来避免单点故障。在每个 peer 下面,您可以看到四个非独占角色:endorsingPeer、chaincodeQuery、ledgerQuery 和 eventSource。了解一下
peer1和peer2如何在主机papercontract中执行所有角色。它们与peer3不同,peer3只能用于通知,或者用于访问帐本的链组件而不是世界状态的帐本查询,因此不需要安装智能合约。请注意peer9不应该用于除背书之外的任何其他情况,因为 MagnetoCorp 的节点可以更好地服务于这些角色。再次,看看如何根据 Peer 节点的逻辑名称和角色来描述 Peer 节点。稍后在配置文件中,我们将看到这些 Peer 节点的物理信息。
第97行:
organizations:所有组织的详细信息将适用与所有通道。请注意,这些组织适用于所有通道,即使
papernet是目前唯一列出的组织。这是因为组织可以在多个通道中,通道可以有多个组织。此外,一些应用程序操作涉及组织而不是通道。例如,应用程序可以使用连接选项从其组织内的一个或所有 Peer 节点或网络中的所有组织请求通知。为此,需要有一个组织到 Peer 节点的映射,本节提供了它。第101行:
MagnetoCorp:列出了属于 MagnetoCorp 的所有 Peer 节点:
peer1、peer2和peer3。同样适用于证书颁发机构。再次注意逻辑名称用法,与channels:部分相同;物理信息将在后面的配置文件中显示。第121行
DigiBank:只有
peer9被列为 DigiBank 的一部分,没有证书颁发机构。这是因为这些其他 Peer 节点和 DigiBank CA与此连接配置文件的用户无关。第134行:
orderers:现在列出了排序节点的物理信息。由于此连接配置文件仅提到了
papernet一个排序节点,您会看到列出的orderer1.magnetocorp.example.com的详细信息。包括其 IP 地址和端口,以及可以覆盖与排序节点通信时使用的默认值的 gRPC 选项(如有必要)。对于peers:为了实现高可用性,可以指定多个排序节点。第152行:
peers:现在列出所有先前 Peer 节点的物理信息。此连接配置文件有三个 MagnetoCorp 的 Peer 节点:
peer1、peer2和peer3;对于 DigiBank,单个 peerpeer9列出了其信息。对于每个 Peer 节点,与排序节点一样,列出了它们的 IP 地址和端口,以及可以覆盖与特定节点通信时使用的默认值的 gRPC 选项(如有必要)。第194行:
certificateAuthorities:现在列出了证书颁发机构的物理信息。连接配置文件为 MagnetoCorp 列出了一个 CA
ca1-magnetocorp,然后是其物理信息。除了 IP 详细信息,注册商信息允许此 CA 用于证书签名请求(CSR)。这些都是用本地生成的公钥/私钥对来请求新证书。
现在您已经了解了 MagnetoCorp 的连接配置文件,您可能希望查看 DigiBank 的相关配置文件。找到与 MagnetoCorp 相同的配置文件的位置,查看它的相似之处,并比较最终哪里不同。想想为什么这些差异对 DigiBank 应用程序有作用。
这就是您需要了解的有关连接配置文件的所有信息。总之,连接配置文件为应用程序定义了足够的通道、组织、Peer 节点、排序节点和 CA 以配置网关。网关允许应用程序专注于业务逻辑而不是网络拓扑的细节。
示例
该文件是从 GitHub 商业票据示例中复制的。
1: ---
2: #
3: # [Required]. A connection profile contains information about a set of network
4: # components. It is typically used to configure gateway, allowing applications
5: # interact with a network channel without worrying about the underlying
6: # topology. A connection profile is normally created by an administrator who
7: # understands this topology.
8: #
9: name: "papernet.magnetocorp.profile.sample"
10: #
11: # [Optional]. Analogous to HTTP, properties with an "x-" prefix are deemed
12: # "application-specific", and ignored by the gateway. For example, property
13: # "x-type" with value "hlfv1" was originally used to identify a connection
14: # profile for Fabric 1.x rather than 0.x.
15: #
16: x-type: "hlfv1"
17: #
18: # [Required]. A short description of the connection profile
19: #
20: description: "Sample connection profile for documentation topic"
21: #
22: # [Required]. Connection profile schema version. Used by the gateway to
23: # interpret these data.
24: #
25: version: "1.0"
26: #
27: # [Optional]. A logical description of each network channel; its peer and
28: # orderer names and their roles within the channel. The physical details of
29: # these components (e.g. peer IP addresses) will be specified later in the
30: # profile; we focus first on the logical, and then the physical.
31: #
32: channels:
33:   #
34:   # [Optional]. papernet is the only channel in this connection profile
35:   #
36:   papernet:
37:     #
38:     # [Optional]. Channel orderers for PaperNet. Details of how to connect to
39:     # them is specified later, under the physical "orderers:" section
40:     #
41:     orderers:
42:     #
43:     # [Required]. Orderer logical name
44:     #
45:       - orderer1.magnetocorp.example.com
46:     #
47:     # [Optional]. Peers and their roles
48:     #
49:     peers:
50:     #
51:     # [Required]. Peer logical name
52:     #
53:       peer1.magnetocorp.example.com:
54:         #
55:         # [Optional]. Is this an endorsing peer? (It must have chaincode
56:         # installed.) Default: true
57:         #
58:         endorsingPeer: true
59:         #
60:         # [Optional]. Is this peer used for query? (It must have chaincode
61:         # installed.) Default: true
62:         #
63:         chaincodeQuery: true
64:         #
65:         # [Optional]. Is this peer used for non-chaincode queries? All peers
66:         # support these types of queries, which include queryBlock(),
67:         # queryTransaction(), etc. Default: true
68:         #
69:         ledgerQuery: true
70:         #
71:         # [Optional]. Is this peer used as an event hub? All peers can produce
72:         # events. Default: true
73:         #
74:         eventSource: true
75:       #
76:       peer2.magnetocorp.example.com:
77:         endorsingPeer: true
78:         chaincodeQuery: true
79:         ledgerQuery: true
80:         eventSource: true
81:       #
82:       peer3.magnetocorp.example.com:
83:         endorsingPeer: false
84:         chaincodeQuery: false
85:         ledgerQuery: true
86:         eventSource: true
87:       #
88:       peer9.digibank.example.com:
89:         endorsingPeer: true
90:         chaincodeQuery: false
91:         ledgerQuery: false
92:         eventSource: false
93: #
94: # [Required]. List of organizations for all channels. At least one organization
95: # is required.
96: #
97: organizations:
98:    #
99:    # [Required]. Organizational information for MagnetoCorp
100:   #
101:   MagnetoCorp:
102:     #
103:     # [Required]. The MSPID used to identify MagnetoCorp
104:     #
105:     mspid: MagnetoCorpMSP
106:     #
107:     # [Required]. The MagnetoCorp peers
108:     #
109:     peers:
110:       - peer1.magnetocorp.example.com
111:       - peer2.magnetocorp.example.com
112:       - peer3.magnetocorp.example.com
113:     #
114:     # [Optional]. Fabric-CA Certificate Authorities.
115:     #
116:     certificateAuthorities:
117:       - ca-magnetocorp
118:   #
119:   # [Optional]. Organizational information for DigiBank
120:   #
121:   DigiBank:
122:     #
123:     # [Required]. The MSPID used to identify DigiBank
124:     #
125:     mspid: DigiBankMSP
126:     #
127:     # [Required]. The DigiBank peers
128:     #
129:     peers:
130:       - peer9.digibank.example.com
131: #
132: # [Optional]. Orderer physical information, by orderer name
133: #
134: orderers:
135:   #
136:   # [Required]. Name of MagnetoCorp orderer
137:   #
138:   orderer1.magnetocorp.example.com:
139:     #
140:     # [Required]. This orderer's IP address
141:     #
142:     url: grpc://localhost:7050
143:     #
144:     # [Optional]. gRPC connection properties used for communication
145:     #
146:     grpcOptions:
147:       ssl-target-name-override: orderer1.magnetocorp.example.com
148: #
149: # [Required]. Peer physical information, by peer name. At least one peer is
150: # required.
151: #
152: peers:
153:   #
154:   # [Required]. First MagetoCorp peer physical properties
155:   #
156:   peer1.magnetocorp.example.com:
157:     #
158:     # [Required]. Peer's IP address
159:     #
160:     url: grpc://localhost:7151
161:     #
162:     # [Optional]. gRPC connection properties used for communication
163:     #
164:     grpcOptions:
165:       ssl-target-name-override: peer1.magnetocorp.example.com
166:       request-timeout: 120001
167:   #
168:   # [Optional]. Other MagnetoCorp peers
169:   #
170:   peer2.magnetocorp.example.com:
171:     url: grpc://localhost:7251
172:     grpcOptions:
173:       ssl-target-name-override: peer2.magnetocorp.example.com
174:       request-timeout: 120001
175:   #
176:   peer3.magnetocorp.example.com:
177:     url: grpc://localhost:7351
178:     grpcOptions:
179:       ssl-target-name-override: peer3.magnetocorp.example.com
180:       request-timeout: 120001
181:   #
182:   # [Required]. Digibank peer physical properties
183:   #
184:   peer9.digibank.example.com:
185:     url: grpc://localhost:7951
186:     grpcOptions:
187:       ssl-target-name-override: peer9.digibank.example.com
188:       request-timeout: 120001
189: #
190: # [Optional]. Fabric-CA Certificate Authority physical information, by name.
191: # This information can be used to (e.g.) enroll new users. Communication is via
192: # REST, hence options relate to HTTP rather than gRPC.
193: #
194: certificateAuthorities:
195:   #
196:   # [Required]. MagnetoCorp CA
197:   #
198:   ca1-magnetocorp:
199:     #
200:     # [Required]. CA IP address
201:     #
202:     url: http://localhost:7054
203:     #
204:     # [Optioanl]. HTTP connection properties used for communication
205:     #
206:     httpOptions:
207:       verify: false
208:     #
209:     # [Optional]. Fabric-CA supports Certificate Signing Requests (CSRs). A
210:     # registrar is needed to enroll new users.
211:     #
212:     registrar:
213:       - enrollId: admin
214:         enrollSecret: adminpw
215:     #
216:     # [Optional]. The name of the CA.
217:     #
218:     caName: ca-magnetocorp
连接选项
受众:架构师、管理员、应用程序与智能合约开发者
连接选项(Connection option)用于与连接配置文件联合使用去精准地控制一个网关如何与网络交互。通过使用网关,允许一个应用开发专注于商业逻辑而不是网络拓扑。
本主题中,我们将涉及:
情景
连接选项指定网关行为的特定方面。网关对于一些原因是重要,其主要目的是允许应用程序去聚焦在业务逻辑和智能合约,同时管理与网络的一些组件的交互。
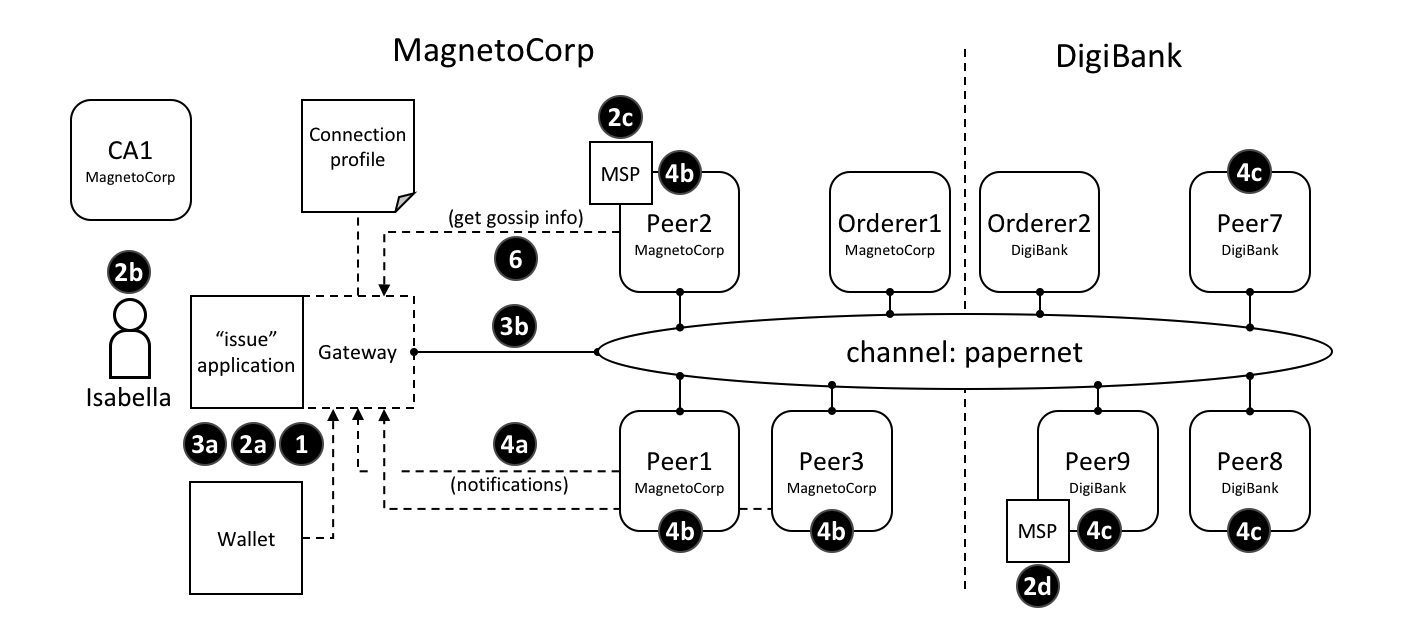 连接控制行为的不同交互点。这些选项将会在本文中被充分说明
一个连接选项的例子可能是想说明:被 issue 程序使用的网关应该使用 Isabella 身份将交易提交到 papernet 网络中。另一个可能是网关应该等待来自 MagnetoCorp 的三个节点去确定一个交易被提交并返回控制。连接选项允许应用程序去指定与网络交互的网关的精准行为。如果没有网关,应用程序需要去很多的工作;网关节省了你的时间,让你的应用程序更加可读,不易出错。
用法
我们将马上描述应用程序可用的连接选项的全集;首先让我们看看他们如何被示例 MagnetoCorp issue 应用指定:
const userName = 'User1@org1.example.com';
const wallet = new FileSystemWallet('../identity/user/isabella/wallet');

const connectionOptions = {
  identity: userName,
  wallet: wallet,
  eventHandlerOptions: {
    commitTimeout: 100,
    strategy: EventStrategies.MSPID_SCOPE_ANYFORTX
    }
  };

await gateway.connect(connectionProfile, connectionOptions);
看一下 identity 和 wallet 选项是 connectionOptions 对象的简单属性。他们分别有 userName and wallet,他们较早的被设置在代码里。相比于这些属性,eventHandlerOptions 本身就是一个独立的对象。它有两个属性:commitTimeout: 100 (以秒为单位)和 strategy:EventStrategies.MSPID_SCOPE_ANYFORTX。
看一下 connectionOptions 如何作为一个 connectionProfile 的补充被传递给网关的;网络被网络配置文件所标识,这些选项精确地指定了网关该如何与它交互。现在让我们看下可用选项。
选项
这里是可用选项的列表以及他们的作用。
wallet标识了将要被应用程序上的网关所使用的钱包。看一下交互1,钱包是由应用程序指定的,但它实际上是检索身份的网关。一个钱包必须被指定;最重要的决定是钱包使用的类型,是文件系统、内存、HSM 还是数据库。
identity应用程序从wallet中使用的用户身份。看一下交互2a;用户身份被应用程序指定,也代表了应用程序的用户 Isabella,2b。身份实际上被网络检索。在我们的例子中,Isabella 的身份将会被不同的 MSP(2c,2d)使用,用于确定他为来自 MagnetoCorp 的一员,并且在其中扮演着一个特殊的角色。这两个事实将相应地决定了他在资源上的许可。
一个用户的身份必须被指定。正如你所看到的,这个身份对于 Hyperledger Fabric 是一个有权限的网络的概念来说是基本的原则——所有的操作者有一个身份,包括应用程序、Peer 节点和排序节点,这些身份决定了他们在资源上的控制。你可以在成员身份服务话题中阅读更过关于这方面的概念。
clientTIsIdentity是可以从钱包(3a)获取到的身份,用于确保网关和不同的t通道组件之间的交流(3b),比如 Peer 节点和排序节点。注意:这个身份不同于用户身份。即使
clientTlsIdentity对于安全通信来说很重要,但它并不像用户身份那样基础,因为它的范围没有超过确保网络的通信。clientTlsIdentity是可选项。建议你把它设置进生产环境中。你应该也使用不同的clientTlsIdentity用做identity,因为这些身份有着非常不同的意义和生命周期。例如,如果clientTIsIdentity被破坏,那么你的identity也会被破坏;让他们保持分离会更加安全。eventHandlerOptions.commitTimeout是可选的。它以秒为单位指定网关在将控制权返回给应用程序之前,应该等待任何对等方提交事务的最大时间量(4a)。用于通知的 Peer 节点集合由eventHandlerOptions选项决定。如果没有指定 commitTimeout,网关默认将使用300秒的超时。eventHandlerOptions.strategy是可选的。它定义了网关用来监听交易被提交通知的 Peer 节点集合。例如,是监听组织中的单一的 Peer 节点还是全部的节点。可以采用以下参数之一:EventStrategies.MSPID_SCOPE_ANYFORTX监听用户组织内的一些 Peer 节点。在我们的例子中,看一下交互点4b;MagnetoCorp 中的 peer1、peer2、peer3 节点能够通知网关。EventStrategies.MSPID_SCOPE_ALLFORTX这是一个默认值。监听用户组织内的所有 Peer 节点。在我们例子中,看一下交互点4b。所有来自 MagnetoCorp 的节点必须全部通知网关:peer1、peer2 和 peer3 节点。只有已知/被发现和可用的 Peer 节点才会被计入,停止或者失效的节点不包括在内。EventStrategies.NETWORK_SCOPE_ANYFORTX监听整个网络通道内的一些 Peer 节点。在我们的例子中,看一下交互点 4b 和 4c;MagnetoCorp 中部分 Peer 节点1-3 或者 DigiBank 的部分 Peer 节点 7-9 能够通知网关。EventStrategies.NETWORK_SCOPE_ALLFORTX监听整个网络通道内所有 Peer 节点。在我们的例子中,看一些交互 4b 和 4c。所有来自 MagnetoCorp 和 DigiBank 的 Peer 节点 1-3 和 Peer 节点 7-9 都必须通知网关。只有已知/被发现和可用的 Peer 节点才会被计入,停止或者失效的节点不包括在内。<
PluginEventHandlerFunction> 用户定义的事件处理器的名字。这个允许用户针对事件处理而定义他们自己的逻辑。看一下如何定义一个时间处理器插件,并检验一个示例处理器。如果你有一个迫切需要事件处理的需求的话,那么用户定义的事件处理器是有必要的;大体上来说,一个内建的事件策略是足够的。一个用户定义的事件处理器的例子可能是等待超过半数的组织内的 Peer 节点,以去确认交易被提交。
如果你确实指定了一个用户定义的事件处理器,她不会影响你的一个应用程序的逻辑;它是完全独立的。处理器被处理过程中的SDK调用;它决定了什么时候调用它,并且使用它的处理结果去选择哪个 Peer 节点用于事件通知。当SDK完成它的处理的时候,应用程序收到控制。
如果一个用户定义的事件处理器没有被指定,那么
EventStrategies的默认值将会被使用。discovery.enabled是可选项,可能的值是true还是false。默认是ture。它决定了网关是否使用服务发现去增加连接配置文件里指定的网络拓扑。看一下交互点6;peer 节点的 gossip 信息会被网关使用。这个值会被
INITIALIIZE-WITH-DISCOVERY的环境变量覆盖,其值可以被设置成true或者false。discovery.asLocalhost是可选项,可能的值是true或者false。默认是true。它决定在服务发现期间发现的 IP 地址是否从 docker 网络传递给本地主机。通常,开发人员将为其网络组件(如 Peer 节点、排序节点 和 CA 节点)编写使用 docker 容器的应用程序,但是他们自己本身不会运行在 docker 容器内。这个就是为什么
true是默认的,这生产环境中,应用程序很可能以网络组件相同的方式运行在 docker 中,因此不需要地址转换。在这种情况下,应用程序应该要不明确指定false,要不使用环境变量来覆盖。这个值会被
DISCOVERY-AS-LOCALHOST环境变量覆盖,其值可以被设置成true或者false。
注意事项
当打算选择连接选项的时候,下面的事项列表是有帮助的。
eventHandlerOptions.commitTimeout和eventHandlerOptions.strategy协同工作。例如,commitTimeout: 100和strategy:EventStrategies.MSPID_SCOPE_ANYFORTX意味着网关最多等待100秒,使得一些 Peer 节点确定交易被提交。相反,指定strategy: EventStrategies.NETWORK_SCOPE_ALLFORTX意味着网关将会等待所有组织里的所有 Peer 节点100秒。eventHandlerOptions.strategy:EventStrategies.MSPID_SCOPE_ALLFORTX的默认值将等待应用程序内的组织的所有 Peer 节点提交提交交易。这是一个好的默认设置,因为应用程序能够确保所有的节点有一个最新账本的拷贝,最小的并发性问题。然而,当组织内的 Peer 节点数量增加,等待所有 Peer 节点则没有必要,在这种情况下,使用一个可插拔的事件处理器能够提供更多有效果的策略。例如,在一个公式能够保持所有帐本同步的安全假设下,相同的 Peer 节点集合能够用于提交交易和监听通知。
服务发现要求
clientTlsIdentity被设置。因为与应用程序有交换信息的 Peer 节点需要确信他们在与信任的实体交换信息。如果clientTlsIdentity没有被设置,那么discovery不会生效,不管它是否被设置。即使应用程序在连接网关时能够设置连接选项,但是管理员可能需要覆盖这些选项。这是因为选项与网络交互有关,而网络交互可能随时间而变化。例如,管理员试图了解使用服务发现对网络性能的影响。
一个好的方式是在一个配置文件中定义应用程序覆盖,此文件在配置与网关的连接的时候,会被应用程序读取。
因为服务发现选项
enabled和asLocalHost最容易被管理员频繁的覆盖,环境变量INITIALIIZE-WITH-DISCOVERY和DISCOVERY-AS-LOCALHOST是因为方便而提供的。管理员应该在应用程序的生产环境中设置他们,其生产环境很可能是一个 docker 容器。
钱包
受众:架构师、应用程序和智能合约应用开发者们
一个钱包包括了一组用户身份。当与通道连接的时候,应用程序会从这些身份中选择一个用户来运行。对通道资源的访问权限,比如账本,由与 MSP(Membership provider)相关联的这个身份所定义。
在本主题中,我们将涉及:
情景
当应用程序连接到一个比如像 PaperNer 的网络通道的时候,它选择一个用户身份去这么做,例如 ID1。通道的 MSP 将 ID1 与组织内特定的角色相关联,而且这个角色将最终决定应用程序在通道上的权限。
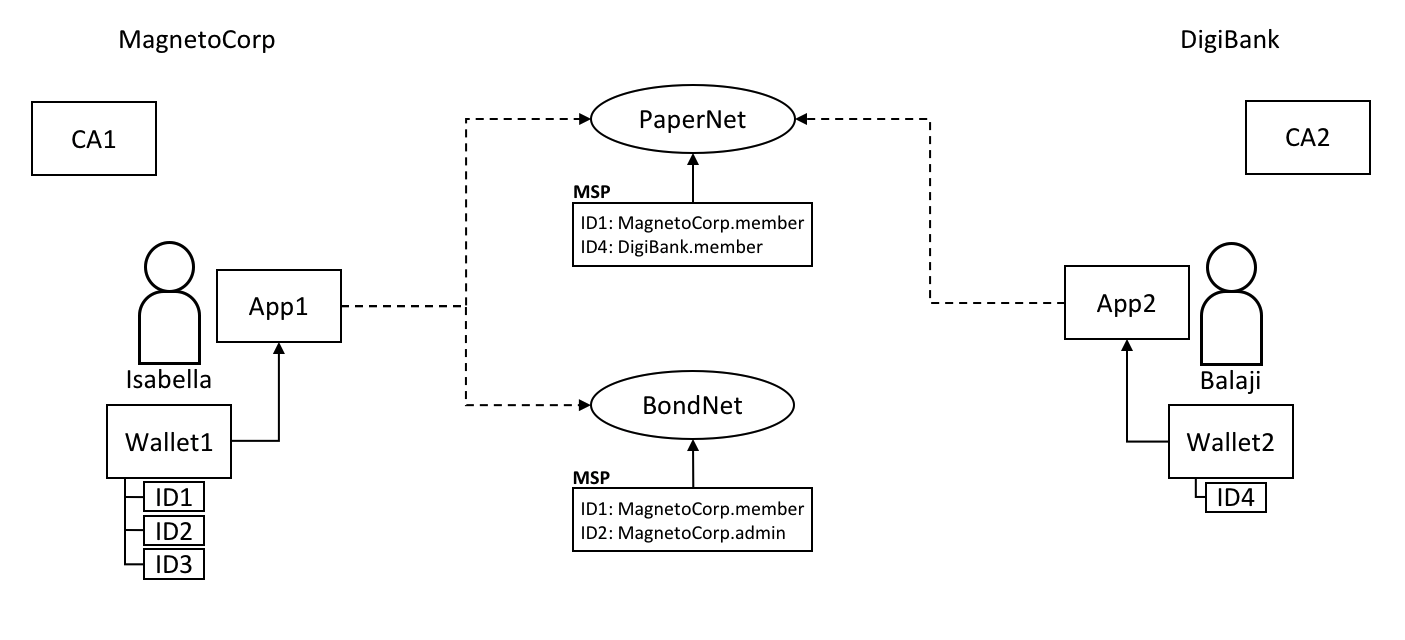 两个用户, Isabella 和 Balaji 拥有包含能够用于连接不同网络通道的不同身份的钱包,PaperNet 和 BondNet。
思考一下这两个用户的例子;来自于 MagnetoCorp 的 lsabella 和来自 DigiBank 的 Balaji。Isabella 打算使用应用程序1去调用 PaperNet 里的智能合约和一个 BondNet 的智能合约。同理,Balaji 打算使用应用程序2去调用智能合约,但是这是在 PaperNet 中。(对于应用程序来说,访问多个网络和其中多个的智能合约是简单的。)
看一下:
- MagnetoCorp 使用 CA1 去颁发身份,DigiBank 使用 CA2 去颁发身份。这些身份被存储在用户的钱包中。
- Balaji 的钱包拥有一个唯一的身份,
ID4由 CA2 发行。Isabella 的钱包拥有多种被 CA1 颁发的身份,ID1、ID2和ID3。钱包能够让一个用户拥有多个身份,并且每一个身份都能由不同的 CA 颁发。 - Isabella 和 Balaji 都连接到 PaperNet,它(PaperNet)的 MSP 确定了 Isabella 是 MagnetoCorp 的成员,且确定了 Balaji 是 DigiBank 组织的一员,因为信任颁发他们身份的 CA。(一个组织使用多个 CA 或者一个 CA 支持多个组织是可能的)
- Isabella 能够使用
ID1去连接 PaperNet 和 BondNet。在这两种情况下,当 Isabella 使用这个身份时候,她会被是识别为 MangetoCorp 的一员。 - Isabella 能够使用
ID2去连接 BondNet,在这种情况下,她被标识为 MagnetoCorp 的管理员。这给了 Isabella 两种不同的权利:ID1把她标识为能够读写 BondNet 账本的 MagnetoCorp 的普通一员,然而ID2标识她为能够给 BondNet 添加组织的 MagnetoCorp 的管理员。 - Balaji 不能够使用
ID4连接 BondNet。如果他尝试去连接,ID4将不会被认可其属于 DigiBank,因为 CA2 不知道 BondNet 的 MSP。
类型
根据他们身份存储的位置,会有不同的钱包的类型。
 三种不同的钱包类型:文件系统、内存和 CouchDB
- 文件系统(FileSystem):这是存储钱包最常见的地方;文件系统是无处不在的、容易理解且可以挂载在网络上。对于钱包来说,这是很好的默认选择。
- 内存(In-memory):存储在应用程序里的钱包。当你的应用程序正在运行在一个没有访问文件系统的约束环境的时候,使用这种类型的钱包;有代表性的是 web 浏览器。需要记住的是这种类型的钱包是不稳定的;在应用程序正常结束或者崩溃的时候,身份将失去丢失。
- CouchDB:存储在 Couch DB 的钱包。这是最罕见的一种钱包存储形式,但是对于想去使用数据备份和恢复机制的用户来说,CouchDB 钱包能够提供一个有用的选择去简化崩溃的恢复。
使用 Wallets 类提供的工厂方法来创建钱包。
硬件安全模块
硬件安全模块(Hardware Security Module,HSM)超安全、防干扰设备存储数字身份信息,特别是私钥。HSM 能够本地连接到你的电脑或可访问的网络。 A Hardware Security Module (HSM) is an ultra-secure, tamper-proof device that stores digital identity information, particularly private keys. HSMs can be locally attached to your computer or network accessible. Most HSMs provide the ability to perform on-board encryption with private keys, such that the private keys never leave the HSM.
An HSM can be used with any of the wallet types. In this case the certificate for an identity will be stored in the wallet and the private key will be stored in the HSM.
To enable the use of HSM-managed identities, an IdentityProvider must be
configured with the HSM connection information and registered with the wallet.
For further details, refer to the Using wallets to manage identities tutorial.
结构
一个单一的钱包能够保存多个身份,每一个都被一个被指定的证书机构发放。每一个身份都有一个规范的带有描述性标签的结构,一个包括公钥、私钥与一些 Fabric-specific 元数据的 X.509 证书。不同的钱包类型 将这个结构合理地映射到他们地存储机制上。
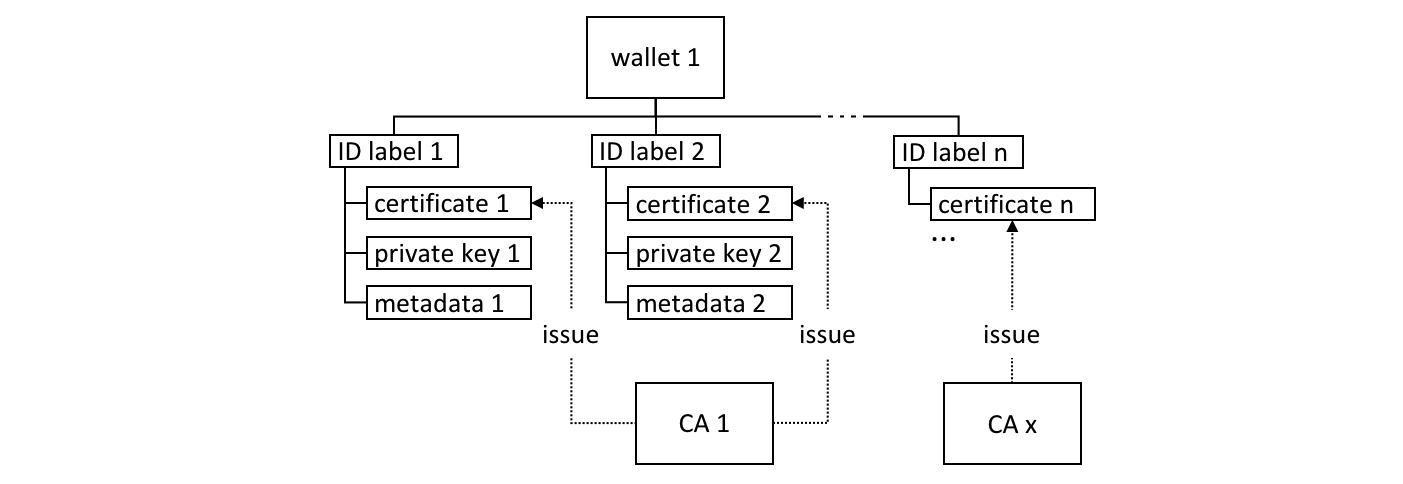 Fabric 钱包能够持有多个被不同证书机构颁发的身份,身份包含了证书、私钥和一些 Fabric 元数据
这是几个关键的类方法,使得钱包和身份更容易被管理:
const identity: X509Identity = {
    credentials: {
        certificate: certificatePEM,
        privateKey: privateKeyPEM,
    },
    mspId: 'Org1MSP',
    type: 'X.509',
};
await wallet.put(identityLabel, identity);
See how an identity is created that has metadata Org1MSP, a certificate and
a privateKey. See how wallet.put() adds this identity to the wallet with a
particular identityLabel.
The Gateway class only requires the mspId and type metadata to be set for
an identity – Org1MSP and X.509 in the above example. It currently uses the
MSP ID value to identify particular peers from a connection profile,
for example when a specific notification strategy is
requested. In the DigiBank gateway file networkConnection.yaml, see how
Org1MSP notifications will be associated with peer0.org1.example.com:
organizations:
  Org1:
    mspid: Org1MSP

    peers:
      - peer0.org1.example.com
你真的不需要担心内部不同的钱包类型的结构,但是如果你感兴趣,导航到商业票据例子里的用户身份文件夹:
magnetocorp/identity/user/isabella/
                                  wallet/
                                        User1@org1.example.com.id
你能够检查这些文件,但是正如讨论的,它很容易去使用 SDK 实现这些数据。
选项
The different wallet types all implement a common Wallet interface which provides a standard set of APIs to manage identities. It means that applications can be made independent of the underlying wallet storage mechanism; for example, File system and HSM wallets are handled in a very similar way.
 钱包遵循一个生命周期:他们能够被创建、被打开,身份能够被读取、添加和删除。
应用程序能够根据一个简单的生命周期去使用钱包。钱包能够被打开、创建,随后可以添加、读取、更新和删除身份。花费一些时间在 JSDOC 中不同的 Wallet 方法上来看一下他们是如何工作的;商业票据的教程在 addToWallet.js 中提供了一个很好的例子:
const wallet = await Wallets.newFileSystemWallet('../identity/user/isabella/wallet');

const cert = fs.readFileSync(path.join(credPath, '.../User1@org1.example.com-cert.pem')).toString();
const key = fs.readFileSync(path.join(credPath, '.../_sk')).toString();

const identityLabel = 'User1@org1.example.com';
const identity = {
    credentials: {
        certificate: cert,
        privateKey: key,
    },
    mspId: 'Org1MSP',
    type: 'X.509',
};

await wallet.put(identityLabel, identity);
注意:
- 当程序第一次运行的时候,钱包被创建在本地文件系统
.../isabella/wallet。 证书和密钥从文件系统中下载。- 一个新的身份使用
证书,密钥和Org1MSP来创建。 - 新的身份通过
wallet.put()加入的钱包中,并附带User1@org1.example.com标签。
这是关于钱包你所要知道的所有事情。你已经看到用户代表在访问 Fabric 网络资源上,钱包如何持有被应用程序使用的身份的。更具你的应用程序和安全需要,这里有一些有用的不同类型的钱包,和一套简单的 API 去帮助应用程序去管理其内部的钱包和身份。
网关
受众:架构师,应用和智能合约开发者
网关代表应用程序管理与区块链网络的交互,使其能够专注于业务逻辑。应用程序连接到网关,然后使用该网关的配置管理所有后续交互。
本主题,将包括如下内容:
情景
Hyperledger Fabric 网络通道可以不断变化。Peer 节点、排序节点和 CA 组件,由网络中的不同组织提供,会经常变化。造成这种情况的原因包括业务需求增加或减少,以及计划内和计划外中断。网关为应用解除这种负担,使其能够专注于它试图解决的业务问题。
 MagnetoCorp 和 DigiBank 应用程序(发行和购买)将各自的网络交互委托给其网关。每个网关都了解网络信道拓扑,包括 MagnetoCorp 和 DigiBank 两个组织的多个 Peer 节点 和 排序节点,使应用程序专注于业务逻辑。Peer 节点可以使用 gossip 协议在组织内部和组织之间相互通信。
应用程序可以通过两种不同的方式使用网关:
静态:网关配置完全定义在连接配置中。应用程序可用的所有 Peer 节点、排序节点和 CA 在用于配置网关的连接配置文件中静态定义。比如对 Peer 节点来说,这包括他们作为背书节点或事件通知节点的角色配置。你可以在连接配置主题中了解到更多关于角色的内容。
SDK 将使用此静态拓扑并结合网关连接配置来管理交易提交和通知过程。连接配置必须包括足够多的网络拓扑来允许网关以应用程序的身份和网络进行交互;包括网络通道、组织、排序节点、Peer 节点和他们的角色。
动态:网关配置被最小化的定义在连接配置中。通常,指定应用程序组织中的一个或两个 Peer 节点,然后使用服务发现来发现可用的网络拓扑。这包括 Peer 节点, 排序节点、通道、部署过的智能合约和他们的背书策略。(在生产环境中,网关配置需要至少指定两个可用的 Peer 节点。)
SDK 将使用静态的配置和发现的拓扑信息,结合网关连接选项来管理交易提交和通知过程。作为其中的一部分,它还将智能地使用发现的拓扑;比如,它会使用为智能合约发现的背书策略来计算需要的最少背书节点。
你可能会问静态或动态网关哪一个更好?这取决于对可预测性和响应性的权衡。静态网络将始终以相同的方式运行,因为它们将网络视为不变的。从这个意义上讲,它们是可预测的——如果它们可用,它们将始终使用相同的 Peer 节点和排序节点。动态网络在了解网络如何变化时更具响应性——它们可以使用新添加的 Peer 节点和排序节点,从而带来额外的弹性和可扩展性,可能会带来一定的可预测性成本。一般情况下,使用动态网络比较好,实际上这是网关的默认模式。
请注意,静态或动态可以使用相同的连接配置文件。显然,如果配置文件被静态网关使用,它需要是全面的,而动态网关使用只需要很少的配置。
这两种类型的网关对应用程序都是透明的;无论是静态网关还是动态网关应用程序设计无序改变。意思就是一些应用可以使用服务发现,另外一些可以不使用。通常,SDK 使用动态发现意味着更少的定义和更加的智能;而这是默认的。
连接
当应用连接到一个网关,需要提供两个配置项。在随后的 SDK 处理程序中会使用到:
await gateway.connect(connectionProfile, connectionOptions);
连接配置:不管是静态网关还是动态网关,
connectionProfile是被 SDK 用来做交易处理的网关配置项,它可以使用 YAML 或 JSON 进行配置,尽管在传给网关后会被转换成 JSON 对象。let connectionProfile = yaml.safeLoad(fs.readFileSync('../gateway/paperNet.yaml', 'utf8'));
阅读更多关于连接配置的信息,了解如何配置。
连接选项:
connectionOptions允许应用程序声明而不是实现所需的交易处理行为。连接选项被 SDK 解释以控制与网络组件的交互模式,比如选择哪个身份进行连接,使用哪个节点做事件通知。这些选项可在不影响功能的情况下显著地降低应用复杂度。这是可能的,因为 SDK 已经实现了许多应用程序所需的低级逻辑; 连接选项控制逻辑流程。阅读可用的连接选项列表以及何时使用它们。
静态网关
静态网关定义了一个固定的网络视图。在 MagnetoCorp 情景中,网关可以识别来自 MagnetoCorp 的单个 Peer 节点,来自 DigiBank 的单个 Peer 节点以及 MagentoCorp 的排序节点。或者,网关可以定义来自 MagnetCorp 和 DigiBank 的所有 Peer 节点和排序节点。在两个案例中,网关必须定义充分的网络视图来获取和分发商业票据的交易背书。
应用可以通过在 gateway.connect() API 上明确指定连接选项 discovery: { enabled:false } 来使用静态网关。或者,在环境变量中设置 FABRIC_SDK_DISCOVERY=false,将始终覆盖应用程序的选择。
检查被 MagnetoCorp 发行票据应用使用的连接选项。了解一下所有的 Peer 节点、排序节点和 CA 是如何配置的,包括他们的角色。
值得注意的是,静态网关代表这一刻的网络视图。随着网络的变化,在网关文件中反映变更可能很重要。当重新加载网关配置文件时,应用程序将会自动生效这些变更。
动态网关
动态网关为网络定义一个小的固定起点。在 MagnetoCorp 场景中,动态网关可能只识别来自 MagnetoCorp 的单个 Peer 节点; 其他一切都将被发现!(为了提供弹性,最好定义两个这样的引导节点。)
如果应用程序选择了服务发现,则网关文件中定义的拓扑将使用此进程生成的拓扑进行扩充。服务发现从网关定义开始,使用 gossip 协议查找 MagnetoCorp 组织内的所有连接的 Peer 节点和排序节点。如果已为某个通道定义了锚节点,则服务发现将使用跨组织的 goosip 协议来发现已连接组织的组件。此过程还将发现安装在 Peer 节点上的智能合约及其在通道级别定义的背书策略。与静态网关一样,发现的网络必须足以获取和分发商业票据交易背书。
动态网关时 Fabric 应用的默认设置。可在 gateway.connect() API 上明确的指定连接选项配置 discovery: { enabled:true }。或者,设置环境变量 FABRIC_SDK_DISCOVERY=true,将会覆盖应用程序的选择。
动态网络代表了一个与时俱进的网络视图。随着网络的改变,服务发现将会确保网络视图精确反映应用程序可见的拓扑。应用程序将会自动生效这些变更;甚至不需要重载网关配置文件。
多网关
最后,应用程序可以直接为相同或不同的网络定义多个网关。此外,应用程序可以静态和动态地使用命名网关。
拥有多个网关可能会有所帮助。 原因如下:
- 代表不同用户处理请求。
- 同时连接不同的网络。
- 通过同时将其行为与现有配置进行比较来测试网络配置。
本主题介绍如何使用 Hyperledger Fabric 开发客户端应用程序和智能合约来解决业务问题。在现实世界的 商业票据 场景中,涉及多个组织,您将了解实现此目标所需的所有概念和任务。我们假设区块链网络已经可用。
该主题为多个受众设计:
- 解决方案和应用架构师
- 客户端应用开发者
- 智能合约开发者
- 业务专家
您可以选择按顺序阅读,也可以根据需要选择各个部分。各个部分是根据读者的相关性来进行标记的,所以无论您是在寻找业务信息还是技术信息,都可以清楚地知道这个主题是否适合您。
该主题遵循典型的软件开发生命周期。它以业务需求开始,然后覆盖了为满足业务需求而开发一个应用和智能合约所需要的所有主要的技术活动。
如果您愿意,通过运行商业票据 教程,按照简短的解释立即试用商业票据场景。当您需要对本教程中介绍的概念进行更全面的解释时,可以返回此主题。
教程
Application developers can use the Fabric tutorials to get started building their own solutions. Start working with Fabric by deploying the test network on your local machine. You can then use the steps provided by the Deploying a smart contract to a channel tutorial to deploy and test your smart contracts. The 编写你的第一个应用 tutorial provides an introduction to how to use the APIs provided by the Fabric SDKs to invoke smart contracts from your client applications. For an in depth overview of how Fabric applications and smart contracts work together, you can visit the 开发应用 topic.
Network operators can use the Deploying a smart contract to a channel tutorial and the 创建通道 tutorial series to learn important aspects of administering a running network. Both network operators and application developers can use the tutorials on Private data and CouchDB to explore important Fabric features. When you are ready to deploy Hyperledger Fabric in production, see the guide for 部署一个生产网络.
有两个更新通道的教程: 更新通道配置 和 Updating the capability level of a channel , Upgrading your components 展示了如何升级组件,如 Peer 节点、排序节点、SDK等。
最后,我们提供了一个如何写基础智能合约的介绍, 链码开发者教程 。
注解
如果本文档不能解决你的问题,或者你使用本教程的过程中遇到了其他问题,请阅读 仍有问题? 章节来寻求额外的帮助。
Deploying a smart contract to a channel
End users interact with the blockchain ledger by invoking smart contracts. In Hyperledger Fabric, smart contracts are deployed in packages referred to as chaincode. Organizations that want to validate transactions or query the ledger need to install a chaincode on their peers. After a chaincode has been installed on the peers joined to a channel, channel members can deploy the chaincode to the channel and use the smart contracts in the chaincode to create or update assets on the channel ledger.
A chaincode is deployed to a channel using a process known as the Fabric chaincode lifecycle. The Fabric chaincode lifecycle allows multiple organizations to agree how a chaincode will be operated before it can be used to create transactions. For example, while an endorsement policy specifies which organizations need to execute a chaincode to validate a transaction, channel members need to use the Fabric chaincode lifecycle to agree on the chaincode endorsement policy. For a more in-depth overview about how to deploy and manage a chaincode on a channel, see Fabric chaincode lifecycle.
You can use this tutorial to learn how to use the peer lifecycle chaincode commands to deploy a chaincode to a channel of the Fabric test network. Once you have an understanding of the commands, you can use the steps in this tutorial to deploy your own chaincode to the test network, or to deploy chaincode to a production network. In this tutorial, you will deploy the Fabcar chaincode that is used by the Writing your first application tutorial.
Note: These instructions use the Fabric chaincode lifecycle introduced in the v2.0 release. If you would like to use the previous lifecycle to install and instantiate a chaincode, visit the v1.4 version of the Fabric documentation.
Start the network
We will start by deploying an instance of the Fabric test network. Before you begin, make sure that that you have installed the Prerequisites and Installed the Samples, Binaries and Docker Images. Use the following command to navigate to the test network directory within your local clone of the fabric-samples repository:
cd fabric-samples/test-network
For the sake of this tutorial, we want to operate from a known initial state. The following command will kill any active or stale docker containers and remove previously generated artifacts.
./network.sh down
You can then use the following command to start the test network:
./network.sh up createChannel
The createChannel command creates a channel named mychannel with two channel members, Org1 and Org2. The command also joins a peer that belongs to each organization to the channel. If the network and the channel are created successfully, you can see the following message printed in the logs:
========= Channel successfully joined ===========
We can now use the Peer CLI to deploy the Fabcar chaincode to the channel using the following steps:
Setup Logspout (optional)
This step is not required but is extremely useful for troubleshooting chaincode. To monitor the logs of the smart contract, an administrator can view the aggregated output from a set of Docker containers using the logspout tool. The tool collects the output streams from different Docker containers into one place, making it easy to see what’s happening from a single window. This can help administrators debug problems when they install smart contracts or developers when they invoke smart contracts. Because some containers are created purely for the purposes of starting a smart contract and only exist for a short time, it is helpful to collect all of the logs from your network.
A script to install and configure Logspout, monitordocker.sh, is already included in the commercial-paper sample in the Fabric samples. We will use the same script in this tutorial as well. The Logspout tool will continuously stream logs to your terminal, so you will need to use a new terminal window. Open a new terminal and navigate to the test-network directory.
cd fabric-samples/test-network
You can run the monitordocker.sh script from any directory. For ease of use, we will copy the monitordocker.sh script from the commercial-paper sample to your working directory
cp ../commercial-paper/organization/digibank/configuration/cli/monitordocker.sh .
# if you're not sure where it is
find . -name monitordocker.sh
You can then start Logspout by running the following command:
./monitordocker.sh net_test
You should see output similar to the following:
Starting monitoring on all containers on the network net_basic
Unable to find image 'gliderlabs/logspout:latest' locally
latest: Pulling from gliderlabs/logspout
4fe2ade4980c: Pull complete
decca452f519: Pull complete
ad60f6b6c009: Pull complete
Digest: sha256:374e06b17b004bddc5445525796b5f7adb8234d64c5c5d663095fccafb6e4c26
Status: Downloaded newer image for gliderlabs/logspout:latest
1f99d130f15cf01706eda3e1f040496ec885036d485cb6bcc0da4a567ad84361
You will not see any logs at first, but this will change when we deploy our chaincode. It can be helpful to make this terminal window wide and the font small.
Package the smart contract
We need to package the chaincode before it can be installed on our peers. The steps are different if you want to install a smart contract written in Go, Java, or JavaScript.
Go
Before we package the chaincode, we need to install the chaincode dependences. Navigate to the folder that contains the Go version of the Fabcar chaincode.
cd fabric-samples/chaincode/fabcar/go
The sample uses a Go module to install the chaincode dependencies. The dependencies are listed in a go.mod file in the fabcar/go directory. You should take a moment to examine this file.
$ cat go.mod
module github.com/hyperledger/fabric-samples/chaincode/fabcar/go

go 1.13

require github.com/hyperledger/fabric-contract-api-go v1.1.0
The go.mod file imports the Fabric contract API into the smart contract package. You can open fabcar.go in a text editor to see how the contract API is used to define the SmartContract type at the beginning of the smart contract:
// SmartContract provides functions for managing a car
type SmartContract struct {
    contractapi.Contract
}
The SmartContract type is then used to create the transaction context for the functions defined within the smart contract that read and write data to the blockchain ledger.
// CreateCar adds a new car to the world state with given details
func (s *SmartContract) CreateCar(ctx contractapi.TransactionContextInterface, carNumber string, make string, model string, colour string, owner string) error {
    car := Car{
        Make:   make,
        Model:  model,
        Colour: colour,
        Owner:  owner,
    }

    carAsBytes, _ := json.Marshal(car)

    return ctx.GetStub().PutState(carNumber, carAsBytes)
}
You can learn more about the Go contract API by visiting the API documentation and the smart contract processing topic.
To install the smart contract dependencies, run the following command from the fabcar/go directory.
GO111MODULE=on go mod vendor
If the command is successful, the go packages will be installed inside a vendor folder.
Now that we that have our dependences, we can create the chaincode package. Navigate back to our working directory in the test-network folder so that we can package the chaincode together with our other network artifacts.
cd ../../../test-network
You can use the peer CLI to create a chaincode package in the required format. The peer binaries are located in the bin folder of the fabric-samples repository. Use the following command to add those binaries to your CLI Path:
export PATH=${PWD}/../bin:$PATH
You also need to set the FABRIC_CFG_PATH to point to the core.yaml file in the fabric-samples repository:
export FABRIC_CFG_PATH=$PWD/../config/
To confirm that you are able to use the peer CLI, check the version of the binaries. The binaries need to be version 2.0.0 or later to run this tutorial.
peer version
You can now create the chaincode package using the peer lifecycle chaincode package command:
peer lifecycle chaincode package fabcar.tar.gz --path ../chaincode/fabcar/go/ --lang golang --label fabcar_1
This command will create a package named fabcar.tar.gz in your current directory.
The --lang flag is used to specify the chaincode language and the --path flag provides the location of your smart contract code. The path must be a fully qualified path or a path relative to your present working directory.
The --label flag is used to specify a chaincode label that will identity your chaincode after it is installed. It is recommended that your label include the chaincode name and version.
Now that we created the chaincode package, we can install the chaincode on the peers of the test network.
JavaScript
Before we package the chaincode, we need to install the chaincode dependences. Navigate to the folder that contains the JavaScript version of the Fabcar chaincode.
cd fabric-samples/chaincode/fabcar/javascript
The dependencies are listed in the package.json file in the fabcar/javascript directory. You should take a moment to examine this file. You can find the dependences section displayed below:
"dependencies": {
        "fabric-contract-api": "^2.0.0",
        "fabric-shim": "^2.0.0"
The package.json file imports the Fabric contract class into the smart contract package. You can open lib/fabcar.js in a text editor to see the contract class imported into the smart contract and used to create the FabCar class.
const { Contract } = require('fabric-contract-api');

class FabCar extends Contract {
    ...
}
The FabCar class provides the transaction context for the functions defined within the smart contract that read and write data to the blockchain ledger.
async createCar(ctx, carNumber, make, model, color, owner) {
    console.info('============= START : Create Car ===========');

    const car = {
        color,
        docType: 'car',
        make,
        model,
        owner,
    };

    await ctx.stub.putState(carNumber, Buffer.from(JSON.stringify(car)));
    console.info('============= END : Create Car ===========');
}
You can learn more about the JavaScript contract API by visiting the API documentation and the smart contract processing topic.
To install the smart contract dependencies, run the following command from the fabcar/javascript directory.
npm install
If the command is successful, the JavaScript packages will be installed inside a npm_modules folder.
Now that we that have our dependences, we can create the chaincode package. Navigate back to our working directory in the test-network folder so that we can package the chaincode together with our other network artifacts.
cd ../../../test-network
You can use the peer CLI to create a chaincode package in the required format. The peer binaries are located in the bin folder of the fabric-samples repository. Use the following command to add those binaries to your CLI Path:
export PATH=${PWD}/../bin:$PATH
You also need to set the FABRIC_CFG_PATH to point to the core.yaml file in the fabric-samples repository:
export FABRIC_CFG_PATH=$PWD/../config/
To confirm that you are able to use the peer CLI, check the version of the binaries. The binaries need to be version 2.0.0 or later to run this tutorial.
peer version
You can now create the chaincode package using the peer lifecycle chaincode package command:
peer lifecycle chaincode package fabcar.tar.gz --path ../chaincode/fabcar/javascript/ --lang node --label fabcar_1
This command will create a package named fabcar.tar.gz in your current directory. The --lang flag is used to specify the chaincode language and the --path flag provides the location of your smart contract code. The --label flag is used to specify a chaincode label that will identity your chaincode after it is installed. It is recommended that your label include the chaincode name and version.
Now that we created the chaincode package, we can install the chaincode on the peers of the test network.
Java
Before we package the chaincode, we need to install the chaincode dependences. Navigate to the folder that contains the Java version of the Fabcar chaincode.
cd fabric-samples/chaincode/fabcar/java
The sample uses Gradle to install the chaincode dependencies. The dependencies are listed in the build.gradle file in the fabcar/java directory. You should take a moment to examine this file. You can find the dependences section displayed below:
dependencies {
    compileOnly 'org.hyperledger.fabric-chaincode-java:fabric-chaincode-shim:2.0.+'
    implementation 'com.owlike:genson:1.5'
    testImplementation 'org.hyperledger.fabric-chaincode-java:fabric-chaincode-shim:2.0.+'
    testImplementation 'org.junit.jupiter:junit-jupiter:5.4.2'
    testImplementation 'org.assertj:assertj-core:3.11.1'
    testImplementation 'org.mockito:mockito-core:2.+'
}
The build.gradle file imports the Java chaincode shim into the smart contract package, which includes the contract class. You can find Fabcar smart contract in the src directory. You can navigate to the FabCar.java file and open it in a text editor to see how the contract class is used to create the transaction context for the functions defined that read and write data to the blockchain ledger.
You can learn more about the Java chaincode shim and the contract class by visiting the Java chaincode documentation and the smart contract processing topic.
To install the smart contract dependencies, run the following command from the fabcar/java directory.
./gradlew installDist
If the command is successful, you will be able to find the built smart contract in the build folder.
Now that we have installed the dependences and built the smart contract, we can create the chaincode package. Navigate back to our working directory in the test-network folder so that we can package the chaincode together with our other network artifacts.
cd ../../../test-network
You can use the peer CLI to create a chaincode package in the required format. The peer binaries are located in the bin folder of the fabric-samples repository. Use the following command to add those binaries to your CLI Path:
export PATH=${PWD}/../bin:$PATH
You also need to set the FABRIC_CFG_PATH to point to the core.yaml file in the fabric-samples repository:
export FABRIC_CFG_PATH=$PWD/../config/
To confirm that you are able to use the peer CLI, check the version of the binaries. The binaries need to be version 2.0.0 or later to run this tutorial.
peer version
You can now create the chaincode package using the peer lifecycle chaincode package command:
peer lifecycle chaincode package fabcar.tar.gz --path ../chaincode/fabcar/java/build/install/fabcar --lang java --label fabcar_1
This command will create a package named fabcar.tar.gz in your current directory. The --lang flag is used to specify the chaincode language and the --path flag provides the location of your smart contract code. The --label flag is used to specify a chaincode label that will identity your chaincode after it is installed. It is recommended that your label include the chaincode name and version.
Now that we created the chaincode package, we can install the chaincode on the peers of the test network.
Install the chaincode package
After we package the Fabcar smart contract, we can install the chaincode on our peers. The chaincode needs to be installed on every peer that will endorse a transaction. Because we are going to set the endorsement policy to require endorsements from both Org1 and Org2, we need to install the chaincode on the peers operated by both organizations:
- peer0.org1.example.com
- peer0.org2.example.com
Let’s install the chaincode on the Org1 peer first. Set the following environment variables to operate the peer CLI as the Org1 admin user. The CORE_PEER_ADDRESS will be set to point to the Org1 peer, peer0.org1.example.com.
export CORE_PEER_TLS_ENABLED=true
export CORE_PEER_LOCALMSPID="Org1MSP"
export CORE_PEER_TLS_ROOTCERT_FILE=${PWD}/organizations/peerOrganizations/org1.example.com/peers/peer0.org1.example.com/tls/ca.crt
export CORE_PEER_MSPCONFIGPATH=${PWD}/organizations/peerOrganizations/org1.example.com/users/Admin@org1.example.com/msp
export CORE_PEER_ADDRESS=localhost:7051
Issue the peer lifecycle chaincode install command to install the chaincode on the peer:
peer lifecycle chaincode install fabcar.tar.gz
If the command is successful, the peer will generate and return the package identifier. This package ID will be used to approve the chaincode in the next step. You should see output similar to the following:
2020-02-12 11:40:02.923 EST [cli.lifecycle.chaincode] submitInstallProposal -> INFO 001 Installed remotely: response:<status:200 payload:"\nIfabcar_1:69de748301770f6ef64b42aa6bb6cb291df20aa39542c3ef94008615704007f3\022\010fabcar_1" >
2020-02-12 11:40:02.925 EST [cli.lifecycle.chaincode] submitInstallProposal -> INFO 002 Chaincode code package identifier: fabcar_1:69de748301770f6ef64b42aa6bb6cb291df20aa39542c3ef94008615704007f3
We can now install the chaincode on the Org2 peer. Set the following environment variables to operate as the Org2 admin and target target the Org2 peer, peer0.org2.example.com.
export CORE_PEER_LOCALMSPID="Org2MSP"
export CORE_PEER_TLS_ROOTCERT_FILE=${PWD}/organizations/peerOrganizations/org2.example.com/peers/peer0.org2.example.com/tls/ca.crt
export CORE_PEER_TLS_ROOTCERT_FILE=${PWD}/organizations/peerOrganizations/org2.example.com/peers/peer0.org2.example.com/tls/ca.crt
export CORE_PEER_MSPCONFIGPATH=${PWD}/organizations/peerOrganizations/org2.example.com/users/Admin@org2.example.com/msp
export CORE_PEER_ADDRESS=localhost:9051
Issue the following command to install the chaincode:
peer lifecycle chaincode install fabcar.tar.gz
The chaincode is built by the peer when the chaincode is installed. The install command will return any build errors from the chaincode if there is a problem with the smart contract code.
Approve a chaincode definition
After you install the chaincode package, you need to approve a chaincode definition for your organization. The definition includes the important parameters of chaincode governance such as the name, version, and the chaincode endorsement policy.
The set of channel members who need to approve a chaincode before it can be deployed is governed by the Application/Channel/lifeycleEndorsement policy. By default, this policy requires that a majority of channel members need to approve a chaincode before it can used on a channel. Because we have only two organizations on the channel, and a majority of 2 is 2, we need approve a chaincode definition of Fabcar as Org1 and Org2.
If an organization has installed the chaincode on their peer, they need to include the packageID in the chaincode definition approved by their organization. The package ID is used to associate the chaincode installed on a peer with an approved chaincode definition, and allows an organization to use the chaincode to endorse transactions. You can find the package ID of a chaincode by using the peer lifecycle chaincode queryinstalled command to query your peer.
peer lifecycle chaincode queryinstalled
The package ID is the combination of the chaincode label and a hash of the chaincode binaries. Every peer will generate the same package ID. You should see output similar to the following:
Installed chaincodes on peer:
Package ID: fabcar_1:69de748301770f6ef64b42aa6bb6cb291df20aa39542c3ef94008615704007f3, Label: fabcar_1
We are going to use the package ID when we approve the chaincode, so let’s go ahead and save it as an environment variable. Paste the package ID returned by peer lifecycle chaincode queryinstalled into the command below. Note: The package ID will not be the same for all users, so you need to complete this step using the package ID returned from your command window in the previous step.
export CC_PACKAGE_ID=fabcar_1:69de748301770f6ef64b42aa6bb6cb291df20aa39542c3ef94008615704007f3
Because the environment variables have been set to operate the peer CLI as the Org2 admin, we can approve the chaincode definition of Fabcar as Org2. Chaincode is approved at the organization level, so the command only needs to target one peer. The approval is distributed to the other peers within the organization using gossip. Approve the chaincode definition using the peer lifecycle chaincode approveformyorg command:
peer lifecycle chaincode approveformyorg -o localhost:7050 --ordererTLSHostnameOverride orderer.example.com --channelID mychannel --name fabcar --version 1.0 --package-id $CC_PACKAGE_ID --sequence 1 --tls --cafile ${PWD}/organizations/ordererOrganizations/example.com/orderers/orderer.example.com/msp/tlscacerts/tlsca.example.com-cert.pem
The command above uses the --package-id flag to include the package identifier in the chaincode definition. The --sequence parameter is an integer that keeps track of the number of times a chaincode has been defined or updated. Because the chaincode is being deployed to the channel for the first time, the sequence number is 1. When the Fabcar chaincode is upgraded, the sequence number will be incremented to 2. If you are using the low level APIs provided by the Fabric Chaincode Shim API, you could pass the --init-required flag to the command above to request the execution of the Init function to initialize the chaincode. The first invoke of the chaincode would need to target the Init function and include the --isInit flag before you could use the other functions in the chaincode to interact with the ledger.
We could have provided a --signature-policy or --channel-config-policy argument to the approveformyorg command to specify a chaincode endorsement policy. The endorsement policy specifies how many peers belonging to different channel members need to validate a transaction against a given chaincode. Because we did not set a policy, the definition of Fabcar will use the default endorsement policy, which requires that a transaction be endorsed by a majority of channel members present when the transaction is submitted. This implies that if new organizations are added or removed from the channel, the endorsement policy
is updated automatically to require more or fewer endorsements. In this tutorial, the default policy will require a majority of 2 out of 2 and transactions will need to be endorsed by a peer from Org1 and Org2. If you want to specify a custom endorsement policy, you can use the Endorsement Policies operations guide to learn about the policy syntax.
You need to approve a chaincode definition with an identity that has an admin role. As a result, the CORE_PEER_MSPCONFIGPATH variable needs to point to the MSP folder that contains an admin identity. You cannot approve a chaincode definition with a client user. The approval needs to be submitted to the ordering service, which will validate the admin signature and then distribute the approval to your peers.
We still need to approve the chaincode definition as Org1. Set the following environment variables to operate as the Org1 admin:
export CORE_PEER_LOCALMSPID="Org1MSP"
export CORE_PEER_MSPCONFIGPATH=${PWD}/organizations/peerOrganizations/org1.example.com/users/Admin@org1.example.com/msp
export CORE_PEER_TLS_ROOTCERT_FILE=${PWD}/organizations/peerOrganizations/org1.example.com/peers/peer0.org1.example.com/tls/ca.crt
export CORE_PEER_ADDRESS=localhost:7051
You can now approve the chaincode definition as Org1.
peer lifecycle chaincode approveformyorg -o localhost:7050 --ordererTLSHostnameOverride orderer.example.com --channelID mychannel --name fabcar --version 1.0 --package-id $CC_PACKAGE_ID --sequence 1 --tls --cafile ${PWD}/organizations/ordererOrganizations/example.com/orderers/orderer.example.com/msp/tlscacerts/tlsca.example.com-cert.pem
We now have the majority we need to deploy the Fabcar the chaincode to the channel. While only a majority of organizations need to approve a chaincode definition (with the default policies), all organizations need to approve a chaincode definition to start the chaincode on their peers. If you commit the definition before a channel member has approved the chaincode, the organization will not be able to endorse transactions. As a result, it is recommended that all channel members approve a chaincode before committing the chaincode definition.
Committing the chaincode definition to the channel
After a sufficient number of organizations have approved a chaincode definition, one organization can commit the chaincode definition to the channel. If a majority of channel members have approved the definition, the commit transaction will be successful and the parameters agreed to in the chaincode definition will be implemented on the channel.
You can use the peer lifecycle chaincode checkcommitreadiness command to check whether channel members have approved the same chaincode definition. The flags used for the checkcommitreadiness command are identical to the flags used to approve a chaincode for your organization. However, you do not need to include the --package-id flag.
peer lifecycle chaincode checkcommitreadiness --channelID mychannel --name fabcar --version 1.0 --sequence 1 --tls --cafile ${PWD}/organizations/ordererOrganizations/example.com/orderers/orderer.example.com/msp/tlscacerts/tlsca.example.com-cert.pem --output json
The command will produce a JSON map that displays if a channel member has approved the parameters that were specified in the checkcommitreadiness command:
    {
            "Approvals": {
                    "Org1MSP": true,
                    "Org2MSP": true
            }
    }
Since both organizations that are members of the channel have approved the same parameters, the chaincode definition is ready to be committed to the channel. You can use the peer lifecycle chaincode commit command to commit the chaincode definition to the channel. The commit command also needs to be submitted by an organization admin.
peer lifecycle chaincode commit -o localhost:7050 --ordererTLSHostnameOverride orderer.example.com --channelID mychannel --name fabcar --version 1.0 --sequence 1 --tls --cafile ${PWD}/organizations/ordererOrganizations/example.com/orderers/orderer.example.com/msp/tlscacerts/tlsca.example.com-cert.pem --peerAddresses localhost:7051 --tlsRootCertFiles ${PWD}/organizations/peerOrganizations/org1.example.com/peers/peer0.org1.example.com/tls/ca.crt --peerAddresses localhost:9051 --tlsRootCertFiles ${PWD}/organizations/peerOrganizations/org2.example.com/peers/peer0.org2.example.com/tls/ca.crt
The transaction above uses the --peerAddresses flag to target peer0.org1.example.com from Org1 and peer0.org2.example.com from Org2. The commit transaction is submitted to the peers joined to the channel to query the chaincode definition that was approved by the organization that operates the peer. The command needs to target the peers from a sufficient number of organizations to satisfy the policy for deploying a chaincode. Because the approval is distributed within each organization, you can target any peer that belongs to a channel member.
The chaincode definition endorsements by channel members are submitted to the ordering service to be added to a block and distributed to the channel. The peers on the channel then validate whether a sufficient number of organizations have approved the chaincode definition. The peer lifecycle chaincode commit command will wait for the validations from the peer before returning a response.
You can use the peer lifecycle chaincode querycommitted command to confirm that the chaincode definition has been committed to the channel.
peer lifecycle chaincode querycommitted --channelID mychannel --name fabcar --cafile ${PWD}/organizations/ordererOrganizations/example.com/orderers/orderer.example.com/msp/tlscacerts/tlsca.example.com-cert.pem
If the chaincode was successful committed to the channel, the querycommitted command will return the sequence and version of the chaincode definition:
Committed chaincode definition for chaincode 'fabcar' on channel 'mychannel':
Version: 1, Sequence: 1, Endorsement Plugin: escc, Validation Plugin: vscc, Approvals: [Org1MSP: true, Org2MSP: true]
Invoking the chaincode
After the chaincode definition has been committed to a channel, the chaincode will start on the peers joined to the channel where the chaincode was installed. The Fabcar chaincode is now ready to be invoked by client applications. Use the following command create an initial set of cars on the ledger. Note that the invoke command needs target a sufficient number of peers to meet chaincode endorsement policy.
peer chaincode invoke -o localhost:7050 --ordererTLSHostnameOverride orderer.example.com --tls --cafile ${PWD}/organizations/ordererOrganizations/example.com/orderers/orderer.example.com/msp/tlscacerts/tlsca.example.com-cert.pem -C mychannel -n fabcar --peerAddresses localhost:7051 --tlsRootCertFiles ${PWD}/organizations/peerOrganizations/org1.example.com/peers/peer0.org1.example.com/tls/ca.crt --peerAddresses localhost:9051 --tlsRootCertFiles ${PWD}/organizations/peerOrganizations/org2.example.com/peers/peer0.org2.example.com/tls/ca.crt -c '{"function":"initLedger","Args":[]}'
If the command is successful, you should be able to a response similar to the following:
2020-02-12 18:22:20.576 EST [chaincodeCmd] chaincodeInvokeOrQuery -> INFO 001 Chaincode invoke successful. result: status:200
We can use a query function to read the set of cars that were created by the chaincode:
peer chaincode query -C mychannel -n fabcar -c '{"Args":["queryAllCars"]}'
The response to the query should be the following list of cars:
[{"Key":"CAR0","Record":{"make":"Toyota","model":"Prius","colour":"blue","owner":"Tomoko"}},
{"Key":"CAR1","Record":{"make":"Ford","model":"Mustang","colour":"red","owner":"Brad"}},
{"Key":"CAR2","Record":{"make":"Hyundai","model":"Tucson","colour":"green","owner":"Jin Soo"}},
{"Key":"CAR3","Record":{"make":"Volkswagen","model":"Passat","colour":"yellow","owner":"Max"}},
{"Key":"CAR4","Record":{"make":"Tesla","model":"S","colour":"black","owner":"Adriana"}},
{"Key":"CAR5","Record":{"make":"Peugeot","model":"205","colour":"purple","owner":"Michel"}},
{"Key":"CAR6","Record":{"make":"Chery","model":"S22L","colour":"white","owner":"Aarav"}},
{"Key":"CAR7","Record":{"make":"Fiat","model":"Punto","colour":"violet","owner":"Pari"}},
{"Key":"CAR8","Record":{"make":"Tata","model":"Nano","colour":"indigo","owner":"Valeria"}},
{"Key":"CAR9","Record":{"make":"Holden","model":"Barina","colour":"brown","owner":"Shotaro"}}]
Upgrading a smart contract
You can use the same Fabric chaincode lifecycle process to upgrade a chaincode that has already been deployed to a channel. Channel members can upgrade a chaincode by installing a new chaincode package and then approving a chaincode definition with the new package ID, a new chaincode version, and with the sequence number incremented by one. The new chaincode can be used after the chaincode definition is committed to the channel. This process allows channel members to coordinate on when a chaincode is upgraded, and ensure that a sufficient number of channel members are ready to use the new chaincode before it is deployed to the channel.
Channel members can also use the upgrade process to change the chaincode endorsement policy. By approving a chaincode definition with a new endorsement policy and committing the chaincode definition to the channel, channel members can change the endorsement policy governing a chaincode without installing a new chaincode package.
To provide a scenario for upgrading the Fabcar chaincode that we just deployed, let’s assume that Org1 and Org2 would like to install a version of the chaincode that is written in another language. They will use the Fabric chaincode lifecycle to update the chaincode version and ensure that both organizations have installed the new chaincode before it becomes active on the channel.
We are going to assume that Org1 and Org2 initially installed the GO version of the Fabcar chaincode, but would be more comfortable working with a chaincode written in JavaScript. The first step is to package the JavaScript version of the Fabcar chaincode. If you used the JavaScript instructions to package your chaincode when you went through the tutorial, you can install new chaincode binaries by following the steps for packaging a chaincode written in Go or Java.
Issue the following commands from the test-network directory to install the chaincode dependences.
cd ../chaincode/fabcar/javascript
npm install
cd ../../../test-network
You can then issue the following commands to package the JavaScript chaincode from the test-network directory. We will set the environment variables needed to use the peer CLI again in case you closed your terminal.
export PATH=${PWD}/../bin:$PATH
export FABRIC_CFG_PATH=$PWD/../config/
export CORE_PEER_MSPCONFIGPATH=${PWD}/organizations/peerOrganizations/org1.example.com/users/Admin@org1.example.com/msp
peer lifecycle chaincode package fabcar_2.tar.gz --path ../chaincode/fabcar/javascript/ --lang node --label fabcar_2
Run the following commands to operate the peer CLI as the Org1 admin:
export CORE_PEER_TLS_ENABLED=true
export CORE_PEER_LOCALMSPID="Org1MSP"
export CORE_PEER_TLS_ROOTCERT_FILE=${PWD}/organizations/peerOrganizations/org1.example.com/peers/peer0.org1.example.com/tls/ca.crt
export CORE_PEER_MSPCONFIGPATH=${PWD}/organizations/peerOrganizations/org1.example.com/users/Admin@org1.example.com/msp
export CORE_PEER_ADDRESS=localhost:7051
We can now use the following command to install the new chaincode package on the Org1 peer.
peer lifecycle chaincode install fabcar_2.tar.gz
The new chaincode package will create a new package ID. We can find the new package ID by querying our peer.
peer lifecycle chaincode queryinstalled
The queryinstalled command will return a list of the chaincode that have been installed on your peer.
Installed chaincodes on peer:
Package ID: fabcar_1:69de748301770f6ef64b42aa6bb6cb291df20aa39542c3ef94008615704007f3, Label: fabcar_1
Package ID: fabcar_2:1d559f9fb3dd879601ee17047658c7e0c84eab732dca7c841102f20e42a9e7d4, Label: fabcar_2
You can use the package label to find the package ID of the new chaincode and save it as a new environment variable.
export NEW_CC_PACKAGE_ID=fabcar_2:1d559f9fb3dd879601ee17047658c7e0c84eab732dca7c841102f20e42a9e7d4
Org1 can now approve a new chaincode definition:
peer lifecycle chaincode approveformyorg -o localhost:7050 --ordererTLSHostnameOverride orderer.example.com --channelID mychannel --name fabcar --version 2.0 --package-id $NEW_CC_PACKAGE_ID --sequence 2 --tls --cafile ${PWD}/organizations/ordererOrganizations/example.com/orderers/orderer.example.com/msp/tlscacerts/tlsca.example.com-cert.pem
The new chaincode definition uses the package ID of the JavaScript chaincode package and updates the chaincode version. Because the sequence parameter is used by the Fabric chaincode lifecycle to keep track of chaincode upgrades, Org1 also needs to increment the sequence number from 1 to 2. You can use the peer lifecycle chaincode querycommitted command to find the sequence of the chaincode that was last committed to the channel.
We now need to install the chaincode package and approve the chaincode definition as Org2 in order to upgrade the chaincode. Run the following commands to operate the peer CLI as the Org2 admin:
export CORE_PEER_LOCALMSPID="Org2MSP"
export CORE_PEER_TLS_ROOTCERT_FILE=${PWD}/organizations/peerOrganizations/org2.example.com/peers/peer0.org2.example.com/tls/ca.crt
export CORE_PEER_TLS_ROOTCERT_FILE=${PWD}/organizations/peerOrganizations/org2.example.com/peers/peer0.org2.example.com/tls/ca.crt
export CORE_PEER_MSPCONFIGPATH=${PWD}/organizations/peerOrganizations/org2.example.com/users/Admin@org2.example.com/msp
export CORE_PEER_ADDRESS=localhost:9051
We can now use the following command to install the new chaincode package on the Org2 peer.
peer lifecycle chaincode install fabcar_2.tar.gz
You can now approve the new chaincode definition for Org2.
peer lifecycle chaincode approveformyorg -o localhost:7050 --ordererTLSHostnameOverride orderer.example.com --channelID mychannel --name fabcar --version 2.0 --package-id $NEW_CC_PACKAGE_ID --sequence 2 --tls --cafile ${PWD}/organizations/ordererOrganizations/example.com/orderers/orderer.example.com/msp/tlscacerts/tlsca.example.com-cert.pem
Use the peer lifecycle chaincode checkcommitreadiness command to check if the chaincode definition with sequence 2 is ready to be committed to the channel:
peer lifecycle chaincode checkcommitreadiness --channelID mychannel --name fabcar --version 2.0 --sequence 2 --tls --cafile ${PWD}/organizations/ordererOrganizations/example.com/orderers/orderer.example.com/msp/tlscacerts/tlsca.example.com-cert.pem --output json
The chaincode is ready to be upgraded if the command returns the following JSON:
    {
            "Approvals": {
                    "Org1MSP": true,
                    "Org2MSP": true
            }
    }
The chaincode will be upgraded on the channel after the new chaincode definition is committed. Until then, the previous chaincode will continue to run on the peers of both organizations. Org2 can use the following command to upgrade the chaincode:
peer lifecycle chaincode commit -o localhost:7050 --ordererTLSHostnameOverride orderer.example.com --channelID mychannel --name fabcar --version 2.0 --sequence 2 --tls --cafile ${PWD}/organizations/ordererOrganizations/example.com/orderers/orderer.example.com/msp/tlscacerts/tlsca.example.com-cert.pem --peerAddresses localhost:7051 --tlsRootCertFiles ${PWD}/organizations/peerOrganizations/org1.example.com/peers/peer0.org1.example.com/tls/ca.crt --peerAddresses localhost:9051 --tlsRootCertFiles ${PWD}/organizations/peerOrganizations/org2.example.com/peers/peer0.org2.example.com/tls/ca.crt
A successful commit transaction will start the new chaincode right away. If the chaincode definition changed the endorsement policy, the new policy would be put in effect.
You can use the docker ps command to verify that the new chaincode has started on your peers:
$docker ps
CONTAINER ID        IMAGE                                                                                                                                                                   COMMAND                  CREATED             STATUS              PORTS                              NAMES
197a4b70a392        dev-peer0.org1.example.com-fabcar_2-1d559f9fb3dd879601ee17047658c7e0c84eab732dca7c841102f20e42a9e7d4-d305a4e8b4f7c0bc9aedc84c4a3439daed03caedfbce6483058250915d64dd23   "docker-entrypoint.s…"   2 minutes ago       Up 2 minutes                                           dev-peer0.org1.example.com-fabcar_2-1d559f9fb3dd879601ee17047658c7e0c84eab732dca7c841102f20e42a9e7d4
b7e4dbfd4ea0        dev-peer0.org2.example.com-fabcar_2-1d559f9fb3dd879601ee17047658c7e0c84eab732dca7c841102f20e42a9e7d4-9de9cd456213232033c0cf8317cbf2d5abef5aee2529be9176fc0e980f0f7190   "docker-entrypoint.s…"   2 minutes ago       Up 2 minutes                                           dev-peer0.org2.example.com-fabcar_2-1d559f9fb3dd879601ee17047658c7e0c84eab732dca7c841102f20e42a9e7d4
8b6e9abaef8d        hyperledger/fabric-peer:latest                                                                                                                                          "peer node start"        About an hour ago   Up About an hour    0.0.0.0:7051->7051/tcp             peer0.org1.example.com
429dae4757ba        hyperledger/fabric-peer:latest                                                                                                                                          "peer node start"        About an hour ago   Up About an hour    7051/tcp, 0.0.0.0:9051->9051/tcp   peer0.org2.example.com
7de5d19400e6        hyperledger/fabric-orderer:latest                                                                                                                                       "orderer"                About an hour ago   Up About an hour    0.0.0.0:7050->7050/tcp             orderer.example.com
If you used the --init-required flag, you need to invoke the Init function before you can use the upgraded chaincode. Because we did not request the execution of Init, we can test our new JavaScript chaincode by creating a new car:
peer chaincode invoke -o localhost:7050 --ordererTLSHostnameOverride orderer.example.com --tls --cafile ${PWD}/organizations/ordererOrganizations/example.com/orderers/orderer.example.com/msp/tlscacerts/tlsca.example.com-cert.pem -C mychannel -n fabcar --peerAddresses localhost:7051 --tlsRootCertFiles ${PWD}/organizations/peerOrganizations/org1.example.com/peers/peer0.org1.example.com/tls/ca.crt --peerAddresses localhost:9051 --tlsRootCertFiles ${PWD}/organizations/peerOrganizations/org2.example.com/peers/peer0.org2.example.com/tls/ca.crt -c '{"function":"createCar","Args":["CAR11","Honda","Accord","Black","Tom"]}'
You can query all the cars on the ledger again to see the new car:
peer chaincode query -C mychannel -n fabcar -c '{"Args":["queryAllCars"]}'
You should see the following result from the JavaScript chaincode:
[{"Key":"CAR0","Record":{"make":"Toyota","model":"Prius","colour":"blue","owner":"Tomoko"}},
{"Key":"CAR1","Record":{"make":"Ford","model":"Mustang","colour":"red","owner":"Brad"}},
{"Key":"CAR11","Record":{"color":"Black","docType":"car","make":"Honda","model":"Accord","owner":"Tom"}},
{"Key":"CAR2","Record":{"make":"Hyundai","model":"Tucson","colour":"green","owner":"Jin Soo"}},
{"Key":"CAR3","Record":{"make":"Volkswagen","model":"Passat","colour":"yellow","owner":"Max"}},
{"Key":"CAR4","Record":{"make":"Tesla","model":"S","colour":"black","owner":"Adriana"}},
{"Key":"CAR5","Record":{"make":"Peugeot","model":"205","colour":"purple","owner":"Michel"}},
{"Key":"CAR6","Record":{"make":"Chery","model":"S22L","colour":"white","owner":"Aarav"}},
{"Key":"CAR7","Record":{"make":"Fiat","model":"Punto","colour":"violet","owner":"Pari"}},
{"Key":"CAR8","Record":{"make":"Tata","model":"Nano","colour":"indigo","owner":"Valeria"}},
{"Key":"CAR9","Record":{"make":"Holden","model":"Barina","colour":"brown","owner":"Shotaro"}}]
Clean up
When you are finished using the chaincode, you can also use the following commands to remove the Logspout tool.
docker stop logspout
docker rm logspout
You can then bring down the test network by issuing the following command from the test-network directory:
./network.sh down
Next steps
After you write your smart contract and deploy it to a channel, you can use the APIs provided by the Fabric SDKs to invoke the smart contracts from a client application. This allows end users to interact with the assets on the blockchain ledger. To get started with the Fabric SDKs, see the Writing Your first application tutorial.
troubleshooting
Chaincode not agreed to by this org
Problem: When I try to commit a new chaincode definition to the channel, the peer lifecycle chaincode commit command fails with the following error:
Error: failed to create signed transaction: proposal response was not successful, error code 500, msg failed to invoke backing implementation of 'CommitChaincodeDefinition': chaincode definition not agreed to by this org (Org1MSP)
Solution: You can try to resolve this error by using the peer lifecycle chaincode checkcommitreadiness command to check which channel members have approved the chaincode definition that you are trying to commit. If any organization used a different value for any parameter of the chaincode definition, the commit transaction will fail. The peer lifecycle chaincode checkcommitreadiness will reveal which organizations did not approve the chaincode definition you are trying to commit:
{
    "approvals": {
        "Org1MSP": false,
        "Org2MSP": true
    }
}
Invoke failure
Problem: The peer lifecycle chaincode commit transaction is successful, but when I try to invoke the chaincode for the first time, it fails with the following error:
Error: endorsement failure during invoke. response: status:500 message:"make sure the chaincode fabcar has been successfully defined on channel mychannel and try again: chaincode definition for 'fabcar' exists, but chaincode is not installed"
Solution: You may not have set the correct --package-id when you approved your chaincode definition. As a result, the chaincode definition that was committed to the channel was not associated with the chaincode package you installed and the chaincode was not started on your peers. If you are running a docker based network, you can use the docker ps command to check if your chaincode is running:
docker ps
CONTAINER ID        IMAGE                               COMMAND             CREATED             STATUS              PORTS                              NAMES
7fe1ae0a69fa        hyperledger/fabric-orderer:latest   "orderer"           5 minutes ago       Up 4 minutes        0.0.0.0:7050->7050/tcp             orderer.example.com
2b9c684bd07e        hyperledger/fabric-peer:latest      "peer node start"   5 minutes ago       Up 4 minutes        0.0.0.0:7051->7051/tcp             peer0.org1.example.com
39a3e41b2573        hyperledger/fabric-peer:latest      "peer node start"   5 minutes ago       Up 4 minutes        7051/tcp, 0.0.0.0:9051->9051/tcp   peer0.org2.example.com
If you do not see any chaincode containers listed, use the peer lifecycle chaincode approveformyorg command approve a chaincode definition with the correct package ID.
Endorsement policy failure
Problem: When I try to commit the chaincode definition to the channel, the transaction fails with the following error:
2020-04-07 20:08:23.306 EDT [chaincodeCmd] ClientWait -> INFO 001 txid [5f569e50ae58efa6261c4ad93180d49ac85ec29a07b58f576405b826a8213aeb] committed with status (ENDORSEMENT_POLICY_FAILURE) at localhost:7051
Error: transaction invalidated with status (ENDORSEMENT_POLICY_FAILURE)
Solution: This error is a result of the commit transaction not gathering enough endorsements to meet the Lifecycle endorsement policy. This problem could be a result of your transaction not targeting a sufficient number of peers to meet the policy. This could also be the result of some of the peer organizations not including the Endorsement: signature policy referenced by the default /Channel/Application/Endorsement policy in their configtx.yaml file:
Readers:
        Type: Signature
        Rule: "OR('Org2MSP.admin', 'Org2MSP.peer', 'Org2MSP.client')"
Writers:
        Type: Signature
        Rule: "OR('Org2MSP.admin', 'Org2MSP.client')"
Admins:
        Type: Signature
        Rule: "OR('Org2MSP.admin')"
Endorsement:
        Type: Signature
        Rule: "OR('Org2MSP.peer')"
When you enable the Fabric chaincode lifecycle, you also need to use the new Fabric 2.0 channel policies in addition to upgrading your channel to the V2_0 capability. Your channel needs to include the new /Channel/Application/LifecycleEndorsement and /Channel/Application/Endorsement policies:
Policies:
        Readers:
                Type: ImplicitMeta
                Rule: "ANY Readers"
        Writers:
                Type: ImplicitMeta
                Rule: "ANY Writers"
        Admins:
                Type: ImplicitMeta
                Rule: "MAJORITY Admins"
        LifecycleEndorsement:
                Type: ImplicitMeta
                Rule: "MAJORITY Endorsement"
        Endorsement:
                Type: ImplicitMeta
                Rule: "MAJORITY Endorsement"
If you do not include the new channel policies in the channel configuration, you will get the following error when you approve a chaincode definition for your organization:
Error: proposal failed with status: 500 - failed to invoke backing implementation of 'ApproveChaincodeDefinitionForMyOrg': could not set defaults for chaincode definition in channel mychannel: policy '/Channel/Application/Endorsement' must be defined for channel 'mychannel' before chaincode operations can be attempted
编写你的第一个应用
注解
如果你对 Fabric 网络的基本架构还不熟悉,在继续本部分之前,你可能想先阅读 关键概念 部分。
本教程的价值仅限于介绍 Fabric 应用和使用简单的智能合约和应用。更深入的了解 Fabric 应用和智能合约请查看 开发应用 或 商业票据教程 部分。
This tutorial provides an introduction to how Fabric applications interact with deployed blockchain networks. The tutorial uses sample programs built using the Fabric SDKs – described in detail in the 应用 topic – to invoke a smart contract which queries and updates the ledger with the smart contract API – described in detail in 智能合约处理. We will also use our sample programs and a deployed Certificate Authority to generate the X.509 certificates that an application needs to interact with a permissioned blockchain.
关于 FabCar
FabCar例子演示了如何查询保存在账本上的Car(我们业务对象例子),以及如何更新账本(向账本添加新的Car)。 它包含以下两个组件:
- 示例应用程序:调用区块链网络,调用智能合约中实现的交易。
2. Smart contract itelf, implementing the transactions that involve interactions with the ledger.
我们将按照以下三个步骤进行:
1. 搭建开发环境。 我们的应用程序需要和网络交互,所以我们需要一个智能合约和 应用程序使用的基础网络。
2. 浏览一个示例智能合约。 我们将查看示例智能合约 Fabcar 来学习他们的交易,还有应用程序是怎么使用他们来进行查询和更新账本的。
3. 使用示例应用程序和智能合约交互。 我们的应用程序将使用 FabCar 智能合约来查询和更新账本上的汽车资产。我们将进入到应用程序的代码和他们创建的交易,包括查询一辆汽车,查询一批汽车和创建一辆新车。
在完成这个教程之后,你将基本理解一个应用是如何通过编程关联智能合约来和 Fabric 网络上的多个节点的账本的进行交互的。
Before you begin
In addition to the standard 准备阶段 for Fabric, this tutorial leverages the Hyperledger Fabric SDK for Node.js. See the Node.js SDK README for a up to date list of prerequisites.
If you are using macOS, complete the following steps:
- Install Homebrew.
- Check the Node SDK prerequisites to find out what level of Node to install.
- Run
brew install nodeto download the latest version of node or choose a specific version, for example:brew install node@10according to what is supported in the prerequisites. - Run
npm install.
If you are on Windows, you can install the windows-build-tools with npm which installs all required compilers and tooling by running the following command:
npm install --global windows-build-tools
If you are on Linux, you need to install Python v2.7, make, and a C/C++ compiler toolchain such as GCC. You can run the following command to install the other tools:
sudo apt install build-essential
设置区块链网络
如果你已经学习了 使用Fabric的测试网络 而且已经运行起来了一个网络,本教程将在启动一个新网络之前关闭正在运行的网络。
启动网络
注解
这个教程演示了 Javascript 版本的 FabCar 智能合约和应用程序,但是 fabric-samples 仓库也包含 Go、Java 和 TypeScript 版本的样例。想尝试 Go、Java 或者 TypeScript 版本,改变下边的 ./startFabric.sh 的 javascript 参数为 go、 java 或者 typescript,然后跟着介绍写到终端中。
进入你克隆到本地的 fabric-samples 仓库的 fabcar 子目录。
cd fabric-samples/fabcar
使用 startFabric.sh 脚本启动网络。
./startFabric.sh javascript
This command will deploy the Fabric test network with two peers and an ordering
service. Instead of using the cryptogen tool, we will bring up the test network
using Certificate Authorities. We will use one of these CAs to create the certificates
and keys that will be used by our applications in a future step. The startFabric.sh
script will also deploy and initialize the JavaScript version of the FabCar smart
contract on the channel mychannel, and then invoke the smart contract to
put initial data on the ledger.
Sample application
First component of FabCar, the sample application, is available in following languages:
In this tutorial, we will explain the sample written in javascript for nodejs.
From the fabric-samples/fabcar directory, navigate to the
javascript folder.
cd javascript
This directory contains sample programs that were developed using the Fabric SDK for Node.js. Run the following command to install the application dependencies. It will take about a minute to complete:
npm install
这个指令将安装应用程序的主要依赖,这些依赖定义在 package.json 中。其中最重要的是 fabric-network 类;它使得应用程序可以使用身份、钱包和连接到通道的网关,以及提交交易和等待通知。本教程也将使用 fabric-ca-client 类来注册用户以及他们的授权证书,生成一个 fabric-network 在后边会用到的合法身份。
完成 npm install ,运行应用程序所需要的一切就准备好了。让我们来看一眼教程中使用的示例 JavaScript 应用文件:
ls
你会看到下边的文件:
enrollAdmin.js  node_modules       package.json  registerUser.js
invoke.js       package-lock.json  query.js      wallet
里边也有一些其他编程语言的文件,比如在 fabcar/java 目录中。当你使用过 JavaScript 示例之后,你可以看一下它们,主要的内容都是一样的。
登记管理员用户
注解
下边的部分执行和证书授权服务器通讯。你在运行下边的程序时,你会发现,打开一个新终端,并运行 docker logs -f ca_org1 来查看 CA 的日志流,会很有帮助。
当我们创建网络的时候,一个管理员用户( admin)被证书授权服务器(CA)创建成了 注册员 。我们第一步要使用 enroll.js 程序为 admin 生成私钥、公钥和 x.509 证书。这个程序使用一个 证书签名请求 (CSR)——现在本地生成公钥和私钥,然后把公钥发送到 CA ,CA 会发布会一个让应用程序使用的证书。这三个证书会保存在钱包中,以便于我们以管理员的身份使用 CA 。
我们登记一个 admin 用户:
node enrollAdmin.js
这个命令将 CA 管理员的证书保存在 wallet 目录。You can find administrator’s certificate and private key in the wallet/admin.id
file。
注册和登记应用程序用户
Our admin is used to work with the CA. Now that we have the administrator’s
credentials in a wallet, we can create a new application user which will be used
to interact with the blockchain. Run the following command to register and enroll
a new user named appUser:
node registerUser.js
Similar to the admin enrollment, this program uses a CSR to enroll appUser and
store its credentials alongside those of admin in the wallet. We now have
identities for two separate users — admin and appUser — that can be
used by our application.
查询账本
区块链网络中的每个节点都拥有一个 账本 <./ledger/ledger.html> 的副本,应用程序可以通过执行智能合约查询账本上最新的数据来实现来查询账本,并将查询结果返回给应用程序。
这里是一个查询工作如何进行的简单说明:
最常用的查询是查寻账本中询当前的值,也就是 世界状态 。世界状态是一个键值对的集合,应用程序可以根据一个键或者多个键来查询数据。而且,当键值对是以 JSON 值模式组织的时候,世界状态可以通过配置使用数据库(如 CouchDB )来支持富查询。这对于查询所有资产来匹配特定的键的值是很有用的,比如查询一个人的所有汽车。
首先,我们来运行我们的 query.js 程序来返回账本上所有汽车的侦听。这个程序使用我们的第二个身份——user1——来操作账本。
node query.js
输入结果应该类似下边:
Wallet path: ...fabric-samples/fabcar/javascript/wallet
Transaction has been evaluated, result is:
[{"Key":"CAR0","Record":{"color":"blue","docType":"car","make":"Toyota","model":"Prius","owner":"Tomoko"}},
{"Key":"CAR1","Record":{"color":"red","docType":"car","make":"Ford","model":"Mustang","owner":"Brad"}},
{"Key":"CAR2","Record":{"color":"green","docType":"car","make":"Hyundai","model":"Tucson","owner":"Jin Soo"}},
{"Key":"CAR3","Record":{"color":"yellow","docType":"car","make":"Volkswagen","model":"Passat","owner":"Max"}},
{"Key":"CAR4","Record":{"color":"black","docType":"car","make":"Tesla","model":"S","owner":"Adriana"}},
{"Key":"CAR5","Record":{"color":"purple","docType":"car","make":"Peugeot","model":"205","owner":"Michel"}},
{"Key":"CAR6","Record":{"color":"white","docType":"car","make":"Chery","model":"S22L","owner":"Aarav"}},
{"Key":"CAR7","Record":{"color":"violet","docType":"car","make":"Fiat","model":"Punto","owner":"Pari"}},
{"Key":"CAR8","Record":{"color":"indigo","docType":"car","make":"Tata","model":"Nano","owner":"Valeria"}},
{"Key":"CAR9","Record":{"color":"brown","docType":"car","make":"Holden","model":"Barina","owner":"Shotaro"}}]
Let’s take a closer look at how query.js program uses the APIs provided by the
Fabric Node SDK to
interact with our Fabric network。使用一个编辑器(比如, atom 或 visual studio)打开 query.js 。
The application starts by bringing in scope two key classes from the
fabric-network module; Wallets and Gateway. These classes
will be used to locate the appUser identity in the wallet, and use it to
connect to the network:
const { Gateway, Wallets } = require('fabric-network');
First, the program uses the Wallet class to get our application user from our file system.
const identity = await wallet.get('appUser');
Once the program has an identity, it uses the Gateway class to connect to our network.
const gateway = new Gateway();
await gateway.connect(ccpPath, { wallet, identity: 'appUser', discovery: { enabled: true, asLocalhost: true } });
ccpPath describes the path to the connection profile that our application will use
to connect to our network. The connection profile was loaded from inside the
fabric-samples/test-network directory and parsed as a JSON file:
const ccpPath = path.resolve(__dirname, '..', '..', 'test-network','organizations','peerOrganizations','org1.example.com', 'connection-org1.json');
如果你想了解更多关于连接配置文件的结构,和它是怎么定义网络的,请查阅 链接配置主题 。
一个网络可以被差分成很多通道,代码中下一个很重的一行是将应用程序连接到网络中特定的通道 mychannel 上:
const network = await gateway.getNetwork('mychannel');
在这个通道中,我们可以通过 FabCar 智能合约来和账本进行交互:
const contract = network.getContract('fabcar');
在 fabcar 中有许多不同的 交易 ,我们的应用程序先使用 queryAllCars 交易来查询账本世界状态的值:
const result = await contract.evaluateTransaction('queryAllCars');
evaluateTransaction 方法代表了一种区块链网络中和智能合约最简单的交互。它只是的根据配置文件中的定义连接一个节点,然后向节点发送请求,请求内容将在节点中执行。智能合约查询节点账本上的所有汽车,然后把结果返回给应用程序。这次交互没有导致账本的更新。
FabCar 智能合约
FabCar smart contract sample is available in following languages:
Let’s take a look at the transactions within the FabCar smart contract written in JavaScript. Open a
new terminal and navigate to the JavaScript version of the FabCar Smart contract
inside the fabric-samples repository:
cd fabric-samples/chaincode/fabcar/javascript/lib
Open the fabcar.js file in a text editor editor.
See how our smart contract is defined using the Contract class:
class FabCar extends Contract {...
在这个类结构中,你将看到定义了以下交易: initLedger, queryCar, queryAllCars, createCar 和 changeCarOwner 。例如:
async queryCar(ctx, carNumber) {...}
async queryAllCars(ctx) {...}
让我们更进一步看一下 queryAllCars ,看一下它是怎么和账本交互的。
async queryAllCars(ctx) {

  const startKey = '';
  const endKey = '';

  const iterator = await ctx.stub.getStateByRange(startKey, endKey);
This code shows how to retrieve all cars from the ledger within a key range using
getStateByRange. Giving empty startKey & endKey is interpreted as all the keys from beginning to end.
As another example, if you use startKey = 'CAR0', endKey = 'CAR999' , then getStateByRange
will retrieve cars with keys between CAR0 (inclusive) and CAR999 (exclusive) in lexical order.
The remainder of the code iterates through the query results and packages them into
JSON for the sample application to use.
下面展示了应用程序如何调用智能合约中的不同交易。每一个交易都使用一组 API 比如 getStateByRange 来和账本进行交互。了解更多 API 请阅读 detail.
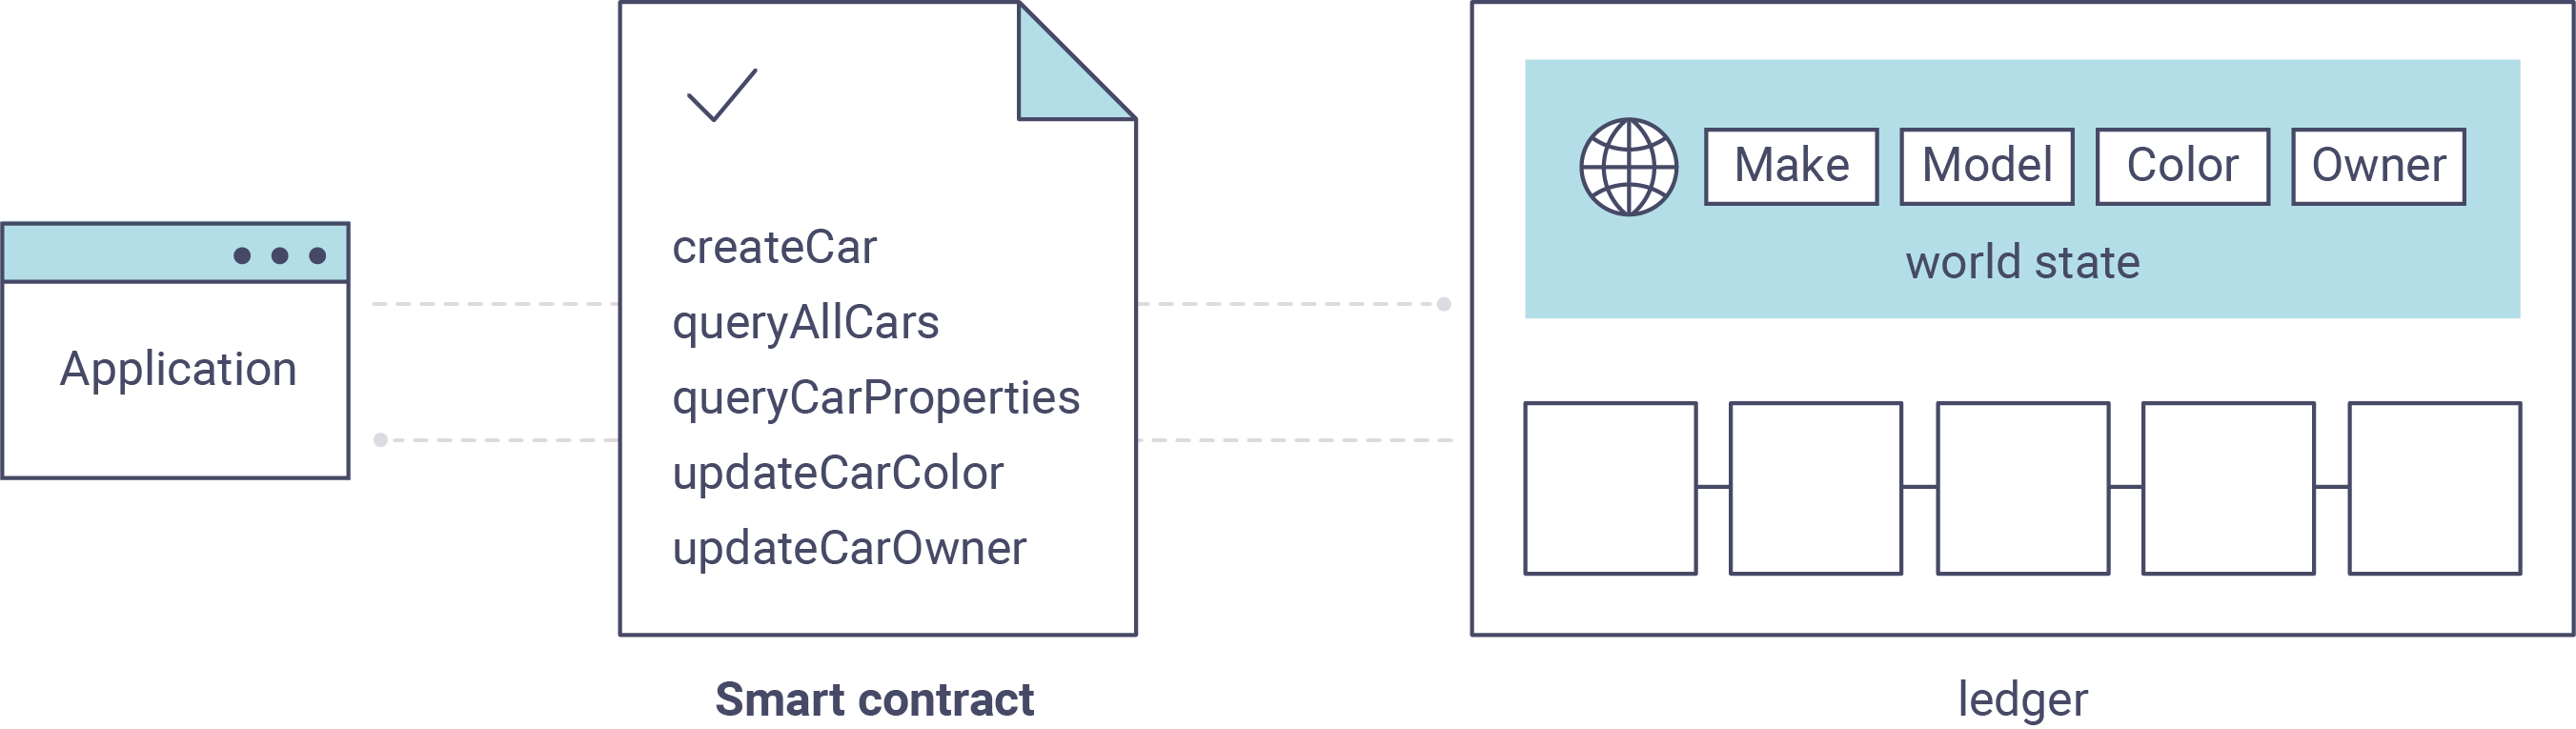
你可以看到我们的 queryAllCars 交易,还有另一个叫做 createCar 。我们稍后将在教程中使用他们来更细账本,和添加新的区块。
但是在那之前,返回到 query 程序,更改 evaluateTransaction 的请求来查询 CAR4 。 query 程序现在看起来应该是这个样子:
const result = await contract.evaluateTransaction('queryCar', 'CAR4');
保存程序,然后返回到 fabcar/javascript 目录。现在,再次运行 query 程序:
node query.js
你应该会看到如下:
Wallet path: ...fabric-samples/fabcar/javascript/wallet
Transaction has been evaluated, result is:
{"color":"black","docType":"car","make":"Tesla","model":"S","owner":"Adriana"}
如果你回头去看一下 queryAllCars 的交易结果,你会看到 CAR4 是 Adriana 的黑色 Tesla model S,也就是这里返回的结果。
我们可以使用 queryCar 交易来查询任意汽车,使用它的键 (比如 CAR0 )得到车辆的制造商、型号、颜色和车主等相关信息。
很棒。现在你应该已经了解了智能合约中基础的查询交易,也手动修改了查询程序中的参数。
账本更新时间。。。
更新账本
现在我们已经完成一些账本的查询和添加了一些代码,我们已经准备好更新账本了。有很多的更新操作我们可以做,但是我们从创建一个 新 车开始。
从一个应用程序的角度来说,更新一个账本很简单。应用程序向区块链网络提交一个交易,当交易被验证和提交后,应用程序会收到一个交易成功的提醒。但是在底层,区块链网络中各组件中不同的 共识 程序协同工作,来保证账本的每一个更新提案都是合法的,而且有一个大家一致认可的顺序。
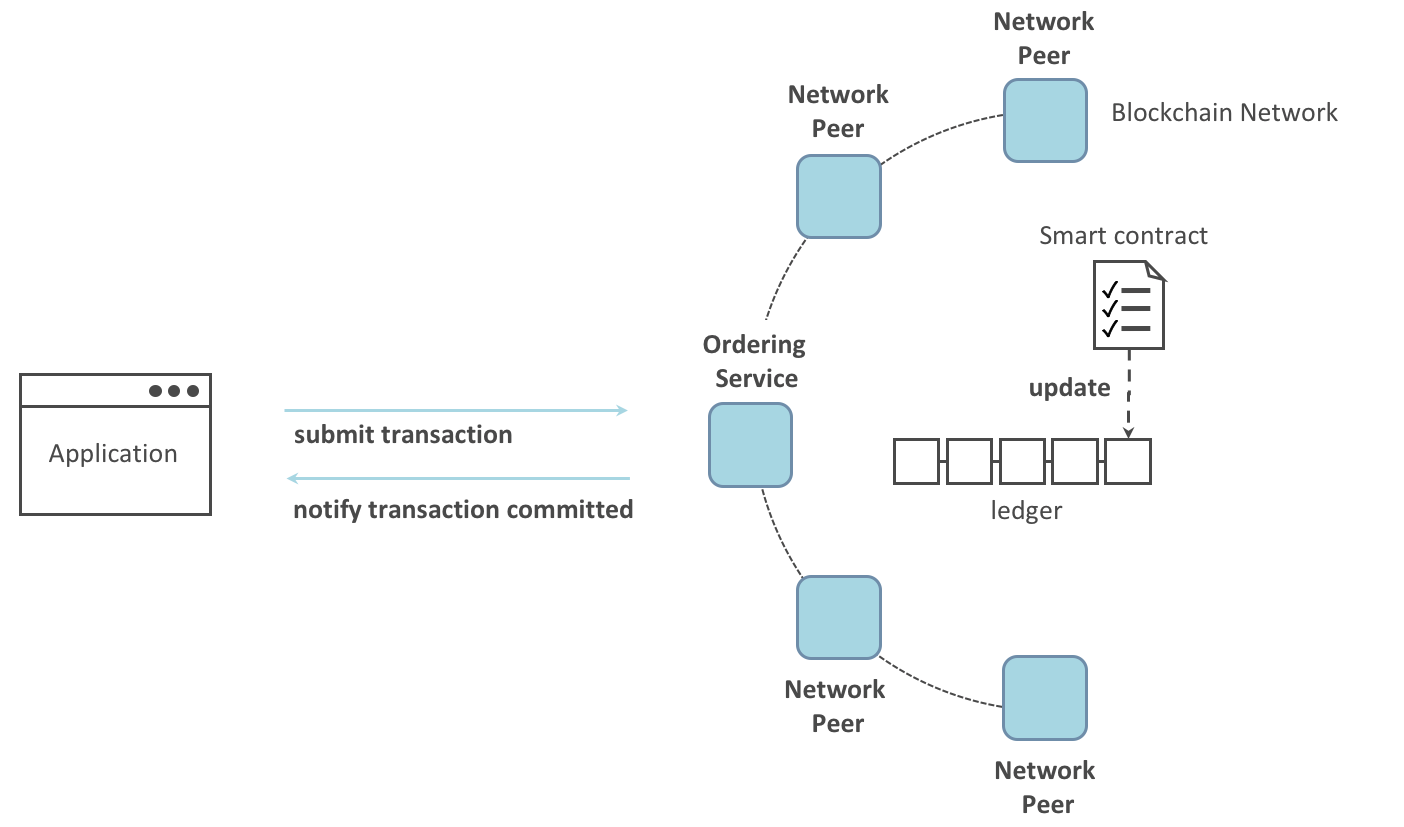
上图中,我们可以看到完成这项工作的主要组件。同时,多个节点中每一个节点都拥有一份账本的副本,并可选的拥有一份智能合约的副本,网络中也有一个排序服务。排序服务保证网络中交易的一致性;它也将连接到网络中不同的应用程序的交易以定义好的顺序生成区块。
我们对账本的的第一个更新是创建一辆新车。我们有一个单独的程序叫做 invoke.js ,用来更新账本。和查询一样,使用一个编辑器打开程序定位到我们构建和提交交易到网络的代码段:
await contract.submitTransaction('createCar', 'CAR12', 'Honda', 'Accord', 'Black', 'Tom');
看一下应用程序如何调用智能合约的交易 createCar 来创建一量车主为 Tom 的黑色 Honda Accord 汽车。我们使用 CAR12 作为这里的键,这也说明了我们不必使用连续的键。
保存并运行程序:
node invoke.js
如果执行成功,你将看到类似输出:
Wallet path: ...fabric-samples/fabcar/javascript/wallet
Transaction has been submitted
注意 inovke 程序是怎样使用 submitTransaction API 和区块链网络交互的,而不是 evaluateTransaction 。
await contract.submitTransaction('createCar', 'CAR12', 'Honda', 'Accord', 'Black', 'Tom');
submitTransaction 比 evaluateTransaction 更加复杂。除了跟一个单独的 peer 进行互动外,SDK 会将 submitTransaction 提案发送给在区块链网络中的每个需要的组织的 peer。其中的每个 peer 将会使用这个提案来执行被请求的智能合约,以此来产生一个建议的回复,它会为这个回复签名并将其返回给 SDK。SDK 搜集所有签过名的交易反馈到一个单独的交易中,这个交易会被发送给排序节点。排序节点从每个应用程序那里搜集并将交易排序,然后打包进一个交易的区块中。接下来它会将这些区块分发给网络中的每个 peer,在那里每笔交易会被验证并提交。最后,SDK 会被通知,这允许它能够将控制返回给应用程序。
注解
submitTransaction 也包含一个监听者,它会检查来确保交易被验证并提交到账本中。应用程序应该使用一个提交监听者,或者使用像 submitTransaction 这样的 API 来给你做这件事情。如果不做这个,你的交易就可能没有被成功地排序、验证以及提交到账本。
应用程序中的这些工作由 submitTransaction 完成!应用程序、智能合约、节点和排序服务一起工作来保证网络中账本一致性的程序被称为共识,它的详细解释在这里 section 。
为了查看这个被写入账本的交易,返回到 query.js 并将参数 CAR4 更改为 CAR12 。
就是说,将:
const result = await contract.evaluateTransaction('queryCar', 'CAR4');
改为:
const result = await contract.evaluateTransaction('queryCar', 'CAR12');
再次保存,然后查询:
node query.js
应该返回这些:
Wallet path: ...fabric-samples/fabcar/javascript/wallet
Transaction has been evaluated, result is:
{"color":"Black","docType":"car","make":"Honda","model":"Accord","owner":"Tom"}
恭喜。你创建了一辆汽车并验证了它记录在账本上!
现在我们已经完成了,我们假设 Tom 很大方,想把他的 Honda Accord 送给一个叫 Dave 的人。
为了完成这个,返回到 invoke.js 然后利用输入的参数,将智能合约的交易从 createCar 改为 changeCarOwner :
await contract.submitTransaction('changeCarOwner', 'CAR12', 'Dave');
第一个参数 CAR12 表示将要易主的车。第二个参数 Dave 表示车的新主人。
再次保存并执行程序:
node invoke.js
现在我们来再次查询账本,以确定 Dave 和 CAR12 键已经关联起来了:
node query.js
将返回如下结果:
Wallet path: ...fabric-samples/fabcar/javascript/wallet
Transaction has been evaluated, result is:
{"color":"Black","docType":"car","make":"Honda","model":"Accord","owner":"Dave"}
CAR12 的主人已经从 Tom 变成了 Dave。
Wallet path: …fabric-samples/fabcar/javascript/wallet Transaction has been evaluated, result is: {“color”:”Black”,”docType”:”car”,”make”:”Honda”,”model”:”Accord”,”owner”:”Tom”}
注解
在真实世界中的一个应用程序里,智能合约应该有一些访问控制逻辑。比如,只有某些有权限的用户能够创建新车,并且只有车辆的拥有者才能够将车辆交换给其他人。
Clean up
When you are finished using the FabCar sample, you can bring down the test
network using networkDown.sh script.
./networkDown.sh
This command will bring down the CAs, peers, and ordering node of the network
that we created. It will also remove the admin and appUser crypto material stored
in the wallet directory. Note that all of the data on the ledger will be lost.
If you want to go through the tutorial again, you will start from a clean initial state.
总结
现在我们完成了一些查询和跟新,你应该已经比较了解如何通过智能合约和区块链网络进行交互来查询和更新账本。我们已经看过了查询和更新的基本角智能合约、API 和 SDK ,你也应该对如何在其他的商业场景和操作中使用不同应用有了一些认识。
商业票据教程
受众: 架构师,应用和智能合约开发者,管理员
本教程将向你展示如何安装和使用商业票据样例应用程序和智能合约。该主题是以任务为导向的, 因此它更侧重的是流程而不是概念。如果你想更深入地了解这些概念,可以阅读开发应用程序主题。
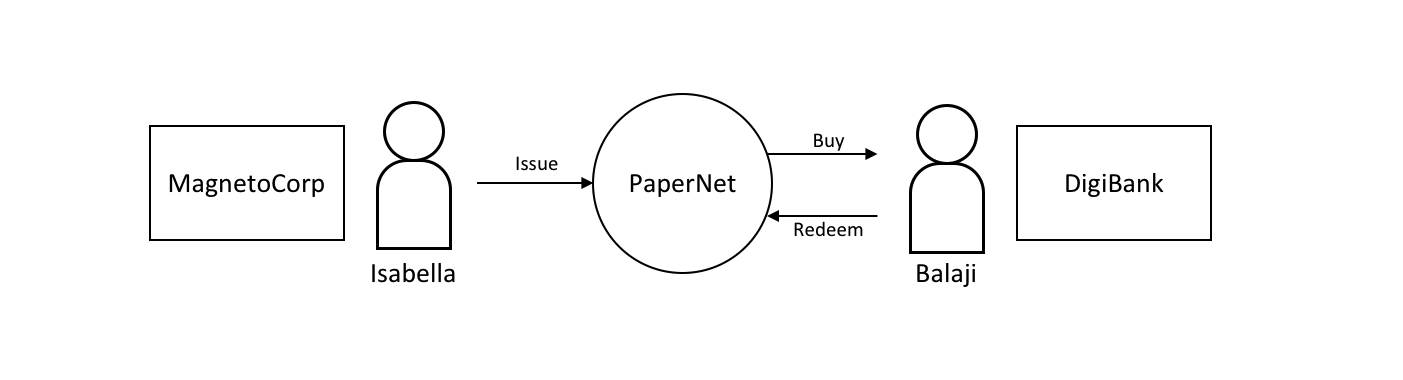 在本教程中,MagnetoCorp 和 DigiBank 这两个组织使用 Hyperledger Fabric 区块链网络 PaperNet 相互交易商业票据。
一旦建立了一个基本的网络,你就将扮演 MagnetoCorp 的员工 Isabella,她将代表公司发行商业票据。然后,你将转换角色,担任 DigiBank 的员工 Balaji,他将购买此商业票据,持有一段时间,然后向 MagnetoCorp 兑换该商业票据,以获取小额利润。
你将扮演开发人员,最终用户和管理员,这些角色位于不同组织中,都将执行以下步骤,这些步骤旨在帮助你了解作为两个不同组织独立工作但要根据Hyperledger Fabric 网络中双方共同商定的规则来进行协作是什么感觉。
- 环境配置 和 下载示例
- Create the network
- Examine the commercial paper smart contract
- Deploy the smart contract to the channel by approving the chaincode definition as MagnetoCorp and Digibank.
- Understand the structure of a MagnetoCorp application, including its dependencies
- Configure and use a wallet and identities
- Run a MagnetoCorp application to issue a commercial paper
- Understand how DigiBank uses the smart contract in their applications
- As Digibank, run applications that buy and redeem commercial paper
本教程已经在 MacOS 和 Ubuntu 上进行了测试,应该可以在其他 Linux 发行版上运行。Windows版本的教程正在开发中。
准备阶段
在开始之前,你必须安装本教程所需的一些必备工具。我们将必备工具控制在最低限度,以便你能快速开始。
你必须安装以下软件:
- Node The Node.js SDK README contains the up to date list of prerequisites.
你会发现安装以下软件很有帮助:
源码编辑器,如 Visual Studio Code 版本 1.28,或更高版本。VS Code 将会帮助你开发和测试你的应用程序和智能合约。安装 VS Code 看这里。
许多优秀的代码编辑器都可以使用,包括 Atom, Sublime Text 和 Brackets。
你可能会发现,随着你在应用程序和智能合约开发方面的经验越来越丰富,安装以下软件会很有帮助。首次运行教程时无需安装这些:
- Node Version Manager。NVM 帮助你轻松切换不同版本的 node——如果你同时处理多个项目的话,那将非常有用。安装 NVM 看这里。
下载示例
The commercial paper tutorial is one of the samples in the fabric-samples
repository. Before you begin this tutorial, ensure that you have followed the
instructions to install the Fabric Prerequisites and
Download the Samples, Binaries and Docker Images.
When you are finished, you will have cloned the fabric-samples repository that
contains the tutorial scripts, smart contract, and application files.
 Download the
fabric-samples GitHub repository to your local machine.
After downloading, feel free to examine the directory structure of fabric-samples:
$ cd fabric-samples
$ ls

CODEOWNERS              SECURITY.md                 first-network
CODE_OF_CONDUCT.md      chaincode                   high-throughput
CONTRIBUTING.md         chaincode-docker-devmode    interest_rate_swaps
LICENSE                 ci                          off_chain_data
MAINTAINERS.md          commercial-paper            test-network
README.md               fabcar
注意 commercial-paper 目录,我们的示例就在这里!
现在你已经完成了教程的第一个阶段!随着你继续操作,你将为不同用户和组件打开多个命令窗口。例如:
- To show peer, orderer and CA log output from your network.
- To approve the chaincode as an administrator from MagnetoCorp and as an administrator from DigiBank.
- To run applications on behalf of Isabella and Balaji, who will use the smart contract to trade commercial paper with each other.
当你应该从特定命令窗口运行一项命令时,我们将详细说明这一点。例如:
(isabella)$ ls
这表示你应该在 Isabella 的窗口中执行 ls 命令。
创建网络
This tutorial will deploy a smart contract using the Fabric test network.
The test network consists of two peer organizations and one ordering organization.
The two peer organizations operate one peer each, while the ordering organization
operates a single node Raft ordering service. We will also use the test network
to create a single channel named mychannel that both peer organizations
will be members of.
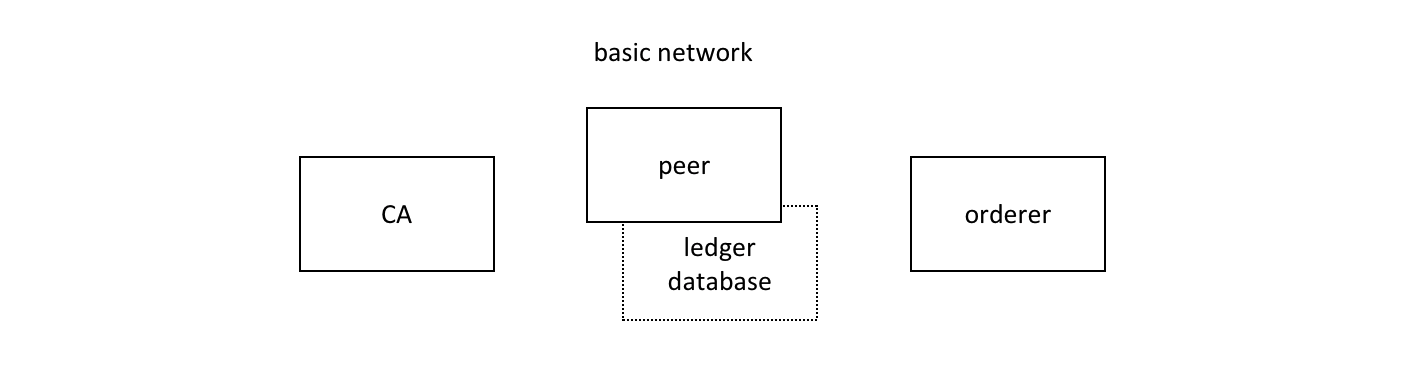 The Hyperledger Fabric 基础网络的组成部分包括一个节点及该节点的账本数据库,一个排序服务和一个证书授权中心。以上每个组件都在一个 Docker 容器中运行。
Each organization runs their own Certificate Authority. The two peers, the state databases, the ordering service node, and each organization CA each run in their own Docker container. In production environments, organizations typically use existing CAs that are shared with other systems; they’re not dedicated to the Fabric network.
The two organizations of the test network allow us to interact with a blockchain ledger as two organizations that operate separate peers. In this tutorial, we will operate Org1 of the test network as DigiBank and Org2 as MagnetoCorp.
You can start the test network and create the channel with a script provided in
the commercial paper directory. Change to the commercial-paper directory in
the fabric-samples:
cd fabric-samples/commercial-paper
Then use the script to start the test network:
./network-starter.sh
While the script is running, you will see logs of the test network being deployed.
When the script is complete, you can use the docker ps command to see the
Fabric nodes running on your local machine:
$ docker ps

CONTAINER ID        IMAGE                               COMMAND                  CREATED              STATUS              PORTS                                        NAMES
a86f50ca1907        hyperledger/fabric-peer:latest      "peer node start"        About a minute ago   Up About a minute   7051/tcp, 0.0.0.0:9051->9051/tcp             peer0.org2.example.com
77d0fcaee61b        hyperledger/fabric-peer:latest      "peer node start"        About a minute ago   Up About a minute   0.0.0.0:7051->7051/tcp                       peer0.org1.example.com
7eb5f64bfe5f        hyperledger/fabric-couchdb          "tini -- /docker-ent…"   About a minute ago   Up About a minute   4369/tcp, 9100/tcp, 0.0.0.0:5984->5984/tcp   couchdb0
2438df719f57        hyperledger/fabric-couchdb          "tini -- /docker-ent…"   About a minute ago   Up About a minute   4369/tcp, 9100/tcp, 0.0.0.0:7984->5984/tcp   couchdb1
03373d116c5a        hyperledger/fabric-orderer:latest   "orderer"                About a minute ago   Up About a minute   0.0.0.0:7050->7050/tcp                       orderer.example.com
6b4d87f65909        hyperledger/fabric-ca:latest        "sh -c 'fabric-ca-se…"   About a minute ago   Up About a minute   7054/tcp, 0.0.0.0:8054->8054/tcp             ca_org2
7b01f5454832        hyperledger/fabric-ca:latest        "sh -c 'fabric-ca-se…"   About a minute ago   Up About a minute   7054/tcp, 0.0.0.0:9054->9054/tcp             ca_orderer
87aef6062f23        hyperledger/fabric-ca:latest        "sh -c 'fabric-ca-se…"   About a minute ago   Up About a minute   0.0.0.0:7054->7054/tcp                       ca_org1
看看你是否可以将这些容器映射到基本网络上(可能需要横向移动才能找到信息):
- The Org1 peer,
peer0.org1.example.com, is running in containera86f50ca1907 - The Org2 peer,
peer0.org2.example.com, is running in container77d0fcaee61b - The CouchDB database for the Org1 peer,
couchdb0, is running in container7eb5f64bfe5f - The CouchDB database for the Org2 peer,
couchdb1, is running in container2438df719f57 - The Ordering node,
orderer.example.com, is running in container03373d116c5a - The Org1 CA,
ca_org1, is running in container87aef6062f23 - The Org2 CA,
ca_org2, is running in container6b4d87f65909 - The Ordering Org CA,
ca_orderer, is running in container7b01f5454832
所有这些容器构成了被称作 net_test 的 docker 网络。你可以使用 docker network 命令查看该网络:
$ docker network inspect net_test

  [
      {
          "Name": "net_test",
          "Id": "f4c9712139311004b8f7acc14e9f90170c5dcfd8cdd06303c7b074624b44dc9f",
          "Created": "2020-04-28T22:45:38.525016Z",
          "Containers": {
              "03373d116c5abf2ca94f6f00df98bb74f89037f511d6490de4a217ed8b6fbcd0": {
                  "Name": "orderer.example.com",
                  "EndpointID": "0eed871a2aaf9a5dbcf7896aa3c0f53cc61f57b3417d36c56747033fd9f81972",
                  "MacAddress": "02:42:c0:a8:70:05",
                  "IPv4Address": "192.168.112.5/20",
                  "IPv6Address": ""
              },
              "2438df719f57a597de592cfc76db30013adfdcfa0cec5b375f6b7259f67baff8": {
                  "Name": "couchdb1",
                  "EndpointID": "52527fb450a7c80ea509cb571d18e2196a95c630d0f41913de8ed5abbd68993d",
                  "MacAddress": "02:42:c0:a8:70:06",
                  "IPv4Address": "192.168.112.6/20",
                  "IPv6Address": ""
              },
              "6b4d87f65909afd335d7acfe6d79308d6e4b27441b25a829379516e4c7335b88": {
                  "Name": "ca_org2",
                  "EndpointID": "1cc322a995880d76e1dd1f37ddf9c43f86997156124d4ecbb0eba9f833218407",
                  "MacAddress": "02:42:c0:a8:70:04",
                  "IPv4Address": "192.168.112.4/20",
                  "IPv6Address": ""
              },
              "77d0fcaee61b8fff43d33331073ab9ce36561a90370b9ef3f77c663c8434e642": {
                  "Name": "peer0.org1.example.com",
                  "EndpointID": "05d0d34569eee412e28313ba7ee06875a68408257dc47e64c0f4f5ef4a9dc491",
                  "MacAddress": "02:42:c0:a8:70:08",
                  "IPv4Address": "192.168.112.8/20",
                  "IPv6Address": ""
              },
              "7b01f5454832984fcd9650f05b4affce97319f661710705e6381dfb76cd99fdb": {
                  "Name": "ca_orderer",
                  "EndpointID": "057390288a424f49d6e9d6f788049b1e18aa28bccd56d860b2be8ceb8173ef74",
                  "MacAddress": "02:42:c0:a8:70:02",
                  "IPv4Address": "192.168.112.2/20",
                  "IPv6Address": ""
              },
              "7eb5f64bfe5f20701aae8a6660815c4e3a81c3834b71f9e59a62fb99bed1afc7": {
                  "Name": "couchdb0",
                  "EndpointID": "bfe740be15ec9dab7baf3806964e6b1f0b67032ce1b7ae26ac7844a1b422ddc4",
                  "MacAddress": "02:42:c0:a8:70:07",
                  "IPv4Address": "192.168.112.7/20",
                  "IPv6Address": ""
              },
              "87aef6062f2324889074cda80fec8fe014d844e10085827f380a91eea4ccdd74": {
                  "Name": "ca_org1",
                  "EndpointID": "a740090d33ca94dd7c6aaf14a79e1cb35109b549ee291c80195beccc901b16b7",
                  "MacAddress": "02:42:c0:a8:70:03",
                  "IPv4Address": "192.168.112.3/20",
                  "IPv6Address": ""
              },
              "a86f50ca19079f59552e8674932edd02f7f9af93ded14db3b4c404fd6b1abe9c": {
                  "Name": "peer0.org2.example.com",
                  "EndpointID": "6e56772b4783b1879a06f86901786fed1c307966b72475ce4631405ba8bca79a",
                  "MacAddress": "02:42:c0:a8:70:09",
                  "IPv4Address": "192.168.112.9/20",
                  "IPv6Address": ""
              }
          },
          "Options": {},
          "Labels": {}
      }
  ]
看看这八个容器如何在作为单个 Docker 网络一部分的同时使用不同的 IP 地址。(为了清晰起见,我们对输出进行了缩写。)
Because we are operating the test network as DigiBank and MagnetoCorp,
peer0.org1.example.com will belong to the DigiBank organization while
peer0.org2.example.com will be operated by MagnetoCorp. Now that the test
network is up and running, we can refer to our network as PaperNet from this point
forward.
回顾一下: 你已经从 GitHub 下载了 Hyperledger Fabric 示例仓库,并且已经在本地机器上运行了基本的网络。现在让我们开始扮演 MagnetoCorp 的角色来交易商业票据。
以 MagnetoCorp 的身份管理网络
The commercial paper tutorial allows you to act as two organizations by
providing two separate folders for DigiBank and MagnetoCorp. The two folders
contain the smart contracts and application files for each organization. Because
the two organizations have different roles in the trading of the commercial paper,
the application files are different for each organization. Open a new window in
the fabric-samples repository and use the following command to change into
the MagnetoCorp directory:
cd commercial-paper/organization/magnetocorp
我们要做的第一件事就是以 MagnetoCorp 的角色监控 PaperNet 网络中的组件。管理员可以使用 logspout 工具 。该工具可以将不同输出流采集到一个地方,从而在一个窗口中就可以轻松看到正在发生的事情。比如,对于正在安装智能合约的管理员或者正在调用智能合约的开发人员来说,这个工具确实很有帮助。
In the MagnetoCorp directory, run the following command to run the
monitordocker.sh script and start the logspout tool for the containers
associated with PaperNet running on net_test:
(magnetocorp admin)$ ./configuration/cli/monitordocker.sh net_test
...
latest: Pulling from gliderlabs/logspout
4fe2ade4980c: Pull complete
decca452f519: Pull complete
(...)
Starting monitoring on all containers on the network net_test
b7f3586e5d0233de5a454df369b8eadab0613886fc9877529587345fc01a3582
注意,如果 monitordocker.sh 中的默认端口已经在使用,你可以传入一个端口号。
(magnetocorp admin)$ ./monitordocker.sh net_test <port_number>
This window will now show output from the Docker containers for the remainder of the tutorial, so go ahead and open another command window. The next thing we will do is examine the smart contract that MagnetoCorp will use to issue to the commercial paper.
Examine the commercial paper smart contract
issue, buy 和 redeem 是 PaperNet 智能合约的三个核心功能。应用程序使用这些功能来提交交易,相应地,在账本上会发行、购买和赎回商业票据。我们接下来的任务就是检查这个智能合约。
打开一个新的终端窗口来代表 MagnetoCorp 开发人员。
cd commercial-paper/organization/magnetocorp
You can then view the smart contract in the contract directory using your chosen
editor (VS Code in this tutorial):
(magnetocorp developer)$ code contract
在这个文件夹的 lib 目录下,你将看到 papercontract.js 文件,其中包含了商业票据智能合约!
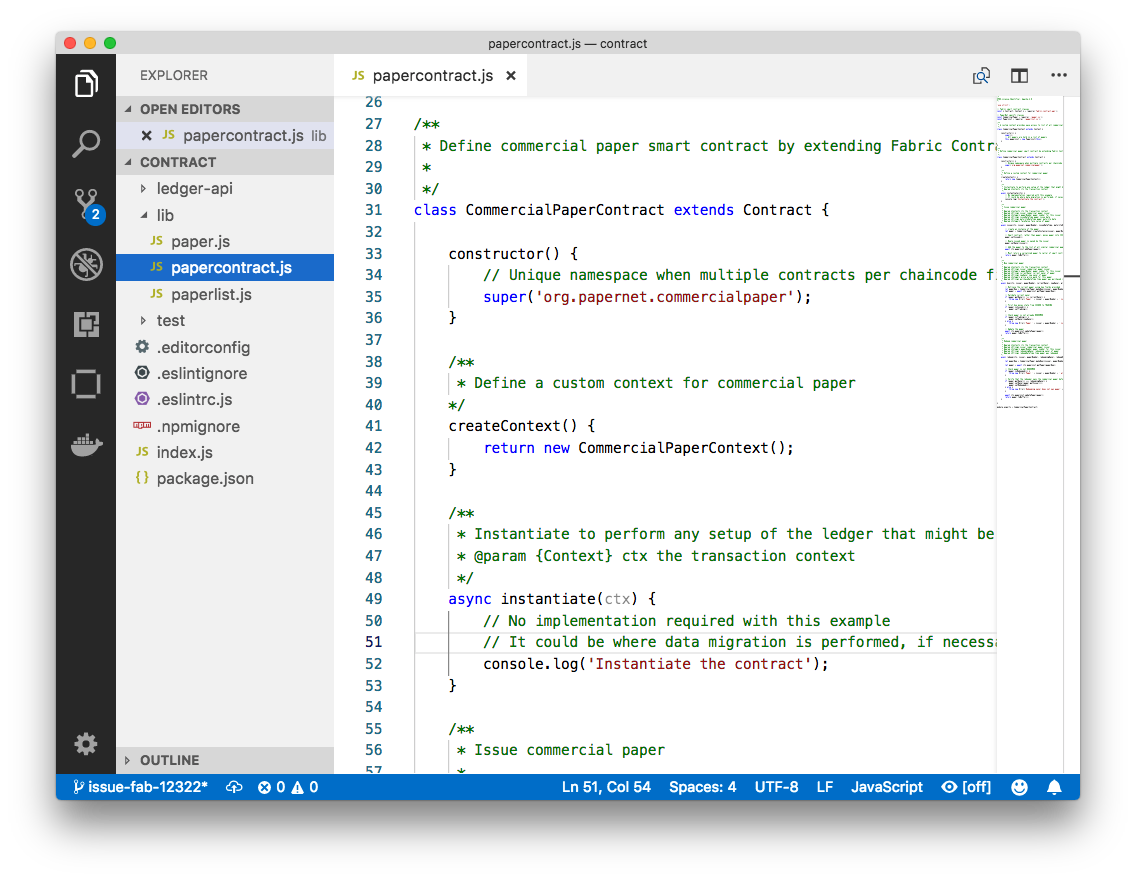 一个示例代码编辑器在
 papercontract.js 文件中展示商业票据智能合约
papercontract.js 是一个在 Node.js 环境中运行的 JavaScript 程序。注意下面的关键程序行:
const { Contract, Context } = require('fabric-contract-api');这个语句引入了两个关键的 Hyperledger Fabric 类:
Contract和Context,它们被智能合约广泛使用。你可以在fabric-shimJSDOCS 中了解到这些类的更多信息。class CommercialPaperContract extends Contract {这里基于内置的 Fabric
Contract类定义了智能合约类CommercialPaperContract。实现了issue,buy和redeem商业票据关键交易的方法被定义在该类中。async issue(ctx, issuer, paperNumber, issueDateTime, maturityDateTime...) {这个方法为 PaperNet 定义了商业票据
issue交易。传入的参数用于创建新的商业票据。找到并检查智能合约内的
buy和redeem交易。let paper = CommercialPaper.createInstance(issuer, paperNumber, issueDateTime...);在
issue交易内部,这个语句根据提供的交易输入使用CommercialPaper类在内存中创建了一个新的商业票据。检查buy和redeem交易看如何类似地使用该类。await ctx.paperList.addPaper(paper);这个语句使用
ctx.paperList在账本上添加了新的商业票据,其中ctx.paperList是PaperList类的一个实例,当智能合约场景CommercialPaperContext被初始化时,就会创建出一个ctx.paperList。再次检查buy和redeem方法,以了解这些方法是如何使用这一类的。return paper;该语句返回一个二进制缓冲区,作为来自
issue交易的响应,供智能合约的调用者处理。
欢迎检查 contract 目录下的其他文件来理解智能合约是如何工作的,请仔细阅读智能合约处理主题中 papercontract.js 是如何设计的。
将智能合约部署到通道
Before papercontract can be invoked by applications, it must be installed onto
the appropriate peer nodes of the test network and then defined on the channel
using the Fabric chaincode lifecycle. The Fabric chaincode
lifecycle allows multiple organizations to agree to the parameters of a chaincode
before the chaincode is deployed to a channel. As a result, we need to install
and approve the chaincode as administrators of both MagnetoCorp and DigiBank.
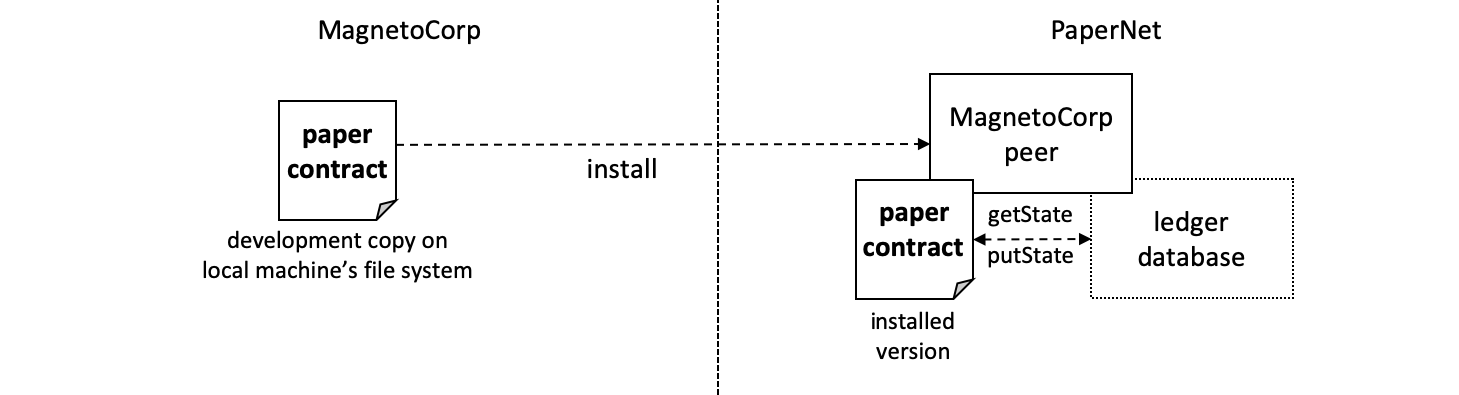 MagnetoCorp 的管理员将
 papercontract 的一个副本安装在 MagnetoCorp 的节点上。
智能合约是应用开发的重点,它被包含在一个名为链码的 Hyperledger Fabric 构件中。在一个链码中可以定义一个或多个智能合约,安装链码就使得 PaperNet 中的不同组织可以使用其中的智能合约。这意味着只有管理员需要关注链码;其他人都只需关注智能合约。
以 MagnetoCorp 的身份安装和批准智能合约
We will first install and approve the smart contract as the MagnetoCorp admin. Make
sure that you are operating from the magnetocorp folder, or navigate back to that
folder using the following command:
cd commercial-paper/organization/magnetocorp
A MagnetoCorp administrator can interact with PaperNet using the peer CLI. However,
the administrator needs to set certain environment variables in their command
window to use the correct set of peer binaries, send commands to the address
of the MagnetoCorp peer, and sign requests with the correct cryptographic material.
You can use a script provided by the sample to set the environment variables in
your command window. Run the following command in the magnetocorp directory:
source magnetocorp.sh
You will see the full list of environment variables printed in your window. We can now use this command window to interact with PaperNet as the MagnetoCorp administrator.
The first step is to install the papercontract smart contract. The smart
contract can be packaged into a chaincode using the
peer lifecycle chaincode package command. In the MagnetoCorp administrator’s
command window, run the following command to create the chaincode package:
(magnetocorp admin)$ peer lifecycle chaincode package cp.tar.gz --lang node --path ./contract --label cp_0
The MagnetoCorp admin can now install the chaincode on the MagnetoCorp peer using
the peer lifecycle chaincode install command:
(magnetocorp admin)$ peer lifecycle chaincode install cp.tar.gz
When the chaincode package is installed, you will see messages similar to the following printed in your terminal:
2020-01-30 18:32:33.762 EST [cli.lifecycle.chaincode] submitInstallProposal -> INFO 001 Installed remotely: response:<status:200 payload:"\nEcp_0:ffda93e26b183e231b7e9d5051e1ee7ca47fbf24f00a8376ec54120b1a2a335c\022\004cp_0" >
2020-01-30 18:32:33.762 EST [cli.lifecycle.chaincode] submitInstallProposal -> INFO 002 Chaincode code package identifier: cp_0:ffda93e26b183e231b7e9d5051e1ee7ca47fbf24f00a8376ec54120b1a2a335c
Because the MagnetoCorp admin has set CORE_PEER_ADDRESS=localhost:9051 to
target its commands to peer0.org2.example.com, the INFO 001 Installed remotely...
indicates that papercontract has been successfully installed on this peer.
After we install the smart contract, we need to approve the chaincode definition
for papercontract as MagnetoCorp. The first step is to find the packageID of
the chaincode we installed on our peer. We can query the packageID using the
peer lifecycle chaincode queryinstalled command:
peer lifecycle chaincode queryinstalled
The command will return the same package identifier as the install command. You should see output similar to the following:
Installed chaincodes on peer:
Package ID: cp_0:ffda93e26b183e231b7e9d5051e1ee7ca47fbf24f00a8376ec54120b1a2a335c, Label: cp_0
We will need the package ID in the next step, so we will save it as an environment variable. The package ID may not be the same for all users, so you need to complete this step using the package ID returned from your command window.
export PACKAGE_ID=cp_0:ffda93e26b183e231b7e9d5051e1ee7ca47fbf24f00a8376ec54120b1a2a335c
The admin can now approve the chaincode definition for MagnetoCorp using the
peer lifecycle chaincode approveformyorg command:
(magnetocorp admin)$ peer lifecycle chaincode approveformyorg --orderer localhost:7050 --ordererTLSHostnameOverride orderer.example.com --channelID mychannel --name papercontract -v 0 --package-id $PACKAGE_ID --sequence 1 --tls --cafile $ORDERER_CA
One of the most important chaincode parameters that channel members need to
agree to using the chaincode definition is the chaincode endorsement policy.
The endorsement policy describes the set of organizations that must endorse
(execute and sign) a transaction before it can be determined to be valid. By
approving the papercontract chaincode without the --policy flag, the
MagnetoCorp admin agrees to using the channel’s default Endorsement policy,
which in the case of the mychannel test channel requires a
majority of organizations on the channel to endorse a transaction. All transactions,
whether valid or invalid, will be recorded on the ledger blockchain,
but only valid transactions will update the world state.
以 DigiBank 的身份安装和批准智能合约
Based on the mychannel LifecycleEndorsement policy, the Fabric Chaincode lifecycle
will require a majority of organizations on the channel to agree to the chaincode
definition before the chaincode can be committed to the channel.
This implies that we need to approve the papernet chaincode as both MagnetoCorp
and DigiBank to get the required majority of 2 out of 2. Open a new terminal
window in the fabric-samples and navigate to the folder that contains the
DigiBank smart contract and application files:
(digibank admin)$ cd commercial-paper/organization/digibank/
Use the script in the DigiBank folder to set the environment variables that will allow you to act as the DigiBank admin:
source digibank.sh
We can now install and approve papercontract as the DigiBank. Run the following
command to package the chaincode:
(digibank admin)$ peer lifecycle chaincode package cp.tar.gz --lang node --path ./contract --label cp_0
The admin can now install the chaincode on the DigiBank peer:
(digibank admin)$ peer lifecycle chaincode install cp.tar.gz
We then need to query and save the packageID of the chaincode that was just installed:
(digibank admin)$ peer lifecycle chaincode queryinstalled
Save the package ID as an environment variable. Complete this step using the package ID returned from your console.
export PACKAGE_ID=cp_0:ffda93e26b183e231b7e9d5051e1ee7ca47fbf24f00a8376ec54120b1a2a335c
The Digibank admin can now approve the chaincode definition of papercontract:
(digibank admin)$ peer lifecycle chaincode approveformyorg --orderer localhost:7050 --ordererTLSHostnameOverride orderer.example.com --channelID mychannel --name papercontract -v 0 --package-id $PACKAGE_ID --sequence 1 --tls --cafile $ORDERER_CA
将链码定义提交到通道
Now that DigiBank and MagnetoCorp have both approved the papernet chaincode, we
have the majority we need (2 out of 2) to commit the chaincode definition to the
channel. Once the chaincode is successfully defined on the channel, the
CommercialPaper smart contract inside the papercontract chaincode can be
invoked by client applications on the channel. Since either organization can
commit the chaincode to the channel, we will continue operating as the
DigiBank admin:
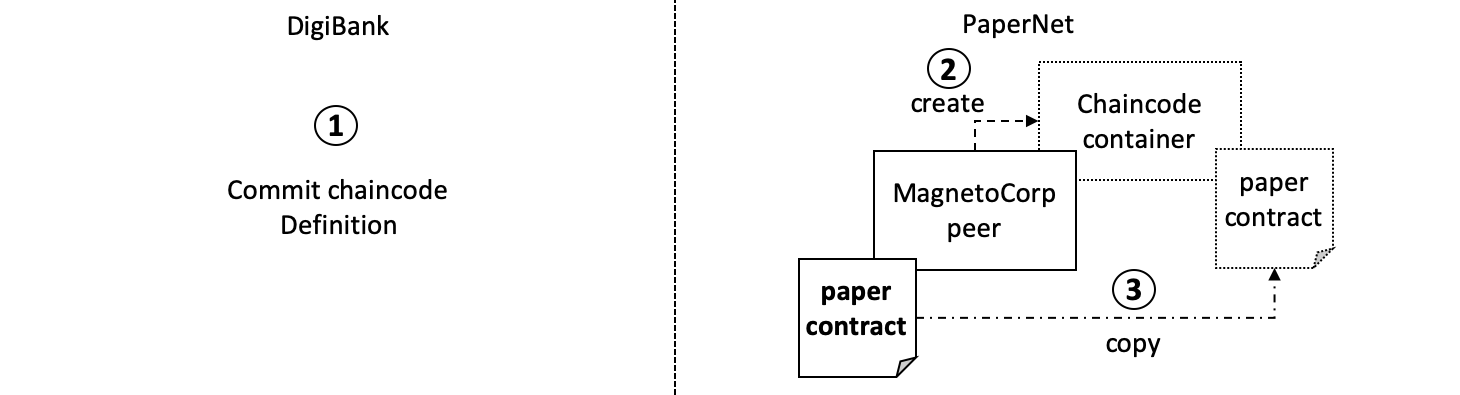 After the DigiBank administrator commits the definition of the
 papercontract chaincode to the channel, a new Docker chaincode container will be created to run papercontract on both PaperNet peers
The DigiBank administrator uses the peer lifecycle chaincode commit command
to commit the chaincode definition of papercontract to mychannel:
(digibank admin)$ peer lifecycle chaincode commit -o localhost:7050 --ordererTLSHostnameOverride orderer.example.com --peerAddresses localhost:7051 --tlsRootCertFiles ${PEER0_ORG1_CA} --peerAddresses localhost:9051 --tlsRootCertFiles ${PEER0_ORG2_CA} --channelID mychannel --name papercontract -v 0 --sequence 1 --tls --cafile $ORDERER_CA --waitForEvent
The chaincode container will start after the chaincode definition has been
committed to the channel. You can use the docker ps command to see
papercontract container starting on both peers.
(digibank admin)$ docker ps

CONTAINER ID        IMAGE                                                                                                                                                               COMMAND                  CREATED             STATUS              PORTS                                        NAMES
d4ba9dc9c55f        dev-peer0.org1.example.com-cp_0-ebef35e7f1f25eea1dcc6fcad5019477cd7f434c6a5dcaf4e81744e282903535-05cf67c20543ee1c24cf7dfe74abce99785374db15b3bc1de2da372700c25608   "docker-entrypoint.s…"   30 seconds ago      Up 28 seconds                                                    dev-peer0.org1.example.com-cp_0-ebef35e7f1f25eea1dcc6fcad5019477cd7f434c6a5dcaf4e81744e282903535
a944c0f8b6d6        dev-peer0.org2.example.com-cp_0-1487670371e56d107b5e980ce7f66172c89251ab21d484c7f988c02912ddeaec-1a147b6fd2a8bd2ae12db824fad8d08a811c30cc70bc5b6bc49a2cbebc2e71ee   "docker-entrypoint.s…"   31 seconds ago      Up 28 seconds                                                    dev-peer0.org2.example.com-cp_0-1487670371e56d107b5e980ce7f66172c89251ab21d484c7f988c02912ddeaec
Notice that the containers are named to indicate the peer that started it, and
the fact that it’s running papercontract version 0.
Now that we have deployed the papercontract chaincode to the channel, we can
use the MagnetoCorp application to issue the commercial paper. Let’s take a
moment to examine the application structure.
应用结构
包含在 papercontract 中的智能合约由 MagnetoCorp 的应用程序 issue.js 调用。Isabella 使用该程序向发行商业票据 00001 的账本提交一项交易。让我么来快速检验一下 issue 应用是怎么工作的。
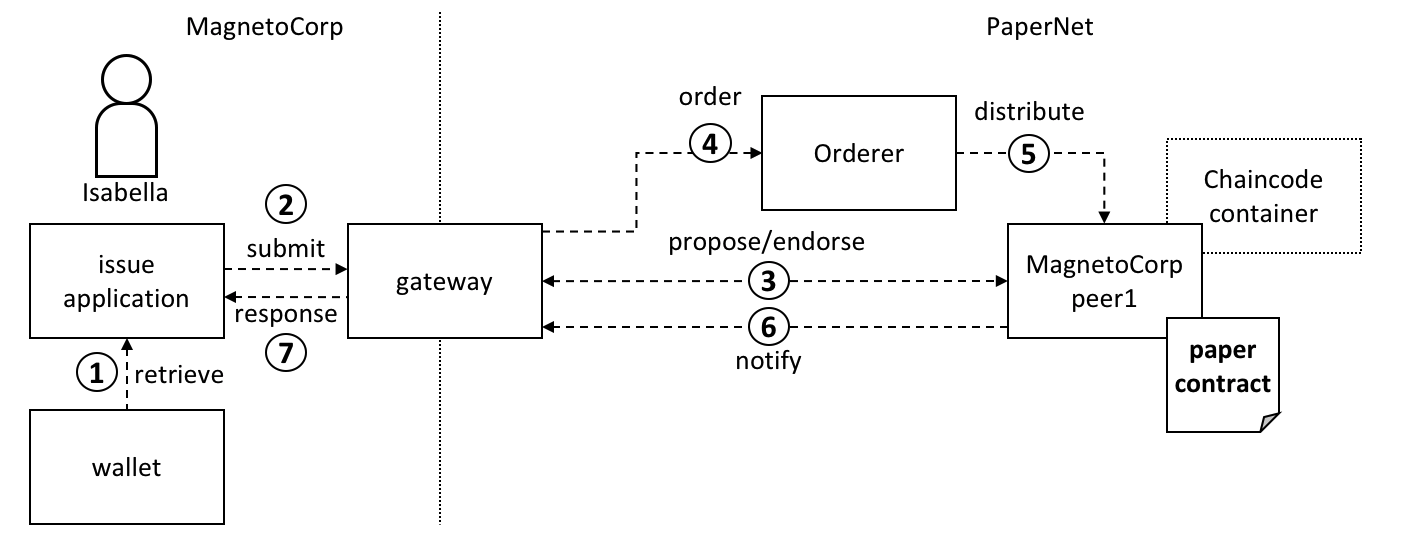 网关允许应用程序专注于交易的生成、提交和响应。它协调不同网络组件之间的交易提案、排序和通知处理。
issue 应用程序代表 Isabella 提交交易,它通过从 Isabella 的 钱包 中索取其 X.509 证书来开始运行,此证书可能储存在本地文件系统中或一个硬件安全模块 HSM 里。随后,issue 应用程序就能够利用网关在通道上提交交易。Hyperledger Fabric的软件开发包(SDK)提供了一个 gateway 抽象,因此应用程序在将网络交互托管给网关时能够专注于应用逻辑。网关和钱包使得编写 Hyperledger Fabric 应用程序变得很简单。
让我们来检验一下 Isabella 将要使用的 issue 应用程序,为其打开另一个终端窗口,在 fabric-samples 中找到 MagnetoCorp 的 /application 文件夹:
(isabella)$ cd commercial-paper/organization/magnetocorp/application/
(isabella)$ ls

enrollUser.js       issue.js        package.json
addToWallet.js 是 Isabella 将用来把自己的身份装进钱包的程序,而 issue.js 将使用这一身份通过调用 papercontract 来代表 MagnetoCorp 生成商业票据 00001。
切换至包含 MagnetoCorp 的 issue.js 应用程序副本的目录,并且使用你的代码编辑器检查此目录:
(isabella)$ cd commercial-paper/organization/magnetocorp/application
(isabella)$ code issue.js
检查该目录;目录包含了 issue 应用程序和其所有依赖项。
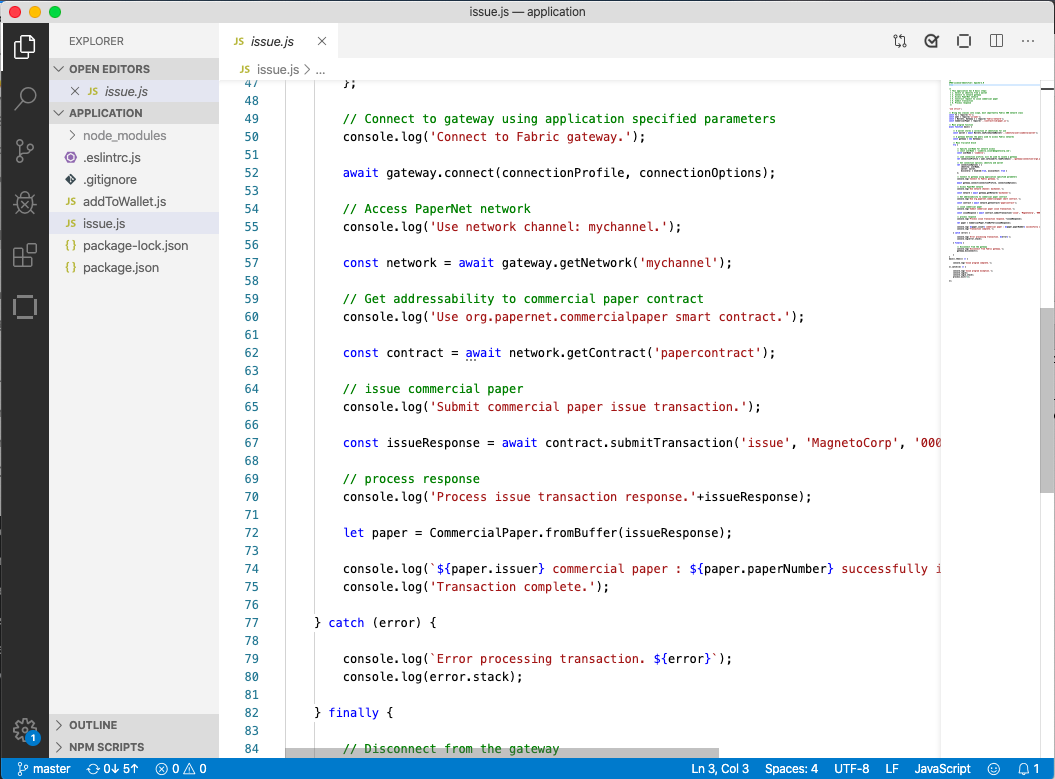 一个展示了商业票据应用程序目录内容的代码编辑器。
注意以下在 issue.js 中的关键程序行:
const { Wallets, Gateway } = require('fabric-network');该语句把两个关键的 Hyperledger Fabric 软件开发包(SDK)类引入了
Wallet和Gateway。const wallet = await Wallets.newFileSystemWallet('../identity/user/isabella/wallet');该语句表明了应用程序在连接到区块链网络通道上时将使用
Isabella钱包。因为 Isabella 的 X.509 证书位于本地文件系统中,所以应用程序创建了一个FileSystemWallet。应用程序会在isabella钱包中选择一个特定的身份。await gateway.connect(connectionProfile, connectionOptions);此行代码使用
connectionProfile识别的网关来连接到网络,使用ConnectionOptions当中引用的身份。看看
../gateway/networkConnection.yaml和User1@org1.example.com是如何分别被用于这些值的。const network = await gateway.getNetwork('mychannel');该语句是将应用程序连接到网络通道
mychannel上,papercontract之前就已经在该通道上部署过了。const contract = await network.getContract('papercontract');该语句是让应用程序可以访问由
papercontract中的org.papernet.commercialpaper命名空间定义的智能合约。一旦应用程序请求了 getContract,那么它就能提交任意在其内实现的交易。const issueResponse = await contract.submitTransaction('issue', 'MagnetoCorp', '00001', ...);该行代码是使用在智能合约中定义的
issue交易来向网络提交一项交易。MagnetoCorp,00001… 都是被issue交易用来生成一个新的商业票据的值。let paper = CommercialPaper.fromBuffer(issueResponse);此语句是处理
issue交易发来的响应。该响应需要从缓冲区被反序列化成paper,这是一个能够被应用程序准确解释的CommercialPaper对象。
欢迎检查 /application 目录下的其他文档来了解 issue.js 是如何工作的,并仔细阅读应用程序 主题 中关于如何实现 issue.js 的内容。
应用程序依赖
issue.js 应用程序是用 JavaScript 编写的,旨在作为 PaperNet 网络的客户端来在 node.js 环境中运行。按照惯例,会在多个网络外部的节点包上建立 MagnetoCorp 的应用程序,以此来提升开发的质量和速度。考虑一下 issue.js 是如何纳入 js-yaml
包 来处理 YAML 网关连接配置文件的,或者 issue.js 是如何纳入 fabric-network 包 来访问 Gateway 和 Wallet 类的:
const yaml = require('js-yaml');
const { Wallets, Gateway } = require('fabric-network');
需要使用 npm install 命令来将这些包装从 npm 下载到本地文件系统中。按照惯例,必须将包装安装进一个相对于应用程序的 /node_modules 目录中,以供运行时使用。
检查 package.json 文件来看看 issue.js 是如何通过识别包装来下载自己的准确版本的:
npm 版本控制功能非常强大;点击这里可以了解更多相关信息。
让我们使用 npm install 命令来安装这些包装,安装过程可能需要一分钟:
(isabella)$ cd commercial-paper/organization/magnetocorp/application/
(isabella)$ npm install

(           ) extract:lodash: sill extract ansi-styles@3.2.1
(...)
added 738 packages in 46.701s
看看这个命令是如何更新目录的:
(isabella)$ ls

enrollUser.js       node_modules            package.json
issue.js            package-lock.json
检查 node_modules 目录,查看已经安装的包。能看到很多已经安装了的包,这是因为 js-yaml 和 fabric-network 本身都被搭建在其他 npm 包中! package-lock.json 文件 能准确识别已安装的版本,如果你想用于生产环境的话,那么这一点对你来说就很重要。例如,测试、排查问题或者分发已验证的应用。
钱包
Isabella 马上就能够运行 issue.js 来发行 MagnetoCorp 商业票票据 00001 了;现在还剩最后一步!因为 issue.js 代表 Isabella,所以也就代表 MagnetoCorp, issue.js 将会使用 Isabella 钱包中反应以上事实的身份。现在我们需要执行这个一次性的活动,向 Isabella 的钱包中添 X.509 证书。
The MagnetoCorp Certificate Authority running on PaperNet, ca_org2, has an
application user that was registered when the network was deployed. Isabella
can use the identity name and secret to generate the X.509 cryptographic material
for the issue.js application. The process of using a CA to generate client side
cryptographic material is referred to as enrollment. In a real word scenario,
a network operator would provide the name and secret of a client identity that
was registered with the CA to an application developer. The developer would then
use the credentials to enroll their application and interact with the network.
The enrollUser.js program uses the fabric-ca-client class to generate a private
and public key pair, and then issues a Certificate Signing Request to the CA.
If the identiy name and secret submitted by Isabella match the credentials
registered with the CA, the CA will issue and sign a certificate that encodes the
public key, establishing that Isabella belongs to MagnetoCorp. When the signing
request is complete, enrollUser.js stores the private key and signing certificate
in Isabella’s wallet. You can examine the enrollUser.js file to learn more about
how the Node SDK uses the fabric-ca-client class to complete these tasks.
在 Isabella 的终端窗口中运行 addToWallet.js 程序来把身份信息添加到她的钱包中:
(isabella)$ node enrollUser.js

Wallet path: /Users/nikhilgupta/fabric-samples/commercial-paper/organization/magnetocorp/identity/user/isabella/wallet
Successfully enrolled client user "isabella" and imported it into the wallet
We can now turn our focus to the result of this program — the contents of the wallet which will be used to submit transactions to PaperNet:
(isabella)$ ls ../identity/user/isabella/wallet/

isabella.id
Isabella can store multiple identities in her wallet, though in our example, she
only uses one. The wallet folder contains an isabella.id file that provides
the information that Isabella needs to connect to the network. Other identities
used by Isabella would have their own file. You can open this file to see the
identity information that issue.js will use on behalf of Isabella inside a JSON
file. The output has been formatted for clarity.
(isabella)$  cat ../identity/user/isabella/wallet/*

{
  "credentials": {
    "certificate": "-----BEGIN CERTIFICATE-----\nMIICKTCCAdCgAwIBAgIQWKwvLG+sqeO3LwwQK6avZDAKBggqhkjOPQQDAjBzMQsw\nCQYDVQQGEwJVUzETMBEGA1UECBMKQ2FsaWZvcm5pYTEWMBQGA1UEBxMNU2FuIEZy\nYW5jaXNjbzEZMBcGA1UEChMQb3JnMi5leGFtcGxlLmNvbTEcMBoGA1UEAxMTY2Eu\nb3JnMi5leGFtcGxlLmNvbTAeFw0yMDAyMDQxOTA5MDBaFw0zMDAyMDExOTA5MDBa\nMGwxCzAJBgNVBAYTAlVTMRMwEQYDVQQIEwpDYWxpZm9ybmlhMRYwFAYDVQQHEw1T\nYW4gRnJhbmNpc2NvMQ8wDQYDVQQLEwZjbGllbnQxHzAdBgNVBAMMFlVzZXIxQG9y\nZzIuZXhhbXBsZS5jb20wWTATBgcqhkjOPQIBBggqhkjOPQMBBwNCAAT4TnTblx0k\ngfqX+NN7F76Me33VTq3K2NUWZRreoJzq6bAuvdDR+iFvVPKXbdORnVvRSATcXsYl\nt20yU7n/53dbo00wSzAOBgNVHQ8BAf8EBAMCB4AwDAYDVR0TAQH/BAIwADArBgNV\nHSMEJDAigCDOCdm4irsZFU3D6Hak4+84QRg1N43iwg8w1V6DRhgLyDAKBggqhkjO\nPQQDAgNHADBEAiBhzKix1KJcbUy9ey5ulWHRUMbqdVCNHe/mRtUdaJagIgIgYpbZ\nXf0CSiTXIWOJIsswN4Jp+ZxkJfFVmXndqKqz+VM=\n-----END CERTIFICATE-----\n",
    "privateKey": "-----BEGIN PRIVATE KEY-----\nMIGHAgEAMBMGByqGSM49AgEGCCqGSM49AwEHBG0wawIBAQQggs55vQg2oXi8gNi8\nNidE8Fy5zenohArDq3FGJD8cKU2hRANCAAT4TnTblx0kgfqX+NN7F76Me33VTq3K\n2NUWZRreoJzq6bAuvdDR+iFvVPKXbdORnVvRSATcXsYlt20yU7n/53db\n-----END PRIVATE KEY-----\n"
  },
  "mspId": "Org2MSP",
  "type": "X.509",
  "version": 1
}
In the file you can notice the following:
- a
"privateKey":used to sign transactions on Isabella’s behalf, but not distributed outside of her immediate control. - a
"certificate":which contains Isabella’s public key and other X.509 attributes added by the Certificate Authority at certificate creation. This certificate is distributed to the network so that different actors at different times can cryptographically verify information created by Isabella’s private key.
点击此处获取更多关于证书信息。在实践中,证书文档还包含一些 Fabric 专门的元数据,例如 Isabella 的组织和角色——在钱包主题阅读更多内容。
发行应用
Isabella 现在可以用 issue.js 来提交一项交易,该交易将发行 MagnetoCorp 商业票据 00001:
(isabella)$ node issue.js

Connect to Fabric gateway.
Use network channel: mychannel.
Use org.papernet.commercialpaper smart contract.
Submit commercial paper issue transaction.
Process issue transaction response.{"class":"org.papernet.commercialpaper","key":"\"MagnetoCorp\":\"00001\"","currentState":1,"issuer":"MagnetoCorp","paperNumber":"00001","issueDateTime":"2020-05-31","maturityDateTime":"2020-11-30","faceValue":"5000000","owner":"MagnetoCorp"}
MagnetoCorp commercial paper : 00001 successfully issued for value 5000000
Transaction complete.
Disconnect from Fabric gateway.
Issue program complete.
node 命令初始化一个 node.js 环境,并运行 issue.js。从程序输出我们能看到,系统发行了一张 MagnetoCorp 商业票据 00001,面值为 500 万美元。
如您所见,为实现这一点,应用程序调用了 papercontract.js 中 CommercialPaper 智能合约里定义的 issue 交易。MagnetoCorp 管理员已经在网络上安装并实例化了 CommercialPaper 智能合约。在世界状态里作为一个矢量状态来代表新的商业票据的是通过 Fabric 应用程序编码端口(API)来与账本交互的智能合约,其中最显著的 API 是 putState() 和 getState()。我们即将看到该矢量状态在随后是如何被 buy 和 redeem 交易来操作的,这两项交易同样也是定义在那个智能合约中。
潜在的 Fabric 软件开发包(SDK)一直都在处理交易的背书、排序和通知流程,使得应用程序的逻辑变得简单明了; SDK 用网关提取出网络细节信息和连接选项 ,以此来声明更先进的流程策略,如交易重试。
现在让我们将重点转换到 DigiBank(将购买商业票据),以遵循 MagnetoCorp 00001 的生命周期。
DigiBank应用
Balaji 使用 DigiBank 的 buy 应用程序来向账本提交一项交易,该账本将商业票据 00001 的所属权从 MagnetoCorp 转向 DigiBank。 CommercialPaper 智能合约与 MagnetoCorp 应用程序使用的相同,但是此次的交易不同,是 buy 交易而不是 issue 交易。让我们检查一下 DigiBank 的应用程序是怎样工作的。
为 Balaji 打开另一个终端窗口。 在 fabric-samples 中,切换到包含 buy.js 应用程序的 DigiBank 应用程序目录,并用编辑器打开该目录:
(balaji)$ cd commercial-paper/organization/digibank/application/
(balaji)$ code buy.js
如你所见,该目录同时包含了 Balaji 将使用的 buy 和 redeem 应用程序 。
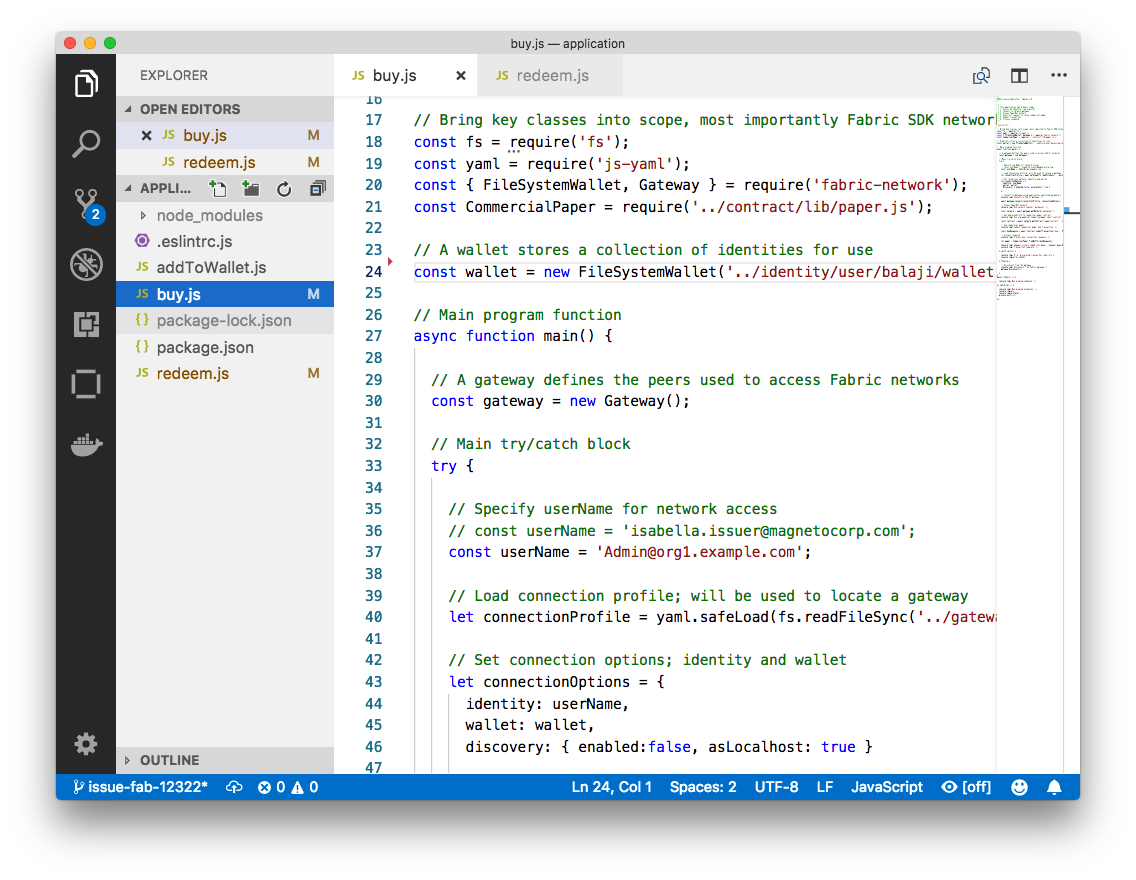 DigiBank 的商业票据目录包含
 buy.js 和 redeem.js 应用程序。
DigiBank 的 buy.js 应用程序在结构上与 MagnetoCorp的 issue.js 十分相似,但存在两个重要的差异:
身份:用户是 DigiBank 的用户
Balaji而不是 MagnetoCorp 的Isabellaconst wallet = await Wallets.newFileSystemWallet('../identity/user/balaji/wallet');
看看应用程序在连接到 PaperNet 网络上时是如何使用
balaji钱包的。buy.js在balaji钱包里选择一个特定的身份。交易:被调用的交易是
buy而不是issueconst buyResponse = await contract.submitTransaction('buy', 'MagnetoCorp', '00001', ...);
提交一项
buy交易,其值为MagnetoCorp,00001…,CommercialPaper智能合约类使用这些值来将商业票据00001的所属权转换成 DigiBank。
欢迎检查 application 目录下的其他文档来理解应用程序的工作原理,并仔细阅读应用程序主题中关于如何实现 buy.js 的内容。
以 DigiBank 的身份运行
负责购买和赎回商业票据的 DigiBank 应用程序的结构和 MagnetoCorp 的发行交易十分相似。所以,我们来安装这些应用程序 的依赖项,并搭建 Balaji 的钱包,这样一来,Balaji 就能使用这些应用程序购买和赎回商业票据。
和 MagnetoCorp 一样, Digibank 必须使用 npm install 命令来安装规定的应用包,同时,安装时间也很短。
在 DigiBank 管理员窗口安装应用程序依赖项:
(digibank admin)$ cd commercial-paper/organization/digibank/application/
(digibank admin)$ npm install

(            ) extract:lodash: sill extract ansi-styles@3.2.1
(...)
added 738 packages in 46.701s
在 Balaji 的终端窗口运行 addToWallet.js 程序,把身份信息添加到他的钱包中:
addToWallet.js 程序为 balaji 将其身份信息添加到他的钱包中, buy.js 和 redeem.js 将使用这些身份信息来向 PaperNet 提交交易。
(balaji)$ node enrollUser.js

Wallet path: /Users/nikhilgupta/fabric-samples/commercial-paper/organization/digibank/identity/user/balaji/wallet
Successfully enrolled client user "balaji" and imported it into the wallet
The addToWallet.js program has added identity information for balaji, to his
wallet, which will be used by buy.js and redeem.js to submit transactions to
PaperNet.
Like Isabella, Balaji can store multiple identities in his wallet, though in our
example, he only uses one. His corresponding id file at
digibank/identity/user/balaji/wallet/balaji.id is very similar Isabella’s —
feel free to examine it.
购买应用
Balaji 现在可以使用 buy.js 来提交一项交易,该交易将会把 MagnetoCorp 商业票据 00001 的所属权转换成 DigiBank。
在 Balaji 的窗口运行 buy 应用程序:
(balaji)$ node buy.js

Connect to Fabric gateway.
Use network channel: mychannel.
Use org.papernet.commercialpaper smart contract.
Submit commercial paper buy transaction.
Process buy transaction response.
MagnetoCorp commercial paper : 00001 successfully purchased by DigiBank
Transaction complete.
Disconnect from Fabric gateway.
Buy program complete.
你可看到程序输出为:Balaji 已经代表 DigiBank 成功购买了 MagnetoCorp 商业票据 00001。 buy.js 调用了 CommercialPaper 智能合约中定义的 buy 交易,该智能合约使用 Fabric 应用程序编程接口(API) putState() 和 getState() 在世界状态中更新了商业票据 00001 。如您所见,就智能合约的逻辑来说,购买和发行商业票据的应用程序逻辑彼此十分相似。
兑换应用
商业票据 00001 生命周期的最后一步交易是 DigiBank 从 MagnetoCorp 那里收回商业票据。Balaji 使用 redeem.js 提交一项交易来执行智能合约中的收回逻辑。
在Balaji的窗口运行 redeem 交易:
(balaji)$ node redeem.js

Connect to Fabric gateway.
Use network channel: mychannel.
Use org.papernet.commercialpaper smart contract.
Submit commercial paper redeem transaction.
Process redeem transaction response.
MagnetoCorp commercial paper : 00001 successfully redeemed with MagnetoCorp
Transaction complete.
Disconnect from Fabric gateway.
Redeem program complete.
同样地,看看当 redeem.js 调用了 CommercialPaper 中定义的 redeem 交易时,商业票据 00001 是如何被成功收回的。 redeem 交易在世界状态中更新了商业票据 00001 ,以此来反映商业票据的所属权又归回其发行方 MagnetoCorp。
Clean up
When you are finished using the Commercial Paper tutorial, you can use a script to clean up your environment. Use a command window to navigate back to the root directory of the commercial paper sample:
cd fabric-samples/commercial-paper
You can then bring down the network with the following command:
./network-clean.sh
This command will bring down the peers, CouchDB containers, and ordering node of the network, in addition to the logspout tool. It will also remove the identities that we created for Isabella and Balaji. Note that all of the data on the ledger will be lost. If you want to go through the tutorial again, you will start from a clean initial state.
在 Fabric 中使用私有数据
本教程将演示如何使用集合在区块链网络中授权的 Peer 节点上存储和检索私有数据。
本教程需要你已经掌握私有数据存储及其使用方法。更多信息,请查看 私有数据。
注解
本教程使用 Fabric-2.0 中新的链码生命管理周期操作。如果你想在之前的版本中使用私有数据,请参阅 v1.4 版本的教程`在 Fabric 中使用私有数据教程 <https://hyperledger-fabric.readthedocs.io/en/release-1.4/private_data_tutorial.html>`__.
本教程将会在 Fabric Building Your First Network (BYFN)教程网络中使用 弹珠私有数据示例 来演示如何创建、部署以及 使用私有数据合集。你应该先完成 fabric 的安装 安装示例、二进制和 Docker 镜像。
创建集合定义的 JSON 文件
在通道中使用私有数据的第一步是定义集合以决定私有数据的访问权限。
该集合的定义描述了谁可以保存数据,数据要分发给多少个节点,需要多少个节点来进行数据分发,以及私有数据在私有数据库中的保存时间。之后,我们将会展示链码的接口:PutPrivateData 和 GetPrivateData 将集合映射到私有数据以确保其安全。
集合定义由以下几个属性组成:
name: 集合的名称。policy: 定义了哪些组织中的 Peer 节点能够存储集合数据。requiredPeerCount: 私有数据要分发到的节点数,这是链码背书成功的条件之一。maxPeerCount: 为了数据冗余,当前背书节点将尝试向其他节点分发数据的数量。如果当前背书节点发生故障,其他的冗余节点可以承担私有数据查询的任务。blockToLive: 对于非常敏感的信息,比如价格或者个人信息,这个值代表书库可以在私有数据库中保存的时间。数据会在私有数据库中保存blockToLive个区块,之后就会被清除。如果要永久保留,将此值设置为0即可。memberOnlyRead: 设置为true时,节点会自动强制集合中定义的成员组织内的客户端对私有数据仅拥有只读权限。
为了说明私有数据的用法,弹珠私有数据示例包含两个私有数据集合定义:collectionMarbles和 和 collectionMarblePrivateDetails。collectionMarbles 定义中的 policy 属性允许通道的所有成员(Org1 和 Org2)在私有数据库中保存私有数据。collectionMarblesPrivateDetails 集合仅允许 Org1 的成员在其私有数据库中保存私有数据。
关于 policy 属性的更多相关信息,请查看 背书策略。
// collections_config.json

[
  {
       "name": "collectionMarbles",
       "policy": "OR('Org1MSP.member', 'Org2MSP.member')",
       "requiredPeerCount": 0,
       "maxPeerCount": 3,
       "blockToLive":1000000,
       "memberOnlyRead": true
  },

  {
       "name": "collectionMarblePrivateDetails",
       "policy": "OR('Org1MSP.member')",
       "requiredPeerCount": 0,
       "maxPeerCount": 3,
       "blockToLive":3,
       "memberOnlyRead": true
  }
]
由这些策略保护的数据将会在链码中映射出来,在本教程后半段将有说明。
当链码被使用 peer lifecycle chaincode commit 命令 提交到通道中时,集合定义文件也会被部署到通道中。更多信息请看下面的第三节。
使用链码 API 读写私有数据
接下来将通过在链码中构建数据定义来让您理解数据在通道中的私有化。弹珠私有数据示例将私有数据拆分为两个数据定义来进行数据权限控制。
// Peers in Org1 and Org2 will have this private data in a side database
type marble struct {
  ObjectType string `json:"docType"`
  Name       string `json:"name"`
  Color      string `json:"color"`
  Size       int    `json:"size"`
  Owner      string `json:"owner"`
}

// Only peers in Org1 will have this private data in a side database
type marblePrivateDetails struct {
  ObjectType string `json:"docType"`
  Name       string `json:"name"`
  Price      int    `json:"price"`
}
对私有数据的访问将遵循以下策略:
name, color, size, and owner通道中所有成员都可见(Org1 和 Org2)price仅对 Org1 中的成员可见
弹珠示例中有两个不同的私有数据定义。这些数据和限制访问权限的集合策略将由链码接口进行控制。具体来说,就是读取和写入带有集合定义的私有数据需要使用 GetPrivateData() 和 PutPrivateData() 接口,你可以在 这里 找到他们。
下图说明了弹珠私有数据示例中使用的私有数据模型。

读取集合数据
使用链码 API GetPrivateData() 在数据库中访问私有数据。 GetPrivateData() 有两个参数,集合名(collection name) 和 数据键(data key)。 重申一下,集合 collectionMarbles 允许 Org1 和 Org2 的成员在侧数据库中保存私有数据,集合 collectionMarblePrivateDetails 只允许 Org1 在侧数据库中保存私有数据。有关接口的实现详情请查看 弹珠私有数据方法 :
- readMarble 用来查询
name, color, size and owner这些属性- readMarblePrivateDetails 用来查询
price属性
下面教程中,使用 peer 命令查询数据库的时候,会使用这两个方法。
写入私有数据
使用链码接口 PutPrivateData() 将私有数据保存到私有数据库中。该接口需要集合名称。由于弹珠私有数据示例中包含两个不同的私有数据集,因此这个接口在链码中会被调用两次:
- 使用集合
collectionMarbles写入私有数据name, color, size 和 owner。 - 使用集合
collectionMarblePrivateDetails写入私有数据``price``。
例如,在链码的 initMarble 方法片段中,``PutPrivateData()`` 被调用了两次,每个私有数据调用一次。
// ==== Create marble object, marshal to JSON, and save to state ====
      marble := &marble{
              ObjectType: "marble",
              Name:       marbleInput.Name,
              Color:      marbleInput.Color,
              Size:       marbleInput.Size,
              Owner:      marbleInput.Owner,
      }
      marbleJSONasBytes, err := json.Marshal(marble)
      if err != nil {
              return shim.Error(err.Error())
      }

      // === Save marble to state ===
      err = stub.PutPrivateData("collectionMarbles", marbleInput.Name, marbleJSONasBytes)
      if err != nil {
              return shim.Error(err.Error())
      }

      // ==== Create marble private details object with price, marshal to JSON, and save to state ====
      marblePrivateDetails := &marblePrivateDetails{
              ObjectType: "marblePrivateDetails",
              Name:       marbleInput.Name,
              Price:      marbleInput.Price,
      }
      marblePrivateDetailsBytes, err := json.Marshal(marblePrivateDetails)
      if err != nil {
              return shim.Error(err.Error())
      }
      err = stub.PutPrivateData("collectionMarblePrivateDetails", marbleInput.Name, marblePrivateDetailsBytes)
      if err != nil {
              return shim.Error(err.Error())
      }
总结一下,在上边的 collection.json 中定义的策略,允许 Org1 和 Org2 中的所有成员都能在他们的私有数据库中对私有数据 name, color, size, owner 进行存储和交易。但是只有 Org1 中的成员才能够对 price 进行存储和交易。
数据私有化的另一个好处就是,使用集合时,只有私有数据的哈希值会通过排序节点, 而数据本身不会参与排序。这样就保证了私有数据对排序节点的保密性。
启动网络
现在我们准备使用一些命令来如何使用私有数据。
Try it yourself
在安装、定义和使用弹珠私有数据示例链码之前,我们需要启动 Fabric 测试网络。为了大家可以正确使用本教程,我们将从一个已知的初始化状态开始操作。接下来的命令将会停止你主机上所有正在运行的 Docker 容器,并会清除之前生成的构件。所以我们运行以下命令来清除之前的环境。
cd fabric-samples/test-network
./network.sh down
如果你之前没有运行过本教程,你需要在我们部署链码前下载链码所需的依赖。运行如下命令:
cd ../chaincode/marbles02_private/go
GO111MODULE=on go mod vendor
cd ../../../test-network
如果你之前已经运行过本教程,你也需要删除之前弹珠私有数据链码的 Docker 容器。运行如下命令:
docker rm -f $(docker ps -a | awk '($2 ~ /dev-peer.*.marblesp.*/) {print $1}')
docker rmi -f $(docker images | awk '($1 ~ /dev-peer.*.marblesp.*/) {print $3}')
在 test-network 目录中,你可以使用如下命令启动使用 CouchDB 的 Fabric 测试网络:
./network.sh up createChannel -s couchdb
这个命令将会部署一个 Fabric 网络,包括一个名为的通道 mychannel,两个组织(各拥有一个 Peer 节点),Peer 节点将使用 CouchDB 作为状态数据库。用默认的 LevelDB 和 CouchDB 都可以使用私有数据集合。我们选择 CouchDB 来演示如何使用私有数据的索引。
注解
为了保证私有数据集正常工作,需要正确地配置组织间的 gossip 通信。请参考文档 Gossip 数据传播协议,需要特别注意 “锚节点(anchor peers)” 章节。本教程不关注 gossip,它在测试网络中已经配置好了。但当我们配置通道的时候,gossip 的锚节点是否被正确配置影响到私有数据集能否正常工作。
安装并定义一个带集合的链码
客户端应用程序是通过链码与区块链账本进行数据交互的。因此我们需要在每个节点上安装链码,用他们来执行和背书我们的交易。然而,在我们与链码进行交互之前,通道中的成员需要一致同意链码的定义,以此来建立链码的治理,当然还包括链私有数据集合的定义。我们将要使用命令:peer lifecycle chaincode 打包、安装,以及在通道上定义链码。
链码安装到 Peer 节点之前需要先进行打包操作。我们可以用 peer lifecycle chaincode package 命令对弹珠链码进行打包。
测试网络包含两个组织,Org1 和 Org2,各自拥有一个节点。所以要安装链码包到两个节点上:
- peer0.org1.example.com
- peer0.org2.example.com
链码打包之后,我们可以使用 peer lifecycle chaincode install 命令将弹珠链码安装到每个节点上。
Try it yourself
如果你已经成功启动测试网络,复制粘贴如下环境变量到你的 CLI 以 Org1 管理员的身份与测试网络进行交互。请确保你在 test-network 目录中。
export PATH=${PWD}/../bin:$PATH
export FABRIC_CFG_PATH=$PWD/../config/
export CORE_PEER_TLS_ENABLED=true
export CORE_PEER_LOCALMSPID="Org1MSP"
export CORE_PEER_TLS_ROOTCERT_FILE=${PWD}/organizations/peerOrganizations/org1.example.com/peers/peer0.org1.example.com/tls/ca.crt
export CORE_PEER_MSPCONFIGPATH=${PWD}/organizations/peerOrganizations/org1.example.com/users/Admin@org1.example.com/msp
export CORE_PEER_ADDRESS=localhost:7051
- 用以下命令打包弹珠私有数据链码。
peer lifecycle chaincode package marblesp.tar.gz --path ../chaincode/marbles02_private/go/ --lang golang --label marblespv1
这个命令将会生成一个链码包文件 marblesp.tar.gz。
- 用以下命令在节点
peer0.org1.example.com上安装链码包。
peer lifecycle chaincode install marblesp.tar.gz
安装成功会返回链码标识,类似如下响应:
2019-04-22 19:09:04.336 UTC [cli.lifecycle.chaincode] submitInstallProposal -> INFO 001 Installed remotely: response:<status:200 payload:"\nKmarblespv1:57f5353b2568b79cb5384b5a8458519a47186efc4fcadb98280f5eae6d59c1cd\022\nmarblespv1" >
2019-04-22 19:09:04.336 UTC [cli.lifecycle.chaincode] submitInstallProposal -> INFO 002 Chaincode code package identifier: marblespv1:57f5353b2568b79cb5384b5a8458519a47186efc4fcadb98280f5eae6d59c1cd
- 现在在 CLI 中切换到 Org2 管理员。复制粘贴如下代码到你的命令行窗口并运行:
export CORE_PEER_LOCALMSPID="Org2MSP"
export CORE_PEER_TLS_ROOTCERT_FILE=${PWD}/organizations/peerOrganizations/org2.example.com/peers/peer0.org2.example.com/tls/ca.crt
export CORE_PEER_MSPCONFIGPATH=${PWD}/organizations/peerOrganizations/org2.example.com/users/Admin@org2.example.com/msp
export CORE_PEER_ADDRESS=localhost:9051
- 用以下命令在 Org2 的节点上安装链码:
peer lifecycle chaincode install marblesp.tar.gz
批准链码定义
每个通道中的成员想要使用链码,都需要为他们的组织审批链码定义。由于本教程中的两个组织都要使用链码,所以我们需要使用 peer lifecycle chaincode approveformyorg 为Org1 和 Org2 审批链码定义。链码定义也包含私有数据集合的定义,它们都在 marbles02_private 示例中。我们会使用 --collections-config 参数来指明私有数据集 JSON 文件的路径。
Try it yourself
在 test-network 目录下运行如下命令来为 Org1 和 Org2 审批链码定义。
- 使用如下命令来查询节点上已安装链码包的 ID。
peer lifecycle chaincode queryinstalled
这个命令将返回和安装命令一样的链码包的标识,你会看到类似如下的输出信息:
Installed chaincodes on peer:
Package ID: marblespv1:f8c8e06bfc27771028c4bbc3564341887881e29b92a844c66c30bac0ff83966e, Label: marblespv1
- 将包 ID 声明为一个环境变量。粘贴
peer lifecycle chaincode queryinstalled命令返回的包 ID 到下边的命令中。包 ID 在不同用户中是不一样的,所以你的 ID 可能与本教程中的不同,所以你需要使用你的终端中返回的包 ID 来完成这一步。
export CC_PACKAGE_ID=marblespv1:f8c8e06bfc27771028c4bbc3564341887881e29b92a844c66c30bac0ff83966e
- 为了确保我们在以 Org1 的身份运行 CLI。复制粘贴如下信息到节点容器中并执行:
export CORE_PEER_LOCALMSPID="Org1MSP"
export CORE_PEER_TLS_ROOTCERT_FILE=${PWD}/organizations/peerOrganizations/org1.example.com/peers/peer0.org1.example.com/tls/ca.crt
export CORE_PEER_MSPCONFIGPATH=${PWD}/organizations/peerOrganizations/org1.example.com/users/Admin@org1.example.com/msp
export CORE_PEER_ADDRESS=localhost:7051
- 用如下命令审批 Org1 的弹珠私有数据链码定义。此命令包含了一个集合文件的路径。
export ORDERER_CA=${PWD}/organizations/ordererOrganizations/example.com/orderers/orderer.example.com/msp/tlscacerts/tlsca.example.com-cert.pem
peer lifecycle chaincode approveformyorg -o localhost:7050 --ordererTLSHostnameOverride orderer.example.com --channelID mychannel --name marblesp --version 1.0 --collections-config ../chaincode/marbles02_private/collections_config.json --signature-policy "OR('Org1MSP.member','Org2MSP.member')" --package-id $CC_PACKAGE_ID --sequence 1 --tls --cafile $ORDERER_CA
当命令成功完成后,你会收到类似如下的返回信息:
2020-01-03 17:26:55.022 EST [chaincodeCmd] ClientWait -> INFO 001 txid [06c9e86ca68422661e09c15b8e6c23004710ea280efda4bf54d501e655bafa9b] committed with status (VALID) at
- 将 CLI 转换到 Org2。复制粘贴如下信息到节点容器中并执行:
export CORE_PEER_LOCALMSPID="Org2MSP"
export CORE_PEER_TLS_ROOTCERT_FILE=${PWD}/organizations/peerOrganizations/org2.example.com/peers/peer0.org2.example.com/tls/ca.crt
export CORE_PEER_MSPCONFIGPATH=${PWD}/organizations/peerOrganizations/org2.example.com/users/Admin@org2.example.com/msp
export CORE_PEER_ADDRESS=localhost:9051
- 现在你可以为 Org2 审批链码定义:
peer lifecycle chaincode approveformyorg -o localhost:7050 --ordererTLSHostnameOverride orderer.example.com --channelID mychannel --name marblesp --version 1.0 --collections-config ../chaincode/marbles02_private/collections_config.json --signature-policy "OR('Org1MSP.member','Org2MSP.member')" --package-id $CC_PACKAGE_ID --sequence 1 --tls --cafile $ORDERER_CA
提交链码定义
当组织中大部分成员审批通过了链码定义,该组织才可以提交该链码定义到通道上。
使用 peer lifecycle chaincode commit 命令来提交链码定义。这个命令同样也会部署私有数据集合到通道上。
在链码定义被提交到通道后,我们就可以使用这个链码了。因为弹珠私有数据示例包含一个初始化方法,我们在调用链码中的其他方法前,需要使用 peer chaincode invoke 命令
去调用 Init() 方法。
Try it yourself
- 运行如下命令提交弹珠私有数据示例链码定义到
mychannel通道。
Try it yourself
   export ORDERER_CA=${PWD}/organizations/ordererOrganizations/example.com/orderers/orderer.example.com/msp/tlscacerts/tlsca.example.com-cert.pem
   export ORG1_CA=${PWD}/organizations/peerOrganizations/org1.example.com/peers/peer0.org1.example.com/tls/ca.crt
   export ORG2_CA=${PWD}/organizations/peerOrganizations/org2.example.com/peers/peer0.org2.example.com/tls/ca.crt
   peer lifecycle chaincode commit -o localhost:7050 --ordererTLSHostnameOverride orderer.example.com --channelID mychannel --name marblesp --version 1.0 --sequence 1 --collections-config ../chaincode/marbles02_private/collections_config.json --signature-policy "OR('Org1MSP.member','Org2MSP.member')" --tls --cafile $ORDERER_CA --peerAddresses localhost:7051 --tlsRootCertFiles $ORG1_CA --peerAddresses localhost:9051 --tlsRootCertFiles $ORG2_CA

提交成功后,你会看到类似如下的输出信息:
2020-01-06 16:24:46.104 EST [chaincodeCmd] ClientWait -> INFO 001 txid [4a0d0f5da43eb64f7cbfd72ea8a8df18c328fb250cb346077d91166d86d62d46] committed with status (VALID) at localhost:9051
2020-01-06 16:24:46.184 EST [chaincodeCmd] ClientWait -> INFO 002 txid [4a0d0f5da43eb64f7cbfd72ea8a8df18c328fb250cb346077d91166d86d62d46] committed with status (VALID) at localhost:7051
存储私有数据
Org1 的成员已经被授权使用弹珠私有数据示例中的所有私有数据进行交易,切换回 Org1 节点并提交添加一个弹珠的请求:
Try it yourself
在 CLI 的 test-network 的目录中,复制粘贴如下命令:
export CORE_PEER_LOCALMSPID="Org1MSP"
export CORE_PEER_TLS_ROOTCERT_FILE=${PWD}/organizations/peerOrganizations/org1.example.com/peers/peer0.org1.example.com/tls/ca.crt
export CORE_PEER_MSPCONFIGPATH=${PWD}/organizations/peerOrganizations/org1.example.com/users/Admin@org1.example.com/msp
export CORE_PEER_ADDRESS=localhost:7051
调用 initMarble 方法,将会创建一个带有私有数据的弹珠,该弹珠名为 marble1,所有者为 tom,颜色为 blue,尺寸为 35,价格为 99。重申一下,私有数据 price 将会和私有数据 name, owner, color, size 分开存储。因此, initMarble 方法会调用 PutPrivateData() 接口两次来存储私有数据。另外注意,传递私有数据时使用 --transient 参数。作为瞬态的输入不会被记录到交易中,以此来保证数据的隐私性。瞬态数据会以二进制的方式被传输,所以在 CLI 中使用时,必须使用 base64 编码。我们设置一个环境变量来获取 base64 编码后的值,并使用 tr 命令来去掉 linux base64 命令添加的换行符。
export MARBLE=$(echo -n "{\"name\":\"marble1\",\"color\":\"blue\",\"size\":35,\"owner\":\"tom\",\"price\":99}" | base64 | tr -d \\n)
peer chaincode invoke -o localhost:7050 --ordererTLSHostnameOverride orderer.example.com --tls --cafile ${PWD}/organizations/ordererOrganizations/example.com/orderers/orderer.example.com/msp/tlscacerts/tlsca.example.com-cert.pem -C mychannel -n marblesp -c '{"Args":["InitMarble"]}' --transient "{\"marble\":\"$MARBLE\"}"
你会看到类似如下的输出结果:
[chaincodeCmd] chaincodeInvokeOrQuery->INFO 001 Chaincode invoke successful. result: status:200
授权节点查询私有数据
我们的集合定义定义允许 Org1 和 Org2 的所有成员在他们的侧数据库中保存 name, color, size, owner 私有数据,但是只有 Org1 的成员才可以在他们的侧数据库中保存 ``price``私有数据。作为一个已授权的 Org1 的节点,我们可以查询两个私有数据集。
第一个 query 命令调用了 readMarble 方法并将 collectionMarbles 作为参数传入。
// ===============================================
// readMarble - read a marble from chaincode state
// ===============================================

func (t *SimpleChaincode) readMarble(stub shim.ChaincodeStubInterface, args []string) pb.Response {
     var name, jsonResp string
     var err error
     if len(args) != 1 {
             return shim.Error("Incorrect number of arguments. Expecting name of the marble to query")
     }

     name = args[0]
     valAsbytes, err := stub.GetPrivateData("collectionMarbles", name) //get the marble from chaincode state

     if err != nil {
             jsonResp = "{\"Error\":\"Failed to get state for " + name + "\"}"
             return shim.Error(jsonResp)
     } else if valAsbytes == nil {
             jsonResp = "{\"Error\":\"Marble does not exist: " + name + "\"}"
             return shim.Error(jsonResp)
     }

     return shim.Success(valAsbytes)
}
第二个 query 命令调用了 readMarblePrivateDetails 方法,
并将 collectionMarblePrivateDetails 作为参数传入。
// ===============================================
// readMarblePrivateDetails - read a marble private details from chaincode state
// ===============================================

func (t *SimpleChaincode) readMarblePrivateDetails(stub shim.ChaincodeStubInterface, args []string) pb.Response {
     var name, jsonResp string
     var err error

     if len(args) != 1 {
             return shim.Error("Incorrect number of arguments. Expecting name of the marble to query")
     }

     name = args[0]
     valAsbytes, err := stub.GetPrivateData("collectionMarblePrivateDetails", name) //get the marble private details from chaincode state

     if err != nil {
             jsonResp = "{\"Error\":\"Failed to get private details for " + name + ": " + err.Error() + "\"}"
             return shim.Error(jsonResp)
     } else if valAsbytes == nil {
             jsonResp = "{\"Error\":\"Marble private details does not exist: " + name + "\"}"
             return shim.Error(jsonResp)
     }
     return shim.Success(valAsbytes)
}
Now Try it yourself
用 Org1 的成员来查询 marble1 的私有数据 name, color, size 和 owner。注意,因为查询操作不会在账本上留下记录,因此没必要以瞬态的方式传入弹珠名称。
peer chaincode query -C mychannel -n marblesp -c '{"Args":["ReadMarble","marble1"]}'
你会看到如下输出结果:
{"color":"blue","docType":"marble","name":"marble1","owner":"tom","size":35}
Query for the price private data of marble1 as a member of Org1.
peer chaincode query -C mychannel -n marblesp -c '{"Args":["ReadMarblePrivateDetails","marble1"]}'
你会看到如下输出结果:
{"docType":"marblePrivateDetails","name":"marble1","price":99}
未授权节点查询私有数据
现在我们将切换到 Org2 的成员。Org2 在侧数据库中存有私有数据 name, color, size, owner,但是不存储弹珠的 price 数据。我们来同时查询两个私有数据集。
切换到 Org2 的节点
运行如下命令以 Org2 管理员的身份操作并查询 Org2 节点:
Try it yourself
export CORE_PEER_LOCALMSPID="Org2MSP"
export CORE_PEER_TLS_ROOTCERT_FILE=${PWD}/organizations/peerOrganizations/org2.example.com/peers/peer0.org2.example.com/tls/ca.crt
export CORE_PEER_MSPCONFIGPATH=${PWD}/organizations/peerOrganizations/org2.example.com/users/Admin@org2.example.com/msp
export CORE_PEER_ADDRESS=localhost:9051
Try it yourself
查询 Org2 被授权的私有数据
Org2 的节点应该拥有第一个私有数据集(name, color, size and owner)的访问权限,可以使用 readMarble() 方法,该方法使用了 collectionMarbles 参数。
Try it yourself
peer chaincode query -C mychannel -n marblesp -c '{"Args":["ReadMarble","marble1"]}'
你会看到类似如下的输出结果:
{"docType":"marble","name":"marble1","color":"blue","size":35,"owner":"tom"}
查询 Org2 未被授权的私有数据
Org2 的节点的侧数据库中不存在 price 数据。当你尝试查询这个数据时,将会返回一个公共状态中对应键的 hash 值,但并不会返回私有状态。
Try it yourself
peer chaincode query -C mychannel -n marblesp -c '{"Args":["ReadMarblePrivateDetails","marble1"]}'
你会看到类似如下的输出结果:
Error: endorsement failure during query. response: status:500
message:"{\"Error\":\"Failed to get private details for marble1:
GET_STATE failed: transaction ID: d9c437d862de66755076aeebe79e7727791981606ae1cb685642c93f102b03e5:
tx creator does not have read access permission on privatedata in chaincodeName:marblesp collectionName: collectionMarblePrivateDetails\"}"
Org2 的成员,将只能看到私有数据的公共 hash。
清除私有数据
对于一些案例,私有数据仅需在账本上保存到在链下数据库复制之后就可以了,我们可以将 数据在过了一定数量的区块后进行“清除”,仅仅把数据的哈希作为交易不可篡改的证据保存下来。
私有数据可能会包含私人的或者机密的信息,比如我们例子中的价格数据,这是交易伙伴不想让通道中的其他组织知道的。而且,它具有有限的生命周期,就可以根据集合定义中的 blockToLive 属性在固定的区块数量之后清除。
我们的 collectionMarblePrivateDetails 中定义的 blockToLive 值为3,表明这个数据会在侧数据库中保存三个区块的时间,之后它就会被清除。将所有内容放在一起,回想一下绑定了私有数据 price 的私有数据集 collectionMarblePrivateDetails,在函数 initMarble() 中,当调用 PutPrivateData() API 并传递了参数 collectionMarblePrivateDetails。
我们将在链上增加区块,然后来通过执行四笔新交易(创建一个新弹珠,然后转移三个 弹珠)看一看价格信息被清除的过程,增加新交易的过程中会在链上增加四个新区块。在第四笔交易完成之后(第三个弹珠转移后),我们将验证一下价格私有数据是否被清除了。
Try it yourself
使用如下命令切换到 Org1 。复制和粘贴下边的一组命令到节点容器并执行:
export CORE_PEER_LOCALMSPID="Org1MSP"
export CORE_PEER_TLS_ROOTCERT_FILE=${PWD}/organizations/peerOrganizations/org1.example.com/peers/peer0.org1.example.com/tls/ca.crt
export CORE_PEER_MSPCONFIGPATH=${PWD}/organizations/peerOrganizations/org1.example.com/users/Admin@org1.example.com/msp
export CORE_PEER_ADDRESS=localhost:7051
打开一个新终端窗口,通过运行如下命令来查看这个节点上私有数据日志。注意当前区块高度。
docker logs peer0.org1.example.com 2>&1 | grep -i -a -E 'private|pvt|privdata'
回到节点容器中,使用如下命令查询 marble1 的 price 数据(查询并不会产生一笔新的交易)。
peer chaincode query -C mychannel -n marblesp -c '{"Args":["ReadMarblePrivateDetails","marble1"]}'
你将看到类似下边的结果:
{"docType":"marblePrivateDetails","name":"marble1","price":99}
price 数据仍然存在于私有数据库上。
执行如下命令创建一个新的 marble2。这个交易将在链上创建一个新区块。
export MARBLE=$(echo -n "{\"name\":\"marble2\",\"color\":\"blue\",\"size\":35,\"owner\":\"tom\",\"price\":99}" | base64 | tr -d \\n)
peer chaincode invoke -o localhost:7050 --ordererTLSHostnameOverride orderer.example.com --tls --cafile ${PWD}/organizations/ordererOrganizations/example.com/orderers/orderer.example.com/msp/tlscacerts/tlsca.example.com-cert.pem -C mychannel -n marblesp -c '{"Args":["InitMarble"]}' --transient "{\"marble\":\"$MARBLE\"}"
再次切换回终端窗口并查看节点的私有数据日志。你将看到区块高度增加了 1。
docker logs peer0.org1.example.com 2>&1 | grep -i -a -E 'private|pvt|privdata'
返回到节点容器,运行如下命令查询 marble1 的价格数据:
peer chaincode query -C mychannel -n marblesp -c '{"Args":["ReadMarblePrivateDetails","marble1"]}'
私有数据没有被清除,查询结果也没有改变:
{"docType":"marblePrivateDetails","name":"marble1","price":99}
运行下边的命令将 marble2 转移给 “joe” 。这个交易将使链上增加第二个区块。
export MARBLE_OWNER=$(echo -n "{\"name\":\"marble2\",\"owner\":\"joe\"}" | base64 | tr -d \\n)
peer chaincode invoke -o localhost:7050 --ordererTLSHostnameOverride orderer.example.com --tls --cafile ${PWD}/organizations/ordererOrganizations/example.com/orderers/orderer.example.com/msp/tlscacerts/tlsca.example.com-cert.pem -C mychannel -n marblesp -c '{"Args":["TransferMarble"]}' --transient "{\"marble_owner\":\"$MARBLE_OWNER\"}"
再次切换回终端窗口并查看节点的私有数据日志。你将看到区块高度增加了 1 。
docker logs peer0.org1.example.com 2>&1 | grep -i -a -E 'private|pvt|privdata'
返回到节点容器,再次运行如下命令查询 marble1 的价格数据:
peer chaincode query -C mychannel -n marblesp -c '{"Args":["ReadMarblePrivateDetails","marble1"]}'
你仍然可以看到价格。
{"docType":"marblePrivateDetails","name":"marble1","price":99}
运行下边的命令将 marble2 转移给 “tom” 。这个交易将使链上增加第三个区块。
export MARBLE_OWNER=$(echo -n "{\"name\":\"marble2\",\"owner\":\"tom\"}" | base64 | tr -d \\n)
peer chaincode invoke -o localhost:7050 --ordererTLSHostnameOverride orderer.example.com --tls --cafile ${PWD}/organizations/ordererOrganizations/example.com/orderers/orderer.example.com/msp/tlscacerts/tlsca.example.com-cert.pem -C mychannel -n marblesp -c '{"Args":["TransferMarble"]}' --transient "{\"marble_owner\":\"$MARBLE_OWNER\"}"
再次切换回终端窗口并查看节点的私有数据日志。你将看到区块高度增加了 1 。
docker logs peer0.org1.example.com 2>&1 | grep -i -a -E 'private|pvt|privdata'
返回到节点容器,再次运行如下命令查询 marble1 的价格数据:
peer chaincode query -C mychannel -n marblesp -c '{"Args":["ReadMarblePrivateDetails","marble1"]}'
你仍然可以看到价格数据。
{"docType":"marblePrivateDetails","name":"marble1","price":99}
最后,运行下边的命令将 marble2 转移给 “jerry” 。这个交易将使链上增加第四个区块。在此次交易之后,price 私有数据将会被清除。
export MARBLE_OWNER=$(echo -n "{\"name\":\"marble2\",\"owner\":\"jerry\"}" | base64 | tr -d \\n)
peer chaincode invoke -o localhost:7050 --ordererTLSHostnameOverride orderer.example.com --tls --cafile ${PWD}/organizations/ordererOrganizations/example.com/orderers/orderer.example.com/msp/tlscacerts/tlsca.example.com-cert.pem -C mychannel -n marblesp -c '{"Args":["TransferMarble"]}' --transient "{\"marble_owner\":\"$MARBLE_OWNER\"}"
再次切换回终端窗口并查看节点的私有数据日志。你将看到区块高度增加了 1 。
docker logs peer0.org1.example.com 2>&1 | grep -i -a -E 'private|pvt|privdata'
返回到节点容器,再次运行如下命令查询 marble1 的价格数据:
peer chaincode query -C mychannel -n marblesp -c '{"Args":["ReadMarblePrivateDetails","marble1"]}'
因为价格数据已经被清除了,所以你就查询不到了。你应该会看到类似下边的结果:
Error: endorsement failure during query. response: status:500
message:"{\"Error\":\"Marble private details does not exist: marble1\"}"
使用 CouchDB
本教程将讲述在 Hyperledger Fabric 中使用 CouchDB 作为状态数据库的步骤。现在, 你应该已经熟悉 Fabric 的概念并且已经浏览了一些示例和教程。
注解
这个教程使用了 Fabric v2.0 引进的新功能链码生命周期。 如果你想要使用以前版本的生命周期模型来操作链码的索引功能, 访问 v1.4 版本的 使用 CouchDB .
本教程将带你按如下步骤与学习:
- 在 Hyperledger Fabric 中启用 CouchDB
- 创建一个索引
- 将索引添加到你的链码文件夹
- 安装和定义链码
- 查询 CouchDB 状态数据库
- 查询和索引的最佳实践
- 在 CouchDB 状态数据库查询中使用分页
- 升级索引
- 删除索引
想要更深入的研究 CouchDB 的话,请参阅 使用 CouchDB 作为状态数据库 ,关于 Fabric 账 本的跟多信息请参阅 Ledger 主题。下边的教程将详细讲述如何在你的区 块链网络中使用 CouchDB 。
本教程将使用 Marbles sample 作为演示在 Fabric 中使用 CouchDB 的用例,并且将会把 Marbles 部署在 构建你的第一个网络 (BYFN)教程网络上。
为什么是 CouchDB ?
Fabric 支持两种类型的节点数据库。LevelDB 是默认嵌入在 peer 节点的状态数据库。 LevelDB 用于将链码数据存储为简单的键-值对,仅支持键、键范围和复合键查询。CouchDB 是一 个可选的状态数据库,支持以 JSON 格式在账本上建模数据并支持富查询,以便您查询实际数据 内容而不是键。CouchDB 同样支持在链码中部署索引,以便高效查询和对大型数据集的支持。
为了发挥 CouchDB 的优势,也就是说基于内容的 JSON 查询,你的数据必须以 JSON 格式 建模。你必须在设置你的网络之前确定使用 LevelDB 还是 CouchDB 。由于数据兼容性的问 题,不支持节点从 LevelDB 切换为 CouchDB 。网络中的所有节点必须使用相同的数据库类 型。如果你想 JSON 和二进制数据混合使用,你同样可以使用 CouchDB ,但是二进制数据只 能根据键、键范围和复合键查询。
在 Hyperledger Fabric 中启用 CouchDB
CouchDB 是独立于节点运行的一个数据库进程。在安装、管理和操作的时候有一些额外
的注意事项。有一个可用的 Docker 镜像 CouchDB
并且我们建议它和节点运行在同一个服务器上。我们需要在每一个节点上安装一个 CouchDB
容器,并且更新每一个节点的配置文件 core.yaml ,将节点指向 CouchDB 容器。
core.yaml 文件的路径必须在环境变量 FABRIC_CFG_PATH 中指定:
- 对于 Docker 的部署,在节点容器中
FABRIC_CFG_PATH指定的文件夹中的core.yaml是预先配置好的。如果你要使用 docker 环境,你可以通过重写docker-compose-couch.yaml中的环境变量来覆盖 core.yaml - 对于原生的二进制部署,
core.yaml包含在发布的构件中。
编辑 core.yaml 中的 stateDatabase 部分。将 stateDatabase 指定为 CouchDB
并且填写 couchDBConfig 相关的配置。在 Fabric 中配置 CouchDB 的更多细节,请参阅
CouchDB 配置 。
创建一个索引
为什么索引很重要?
索引可以让数据库不用在每次查询的时候都检查每一行,可以让数据库运行的更快和更高效。 一般来说,对频繁查询的数据进行索引可以使数据查询更高效。为了充分发挥 CouchDB 的优 势 – 对 JSON 数据进行富查询的能力 – 并不需要索引,但是为了性能考虑强烈建议建立 索引。另外,如果在一个查询中需要排序,CouchDB 需要在排序的字段有一个索引。
注解
没有索引的情况下富查询也是可以使用的,但是会在 CouchDB 的日志中抛出一个没 有找到索引的警告。如果一个富查询中包含了一个排序的说明,需要排序的那个字段 就必须有索引;否则,查询将会失败并抛出错误。
为了演示构建一个索引,我们将会使用来自 Marbles sample. 的数据。 在这个例子中, Marbles 的数据结构定义如下:
type marble struct {
         ObjectType string `json:"docType"` //docType is used to distinguish the various types of objects in state database
         Name       string `json:"name"`    //the field tags are needed to keep case from bouncing around
         Color      string `json:"color"`
         Size       int    `json:"size"`
         Owner      string `json:"owner"`
}
在这个结构体中,( docType, name, color, size, owner )属性
定义了和资产相关的账本数据。 docType 属性用来在链码中区分可能需要单独查询的
不同数据类型的模式。当时使用 CouchDB 的时候,建议包含 docType 属性来区分在链
码命名空间中的每一个文档。(每一个链码都需要有他们自己的 CouchDB 数据库,也就是
说,每一个链码都有它自己的键的命名空间。)
在 Marbles 数据结构的定义中, docType 用来识别这个文档或者资产是一个弹珠资产。
同时在链码数据库中也可能存在其他文档或者资产。数据库中的文档对于这些属性值来说都是
可查询的。
当为链码查询定义一个索引的时候,每一个索引都必须定义在一个扩展名为 *.json 的文本文件中,并且索引定义的格式必须为 CouchDB 索引的 JSON 格式。
需要以下三条信息来定义一个索引:
- fields: 这些是常用的查询字段
- name: 索引名
- type: 它的内容一般是 json
例如,这是一个对字段 foo 的一个名为 foo-index 的简单索引。
{
    "index": {
        "fields": ["foo"]
    },
    "name" : "foo-index",
    "type" : "json"
}
可选地,设计文档( design document )属性 ddoc 可以写在索引的定义中。design document 是 CouchDB 结构,用于包含索引。索引可以以组的形式定义在设计文档中以提升效率,但是 CouchDB 建议每一个设计文档包含一个索引。
小技巧
当定义一个索引的时候,最好将 ddoc 属性和值包含在索引内。包含这个
属性以确保在你需要的时候升级索引,这是很重要的。它还使你能够明确指定
要在查询上使用的索引。
这里有另外一个使用 Marbles 示例定义索引的例子,在索引 indexOwner 使用了多个字段 docType 和 owner 并且包含了 ddoc 属性:
{
  "index":{
      "fields":["docType","owner"] // Names of the fields to be queried
  },
  "ddoc":"indexOwnerDoc", // (optional) Name of the design document in which the index will be created.
  "name":"indexOwner",
  "type":"json"
}
在上边的例子中,如果设计文档 indexOwnerDoc 不存在,当索引部署的时候会自动创建
一个。一个索引可以根据字段列表中指定的一个或者多个属性构建,而且可以定义任何属性的
组合。一个属性可以存在于同一个 docType 的多个索引中。在下边的例子中, index1
只包含 owner 属性, index2 包含 owner 和 color 属性, index3 包含
owner、 color 和 size 属性。另外,注意,根据 CouchDB 的建议,每一个索引的定义
都包含一个它们自己的 ddoc 值。
{
  "index":{
      "fields":["owner"] // Names of the fields to be queried
  },
  "ddoc":"index1Doc", // (optional) Name of the design document in which the index will be created.
  "name":"index1",
  "type":"json"
}

{
  "index":{
      "fields":["owner", "color"] // Names of the fields to be queried
  },
  "ddoc":"index2Doc", // (optional) Name of the design document in which the index will be created.
  "name":"index2",
  "type":"json"
}

{
  "index":{
      "fields":["owner", "color", "size"] // Names of the fields to be queried
  },
  "ddoc":"index3Doc", // (optional) Name of the design document in which the index will be created.
  "name":"index3",
  "type":"json"
}
一般来说,你为索引字段建模应该匹配将用于查询过滤和排序的字段。对于以 JSON 格式 构建索引的更多信息请参阅 CouchDB documentation 。
关于索引最后要说的是,Fabric 在数据库中为文档建立索引的时候使用一种成为 索引升温
(index warming) 的模式。 CouchDB 直到下一次查询的时候才会索引新的或者更新的
文档。Fabric 通过在每一个数据区块提交完之后请求索引更新的方式,来确保索引处于 ‘热
(warm)’ 状态。这就确保了查询速度快,因为在运行查询之前不用索引文档。这个过程保
持了索引的现状,并在每次新数据添加到状态数据的时候刷新。
将索引添加到你的链码文件夹
当你完成索引之后,你需要把它打包到你的链码中,以便于将它部署到合适的元数据文件夹。你可以使用 peer lifecycle chaincode 命令安装链码。JSON 索引文件必须放在链码目录的 META-INF/statedb/couchdb/indexes 路径下。
下边的 Marbles 示例 展示了如何将索引打包到链码中。

这个例子包含了一个名为 indexOwnerDoc 的索引:
{"index":{"fields":["docType","owner"]},"ddoc":"indexOwnerDoc", "name":"indexOwner","type":"json"}
启动网络
Try it yourself
我们将会启动一个 Fabric 测试网络并且使用它来部署 marbles 链码。 使用下面的命令导航到 Fabric samples 中的目录 test-network :
cd fabric-samples/test-network
对于这个教程,我们希望在一个已知的初始状态进行操作。 下面的命令会删除正在进行的或停止的 docker 容器并且移除之前生成的构件:
./network.sh down
如果你之前从没运行过这个教程,在我们部署链码到网络之前你需要使用 vendor 来安装链码的依赖文件。 运行以下的命令:
cd ../chaincode/marbles02/go
GO111MODULE=on go mod vendor
cd ../../../test-network
在 test-network 目录中,使用以下命令部署带有 CouchDB 的测试网络:
./network.sh up createChannel -s couchdb
运行这个命令会创建两个使用 CouchDB 作为状态数据库的 fabric 节点。
同时也会创建一个排序节点和一个名为 mychannel 的通道
安装和定义链码
客户端应用程序通过链码和区块链账本交互。所以我们需要在每一个执行和背书交易的节点上安装链码。但是在我们和链码交互之前,通道中的成员需要一致同意链码的定义,以此 来建立链码的治理。在之前的章节中,我们演示了如何将索引添加到链码文件夹中以便索引和链码部署在一起。
链码在安装到 Peer 节点之前需要打包。我们可以使用 peer lifecycle chaincode package 命令来打包弹珠链码。
Try it yourself
1. 启动测试网络后,在你终端拷贝粘贴下面的环境变量,这样就可以使用 Org1 管理员用户和网络交互。 确保你在 test-network 目录中。
export PATH=${PWD}/../bin:$PATH
export FABRIC_CFG_PATH=${PWD}/../config/
export CORE_PEER_TLS_ENABLED=true
export CORE_PEER_LOCALMSPID="Org1MSP"
export CORE_PEER_TLS_ROOTCERT_FILE=${PWD}/organizations/peerOrganizations/org1.example.com/peers/peer0.org1.example.com/tls/ca.crt
export CORE_PEER_MSPCONFIGPATH=${PWD}/organizations/peerOrganizations/org1.example.com/users/Admin@org1.example.com/msp
export CORE_PEER_ADDRESS=localhost:7051
- 使用下面的命令来打包 marbles 链码:
peer lifecycle chaincode package marbles.tar.gz --path ../chaincode/marbles02/go --lang golang --label marbles_1
这个命令会创建一个名为 marbles.tar.gz 的链码包。
3. 使用下面的命令来安装链码包到节点上
peer0.org1.example.com:
peer lifecycle chaincode install marbles.tar.gz
一个成功的安装命令会返回链码 id ,就像下面的返回信息:
2019-04-22 18:47:38.312 UTC [cli.lifecycle.chaincode] submitInstallProposal -> INFO 001 Installed remotely: response:<status:200 payload:"\nJmarbles_1:0907c1f3d3574afca69946e1b6132691d58c2f5c5703df7fc3b692861e92ecd3\022\tmarbles_1" >
2019-04-22 18:47:38.312 UTC [cli.lifecycle.chaincode] submitInstallProposal -> INFO 002 Chaincode code package identifier: marbles_1:0907c1f3d3574afca69946e1b6132691d58c2f5c5703df7fc3b692861e92ecd3
安装链码到 peer0.org1.example.com 后,我们需要让 Org1 同意链码定义。
- 使用下面的命令来用你的当前节点查询已安装链码的 package ID 。
peer lifecycle chaincode queryinstalled
这个命令会返回和安装命令相同的 package ID 。 你应该看到类似下面的输出:
Installed chaincodes on peer:
Package ID: marbles_1:60ec9430b221140a45b96b4927d1c3af736c1451f8d432e2a869bdbf417f9787, Label: marbles_1
5. 将 package ID 声明为一个环境变量。
将 peer lifecycle chaincode queryinstalled 命令返回的 marbles_1 的 package ID 粘贴到下面的命令中。
package ID 不是所有用户都一样,所以你需要使用终端返回的 package ID 来完成这个步骤。
export CC_PACKAGE_ID=marbles_1:60ec9430b221140a45b96b4927d1c3af736c1451f8d432e2a869bdbf417f9787
- 使用下面的命令让 Org1 同意 marbles 链码定义。
export ORDERER_CA=${PWD}/organizations/ordererOrganizations/example.com/orderers/orderer.example.com/msp/tlscacerts/tlsca.example.com-cert.pem
peer lifecycle chaincode approveformyorg -o localhost:7050 --ordererTLSHostnameOverride orderer.example.com --channelID mychannel --name marbles --version 1.0 --signature-policy "OR('Org1MSP.member','Org2MSP.member')" --init-required --package-id $CC_PACKAGE_ID --sequence 1 --tls --cafile $ORDERER_CA
命令成功运行的时候你应该看到和下面类似的信息:
2020-01-07 16:24:20.886 EST [chaincodeCmd] ClientWait -> INFO 001 txid [560cb830efa1272c85d2f41a473483a25f3b12715d55e22a69d55abc46581415] committed with status (VALID) at
在链码定义提交之前,我们需要大多数组织同意链码定义。这意味着我们需要 Org2 也同意该链码定义。因为我们不需要 Org2 背书链码并且不安装链码包到 Org2 的节点,所以 packageID 作为链码定义的一部分,我们不需要向 Org2 提供它。
- 让终端使用 Org2 管理员身份操作。将下面的命令一起拷贝粘贴到节点容器并且一次性全部运行。
export CORE_PEER_LOCALMSPID="Org2MSP"
export CORE_PEER_TLS_ROOTCERT_FILE=${PWD}/organizations/peerOrganizations/org2.example.com/peers/peer0.org2.example.com/tls/ca.crt
export CORE_PEER_MSPCONFIGPATH=${PWD}/organizations/peerOrganizations/org2.example.com/users/Admin@org2.example.com/msp
export CORE_PEER_ADDRESS=localhost:9051
- 使用下面的命令让 Org2 同意链码定义:
peer lifecycle chaincode approveformyorg -o localhost:7050 --ordererTLSHostnameOverride orderer.example.com --channelID mychannel --name marbles --version 1.0 --signature-policy "OR('Org1MSP.member','Org2MSP.member')" --init-required --sequence 1 --tls --cafile $ORDERER_CA
- 现在我们可以使用 peer lifecycle chaincode commit 命令来提交链码定义到通道:
export ORDERER_CA=${PWD}/organizations/ordererOrganizations/example.com/orderers/orderer.example.com/msp/tlscacerts/tlsca.example.com-cert.pem
export ORG1_CA=${PWD}/organizations/peerOrganizations/org1.example.com/peers/peer0.org1.example.com/tls/ca.crt
export ORG2_CA=${PWD}/organizations/peerOrganizations/org2.example.com/peers/peer0.org2.example.com/tls/ca.crt
peer lifecycle chaincode commit -o localhost:7050 --ordererTLSHostnameOverride orderer.example.com --channelID mychannel --name marbles --version 1.0 --sequence 1 --signature-policy "OR('Org1MSP.member','Org2MSP.member')" --init-required --tls --cafile $ORDERER_CA --peerAddresses localhost:7051 --tlsRootCertFiles $ORG1_CA --peerAddresses localhost:9051 --tlsRootCertFiles $ORG2_CA
提交交易成功的时候你应该看到类似下面的信息:
2019-04-22 18:57:34.274 UTC [chaincodeCmd] ClientWait -> INFO 001 txid [3da8b0bb8e128b5e1b6e4884359b5583dff823fce2624f975c69df6bce614614] committed with status (VALID) at peer0.org2.example.com:9051
2019-04-22 18:57:34.709 UTC [chaincodeCmd] ClientWait -> INFO 002 txid [3da8b0bb8e128b5e1b6e4884359b5583dff823fce2624f975c69df6bce614614] committed with status (VALID) at peer0.org1.example.com:7051
- 因为 marbles 链码包含一个初始化函数,所以在我们使用链码其他函数前需要使用 peer chaincode invoke 命令调用
Init():
peer chaincode invoke -o localhost:7050 --ordererTLSHostnameOverride orderer.example.com --channelID mychannel --name marbles --isInit --tls --cafile $ORDERER_CA --peerAddresses localhost:7051 --tlsRootCertFiles $ORG1_CA -c '{"Args":["Init"]}'
验证部署的索引
当链码在节点上安装并且在通道上部署完成之后,索引会被部署到每一个节点的 CouchDB 状态数据库上。你可以通过检查 Docker 容器中的节点日志来确认 CouchDB 是否被创建成功。
Try it yourself
为了查看节点 Docker 容器的日志,打开一个新的终端窗口,然后运行下边的命令来匹配索 引被创建的确认信息。
docker logs peer0.org1.example.com 2>&1 | grep "CouchDB index"
你将会看到类似下边的结果:
[couchdb] CreateIndex -> INFO 0be Created CouchDB index [indexOwner] in state database [mychannel_marbles] using design document [_design/indexOwnerDoc]
注解
如果 Marbles 没有安装在节点 peer0.org1.example.com 上,你可
能需要切换到其他的安装了 Marbles 的节点。
查询 CouchDB 状态数据库
现在索引已经在 JSON 中定义了并且和链码部署在了一起,链码函数可以对 CouchDB 状态数据库执行 JSON 查询,同时 peer 命令可以调用链码函数。
在查询的时候指定索引的名字是可选的。如果不指定,同时索引已经在被查询的字段上存在了,已存在的索引会自动被使用。
小技巧
在查询的时候使用 use_index 关键字包含一个索引名字是一个好的习惯。如果
不使用索引名,CouchDB 可能不会使用最优的索引。而且 CouchDB 也可能会不使用
索引,但是在测试期间数据少的化你很难意识到。只有在数据量大的时候,你才可能
会意识到因为 CouchDB 没有使用索引而导致性能较低。
在链码中构建一个查询
你可以使用链码中定义的富查询来查询账本上的数据。 marbles02 示例 中包含了两个富查询方法:
queryMarbles –
一个 富查询 示例。这是一个可以将一个(选择器)字符串传入函数的查询。 这个查询对于需要在运行时动态创建他们自己的选择器的客户端应用程序很有用。 跟多关于选择器的信息请参考 CouchDB selector syntax 。
queryMarblesByOwner –
一个查询逻辑保存在链码中的**参数查询**的示例。在这个例子中,函数值接受单个参数, 就是弹珠的主人。然后使用 JSON 查询语法查询状态数据库中匹配 “marble” 的 docType 和 拥有者 id 的 JSON 文档。
使用 peer 命令运行查询
由于缺少一个客户端程序,我们可以使用节点命令来测试链码中定义的查询函数。我们将自定义 peer chaincode query
命令来使用Marbles索引 indexOwner 并且使用 queryMarbles 函数查询所有 marbles 中拥有者是 “tom” 的 marble 。
Try it yourself
在查询数据库之前,我们应该添加些数据。运行下面的命令使用 Org1 创建一个拥有者是 “tom” 的 marble :
export CORE_PEER_LOCALMSPID="Org1MSP"
export CORE_PEER_TLS_ROOTCERT_FILE=${PWD}/organizations/peerOrganizations/org1.example.com/peers/peer0.org1.example.com/tls/ca.crt
export CORE_PEER_MSPCONFIGPATH=${PWD}/organizations/peerOrganizations/org1.example.com/users/Admin@org1.example.com/msp
export CORE_PEER_ADDRESS=localhost:7051
peer chaincode invoke -o localhost:7050 --ordererTLSHostnameOverride orderer.example.com --tls --cafile ${PWD}/organizations/ordererOrganizations/example.com/orderers/orderer.example.com/msp/tlscacerts/tlsca.example.com-cert.pem -C mychannel -n marbles -c '{"Args":["initMarble","marble1","blue","35","tom"]}'
当链码实例化后,然后部署索引,索引就可以自动被链码的查询使用。CouchDB 可以根 据查询的字段决定使用哪个索引。如果这个查询准则存在索引,它就会被使用。但是建议在查询的时候指定 use_index 关键字。下边的 peer 命令就是一个如何通过在选择器语法中包含 use_index 关键字来明确地指定索引的例子:
// Rich Query with index name explicitly specified:
peer chaincode query -C mychannel -n marbles -c '{"Args":["queryMarbles", "{\"selector\":{\"docType\":\"marble\",\"owner\":\"tom\"}, \"use_index\":[\"_design/indexOwnerDoc\", \"indexOwner\"]}"]}'
详细看一下上边的查询命令,有三个参数值得关注:
queryMarbles
Marbles 链码中的函数名称。注意使用了一个 shimshim.ChaincodeStubInterface来访问和修改账本。getQueryResultForQueryString()传递 queryString 给 shim APIgetQueryResult()。
func (t *SimpleChaincode) queryMarbles(stub shim.ChaincodeStubInterface, args []string) pb.Response {

        //   0
        // "queryString"
         if len(args) < 1 {
                 return shim.Error("Incorrect number of arguments. Expecting 1")
         }

         queryString := args[0]

         queryResults, err := getQueryResultForQueryString(stub, queryString)
         if err != nil {
               return shim.Error(err.Error())
         }
         return shim.Success(queryResults)
}
{"selector":{"docType":"marble","owner":"tom"}
这是一个 ad hoc 选择器 字符串的示例,用来查找所有owner属性值为tom的marble的文档。
"use_index":["_design/indexOwnerDoc", "indexOwner"]
指定设计文档名indexOwnerDoc和索引名indexOwner。在这个示例中,查询 选择器通过指定use_index关键字明确包含了索引名。回顾一下上边的索引定义 创建一个索引 , 它包含了设计文档,"ddoc":"indexOwnerDoc"。在 CouchDB 中,如果你想在查询 中明确包含索引名,在索引定义中必须包含ddoc值,然后它才可以被use_index关键字引用。
利用索引的查询成功后返回如下结果:
Query Result: [{"Key":"marble1", "Record":{"color":"blue","docType":"marble","name":"marble1","owner":"tom","size":35}}]
查询和索引的最佳实践
由于不必扫描整个数据库,couchDB 中使用索引的查询会完成的更快。理解索引的机制会使你在网络中写出更高性能的查询语句并帮你的应用程序处理更大的数据或区块。
规划好安装在你链码上的索引同样重要。你应该每个链码只安装少量能支持大部分查询的索引。 添加太多索引或索引使用过多的字段会降低你网络的性能。这是因为每次区块提交后都会更新索引。 “索引升温( index warming )”需要更新的索引越多,完成交易的时间就越长。
这部分的案例有助于演示查询该如何使用索引,什么类型的查询拥有最好的性能。当你写查询的时候记得下面几点:
- 使用的索引中所有字段必须同样包含在选择器和排序部分。
- 越复杂的查询性能越低并且使用索引的几率也越低。
- 你应该尽量避免会引起全表查询或全索引查询的操作符,比如:
$or,$inand$regex。
在教程的前面章节,你已经对 marbles 链码执行了下面的查询:
// Example one: query fully supported by the index
export CHANNEL_NAME=mychannel
peer chaincode query -C $CHANNEL_NAME -n marbles -c '{"Args":["queryMarbles", "{\"selector\":{\"docType\":\"marble\",\"owner\":\"tom\"}, \"use_index\":[\"indexOwnerDoc\", \"indexOwner\"]}"]}'
Marbles 链码已经安装了 indexOwnerDoc 索引:
{"index":{"fields":["docType","owner"]},"ddoc":"indexOwnerDoc", "name":"indexOwner","type":"json"}
注意查询中的字段 docType 和 owner 都包含在索引中,这使得该查询成为一个完全支持查询( fully supported query )。
因此这个查询能使用索引中的数据,不需要搜索整个数据库。像这样的完全支持查询比你链码中的其他查询返回地更快。
如果你在上述查询中添加了额外字段,它仍会使用索引。然后,查询会另外在索引数据中查找符合额外字段的数据,导致相应时间变长。 下面的例子中查询仍然使用索引,但是会比前面的查询返回更慢。
// Example two: query fully supported by the index with additional data
peer chaincode query -C $CHANNEL_NAME -n marbles -c '{"Args":["queryMarbles", "{\"selector\":{\"docType\":\"marble\",\"owner\":\"tom\",\"color\":\"red\"}, \"use_index\":[\"/indexOwnerDoc\", \"indexOwner\"]}"]}'
没有包含全部索引字段的查询会查询整个数据库。举个例子,下面的查询使用 owner 字段查找数据,
没有指定该项拥有的类型。因为索引 ownerIndexDoc 包含两个字段 owner 和 docType ,
所以下面的查询不会使用索引。
// Example three: query not supported by the index
peer chaincode query -C $CHANNEL_NAME -n marbles -c '{"Args":["queryMarbles", "{\"selector\":{\"owner\":\"tom\"}, \"use_index\":[\"indexOwnerDoc\", \"indexOwner\"]}"]}'
一般来说,越复杂的查询返回的时间就越长,并且使用索引的概率也越低。
操作符 $or, $in 和 $regex 会常常使得查询搜索整个索引或者根本不使用索引。
举个例子,下面的查询包含了条件 $or 使得查询会搜索每一个 marble 和每一条拥有者是 tom 的数据。
// Example four: query with $or supported by the index
peer chaincode query -C $CHANNEL_NAME -n marbles -c '{"Args":["queryMarbles", "{\"selector\":{\"$or\":[{\"docType\":\"marble\"},{\"owner\":\"tom\"}]}, \"use_index\":[\"indexOwnerDoc\", \"indexOwner\"]}"]}'
这个查询仍然会使用索引,因为它查找的字段都包含在索引 indexOwnerDoc 中。然而查询中的条件 $or 需要扫描索引中
所有的项,导致响应时间变长。
索引不支持下面这个复杂查询的例子。
// Example five: Query with $or not supported by the index
peer chaincode query -C $CHANNEL_NAME -n marbles -c '{"Args":["queryMarbles", "{\"selector\":{\"$or\":[{\"docType\":\"marble\",\"owner\":\"tom\"},{\"color\":\"yellow\"}]}, \"use_index\":[\"indexOwnerDoc\", \"indexOwner\"]}"]}'
这个查询搜索所有拥有者是 tom 的 marbles 或其它颜色是黄色的项。 这个查询不会使用索引因为它需要查找
整个表来匹配条件 $or。根据你账本的数据量,这个查询会很久才会响应或者可能超时。
虽然遵循查询的最佳实践非常重要,但是使用索引不是查询大量数据的解决方案。区块链的数据结构优化了 校验和确定交易,但不适合数据分析或报告。如果你想要构建一个仪表盘( dashboard )作为应用程序的一部分或分析网络的 数据,最佳实践是查询一个从你节点复制了数据的离线区块链数据库。这样可以使你了解区块链上的数据并且不会降低 网络的性能或中断交易。
你可以使用来自你应用程序的区块或链码事件来写入交易数据到一个离线的链数据库或分析引擎。
对于每一个接收到的区块,区块监听应用将遍历区块中的每一个交易并根据每一个有效交易的 读写集 中的键值对构建一个数据存储。
文档 基于通道的 Peer 节点事件服务 提供了可重放事件,以确保下游数据存储的完整性。有关如何使用事件监听器将数据写入外部数据库的例子,
访问 Fabric Samples 的 Off chain data sample
在 CouchDB 状态数据库查询中使用分页
当 CouchDB 的查询返回了一个很大的结果集时,有一些将结果分页的 API 可以提供给链码调用。分
页提供了一个将结果集合分区的机制,该机制指定了一个 pagesize 和起始点 – 一个从结果集
合的哪里开始的 书签 。客户端应用程序以迭代的方式调用链码来执行查询,直到没有更多的结
果返回。更多信息请参考 topic on pagination with CouchDB 。
我们将使用 Marbles sample
中的函数 queryMarblesWithPagination 来演示在链码和客户端应用程序中如何使用分页。
queryMarblesWithPagination –
一个 使用分页的 ad hoc 富查询 的示例。这是一个像上边的示例一样,可以将一个(选择器) 字符串传入函数的查询。在这个示例中,在查询中也包含了一个
pageSize作为一个书签。
为了演示分页,需要更多的数据。本例假设你已经加入了 marble1 。在节点容器中执行下边的命令创建 4 个 “tom” 的弹珠,这样就创建了 5 个 “tom” 的弹珠:
Try it yourself
export CORE_PEER_LOCALMSPID="Org1MSP"
export CORE_PEER_TLS_ROOTCERT_FILE=${PWD}/organizations/peerOrganizations/org1.example.com/peers/peer0.org1.example.com/tls/ca.crt
export CORE_PEER_MSPCONFIGPATH=${PWD}/organizations/peerOrganizations/org1.example.com/users/Admin@org1.example.com/msp
export CORE_PEER_ADDRESS=localhost:7051
peer chaincode invoke -o localhost:7050 --ordererTLSHostnameOverride orderer.example.com --tls --cafile  ${PWD}/organizations/ordererOrganizations/example.com/orderers/orderer.example.com/msp/tlscacerts/tlsca.example.com-cert.pem -C mychannel -n marbles -c '{"Args":["initMarble","marble2","yellow","35","tom"]}'
peer chaincode invoke -o localhost:7050 --ordererTLSHostnameOverride orderer.example.com --tls --cafile  ${PWD}/organizations/ordererOrganizations/example.com/orderers/orderer.example.com/msp/tlscacerts/tlsca.example.com-cert.pem -C mychannel -n marbles -c '{"Args":["initMarble","marble3","green","20","tom"]}'
peer chaincode invoke -o localhost:7050 --ordererTLSHostnameOverride orderer.example.com --tls --cafile  ${PWD}/organizations/ordererOrganizations/example.com/orderers/orderer.example.com/msp/tlscacerts/tlsca.example.com-cert.pem -C mychannel -n marbles -c '{"Args":["initMarble","marble4","purple","20","tom"]}'
peer chaincode invoke -o localhost:7050 --ordererTLSHostnameOverride orderer.example.com --tls --cafile  ${PWD}/organizations/ordererOrganizations/example.com/orderers/orderer.example.com/msp/tlscacerts/tlsca.example.com-cert.pem -C mychannel -n marbles -c '{"Args":["initMarble","marble5","blue","40","tom"]}'
除了上边示例中的查询参数, queryMarblesWithPagination 增加了 pagesize 和 bookmark 。
PageSize 指定了每次查询返回结果的数量。 bookmark 是一个用来告诉 CouchDB 从每一页从
哪开始的 “锚(anchor)” 。(结果的每一页都返回一个唯一的书签)
queryMarblesWithPagination
Marbles 链码中函数的名称。注意 shimshim.ChaincodeStubInterface用于访问和修改账本。getQueryResultForQueryStringWithPagination()将 queryString 、 pagesize 和 bookmark 传递给 shim APIGetQueryResultWithPagination()。
func (t *SimpleChaincode) queryMarblesWithPagination(stub shim.ChaincodeStubInterface, args []string) pb.Response {

      //   0
      // "queryString"
      if len(args) < 3 {
              return shim.Error("Incorrect number of arguments. Expecting 3")
      }

      queryString := args[0]
      //return type of ParseInt is int64
      pageSize, err := strconv.ParseInt(args[1], 10, 32)
      if err != nil {
              return shim.Error(err.Error())
      }
      bookmark := args[2]

      queryResults, err := getQueryResultForQueryStringWithPagination(stub, queryString, int32(pageSize), bookmark)
      if err != nil {
              return shim.Error(err.Error())
      }
      return shim.Success(queryResults)
}
下边的例子是一个 peer 命令,以 pageSize 为 3 没有指定 boomark 的方式调用 queryMarblesWithPagination 。
小技巧
当没有指定 bookmark 的时候,查询从记录的“第一”页开始。
Try it yourself
// Rich Query with index name explicitly specified and a page size of 3:
peer chaincode query -C $CHANNEL_NAME -n marbles -c '{"Args":["queryMarblesWithPagination", "{\"selector\":{\"docType\":\"marble\",\"owner\":\"tom\"}, \"use_index\":[\"_design/indexOwnerDoc\", \"indexOwner\"]}","3",""]}'
下边是接收到的响应(为清楚起见,增加了换行),返回了五个弹珠中的三个,因为 pagesize 设置成了 3 。
[{"Key":"marble1", "Record":{"color":"blue","docType":"marble","name":"marble1","owner":"tom","size":35}},
 {"Key":"marble2", "Record":{"color":"yellow","docType":"marble","name":"marble2","owner":"tom","size":35}},
 {"Key":"marble3", "Record":{"color":"green","docType":"marble","name":"marble3","owner":"tom","size":20}}]
[{"ResponseMetadata":{"RecordsCount":"3",
"Bookmark":"g1AAAABLeJzLYWBgYMpgSmHgKy5JLCrJTq2MT8lPzkzJBYqz5yYWJeWkGoOkOWDSOSANIFk2iCyIyVySn5uVBQAGEhRz"}}]
注解
Bookmark 是 CouchDB 每次查询的时候唯一生成的,并显示在结果集中。将返回的 bookmark 传递给迭代查询的子集中来获取结果的下一个集合。
下边是一个 pageSize 为 3 的调用 queryMarblesWithPagination 的 peer 命令。
注意一下这里,这次的查询包含了上次查询返回的 bookmark 。
Try it yourself
peer chaincode query -C $CHANNEL_NAME -n marbles -c '{"Args":["queryMarblesWithPagination", "{\"selector\":{\"docType\":\"marble\",\"owner\":\"tom\"}, \"use_index\":[\"_design/indexOwnerDoc\", \"indexOwner\"]}","3","g1AAAABLeJzLYWBgYMpgSmHgKy5JLCrJTq2MT8lPzkzJBYqz5yYWJeWkGoOkOWDSOSANIFk2iCyIyVySn5uVBQAGEhRz"]}'
下边是接收到的响应(为清楚起见,增加了换行),返回了五个弹珠中的三个,返回了剩下的两个记录:
[{"Key":"marble4", "Record":{"color":"purple","docType":"marble","name":"marble4","owner":"tom","size":20}},
 {"Key":"marble5", "Record":{"color":"blue","docType":"marble","name":"marble5","owner":"tom","size":40}}]
[{"ResponseMetadata":{"RecordsCount":"2",
"Bookmark":"g1AAAABLeJzLYWBgYMpgSmHgKy5JLCrJTq2MT8lPzkzJBYqz5yYWJeWkmoKkOWDSOSANIFk2iCyIyVySn5uVBQAGYhR1"}}]
最后一个命令是调用 queryMarblesWithPagination 的 peer 命令,其中 pageSize 为 3 ,bookmark 是前一次查询返回的结果。
Try it yourself
peer chaincode query -C $CHANNEL_NAME -n marbles -c '{"Args":["queryMarblesWithPagination", "{\"selector\":{\"docType\":\"marble\",\"owner\":\"tom\"}, \"use_index\":[\"_design/indexOwnerDoc\", \"indexOwner\"]}","3","g1AAAABLeJzLYWBgYMpgSmHgKy5JLCrJTq2MT8lPzkzJBYqz5yYWJeWkmoKkOWDSOSANIFk2iCyIyVySn5uVBQAGYhR1"]}'
下边是接收到的响应(为清楚起见,增加了换行)。没有记录返回,说明所有的页 面都获取到了:
[]
[{"ResponseMetadata":{"RecordsCount":"0",
"Bookmark":"g1AAAABLeJzLYWBgYMpgSmHgKy5JLCrJTq2MT8lPzkzJBYqz5yYWJeWkmoKkOWDSOSANIFk2iCyIyVySn5uVBQAGYhR1"}}]
对于如何使用客户端应用程序使用分页迭代结果集,请在
Marbles sample 。
中搜索 getQueryResultForQueryStringWithPagination 函数。
升级索引
可能需要随时升级索引。相同的索引可能会存在安装的链码的子版本中。为了索引的升级,
原来的索引定义必须包含在设计文档 ddoc 属性和索引名。为了升级索引定义,使用相
同的索引名并改变索引定义。简单编辑索引 JSON 文件并从索引中增加或者删除字段。 Fabric
只支持 JSON 类型的索引。不支持改变索引类型。升级后的索引定义在链码定义提交之后
会重新部署在节点的状态数据库中。
注解
如果状态数据库有大量数据,重建索引的过程会花费较长时间,在此期间链码执 行或者查询可能会失败或者超时。
迭代索引定义
如果你在开发环境中访问你的节点的 CouchDB 状态数据库,你可以迭代测试各种索引以支 持你的链码查询。链码的任何改变都可能需要重新部署。使用 CouchDB Fauxton interface 或者命令行 curl 工具来创建和升级索引。
注解
Fauxton 是用于创建、升级和部署 CouchDB 索引的一个网页,如果你想尝试这个接口,
有一个 Marbles 示例中索引的 Fauxton 版本格式的例子。如果你使用 CouchDB 部署了测试网络,可以通过在浏览器的导航栏中打开 http://localhost:5984/_utils 来
访问 Fauxton 。
另外,如果你不想使用 Fauxton UI,下边是通过 curl 命令在 mychannel_marbles 数据库上创
建索引的例子:
// Index for docType, owner.
// Example curl command line to define index in the CouchDB channel_chaincode database
 curl -i -X POST -H "Content-Type: application/json" -d
        "{\"index\":{\"fields\":[\"docType\",\"owner\"]},
          \"name\":\"indexOwner\",
          \"ddoc\":\"indexOwnerDoc\",
          \"type\":\"json\"}" http://hostname:port/mychannel_marbles/_index
注解
如果你在测试网络中配置了 CouchDB,请使用 localhost:5984 替换 hostname:port 。
删除索引
Fabric 工具不能删除索引。如果你需要删除索引,就要手动使用 curl 命令或者 Fauxton 接 口操作数据库。
删除索引的 curl 命令格式如下:
curl -X DELETE http://localhost:5984/{database_name}/_index/{design_doc}/json/{index_name} -H "accept: */*" -H "Host: localhost:5984"
要删除本教程中的索引,curl 命令应该是:
curl -X DELETE http://localhost:5984/mychannel_marbles/_index/indexOwnerDoc/json/indexOwner -H "accept: */*" -H "Host: localhost:5984"
创建通道
为了在Hyperledger Fabric网络上创建和转移资产,一个组织需要加入一个通道。通道是特定组织间交流的私有层并且对其它网络成员不可见。每个通道由单独的分隔的帐本组成,该分隔的帐本只能被通道成员读取和写入,他们的节点被允许加入到该通道并接收 来自排序服务的新交易块。而在Peer节点、节点和CA构成的物理基础网络中,通道是组织间和组织内部交流的过程。
由于通道在Fabric运营和治理中发挥的基础性作用,我们提供一系列的教程,将涵盖如何创建通道的不同方面。 创建新通道 教程描述了网络管理员需要执行的操作步骤。 使用configtx.yaml创建通道配置 教程介绍了创建一个通道的概念,然后单独讨论 :doc:’channel_policies’。
创建新通道
您可以使用本教程来学习如何使用configtxgen CLI工具创建新通道,然后使用peer channel命令让您的Peer节点加入该通道。尽管本教程将利用Fabric测试网络来创建新通道,但是本教程中的步骤生产环境中的网络运维人员也可以使用。
在创建通道的过程中,本教程将带您逐个了解以下步骤和概念:
- 配置configtxgen工具
- 使用configtx.yaml
- Orderer系统通道
- 创建应用通道
- Peer加入通道
- [设置锚节点]](#set-anchor-peers)
配置configtxgen工具
通过构建通道创建交易并将交易提交给排序服务来创建通道。通道创建交易指定通道的初始配置,并由排序服务用于写入通道创世块。尽管可以手动构建通道创建交易文件,但使用configtxgen工具会更容易。该工具通过读取定义通道配置的configtx.yaml文件,然后将相关信息写入通道创建交易中来工作。在下一节讨论configtx.yaml文件之前,我们可以先开始下载并配置好configtxgen工具。
您可以按照安装示例,二进制文件和Docker镜像的步骤下载configtxgen二进制文件。configtxgen和其他Fabric工具一起将被下载到本地fabric-samples的bin文件夹中。
对于本教程,我们将要在fabric-samples目录下的test-network目录中进行操作。使用以下命令进入到该目录:
cd fabric-samples/test-network
在本教程的其余部分中,我们将在test-network目录进行操作。使用以下命令将configtxgen工具添加到您的CLI路径:
export PATH=${PWD}/../bin:$PATH
为了使用configtxgen,您需要将FABRIC_CFG_PATH环境变量设置为本地包含configtx.yaml文件的目录的路径。在本教程中,我们将在configtx文件夹中引用用于设置Fabric测试网络的configtx.yaml:
export FABRIC_CFG_PATH=${PWD}/configtx
您可以通过打印configtxgen帮助文本来检查是否可以使用该工具:
configtxgen --help
使用configtx.yaml
configtx.yaml文件指定新通道的通道配置。建立通道配置所需的信息在configtx.yaml文件中以读写友好的形式指定。configtxgen工具使用configtx.yaml文件中定义的通道配置文件来创建通道配置,并将其写入protobuf格式,然后由Fabric读取。
您可以在test-network目录下的configtx文件夹中找到configtx.yaml文件,该文件用于部署测试网络。该文件包含以下信息,我们将使用这些信息来创建新通道:
- Organizations: 可以成为您的通道成员的组织。每个组织都有对用于建立通道MSP的密钥信息的引用。
- Ordering service: 哪些排序节点将构成网络的排序服务,以及它们将用于同意一致交易顺序的共识方法。该文件还包含将成为排序服务管理员的组织。
- Channel policies: 文件的不同部分共同定义策略,这些策略将控制组织与通道的交互方式以及哪些组织需要批准通道更新。就本教程而言,我们将使用Fabric使用的默认策略。
- Channel profiles: 每个通道配置文件都引用
configtx.yaml文件其他部分的信息来构建通道配置。使用预设文件来创建Orderer系统通道的创世块以及将被Peer组织使用的通道。为了将它们与系统通道区分开来,Peer组织使用的通道通常称为应用通道。
configtxgen工具使用configtx.yaml文件为系统通道创建完整的创世块。因此,系统通道配置文件需要指定完整的系统通道配置。用于创建通道创建交易的通道配置文件仅需要包含创建应用通道所需的其他配置信息。
您可以访问使用configtx.yaml创建通道创世块教程,以了解有关此文件的更多信息。现在,我们将返回创建通道的操作方面,尽管在后续的步骤中将引用此文件的某些部分。
启动网络
我们将使用正在运行的Fabric测试网络来创建新通道。出于本教程的考虑,我们希望从一个已知的初始状态进行操作。以下命令将停掉所有容器并删除任何之前生成的文件。确保您仍在本地fabric-samples的test-network目录中进行操作。
./network.sh down
您可以使用以下命令来启动测试网络:
./network.sh up
这个命令将使用在configtx.yaml文件中定义的两个Peer组织和单个Orderer组织创建一个Fabric网络。Peer组织将各自运营一个Peer节点,而排序服务管理员将运营单个Orderer节点。运行命令时,脚本将打印出正在创建的节点的日志:
Creating network "net_test" with the default driver
Creating volume "net_orderer.example.com" with default driver
Creating volume "net_peer0.org1.example.com" with default driver
Creating volume "net_peer0.org2.example.com" with default driver
Creating orderer.example.com    ... done
Creating peer0.org2.example.com ... done
Creating peer0.org1.example.com ... done
CONTAINER ID        IMAGE                               COMMAND             CREATED             STATUS                  PORTS                              NAMES
8d0c74b9d6af        hyperledger/fabric-orderer:latest   "orderer"           4 seconds ago       Up Less than a second   0.0.0.0:7050->7050/tcp             orderer.example.com
ea1cf82b5b99        hyperledger/fabric-peer:latest      "peer node start"   4 seconds ago       Up Less than a second   0.0.0.0:7051->7051/tcp             peer0.org1.example.com
cd8d9b23cb56        hyperledger/fabric-peer:latest      "peer node start"   4 seconds ago       Up 1 second             7051/tcp, 0.0.0.0:9051->9051/tcp   peer0.org2.example.com
我们测试网络实例的部署没有创建应用通道。但是,当您执行./network.sh up命令时,测试网络脚本会创建系统通道。在底层,脚本使用configtxgen工具和configtx.yaml文件构建系统通道的创世块。因为系统通道用于创建其他通道,所以在创建应用通道之前,我们需要花一些时间来了解Orderer系统通道。
Orderer系统通道
在Fabric网络中创建的第一个通道是系统通道。系统通道定义了形成排序服务的Orderer节点集合和充当排序服务管理员的组织集合。
系统通道还包括属于区块链联盟的组织。联盟是一组Peer组织,它们属于系统通道,但不是排序服务的管理员。联盟成员可以创建新通道,并包括其他联盟组织作为通道成员。
要部署新的排序服务,需要系统通道的创世块。当您执行./network.sh up命令时,测试网络脚本已经创建了系统通道创世块。创世块用于部署单个Orderer节点,该Orderer节点使用该块创建系统通道并形成网络的排序服务。如果检查./ network.sh脚本的输出,则可以在日志中找到创建创世块的命令:
configtxgen -profile TwoOrgsOrdererGenesis -channelID system-channel -outputBlock ./system-genesis-block/genesis.block
configtxgen工具使用来自configtx.yaml的TwoOrgsOrdererGenesis通道配置文件来写入创世块并将其存储在system-genesis-block文件夹中。 您可以在下面看到TwoOrgsOrdererGenesis配置文件:
TwoOrgsOrdererGenesis:
<<: *ChannelDefaults
Orderer:
<<: *OrdererDefaults
Organizations:
- *OrdererOrg
Capabilities:
<<: *OrdererCapabilities
Consortiums:
SampleConsortium:
Organizations:
- *Org1
- *Org2
配置文件的Orderer: 部分创建测试网络使用的单节点Raft排序服务,并以OrdererOrg作为排序服务管理员。配置文件的Consortiums部分创建了一个名为SampleConsortium: 的Peer组织的联盟。 这两个Peer组织Org1和Org2都是该联盟的成员。因此,我们可以将两个组织都包含在测试网络创建的新通道中。如果我们想添加另一个组织作为通道成员而又不将该组织添加到联盟中,则我们首先需要使用Org1和Org2创建通道,然后通过更新通道配置添加该组织。
创建应用通道
现在我们已经部署了网络的节点并使用network.sh脚本创建了Orderer系统通道,我们可以开始为Peer组织创建新通道。我们已经设置了使用configtxgen工具所需的环境变量。运行以下命令为channel1创建一个创建通道的交易:
configtxgen -profile TwoOrgsChannel -outputCreateChannelTx ./channel-artifacts/channel1.tx -channelID channel1
-channelID是将要创建的通道的名称。通道名称必须全部为小写字母,少于250个字符,并且与正则表达式[a-z][a-z0-9.-]*匹配。该命令使用-profile标志来引用configtx.yaml中的TwoOrgsChannel:配置文件,测试网络使用它来创建应用通道:
TwoOrgsChannel:
Consortium: SampleConsortium
<<: *ChannelDefaults
Application:
<<: *ApplicationDefaults
Organizations:
- *Org1
- *Org2
Capabilities:
<<: *ApplicationCapabilities
该配置文件从系统通道引用SampleConsortium的名称,并且包括来自该联盟的两个Peer组织作为通道成员。因为系统通道用作创建应用通道的模板,所以系统通道中定义的排序节点成为新通道的默认共识者集合。排序服务的管理员成为该通道的Orderer管理员。可以使用通道更新在共识者者集合中添加或删除Orderer节点和Orderer组织。
如果命令执行成功,您将看到configtxgen的日志加载configtx.yaml文件并打印通道创建交易:
2020-03-11 16:37:12.695 EDT [common.tools.configtxgen] main -> INFO 001 Loading configuration
2020-03-11 16:37:12.738 EDT [common.tools.configtxgen.localconfig] Load -> INFO 002 Loaded configuration: /Usrs/fabric-samples/test-network/configtx/configtx.yaml
2020-03-11 16:37:12.740 EDT [common.tools.configtxgen] doOutputChannelCreateTx -> INFO 003 Generating new channel configtx
2020-03-11 16:37:12.789 EDT [common.tools.configtxgen] doOutputChannelCreateTx -> INFO 004 Writing new channel tx
我们可以使用peer CLI将通道创建交易提交给排序服务。要使用peer CLI,我们需要将FABRIC_CFG_PATH设置为fabric-samples/config目录中的core.yaml文件。通过运行以下命令来设置FABRIC_CFG_PATH环境变量:
export FABRIC_CFG_PATH=$PWD/../config/
在排序服务创建通道之前,排序服务将检查提交请求的身份的许可。默认情况下,只有属于系统通道的联盟组织的管理员身份才能创建新通道。发出以下命令,以Org1中的admin用户身份运行peer CLI:
export CORE_PEER_TLS_ENABLED=true
export CORE_PEER_LOCALMSPID="Org1MSP"
export CORE_PEER_TLS_ROOTCERT_FILE=${PWD}/organizations/peerOrganizations/org1.example.com/peers/peer0.org1.example.com/tls/ca.crt
export CORE_PEER_MSPCONFIGPATH=${PWD}/organizations/peerOrganizations/org1.example.com/users/Admin@org1.example.com/msp
export CORE_PEER_ADDRESS=localhost:7051
现在,您可以使用以下命令创建通道:
peer channel create -o localhost:7050 --ordererTLSHostnameOverride orderer.example.com -c channel1 -f ./channel-artifacts/channel1.tx --outputBlock ./channel-artifacts/channel1.block --tls --cafile ${PWD}/organizations/ordererOrganizations/example.com/orderers/orderer.example.com/msp/tlscacerts/tlsca.example.com-cert.pem
上面的命令使用-f标志提供通道创建交易文件的路径,并使用-c标志指定通道名称。-o标志用于选择将用于创建通道的排序节点。--cafile是Orderer节点的TLS证书的路径。当您运行peer channel create命令时,peer CLI将生成以下响应:
2020-03-06 17:33:49.322 EST [channelCmd] InitCmdFactory -> INFO 00b Endorser and orderer connections initialized
2020-03-06 17:33:49.550 EST [cli.common] readBlock -> INFO 00c Received block: 0
由于我们使用的是Raft排序服务,因此您可能会收到一些状态不可用的消息,您可以放心地忽略它们。该命令会将新通道的创世块返回到--outputBlock标志指定的位置。
Peer加入通道
创建通道后,我们可以让Peer加入通道。属于该通道成员的组织可以使用peer channel fetch命令从排序服务中获取通道创世块。然后,组织可以使用创世块,通过peer channel join命令将Peer加入到该通道。一旦Peer加入通道,Peer将通过从排序服务中获取通道上的其他区块来构建区块链账本。
由于我们已经以Org1管理员的身份使用peer CLI,因此让我们将Org1的Peer加入到通道中。由于Org1提交了通道创建交易,因此我们的文件系统上已经有了通道创世块。使用以下命令将Org1的Peer加入通道。
peer channel join -b ./channel-artifacts/channel1.block
环境变量CORE_PEER_ADDRESS已设置为以peer0.org1.example.com为目标。命令执行成功后将生成peer0.org1.example.com加入通道的响应:
2020-03-06 17:49:09.903 EST [channelCmd] InitCmdFactory -> INFO 001 Endorser and orderer connections initialized
2020-03-06 17:49:10.060 EST [channelCmd] executeJoin -> INFO 002 Successfully submitted proposal to join channel
您可以使用peer channel getinfo命令验证Peer是否已加入通道:
peer channel getinfo -c channel1
该命令将列出通道的区块高度和最新区块的哈希。由于创世块是通道上的唯一区块,因此通道的高度将为1:
2020-03-13 10:50:06.978 EDT [channelCmd] InitCmdFactory -> INFO 001 Endorser and orderer connections initialized
Blockchain info: {"height":1,"currentBlockHash":"kvtQYYEL2tz0kDCNttPFNC4e6HVUFOGMTIDxZ+DeNQM="}
现在,我们可以将Org2的Peer加入通道。设置以下环境变量,以Org2管理员的身份运行peer CLI。环境变量还将把Org2的Peer peer0.org1.example.com设置为目标Peer。
export CORE_PEER_TLS_ENABLED=true
export CORE_PEER_LOCALMSPID="Org2MSP"
export CORE_PEER_TLS_ROOTCERT_FILE=${PWD}/organizations/peerOrganizations/org2.example.com/peers/peer0.org2.example.com/tls/ca.crt
export CORE_PEER_MSPCONFIGPATH=${PWD}/organizations/peerOrganizations/org2.example.com/users/Admin@org2.example.com/msp
export CORE_PEER_ADDRESS=localhost:9051
尽管我们的文件系统上仍然有通道创世块,但在更现实的场景下,Org2将从排序服务中获取块。例如,我们将使用peer channel fetch命令来获取Org2的创世块:
peer channel fetch 0 ./channel-artifacts/channel_org2.block -o localhost:7050 --ordererTLSHostnameOverride orderer.example.com -c channel1 --tls --cafile ${PWD}/organizations/ordererOrganizations/example.com/orderers/orderer.example.com/msp/tlscacerts/tlsca.example.com-cert.pem
该命令使用0来指定它需要获取加入通道所需的创世块。如果命令成功执行,则应该看到以下输出:
2020-03-13 11:32:06.309 EDT [channelCmd] InitCmdFactory -> INFO 001 Endorser and orderer connections initialized
2020-03-13 11:32:06.336 EDT [cli.common] readBlock -> INFO 002 Received block: 0
该命令返回通道生成块并将其命名为channel_org2.block,以将其与由Org1拉取的块区分开。现在,您可以使用该块将Org2的Peer加入该通道:
peer channel join -b ./channel-artifacts/channel_org2.block
配置锚节点
组织的Peer加入通道后,他们应至少选择一个Peer成为锚定节点。为了利用诸如私有数据和服务发现之类的功能,需要Peer锚节点。每个组织都应在一个通道上设置多个锚节点以实现冗余。有关Gossip和Peer锚节点的更多信息,请参见Gossip数据分发协议。
通道配置中包含每个组织的Peer锚节点的端点信息。每个通道成员可以通过更新通道来指定其Peer锚节点。我们将使用configtxlator工具更新通道配置,并为Org1和Org2选择锚节点。设置Peer锚节点的过程与进行其他通道更新所需的步骤相似,并介绍了如何使用configtxlator 更新通道配置。您还需要在本地计算机上安装jq工具。
我们将从选择一个Peer锚节点作为Org1开始。第一步是使用peer channel fetch命令来获取最新的通道配置块。设置以下环境变量,以Org1 管理员身份运行peer CLI:
export FABRIC_CFG_PATH=$PWD/../config/
export CORE_PEER_TLS_ENABLED=true
export CORE_PEER_LOCALMSPID="Org1MSP"
export CORE_PEER_TLS_ROOTCERT_FILE=${PWD}/organizations/peerOrganizations/org1.example.com/peers/peer0.org1.example.com/tls/ca.crt
export CORE_PEER_MSPCONFIGPATH=${PWD}/organizations/peerOrganizations/org1.example.com/users/Admin@org1.example.com/msp
export CORE_PEER_ADDRESS=localhost:7051
您可以使用以下命令来获取通道配置:
peer channel fetch config channel-artifacts/config_block.pb -o localhost:7050 --ordererTLSHostnameOverride orderer.example.com -c channel1 --tls --cafile ${PWD}/organizations/ordererOrganizations/example.com/orderers/orderer.example.com/msp/tlscacerts/tlsca.example.com-cert.pem
由于最新的通道配置块是通道创世块,因此您将看到该通道的命令返回块0。
2020-04-15 20:41:56.595 EDT [channelCmd] InitCmdFactory -> INFO 001 Endorser and orderer connections initialized
2020-04-15 20:41:56.603 EDT [cli.common] readBlock -> INFO 002 Received block: 0
2020-04-15 20:41:56.603 EDT [channelCmd] fetch -> INFO 003 Retrieving last config block: 0
2020-04-15 20:41:56.608 EDT [cli.common] readBlock -> INFO 004 Received block: 0
通道配置块存储在channel-artifacts文件夹中,以使更新过程与其他工件分开。进入到channel-artifacts文件夹以完成以下步骤:
cd channel-artifacts
现在,我们可以开始使用configtxlator工具开始通道配置相关工作。第一步是将来自protobuf的块解码为可以读写友好的JSON对象。我们还将去除不必要的块数据,仅保留通道配置。
configtxlator proto_decode --input config_block.pb --type common.Block --output config_block.json
jq .data.data[0].payload.data.config config_block.json > config.json
T这些命令将通道配置块转换为简化的JSON config.json,它将作为我们更新的基准。因为我们不想直接编辑此文件,所以我们将制作一个可以编辑的副本。我们将在以后的步骤中使用原始的通道配置。
cp config.json config_copy.json
您可以使用jq工具将Org1的Peer锚节点添加到通道配置中。
jq '.channel_group.groups.Application.groups.Org1MSP.values += {"AnchorPeers":{"mod_policy": "Admins","value":{"anchor_peers": [{"host": "peer0.org1.example.com","port": 7051}]},"version": "0"}}' config_copy.json > modified_config.json
完成此步骤后,我们在modified_config.json文件中以JSON格式获取了通道配置的更新版本。现在,我们可以将原始和修改的通道配置都转换回protobuf格式,并计算它们之间的差异。
configtxlator proto_encode --input config.json --type common.Config --output config.pb
configtxlator proto_encode --input modified_config.json --type common.Config --output modified_config.pb
configtxlator compute_update --channel_id channel1 --original config.pb --updated modified_config.pb --output config_update.pb
名为channel_update.pb的新的protobuf包含我们需要应用于通道配置的Peer锚节点更新。我们可以将配置更新包装在交易Envelope中,以创建通道配置更新交易。
configtxlator proto_decode --input config_update.pb --type common.ConfigUpdate --output config_update.json
echo '{"payload":{"header":{"channel_header":{"channel_id":"channel1", "type":2}},"data":{"config_update":'$(cat config_update.json)'}}}' | jq . > config_update_in_envelope.json
configtxlator proto_encode --input config_update_in_envelope.json --type common.Envelope --output config_update_in_envelope.pb
现在,我们可以使用最终的工件config_update_in_envelope.pb来更新通道。回到test-network目录:
cd ..
我们可以通过向peer channel update命令提供新的通道配置来添加Peer锚节点。因为我们正在更新仅影响Org1的部分通道配置,所以其他通道成员不需要批准通道更新。
peer channel update -f channel-artifacts/config_update_in_envelope.pb -c channel1 -o localhost:7050 --ordererTLSHostnameOverride orderer.example.com --tls --cafile ${PWD}/organizations/ordererOrganizations/example.com/orderers/orderer.example.com/msp/tlscacerts/tlsca.example.com-cert.pem
通道更新成功后,您应该看到以下响应:
2020-01-09 21:30:45.791 UTC [channelCmd] update -> INFO 002 Successfully submitted channel update
我们可以为Org2设置锚节点。因为我们是第二次进行该过程,所以我们将更快地完成这些步骤。 设置环境变量,以Org2管理员的身份运行peer CLI:
export CORE_PEER_TLS_ENABLED=true
export CORE_PEER_LOCALMSPID="Org2MSP"
export CORE_PEER_TLS_ROOTCERT_FILE=${PWD}/organizations/peerOrganizations/org2.example.com/peers/peer0.org2.example.com/tls/ca.crt
export CORE_PEER_MSPCONFIGPATH=${PWD}/organizations/peerOrganizations/org2.example.com/users/Admin@org2.example.com/msp
export CORE_PEER_ADDRESS=localhost:9051
拉取最新的通道配置块,这是该通道上的第二个块:
peer channel fetch config channel-artifacts/config_block.pb -o localhost:7050 --ordererTLSHostnameOverride orderer.example.com -c channel1 --tls --cafile ${PWD}/organizations/ordererOrganizations/example.com/orderers/orderer.example.com/msp/tlscacerts/tlsca.example.com-cert.pem
回到channel-artifacts目录:
cd channel-artifacts
然后,您可以解码并复制配置块。
configtxlator proto_decode --input config_block.pb --type common.Block --output config_block.json
jq .data.data[0].payload.data.config config_block.json > config.json
cp config.json config_copy.json
在通道配置中将加入通道的Org2的Peer添加为锚节点:
jq '.channel_group.groups.Application.groups.Org2MSP.values += {"AnchorPeers":{"mod_policy": "Admins","value":{"anchor_peers": [{"host": "peer0.org2.example.com","port": 9051}]},"version": "0"}}' config_copy.json > modified_config.json
现在,我们可以将原始和更新的通道配置都转换回protobuf格式,并计算它们之间的差异。
configtxlator proto_encode --input config.json --type common.Config --output config.pb
configtxlator proto_encode --input modified_config.json --type common.Config --output modified_config.pb
configtxlator compute_update --channel_id channel1 --original config.pb --updated modified_config.pb --output config_update.pb
将配置更新包装在交易Envelope中以创建通道配置更新交易:
configtxlator proto_decode --input config_update.pb --type common.ConfigUpdate --output config_update.json
echo '{"payload":{"header":{"channel_header":{"channel_id":"channel1", "type":2}},"data":{"config_update":'$(cat config_update.json)'}}}' | jq . > config_update_in_envelope.json
configtxlator proto_encode --input config_update_in_envelope.json --type common.Envelope --output config_update_in_envelope.pb
回到test-network目录.
cd ..
通过执行以下命令来更新通道并设置Org2的Peer锚节点:
peer channel update -f channel-artifacts/config_update_in_envelope.pb -c channel1 -o localhost:7050 --ordererTLSHostnameOverride orderer.example.com --tls --cafile ${PWD}/organizations/ordererOrganizations/example.com/orderers/orderer.example.com/msp/tlscacerts/tlsca.example.com-cert.pem
您可以通过运行peer channel info命令来确认通道已成功更新:
peer channel getinfo -c channel1
现在,已经通过在通道创世块中添加两个通道配置块来更新通道,通道的高度将增加到3:
Blockchain info: {"height":3,"currentBlockHash":"eBpwWKTNUgnXGpaY2ojF4xeP3bWdjlPHuxiPCTIMxTk=","previousBlockHash":"DpJ8Yvkg79XHXNfdgneDb0jjQlXLb/wxuNypbfHMjas="}
在新通道上部署链码
通过将链码部署到通道,我们可以确认该通道已成功创建。我们可以使用network.sh脚本将Fabcar链码部署到任何测试网络通道。使用以下命令将链码部署到我们的新通道:
./network.sh deployCC -c channel1
运行命令后,您应该在日志中看到链代码已部署到通道。调用链码将数据添加到通道账本中,然后查询。
[{"Key":"CAR0","Record":{"make":"Toyota","model":"Prius","colour":"blue","owner":"Tomoko"}},
{"Key":"CAR1","Record":{"make":"Ford","model":"Mustang","colour":"red","owner":"Brad"}},
{"Key":"CAR2","Record":{"make":"Hyundai","model":"Tucson","colour":"green","owner":"Jin Soo"}},
{"Key":"CAR3","Record":{"make":"Volkswagen","model":"Passat","colour":"yellow","owner":"Max"}},
{"Key":"CAR4","Record":{"make":"Tesla","model":"S","colour":"black","owner":"Adriana"}},
{"Key":"CAR5","Record":{"make":"Peugeot","model":"205","colour":"purple","owner":"Michel"}},
{"Key":"CAR6","Record":{"make":"Chery","model":"S22L","colour":"white","owner":"Aarav"}},
{"Key":"CAR7","Record":{"make":"Fiat","model":"Punto","colour":"violet","owner":"Pari"}},
{"Key":"CAR8","Record":{"make":"Tata","model":"Nano","colour":"indigo","owner":"Valeria"}},
{"Key":"CAR9","Record":{"make":"Holden","model":"Barina","colour":"brown","owner":"Shotaro"}}]
===================== Query successful on peer0.org1 on channel 'channel1' =====================
使用configtx.yaml创建通道配置
通过构建指定通道的初始配置的通道创建交易来创建通道。通道配置存储在账本中,并管理所有添加到通道的后续块。通道配置指定哪些组织是通道成员,可以在通道上添加新块的排序节点,以及管理通道更新的策略。可以通过通道配置更新来更新存储在通道创世块中的初始通道配置。如果足够多的组织批准通道更新,则在将新通道配置块提交到通道后,将对其进行管理。
虽然可以手动构建通道创建交易文件,但使用configtx.yaml文件和configtxgen工具可以更轻松地创建通道。configtx.yaml文件包含以易于理解和编辑的格式构建通道配置所需的信息。configtxgen工具读取configtx.yaml文件中的信息,并将其写入Fabric可以读取的protobuf格式。
概览
您可以使用本教程来学习如何使用configtx.yaml文件来构建存储在创世块中的初始通道配置。本教程将讨论由文件的每个部分构建的通道配置部分。
由于文件的不同部分共同创建用于管理通道的策略,因此我们将在独立的教程中讨论通道策略。
在创建通道教程的基础上,我们将使用configtx.yaml文件作为示例来部署Fabric测试网络。在本地计算机上打开命令终端,然后导航到本地Fabric示例中的test-network目录:
cd fabric-samples/test-network
测试网络使用的configtx.yaml文件位于configtx文件夹中。在文本编辑器中打开该文件。在本教程的每一节中,您都可以参考该文件。您可以在Fabric示例配置中找到configtx.yaml文件的更详细版本。
Organizations
通道配置中包含的最重要信息是作为通道成员的组织。每个组织都由MSP ID和通道MSP标识。通道MSP存储在通道配置中,并包含用于标识组织的节点,应用程序和管理员的证书。configtx.yaml文件的Organizations部分用于为通道的每个成员创建通道MSP和随附的MSP ID。
测试网络使用的configtx.yaml文件包含三个组织。可以添加到应用程序通道的两个组织是Peer组织Org1和Org2。OrdererOrg是一个Orderer组织,是排序服务的管理员。因为最佳做法是使用不同的证书颁发机构来部署Peer节点和Orderer节点,所以即使组织实际上是由同一公司运营,也通常将其称为Peer组织或Orderer组织。
您可以在下面看到configtx.yaml的一部分,该部分定义了测试网络的Org1:
- &Org1
# DefaultOrg defines the organization which is used in the sampleconfig
# of the fabric.git development environment
Name: Org1MSP
# ID to load the MSP definition as
ID: Org1MSP
MSPDir: ../organizations/peerOrganizations/org1.example.com/msp
# Policies defines the set of policies at this level of the config tree
# For organization policies, their canonical path is usually
# /Channel/<Application|Orderer>/<OrgName>/<PolicyName>
Policies:
Readers:
Type: Signature
Rule: "OR('Org1MSP.admin', 'Org1MSP.peer', 'Org1MSP.client')"
Writers:
Type: Signature
Rule: "OR('Org1MSP.admin', 'Org1MSP.client')"
Admins:
Type: Signature
Rule: "OR('Org1MSP.admin')"
Endorsement:
Type: Signature
Rule: "OR('Org1MSP.peer')"
# leave this flag set to true.
AnchorPeers:
# AnchorPeers defines the location of peers which can be used
# for cross org gossip communication. Note, this value is only
# encoded in the genesis block in the Application section context
- Host: peer0.org1.example.com
Port: 7051
Name字段是用于标识组织的非正式名称。ID字段是组织的MSP ID。MSP ID充当组织的唯一标识符,并且由通道策略引用,并包含在提交给通道的交易中。MSPDir是组织创建的MSP文件夹的路径。configtxgen工具将使用此MSP文件夹来创建通道MSP。该MSP文件夹需要包含以下信息,这些信息将被传输到通道MSP并存储在通道配置中:- 一个CA根证书,为组织建立信任根。CA根证书用于验证应用程序,节点或管理员是否属于通道成员。
- 来自TLS CA的根证书,该证书颁发了Peer节点或Orderer节点的TLS证书。TLS根证书用于通过Gossip协议标识组织。
- 如果启用了Node OU,则MSP文件夹需要包含一个
config.yaml文件,该文件根据x509证书的OU标识管理员,节点和客户端。 - 如果未启用Node OU,则MSP需要包含一个admincerts文件夹,其中包含组织管理员身份的签名证书。
用于创建通道MSP的MSP文件夹仅包含公共证书。如此一来,您可以在本地生成MSP文件夹,然后将MSP发送到创建通道的组织。
Capabilities
Fabric通道可以由运行不同版本的Hyperledger Fabric的Orderer节点和Peer节点加入。通道功能通过仅启用某些功能,允许运行不同Fabric二进制文件的组织参与同一通道。例如,只要通道功能级别设置为V1_4_X或更低,则运行Fabric v1.4的组织和运行Fabric v2.x的组织可以加入同一通道。所有通道成员都无法使用Fabric v2.0中引入的功能。
在configtx.yaml文件中,您将看到三个功能组:
- Application功能可控制Peer节点使用的功能,例如Fabric链码生命周期,并设置可以由加入通道的Peer运行的Fabric二进制文件的最低版本。
- Orderer功能可控制Orderer节点使用的功能,例如Raft共识,并设置可通过Orderer属于通道共识者集合的节点运行的Fabric二进制文件的最低版本。
- Channel功能设置可以由Peer节点和Orderer节点运行的Fabric的最低版本。由于Fabric测试网络的所有Peer和Orderer节点都运行版本v2.x,因此每个功能组均设置为
V2_0。因此,运行Fabric版本低于v2.0的节点不能加入测试网络。有关更多信息,请参见capabilities概念主题。
Application
Application部分定义了控制Peer组织如何与应用程序通道交互的策略。这些策略控制需要批准链码定义或给更新通道配置的请求签名的Peer组织的数量。这些策略还用于限制对通道资源的访问,例如写入通道账本或查询通道事件的能力。
测试网络使用Hyperledger Fabric提供的默认Application策略。如果您使用默认策略,则所有Peer组织都将能够读取数据并将数据写入账本。默认策略还要求大多数通道成员给通道配置更新签名,并且大多数通道成员需要批准链码定义,然后才能将链码部署到通道。本部分的内容在通道策略教程中进行了更详细的讨论。
Orderer
每个通道配置都在通道共识者集合中包括Orderer节点。共识者集合是一组排序节点,它们能够创建新的块并将其分发给加入该通道的Peer节点。在通道配置中存储作为共识者集合的成员的每个Orderer节点的端点信息。
测试网络使用configtx.yaml文件的Orderer部分来创建单节点Raft 排序服务。
OrdererType字段用于选择Raft作为共识类型:OrdererType: etcdraft
Raft 排序服务由可以参与共识过程的共识者列表定义。因为测试网络仅使用一个Orderer节点,所以共识者列表仅包含一个端点:
EtcdRaft:
Consenters:
- Host: orderer.example.com
Port: 7050
ClientTLSCert: ../organizations/ordererOrganizations/example.com/orderers/orderer.example.com/tls/server.crt
ServerTLSCert: ../organizations/ordererOrganizations/example.com/orderers/orderer.example.com/tls/server.crt
Addresses:
- orderer.example.com:7050
共识者列表中的每个Orderer节点均由其端点地址以及其客户端和服务器TLS证书标识。如果要部署多节点排序服务,则需要提供主机名,端口和每个节点使用的TLS证书的路径。您还需要将每个排序节点的端点地址添加到Addresses列表中。
- 您可以使用
BatchTimeout和BatchSize字段通过更改每个块的最大大小以及创建新块的频率来调整通道的延迟和吞吐量。 Policies部分创建用于管理通道共识者集合的策略。测试网络使用Fabric提供的默认策略,该策略要求大多数Orderer管理员批准添加或删除Orderer节点,组织或对分块切割参数进行更新。
因为测试网络用于开发和测试,所以它使用由单个Orderer节点组成的排序服务。生产中部署的网络应使用多节点排序服务以确保安全性和可用性。要了解更多信息,请参阅配置和操作Raft排序服务。
Channel
通道部分定义了用于管理最高层级通道配置的策略。对于应用程序通道,这些策略控制哈希算法,用于创建新块的数据哈希结构以及通道功能级别。在系统通道中,这些策略还控制Peer组织的联盟的创建或删除。
测试网络使用Fabric提供的默认策略,该策略要求大多数排序服务管理员需要批准对系统通道中这些值的更新。在应用程序通道中,更改需要获得大多数Orderer组织和大多数通道成员的批准。大多数用户不需要更改这些值。
Profiles
configtxgen工具读取Profiles部分中的通道配置文件以构建通道配置。每个配置文件都使用YAML语法从文件的其他部分收集数据。 configtxgen工具使用此配置为应用程序通道创建通道创建交易,或为系统通道写入通道创世块。要了解有关YAML语法的更多信息,Wikipedia提供了一个良好的入门指南。
测试网络使用的configtx.yaml包含两个通道配置文件TwoOrgsOrdererGenesis和TwoOrgsChannel:
TwoOrgsOrdererGenesis
TwoOrgsOrdererGenesis配置文件用于创建系统通道创世块:
TwoOrgsOrdererGenesis:
<<: *ChannelDefaults
Orderer:
<<: *OrdererDefaults
Organizations:
- *OrdererOrg
Capabilities:
<<: *OrdererCapabilities
Consortiums:
SampleConsortium:
Organizations:
- *Org1
- *Org2
系统通道定义了排序服务的节点以及排序服务管理员的组织集合。系统通道还包括一组属于区块链联盟的Peer组织。联盟中每个成员的通道MSP都包含在系统通道中,从而允许他们创建新的应用程序通道并将联盟成员添加到新通道中。
该配置文件创建一个名为SampleConsortium的联盟,该联盟在configtx.yaml文件中包含两个Peer组织Org1和Org2。配置文件的Orderer部分使用文件的Orderer:部分中定义的单节点Raft 排序服务。Organizations:部分中的OrdererOrg成为排序服务的唯一管理员。因为我们唯一的Orderer节点正在运行Fabric 2.x,所以我们可以将Orderer系统通道功能设置为V2_0。系统通道使用Channel部分中的默认策略,并启用V2_0作为通道功能级别。
TwoOrgsChannel
测试网络使用TwoOrgsChannel配置文件创建应用程序通道:
TwoOrgsChannel:
Consortium: SampleConsortium
<<: *ChannelDefaults
Application:
<<: *ApplicationDefaults
Organizations:
- *Org1
- *Org2
Capabilities:
<<: *ApplicationCapabilities
排序服务将系统通道用作创建应用程序通道的模板。在系统通道中定义的排序服务的节点成为新通道的默认共识者集合,而排序服务的管理员则成为该通道的Orderer管理员。通道成员的通道MSP从系统通道转移到新通道。创建通道后,可以通过更新通道配置来添加或删除Orderer节点。您还可以更新通道配置以将其他组织添加为通道成员。
TwoOrgsChannel提供了测试网络系统通道托管的联盟名称SampleConsortium。因此,TwoOrgsOrdererGenesis配置文件中定义的排序服务成为通道共识者集合。在Application部分中,来自联盟的两个组织Org1和Org2均作为通道成员包括在内。通道使用V2_0作为应用程序功能,并使用Application部分中的默认策略来控制Peer组织如何与通道进行交互。应用程序通道还使用Channel部分中的默认策略,并启用V2_0作为通道功能级别。
通道策略
通道是组织之间进行通信的一种私有方法。因此,通道配置的大多数更改都需要该通道的其他成员同意。如果一个组织可以在未经其他组织批准的情况下加入该通道并读取账上的数据,则通道将没有作用。通道组织结构的任何更改都必须由一组能够满足通道策略的组织批准。
策略还控制用户如何与通道交互的过程,例如在将链码部署到通道之前需要一些组织批准或着需要由通道管理员完成一些操作。
通道策略非常重要,因此需要在单独的主题中进行讨论。与通道配置的其他部分不同,控制通道的策略由configtx.yaml文件的不同部分组合起来才能确定。尽管可以在几乎没有任何约束的情况下为任何场景配置通道策略,但本主题将重点介绍如何使用Hyperledger Fabric提供的默认策略。如果您使用Fabric测试网络或Fabric示例配置使用的默认策略,则您创建的每个通道都会使用签名策略,ImplicitMeta策略和访问控制列表的组合来确定组织如何与通道进行交互并同意更新通道结构。您可以通过访问主题:策略概念了解有关Hyperledger Fabric中策略角色的更多信息。
签名策略
默认情况下,每个通道成员都定义了一组引用其组织的签名策略。当提案提交给Peer或交易提交给Orderer节点时,节点将读取附加到交易上的签名,并根据通道配置中定义的签名策略对它们进行评估。每个签名策略都有一个规则,该规则指定了一组签名可以满足该策略的组织和身份。您可以在下面configtx.yaml中的Organizations部分中看到由Org1定义的签名策略:
- &Org1
...
Policies:
Readers:
Type: Signature
Rule: "OR('Org1MSP.admin', 'Org1MSP.peer', 'Org1MSP.client')"
Writers:
Type: Signature
Rule: "OR('Org1MSP.admin', 'Org1MSP.client')"
Admins:
Type: Signature
Rule: "OR('Org1MSP.admin')"
Endorsement:
Type: Signature
Rule: "OR('Org1MSP.peer')"
上面的所有策略都可以通过Org1的签名来满足。但是,每个策略列出了组织内部能够满足该策略的一组不同的角色。Admins策略只能由具有管理员角色的身份提交的交易满足,而只有具有peer的身份才能满足Endorsement策略。附加到单笔交易上的一组签名可以满足多个签名策略。例如,如果交易附加的背书由Org1和Org2共同提供,则此签名集将满足Org1和Org2的Endorsement策略。
ImplicitMeta策略
如果您的通道使用默认策略,则每个组织的签名策略将由通道配置中更高层级的ImplicitMeta策略评估。ImplicitMeta策略不是直接评估提交给通道的签名,而是使用规则在通道配置中指定可以满足该策略的一组其他策略。 如果交易可以满足该策略引用的下层签名策略集合,则它可以满足ImplicitMeta策略。
您可以在下面的configtx.yaml文件的Application部分中看到定义的ImplicitMeta策略:
Policies:
Readers:
Type: ImplicitMeta
Rule: "ANY Readers"
Writers:
Type: ImplicitMeta
Rule: "ANY Writers"
Admins:
Type: ImplicitMeta
Rule: "MAJORITY Admins"
LifecycleEndorsement:
Type: ImplicitMeta
Rule: "MAJORITY Endorsement"
Endorsement:
Type: ImplicitMeta
Rule: "MAJORITY Endorsement"
Application部分中的ImplicitMeta策略控制Peer组织如何与通道进行交互。每个策略都引用与每个通道成员关联的签名策略。您会在下面看到Application部分的策略与Organization部分的策略之间的关系:
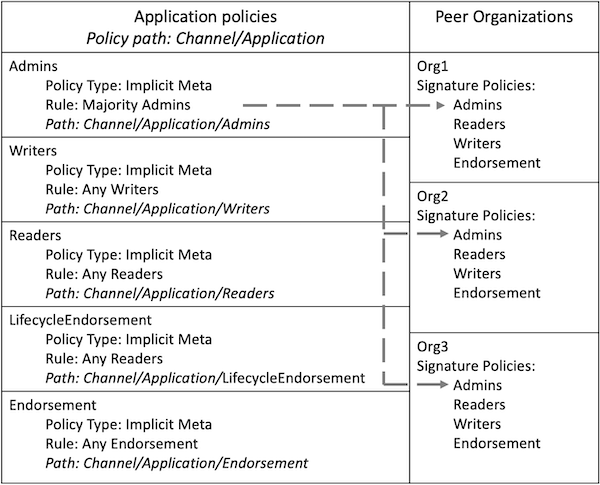
图1:Admins ImplicitMeta策略可以由每个组织定义的大多数Admins签名策略满足。
每个策略均在通道配置中引用其路径。由于Application部分中的策略位于通道组内部的应用程序组中,因此它们被称为Channel/Application策略。由于Fabric文档中的大多数位置都是通过策略路径来引用策略的,因此在本教程的其余部分中,我们将通过策略路径来引用策略。
每个ImplicitMeta中的Rule均引用可以满足该策略的签名策略的名称。 例如,Channel/Application/Admins ImplicitMeta策略引用每个组织的Admins签名策略。 每个Rule还包含满足ImplicitMeta策略所需的签名策略的数量。例如,Channel/Application/Admins策略要求满足大多数Admins签名策略。
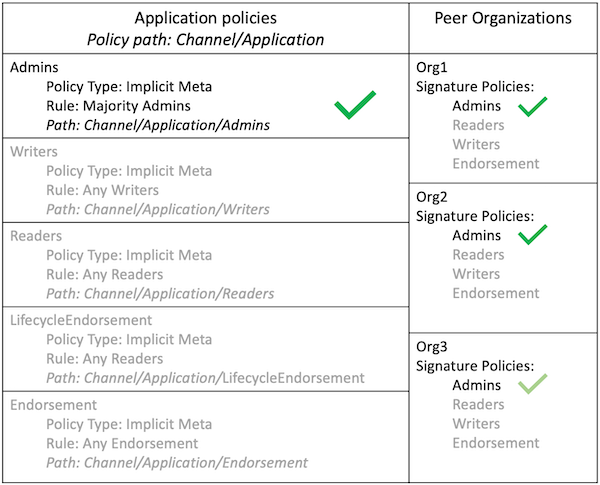
图2:提交给该通道的通道更新请求包含来自Org1,Org2和Org3的签名,满足每个组织的签名策略。因此,该请求满足Channel/Application/Admins策略。Org3检查呈浅绿色,因为不需要签名个数达到大多数。
再举一个例子,大多数组织的Endorsement策略都可以满足Channel/Application/Endorsement策略,这需要每个组织的Peer签名。Fabric链码生命周期将此策略用作默认链码背书策略。除非您提交链码定义时使用不同的背书策略,否则调用链码的交易必须得到大多数通道成员的认可。
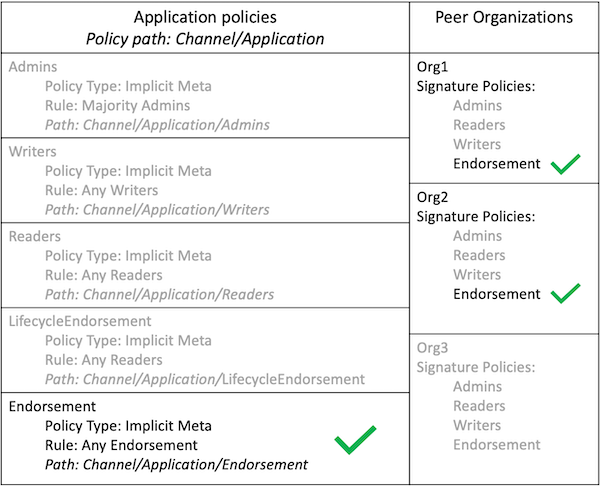
图3:来自客户端应用程序的交易调用了Org1和Org2的Peer上的链码。链码调用成功,并且该应用程序收到了两个组织的Peer背书。由于此交易满足Channel/Application/Endorsement策略,因此该交易符合默认的背书策略,可以添加到通道的账本中。
同时使用ImplicitMeta策略和签名策略的优点是,您可以在通道级别设置治理规则,同时允许每个通道成员选择对其组织进行签名所需的身份。例如,通道可以指定要求大多数组织管理员给通道配置更新签名。但是,每个组织可以使用其签名策略来选择其组织中的哪些身份是管理员,甚至要求其组织中的多个身份签名才能批准通道更新。
ImplicitMeta策略的另一个优点是,在从通道中添加或删除组织时,不需要更新它们。以图 3为例,如果将两个新组织添加到通道,则Channel/Application/Endorsement将需要三个组织的背书才能验证交易。
ImplicitMeta策略的一个缺点是它们不会显式读取通道成员使用的签名策略(这就是为什么它们被称为隐式策略)的原因。相反,他们假定用户具有基于通道配置的必需签名策略。Channel/Application/Endorsement策略的rule基于通道中Peer组织的数量。如果图 3中的三个组织中有两个不具备Endorsement签名策略,则任何交易都无法获得满足Channel/Application/Endorsement ImplicitMeta策略所需的大多数背书。
通道修改策略
通道结构由通道配置内的修改策略控制。通道配置的每个组件都有一个修改策略,需要满足修改策略才能被通道成员更新。例如,每个组织定义的策略和通道MSP,包含通道成员的应用程序组以及定义通道共识者集合的配置组件均具有不同的修改策略。
每个修改策略都可以引用ImplicitMeta策略或签名策略。例如,如果您使用默认策略,则定义每个组织的值将引用与该组织关联的Admins签名策略。因此,组织可以更新其通道MSP或设置锚节点,而无需其他通道成员的批准。定义通道成员集合的应用程序组的修改策略是Channel/Application/Admins ImplicitMeta策略。因此,默认策略是大多数组织需要批准添加或删除通道成员。
通道策略和访问控制列表
通道配置中的策略也由访问控制列表(ACLs)引用,该访问控制列表用于限制对通道使用的Fabric资源的访问。ACL扩展了通道配置内的策略,以管理通道的进程。您可以在示例 configtx.yaml文件中看到默认的ACL。每个ACL都使用路径引用通道策略。例如,以下ACL限制了谁可以基于/Channel/Application/Writers策略调用链码:
# ACL policy for invoking chaincodes on peer
peer/Propose: /Channel/Application/Writers
大多数默认ACL指向通道配置的Application部分中的ImplicitMeta策略。为了扩展上面的示例,如果组织可以满足/Channel/Application/Writers策略,则可以调用链码。
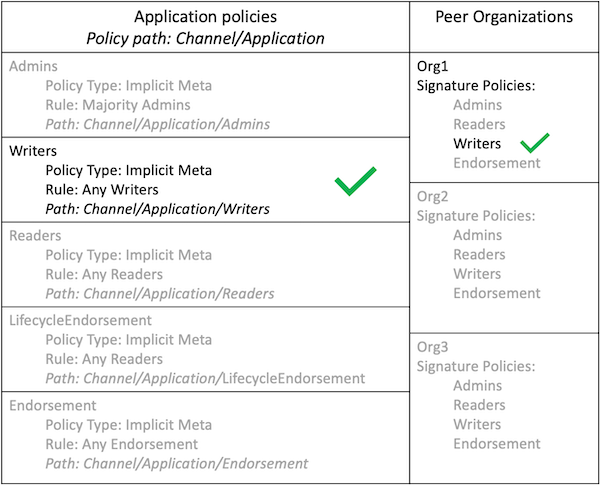
图 4:/Channel/Application/Writers策略满足 peer/Propose ACL。可以使用任何writers签名策略的客户应用程序从任何组织提交的交易来满足此策略。
Orderer策略
configtx.yaml的Orderer部分中的ImplicitMeta策略以与Application部分管理Peer组织类似的方式来管理通道的Orderer节点。 ImplicitMeta策略指向与排序服务管理员的组织相关联的签名策略。

图 5:Channel/Orderer/Admins策略指向与排序服务的管理员相关联的Admins签名策略。
如果使用默认策略,则需要大多数Orderer组织批准添加或删除Orderer节点。

图 6:提交的从通道中删除Orderer节点的请求包含来自网络中三个Orderer组织的签名,符合Channel/Orderer/Admins策略。 Org3检查为浅绿色,因为不需要签名个数达到大多数。
Peer使用Channel/Orderer/BlockValidation策略来确认添加到通道的新块是由作为通道共识者集合一部分的Orderer节点生成的,并且该块未被篡改或被另一个Peer组织创建。默认情况下,任何具有Writers签名策略的Orderer组织都可以创建和验证通道的块。
向通道添加组织
注解
确保你已经下载了 安装示例、二进制和 Docker 镜像 和 :doc:`prereqs`中所列出的镜像和二进制,并确定其版本与本文的版本(v2.2,版本号可在左边目录底部找到)保持一致。
本教程通过向应用通道中添加一个新的组织——Org3来扩展Fabric测试网络。
虽然我们在这里将只关注将新组织添加到通道中,但执行其他通道配置更新(如更新修改策略,调整块大小)也可以采取类似的方式。要了解更多的通道配置更新的相关过程,请查看`:doc:config_update。值得注意的是,像本文演示的这些通道配置更新通常是组织管理者(而非链码或者应用开发者)的职责。
环境构建
我们将从克隆到本地的 fabric-samples 的子目录 ``testt-network``进行操作。现在, 进入那个目录。
cd fabric-samples/test-network
首先,使用 network.sh
脚本清理环境。这个命令会清除所有活动状态或终止状态的容器,并且移除之前生成的构件。关闭Fabric网络并非执行通道配置升级的**必要**步骤。但是为了本教程,我们希望从一个已知的初始状态开始,因此让我们运行以下命令来清理之前的环境:
./network.sh down
现在可以执行脚本,运行带有一个命名为``mychannel``的通道的测试网络:
./network.sh up createChannel
如果上面的脚本成功执行,你能看到日志中打印出如下信息:
========= Channel successfully joined ===========
现在你的机器上运行着一个干净的测试网络版本,我们可以开始向我们创建的通道添加一个新的组织。首先,我们将使用一个脚本将Org3添加到通道中,以确认流程正常工作。然后,我们将通过更新通道配置逐步完成添加Org3的过程。
使用脚本将 Org3 加入通道
你应该在 test-network 目录下,简单地执行以下命令来使用脚本:
./eyfn.sh up
此处的输出值得一读。你可以看到添加了 Org3的加密材料,创建了Org3的组织定义,创建了配置更新和签名,然后提交到通道中。
如果一切顺利,你会看到以下信息:
========= Finished adding Org3 to your test network! =========
现在我们已经确认了我们可以将Org3添加到通道中,我们可以执行以下步骤来更新通道配置,以了解脚本幕后完成的工作。
手动将 Org3 加入通道
如果你刚执行了 addOrg3.sh 脚本,你需要先将网络关掉。下面的命令将关掉所有的组件,并移出所有组织的加密材料:
./addOrg3.sh down
网络关闭后,将其再次启动:
cd ..
./network.sh up createChannel
这会使网络恢复到执行``addOrg3.sh``脚本前的状态。
现在我们准备将Org3手动将加入到通道中。第一步,我们需要生成Org3的加密材料。
生成 Org3 加密材料
在另一个终端,切换到 test-network 的子目录 addOrg3 中。
cd addOrg3
首先,我们将为Org3的peer节点以及一个应用程序和管理员用户创建证书和密钥。因为我们在更新一个示例通道,所以我们将使用``cryptogen``工具代替CA。下面的命令使用``cryptogen``读取``org3-crypto.yaml``文件并在``org3.example.com``文件夹中生成Org3的加密材料。
../../bin/cryptogen generate --config=org3-crypto.yaml --output="../organizations"
在``test-network/organizations/peerOrganizations``目录中,你能在Org1和Org2证书和秘钥旁边找到已生成的Org3加密材料。
一旦我们生成了Org3的加密材料,我们就能使用``configtxgen``工具打印出Org3的组织定义。我们将在执行命令前告诉这个工具在当前目录去获取``configtx.yaml`` 文件。
export FABRIC_CFG_PATH=$PWD
../../bin/configtxgen -printOrg Org3MSP > ../organizations/peerOrganizations/org3.example.com/org3.json
上面的命令会创建一个 JSON 文件 – org3.json – 并将其写入到``test-network/organizations/peerOrganizations/org3.example.com``文件夹下。这个组织定义文件包含了Org3 的策略定义,还有三个 base 64 格式的重要的证书:
- 一个CA 根证书t, 用于建立组织的根信任
- 一个TLS根证书, 用于在gossip协议中识别Org3的块传播和服务发现
- 管理员用户证书 (以后作为Org3的管理员会用到它)
我们将通过把这个组织定义附加到通道配置中来实现将Org3添加到通道中。
启动Org3组件
在创建了Org3证书材料之后,现在可以启动Org3 peer节点。在addOrg3目录中执行以下命令:
docker-compose -f docker/docker-compose-org3.yaml up -d
如果命令成功执行,你将看到Org3 peer节点的创建和一个命名为Org3CLI的Fabric tools容器:
Creating peer0.org3.example.com ... done
Creating Org3cli ... done
这个Docker Compose文件以及被配置为桥接我们的处所网络,所以Org3的peer节点和Org3CLI可以被测试网络中的peer节点和ordering节点解析。我们将使用Org3CLI容器和网络通信,并执行把Org3添加到到通道中的peer命令。
准备CLI环境
配置更新的过程利用了配置翻译工具 – configtxlator。这个工具提供了一个独立于SDK的无状态REST API。此外它还提供了一个用于简化Fabric网络配置任务的的CLI工具。该工具允许在不同的等价数据表示/格式之间进行简单的转换(在本例中是在protobufs和JSON之间)。此外,该工具可以根据两个通道配置之间的差异计算配置更新交易。
使用以下命令进入Org3CLI容器:
docker exec -it Org3cli bash
这个容器已经被挂载在``organizations``文件夹中,让我们能够访问所有组织和Orderer Org的加密材料和TLS证书。我们可以使用环境变量来操作Org3CLI容器,以切换Org1、Org2或Org3的管理员角色。首先,我们需要为orderer TLS证书和通道名称设置环境变量:
export ORDERER_CA=/opt/gopath/src/github.com/hyperledger/fabric/peer/organizations/ordererOrganizations/example.com/orderers/orderer.example.com/msp/tlscacerts/tlsca.example.com-cert.pem
export CHANNEL_NAME=mychannel
检查下以确保变量已经被正确设置:
echo $ORDERER_CA && echo $CHANNEL_NAME
注解
如果出于任何原因需要重启Org3CLI容器,你还需要重新设置两个环境变量 – ORDERER_CA and CHANNEL_NAME.
获取配置
现在我们有了一个设置了 ORDERER_CA 和 CHANNEL_NAME 环境变量的 CLI容器。让我们获取通道 – mychannel 的最新的配置区块。
我们必须拉取最新版本配置的原因是通道配置元素是版本化的。版本管理由于一些原因显得很重要。它可以防止通道配置更新被重复或者重放攻击(例如,回退到带有旧的 CRLs的通道配置将会产生安全风险)。同时它保证了并行性(例如,如果你想从你的通道中添加新的组织后,再删除一个组织,版本管理可以帮助你移除想移除的那个组织,并防止移除两个组织)。
因为Org3还不是通道的成员,所以我们需要作为另一个组织的管理员来操作以获取通道配置。因为Org1是通道的成员,所以Org1管理员有权从ordering服务中获取通道配置。作为Org1管理员进行操作,执行以下命令。
# you can issue all of these commands at once
export CORE_PEER_LOCALMSPID="Org1MSP"
export CORE_PEER_TLS_ROOTCERT_FILE=/opt/gopath/src/github.com/hyperledger/fabric/peer/organizations/peerOrganizations/org1.example.com/peers/peer0.org1.example.com/tls/ca.crt
export CORE_PEER_MSPCONFIGPATH=/opt/gopath/src/github.com/hyperledger/fabric/peer/organizations/peerOrganizations/org1.example.com/users/Admin@org1.example.com/msp
export CORE_PEER_ADDRESS=peer0.org1.example.com:7051
我们现在执行命令获取最新的配置块:
peer channel fetch config config_block.pb -o orderer.example.com:7050 -c $CHANNEL_NAME --tls --cafile $ORDERER_CA
这个命令将通道配置区块以二进制protobuf形式保存在``config_block.pb``。注意文件的名字和扩展名可以任意指定。但是,推荐遵循标识要表示的对象类型及其编码(protobuf或JSON)的约定。
当你执行 peer channel fetch 命令后,下面的输出将出现在你的日志中:
2017-11-07 17:17:57.383 UTC [channelCmd] readBlock -> DEBU 011 Received block: 2
这是告诉我们最新的 mychannel 的配置区块实际上是区块 2, **并非**初始区块。 peer channel fetch config``命令默认返回目标通道最新的配置区块,在这个例子里是第三个区块。这是因为测试网络脚本``network.sh``分别在两个通道更新交易中为两个组织 -- ``Org1 和 ``Org2``定义了锚节点。最终,我们有如下的配置块序列:
- block 0: genesis block
- block 1: Org1 anchor peer update
- block 2: Org2 anchor peer update
将配置转换到 JSON 格式并裁剪
现在我们用 configtxlator 工具将这个通道配置解码为JSON格式(以便被友好地阅读和修改)。我们也必须裁剪所有的头部、元数据、创建者签名等以及其他和我们将要做的修改无关的内容。我们通过``jq`` 这个工具来完成裁剪:
configtxlator proto_decode --input config_block.pb --type common.Block | jq .data.data[0].payload.data.config > config.json
这个命令使我们得到一个裁剪后的JSON对象 – config.json,这个文件将作为我们配置更新的基准。
花一些时间用你的文本编辑器(或者你的浏览器)打开这个文件。即使你已经完成了这个教程, 也值得研究下它,因为它揭示了底层配置结构,和能做的其它类型的通道更新升级。我们将在 :doc:`config_update`更详细地讨论。
添加Org3加密材料
注解
目前到这里你做的步骤和其他任何类型的配置升级所需步骤几乎是一致的。我们之
所以选择在教程中添加一个组织,是因为这是能做的配置升级里最复杂的一个。
我们将再次使用 jq 工具去追加 Org3 的配置定义 – org3.json –到通道的应用组字段,同时定义输出文件是 – modified_config.json 。
jq -s '.[0] * {"channel_group":{"groups":{"Application":{"groups": {"Org3MSP":.[1]}}}}}' config.json ./organizations/peerOrganizations/org3.example.com/org3.json > modified_config.json
现在,我们在Org3CLI 容器有两个重要的 JSON 文件 – config.json 和``modified_config.json`` 。初始的文件包含 Org1 和 Org2 的材料,而”modified”文件包含了总共3个组织。现在只需要将这 2 个 JSON文件重新编码并计算出差异部分。
首先,将 config.json 文件倒回到 protobuf 格式,命名为 config.pb:
configtxlator proto_encode --input config.json --type common.Config --output config.pb
下一步,将 modified_config.json 编码成 modified_config.pb:
configtxlator proto_encode --input modified_config.json --type common.Config --output modified_config.pb
现在使用 configtxlator 去计算两个protobuf配置的差异。这条命令会输出一个新的 protobuf 二进制文件,命名为``org3_update.pb`` :
configtxlator compute_update --channel_id $CHANNEL_NAME --original config.pb --updated modified_config.pb --output org3_update.pb
这个新的 proto 文件 – org3_update.pb – 包含了 Org3 的定义和指向Org1 和 Org2 材料的更高级别的指针。我们可以抛弃 Org1和Org2相关的MSP材料和修改策略信息,因为这些数据已经存在于通道的初始区块。因此,我们只需要两个配置的差异部分。
在我们提交通道更新前,我们执行最后做几个步骤。首先,我们将这个对象解码成可编辑的JSON 格式,并命名为 org3_update.json:
configtxlator proto_decode --input org3_update.pb --type common.ConfigUpdate | jq . > org3_update.json
现在,我们有了一个解码后的更新文件 – org3_update.json –我们需要用信封消息来包装它。这个步骤要把之前裁剪掉的头部信息还原回来。我们将这个文件命名为``org3_update_in_envelope.json`` 。
echo '{"payload":{"header":{"channel_header":{"channel_id":"'$CHANNEL_NAME'", "type":2}},"data":{"config_update":'$(cat org3_update.json)'}}}' | jq . > org3_update_in_envelope.json
使用我们格式化好的 JSON – org3_update_in_envelope.json –我们最后一次使用 configtxlator 工具将他转换为 Fabric需要的完全成熟的protobuf``格式。我们将最后的更新对象命名为``org3_update_in_envelope.pb`` 。
configtxlator proto_encode --input org3_update_in_envelope.json --type common.Envelope --output org3_update_in_envelope.pb
签名并提交配置更新
差不多大功告成了!
我们现在有一个 protobuf二进制文件 – org3_update_in_envelope.pb– 在我们的 Org3CLI容器内。但是,在配置写入到账本前,我们需要来自必要的Admin用户的签名。我们通道应用组的修改策略(mod_policy)设置为默认值”MAJORITY”,这意味着我们需要大多数已经存在的组织管理员去签名这个更新。因为我们只有两个组织 – Org1 和 Org2 – 所以两个的大多数也还是两个,我们需要它们都签名。没有这两个签名,排序服务会因为不满足策略而拒绝这个交易。
首先,让我们以 Org1 管理员来签名这个更新 proto。记住我们导出了必要的环境变量,以作为Org1管理员来操作Org3CLI容器。因此,下面的``peer channel signconfigtx``命令将更新签名为Org1。
peer channel signconfigtx -f org3_update_in_envelope.pb
最后一步,我们将容器的身份切换为 Org2管理员用户。我们通过导出和Org2 MSP相关的4个环境变量实现这步。
注解
切换不同的组织身份为配置交易签名(或者其他事情)不能反映真实世界里Fabric 的操作。一个单一容器不可能挂载了整个网络的加密材料。相反地,配置更新需要在网络外安全地递交给Org2管理员来审查和批准。
导出 Org2 的环境变量:
# you can issue all of these commands at once
export CORE_PEER_LOCALMSPID="Org2MSP"
export CORE_PEER_TLS_ROOTCERT_FILE=/opt/gopath/src/github.com/hyperledger/fabric/peer/organizations/peerOrganizations/org2.example.com/peers/peer0.org2.example.com/tls/ca.crt
export CORE_PEER_MSPCONFIGPATH=/opt/gopath/src/github.com/hyperledger/fabric/peer/organizations/peerOrganizations/org2.example.com/users/Admin@org2.example.com/msp
export CORE_PEER_ADDRESS=peer0.org2.example.com:9051
最后,我们执行 peer channel update 命令。Org2管理员在这个命令中会附带签名,因 此就没有必要对 protobuf 进行两次签名:
注解
将要做的对排序服务的更新调用,会经历一系列的系统级签名和策略检查。你会发现通过检视排序节点的日志流会非常有用。在另外一个终端执行``docker logs -f orderer.example.com`` 命令就能展示它们了。
发起更新调用:
peer channel update -f org3_update_in_envelope.pb -c $CHANNEL_NAME -o orderer.example.com:7050 --tls --cafile $ORDERER_CA
如果你的更新提交成功,将会看到一个类似如下的信息:
2020-01-09 21:30:45.791 UTC [channelCmd] update -> INFO 002 Successfully submitted channel update
成功的通道更新调用会返回一个新的区块 – 区块3 – 给所有在这个通道上的peer节点。你是否还记得,区块 0-2是初始的通道配置,区块3就是带有Org3定义的最新的通道配置。
你可以通过进入到Org3CLI容器外的一个终端并用以下命令来检查查看
peer0.org1.example.com 的日志:
docker logs -f peer0.org1.example.com
将 Org3 加入通道
此时,通道的配置已经更新并包含了我们新的组织 – Org3 – 意味者这个组织下的节点可以加入到 mychannel。
在Org3CLI容器中,导出一下的环境变量用来以Org3Admin的身份来进行操作:
# you can issue all of these commands at once
export CORE_PEER_LOCALMSPID="Org3MSP"
export CORE_PEER_TLS_ROOTCERT_FILE=/opt/gopath/src/github.com/hyperledger/fabric/peer/organizations/peerOrganizations/org3.example.com/peers/peer0.org3.example.com/tls/ca.crt
export CORE_PEER_MSPCONFIGPATH=/opt/gopath/src/github.com/hyperledger/fabric/peer/organizations/peerOrganizations/org3.example.com/users/Admin@org3.example.com/msp
export CORE_PEER_ADDRESS=peer0.org3.example.com:11051
现在,让我们向排序服务发送一个调用,请求``mychannel``的创世块。由于成功地更新了通道,排序服务将验证Org3可以拉取创世块并加入该通道。如果没有成功地将Org3附加到通道配置中,排序服务将拒绝此请求。
使用 peer channel fetch 命令来获取这个区块:
peer channel fetch 0 mychannel.block -o orderer.example.com:7050 -c $CHANNEL_NAME --tls --cafile $ORDERER_CA
注意,我们传递了 ``0``去索引我们在这个通道账本上想要的区块(例如,创世块)。如果我们简单地执行``peer channel fetch config``命令,我们将会收到区块 3 – 那个带有Org3定义的更新后的配置。然而,我们的账本不能从一个下游的区块开始 – 我们必须从区块 0 开始。
如果成功,该命令将创世块返回到名为``mychannel.block``的文件。我们现在可以使用这个块来连接到通道的peer端。执行``peer channel join``命令并传入创世块,以将Org3的peer节点加入到通道中:
peer channel join -b mychannel.block
配置领导节点选举
注解
引入这个章节作为通用参考,是为了理解在完成网络通道配置初始化之后,增加组织时,领导节点选举的设置。这个例子中,默认设置为动态领导选举,这是为网络中所有的节点设置的。
新加入的节点是根据初始区块启动的,初始区块是不包含通道配置更新中新加入的组织信息的。因此新的节点无法利用gossip协议,因为它们无法验证从自己组织里其他节点发送过来的区块,除非它们接收到将组织加入到通道的那个配置交易。新加入的节点必须有以下配置之一才能从排序服务接收区块:
- 采用静态领导者模式,将peer节点配置为组织的领导者。
CORE_PEER_GOSSIP_USELEADERELECTION=false
CORE_PEER_GOSSIP_ORGLEADER=true
注解
这个配置对于新加入到通道中的所有节点必须一致。
- 采用动态领导者选举,配置节点采用领导选举的方式:
CORE_PEER_GOSSIP_USELEADERELECTION=true
CORE_PEER_GOSSIP_ORGLEADER=false
注解
因为新加入组织的节点,无法生成成员关系视图,这个选项和静态配置类似,每
个节点启动时宣称自己是领导者。但是,一旦它们更新到了将组织加入到通道的配置交易,组织中将只会有一个激活状态的领导者。因此,如果你想最终组织的节点采用领导选举,建议你采用这个配置。
安装、定义和调用链码
我们可以通过在通道上安装和调用链码来确认Org3是``mychannel``的成员。如果现有的通道成员已经向该通道提交了链码定义,则新组织可以通过批准链码定义来开始使用该链码。
注解
这些链码生命周期指令是在v2.0 release版本中引入的。如果你想要使用先前的生命周期去安装和实例化链码,可参考v1.4版本的`Adding an org to a channel tutorial <https://hyperledger-fabric.readthedocs.io/en/release-1.4/channel_update_tutorial.html>`__.
在我们以Org3来安装链码之前,我们可以使用 ./network.sh 脚本在通道上部署Fabcar链码。在Org3CLI容器外打开一个新的终端,并进入 test-network 目录。然后你可以使用 test-network 脚本来部署``Fabcar``链码:
cd fabric-samples/test-network
./network.sh deployCC
该脚本将在Org1和Org2的peer节点上安装Fabcar链码,批准Org1和Org2的链码定义,然后将链码定义提交给通道。一旦将链码定义提交到通道,就会初始化Fabcar链码并调用它来将初始数据放到账本上。下面的命令假设我们仍在使用 mychannel 通道。
在部署了链码之后,我们可以使用以下步骤在Org3中调用Fabcar链代码。这些步骤可以在 test-network 目录中完成,而不必在Org3CLI容器中执行。在你的终端中复制和粘贴以下环境变量,以便以Org3管理员的身份与网络交互:
export PATH=${PWD}/../bin:$PATH
export FABRIC_CFG_PATH=$PWD/../config/
export CORE_PEER_TLS_ENABLED=true
export CORE_PEER_LOCALMSPID="Org3MSP"
export CORE_PEER_TLS_ROOTCERT_FILE=${PWD}/organizations/peerOrganizations/org3.example.com/peers/peer0.org3.example.com/tls/ca.crt
export CORE_PEER_MSPCONFIGPATH=${PWD}/organizations/peerOrganizations/org3.example.com/users/Admin@org3.example.com/msp
export CORE_PEER_ADDRESS=localhost:11051
第一步是打包Fabcar链码:
peer lifecycle chaincode package fabcar.tar.gz --path ../chaincode/fabcar/go/ --lang golang --label fabcar_1
这个命令会创建一个链码包,命名为``fabcar.tar.gz``,用它来在我们的Org3的peer节点上安装链码。如果通道中运行的是java或者Node.js语言写的链码,需要根据实际情况修改这个命令。输入下面的命令在peer0.org3.example.com上安装链码:
peer lifecycle chaincode install fabcar.tar.gz
下一步是以Org3的身份批准链码Fabcar定义。Org3需要批准与Org1和Org2同样的链码定义,然后提交到通道中。为了调用链码,Org3需要在链码定义中包含包标识符。你可以在你的peer中查到包标识:
peer lifecycle chaincode queryinstalled
你应该会看到类似下面的输出:
Get installed chaincodes on peer:
Package ID: fabcar_1:25f28c212da84a8eca44d14cf12549d8f7b674a0d8288245561246fa90f7ab03, Label: fabcar_1
我们后面的命令中会需要这个包标识。所以让我们继续把它保存到环境变量。把``peer lifecycle chaincode queryinstalled``返回的包标识粘贴到下面的命令中。这个包标识每个用户可能都不一样,所以需要使用从你控制台返回的包标识完成下一步。
export CC_PACKAGE_ID=fabcar_1:25f28c212da84a8eca44d14cf12549d8f7b674a0d8288245561246fa90f7ab03
使用下面的命令来为Org3批准链码Fabcar定义:
# use the --package-id flag to provide the package identifier
# use the --init-required flag to request the ``Init`` function be invoked to initialize the chaincode
peer lifecycle chaincode approveformyorg -o localhost:7050 --ordererTLSHostnameOverride orderer.example.com --channelID mychannel --name fabcar --version 1 --init-required --package-id $CC_PACKAGE_ID --sequence 1 --tls --cafile ${PWD}/organizations/ordererOrganizations/example.com/orderers/orderer.example.com/msp/tlscacerts/tlsca.example.com-cert.pem
你可以使用 peer lifecycle chaincode querycommitted 命令来检查你批准的链码定义是否已经提交到通道中。
# use the --name flag to select the chaincode whose definition you want to query
peer lifecycle chaincode querycommitted --channelID mychannel --name fabcar --cafile ${PWD}/organizations/ordererOrganizations/example.com/orderers/orderer.example.com/msp/tlscacerts/tlsca.example.com-cert.pem
命令执行成功后会返回关于被提交的链码定义的信息:
ommitted chaincode definition for chaincode 'fabcar' on channel 'mychannel':
Version: 1, Sequence: 1, Endorsement Plugin: escc, Validation Plugin: vscc, Approvals: [Org1MSP: true, Org2MSP: true, Org3MSP: true]
Org3在批准提交到通道的链码定义后,就可以使用Fabcar链码了。链码定义使用默认的背书策略,该策略要求通道上的大多数组织背书一个交易。这意味着,如果一个组织被添加到通道或从通道中删除,背书策略将自动更新。我们之前需要来自Org1和Org2的背书(2个中的2个),现在我们需要来自Org1、Org2和Org3中的两个组织的背书(3个中的2个)。
你可以查询链码,以确保它已经在Org3的peer上启动。注意,你可能需要等待链码容器启动。
eer chaincode query -C mychannel -n fabcar -c '{"Args":["queryAllCars"]}'
你应该看到作为响应添加到账本中的汽车的初始列表。
现在,调用链码将一辆新车添加到账本中。在下面的命令中,我们以Org1和Org3中的peer为目标,以收集足够数量的背书。
peer chaincode invoke -o localhost:7050 --ordererTLSHostnameOverride orderer.example.com --tls --cafile ${PWD}/organizations/ordererOrganizations/example.com/orderers/orderer.example.com/msp/tlscacerts/tlsca.example.com-cert.pem -C mychannel -n fabcar --peerAddresses localhost:7051 --tlsRootCertFiles ${PWD}/organizations/peerOrganizations/org1.example.com/peers/peer0.org1.example.com/tls/ca.crt --peerAddresses localhost:11051 --tlsRootCertFiles ${PWD}/organizations/peerOrganizations/org3.example.com/peers/peer0.org3.example.com/tls/ca.crt -c '{"function":"createCar","Args":["CAR11","Honda","Accord","Black","Tom"]}'
我们再次查看下账本中的新车,发现”CAR11”已结在我们的账本中了:
peer chaincode query -C mychannel -n fabcar -c '{"Args":["queryCar","CAR11"]}'
总结
通道配置更新过程确实非常复杂,但是各个步骤都有一个逻辑方法。最后就是为了形成一个用protobuf二进制表示的差异化的交易对象,然后获取必要数量的管理员签名来使通道配置更新交易满足通道的修改策略。
configtxlator 和 jq 工具,和不断使用的 peer channel
命令,为我们提供了完成这个任务的基本功能。
更新通道配置包括Org3的锚节点(可选)
因为Org1和Org2在通道配置中已经定义了锚节点,所以Org3的节点可以与Org1和Org2的节点通过gossip协议进行连接。同样,像Org3这样新添加的组织也应该在通道配置中定义它们的锚节点,以便来自其他组织的任何新节点可以直接发现Org3节点。在本节中,我们将对通道配置进行更新,以定义Org3锚节点。这个过程将类似于之前的配置更新,因此这次我们会更快。
如果你没有进入到Org3CLI容器,执行:
docker exec -it Org3cli bash
如果尚未设置$ORDERER_CA和$CHANNEL_NAME变量,执行:
export ORDERER_CA=/opt/gopath/src/github.com/hyperledger/fabric/peer/organizations/ordererOrganizations/example.com/orderers/orderer.example.com/msp/tlscacerts/tlsca.example.com-cert.pem
export CHANNEL_NAME=mychannel
和以前一样,我们开始会获取最新的通道配置。在Org3的CLI容器中获取通道中最近的配置区块, 使用``peer channel fetch``命令。
peer channel fetch config config_block.pb -o orderer.example.com:7050 -c $CHANNEL_NAME --tls --cafile $ORDERER_CA
在获取到配置区块后,我们将要把它转换成JSON格式。为此我们会使用configtxlator工具,正如前面在通道中加入Org3一样。当转换时,我们需要删除所有更新Org3不需要的头部、元数据和签名,使用jq工具添加包含一个锚节点的Org3更新。这些信息会在更新通道配置前重新合并。
configtxlator proto_decode --input config_block.pb --type common.Block | jq .data.data[0].payload.data.config > config.json
``config.json``就是现在修剪后的JSON文件,表示我们要更新的最新的通道配置。
再使用jq工具,我们将想要添加的Org3锚节点更新在JSON配置中。
jq '.channel_group.groups.Application.groups.Org3MSP.values += {"AnchorPeers":{"mod_policy": "Admins","value":{"anchor_peers": [{"host": "peer0.org3.example.com","port": 11051}]},"version": "0"}}' config.json > modified_anchor_config.json
现在我们有两个JSON文件了,一个是当前的通道配置``config.json``,另外一个是期望的通道配置``modified_anchor_config.json`` 。 接下来我们依次转换成protobuf格式,并计算他们之间的增量。
把``config.json``翻译回protobuf格式``config.pb``。
configtxlator proto_encode --input config.json --type common.Config --output config.pb
把``modified_anchor_config.json``翻译回protobuf格式``modified_anchor_config.pb``。
configtxlator proto_encode --input modified_anchor_config.json --type common.Config --output modified_anchor_config.pb
计算这两个protobuf``格式配置的增量。
configtxlator compute_update --channel_id $CHANNEL_NAME --original config.pb --updated modified_anchor_config.pb --output anchor_update.pb
现在我们已经有了期望的通道更新,下面必须把它包在一个信封消息里以便正确读取。要做到这一点,我们先把protobuf格式转换回JSON格式才能被包装。
我们再此使用configtxlator命令,把``anchor_update.pb``转换成``anchor_update.json``。
configtxlator proto_decode --input anchor_update.pb --type common.ConfigUpdate | jq . > anchor_update.json
接下来我们来把更新包在信封消息里,恢复先前去掉的头,输出到``anchor_update_in_envelope.json``中。
echo '{"payload":{"header":{"channel_header":{"channel_id":"'$CHANNEL_NAME'", "type":2}},"data":{"config_update":'$(cat anchor_update.json)'}}}' | jq . > anchor_update_in_envelope.json
现在我们已经重新合并了信封,我们需要把它装换成protobuf格式以便正确签名并提交到orderer进行更新。
configtxlator proto_encode --input anchor_update_in_envelope.json --type common.Envelope --output anchor_update_in_envelope.pb
现在更新已经被正确格式化,是时候签名并提交了。因为这只是对Org3做更新,我们只需要Org3对更新签名。为了确保我们以Org3的管理员身份操作,运行以下命令:
# you can issue all of these commands at once
export CORE_PEER_LOCALMSPID="Org3MSP"
export CORE_PEER_TLS_ROOTCERT_FILE=/opt/gopath/src/github.com/hyperledger/fabric/peer/organizations/peerOrganizations/org3.example.com/peers/peer0.org3.example.com/tls/ca.crt
export CORE_PEER_MSPCONFIGPATH=/opt/gopath/src/github.com/hyperledger/fabric/peer/organizations/peerOrganizations/org3.example.com/users/Admin@org3.example.com/msp
export CORE_PEER_ADDRESS=peer0.org3.example.com:11051
在将更新提交给order之前,现在我们以Org3 admin身份使用``peer channel update``命令进行签名。
peer channel update -f anchor_update_in_envelope.pb -c $CHANNEL_NAME -o orderer.example.com:7050 --tls --cafile $ORDERER_CA
orderer接收到配置更新请求,用这个配置更新切分成区块。当节点接收到区块后,他们就会处理配置更新了。
检查其中一个peer节点的日志。当处理新区块带来的配置更新时,你会看到gossip使用新的锚节点与Org3重新建立连接。这就证明了配置更新已经成功应用。
docker logs -f peer0.org1.example.com
2019-06-12 17:08:57.924 UTC [gossip.gossip] learnAnchorPeers -> INFO 89a Learning about the configured anchor peers of Org1MSP for channel mychannel : [{peer0.org1.example.com 7051}]
2019-06-12 17:08:57.926 UTC [gossip.gossip] learnAnchorPeers -> INFO 89b Learning about the configured anchor peers of Org2MSP for channel mychannel : [{peer0.org2.example.com 9051}]
2019-06-12 17:08:57.926 UTC [gossip.gossip] learnAnchorPeers -> INFO 89c Learning about the configured anchor peers of Org3MSP for channel mychannel : [{peer0.org3.example.com 11051}]
恭喜,你已经成功做了两次配置更新 — 一个是向通道加入Org3,第二个是在Org3中定义锚节点。
更新通道配置
受众:网络管理员、节点管理员
什么是通道配置?
像许多复杂的系统一样,Hyperledger Fabric 网络由一些结构及其相关的过程组成。
- Structure:包括用户(如管理员)、组织、peer 节点、排序节点、CA、智能合约以及应用程序。
- Process:结构相互作用的方式。其中最重要的是 策略,这些规则控制着哪些用户可以在什么条件下执行什么操作。
识别区块链网络的结构和管理结构如何相互作用的过程的信息位于通道配置中。这些配置由通道成员共同决定,并包含在提交给通道账本的区块中。通道配置可以使用 configtxgen 工具来构建,该工具使用 configtx.yaml 文件作为输入。你可以在此处查看 configtx.yaml 的样例文件。
由于配置位于区块中(第一个区块被称为创世区块,它包含通道的最新配置),因此更新通道配置的过程(比如,通过添加成员来更改结构或者修改通道配置)被称为配置更新交易。
在生产网络中,通道的初始化配置由该通道的初始成员在外部决定,同样的,配置更新交易也通常是在外部讨论后由单个通道管理员提出。
在本主题中,我们将:
- 展示一个应用程序通道的完整配置示例。
- 讨论很多可以编辑的通道参数。
- 展示更新通道配置的过程,该过程包括提取、转换和确定配置范围的命令,这些命令会将通道配置转换成易于人们阅读的格式。
- 讨论可以用于修改通道配置的方法。
- 展示重新格式化配置的过程,并获取使配置生效所必需的签名。
可以更新的通道参数
通道是高度可配置的,但也有限制。某些与通道相关的内容(例如通道的名称)被确定后就无法再进行修改。而且修改我们在本主题中讨论的某个参数时需要满足通道配置中指定的相关策略。
在本节中,我们将查看一个通道配置示例,并展示那些可以更新的配置参数。
通道配置示例
要查看应用程序通道被提取并被确定范围后的内容,请点击下方的点击此处查看配置。为了方便阅读,最好将此配置放入支持 JSON 折叠的查看器中,比如 atom 或 Visual Studio。
请注意:为简单起见,这里只展示了应用程序通道的配置。排序系统通道的配置与应用程序通道的配置非常相似,但不完全相同。不过当提取和编辑配置时,使用的基本规则、结构是相同的,你可以在更新通道的功能级别主题中查看相关内容。
Click here to see the config. Note that this is the configuration of an application channel, not the orderer system channel.
{
"channel_group": {
"groups": {
"Application": {
"groups": {
"Org1MSP": {
"groups": {},
"mod_policy": "Admins",
"policies": {
"Admins": {
"mod_policy": "Admins",
"policy": {
"type": 1,
"value": {
"identities": [
{
"principal": {
"msp_identifier": "Org1MSP",
"role": "ADMIN"
},
"principal_classification": "ROLE"
}
],
"rule": {
"n_out_of": {
"n": 1,
"rules": [
{
"signed_by": 0
}
]
}
},
"version": 0
}
},
"version": "0"
},
"Endorsement": {
"mod_policy": "Admins",
"policy": {
"type": 1,
"value": {
"identities": [
{
"principal": {
"msp_identifier": "Org1MSP",
"role": "PEER"
},
"principal_classification": "ROLE"
}
],
"rule": {
"n_out_of": {
"n": 1,
"rules": [
{
"signed_by": 0
}
]
}
},
"version": 0
}
},
"version": "0"
},
"Readers": {
"mod_policy": "Admins",
"policy": {
"type": 1,
"value": {
"identities": [
{
"principal": {
"msp_identifier": "Org1MSP",
"role": "ADMIN"
},
"principal_classification": "ROLE"
},
{
"principal": {
"msp_identifier": "Org1MSP",
"role": "PEER"
},
"principal_classification": "ROLE"
},
{
"principal": {
"msp_identifier": "Org1MSP",
"role": "CLIENT"
},
"principal_classification": "ROLE"
}
],
"rule": {
"n_out_of": {
"n": 1,
"rules": [
{
"signed_by": 0
},
{
"signed_by": 1
},
{
"signed_by": 2
}
]
}
},
"version": 0
}
},
"version": "0"
},
"Writers": {
"mod_policy": "Admins",
"policy": {
"type": 1,
"value": {
"identities": [
{
"principal": {
"msp_identifier": "Org1MSP",
"role": "ADMIN"
},
"principal_classification": "ROLE"
},
{
"principal": {
"msp_identifier": "Org1MSP",
"role": "CLIENT"
},
"principal_classification": "ROLE"
}
],
"rule": {
"n_out_of": {
"n": 1,
"rules": [
{
"signed_by": 0
},
{
"signed_by": 1
}
]
}
},
"version": 0
}
},
"version": "0"
}
},
"values": {
"AnchorPeers": {
"mod_policy": "Admins",
"value": {
"anchor_peers": [
{
"host": "peer0.org1.example.com",
"port": 7051
}
]
},
"version": "0"
},
"MSP": {
"mod_policy": "Admins",
"value": {
"config": {
"admins": [],
"crypto_config": {
"identity_identifier_hash_function": "SHA256",
"signature_hash_family": "SHA2"
},
"fabric_node_ous": {
"admin_ou_identifier": {
"certificate": "LS0tLS1CRUdJTiBDRVJUSUZJQ0FURS0tLS0tCk1JSUNKekNDQWMyZ0F3SUJBZ0lVYWVSeWNkQytlR1lUTUNyWTg2UFVXUEdzQUw0d0NnWUlLb1pJemowRUF3SXcKY0RFTE1Ba0dBMVVFQmhNQ1ZWTXhGekFWQmdOVkJBZ1REazV2Y25Sb0lFTmhjbTlzYVc1aE1ROHdEUVlEVlFRSApFd1pFZFhKb1lXMHhHVEFYQmdOVkJBb1RFRzl5WnpFdVpYaGhiWEJzWlM1amIyMHhIREFhQmdOVkJBTVRFMk5oCkxtOXlaekV1WlhoaGJYQnNaUzVqYjIwd0hoY05NakF3TXpJME1qQXhPREF3V2hjTk16VXdNekl4TWpBeE9EQXcKV2pCd01Rc3dDUVlEVlFRR0V3SlZVekVYTUJVR0ExVUVDQk1PVG05eWRHZ2dRMkZ5YjJ4cGJtRXhEekFOQmdOVgpCQWNUQmtSMWNtaGhiVEVaTUJjR0ExVUVDaE1RYjNKbk1TNWxlR0Z0Y0d4bExtTnZiVEVjTUJvR0ExVUVBeE1UClkyRXViM0puTVM1bGVHRnRjR3hsTG1OdmJUQlpNQk1HQnlxR1NNNDlBZ0VHQ0NxR1NNNDlBd0VIQTBJQUJLWXIKSmtqcEhjRkcxMVZlU200emxwSmNCZEtZVjc3SEgvdzI0V09sZnphYWZWK3VaaEZ2YTFhQm9aaGx5RloyMGRWeApwMkRxb09BblZ4MzZ1V3o2SXl1alJUQkRNQTRHQTFVZER3RUIvd1FFQXdJQkJqQVNCZ05WSFJNQkFmOEVDREFHCkFRSC9BZ0VCTUIwR0ExVWREZ1FXQkJTcHpDQWdPaGRuSkE3VVpxUWlFSVFXSFpnYXZEQUtCZ2dxaGtqT1BRUUQKQWdOSUFEQkZBaUVBbEZtYWdIQkJoblFUd3dDOXBQRTRGbFY2SlhIbTdnQ1JyWUxUbVgvc0VySUNJRUhLZG51KwpIWDgrVTh1ZkFKbTdrL1laZEtVVnlWS2E3bGREUjlWajNveTIKLS0tLS1FTkQgQ0VSVElGSUNBVEUtLS0tLQo=",
"organizational_unit_identifier": "admin"
},
"client_ou_identifier": {
"certificate": "LS0tLS1CRUdJTiBDRVJUSUZJQ0FURS0tLS0tCk1JSUNKekNDQWMyZ0F3SUJBZ0lVYWVSeWNkQytlR1lUTUNyWTg2UFVXUEdzQUw0d0NnWUlLb1pJemowRUF3SXcKY0RFTE1Ba0dBMVVFQmhNQ1ZWTXhGekFWQmdOVkJBZ1REazV2Y25Sb0lFTmhjbTlzYVc1aE1ROHdEUVlEVlFRSApFd1pFZFhKb1lXMHhHVEFYQmdOVkJBb1RFRzl5WnpFdVpYaGhiWEJzWlM1amIyMHhIREFhQmdOVkJBTVRFMk5oCkxtOXlaekV1WlhoaGJYQnNaUzVqYjIwd0hoY05NakF3TXpJME1qQXhPREF3V2hjTk16VXdNekl4TWpBeE9EQXcKV2pCd01Rc3dDUVlEVlFRR0V3SlZVekVYTUJVR0ExVUVDQk1PVG05eWRHZ2dRMkZ5YjJ4cGJtRXhEekFOQmdOVgpCQWNUQmtSMWNtaGhiVEVaTUJjR0ExVUVDaE1RYjNKbk1TNWxlR0Z0Y0d4bExtTnZiVEVjTUJvR0ExVUVBeE1UClkyRXViM0puTVM1bGVHRnRjR3hsTG1OdmJUQlpNQk1HQnlxR1NNNDlBZ0VHQ0NxR1NNNDlBd0VIQTBJQUJLWXIKSmtqcEhjRkcxMVZlU200emxwSmNCZEtZVjc3SEgvdzI0V09sZnphYWZWK3VaaEZ2YTFhQm9aaGx5RloyMGRWeApwMkRxb09BblZ4MzZ1V3o2SXl1alJUQkRNQTRHQTFVZER3RUIvd1FFQXdJQkJqQVNCZ05WSFJNQkFmOEVDREFHCkFRSC9BZ0VCTUIwR0ExVWREZ1FXQkJTcHpDQWdPaGRuSkE3VVpxUWlFSVFXSFpnYXZEQUtCZ2dxaGtqT1BRUUQKQWdOSUFEQkZBaUVBbEZtYWdIQkJoblFUd3dDOXBQRTRGbFY2SlhIbTdnQ1JyWUxUbVgvc0VySUNJRUhLZG51KwpIWDgrVTh1ZkFKbTdrL1laZEtVVnlWS2E3bGREUjlWajNveTIKLS0tLS1FTkQgQ0VSVElGSUNBVEUtLS0tLQo=",
"organizational_unit_identifier": "client"
},
"enable": true,
"orderer_ou_identifier": {
"certificate": "LS0tLS1CRUdJTiBDRVJUSUZJQ0FURS0tLS0tCk1JSUNKekNDQWMyZ0F3SUJBZ0lVYWVSeWNkQytlR1lUTUNyWTg2UFVXUEdzQUw0d0NnWUlLb1pJemowRUF3SXcKY0RFTE1Ba0dBMVVFQmhNQ1ZWTXhGekFWQmdOVkJBZ1REazV2Y25Sb0lFTmhjbTlzYVc1aE1ROHdEUVlEVlFRSApFd1pFZFhKb1lXMHhHVEFYQmdOVkJBb1RFRzl5WnpFdVpYaGhiWEJzWlM1amIyMHhIREFhQmdOVkJBTVRFMk5oCkxtOXlaekV1WlhoaGJYQnNaUzVqYjIwd0hoY05NakF3TXpJME1qQXhPREF3V2hjTk16VXdNekl4TWpBeE9EQXcKV2pCd01Rc3dDUVlEVlFRR0V3SlZVekVYTUJVR0ExVUVDQk1PVG05eWRHZ2dRMkZ5YjJ4cGJtRXhEekFOQmdOVgpCQWNUQmtSMWNtaGhiVEVaTUJjR0ExVUVDaE1RYjNKbk1TNWxlR0Z0Y0d4bExtTnZiVEVjTUJvR0ExVUVBeE1UClkyRXViM0puTVM1bGVHRnRjR3hsTG1OdmJUQlpNQk1HQnlxR1NNNDlBZ0VHQ0NxR1NNNDlBd0VIQTBJQUJLWXIKSmtqcEhjRkcxMVZlU200emxwSmNCZEtZVjc3SEgvdzI0V09sZnphYWZWK3VaaEZ2YTFhQm9aaGx5RloyMGRWeApwMkRxb09BblZ4MzZ1V3o2SXl1alJUQkRNQTRHQTFVZER3RUIvd1FFQXdJQkJqQVNCZ05WSFJNQkFmOEVDREFHCkFRSC9BZ0VCTUIwR0ExVWREZ1FXQkJTcHpDQWdPaGRuSkE3VVpxUWlFSVFXSFpnYXZEQUtCZ2dxaGtqT1BRUUQKQWdOSUFEQkZBaUVBbEZtYWdIQkJoblFUd3dDOXBQRTRGbFY2SlhIbTdnQ1JyWUxUbVgvc0VySUNJRUhLZG51KwpIWDgrVTh1ZkFKbTdrL1laZEtVVnlWS2E3bGREUjlWajNveTIKLS0tLS1FTkQgQ0VSVElGSUNBVEUtLS0tLQo=",
"organizational_unit_identifier": "orderer"
},
"peer_ou_identifier": {
"certificate": "LS0tLS1CRUdJTiBDRVJUSUZJQ0FURS0tLS0tCk1JSUNKekNDQWMyZ0F3SUJBZ0lVYWVSeWNkQytlR1lUTUNyWTg2UFVXUEdzQUw0d0NnWUlLb1pJemowRUF3SXcKY0RFTE1Ba0dBMVVFQmhNQ1ZWTXhGekFWQmdOVkJBZ1REazV2Y25Sb0lFTmhjbTlzYVc1aE1ROHdEUVlEVlFRSApFd1pFZFhKb1lXMHhHVEFYQmdOVkJBb1RFRzl5WnpFdVpYaGhiWEJzWlM1amIyMHhIREFhQmdOVkJBTVRFMk5oCkxtOXlaekV1WlhoaGJYQnNaUzVqYjIwd0hoY05NakF3TXpJME1qQXhPREF3V2hjTk16VXdNekl4TWpBeE9EQXcKV2pCd01Rc3dDUVlEVlFRR0V3SlZVekVYTUJVR0ExVUVDQk1PVG05eWRHZ2dRMkZ5YjJ4cGJtRXhEekFOQmdOVgpCQWNUQmtSMWNtaGhiVEVaTUJjR0ExVUVDaE1RYjNKbk1TNWxlR0Z0Y0d4bExtTnZiVEVjTUJvR0ExVUVBeE1UClkyRXViM0puTVM1bGVHRnRjR3hsTG1OdmJUQlpNQk1HQnlxR1NNNDlBZ0VHQ0NxR1NNNDlBd0VIQTBJQUJLWXIKSmtqcEhjRkcxMVZlU200emxwSmNCZEtZVjc3SEgvdzI0V09sZnphYWZWK3VaaEZ2YTFhQm9aaGx5RloyMGRWeApwMkRxb09BblZ4MzZ1V3o2SXl1alJUQkRNQTRHQTFVZER3RUIvd1FFQXdJQkJqQVNCZ05WSFJNQkFmOEVDREFHCkFRSC9BZ0VCTUIwR0ExVWREZ1FXQkJTcHpDQWdPaGRuSkE3VVpxUWlFSVFXSFpnYXZEQUtCZ2dxaGtqT1BRUUQKQWdOSUFEQkZBaUVBbEZtYWdIQkJoblFUd3dDOXBQRTRGbFY2SlhIbTdnQ1JyWUxUbVgvc0VySUNJRUhLZG51KwpIWDgrVTh1ZkFKbTdrL1laZEtVVnlWS2E3bGREUjlWajNveTIKLS0tLS1FTkQgQ0VSVElGSUNBVEUtLS0tLQo=",
"organizational_unit_identifier": "peer"
}
},
"intermediate_certs": [],
"name": "Org1MSP",
"organizational_unit_identifiers": [],
"revocation_list": [],
"root_certs": [
"LS0tLS1CRUdJTiBDRVJUSUZJQ0FURS0tLS0tCk1JSUNKekNDQWMyZ0F3SUJBZ0lVYWVSeWNkQytlR1lUTUNyWTg2UFVXUEdzQUw0d0NnWUlLb1pJemowRUF3SXcKY0RFTE1Ba0dBMVVFQmhNQ1ZWTXhGekFWQmdOVkJBZ1REazV2Y25Sb0lFTmhjbTlzYVc1aE1ROHdEUVlEVlFRSApFd1pFZFhKb1lXMHhHVEFYQmdOVkJBb1RFRzl5WnpFdVpYaGhiWEJzWlM1amIyMHhIREFhQmdOVkJBTVRFMk5oCkxtOXlaekV1WlhoaGJYQnNaUzVqYjIwd0hoY05NakF3TXpJME1qQXhPREF3V2hjTk16VXdNekl4TWpBeE9EQXcKV2pCd01Rc3dDUVlEVlFRR0V3SlZVekVYTUJVR0ExVUVDQk1PVG05eWRHZ2dRMkZ5YjJ4cGJtRXhEekFOQmdOVgpCQWNUQmtSMWNtaGhiVEVaTUJjR0ExVUVDaE1RYjNKbk1TNWxlR0Z0Y0d4bExtTnZiVEVjTUJvR0ExVUVBeE1UClkyRXViM0puTVM1bGVHRnRjR3hsTG1OdmJUQlpNQk1HQnlxR1NNNDlBZ0VHQ0NxR1NNNDlBd0VIQTBJQUJLWXIKSmtqcEhjRkcxMVZlU200emxwSmNCZEtZVjc3SEgvdzI0V09sZnphYWZWK3VaaEZ2YTFhQm9aaGx5RloyMGRWeApwMkRxb09BblZ4MzZ1V3o2SXl1alJUQkRNQTRHQTFVZER3RUIvd1FFQXdJQkJqQVNCZ05WSFJNQkFmOEVDREFHCkFRSC9BZ0VCTUIwR0ExVWREZ1FXQkJTcHpDQWdPaGRuSkE3VVpxUWlFSVFXSFpnYXZEQUtCZ2dxaGtqT1BRUUQKQWdOSUFEQkZBaUVBbEZtYWdIQkJoblFUd3dDOXBQRTRGbFY2SlhIbTdnQ1JyWUxUbVgvc0VySUNJRUhLZG51KwpIWDgrVTh1ZkFKbTdrL1laZEtVVnlWS2E3bGREUjlWajNveTIKLS0tLS1FTkQgQ0VSVElGSUNBVEUtLS0tLQo="
],
"signing_identity": null,
"tls_intermediate_certs": [],
"tls_root_certs": [
"LS0tLS1CRUdJTiBDRVJUSUZJQ0FURS0tLS0tCk1JSUNKekNDQWMyZ0F3SUJBZ0lVYWVSeWNkQytlR1lUTUNyWTg2UFVXUEdzQUw0d0NnWUlLb1pJemowRUF3SXcKY0RFTE1Ba0dBMVVFQmhNQ1ZWTXhGekFWQmdOVkJBZ1REazV2Y25Sb0lFTmhjbTlzYVc1aE1ROHdEUVlEVlFRSApFd1pFZFhKb1lXMHhHVEFYQmdOVkJBb1RFRzl5WnpFdVpYaGhiWEJzWlM1amIyMHhIREFhQmdOVkJBTVRFMk5oCkxtOXlaekV1WlhoaGJYQnNaUzVqYjIwd0hoY05NakF3TXpJME1qQXhPREF3V2hjTk16VXdNekl4TWpBeE9EQXcKV2pCd01Rc3dDUVlEVlFRR0V3SlZVekVYTUJVR0ExVUVDQk1PVG05eWRHZ2dRMkZ5YjJ4cGJtRXhEekFOQmdOVgpCQWNUQmtSMWNtaGhiVEVaTUJjR0ExVUVDaE1RYjNKbk1TNWxlR0Z0Y0d4bExtTnZiVEVjTUJvR0ExVUVBeE1UClkyRXViM0puTVM1bGVHRnRjR3hsTG1OdmJUQlpNQk1HQnlxR1NNNDlBZ0VHQ0NxR1NNNDlBd0VIQTBJQUJLWXIKSmtqcEhjRkcxMVZlU200emxwSmNCZEtZVjc3SEgvdzI0V09sZnphYWZWK3VaaEZ2YTFhQm9aaGx5RloyMGRWeApwMkRxb09BblZ4MzZ1V3o2SXl1alJUQkRNQTRHQTFVZER3RUIvd1FFQXdJQkJqQVNCZ05WSFJNQkFmOEVDREFHCkFRSC9BZ0VCTUIwR0ExVWREZ1FXQkJTcHpDQWdPaGRuSkE3VVpxUWlFSVFXSFpnYXZEQUtCZ2dxaGtqT1BRUUQKQWdOSUFEQkZBaUVBbEZtYWdIQkJoblFUd3dDOXBQRTRGbFY2SlhIbTdnQ1JyWUxUbVgvc0VySUNJRUhLZG51KwpIWDgrVTh1ZkFKbTdrL1laZEtVVnlWS2E3bGREUjlWajNveTIKLS0tLS1FTkQgQ0VSVElGSUNBVEUtLS0tLQo="
]
},
"type": 0
},
"version": "0"
}
},
"version": "1"
},
"Org2MSP": {
"groups": {},
"mod_policy": "Admins",
"policies": {
"Admins": {
"mod_policy": "Admins",
"policy": {
"type": 1,
"value": {
"identities": [
{
"principal": {
"msp_identifier": "Org2MSP",
"role": "ADMIN"
},
"principal_classification": "ROLE"
}
],
"rule": {
"n_out_of": {
"n": 1,
"rules": [
{
"signed_by": 0
}
]
}
},
"version": 0
}
},
"version": "0"
},
"Endorsement": {
"mod_policy": "Admins",
"policy": {
"type": 1,
"value": {
"identities": [
{
"principal": {
"msp_identifier": "Org2MSP",
"role": "PEER"
},
"principal_classification": "ROLE"
}
],
"rule": {
"n_out_of": {
"n": 1,
"rules": [
{
"signed_by": 0
}
]
}
},
"version": 0
}
},
"version": "0"
},
"Readers": {
"mod_policy": "Admins",
"policy": {
"type": 1,
"value": {
"identities": [
{
"principal": {
"msp_identifier": "Org2MSP",
"role": "ADMIN"
},
"principal_classification": "ROLE"
},
{
"principal": {
"msp_identifier": "Org2MSP",
"role": "PEER"
},
"principal_classification": "ROLE"
},
{
"principal": {
"msp_identifier": "Org2MSP",
"role": "CLIENT"
},
"principal_classification": "ROLE"
}
],
"rule": {
"n_out_of": {
"n": 1,
"rules": [
{
"signed_by": 0
},
{
"signed_by": 1
},
{
"signed_by": 2
}
]
}
},
"version": 0
}
},
"version": "0"
},
"Writers": {
"mod_policy": "Admins",
"policy": {
"type": 1,
"value": {
"identities": [
{
"principal": {
"msp_identifier": "Org2MSP",
"role": "ADMIN"
},
"principal_classification": "ROLE"
},
{
"principal": {
"msp_identifier": "Org2MSP",
"role": "CLIENT"
},
"principal_classification": "ROLE"
}
],
"rule": {
"n_out_of": {
"n": 1,
"rules": [
{
"signed_by": 0
},
{
"signed_by": 1
}
]
}
},
"version": 0
}
},
"version": "0"
}
},
"values": {
"AnchorPeers": {
"mod_policy": "Admins",
"value": {
"anchor_peers": [
{
"host": "peer0.org2.example.com",
"port": 9051
}
]
},
"version": "0"
},
"MSP": {
"mod_policy": "Admins",
"value": {
"config": {
"admins": [],
"crypto_config": {
"identity_identifier_hash_function": "SHA256",
"signature_hash_family": "SHA2"
},
"fabric_node_ous": {
"admin_ou_identifier": {
"certificate": "LS0tLS1CRUdJTiBDRVJUSUZJQ0FURS0tLS0tCk1JSUNIakNDQWNXZ0F3SUJBZ0lVQVFkb1B0S0E0bEk2a0RrMituYzk5NzNhSC9Vd0NnWUlLb1pJemowRUF3SXcKYkRFTE1Ba0dBMVVFQmhNQ1ZVc3hFakFRQmdOVkJBZ1RDVWhoYlhCemFHbHlaVEVRTUE0R0ExVUVCeE1IU0hWeQpjMnhsZVRFWk1CY0dBMVVFQ2hNUWIzSm5NaTVsZUdGdGNHeGxMbU52YlRFY01Cb0dBMVVFQXhNVFkyRXViM0puCk1pNWxlR0Z0Y0d4bExtTnZiVEFlRncweU1EQXpNalF5TURFNE1EQmFGdzB6TlRBek1qRXlNREU0TURCYU1Hd3gKQ3pBSkJnTlZCQVlUQWxWTE1SSXdFQVlEVlFRSUV3bElZVzF3YzJocGNtVXhFREFPQmdOVkJBY1RCMGgxY25OcwpaWGt4R1RBWEJnTlZCQW9URUc5eVp6SXVaWGhoYlhCc1pTNWpiMjB4SERBYUJnTlZCQU1URTJOaExtOXlaekl1ClpYaGhiWEJzWlM1amIyMHdXVEFUQmdjcWhrak9QUUlCQmdncWhrak9QUU1CQndOQ0FBVFk3VGJqQzdYSHNheC8Kem1yVk1nWnpmODBlb3JFbTNIdis2ZnRqMFgzd2cxdGZVM3hyWWxXZVJwR0JGeFQzNnJmVkdLLzhUQWJ2cnRuZgpUQ1hKak93a28wVXdRekFPQmdOVkhROEJBZjhFQkFNQ0FRWXdFZ1lEVlIwVEFRSC9CQWd3QmdFQi93SUJBVEFkCkJnTlZIUTRFRmdRVWJJNkV4dVRZSEpjczRvNEl5dXZWOVFRa1lGZ3dDZ1lJS29aSXpqMEVBd0lEUndBd1JBSWcKWndjdElBNmdoSlFCZmpDRXdRK1NmYi9iemdsQlV4b0g3ZHVtOUJrUjFkd0NJQlRqcEZkWlcyS2UzSVBMS1h2aApERmQvVmMrcloyMksyeVdKL1BIYXZWWmkKLS0tLS1FTkQgQ0VSVElGSUNBVEUtLS0tLQo=",
"organizational_unit_identifier": "admin"
},
"client_ou_identifier": {
"certificate": "LS0tLS1CRUdJTiBDRVJUSUZJQ0FURS0tLS0tCk1JSUNIakNDQWNXZ0F3SUJBZ0lVQVFkb1B0S0E0bEk2a0RrMituYzk5NzNhSC9Vd0NnWUlLb1pJemowRUF3SXcKYkRFTE1Ba0dBMVVFQmhNQ1ZVc3hFakFRQmdOVkJBZ1RDVWhoYlhCemFHbHlaVEVRTUE0R0ExVUVCeE1IU0hWeQpjMnhsZVRFWk1CY0dBMVVFQ2hNUWIzSm5NaTVsZUdGdGNHeGxMbU52YlRFY01Cb0dBMVVFQXhNVFkyRXViM0puCk1pNWxlR0Z0Y0d4bExtTnZiVEFlRncweU1EQXpNalF5TURFNE1EQmFGdzB6TlRBek1qRXlNREU0TURCYU1Hd3gKQ3pBSkJnTlZCQVlUQWxWTE1SSXdFQVlEVlFRSUV3bElZVzF3YzJocGNtVXhFREFPQmdOVkJBY1RCMGgxY25OcwpaWGt4R1RBWEJnTlZCQW9URUc5eVp6SXVaWGhoYlhCc1pTNWpiMjB4SERBYUJnTlZCQU1URTJOaExtOXlaekl1ClpYaGhiWEJzWlM1amIyMHdXVEFUQmdjcWhrak9QUUlCQmdncWhrak9QUU1CQndOQ0FBVFk3VGJqQzdYSHNheC8Kem1yVk1nWnpmODBlb3JFbTNIdis2ZnRqMFgzd2cxdGZVM3hyWWxXZVJwR0JGeFQzNnJmVkdLLzhUQWJ2cnRuZgpUQ1hKak93a28wVXdRekFPQmdOVkhROEJBZjhFQkFNQ0FRWXdFZ1lEVlIwVEFRSC9CQWd3QmdFQi93SUJBVEFkCkJnTlZIUTRFRmdRVWJJNkV4dVRZSEpjczRvNEl5dXZWOVFRa1lGZ3dDZ1lJS29aSXpqMEVBd0lEUndBd1JBSWcKWndjdElBNmdoSlFCZmpDRXdRK1NmYi9iemdsQlV4b0g3ZHVtOUJrUjFkd0NJQlRqcEZkWlcyS2UzSVBMS1h2aApERmQvVmMrcloyMksyeVdKL1BIYXZWWmkKLS0tLS1FTkQgQ0VSVElGSUNBVEUtLS0tLQo=",
"organizational_unit_identifier": "client"
},
"enable": true,
"orderer_ou_identifier": {
"certificate": "LS0tLS1CRUdJTiBDRVJUSUZJQ0FURS0tLS0tCk1JSUNIakNDQWNXZ0F3SUJBZ0lVQVFkb1B0S0E0bEk2a0RrMituYzk5NzNhSC9Vd0NnWUlLb1pJemowRUF3SXcKYkRFTE1Ba0dBMVVFQmhNQ1ZVc3hFakFRQmdOVkJBZ1RDVWhoYlhCemFHbHlaVEVRTUE0R0ExVUVCeE1IU0hWeQpjMnhsZVRFWk1CY0dBMVVFQ2hNUWIzSm5NaTVsZUdGdGNHeGxMbU52YlRFY01Cb0dBMVVFQXhNVFkyRXViM0puCk1pNWxlR0Z0Y0d4bExtTnZiVEFlRncweU1EQXpNalF5TURFNE1EQmFGdzB6TlRBek1qRXlNREU0TURCYU1Hd3gKQ3pBSkJnTlZCQVlUQWxWTE1SSXdFQVlEVlFRSUV3bElZVzF3YzJocGNtVXhFREFPQmdOVkJBY1RCMGgxY25OcwpaWGt4R1RBWEJnTlZCQW9URUc5eVp6SXVaWGhoYlhCc1pTNWpiMjB4SERBYUJnTlZCQU1URTJOaExtOXlaekl1ClpYaGhiWEJzWlM1amIyMHdXVEFUQmdjcWhrak9QUUlCQmdncWhrak9QUU1CQndOQ0FBVFk3VGJqQzdYSHNheC8Kem1yVk1nWnpmODBlb3JFbTNIdis2ZnRqMFgzd2cxdGZVM3hyWWxXZVJwR0JGeFQzNnJmVkdLLzhUQWJ2cnRuZgpUQ1hKak93a28wVXdRekFPQmdOVkhROEJBZjhFQkFNQ0FRWXdFZ1lEVlIwVEFRSC9CQWd3QmdFQi93SUJBVEFkCkJnTlZIUTRFRmdRVWJJNkV4dVRZSEpjczRvNEl5dXZWOVFRa1lGZ3dDZ1lJS29aSXpqMEVBd0lEUndBd1JBSWcKWndjdElBNmdoSlFCZmpDRXdRK1NmYi9iemdsQlV4b0g3ZHVtOUJrUjFkd0NJQlRqcEZkWlcyS2UzSVBMS1h2aApERmQvVmMrcloyMksyeVdKL1BIYXZWWmkKLS0tLS1FTkQgQ0VSVElGSUNBVEUtLS0tLQo=",
"organizational_unit_identifier": "orderer"
},
"peer_ou_identifier": {
"certificate": "LS0tLS1CRUdJTiBDRVJUSUZJQ0FURS0tLS0tCk1JSUNIakNDQWNXZ0F3SUJBZ0lVQVFkb1B0S0E0bEk2a0RrMituYzk5NzNhSC9Vd0NnWUlLb1pJemowRUF3SXcKYkRFTE1Ba0dBMVVFQmhNQ1ZVc3hFakFRQmdOVkJBZ1RDVWhoYlhCemFHbHlaVEVRTUE0R0ExVUVCeE1IU0hWeQpjMnhsZVRFWk1CY0dBMVVFQ2hNUWIzSm5NaTVsZUdGdGNHeGxMbU52YlRFY01Cb0dBMVVFQXhNVFkyRXViM0puCk1pNWxlR0Z0Y0d4bExtTnZiVEFlRncweU1EQXpNalF5TURFNE1EQmFGdzB6TlRBek1qRXlNREU0TURCYU1Hd3gKQ3pBSkJnTlZCQVlUQWxWTE1SSXdFQVlEVlFRSUV3bElZVzF3YzJocGNtVXhFREFPQmdOVkJBY1RCMGgxY25OcwpaWGt4R1RBWEJnTlZCQW9URUc5eVp6SXVaWGhoYlhCc1pTNWpiMjB4SERBYUJnTlZCQU1URTJOaExtOXlaekl1ClpYaGhiWEJzWlM1amIyMHdXVEFUQmdjcWhrak9QUUlCQmdncWhrak9QUU1CQndOQ0FBVFk3VGJqQzdYSHNheC8Kem1yVk1nWnpmODBlb3JFbTNIdis2ZnRqMFgzd2cxdGZVM3hyWWxXZVJwR0JGeFQzNnJmVkdLLzhUQWJ2cnRuZgpUQ1hKak93a28wVXdRekFPQmdOVkhROEJBZjhFQkFNQ0FRWXdFZ1lEVlIwVEFRSC9CQWd3QmdFQi93SUJBVEFkCkJnTlZIUTRFRmdRVWJJNkV4dVRZSEpjczRvNEl5dXZWOVFRa1lGZ3dDZ1lJS29aSXpqMEVBd0lEUndBd1JBSWcKWndjdElBNmdoSlFCZmpDRXdRK1NmYi9iemdsQlV4b0g3ZHVtOUJrUjFkd0NJQlRqcEZkWlcyS2UzSVBMS1h2aApERmQvVmMrcloyMksyeVdKL1BIYXZWWmkKLS0tLS1FTkQgQ0VSVElGSUNBVEUtLS0tLQo=",
"organizational_unit_identifier": "peer"
}
},
"intermediate_certs": [],
"name": "Org2MSP",
"organizational_unit_identifiers": [],
"revocation_list": [],
"root_certs": [
"LS0tLS1CRUdJTiBDRVJUSUZJQ0FURS0tLS0tCk1JSUNIakNDQWNXZ0F3SUJBZ0lVQVFkb1B0S0E0bEk2a0RrMituYzk5NzNhSC9Vd0NnWUlLb1pJemowRUF3SXcKYkRFTE1Ba0dBMVVFQmhNQ1ZVc3hFakFRQmdOVkJBZ1RDVWhoYlhCemFHbHlaVEVRTUE0R0ExVUVCeE1IU0hWeQpjMnhsZVRFWk1CY0dBMVVFQ2hNUWIzSm5NaTVsZUdGdGNHeGxMbU52YlRFY01Cb0dBMVVFQXhNVFkyRXViM0puCk1pNWxlR0Z0Y0d4bExtTnZiVEFlRncweU1EQXpNalF5TURFNE1EQmFGdzB6TlRBek1qRXlNREU0TURCYU1Hd3gKQ3pBSkJnTlZCQVlUQWxWTE1SSXdFQVlEVlFRSUV3bElZVzF3YzJocGNtVXhFREFPQmdOVkJBY1RCMGgxY25OcwpaWGt4R1RBWEJnTlZCQW9URUc5eVp6SXVaWGhoYlhCc1pTNWpiMjB4SERBYUJnTlZCQU1URTJOaExtOXlaekl1ClpYaGhiWEJzWlM1amIyMHdXVEFUQmdjcWhrak9QUUlCQmdncWhrak9QUU1CQndOQ0FBVFk3VGJqQzdYSHNheC8Kem1yVk1nWnpmODBlb3JFbTNIdis2ZnRqMFgzd2cxdGZVM3hyWWxXZVJwR0JGeFQzNnJmVkdLLzhUQWJ2cnRuZgpUQ1hKak93a28wVXdRekFPQmdOVkhROEJBZjhFQkFNQ0FRWXdFZ1lEVlIwVEFRSC9CQWd3QmdFQi93SUJBVEFkCkJnTlZIUTRFRmdRVWJJNkV4dVRZSEpjczRvNEl5dXZWOVFRa1lGZ3dDZ1lJS29aSXpqMEVBd0lEUndBd1JBSWcKWndjdElBNmdoSlFCZmpDRXdRK1NmYi9iemdsQlV4b0g3ZHVtOUJrUjFkd0NJQlRqcEZkWlcyS2UzSVBMS1h2aApERmQvVmMrcloyMksyeVdKL1BIYXZWWmkKLS0tLS1FTkQgQ0VSVElGSUNBVEUtLS0tLQo="
],
"signing_identity": null,
"tls_intermediate_certs": [],
"tls_root_certs": [
"LS0tLS1CRUdJTiBDRVJUSUZJQ0FURS0tLS0tCk1JSUNIakNDQWNXZ0F3SUJBZ0lVQVFkb1B0S0E0bEk2a0RrMituYzk5NzNhSC9Vd0NnWUlLb1pJemowRUF3SXcKYkRFTE1Ba0dBMVVFQmhNQ1ZVc3hFakFRQmdOVkJBZ1RDVWhoYlhCemFHbHlaVEVRTUE0R0ExVUVCeE1IU0hWeQpjMnhsZVRFWk1CY0dBMVVFQ2hNUWIzSm5NaTVsZUdGdGNHeGxMbU52YlRFY01Cb0dBMVVFQXhNVFkyRXViM0puCk1pNWxlR0Z0Y0d4bExtTnZiVEFlRncweU1EQXpNalF5TURFNE1EQmFGdzB6TlRBek1qRXlNREU0TURCYU1Hd3gKQ3pBSkJnTlZCQVlUQWxWTE1SSXdFQVlEVlFRSUV3bElZVzF3YzJocGNtVXhFREFPQmdOVkJBY1RCMGgxY25OcwpaWGt4R1RBWEJnTlZCQW9URUc5eVp6SXVaWGhoYlhCc1pTNWpiMjB4SERBYUJnTlZCQU1URTJOaExtOXlaekl1ClpYaGhiWEJzWlM1amIyMHdXVEFUQmdjcWhrak9QUUlCQmdncWhrak9QUU1CQndOQ0FBVFk3VGJqQzdYSHNheC8Kem1yVk1nWnpmODBlb3JFbTNIdis2ZnRqMFgzd2cxdGZVM3hyWWxXZVJwR0JGeFQzNnJmVkdLLzhUQWJ2cnRuZgpUQ1hKak93a28wVXdRekFPQmdOVkhROEJBZjhFQkFNQ0FRWXdFZ1lEVlIwVEFRSC9CQWd3QmdFQi93SUJBVEFkCkJnTlZIUTRFRmdRVWJJNkV4dVRZSEpjczRvNEl5dXZWOVFRa1lGZ3dDZ1lJS29aSXpqMEVBd0lEUndBd1JBSWcKWndjdElBNmdoSlFCZmpDRXdRK1NmYi9iemdsQlV4b0g3ZHVtOUJrUjFkd0NJQlRqcEZkWlcyS2UzSVBMS1h2aApERmQvVmMrcloyMksyeVdKL1BIYXZWWmkKLS0tLS1FTkQgQ0VSVElGSUNBVEUtLS0tLQo="
]
},
"type": 0
},
"version": "0"
}
},
"version": "1"
}
},
"mod_policy": "Admins",
"policies": {
"Admins": {
"mod_policy": "Admins",
"policy": {
"type": 3,
"value": {
"rule": "MAJORITY",
"sub_policy": "Admins"
}
},
"version": "0"
},
"Endorsement": {
"mod_policy": "Admins",
"policy": {
"type": 3,
"value": {
"rule": "MAJORITY",
"sub_policy": "Endorsement"
}
},
"version": "0"
},
"LifecycleEndorsement": {
"mod_policy": "Admins",
"policy": {
"type": 3,
"value": {
"rule": "MAJORITY",
"sub_policy": "Endorsement"
}
},
"version": "0"
},
"Readers": {
"mod_policy": "Admins",
"policy": {
"type": 3,
"value": {
"rule": "ANY",
"sub_policy": "Readers"
}
},
"version": "0"
},
"Writers": {
"mod_policy": "Admins",
"policy": {
"type": 3,
"value": {
"rule": "ANY",
"sub_policy": "Writers"
}
},
"version": "0"
}
},
"values": {
"Capabilities": {
"mod_policy": "Admins",
"value": {
"capabilities": {
"V2_0": {}
}
},
"version": "0"
}
},
"version": "1"
},
"Orderer": {
"groups": {
"OrdererOrg": {
"groups": {},
"mod_policy": "Admins",
"policies": {
"Admins": {
"mod_policy": "Admins",
"policy": {
"type": 1,
"value": {
"identities": [
{
"principal": {
"msp_identifier": "OrdererMSP",
"role": "ADMIN"
},
"principal_classification": "ROLE"
}
],
"rule": {
"n_out_of": {
"n": 1,
"rules": [
{
"signed_by": 0
}
]
}
},
"version": 0
}
},
"version": "0"
},
"Readers": {
"mod_policy": "Admins",
"policy": {
"type": 1,
"value": {
"identities": [
{
"principal": {
"msp_identifier": "OrdererMSP",
"role": "MEMBER"
},
"principal_classification": "ROLE"
}
],
"rule": {
"n_out_of": {
"n": 1,
"rules": [
{
"signed_by": 0
}
]
}
},
"version": 0
}
},
"version": "0"
},
"Writers": {
"mod_policy": "Admins",
"policy": {
"type": 1,
"value": {
"identities": [
{
"principal": {
"msp_identifier": "OrdererMSP",
"role": "MEMBER"
},
"principal_classification": "ROLE"
}
],
"rule": {
"n_out_of": {
"n": 1,
"rules": [
{
"signed_by": 0
}
]
}
},
"version": 0
}
},
"version": "0"
}
},
"values": {
"MSP": {
"mod_policy": "Admins",
"value": {
"config": {
"admins": [],
"crypto_config": {
"identity_identifier_hash_function": "SHA256",
"signature_hash_family": "SHA2"
},
"fabric_node_ous": {
"admin_ou_identifier": {
"certificate": "LS0tLS1CRUdJTiBDRVJUSUZJQ0FURS0tLS0tCk1JSUNDekNDQWJHZ0F3SUJBZ0lVUkgyT0tlV1loaStFMkFHZ3IwWUdlVTRUOWs0d0NnWUlLb1pJemowRUF3SXcKWWpFTE1Ba0dBMVVFQmhNQ1ZWTXhFVEFQQmdOVkJBZ1RDRTVsZHlCWmIzSnJNUkV3RHdZRFZRUUhFd2hPWlhjZwpXVzl5YXpFVU1CSUdBMVVFQ2hNTFpYaGhiWEJzWlM1amIyMHhGekFWQmdOVkJBTVREbU5oTG1WNFlXMXdiR1V1ClkyOXRNQjRYRFRJd01ETXlOREl3TVRnd01Gb1hEVE0xTURNeU1USXdNVGd3TUZvd1lqRUxNQWtHQTFVRUJoTUMKVlZNeEVUQVBCZ05WQkFnVENFNWxkeUJaYjNKck1SRXdEd1lEVlFRSEV3aE9aWGNnV1c5eWF6RVVNQklHQTFVRQpDaE1MWlhoaGJYQnNaUzVqYjIweEZ6QVZCZ05WQkFNVERtTmhMbVY0WVcxd2JHVXVZMjl0TUZrd0V3WUhLb1pJCnpqMENBUVlJS29aSXpqMERBUWNEUWdBRS9yb2dWY0hFcEVQMDhTUTl3VTVpdkNxaUFDKzU5WUx1dkRDNkx6UlIKWXdyZkFxdncvT0FodVlQRkhnRFZ1SFExOVdXMGxSV2FKWmpVcDFxNmRCWEhlYU5GTUVNd0RnWURWUjBQQVFILwpCQVFEQWdFR01CSUdBMVVkRXdFQi93UUlNQVlCQWY4Q0FRRXdIUVlEVlIwT0JCWUVGTG9kWFpjaTVNNlFxYkNUCm1YZ3lTbU1aYlZHWE1Bb0dDQ3FHU000OUJBTUNBMGdBTUVVQ0lRQ0hFTElvajJUNG15ODI0SENQRFc2bEZFRTEKSDc1c2FyN1V4TVJSNmFWckZnSWdMZUxYT0ZoSDNjZ0pGeDhJckVyTjlhZmdjVVIyd0ZYUkQ0V0V0MVp1bmxBPQotLS0tLUVORCBDRVJUSUZJQ0FURS0tLS0tCg==",
"organizational_unit_identifier": "admin"
},
"client_ou_identifier": {
"certificate": "LS0tLS1CRUdJTiBDRVJUSUZJQ0FURS0tLS0tCk1JSUNDekNDQWJHZ0F3SUJBZ0lVUkgyT0tlV1loaStFMkFHZ3IwWUdlVTRUOWs0d0NnWUlLb1pJemowRUF3SXcKWWpFTE1Ba0dBMVVFQmhNQ1ZWTXhFVEFQQmdOVkJBZ1RDRTVsZHlCWmIzSnJNUkV3RHdZRFZRUUhFd2hPWlhjZwpXVzl5YXpFVU1CSUdBMVVFQ2hNTFpYaGhiWEJzWlM1amIyMHhGekFWQmdOVkJBTVREbU5oTG1WNFlXMXdiR1V1ClkyOXRNQjRYRFRJd01ETXlOREl3TVRnd01Gb1hEVE0xTURNeU1USXdNVGd3TUZvd1lqRUxNQWtHQTFVRUJoTUMKVlZNeEVUQVBCZ05WQkFnVENFNWxkeUJaYjNKck1SRXdEd1lEVlFRSEV3aE9aWGNnV1c5eWF6RVVNQklHQTFVRQpDaE1MWlhoaGJYQnNaUzVqYjIweEZ6QVZCZ05WQkFNVERtTmhMbVY0WVcxd2JHVXVZMjl0TUZrd0V3WUhLb1pJCnpqMENBUVlJS29aSXpqMERBUWNEUWdBRS9yb2dWY0hFcEVQMDhTUTl3VTVpdkNxaUFDKzU5WUx1dkRDNkx6UlIKWXdyZkFxdncvT0FodVlQRkhnRFZ1SFExOVdXMGxSV2FKWmpVcDFxNmRCWEhlYU5GTUVNd0RnWURWUjBQQVFILwpCQVFEQWdFR01CSUdBMVVkRXdFQi93UUlNQVlCQWY4Q0FRRXdIUVlEVlIwT0JCWUVGTG9kWFpjaTVNNlFxYkNUCm1YZ3lTbU1aYlZHWE1Bb0dDQ3FHU000OUJBTUNBMGdBTUVVQ0lRQ0hFTElvajJUNG15ODI0SENQRFc2bEZFRTEKSDc1c2FyN1V4TVJSNmFWckZnSWdMZUxYT0ZoSDNjZ0pGeDhJckVyTjlhZmdjVVIyd0ZYUkQ0V0V0MVp1bmxBPQotLS0tLUVORCBDRVJUSUZJQ0FURS0tLS0tCg==",
"organizational_unit_identifier": "client"
},
"enable": true,
"orderer_ou_identifier": {
"certificate": "LS0tLS1CRUdJTiBDRVJUSUZJQ0FURS0tLS0tCk1JSUNDekNDQWJHZ0F3SUJBZ0lVUkgyT0tlV1loaStFMkFHZ3IwWUdlVTRUOWs0d0NnWUlLb1pJemowRUF3SXcKWWpFTE1Ba0dBMVVFQmhNQ1ZWTXhFVEFQQmdOVkJBZ1RDRTVsZHlCWmIzSnJNUkV3RHdZRFZRUUhFd2hPWlhjZwpXVzl5YXpFVU1CSUdBMVVFQ2hNTFpYaGhiWEJzWlM1amIyMHhGekFWQmdOVkJBTVREbU5oTG1WNFlXMXdiR1V1ClkyOXRNQjRYRFRJd01ETXlOREl3TVRnd01Gb1hEVE0xTURNeU1USXdNVGd3TUZvd1lqRUxNQWtHQTFVRUJoTUMKVlZNeEVUQVBCZ05WQkFnVENFNWxkeUJaYjNKck1SRXdEd1lEVlFRSEV3aE9aWGNnV1c5eWF6RVVNQklHQTFVRQpDaE1MWlhoaGJYQnNaUzVqYjIweEZ6QVZCZ05WQkFNVERtTmhMbVY0WVcxd2JHVXVZMjl0TUZrd0V3WUhLb1pJCnpqMENBUVlJS29aSXpqMERBUWNEUWdBRS9yb2dWY0hFcEVQMDhTUTl3VTVpdkNxaUFDKzU5WUx1dkRDNkx6UlIKWXdyZkFxdncvT0FodVlQRkhnRFZ1SFExOVdXMGxSV2FKWmpVcDFxNmRCWEhlYU5GTUVNd0RnWURWUjBQQVFILwpCQVFEQWdFR01CSUdBMVVkRXdFQi93UUlNQVlCQWY4Q0FRRXdIUVlEVlIwT0JCWUVGTG9kWFpjaTVNNlFxYkNUCm1YZ3lTbU1aYlZHWE1Bb0dDQ3FHU000OUJBTUNBMGdBTUVVQ0lRQ0hFTElvajJUNG15ODI0SENQRFc2bEZFRTEKSDc1c2FyN1V4TVJSNmFWckZnSWdMZUxYT0ZoSDNjZ0pGeDhJckVyTjlhZmdjVVIyd0ZYUkQ0V0V0MVp1bmxBPQotLS0tLUVORCBDRVJUSUZJQ0FURS0tLS0tCg==",
"organizational_unit_identifier": "orderer"
},
"peer_ou_identifier": {
"certificate": "LS0tLS1CRUdJTiBDRVJUSUZJQ0FURS0tLS0tCk1JSUNDekNDQWJHZ0F3SUJBZ0lVUkgyT0tlV1loaStFMkFHZ3IwWUdlVTRUOWs0d0NnWUlLb1pJemowRUF3SXcKWWpFTE1Ba0dBMVVFQmhNQ1ZWTXhFVEFQQmdOVkJBZ1RDRTVsZHlCWmIzSnJNUkV3RHdZRFZRUUhFd2hPWlhjZwpXVzl5YXpFVU1CSUdBMVVFQ2hNTFpYaGhiWEJzWlM1amIyMHhGekFWQmdOVkJBTVREbU5oTG1WNFlXMXdiR1V1ClkyOXRNQjRYRFRJd01ETXlOREl3TVRnd01Gb1hEVE0xTURNeU1USXdNVGd3TUZvd1lqRUxNQWtHQTFVRUJoTUMKVlZNeEVUQVBCZ05WQkFnVENFNWxkeUJaYjNKck1SRXdEd1lEVlFRSEV3aE9aWGNnV1c5eWF6RVVNQklHQTFVRQpDaE1MWlhoaGJYQnNaUzVqYjIweEZ6QVZCZ05WQkFNVERtTmhMbVY0WVcxd2JHVXVZMjl0TUZrd0V3WUhLb1pJCnpqMENBUVlJS29aSXpqMERBUWNEUWdBRS9yb2dWY0hFcEVQMDhTUTl3VTVpdkNxaUFDKzU5WUx1dkRDNkx6UlIKWXdyZkFxdncvT0FodVlQRkhnRFZ1SFExOVdXMGxSV2FKWmpVcDFxNmRCWEhlYU5GTUVNd0RnWURWUjBQQVFILwpCQVFEQWdFR01CSUdBMVVkRXdFQi93UUlNQVlCQWY4Q0FRRXdIUVlEVlIwT0JCWUVGTG9kWFpjaTVNNlFxYkNUCm1YZ3lTbU1aYlZHWE1Bb0dDQ3FHU000OUJBTUNBMGdBTUVVQ0lRQ0hFTElvajJUNG15ODI0SENQRFc2bEZFRTEKSDc1c2FyN1V4TVJSNmFWckZnSWdMZUxYT0ZoSDNjZ0pGeDhJckVyTjlhZmdjVVIyd0ZYUkQ0V0V0MVp1bmxBPQotLS0tLUVORCBDRVJUSUZJQ0FURS0tLS0tCg==",
"organizational_unit_identifier": "peer"
}
},
"intermediate_certs": [],
"name": "OrdererMSP",
"organizational_unit_identifiers": [],
"revocation_list": [],
"root_certs": [
"LS0tLS1CRUdJTiBDRVJUSUZJQ0FURS0tLS0tCk1JSUNDekNDQWJHZ0F3SUJBZ0lVUkgyT0tlV1loaStFMkFHZ3IwWUdlVTRUOWs0d0NnWUlLb1pJemowRUF3SXcKWWpFTE1Ba0dBMVVFQmhNQ1ZWTXhFVEFQQmdOVkJBZ1RDRTVsZHlCWmIzSnJNUkV3RHdZRFZRUUhFd2hPWlhjZwpXVzl5YXpFVU1CSUdBMVVFQ2hNTFpYaGhiWEJzWlM1amIyMHhGekFWQmdOVkJBTVREbU5oTG1WNFlXMXdiR1V1ClkyOXRNQjRYRFRJd01ETXlOREl3TVRnd01Gb1hEVE0xTURNeU1USXdNVGd3TUZvd1lqRUxNQWtHQTFVRUJoTUMKVlZNeEVUQVBCZ05WQkFnVENFNWxkeUJaYjNKck1SRXdEd1lEVlFRSEV3aE9aWGNnV1c5eWF6RVVNQklHQTFVRQpDaE1MWlhoaGJYQnNaUzVqYjIweEZ6QVZCZ05WQkFNVERtTmhMbVY0WVcxd2JHVXVZMjl0TUZrd0V3WUhLb1pJCnpqMENBUVlJS29aSXpqMERBUWNEUWdBRS9yb2dWY0hFcEVQMDhTUTl3VTVpdkNxaUFDKzU5WUx1dkRDNkx6UlIKWXdyZkFxdncvT0FodVlQRkhnRFZ1SFExOVdXMGxSV2FKWmpVcDFxNmRCWEhlYU5GTUVNd0RnWURWUjBQQVFILwpCQVFEQWdFR01CSUdBMVVkRXdFQi93UUlNQVlCQWY4Q0FRRXdIUVlEVlIwT0JCWUVGTG9kWFpjaTVNNlFxYkNUCm1YZ3lTbU1aYlZHWE1Bb0dDQ3FHU000OUJBTUNBMGdBTUVVQ0lRQ0hFTElvajJUNG15ODI0SENQRFc2bEZFRTEKSDc1c2FyN1V4TVJSNmFWckZnSWdMZUxYT0ZoSDNjZ0pGeDhJckVyTjlhZmdjVVIyd0ZYUkQ0V0V0MVp1bmxBPQotLS0tLUVORCBDRVJUSUZJQ0FURS0tLS0tCg=="
],
"signing_identity": null,
"tls_intermediate_certs": [],
"tls_root_certs": [
"LS0tLS1CRUdJTiBDRVJUSUZJQ0FURS0tLS0tCk1JSUNDekNDQWJHZ0F3SUJBZ0lVUkgyT0tlV1loaStFMkFHZ3IwWUdlVTRUOWs0d0NnWUlLb1pJemowRUF3SXcKWWpFTE1Ba0dBMVVFQmhNQ1ZWTXhFVEFQQmdOVkJBZ1RDRTVsZHlCWmIzSnJNUkV3RHdZRFZRUUhFd2hPWlhjZwpXVzl5YXpFVU1CSUdBMVVFQ2hNTFpYaGhiWEJzWlM1amIyMHhGekFWQmdOVkJBTVREbU5oTG1WNFlXMXdiR1V1ClkyOXRNQjRYRFRJd01ETXlOREl3TVRnd01Gb1hEVE0xTURNeU1USXdNVGd3TUZvd1lqRUxNQWtHQTFVRUJoTUMKVlZNeEVUQVBCZ05WQkFnVENFNWxkeUJaYjNKck1SRXdEd1lEVlFRSEV3aE9aWGNnV1c5eWF6RVVNQklHQTFVRQpDaE1MWlhoaGJYQnNaUzVqYjIweEZ6QVZCZ05WQkFNVERtTmhMbVY0WVcxd2JHVXVZMjl0TUZrd0V3WUhLb1pJCnpqMENBUVlJS29aSXpqMERBUWNEUWdBRS9yb2dWY0hFcEVQMDhTUTl3VTVpdkNxaUFDKzU5WUx1dkRDNkx6UlIKWXdyZkFxdncvT0FodVlQRkhnRFZ1SFExOVdXMGxSV2FKWmpVcDFxNmRCWEhlYU5GTUVNd0RnWURWUjBQQVFILwpCQVFEQWdFR01CSUdBMVVkRXdFQi93UUlNQVlCQWY4Q0FRRXdIUVlEVlIwT0JCWUVGTG9kWFpjaTVNNlFxYkNUCm1YZ3lTbU1aYlZHWE1Bb0dDQ3FHU000OUJBTUNBMGdBTUVVQ0lRQ0hFTElvajJUNG15ODI0SENQRFc2bEZFRTEKSDc1c2FyN1V4TVJSNmFWckZnSWdMZUxYT0ZoSDNjZ0pGeDhJckVyTjlhZmdjVVIyd0ZYUkQ0V0V0MVp1bmxBPQotLS0tLUVORCBDRVJUSUZJQ0FURS0tLS0tCg=="
]
},
"type": 0
},
"version": "0"
}
},
"version": "0"
}
},
"mod_policy": "Admins",
"policies": {
"Admins": {
"mod_policy": "Admins",
"policy": {
"type": 3,
"value": {
"rule": "MAJORITY",
"sub_policy": "Admins"
}
},
"version": "0"
},
"BlockValidation": {
"mod_policy": "Admins",
"policy": {
"type": 3,
"value": {
"rule": "ANY",
"sub_policy": "Writers"
}
},
"version": "0"
},
"Readers": {
"mod_policy": "Admins",
"policy": {
"type": 3,
"value": {
"rule": "ANY",
"sub_policy": "Readers"
}
},
"version": "0"
},
"Writers": {
"mod_policy": "Admins",
"policy": {
"type": 3,
"value": {
"rule": "ANY",
"sub_policy": "Writers"
}
},
"version": "0"
}
},
"values": {
"BatchSize": {
"mod_policy": "Admins",
"value": {
"absolute_max_bytes": 103809024,
"max_message_count": 10,
"preferred_max_bytes": 524288
},
"version": "0"
},
"BatchTimeout": {
"mod_policy": "Admins",
"value": {
"timeout": "2s"
},
"version": "0"
},
"Capabilities": {
"mod_policy": "Admins",
"value": {
"capabilities": {
"V2_0": {}
}
},
"version": "0"
},
"ChannelRestrictions": {
"mod_policy": "Admins",
"value": null,
"version": "0"
},
"ConsensusType": {
"mod_policy": "Admins",
"value": {
"metadata": {
"consenters": [
{
"client_tls_cert": "LS0tLS1CRUdJTiBDRVJUSUZJQ0FURS0tLS0tCk1JSUN3akNDQW1pZ0F3SUJBZ0lVZG9JbmpzaW5vVnZua0llbE5WUU8wbDRMbEdrd0NnWUlLb1pJemowRUF3SXcKWWpFTE1Ba0dBMVVFQmhNQ1ZWTXhFVEFQQmdOVkJBZ1RDRTVsZHlCWmIzSnJNUkV3RHdZRFZRUUhFd2hPWlhjZwpXVzl5YXpFVU1CSUdBMVVFQ2hNTFpYaGhiWEJzWlM1amIyMHhGekFWQmdOVkJBTVREbU5oTG1WNFlXMXdiR1V1ClkyOXRNQjRYRFRJd01ETXlOREl3TVRnd01Gb1hEVEl4TURNeU5ESXdNak13TUZvd1lERUxNQWtHQTFVRUJoTUMKVlZNeEZ6QVZCZ05WQkFnVERrNXZjblJvSUVOaGNtOXNhVzVoTVJRd0VnWURWUVFLRXd0SWVYQmxjbXhsWkdkbApjakVRTUE0R0ExVUVDeE1IYjNKa1pYSmxjakVRTUE0R0ExVUVBeE1IYjNKa1pYSmxjakJaTUJNR0J5cUdTTTQ5CkFnRUdDQ3FHU000OUF3RUhBMElBQkdGaFd3SllGbHR3clBVellIQ3loNTMvU3VpVU1ZYnVJakdGTWRQMW9FRzMKSkcrUlRSOFR4NUNYTXdpV05sZ285dU00a1NGTzBINURZUWZPQU5MU0o5NmpnZjB3Z2Zvd0RnWURWUjBQQVFILwpCQVFEQWdPb01CMEdBMVVkSlFRV01CUUdDQ3NHQVFVRkJ3TUJCZ2dyQmdFRkJRY0RBakFNQmdOVkhSTUJBZjhFCkFqQUFNQjBHQTFVZERnUVdCQlJ2M3lNUmh5cHc0Qi9Cc1NHTlVJL0VpU1lNN2pBZkJnTlZIU01FR0RBV2dCUzYKSFYyWEl1VE9rS213azVsNE1rcGpHVzFSbHpBZUJnTlZIUkVFRnpBVmdoTnZjbVJsY21WeUxtVjRZVzF3YkdVdQpZMjl0TUZzR0NDb0RCQVVHQndnQkJFOTdJbUYwZEhKeklqcDdJbWhtTGtGbVptbHNhV0YwYVc5dUlqb2lJaXdpCmFHWXVSVzV5YjJ4c2JXVnVkRWxFSWpvaWIzSmtaWEpsY2lJc0ltaG1MbFI1Y0dVaU9pSnZjbVJsY21WeUluMTkKTUFvR0NDcUdTTTQ5QkFNQ0EwZ0FNRVVDSVFESHNrWUR5clNqeWpkTVVVWDNaT05McXJUNkdCcVNUdmZXN0dXMwpqVTg2cEFJZ0VIZkloVWxVV0VpN1hTb2Y4K2toaW9PYW5PWG80TWxQbGhlT0xjTGlqUzA9Ci0tLS0tRU5EIENFUlRJRklDQVRFLS0tLS0K",
"host": "orderer.example.com",
"port": 7050,
"server_tls_cert": "LS0tLS1CRUdJTiBDRVJUSUZJQ0FURS0tLS0tCk1JSUN3akNDQW1pZ0F3SUJBZ0lVZG9JbmpzaW5vVnZua0llbE5WUU8wbDRMbEdrd0NnWUlLb1pJemowRUF3SXcKWWpFTE1Ba0dBMVVFQmhNQ1ZWTXhFVEFQQmdOVkJBZ1RDRTVsZHlCWmIzSnJNUkV3RHdZRFZRUUhFd2hPWlhjZwpXVzl5YXpFVU1CSUdBMVVFQ2hNTFpYaGhiWEJzWlM1amIyMHhGekFWQmdOVkJBTVREbU5oTG1WNFlXMXdiR1V1ClkyOXRNQjRYRFRJd01ETXlOREl3TVRnd01Gb1hEVEl4TURNeU5ESXdNak13TUZvd1lERUxNQWtHQTFVRUJoTUMKVlZNeEZ6QVZCZ05WQkFnVERrNXZjblJvSUVOaGNtOXNhVzVoTVJRd0VnWURWUVFLRXd0SWVYQmxjbXhsWkdkbApjakVRTUE0R0ExVUVDeE1IYjNKa1pYSmxjakVRTUE0R0ExVUVBeE1IYjNKa1pYSmxjakJaTUJNR0J5cUdTTTQ5CkFnRUdDQ3FHU000OUF3RUhBMElBQkdGaFd3SllGbHR3clBVellIQ3loNTMvU3VpVU1ZYnVJakdGTWRQMW9FRzMKSkcrUlRSOFR4NUNYTXdpV05sZ285dU00a1NGTzBINURZUWZPQU5MU0o5NmpnZjB3Z2Zvd0RnWURWUjBQQVFILwpCQVFEQWdPb01CMEdBMVVkSlFRV01CUUdDQ3NHQVFVRkJ3TUJCZ2dyQmdFRkJRY0RBakFNQmdOVkhSTUJBZjhFCkFqQUFNQjBHQTFVZERnUVdCQlJ2M3lNUmh5cHc0Qi9Cc1NHTlVJL0VpU1lNN2pBZkJnTlZIU01FR0RBV2dCUzYKSFYyWEl1VE9rS213azVsNE1rcGpHVzFSbHpBZUJnTlZIUkVFRnpBVmdoTnZjbVJsY21WeUxtVjRZVzF3YkdVdQpZMjl0TUZzR0NDb0RCQVVHQndnQkJFOTdJbUYwZEhKeklqcDdJbWhtTGtGbVptbHNhV0YwYVc5dUlqb2lJaXdpCmFHWXVSVzV5YjJ4c2JXVnVkRWxFSWpvaWIzSmtaWEpsY2lJc0ltaG1MbFI1Y0dVaU9pSnZjbVJsY21WeUluMTkKTUFvR0NDcUdTTTQ5QkFNQ0EwZ0FNRVVDSVFESHNrWUR5clNqeWpkTVVVWDNaT05McXJUNkdCcVNUdmZXN0dXMwpqVTg2cEFJZ0VIZkloVWxVV0VpN1hTb2Y4K2toaW9PYW5PWG80TWxQbGhlT0xjTGlqUzA9Ci0tLS0tRU5EIENFUlRJRklDQVRFLS0tLS0K"
}
],
"options": {
"election_tick": 10,
"heartbeat_tick": 1,
"max_inflight_blocks": 5,
"snapshot_interval_size": 16777216,
"tick_interval": "500ms"
}
},
"state": "STATE_NORMAL",
"type": "etcdraft"
},
"version": "0"
}
},
"version": "0"
}
},
"mod_policy": "Admins",
"policies": {
"Admins": {
"mod_policy": "Admins",
"policy": {
"type": 3,
"value": {
"rule": "MAJORITY",
"sub_policy": "Admins"
}
},
"version": "0"
},
"Readers": {
"mod_policy": "Admins",
"policy": {
"type": 3,
"value": {
"rule": "ANY",
"sub_policy": "Readers"
}
},
"version": "0"
},
"Writers": {
"mod_policy": "Admins",
"policy": {
"type": 3,
"value": {
"rule": "ANY",
"sub_policy": "Writers"
}
},
"version": "0"
}
},
"values": {
"BlockDataHashingStructure": {
"mod_policy": "Admins",
"value": {
"width": 4294967295
},
"version": "0"
},
"Capabilities": {
"mod_policy": "Admins",
"value": {
"capabilities": {
"V2_0": {}
}
},
"version": "0"
},
"Consortium": {
"mod_policy": "Admins",
"value": {
"name": "SampleConsortium"
},
"version": "0"
},
"HashingAlgorithm": {
"mod_policy": "Admins",
"value": {
"name": "SHA256"
},
"version": "0"
},
"OrdererAddresses": {
"mod_policy": "/Channel/Orderer/Admins",
"value": {
"addresses": [
"orderer.example.com:7050"
]
},
"version": "0"
}
},
"version": "0"
},
"sequence": "3"
}
这种格式的配置看起来很吓人,但是只要你研究一下你就会发现,它是有逻辑结构的。
例如,让我们看一下关闭了若干标签后的配置。
请注意,这是应用程序通道的配置,而不是排序系统通道的配置。
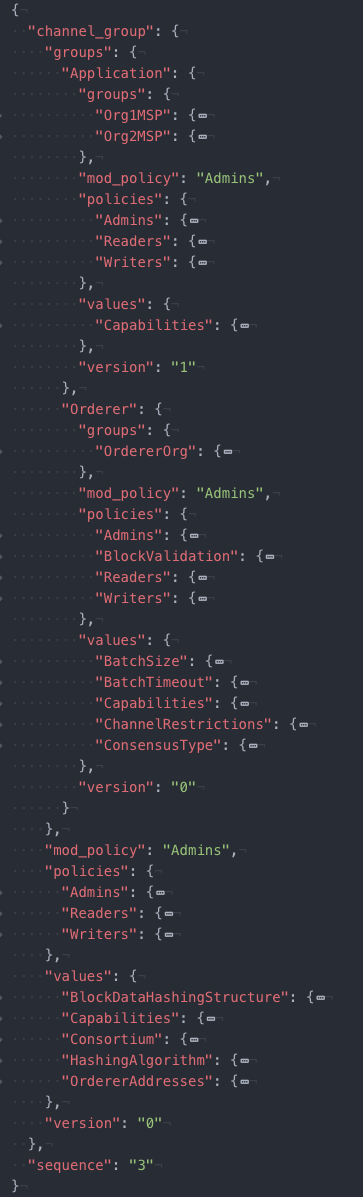
配置的结构现在应该更清晰了。你可以看到这些配置分组:Channel、Application 和 Orderer,以及与这些分组相关的配置参数(我们将在下一节中详细讨论这些配置参数),还可以看到表示组织的MSP所在的位置。请注意,Channel 配置分组位于 Orderer 下方。
关于这些参数的更多信息
在本节中,我们将深入研究可配置的值在配置上下文中的位置。
首先,在配置的多个部分中都有如下配置参数:
- 策略。策略不仅是一个配置值(它可以按照
mod_policy中的定义进行升级),它们还定义了所有参数在发生变更时所需的环境。更多相关信息,请查看 Policies。 - Capabilities。确保网络和通道以相同的方式处理事情,为诸如通道配置更新和链码调用之类的事情创建确定性的结果。如果没有确定性的结果,当通道上的某个peer节点则使交易生效时,通道上的另一个peer节点可能会使交易无效。更多相关信息,请查看 Capabilities。
Channel/Application
管理应用程序通道特有的配置参数(例如,添加或删除通道成员)。默认情况下,更改这些参数需要大多数应用程序组织管理员的签名。
- 向通道中添加组织。要想将组织添加到通道,必须生成其 MSP 和其他组织的参数并将它们添加到此处(
Channel/Application/groups里)。 - 与组织相关的参数。任何特定于组织的参数(例如标识锚节点或组织管理员的证书)都可以修改。请注意,默认情况下,更改这些值不需要大多数应用程序组织管理员的签名,而只需要该组织本身管理员的签名即可。
Channel/Orderer
管理排序服务或排序系统通道特有的配置参数,这需要大多数排序组织的管理员同意(默认情况下只有一个排序组织,但是也可以有多个,例如当多个组织向排序服务提供节点时就会存在多个排序组织)。
- Batch size。 这些参数决定了一个区块中交易的数量和大小。没有哪个区块会大于
absolute_max_bytes,也没有哪个区块包含的交易数会比max_message_count多。如果可以构造大小不超过preferred_max_bytes的区块,那么区块将被提早分割,而大于此大小的交易将出现在它们自己的区块中。(译者注:现根据 Fabric release-2.0源代码对preferred_max_bytes做进一步阐述。打包区块时为防止区块过大,有一个 BlockCut 的过程,cut 的规则是:如果当前 Envelope message 的大小大于preferred_max_bytes,则将之前接收到的message打包为一个区块,同时将当前 message 单独打包为另一个区块;如果当前message小于等于preferred_max_bytes且该message加上之前接收到的 message 大于preferred_max_bytes,则将当前 message 与之前接收到的 message 打包为一个区块,否则继续接收 message。) - Batch timeout。 是指在第一个交易到达后至分割区块前的等待时间。降低这个值会改善延迟,但降低太多则会由于区块未达到最大容量而降低吞吐量。(译者注:假设区块大小为1M。如果超时时间太短,则生成的区块会远小于1M,此时出块较快、交易延迟较低,但这也会导致区块数量激增。处理大量的区块会消耗非常多的时间从而降低系统吞吐量。)
- Block validation。 该策略指定了一个区块被视为有效区块需要满足什么样的签名要求。默认情况下,它需要排序组织中某个成员的签名。
- Consensus type。为了能将基于 Kafka 的排序服务切换为基于Raft的排序服务,可以更改通道的共识类型。更多相关信息,请查看从Kafka迁移到Raft。
- Raft 排序服务参数。想了解Raft排序服务特有的参数,请查看Raft配置。
- kafka brokers(如果可用)。当设置
ConsensusType设置为kafka时,brokers列表将遍历 Kafka brokers 的某些子集(最好是全部),以供排序节点在启动时进行初始连接。
Channel
管理那些peer组织和排序服务组织都需要同意才能修改的配置参数,需要大多数应用程序组织管理员和排序组织管理员的同意。
- Orderer addresses。 客户端可以用来调用排序节点的
Broadcast和Deliver功能的地址列表。peer 节点会在这些地址中随机选择,并在它们之间进行故障转移来获取区块。 - 哈希结构。区块数据的哈希值用 Merkle Tree 进行计算。这个值定义了 Merkle Tree 的宽度。目前,这个值固定为
4294967295,它是对区块数据串联后进行简单的 flat hash 而得到的结果。 - 哈希算法。 此算法用于计算编码到区块中的 hash 值。这会影响数据哈希和本区块的前一区块的哈希字段。请注意,这个字段当前仅有一个有效的值(
SHA256),并且不应该被修改。
系统通道配置参数
某些配置值是排序系统通道中特有的。
- Channel creation policy。 此参数用于定义策略值,该策略值将被设置为在联盟中定义的新通道的 Application group 的 mod_policy。系统将根据策略在新通道中的实例化值对附加到通道创建请求中的签名集进行检查,以确保通道创建是经过授权的。请注意,这个配置值只能在排序系统通道中设置。
- Channel restrictions。 此参数仅在排序系统通道中可编辑。排序节点可以分配的通道总数被定义为
max_count。这在使用弱联盟ChannelCreation策略的预生产环境中非常有用。
编辑配置
更新通道配置共有三步操作,从概念上来讲比较简单:
- 获取最新的通道配置
- 创建修改后的通道配置
- 创建配置更新交易
但是你将会发现,在这种概念上的简单之外,还伴随着一个有点复杂的过程。因此,有些用户可能选择将提取、转换和确定配置更新范围的过程脚本化。用户还可以选择如何修改通道配置:可以手动修改,也可以使用 jq 之类的工具进行修改。
我们提供了两个教程,这些教程专门用于编辑通道配置以实现特定的目标:
在本主题中,我们将展示编辑通道配置的过程,该过程独立于配置更新的最终目标。
为配置更新设置环境变量
在尝试使用示例命令前,请确保设置以下环境变量,这些环境变量取决于你部署的方式。请注意,必须为每个要更新的通道设置通道名称 CH_NAME,因为通道配置更新只能应用于要更新的通道的配置(排序系统通道除外,因为默认情况下,它的配置会被拷贝到应用程序通道的配置中)。
CH_NAME:要更新的通道的名称。TLS_ROOT_CA:提出配置更新的组织,其TLS CA的root CA证书的路径。CORE_PEER_LOCALMSPID:MSP的名称。CORE_PEER_MSPCONFIGPATH:组织MSP的绝对路径。ORDERER_CONTAINER:排序节点容器的名称。请注意,在定位排序服务时,你可以定位排序服务中任意一个活动的节点,你的请求将被自动转发给排序服务的 leader 节点。
请注意:本主题将为各种要被提取、修改的 JSON 文件和 protobuf 文件提供默认名称(config_block.pb、config_block.json等)。你可以使用任何名字。但需要注意的是,除非你在每次配置更新结束时回过头来清除这些文件,否则在进行其他更新时必须用其他文件名来命名文件。(译者注:请每次更新时尽量使用不同的名字,最好在每次更新结束后备份并删除本次更新产生的 JSON 文件和 protobuf 文件,避免下次更新时产生混淆。可以考虑为文件添加具有明确含义的前缀,如:”add_xxx_org_”。)
步骤 1:提取并转换配置
更新通道配置的第一步是获取最新的配置区块,这个过程包含三步。首先,我们要获取 protobuf 格式的通道配置并将其写入 config_block.pb 文件。
请确保以下命令是在 peer 容器中进行的。
现在执行:
peer channel fetch config config_block.pb -o $ORDERER_CONTAINER -c $CH_NAME --tls --cafile $TLS_ROOT_CA
接下来,我们要把上述命令得到的 protobuf 版本的通道配置转换为 JSON 版本,并将转换后的内容写入 config_block.json 文件(JSON 文件更易于人们阅读和理解):
configtxlator proto_decode --input config_block.pb --type common.Block --output config_block.json
最后,为了方便阅读,我们将从配置中排除所有不必要的元数据并重新写入一个新文件。你可以给该文件起任何名字,但在本例中,我们将其命名为 config.json。
jq .data.data[0].payload.data.config config_block.json > config.json
现在我们要 copy 一份 config.json 并将其命名为 modified_config.json。请不要直接编辑 config.json 文件,因为我们将在后面的步骤中计算 config.json 和 modified_config.json 之间的差异。
cp config.json modified_config.json
步骤 2:修改配置
在这一步,你有两种可选的方式来修改配置。
- 用文本编辑器打开
modified_config.json并进行编辑。有些在线教程描述了如何从没有编辑器的容器中复制文件、编辑文件然后将其放回容器。 - 使用
jq完成对配置的编辑。
是手动编辑配置还是使用 jq 编辑配置取决于你的实际情况。由于 jq 使用简单而且能编写脚本(当对多个通道进行相同的配置更新时,编写脚本会是一个优势),因此在更新通道时我们推荐使用此种方式。有关如何使用 jq 的示例,请查看更新通道功能,里面展示了多个用 jq 操作 capabilities.json 功能配置文件的命令。如果你不想更新通道的功能,而是要更新其他内容,则必须对其中涉及 jq 命令和 JSON 文件进行相应的修改。
有关通道配置的内容和结构的更多信息,请查看上面的通道配置示例。
步骤 3:重新编码并提交配置
无论你是手动配置的还是使用向 jq 之类的工具进行配置的,除了计算旧配置和新配置之间的差异,你还必须运行与之前提取、确定配置范围相反的过程,然后将配置更新提交给通道上的其他管理员。
首先,我们将 config.json 文件恢复回protobuf格式并将恢复后的内容写入 config.pb 文件。接下来对 modified_config.json 文件执行相同的操作,然后计算两个文件之间的差异,并将差异写入 config_update.pb 文件。
configtxlator proto_encode --input config.json --type common.Config --output config.pb
configtxlator proto_encode --input modified_config.json --type common.Config --output modified_config.pb
configtxlator compute_update --channel_id $CH_NAME --original config.pb --updated modified_config.pb --output config_update.pb
既然我们已经计算出了旧配置和新配置之间的差异,那么我们现在可以将更新应用于配置中了。
configtxlator proto_decode --input config_update.pb --type common.ConfigUpdate --output config_update.json
echo '{"payload":{"header":{"channel_header":{"channel_id":"'$CH_NAME'", "type":2}},"data":{"config_update":'$(cat config_update.json)'}}}' | jq . > config_update_in_envelope.json
configtxlator proto_encode --input config_update_in_envelope.json --type common.Envelope --output config_update_in_envelope.pb
提交配置更新交易:
peer channel update -f config_update_in_envelope.pb -c $CH_NAME -o $ORDERER_CONTAINER --tls --cafile $TLS_ROOT_CA
我们的配置更新交易表示原始配置和修改后的配置之间的差异,但是排序服务会将其转换为完整的通道配置。
获取必要的签名
无论你要修改的是什么内容,在生成新的 protobuf 配置文件后,protobuf 配置文件需要满足相关的策略才会被认为有效,通常(并非总是)需要其他组织的签名。
请注意:你可以根据你的应用程序编写收集签名的脚本。一般来说,你收集到的签名可能会比你需要的签名多。
获取这些签名的实际过程取决于你是如何设置系统的,不过主要有两种实现方式。Fabric 命令行目前默认使用 “pass it along” 方式。也就是说,提出配置更新的组织的管理员要将更新发送给需要签名的其他人(如另一个管理员)。这个管理员对接收到的配置更新进行签名(或不签名)并把它传递给下一个管理员,以此类推,直到有足够的签名可以提交配置为止。
这种方式的优点是简单——当有足够的签名时,最后一个管理员可以直接提交配置交易(在 Fabric 中,peer channel update 命令默认包含当前组织的签名)。但是这个过程只适用于较小的通道,因为 “pass it along” 方式可能会很耗时。
另一种方式是将更新提交给通道中每个管理员并等待他们返回足够的签名。这些签名会被集中在一起提交。这使创建配置更新的管理员的工作更加困难(他们必须处理每个签名者返回的文件),但对于正在开发 Fabric 管理应用程序的用户来说,这是推荐的工作流程。
配置被添加到账本后,最好将其提取并转换成 JSON 格式以确认所有内容均已被正确添加。确认过程中得到的文件也可以用作最新配置的副本。
链码开发者教程
链码是什么?
链码是一段程序,由 Go 、 node.js 、或者`Java <https://java.com/en/>`_ 编写,来实现一些预定义的接口。链码运行在一个和背书节点分开的独立进程中,通过应用程序提交的交易来初始化和管理账本状态。
链码一般处理网络中的成员一致同意的商业逻辑,所以它类似于“智能合约”。链码可以在提案交易中被调用用来升级或者查询账本。赋予适当的权限,链码就可以调用其他链码访问它的状态,不管是在同一个通道还是不同的通道。注意,如果被调用链码和调用链码在不同的通道,就只能执行只读查询。就是说,调用不同通道的链码只能进行“查询”,在提交的子语句中不能参与状态的合法性检查。
在下边的章节中,我们站在应用开发者的角度来介绍链码。我们将演示一个简单的链码示例应用,并浏览 Chaincode Shim API 中每一个方法的作用。如果你是网络管理员,负责将链码部署在运行中的网络上,请查看 Deploying a smart contract to a channel 教程和 Fabric 链码生命周期 概念主题。
本教程以底层视角提供 Fabric Chaincode Shim API 的概览。你也可以使用 Fabric Contract API 提供的高级 API。关于使用 Fabric Contract API 开发智能合约的更多信息,请访问 智能合约处理 主题。
Chaincode API
每一个链码程序都必须实现 Chaincode 接口,该接口的方法在接收
到交易时会被调用。你可以在下边找到不同语言 Chaincode Shim API 的参考文档:
在每种语言中,客户端提交交易提案都会调用 Invoke 方法。该方法可以让你使用链码来读写通道账本上的数据。
你还要包含 Init 方法,该方法是实例化方法。该方法是链码接口需要的,你的应用程序没有必要调用。你可以使用 Fabric 链码生命周期过程来指定在 Invoke 之前是否必须调用 Init 方法。更多信息,请参考 Fabric 链码生命周期文档中 批准链码定义 步骤的实例化参数。
链码 “shim” API 中的其他接口是 ChaincodeStubInterface:
用来访问和修改账本,以及在链码间发起调用。
在本教程中使用 Go 链码,我们将通过实现一个管理简单的“资产”示例链码应用来演示如何使用这些 API 。
简单资产链码
我们的应用程序是一个基本的示例链码,用来在账本上创建资产(键-值对)。
选择一个位置存放代码
如果你没有写过 Go 的程序,你可能需要确认一下你是否安装了 Go 以及你的系统是否配置正确。我们假设你用的是支持模块的版本。
现在你需要为你的链码应用程序创建一个目录。
简单起见,我们使用如下命令:
mkdir sacc && cd sacc
现在,我们创建一个用于编写代码的源文件:
go mod init sacc
touch sacc.go
内务
首先,我们从内务开始。每一个链码都要实现 Chaincode 接口 中的 Init 和 Invoke 方法。所以,我们先使用 Go import 语句来导入链码必要的依赖。我们将导入链码 shim 包和 peer protobuf 包 。然后,我们加入一个 SimpleAsset 结构体来作为 Chaincode shim 方法的接收者。
package main
import (
"fmt"
"github.com/hyperledger/fabric-chaincode-go/shim"
"github.com/hyperledger/fabric-protos-go/peer"
)
// SimpleAsset implements a simple chaincode to manage an asset
type SimpleAsset struct {
}
初始化链码
然后,我们将实现 Init 方法。
// Init is called during chaincode instantiation to initialize any data.
func (t *SimpleAsset) Init(stub shim.ChaincodeStubInterface) peer.Response {
}
注解
注意,链码升级的时候也要调用这个方法。当写一个用来升级已存在的链码的时候,请确保合理更改 Init 方法。特别地,当升级时没有“迁移”或者没东西需要初始化时,可以提供一个空的 Init 方法。
接下来,我们将使用 ChaincodeStubInterface.GetStringArgs 方法获取 Init 调用的参数,并且检查其合法性。在我们的用例中,我们希望得到一个键-值对。
// Init is called during chaincode instantiation to initialize any // data. Note that chaincode upgrade also calls this function to reset // or to migrate data, so be careful to avoid a scenario where you // inadvertently clobber your ledger's data! func (t *SimpleAsset) Init(stub shim.ChaincodeStubInterface) peer.Response { // Get the args from the transaction proposal args := stub.GetStringArgs() if len(args) != 2 { return shim.Error("Incorrect arguments. Expecting a key and a value") } }
接下来,我们已经确定了调用是合法的,我们将把初始状态存入账本中。我们将调用 ChaincodeStubInterface.PutState 并将键和值作为参数传递给它。假设一切正常,将返回一个 peer.Response 对象,表明初始化成功。
// Init is called during chaincode instantiation to initialize any
// data. Note that chaincode upgrade also calls this function to reset
// or to migrate data, so be careful to avoid a scenario where you
// inadvertently clobber your ledger's data!
func (t *SimpleAsset) Init(stub shim.ChaincodeStubInterface) peer.Response {
// Get the args from the transaction proposal
args := stub.GetStringArgs()
if len(args) != 2 {
return shim.Error("Incorrect arguments. Expecting a key and a value")
}
// Set up any variables or assets here by calling stub.PutState()
// We store the key and the value on the ledger
err := stub.PutState(args[0], []byte(args[1]))
if err != nil {
return shim.Error(fmt.Sprintf("Failed to create asset: %s", args[0]))
}
return shim.Success(nil)
}
调用链码
首先,我们增加一个 Invoke 函数的签名。
// Invoke is called per transaction on the chaincode. Each transaction is
// either a 'get' or a 'set' on the asset created by Init function. The 'set'
// method may create a new asset by specifying a new key-value pair.
func (t *SimpleAsset) Invoke(stub shim.ChaincodeStubInterface) peer.Response {
}
就像上边的 Init 函数一样,我们需要从 ChaincodeStubInterface 中解析参数。Invoke 函数的参数是将要调用的链码应用程序的函数名。在我们的用例中,我们的应用程序将有两个方法: set 和 get ,用来设置或者获取资产当前的状态。我们先调用 ChaincodeStubInterface.GetFunctionAndParameters 来为链码应用程序的方法解析方法名和参数。
// Invoke is called per transaction on the chaincode. Each transaction is
// either a 'get' or a 'set' on the asset created by Init function. The Set
// method may create a new asset by specifying a new key-value pair.
func (t *SimpleAsset) Invoke(stub shim.ChaincodeStubInterface) peer.Response {
// Extract the function and args from the transaction proposal
fn, args := stub.GetFunctionAndParameters()
}
然后,我们将验证函数名是否为 set 或者 get ,并执行链码应用程序的方法,通过 shim.Success 或 shim.Error 返回一个适当的响应,这个响应将被序列化为 gRPC protobuf 消息。
// Invoke is called per transaction on the chaincode. Each transaction is
// either a 'get' or a 'set' on the asset created by Init function. The Set
// method may create a new asset by specifying a new key-value pair.
func (t *SimpleAsset) Invoke(stub shim.ChaincodeStubInterface) peer.Response {
// Extract the function and args from the transaction proposal
fn, args := stub.GetFunctionAndParameters()
var result string
var err error
if fn == "set" {
result, err = set(stub, args)
} else {
result, err = get(stub, args)
}
if err != nil {
return shim.Error(err.Error())
}
// Return the result as success payload
return shim.Success([]byte(result))
}
实现链码应用程序
就像我们说的,我们的链码应用程序实现了两个功能,它们可以通过 Invoke 方法调用。我们现在来实现这些方法。注意我们之前提到的,要访问账本状态,我们需要使用链码 shim API 中的 ChaincodeStubInterface.PutState
和 ChaincodeStubInterface.GetState 方法。
// Set stores the asset (both key and value) on the ledger. If the key exists,
// it will override the value with the new one
func set(stub shim.ChaincodeStubInterface, args []string) (string, error) {
if len(args) != 2 {
return "", fmt.Errorf("Incorrect arguments. Expecting a key and a value")
}
err := stub.PutState(args[0], []byte(args[1]))
if err != nil {
return "", fmt.Errorf("Failed to set asset: %s", args[0])
}
return args[1], nil
}
// Get returns the value of the specified asset key
func get(stub shim.ChaincodeStubInterface, args []string) (string, error) {
if len(args) != 1 {
return "", fmt.Errorf("Incorrect arguments. Expecting a key")
}
value, err := stub.GetState(args[0])
if err != nil {
return "", fmt.Errorf("Failed to get asset: %s with error: %s", args[0], err)
}
if value == nil {
return "", fmt.Errorf("Asset not found: %s", args[0])
}
return string(value), nil
}
把它们组合在一起
最后,我们增加一个 main 方法,它将调用
shim.Start 方法。下边是我们链码程序的完整源码。
package main
import (
"fmt"
"github.com/hyperledger/fabric-chaincode-go/shim"
"github.com/hyperledger/fabric-protos-go/peer"
)
// SimpleAsset implements a simple chaincode to manage an asset
type SimpleAsset struct {
}
// Init is called during chaincode instantiation to initialize any
// data. Note that chaincode upgrade also calls this function to reset
// or to migrate data.
func (t *SimpleAsset) Init(stub shim.ChaincodeStubInterface) peer.Response {
// Get the args from the transaction proposal
args := stub.GetStringArgs()
if len(args) != 2 {
return shim.Error("Incorrect arguments. Expecting a key and a value")
}
// Set up any variables or assets here by calling stub.PutState()
// We store the key and the value on the ledger
err := stub.PutState(args[0], []byte(args[1]))
if err != nil {
return shim.Error(fmt.Sprintf("Failed to create asset: %s", args[0]))
}
return shim.Success(nil)
}
// Invoke is called per transaction on the chaincode. Each transaction is
// either a 'get' or a 'set' on the asset created by Init function. The Set
// method may create a new asset by specifying a new key-value pair.
func (t *SimpleAsset) Invoke(stub shim.ChaincodeStubInterface) peer.Response {
// Extract the function and args from the transaction proposal
fn, args := stub.GetFunctionAndParameters()
var result string
var err error
if fn == "set" {
result, err = set(stub, args)
} else { // assume 'get' even if fn is nil
result, err = get(stub, args)
}
if err != nil {
return shim.Error(err.Error())
}
// Return the result as success payload
return shim.Success([]byte(result))
}
// Set stores the asset (both key and value) on the ledger. If the key exists,
// it will override the value with the new one
func set(stub shim.ChaincodeStubInterface, args []string) (string, error) {
if len(args) != 2 {
return "", fmt.Errorf("Incorrect arguments. Expecting a key and a value")
}
err := stub.PutState(args[0], []byte(args[1]))
if err != nil {
return "", fmt.Errorf("Failed to set asset: %s", args[0])
}
return args[1], nil
}
// Get returns the value of the specified asset key
func get(stub shim.ChaincodeStubInterface, args []string) (string, error) {
if len(args) != 1 {
return "", fmt.Errorf("Incorrect arguments. Expecting a key")
}
value, err := stub.GetState(args[0])
if err != nil {
return "", fmt.Errorf("Failed to get asset: %s with error: %s", args[0], err)
}
if value == nil {
return "", fmt.Errorf("Asset not found: %s", args[0])
}
return string(value), nil
}
// main function starts up the chaincode in the container during instantiate
func main() {
if err := shim.Start(new(SimpleAsset)); err != nil {
fmt.Printf("Error starting SimpleAsset chaincode: %s", err)
}
}
链码访问控制
链码可以通过调用 GetCreator() 方法来使用客户端(提交者)证书进行访问控制决策。另外,Go shim 提供了扩展 API ,用于从提交者的证书中提取客户端标识用于访问控制决策,该证书可以是客户端身份本身,或者组织身份,或客户端身份属性。
例如,一个以键-值对表示的资产可以将客户端的身份作为值的一部分保存其中(比如以 JSON 属性标识资产主人),以后就只有被授权的客户端才可以更新键-值对。
详细信息请查阅 client identity (CID) library documentation
To add the client identity shim extension to your chaincode as a dependency, see 管理 Go 链码的扩展依赖.
将客户端身份 shim 扩展作为依赖添加到你的链码,请查阅 管理 Go 链码的扩展依赖 。
管理 Go 链码的扩展依赖
你的 Go 链码需要 Go 标准库之外的一些依赖包(比如链码 shim)。当链码安装到 peer 的时候,这些报的源码必须被包含在你的链码包中。如果你将你的链码构造为一个模块,最简单的方法就是在打包你的链码之前使用 go mod vendor 来 “vendor” 依赖。
go mod tidy
go mod vendor
这就把你链码的扩展依赖放进了本地的 vendor 目录。
当依赖都引入到你的链码目录后, peer chaincode package 和 peer chaincode install 操作将把这些依赖一起放入链码包中。
部署一个生产网络
本部署指南是对设置生产 Fabric 网络组件的适当的顺序的整体概述,此外还有最佳做法和部署时要记住的一些注意事项。
部署 Fabric 网络的过程很复杂,需要了解公钥基础设施和管理分布式系统。如果你是智能合约或应用开发者,在部署生产级别 Fabric 网络时,你不应该需要这种级别的专业技能。然而,你可能需要了解网络是如何部署的,以便开发有效的智能合约和应用程序。
如果你只需要一个开发环境来测试链码、智能合约和应用程序,请查看 使用Fabric的测试网络。它包括两个组织,每个组织拥有一个 peer 节点,以及一个拥有单个排序节点的排序服务组织。该测试网络并不打算为部署生产组件提供蓝图,也不应该这样使用,因为它会做出生产部署不会做出的假设和决策。
本指南会向你概述设置生产组件和生产网络的步骤:
步骤一:选定你的网络配置
区块链网络结构必须按照用例来决定。这些基本的业务决策将根据你的用例的改变而改变,但是让我们考虑一些场景。
与开发环境或概念证明相反,在生产环境中操作时,安全性、资源管理和高可用性成为优先考虑的事项。你需要多少个节点来满足高可用性,以及你希望在哪些数据中心部署它们来确保灾难恢复和数据驻留的需求得到满足?你将如何确保你的私钥和信任根保持安全状态?
除了以上提到的,这有一个在部署组件之前你需要做出决定的案例:
- 证书颁发机构配置。 作为整体决策的一部分,你必须决定你的 peer 节点(有多少,每个通道有多少等等)和你的排序服务(有多少节点,谁将拥有它们),你还必须决定你的组织的 CA(译者注:证书颁发机构,下同)节点如何被部署。生产网络应该使用传输层安全性(TLS),这将需要设置一个 TLS CA,并使用它来生成 TLS 证书。此 TLS CA 需要在你登录 CA 之前部署。我们将更多在 步骤三:设置你的 CA(译注:证书颁发机构,下同)节点 讨论这点。
- 使用或者不使用组织的单位? 一些组织可能会发现有必要建立组织单位,以便在特定身份和由单一认证机构创建的 MSP(成员服务提供商)之间建立分离。
- 数据库类型。 网络中的一些通道可能需要所有数据以某种 使用 CouchDB 作为状态数据库 能理解的方式进行建模,然而其他优先考虑速度的网络可能会决定所有 peer 节点将使用 LevelDB。注意通道中不应该有同时使用 CouchDB 和 LevelDB 的 peer 节点,因为两个数据库类型模型数据稍有不同。
- 通道和私有数据。 一些网络可能认为 通道 是确保某些特定交易的隐私性和隔离性的最佳方式。其他网络可能会认为一个单一通道连同 私有数据 能更好地服务于他们的隐私需求。
- 容器编排。 不同用户也可能做出针对他们的容器编排的不同决定,为他们的 peer 进程创建单独的容器,为 peer 进程、CouchDB、gRPC 通信以及链码记录日志;而其他用户可能会决定组合这些进程中的一些。
- 链码部署方式。 用户现在可以选择使用内置构建结合运行支持(自定义构建和使用 外部构建器和启动器 来运行),或者使用 将链码作为外部服务。
- 使用防火墙。 在产品部署中,属于某个组织的组件可能需要访问其他组织的组件,使用防火墙和高级网络配置成为必须。例如,使用 Fabric SDK 的应用程序需要访问所有组织的所有背书 peer 节点以及所有通道的排序服务。类似地,peer 节点需要在他们接收区块的通道上访问排序服务。
无论你的组件何时以何种方式部署的,为了有效地运行你的网络,你将需要在你选择的管理系统(如 Kubernetes)中拥有高度的专业知识。类似地,网络结构必须被设计成适用于业务用例以及网络所运行行业的任何相关法律法规。
本部署指南不会覆盖每一次迭代和潜在的网络配置,但给出了需要考虑的通用指南和规则。
步骤二:为你的资源设置一个集群
一般来说,Fabric 与部署和管理它的方法无关。例如,可能在一台笔记本电脑上部署和管理一个 peer 节点。因为种种原因,这可能不是可取的,但 Fabric 中没有任何东西可以禁止它。
只要你有能力部署容器,无论是在本地(或防火墙后),还是在云端,都应该有可能建立组件并将它们相互连接。然而,Kubernetes 具有许多有用的工具,使其成为部署和管理 Fabric 网络的普及容器管理平台。需了解更多关于 Kubernetes 的信息,请查看 the Kubernetes documentation。本主题将主要将其范围限制在二进制文件中,并提供在使用 Docker 部署或 Kubernetes 时可以应用的说明。
无论你选择以什么方式,在什么地方部署你的组件,你都需要确保有足够的资源让组件有效运行。你需要的大小很大程度上取决于你的用例。如果你计划将单个 peer 节点加入几个高容量通道,它将比一个用户计划加入单个通道的 peer 节点需要更多的 CPU 和内存。粗略计算,计划分配给 peer 节点的资源大约是你计划分配给单个排序节点资源(如下所述,推荐部署至少三个,最好是五个节点到排序服务)的三倍。类似地,对于一个 CA,你应该需要相当于 peer 节点十分之一的资源。你也需要添加存储到你的集群(一些云提供商可能会提供存储),因为如果没有先与云提供商一起设置存储,你就无法配置持久卷和持久卷声明。
通过部署概念证明网络并在负载下测试它,你将更好地了解你需要的资源。
管理你的基础设施
你用来管理你的后端的确切方法和工具将取决于你选择的后端。然而,这里有一些值得注意的事项。
- 使用机密对象在集群中安全地存储重要的配置文件。有关 Kubernetes 机密的信息,请查看 Kubernetes secrets。你也可以选择使用强化安全模块加密持久卷 (PVs)。类似的路线,在部署完 Fabric 组件后,你可能想在你自己的后端链接一个容器,例如在 Docker Hub 这样的服务中使用私有仓库。你需要以 Kubernetes 密码的形式对登录信息进行编码,并在部署组件时将其包含在 YAML 文件中。
- 集群注意事项和节点大小。在上面的第2步中,我们讨论了如何考虑节点大小的一般概要。你的用例,以及一个健壮的开发阶段,是你真正了解你的 peer 节点、排序节点和 CA 节点需要多大的唯一方法。
- 你选择如何挂载你的卷。最佳做法是将与节点相关的卷挂载在部署节点的外部。这将允许你稍后引用这些卷(例如,重新启动已崩溃的节点或容器),而不必重新部署或重新生成你的密码材料。
- 你如何监控你的资源。通常关键是要建立一个策略和方法来监视我们个人节点使用的资源和部署到集群的资源。随着你加入你的 peer 节点到更多的通道,你可能需要增加它的 CPU 和内存分配。同样,你需要确保你的状态数据库和区块链有足够的存储空间。
步骤三:设置你的 CA(译注:证书颁发机构,下同)节点
Fabric 网络中必须部署的第一个组件是 CA。这是因为在节点本身能被部署之前,节点相关证书(不仅是节点本身的证书,还有识别谁可以管理节点的证书)必须被创建。虽然不是必需使用 Fabric CA 来创建这些证书,但 Fabric CA 还创建了组件和组织要正确定义所需的 MSP 结构。如果用户选择使用 Fabric CA 以外的 CA,则必须自己创建 MSP 文件夹。
- 一个 CA(或者更多,如果你正在使用中间 CA — 以下有关于中间 CA 的更多信息)用于生成(通过一个称为“登录”的过程)组织管理员的证书、该组织的 MSP 以及该组织拥有的任何节点。此 CA 还将为任何其他用户生成证书。由于它在“登录”身份中的作用,这个 CA 有时被称为“登录 CA”或“ecert CA”。
- 其他 CA 生成保护传输层安全(TLS)通信的证书。因此,这个 CA 通常被称为“TLS CA”。这些 TLS 证书被附加到防止“中间人”攻击的活动中。请注意,TLS CA 仅用于为节点颁发证书,当该活动完成时可以关闭。用户可以选择使用单向(仅客户端)TLS 以及双向(服务器和客户端)TLS,后者也称为“相互(mutual)TLS”。因为指定你的网络使用 TLS(推荐使用) 应该在部署“登录” CA(指定此 CA 配置的 YAML 文件有一个启用 TLS 的字段)之前,所以你应该先部署 TLS CA,并在引导登录 CA 时使用其根证书。当链接到登录 CA 为用户和节点登录身份时候,这份 TLS 证书也会被
fabric-ca client使用。
虽然与组织相关的所有非 TLS 证书都可以由单个“根”CA(即其自身信任根的 CA)创建,但对于添加的安全组织来说,可以决定使用证书由根 CA(或最终导向根 CA 的另一个中间 CA)创建的“中间”CA。由于根 CA 的泄露导致其整个信任域(管理员、节点和它为其生成的任何证书的 CA)崩溃,中间 CA 是一种限制根 CA 暴露的有用方法。你是否选择使用中间 CA 将取决于用例的需要。并非强制使用。请注意,对于那些已经采取此实现方式,并且不想在现有基础设施中添加身份管理层的企业,还可以配置轻量级目录访问协议(LDAP)来管理 Fabric 网络上的身份。
在生产网络中,建议每个组织至少部署一个用于注册目的 CA,另一个用于 TLS 的 CA。 例如,如果你部署了三个与某个组织相关联的 peer 节点和一个与排序组织相关联的排序节点,则至少需要四个 CA。两个 CA 是用于 peer 组织(为 peer 节点、管理员、通信以及代表组织的 MSP 目录结构生成登录和 TLS 证书),其他两个 CA 将用于排序组织注意,用户通常只用登录 CA 来注册和登录,然而节点需要用登录 CA(在登录 CA 中,当节点尝试对其操作进行签名时,它将获得标识它的签名证书)和 TLS CA(在那里它将获得用于验证其通信的 TLS 证书)来注册和登录。
对于如何设置组织 CA 和 TLS CA 并登录其管理员身份的示例,请查看 Fabric CA 部署指南。本部署指南使用 Fabric CA 客户端来注册和登录需要设置 CA 的身份。
步骤四:用 CA 来创建身份和 MSP
创建CA后,可以使用它们为与组织相关的身份和组件(由 MSP 表示)创建证书。对于每个组织,你至少需要:
- 注册和登录管理员身份并创建 MSP。在创建了与组织关联的 CA 之后,可以使用它先注册一个身份,然后登录它。在第一步中,身份的用户名和密码由 CA 的管理员分配。属性和从属关系也可以被赋予身份(例如,
admin的role,这是组织管理员所必需的)。身份注册后,可以使用用户名和密码来登录。该CA将为该身份生成两个证书-网络其他成员已知的公共证书(也称为签名证书)和用于身份签名操作的私钥(存储在keystore文件夹中)。该 CA 也会生成一个包含 CA 颁发证书的公有证书的 MSP 文件以及 CA 的信任根(这可能是也可能不是同一个 CA)。此 MSP 可以被认为是定义与管理员身份相关的组织。对于这个过程细节的例子,请查看 管理员如何登录的例子。如果组织的管理员也是节点的管理员(这将是典型的),你必须在创建本地节点的 MSP 之前,创建组织管理员身份,因为当创建本地 MSP 时,节点管理员证书必须被使用。 - 注册和登录节点身份。就像一个组织管理员身份被注册和登录一样,节点的身份必须用登录的 CA 和 TLS CA 执行注册和登录操作。因此,登录 CA 和 TLS 共享数据库(允许节点身份仅注册一次并由每个 CA 服务器单独登录)可能是有用的,尽管这是一个可选的配置选项。当用登录 CA 注册节点身份时,不给节点
admin或user的角色,而是给它一个peer或orderer的角色。与管理员一样,此身份的属性和从属关系也可以分配。节点的 MSP 结构称为 “本地 MSP”,因为分配给身份的权限仅与本地(节点)级别相关。此 MSP 是在创建节点身份时创建的,并在引导节点时使用。在你用 TLS CA 登录后并将组织加入到通道(当登录管理员身份时,此证书必须添加到创建的 orgMSP 中)时,以及使用 peer 二进制作为 CLI 客户端向其他 peer 节点(如peer chaincode invoke)或排序节点(如peer channel fetch)进行调用时(因为没有orderer的 CLI),你将使用生成的TLS 根证书。没有必要将TLS根证书添加到节点的本地MSP中,因为这些证书包含在通道配置中。
有关基于Fabric的块链网络中的身份和权限的更多概念信息,请查看 身份 and Membership Service Provider (MSP).
要了解如何使用 CA 来生成一个管理员身份和 MSP,查看 Enroll Org1’s Admin.
要了解如何用登录 CA 和 TLS CA 来为节点生成证书,查看 Setup Org1’s Peers.
步骤五:部署节点
一旦你收集完你需要的所有证书和 MSP,你几乎准备好创建一个节点了。如上所述,有很多合法的方式来部署节点。
创建一个 peer 节点
在创建 peer 节点之前,你需要为 peer 节点定制配置文件。在 Fabric 中,这个文件叫做 core.yaml。你可以找到一个示例 core.yaml 配置文件 在 Hyperledger Fabric sampleconfig 目录.
正如你在文件中看到的,有相当多的参数,你可以选择设置,或者需要设置节点才能正常工作。一般情况下,如果你不需要更改变化值,就不要管它。但是,你可能需要调整各种地址、指定要使用的数据库类型以及指定节点的 MSP 所在位置。
你主要有两个选择更改配置。
1、编辑和二进制文件绑定的 YAML 文件。
2、在部署时,使用环境变量来重写。
3、在 CLI 命令中指定标识。
选项1的优点是,每当你将节点关闭并又恢复启动时,会持久化你的更改。缺点是,升级到新的二进制版本时,必须将你定制的选项移植到新的 YAML 文件(升级到新版本时,应该使用最新的 YAML)。
无论哪种方式,这有一些在 core.yaml 中你必须检查的值。
peer.localMspID:这是你的 peer 组织的本地 MSP 的名称。在此MSP中,将列出你的 peer 组织管理员以及 peer 组织的根 CA 和TLS CA 证书。peer.mspConfigPath:peer 节点的本地 MSP 的所在地。注意,将此卷挂载到容器外部是最佳做法。这确保即使容器被停止(例如,在维护周期中),MSP也不会丢失,并且必须重新创建。peer.address:代表同一组织中的其他 peer 节点的终端,这是在组织内建立 gossip 通信的一个重要注意事项。peer.tls:当你将enabled值设置为true(应该在生产网络中完成)时,你将必须指定相关 TLS 证书的位置。请注意,网络中的所有节点(peer 节点和排序节点)都必须启用或不启用 TLS。对于生产网络,强烈建议启用TLS。与你的MSP一样,将此卷挂载到容器外部是最佳做法。ledger:用户可以做许多关于其账本的决定,包括状态数据库类型(例如,LevelDB 或 CouchDB)以及其位置(通过fileSystemPath指定)。请注意,对于 CouchDB 来说,在 peer 节点外部(例如,在一个单独的容器中)操作你的状态数据库是一种最佳实践,因为你将能够以这种方式更好地将特定资源分配给数据库。出于延迟和安全原因,将 Couch DB 容器放在与 peer 节点服务器相同的服务器上是最佳做法。对 CouchDB 容器的访问应该仅限于 peer 节点容器。gossip:在设置 Gossip 数据传播协议 时,有许多配置选项要考虑,包括externalEndpoint(它使 peer 节点可被其他组织的 peer 节点发现)以及bootstrap地址(通过它在 peer 自己的组织中识别一个 peer)。chaincode.externalBuilders:当使用 将链码作为外部服务 时,设置这个字段很重要。
当你对如何配置 peer 节点、如何挂载卷以及后端配置感到得心应手时,可以运行命令启动 peer 节点(此命令将取决于后端配置)。
创建一个排序节点
与创建 peer 节点不同,你将需要创建一个创世纪块(或者引用已经创建的块,如果将排序节点添加到现有的排序服务中),并在启动排序节点之前指定其路径。
在Fabric中,这个用于排序节点的配置文件称为 orderer.yaml。你可以在 Hyperledger Fabric 的 sampleconfig 目录中 找到一个示例配置文件 orderer.yaml。请注意,orderer.yaml 与排序服务的“genesis block”不同。该区块包括排序系统通道的初始配置,必须在创建排序节点之前创建,因为它用于引导节点。
与 peer 节点一样,你将看到有相当多的参数,你要么可以选择设置,要么需要设置节点才能正常工作。一般情况下,如果您不需要更改变化值,就不要管它。
你有两个主要选项来更改你的配置。
1、编辑和二进制文件绑定的 YAML 文件。
2、 在部署时,使用环境变量重写。
3、 在 CLI 命令中指明标签。
选项1的优点是,每当你将节点关闭并又恢复启动时,会持久化你的更改。缺点是,升级到新的二进制版本时,必须将你定制的选项移植到新的 YAML 文件(升级到新版本时,应该使用最新的 YAML)。
无论如何,在 orderer.yaml 中有一些值你必须检查。你将发现这些字段中的一些是和 core.yaml 中的一样的,只是名称不同。
General.LocalMSPID:通过排序组织的 CA 生成的本地 MSP 的名称。General.LocalMSPDir:排序节点所在地的本地 MSP。注意,把此卷挂载在容器外面是一种最佳做法。General.ListenAddress和General.ListenPort:代表相同组织中的其他排序节点的终端。FileLedger:虽然排序节点没有状态数据库,但它们仍然都携带区块链的副本,因为这允许它们使用最新的配置块来验证权限。因此,应该用正确的文件路径定制账本字段。Cluster:这些值对于与其他排序节点通信的排序服务节点非常重要,例如在基于 Raft 的排序服务中。General.BootstrapFile:这是用于引导排序节点的配置块的名称。如果此节点是在排序服务中生成的第一个节点,则必须生成此文件,并将其称为“创始块”。General.BootstrapMethod:给出引导块的方法。目前,这只能是文件,其中指明了BootstrapFile中的文件。从2.0开始,你可以通过指定none来简单地在不引导的情况下启动排序节点。Consensus:确定共识插件(支持并推荐 Raft 排序服务)允许的键值对,用于写头日志(WALDir)和快照(SnapDir)。
当你对如何配置排序节点、如何挂载卷以及后端配置感到得心应手时,可以运行命令启动排序节点(此命令将取决于后端配置)。
下一步
区块链网络都是关于连接的,所以一旦你部署了节点,你显然会想把它们连接到其他节点!如果你有一个 peer 组织和一个 peer 节点,你需要加入你的组织到一个联盟,并加入 通道。如果你有一个排序节点,你需要添加 peer 组织到你的联盟。你还将需要学习如何开发链码,你可以在以下主题中了解到 场景 and 链码开发者教程。
连接节点和创建通道的部分过程将涉及修改策略以适应业务网络的用例。有关策略的更多信息,请查看 策略。
Fabric 中的一个常见任务是编辑现有的通道。有关该过程的教程,请查看 更新通道配置。一个常见的的通道更新操作是向现有通道添加一个组织。有关该特定过程的教程,请查看 向通道添加组织。有关部署后升级节点的信息,请查看 Upgrading your components。
操作指南
设置排序节点
本章中,我们将介绍启动排序节点的过程。如果想了解更多有关不同排序服务实现及其优缺点的信息,请查看conceptual documentation about ordering。
总体来说,本章将涉及以下步骤:
- 创建排序节点所属的组织(如果尚未创建)
- 配置节点 (使用
orderer.yaml) - 为排序系统通道创建创世块
- 引导排序节点
注意:本章假定您已从 docker hub 中拉取了 Hyperledger Fabric orderer 镜像。
创建组织定义
和 Peer 节点一样,所有排序节点都必须属于已存在的组织。该组织拥有成员服务提供者(MSP),MSP 由 CA(Certificate Authority)创建,CA 专门为该组织创建证书和 MSP 。
有关创建 CA 以及使用 CA 创建用户和 MSP 的信息,请参阅 Fabric CA user’s guide。
配置节点
排序节点通过名为 orderer.yaml 的 yaml 文件来进行配置。其中 FABRIC_CFG_PATH 环境变量需指向一个已经配置好的 orderer.yaml 文件,该文件将在文件系统中提取一系列文件和证书。
示例 orderer.yaml 请查看 fabric-samples github repo,在继续下一步之前仔细阅读和研究 。需要特别注意以下值:
LocalMSPID—— 这是排序组织的 MSP 的名称,由 CA 生成,并在这里列出了排序组织管理员。LocalMSPDir—— 文件系统中本地 MSP 所在的位置。# TLS enabled,Enabled: false。在这里可以指定是否要启用 TLS 。如果将此值设置为true, 则必须指定相关 TLS 证书的位置。请注意,这对于 Raft 节点是必须的。BootstrapFile—— 这是您将为此排序服务生成的创世块的名称。BootstrapMethod—— 给定引导区块的方法。目前,这里只能是file,引导文件是BootstrapFile中所指定的文件。
如果将此节点部署为集群的一部分(例如,作为 Raft 节点集群的一部分),请注意 Cluster 和 Consensus 部分。
如果想要部署基于 Kafka 的排序服务,则需要完成 Kafka 部分。
创建排序节点的创世区块
新创建通道的第一个区块称为“创世区块”。如果在创建新网络的过程中创建了创世区块(换言之,正在创建的排序节点不会加入现有的排序节点集群),则该创世区块将是“排序系统通道”的第一个区块,“排序系统通道”是一个特殊的通道,它由排序管理员管理,排序管理员包括了允许创建通道的组织列表。排序系统通道的创世区块很特殊:必须先创建它并将其包含在节点的配置中,然后才能启动该节点。
想要了解如何使用 configtxgen 创建创世区块,请查阅 通道配置(configtx)
引导排序节点
当您完成构建镜像,创建 MSP,配置 orderer.yaml 并创建了创世区块之后,就可以使用类似下面的命令来启动排序节点:
docker-compose -f docker-compose-cli.yaml up -d --no-deps orderer.example.com
注意用你的排序节点地址来替换 orderer.example.com。
成员服务提供者 (MSP)
本文档将详细说明MSP的建立并提供MSP的最佳实践。
成员服务提供者(MSP)是 Hyperledger Fabric 的一个组件,旨在提供抽象的成员操作。
具体的,MSP将分发证书、验证证书和用户授权背后的所有加密机制和协议抽象出来。MSP可以定义它们自己的身份概念,同样还可以定义管理(身份验证)和认证(签名生成和验证)这些身份的规则。
一个 Hyperledger Fabric区块链网络可以由一个或多个MSP管理。这提供了成员操作的模块化和不同成员标准和架构之间的互操作性。
此文档的剩余部分将详述MSP在Hyperledger Fabric的建立过程,然后讨论关于其使用的最佳实践。
MSP配置
为了建立一个MSP实体,每个peer和orderer需要指定其本地的配置文件(为了使peer和orderer可以进行签名),也为了在通道上使peer、orderer和client进行身份验证和通道成员之间的签名验证(认证)。
首先,每个MSP必须指定一个名字以便该MSP在网络内被引用(例如 msp1, org2, 以及 org3.divA)。这是一个可以表述其所代表的在通道中联盟、组织或组织部门的名称。这个名称也被称为 MSP Identifier 或 MSP ID。每个MSP的MSPID必须是唯一的。例如,如果在系统通道建立时发现两个MSP的MSPID相同,orderer的建立将失败。
在默认的MSP实现中,需指定一些参数来允许身份(证书)验证和签名验证。这些参数从这里导出: RFC5280 ,并包括:
- 一个自签名(X.509) CA 证书列表来组成信任根(root of trust)
- 一个X.509证书列表来代表证书验证时需要考虑的中间证书,这些证书应该由某一个信任根颁发;中间证书是可选的参数
- 一个X.509证书列表,并拥有从某一信任根起可验证的 CA 证书路径,来代表该MSP的管理员证书;拥有管理员证书则代表拥有申请改变该MSP配置的权力(例如,根CA、中间CA)
- 一个组织单位列表,此列表应出现在该MSP的有效成员的X.509证书中;这是一个可选的配置参数,举例来说,可用于多组织使用相同信任根和中间CA,并给其成员预留OU信息
- 一个证书撤销列表(CRLs),其中每一个对应一个列出的(根或中间)MSP CA;这是一个可选参数
- 一个自签(X.509)证书列表,用来组成TLS证书的信任根(TLS root of trust)
- 一个X.509证书列表来代表证书验证时需要考虑的TLS中间证书,这些证书应该由某一个TLS信任根颁发;TLS中间证书是可选的参数
该MSP的 有效的 身份需满足如下条件:
- 它们以X.509证书的形式存在,并拥有从某一信任根起可验证的证书路径;
- 它们不在任何证书撤销列表(CRL)中;
- 它们在其X.509证书结构的
OU域中 列举 MSP配置中的一个或多个组织单位(OU)
更多关于当前MSP实现中身份认证的信息,我们建议读者阅读文档 MSP Identity Validity Rules
除了认证相关的参数以外,为了使 MSP 启用对其进行实例化的节点进行签名或身份验证,需指定:
- 用于节点签名的签名密钥(当前只支持 ECDSA 密钥)
- 节点的 X.509 证书,这是在 MSP 的验证参数下一个有效的标识
值得注意的是 MSP 身份不会过期;它们只能被撤销(添加进证书撤销列表 CRL)。此外,目前没有支持 TLS 证书的撤销。
如何生成MSP证书以及它们的签名密钥?
为了生成MSP配置所需的X.509证书,可以使用`Openssl <https://www.openssl.org/>`_。需要强调的是Hyperledger Fabric不支持包含RSA密钥的证书。
另外也可以用 cryptogen 工具,它相关的操作请查看文档 入门
Hyperledger Fabric CA 也可以用来生成配置MSP的证书和密钥。
在Peer和Orderer端建立MSP
为了建立(Peer或Orderer的)本地MSP,管理员应当建立目录(例如,$MY_PATH/mspconfig),其中包含一个文件和八个子目录:
- 一个
admincerts目录,其中包含PEM文件,每个PEM文件对应一个管理员证书 - 一个
cacerts目录,其中包含PEM文件,每个PEM文件对应一个根CA证书 - (可选的)一个
intermediatecerts目录,其中包含PEM文件,每个PEM文件对应一个中间CA证书 - (可选的)一个文件
config.yaml,用来配置所支持的组织单位(OU)和身份分类(参见下面对应的部分) - (可选的)一个
crls目录,包含证书撤销列表(CRLs) - 一个
keystore目录,包含一个PEM文件,代表该节点的签名密钥,我们强调当前不支持RSA的密钥形式 - 一个
signcerts目录,包含一个PEM文件,代表该节点的X.509证书 - (可选的)一个
tlscacerts目录,其中包含PEM文件,每个PEM文件对应一个TLS根CA证书 - (可选的)一个
tlsintermediatecerts目录,其中包含PEM文件,每个PEM文件对应一个TLS中间CA证书
在节点的配置文件(对Peer来说是core.yaml,对Orderer来说是orderer.yaml)中,必须指定 mspconfig 目录的路径和节点 MSP 的 MSPID。mspconfig 目录的路径应该是环境变量 FABRIC_CFG_PATH 的相对路径,并且是 Peer 端 mspConfigPath 对应的参数,或是Orderer端 LocalMSPDir 对应的参数。节点的 MSPID 由 Peer 端 localMspId 指定,或由 Orderer 端 LocalMSPID 指定。这些变量可以被环境变量重写,在 Peer 端使用 CORE 前缀(例如,CORE_PEER_LOCALMSPID),在 Orderer 端使用 ORDERER 前缀(例如,ORDERER_GENERAL_LOCALMSPID)。值得一提的是,在 Orderer 建立阶段,需要生成并提供给 Orderer 系统通道的创世块。创世块中所需的 MSP配置信息将在下部分详细说明。
如果想要 重新配置 一个 “本地” MSP,目前只能手动操作,并且Peer或Orderer需要重启。在后续版本我们计划提供在线/动态的重新配置方式(例如,不需要中止节点,使用一个受节点管理的系统链码)。
组织单元(OU)
为了配置在该 MSP 有效用户的证书中的 OU 列表,config.yaml 文件需指定组织单位标识。例如:
OrganizationalUnitIdentifiers:
- Certificate: "cacerts/cacert1.pem"
OrganizationalUnitIdentifier: "commercial"
- Certificate: "cacerts/cacert2.pem"
OrganizationalUnitIdentifier: "administrators"
上面的例子声明了两个组织单位标识:commercial 和 administrators。如果MSP拥有至少其中一个组织单位标识,它才是有效的。 Certificate 域代表拥有有效标识应具有的 CA 证书或中间 CA 证书路径。该路径是相对 MSP 根目录的,并且不能为空。
身份类型
The default MSP implementation allows organizations to further classify identities into clients, admins, peers, and orderers based on the OUs of their x509 certificates.
- An identity should be classified as a client if it transacts on the network.
- An identity should be classified as an admin if it handles administrative tasks such as joining a peer to a channel or signing a channel configuration update transaction.
- An identity should be classified as a peer if it endorses or commits transactions.
- An identity should be classified as an orderer if belongs to an ordering node.
In order to define the clients, admins, peers, and orderers of a given MSP, the config.yaml file
needs to be set appropriately. You can find an example NodeOU section of the config.yaml file
below:
NodeOUs:
Enable: true
ClientOUIdentifier:
Certificate: "cacerts/cacert.pem"
OrganizationalUnitIdentifier: "client"
AdminOUIdentifier:
Certificate: "cacerts/cacert.pem"
OrganizationalUnitIdentifier: "admin"
PeerOUIdentifier:
Certificate: "cacerts/cacert.pem"
OrganizationalUnitIdentifier: "peer"
OrdererOUIdentifier:
Certificate: "cacerts/cacert.pem"
OrganizationalUnitIdentifier: "orderer"
NodeOUs:
Enable: true
# For each identity classification that you would like to utilize, specify
# an OU identifier.
# You can optionally configure that the OU identifier must be issued by a specific CA
# or intermediate certificate from your organization. However, it is typical to NOT
# configure a specific Certificate. By not configuring a specific Certificate, you will be
# able to add other CA or intermediate certs later, without having to reissue all credentials.
# For this reason, the sample below comments out the Certificate field.
ClientOUIdentifier:
# Certificate: "cacerts/cacert.pem"
OrganizationalUnitIdentifier: "client"
AdminOUIdentifier:
# Certificate: "cacerts/cacert.pem"
OrganizationalUnitIdentifier: "admin"
PeerOUIdentifier:
# Certificate: "cacerts/cacert.pem"
OrganizationalUnitIdentifier: "peer"
OrdererOUIdentifier:
# Certificate: "cacerts/cacert.pem"
OrganizationalUnitIdentifier: "orderer"
Identity classification is enabled when NodeOUs.Enable is set to true. Then the client
(admin, peer, orderer) organizational unit identifier is defined by setting the properties of
the NodeOUs.ClientOUIdentifier (NodeOUs.AdminOUIdentifier, NodeOUs.PeerOUIdentifier,
NodeOUs.OrdererOUIdentifier) key:
OrganizationalUnitIdentifier: Is the OU value that the x509 certificate needs to contain to be considered a client (admin, peer, orderer respectively). If this field is empty, then the classification is not applied.Certificate: (Optional) Set this to the path of the CA or intermediate CA certificate under which client (peer, admin or orderer) identities should be validated. The field is relative to the MSP root folder. Only a single Certificate can be specified. If you do not set this field, then the identities are validated under any CA defined in the organization’s MSP configuration, which could be desirable in the future if you need to add other CA or intermediate certificates.
Notice that if the NodeOUs.ClientOUIdentifier section (NodeOUs.AdminOUIdentifier,
NodeOUs.PeerOUIdentifier, NodeOUs.OrdererOUIdentifier) is missing, then the classification
is not applied. If NodeOUs.Enable is set to true and no classification keys are defined,
then identity classification is assumed to be disabled.
Identities can use organizational units to be classified as either a client, an admin, a peer, or an orderer. The four classifications are mutually exclusive. The 1.1 channel capability needs to be enabled before identities can be classified as clients or peers. The 1.4.3 channel capability needs to be enabled for identities to be classified as an admin or orderer.
Classification allows identities to be classified as admins (and conduct administrator actions)
without the certificate being stored in the admincerts folder of the MSP. Instead, the
admincerts folder can remain empty and administrators can be created by enrolling identities
with the admin OU. Certificates in the admincerts folder will still grant the role of
administrator to their bearer, provided that they possess the client or admin OU.
通道 MSP 设置
在系统创世阶段,需要指定出现在网络中的所有MSP的验证参数,并保存到系统通道的创世块。回顾一下,MSP 验证参数包含 MSP 标识、根证书列表、中间 CA 证书和管理员证书列表、OU 信息和证书撤销列表 CRL。在 Orderer 建立阶段,系统创世块将被提供给 Orderer,使 Orderer 可以认证通道建立请求。如果系统创世块包含有两个相同标识的 MSP,Orderer 将拒绝该创世块,从而导致网络启动失败。
对于应用通道,通道的创世块只需包含通道管理者的MSP验证信息。需强调的是,在将 peer 加入通道之前保证通道创世块(或最近的配置块)包含正确的MSP配置信息是 应用自己的责任
当使用configtxgen工具启动通道时,可以通过将MSP验证参数包含进 mspconfig 目录并在 configtx.yaml 相应部分设置其路径的方式配置通道MSP。
通道上 MSP 的 重新配置,MSP 管理员证书的持有者在创建 config_update 事务时,将声明与该 MSP 的已获得CA的证书相关的证书撤销列表。随后被管理员控制的客户端应用将在 MSP 出现的通道上声明这次更新。
最佳实践
在这部分我们将详细说明对MSP配置的通用场景下的最佳实践
1) 组织/企业 和 MSP 之间的映射
我们建议组织和MSP之间是一对一映射的。如果要使用其他类型的映射,需考虑以下情况:
- **一个组织使用多个MSP.**这对应的情况是一个组织有多个部门,每个MSP代表一个部门,出现这种情况可以是独立管理的原因,也可能出于隐私考虑。在这种情况下,一个peer节点只能被单一MSP拥有,并且不能将其他MSP下peer识别成同组织的peer。这意味着peer节点可以通过gossip组织域将数据分享给同部门内的其他peer节点,但不能分享给组成实际组织的全体。
- **多组织使用一个MSP.**这对应的情况是多个组织组成联盟,每个组织都被类似的成员架构管理。要知道,不论是否属于同一实际组织,peer的组织域消息将传播给同MSP下的其他peer节点。这将限制MSP定义和(或)peer配置的粒度。
2) 一个组织有不同分部(组织单元),想要授予不同通道访问权
两种处理方法:
- 定义一个可以容纳所有组织成员的MSP.该MSP的配置将由根CA、中间CA和管理员证书列表;以及成员标识包括成员所属的组织单元(
OU)组成。随后定义策略来捕获某一特定OU的成员,这些策略将组成通道的读/写策略或链码的背书策略。这种方法的局限性是gossip peer节点将把拥有和其相同成员标识的peer当成同组织成员,并因此与它们传播组织域信息(例如状态信息)。 - 给每一个分部定义一个MSP.这涉及到给每个分部指定一组证书,包含根CA证书、中间CA证书和管理员证书,这样能够做到MSP之间没有重复的证书路径。这意味着,每个分部采用不同的中间CA。这么做的缺点是需要管理多个MSP,但是确实绕开了上面方法出现的问题。我们也可以使用MSP配置里的OU扩展项来实现对每个分部定义一个MSP。
3) 区分同一组织下的client和peer
在很多情况下,会要求一个身份的 “type” 是可以被检索的(例如,可能有需求要求背书必须由peer节点提供,不能是client或单独的orderer节点)。
对这种要求的支持是有限的。
实现这种区分的一种方式是为每种节点类型创建单独的中间CA,一个给client,一个给peer或orderer,并分别配置两个不同的MSP。组织加入到的通道需要同时包含两个MSP,但背书策略只部署在peer的MSP。这将最终导致组织被映射到两个MSP实例,并且对peer和client的交互产生一些后果。
由于同一组织的所有peer还是属于同一个MSP,Gossip不会被严重的影响。Peer可以基于本地MSP策略来约束特定系统链码的执行。例如,peer可以只执行 “joinChannel”请求,如果这个请求是被一个只能是client的本地MSP的管理员签名的(终端用户应该是请求的起点)。我们可以绕过这个矛盾,只要我们接受该MSP的管理员是该peer/orderer的唯一client。
这种方法要考虑的另一个点是peer基于请求发起者本地MSP的资格来授权事件注册请求。很明显,由于请求发起者是一个client,它经常被当作是属于与该peer不同的MSP,因此peer将拒绝请求。
4) 管理员和CA证书
将MSP管理员证书设成与该MSP的 root of trust 或中间CA的证书不同非常重要。将管理成员组件和分发新和(或)验证证书的职责分开是常规(安全的)做法。
**5) 将一个中间CA列入黑名单**前面提到,可以通过重新配置机制(对本地MSP实例手动重新配置,并对通道的MSP适当的构建 config_update 消息)对MSP进行重新配置。很明显,有两种方式将一个中间CA列入黑名单:
- 重新配置MSP,使其中间CA证书列表不再包含该中间CA。对本地已配置的MSP来说,
这意味着这个CA的证书将从
intermediatecerts目录移除。 - 重新配置MSP,使其包含一个由信任根颁发的证书撤销列表,该列表包含提到的中间CA的证书。
当前的 MSP 实现中,我们只支持方式(1),因为其更简单,并且不要求将不再考虑的中间 CA 列入黑名单。
6) CA 和 TLS CA
MSP身份的根CA和MSP TLS根CA(以及相关的中间CA)需要在不同的目录被定义。这是为了避免不同类证书之间产生混淆。虽然没有禁止MSP身份和TLS证书使用相同的CA,但这里建议避免在生成环境这样做。
使用硬件安全模块(Hardware Security Module,HSM)
你可以使用硬件安全模块(HSM)来生成和存储 Fabric 节点使用的私钥。HSM 可以保护你的私钥并处理密码学操作,它可以让 Peer 节点和排序节点在不暴露私钥的情况下进行签名和背书。 The cryptographic operations performed by Fabric nodes can be delegated to a Hardware Security Module (HSM). An HSM protects your private keys and handles cryptographic operations, allowing your peers and orderer nodes to sign and endorse transactions without exposing their private keys. If you require compliance with government standards such as FIPS 140-2, there are multiple certified HSMs from which to choose.
目前,Fabric 只支持按照 PKCS11 标准和 HSM 进行通信。
配置 HSM
要在 Fabric 节点中使用 HSM,你需要在节点配置文件(比如 core.yaml 或者 orderer.yaml)中更新 BCCSP (Crypto Service Provider,加密服务提供者)部分。在 BCCSP 部分中,你需要选择 PKCS11 作为提供者,并且要选择你要使用的 PKCS11 库所在的路径。你还需要提供你创建秘钥文件的 label 和 pin。你可以使用一个秘钥生成和保存多个秘钥。
预编译的 Hyperledger Fabric Docker 镜像不支持使用 PKCS11。如果你使用 docker 部署 Fabric,你需要重新编译镜像并启用 PKCS11,编译命令如下:
make docker GO_TAGS=pkcs11
你需要确保 PKCS11 库可用,你可以在节点上安装它,也可以把它挂载到容器里。
示例
下边的示例演示了如何配置 Fabric 节点使用 HSM。
首先,你需要安装 PKCS11 接口的实现。本示例使用开源实现 softhsm。下载并配置 softhsm 之后,你需要将环境变量 SOFTHSM2_CONF 设置为 softhsm2 的配置文件。
然后你就可以使用 softhsm 来创建秘钥并在 Fabric 节点内部的 HSM slot 中处理密码学操作。在本示例中,我们创建了一个标记为 “fabric” 并把 pin 设置为 “71811222” 的秘钥。你创建秘钥之后,将配置文件修改为使用 PKCS11 和你的秘钥作为加密服务提供者。下边是一个 BCCSP 部分的示例:
#############################################################################
# BCCSP (BlockChain Crypto Service Provider) section is used to select which
# crypto library implementation to use
#############################################################################
bccsp:
default: PKCS11
pkcs11:
Library: /etc/hyperledger/fabric/libsofthsm2.so
Pin: "71811222"
Label: fabric
hash: SHA2
security: 256
Immutable: false
By default, when private keys are generated using the HSM, the private key is mutable, meaning PKCS11 private key attributes can be changed after the key is generated. Setting Immutable to true means that the private key attributes cannot be altered after key generation. Before you configure immutability by setting Immutable: true, ensure that PKCS11 object copy is supported by the HSM.
你也可以使用环境变量覆盖配置文件中相关字段。如果你使用 Fabric CA 服务端链接 HSM,你需要设置如下环境变量或者 directly set the corresponding values in the CA server config file:
FABRIC_CA_SERVER_BCCSP_DEFAULT=PKCS11
FABRIC_CA_SERVER_BCCSP_PKCS11_LIBRARY=/etc/hyperledger/fabric/libsofthsm2.so
FABRIC_CA_SERVER_BCCSP_PKCS11_PIN=71811222
FABRIC_CA_SERVER_BCCSP_PKCS11_LABEL=fabric
If you are connecting to softhsm2 using the Fabric peer, you could set the following environment variables or directly set the corresponding values in the peer config file:
CORE_PEER_BCCSP_DEFAULT=PKCS11
CORE_PEER_BCCSP_PKCS11_LIBRARY=/etc/hyperledger/fabric/libsofthsm2.so
CORE_PEER_BCCSP_PKCS11_PIN=71811222
CORE_PEER_BCCSP_PKCS11_LABEL=fabric
If you are connecting to softhsm2 using the Fabric orderer, you could set the following environment variables or directly set the corresponding values in the orderer config file:
ORDERER_GENERAL_BCCSP_DEFAULT=PKCS11
ORDERER_GENERAL_BCCSP_PKCS11_LIBRARY=/etc/hyperledger/fabric/libsofthsm2.so
ORDERER_GENERAL_BCCSP_PKCS11_PIN=71811222
ORDERER_GENERAL_BCCSP_PKCS11_LABEL=fabric
如果你编译了 docker 镜像并使用 docker compose 部署节点,你可以修改 docker compose 配置文件的 volumes 部分来挂载 softhsm 库和配置文件。下边的示例演示了如何在docker compose 配置文件中设置环境变量和卷:
environment:
- SOFTHSM2_CONF=/etc/hyperledger/fabric/config.file
volumes:
- /home/softhsm/config.file:/etc/hyperledger/fabric/config.file
- /usr/local/Cellar/softhsm/2.1.0/lib/softhsm/libsofthsm2.so:/etc/hyperledger/fabric/libsofthsm2.so
设置一个使用 HSM 的网络
如果你使用 HSM 部署 Fabric 节点,你需要在 HSM 中生成私钥而不是在节点本地 MSP 目录的 keystore 目录中。MSP 的 keystore 目录置空。另外,Fabric 节点会使用 signcerts 目录中签名证书的主体密钥标识符(subject key identifier)来检索 HSM 中的私钥。根据你使用 Fabric CA(Certificate Authority)还是你自己的 CA 的情况,创建 MSP 目录的操作是不一样的。
Before you begin
Before configuring a Fabric node to use an HSM, you should have completed the following steps:
- Created a partition on your HSM Server and recorded the
LabelandPINof the partition. - Followed instructions in the documentation from your HSM provider to configure an HSM Client that communicates with your HSM server.
使用带有 HSM 的 Fabric CA
你可以像 Peer 节点或者排序节点一样,通过修改配置文件让 Fabric CA 使用 HSM。因为你可以使用 Fabric CA 在 HSM 内部生成秘钥,所以创建本地 MSP 目录的过程就很简单。按照下边的步骤:
- Modify the
bccspsection of the Fabric CA server configuration file and point to theLabelandPINthat you created for your HSM. When the Fabric CA server starts, the private key is generated and stored in the HSM. If you are not concerned about exposing your CA signing certificate, you can skip this step and only configure an HSM for your peer or ordering nodes, described in the next steps. - 使用 Fabrci CA 客户端,用你的 CA 来注册 Peer 节点或者排序节点的身份。
- Before you deploy a peer or ordering node with HSM support, you need to enroll the node identity by storing its private key in the HSM. Edit the
bccspsection of the Fabric CA client config file or use the associated environment variables to point to the HSM configuration for your peer or ordering node. In the Fabric CA Client configuration file, replace the defaultSWconfiguration with thePKCS11configuration and provide the values for your own HSM:
bccsp:
default: PKCS11
pkcs11:
Library: /etc/hyperledger/fabric/libsofthsm2.so
Pin: "71811222"
Label: fabric
hash: SHA2
security: 256
Immutable: false
Then for each node, use the Fabric CA client to generate the peer or ordering node’s MSP folder by enrolling against the node identity that you registered in step 2. Instead of storing the private key in the keystore folder of the associated MSP, the enroll command uses the node’s HSM to generate and store the private key for the peer or ordering node. The keystore folder remains empty.
- To configure a peer or ordering node to use the HSM, similarly update the
bccspsection of the peer or orderer configuration file to use PKCS11 and provide theLabelandPIN. Also, edit the value of themspConfigPath(for a peer node) or theLocalMSPDir(for an ordering node) to point to the MSP folder that was generated in the previous step using the Fabric CA client. Now that the peer or ordering node is configured to use HSM, when you start the node it will be able sign and endorse transactions with the private key protected by the HSM.
在你自己的 CA 上使用 HSM
如果你使用你自己的 CA 来部署 Fabric 组件,你可以按如下步骤使用 HSM:
- Configure your CA to communicate with an HSM using PKCS11 and create a
LabelandPIN. Then use your CA to generate the private key and signing certificate for each node, with the private key generated inside the HSM. - 使用你的 CA 构建节点 MSP 目录。将第 1 步生成的签名证书放入
signcerts目录。你也可以让keystore目录为空。 - To configure a peer or ordering node to use the HSM, similarly update the
bccspsection of the peer or orderer configuration file to use PKCS11 andand provide theLabelandPIN. Edit the value of themspConfigPath(for a peer node) or theLocalMSPDir(for an ordering node) to point to the MSP folder that was generated in the previous step using the Fabric CA client. Now that the peer or ordering node is configured to use HSM, when you start the node it will be able sign and endorse transactions with the private key protected by the HSM.
通道配置(configtx)
Hyperledger Fabric 区块链网络的共享配置存储在一个集合配置交易中,每个通道一个。 配置交易通常简称为 configtx。
通道配置有以下重要特性:
- 版本化:配置中的所有元素都有一个关联的、每次修改都提高的版本。此外,每个 提交的配置都有一个序列号。
- 许可的:配置中的所有元素都有一个关联的、控制对此元素的修改是否被允许的策略。 任何拥有之前 configtx 副本(没有附加信息)的人均可以这些策略为基础来验证新配置 的有效性。
- 分层的:根配置组包含子组,而且层次结构中的每个组都有关联的值和策略。这些 策略可以利用层次结构从较低层级的策略派生出一个层级的策略。
配置解析
配置,作为一个类型为 HeaderType_CONFIG 的交易,被存储在一个没有其他交易的
区块中。这些区块被称为 配置区块,其中的第一个就是 创世区块。
配置的原型结构在 fabric-protos/common/configtx.proto 中。类型为
HeaderType_CONFIG 的信封将 ConfigEnvelope 消息编码为
Payload data 字段。ConfigEnvelope 的原型定义如下:
message ConfigEnvelope {
Config config = 1;
Envelope last_update = 2;
}
last_update 字段在下面的 配置更新 一节定义,但只有当验证配置时才是必需的,
读取时则不是。当前提交的配置存储在 config 字段,包含 Config 消息。
message Config {
uint64 sequence = 1;
ConfigGroup channel_group = 2;
}
sequence 数字每次提交配置时增加1。channel_group 字段是包含配置的根组。
ConfigGroup 结构是递归定义的,并构建了一个组的树,每个组都包含值和策略。其
定义如下:
message ConfigGroup {
uint64 version = 1;
map<string,ConfigGroup> groups = 2;
map<string,ConfigValue> values = 3;
map<string,ConfigPolicy> policies = 4;
string mod_policy = 5;
}
因为 ConfigGroup 是递归结构,所以它有层次结构。为清楚起见,下面的例子使用
golang 展现。
// Assume the following groups are defined
var root, child1, child2, grandChild1, grandChild2, grandChild3 *ConfigGroup
// Set the following values
root.Groups["child1"] = child1
root.Groups["child2"] = child2
child1.Groups["grandChild1"] = grandChild1
child2.Groups["grandChild2"] = grandChild2
child2.Groups["grandChild3"] = grandChild3
// The resulting config structure of groups looks like:
// root:
// child1:
// grandChild1
// child2:
// grandChild2
// grandChild3
每个组定义了配置层次中的一个级别,每个组都有关联的一组值(按字符串键索引)和策略 (也按字符串键索引)。
值定义:
Values are defined by:
message ConfigValue {
uint64 version = 1;
bytes value = 2;
string mod_policy = 3;
}
策略定义:
message ConfigPolicy {
uint64 version = 1;
Policy policy = 2;
string mod_policy = 3;
}
注意,值、策略和组都有 version 和 mod_policy。一个元素每次修改时
version 都会增长。 mod_policy 被用来控制修改元素时所需要的签名。
对于组,修改就是增加或删除值、策略或组映射中的元素(或改变 mod_policy)。
对于值和策略,修改就是分别改变值和策略字段(或改变 mod_policy)。每个元素
的 mod_policy 都在当前层级配置的上下文中被评估。下面是一个定义在
Channel.Groups["Application"] 中的修改策略示例(这里,我们使用 golang map
语法,所以,Channel.Groups["Application"].Policies["policy1"] 表示根组
Channel 的子组 Application 的 Policies 中的 policy1 所对应的
策略。)
policy1对应Channel.Groups["Application"].Policies["policy1"]Org1/policy2对应Channel.Groups["Application"].Groups["Org1"].Policies["policy2"]/Channel/policy3对应Channel.Policies["policy3"]
注意,如果一个 mod_policy 引用了一个不存在的策略,那么该元素不可修改。
Note that if a mod_policy references a policy which does not exist,
the item cannot be modified.
配置更新
配置更新被作为一个类型为 HeaderType_CONFIG_UPDATE 的 Envelope 消息提交。
交易中的 Payload data 是一个封送的 ConfigUpdateEnvelope。
ConfigUpdateEnvelope 定义如下:
message ConfigUpdateEnvelope {
bytes config_update = 1;
repeated ConfigSignature signatures = 2;
}
signatures 字段包含一组授权配置更新的签名。它的消息定义如下:
message ConfigSignature {
bytes signature_header = 1;
bytes signature = 2;
}
signature_header 是为标准交易定义的,而签名是通过 signature_header 字节
和 ConfigUpdateEnvelope 中的 config_update 字节串联而得。
ConfigUpdateEnvelope config_update 字节是封送的 ConfigUpdate
消息,定义如下:
message ConfigUpdate {
string channel_id = 1;
ConfigGroup read_set = 2;
ConfigGroup write_set = 3;
}
channel_id 是更新所绑定的通道 ID,这对于确定支持此重配置的签名的作用域
是必需的。
read_set 定义了现有配置的子集,属稀疏指定,其中只设置 version 字段,
其他字段不需要填充。尤其 ConfigValue value 或者 ConfigPolicy
policy 字段不应在 read_set 中设置。ConfigGroup 可以有已填充
映射字段的子集,以便引用配置树中更深层次的元素。例如,要将 Application 组
包含在 read-set 中,其父组(Channel 组)也必须包含在读集合中,但
Channel 组不需要填充所有键,例如 Orderer group 键,或任何
values 或 policies 键。
write_set 指定了要修改的配置片段。由于配置的层次性,对层次结构中深层元素
的写入也必须在其 write_set 中包含更高级别的元素。但是,对于 read-set
中也指定的 write-set 中的任何同一版本的元素,应该像在 ``read-set``中一样
稀疏地指定该元素。
例如,给定配置:
Channel: (version 0)
Orderer (version 0)
Application (version 3)
Org1 (version 2)
为了提交一个修改 Org1 的配置更新,read_set 应如:
Channel: (version 0)
Application: (version 3)
write_set 应如
Channel: (version 0)
Application: (version 3)
Org1 (version 3)
收到 CONFIG_UPDATE 后,排序节点按以下步骤计算 CONFIG 结果。
- 验证
channel_id和read_set。read_set中的所有元素都必须 以给定的版本存在。 - 收集
write_set中的所有与read_set版本不一致的元素以计算更新集。 - 校验更新集合中版本号刚好增长了1的每个元素。
- 校验附加到
ConfigUpdateEnvelope的签名集是否满足更新集中每个元素的mod_policy。 - 通过应用更新到到当前配置,计算出配置的新的完整版本。
- 将配置写入
ConfigEnvelope,包含作为last_update字段的CONFIG_UPDATE,和编码为config字段的新配置, 以及递增的sequence值。 - 将新
ConfigEnvelope写入类型为CONFIG的Envelope,并最终将其 作为唯一交易写入一个新的配置区块。
当节点(或其他任何 Deliver 的接收者)收到这个配置区块时,它应该,将
last_update 消息应用到当前配置并校验经过排序计算的 config 字段包含
当前的新配置,以此来校验这个配置是否得到了适当地验证。
组和值的许可配置
任何有效配置都是以下配置的子集。在这里,我们用符号 peer.<MSG> 来定义一个
ConfigValue,其 value 字段是一个封送的名为 <MSG> 的消息。它定义在
fabric-protos/peer/configuration.proto 中。符号 common.<MSG>、
msp.<MSG> 和 orderer.<MSG> 类似对应,它们的消息依次定义在
fabric-protos/common/configuration.proto、
fabric-protos/msp/mspconfig.proto 和
``fabric-protos/orderer/configuration.proto``中
注意,键 {{org_name}} 和 {{consortium_name}} 表示任意名称,指示一个
可以用不同名称重复的元素。
Note, that the keys {{org_name}} and {{consortium_name}}
represent arbitrary names, and indicate an element which may be repeated
with different names.
&ConfigGroup{
Groups: map<string, *ConfigGroup> {
"Application":&ConfigGroup{
Groups:map<String, *ConfigGroup> {
{{org_name}}:&ConfigGroup{
Values:map<string, *ConfigValue>{
"MSP":msp.MSPConfig,
"AnchorPeers":peer.AnchorPeers,
},
},
},
},
"Orderer":&ConfigGroup{
Groups:map<String, *ConfigGroup> {
{{org_name}}:&ConfigGroup{
Values:map<string, *ConfigValue>{
"MSP":msp.MSPConfig,
},
},
},
Values:map<string, *ConfigValue> {
"ConsensusType":orderer.ConsensusType,
"BatchSize":orderer.BatchSize,
"BatchTimeout":orderer.BatchTimeout,
"KafkaBrokers":orderer.KafkaBrokers,
},
},
"Consortiums":&ConfigGroup{
Groups:map<String, *ConfigGroup> {
{{consortium_name}}:&ConfigGroup{
Groups:map<string, *ConfigGroup> {
{{org_name}}:&ConfigGroup{
Values:map<string, *ConfigValue>{
"MSP":msp.MSPConfig,
},
},
},
Values:map<string, *ConfigValue> {
"ChannelCreationPolicy":common.Policy,
}
},
},
},
},
Values: map<string, *ConfigValue> {
"HashingAlgorithm":common.HashingAlgorithm,
"BlockHashingDataStructure":common.BlockDataHashingStructure,
"Consortium":common.Consortium,
"OrdererAddresses":common.OrdererAddresses,
},
}
排序系统通道配置
排序系统通道需要定义一些排序参数,以及创建通道的联盟。一个排序服务有且只能有一个 排序系统通道,它是需要创建的第一个通道(或更准确地说是启动)。建议不要在排序系统 通道的创世配置中定义应用,但在测试时是可以的。注意,任何对排序系统通道具有读权限 的成员可能看到所有的通道创建,所以,这个通道的访问应用受到限制。
排序参数被定义在如下配置子集中:
&ConfigGroup{
Groups: map<string, *ConfigGroup> {
"Orderer":&ConfigGroup{
Groups:map<String, *ConfigGroup> {
{{org_name}}:&ConfigGroup{
Values:map<string, *ConfigValue>{
"MSP":msp.MSPConfig,
},
},
},
Values:map<string, *ConfigValue> {
"ConsensusType":orderer.ConsensusType,
"BatchSize":orderer.BatchSize,
"BatchTimeout":orderer.BatchTimeout,
"KafkaBrokers":orderer.KafkaBrokers,
},
},
},
参与排序的每个组织在 Order 组下都有一个组元素。此组定义单个参数 MSP,
其中包含该组织的加密身份信息。 Order 组的 Values 决定了排序节点的工作
方式。它们在每个通道中存在,因此,例如 orderer.BatchTimeout 可能在不同通
道上被不同地指定。
在启动时,排序节点将面临一个包含了很通道信息的文件系统。排序节点通过识别带有定义的 联盟组的通道来识别系统通道。联盟组的结构如下。
&ConfigGroup{
Groups: map<string, *ConfigGroup> {
"Consortiums":&ConfigGroup{
Groups:map<String, *ConfigGroup> {
{{consortium_name}}:&ConfigGroup{
Groups:map<string, *ConfigGroup> {
{{org_name}}:&ConfigGroup{
Values:map<string, *ConfigValue>{
"MSP":msp.MSPConfig,
},
},
},
Values:map<string, *ConfigValue> {
"ChannelCreationPolicy":common.Policy,
}
},
},
},
},
},
注意,每个联盟定义一组成员,正如排序组织里的组织成员一样。每个联盟也定义一个
ChannelCreationPolicy。这是一个应用于授权通道创建请求的策略。通常,该值
将被设置为一个 ImplicitMetaPolicy,并要求通道的新成员签名以授权通道创建。
更多关于通道创建的细节,请参见下文。
应用通道配置
应用配置适用于为应用类型交易而设计的通道。它定义如下:
&ConfigGroup{
Groups: map<string, *ConfigGroup> {
"Application":&ConfigGroup{
Groups:map<String, *ConfigGroup> {
{{org_name}}:&ConfigGroup{
Values:map<string, *ConfigValue>{
"MSP":msp.MSPConfig,
"AnchorPeers":peer.AnchorPeers,
},
},
},
},
},
}
正如 Orderer 部分,每个组织被编码为组。但是,并非仅仅编码 MSP 身份信息,
每个组织额外编码一个 AnchorPeers 列表。这个列表允许不同组织的节点互相联系以
建立对等 gossip 网络。
应用通道对排序组织副本和共识选项进行编码,以允许对这些参数进行确定的更新,因此排序
系统通道配置中相同的 Orderer 部分也被包括在内。但从应用程序角度来看,这在很大
程度上可能被忽略。
通道创建
当排序节点收到一个尚不存在的通道的 CONFIG_UPDATE 时,排序节点假定这是一个通道
创建请求并执行以下内容。
- 排序节点识别将为之执行通道创建请求的联盟。它通过查看顶级组的
Consortium值 来完成这一操作。 - 排序节点校验:包含在
Application组中的组织是包含在对应联盟中的组织的一个子集, 并且ApplicationGroupversion被设为1。 - 排序节点校验:如果联盟有成员,那么新通道也要有应用成员(创建没有成员的联盟和通道仅 用于测试)。
- 排序节点从排序系统通道中获取
Orderer组,使用新指定的成员建立Application组,并按联盟配置中指定的ChannelCreationPolicy指定它的mod_policy, 以此建立模板配置。注意,策略会在新配置的上下文被评估,所以,一个要求ALL成员 的策略,会要求新通道所有成员的签名,而不是联盟所有成员的签名。 - 然后排序节点将
CONFIG_UPDATE作为一个更新应用到这个模板配置。 因为CONFIG_UPDATE将修改应用到Application组(它的version是1),配置代码按ChannelCreationPolicy验证这些更新。如果通道的创 建包含任何其他修改,比如个别组织的锚节点,则这个元素相应的修改策略也会被调用。 - 带有新通道配置的
CONFIG交易被封装并发送给的排序系统通道以进行排序,排序后, 通道被创建了。
背书策略
每个链码都有背书策略,背书策略指定了通道上的一组 Peer 节点必须执行链码,并且为执行结果进行背书,以此证明交易是有效的。这些背书策略指定了必须为提案进行背书的组织。
注解
回想一下 状态,从区块链数据中分离出来,用键值对表示。更多信息请查看 账本 文档。
作为 Peer 节点进行交易验证的一部分,每个 Peer 节点的检查确保了交易保存了合适 数量 的背书,并且是指定背书节点的背书。这些背书结果的检查,同样确保了它们是有效的(比如,从有效的证书得到的有效签名)。
需要背书的多种方式
By default, endorsement policies are specified in the chaincode definition, which is agreed to by channel members and then committed to a channel (that is, one endorsement policy covers all of the state associated with a chaincode).
For private data collections, you can also specify an endorsement policy at the private data collection level, which would override the chaincode level endorsement policy for any keys in the private data collection, thereby further restricting which organizations can write to a private data collection.
Finally, there are cases where it may be necessary for a particular public channel state or private data collection state (a particular key-value pair, in other words) to have a different endorsement policy. This state-based endorsement allows the chaincode-level or collection-level endorsement policies to be overridden by a different policy for the specified keys.
为了解释哪些情况下使用这多种背书策略,请考虑在通道上实现汽车交易的情况。创建(也称为“发行”)一辆汽车作为可交易的资产(即把一个键值对存到世界状态)需要满足链码级别的背书策略。下文将详细介绍链码级别的背书策略。
如果代表汽车的键需要特殊的背书策略,该背书策略可以在汽车创建或之后被定义。当下有很多为什么需要特定状态的背书策略的原因,汽车可能具有历史重要性或价值,因此有必要获得持牌估价师的认可。还有,汽车的主人(如果他们是通道的成员)可能还希望确保他们的同伴在交易上签名。这两种情况,都需要为特殊资产指定,与当前链码默认背书策略不同的背书策略。
我们将在后面介绍如何定义基于状态的背书策略。但首先,让我们看看如何设置链式代码级的背书策略。
设置链码级背书策略
Chaincode-level endorsement policies are agreed to by channel members when they
approve a chaincode definition for their organization. A sufficient number of
channel members need to approve a chaincode definition to meet the
Channel/Application/LifecycleEndorsement policy, which by default is set to
a majority of channel members, before the definition can be committed to the
channel. Once the definition has been committed, the chaincode is ready to use.
Any invoke of the chaincode that writes data to the ledger will need to be
validated by enough channel members to meet the endorsement policy.
You can specify an endorsement policy for a chaincode using the Fabric SDKs.
For an example, visit the How to install and start your chaincode
in the Node.js SDK documentation. You can also create an endorsement policy from
your CLI when you approve and commit a chaincode definition with the Fabric peer
binaries by using the --signature-policy flag.
注解
现在不要担心背书策略语法 (比如 'Org1.member'),我们后面部分会介绍。
例如:
peer lifecycle chaincode approveformyorg --channelID mychannel --signature-policy "AND('Org1.member', 'Org2.member')" --name mycc --version 1.0 --package-id mycc_1:3a8c52d70c36313cfebbaf09d8616e7a6318ababa01c7cbe40603c373bcfe173 --sequence 1 --tls --cafile /opt/gopath/src/github.com/hyperledger/fabric/peer/crypto/ordererOrganizations/example.com/orderers/orderer.example.com/msp/tlscacerts/tlsca.example.com-cert.pem --waitForEvent
The above command approves the chaincode definition of mycc with the policy
AND('Org1.member', 'Org2.member') which would require that a member of both
Org1 and Org2 sign the transaction. After a sufficient number of channel members
approve a chaincode definition for mycc, the definition and endorsement
policy can be committed to the channel using the command below:
peer lifecycle chaincode commit -o orderer.example.com:7050 --channelID mychannel --signature-policy "AND('Org1.member', 'Org2.member')" --name mycc --version 1.0 --sequence 1 --init-required --tls --cafile /opt/gopath/src/github.com/hyperledger/fabric/peer/crypto/ordererOrganizations/example.com/orderers/orderer.example.com/msp/tlscacerts/tlsca.example.com-cert.pem --waitForEvent --peerAddresses peer0.org1.example.com:7051 --tlsRootCertFiles /opt/gopath/src/github.com/hyperledger/fabric/peer/crypto/peerOrganizations/org1.example.com/peers/peer0.org1.example.com/tls/ca.crt --peerAddresses peer0.org2.example.com:9051 --tlsRootCertFiles /opt/gopath/src/github.com/hyperledger/fabric/peer/crypto/peerOrganizations/org2.example.com/peers/peer0.org2.example.com/tls/ca.crt
注意,如果开启了身份类型 (见 成员服务提供者 (MSP)), 可以使用 PEER 角色限定使用 Peer 进行背书。
例如:
peer lifecycle chaincode approveformyorg --channelID mychannel --signature-policy "AND('Org1.peer', 'Org2.peer')" --name mycc --version 1.0 --package-id mycc_1:3a8c52d70c36313cfebbaf09d8616e7a6318ababa01c7cbe40603c373bcfe173 --sequence 1 --tls --cafile /opt/gopath/src/github.com/hyperledger/fabric/peer/crypto/ordererOrganizations/example.com/orderers/orderer.example.com/msp/tlscacerts/tlsca.example.com-cert.pem --waitForEvent
In addition to the specifying an endorsement policy from the CLI or SDK, a
chaincode can also use policies in the channel configuration as endorsement
policies. You can use the --channel-config-policy flag to select a channel policy with
format used by the channel configuration and by ACLs.
例如:
peer lifecycle chaincode approveformyorg --channelID mychannel --channel-config-policy Channel/Application/Admins --name mycc --version 1.0 --package-id mycc_1:3a8c52d70c36313cfebbaf09d8616e7a6318ababa01c7cbe40603c373bcfe173 --sequence 1 --tls --cafile /opt/gopath/src/github.com/hyperledger/fabric/peer/crypto/ordererOrganizations/example.com/orderers/orderer.example.com/msp/tlscacerts/tlsca.example.com-cert.pem --waitForEvent
If you do not specify a policy, the chaincode definition will use the
Channel/Application/Endorsement policy by default, which requires that a
transaction be validated by a majority of channel members. This policy depends on
the membership of the channel, so it will be updated automatically when organizations
are added or removed from a channel. One advantage of using channel policies is
that they can be written to be updated automatically with channel membership.
If you specify an endorsement policy using the --signature-policy flag or
the SDK, you will need to update the policy when organizations join or leave the
channel. A new organization added to the channel after the chaincode has been defined
will be able to query a chaincode (provided the query has appropriate authorization as
defined by channel policies and any application level checks enforced by the
chaincode) but will not be able to execute or endorse the chaincode. Only
organizations listed in the endorsement policy syntax will be able sign
transactions.
背书策略语法
正如你上面所看到了,策略是使用主体来表达的(主题是跟角色匹配的)。主体可以描述为 'MSP.ROLE', MSP 代表了 MSP ID, ROLE 是以下4个其中之一:member, admin, client, and
peer。
以下是几个有效的主体示例:
'Org0.admin':Org0MSP 的任何管理员'Org1.member':Org1MSP 的任何成员'Org1.client':Org1MSP 的任何客户端'Org1.peer':Org1MSP 的任何 Peer
语法是:
EXPR(E[, E...])
EXPR 可以是 AND, OR, 或者 OutOf, 并且 E 是一个以上语法的主体或者另外一个 EXPR。
- 比如:
AND('Org1.member', 'Org2.member', 'Org3.member')要求3个组织的都至少一个成员进行签名。OR('Org1.member', 'Org2.member')要求组织1或者组织2的任一成员进行签名。OR('Org1.member', AND('Org2.member', 'Org3.member'))要求组织1的任一成员签名,或者组织2和组织3的任一成员,分别进行签名。OutOf(1, 'Org1.member', 'Org2.member'), 等价于``OR(‘Org1.member’, ‘Org2.member’)``。- 类似的,
OutOf(2, 'Org1.member', 'Org2.member')等价于AND('Org1.member', 'Org2.member'),OutOf(2, 'Org1.member', 'Org2.member', 'Org3.member')等价于OR(AND('Org1.member', 'Org2.member'), AND('Org1.member', 'Org3.member'), AND('Org2.member', 'Org3.member')).
Setting collection-level endorsement policies
Similar to chaincode-level endorsement policies, when you approve and commit a chaincode definition, you can also specify the chaincode’s private data collections and corresponding collection-level endorsement policies. If a collection-level endorsement policy is set, transactions that write to a private data collection key will require that the specified organization peers have endorsed the transaction.
You can use collection-level endorsement policies to restrict which organization peers can write to the private data collection key namespace, for example to ensure that non-authorized organizations cannot write to a collection, and to have confidence that any state in a private data collection has been endorsed by the required collection organization(s).
The collection-level endorsement policy may be less restrictive or more restrictive than the chaincode-level endorsement policy and the collection’s private data distribution policy. For example a majority of organizations may be required to endorse a chaincode transaction, but a specific organization may be required to endorse a transaction that includes a key in a specific collection.
The syntax for collection-level endorsement policies exactly matches the syntax
for chaincode-level endorsement policies — in the collection configuration
you can specify an endorsementPolicy with either a signaturePolicy or
channelConfigPolicy. For more details see 私有数据.
设置键级别的背书策略
设置链码级别或者集合级别的背书策略跟对应的链码生命周期有关。可以在通道实例化或者升级对应链码的时候进行设置。
对比来看, 键级别的背书策略可以在链码内更加细粒度的设置和修改。修改键级别的背书策略是常规交易读写集的一部分。
shim API提供了从常规Key设置和获取背书策略的功能。
注解
下文中的 ep 代表背书策略,它可以用上文介绍的语法所描述,或者下文介绍的函数。每种方法都会生成,可以被 shim API 接受的二进制版本的背书策略。
SetStateValidationParameter(key string, ep []byte) error
GetStateValidationParameter(key string) ([]byte, error)
对于在 Collection 中属于 私有数据 使用以下函数:
SetPrivateDataValidationParameter(collection, key string, ep []byte) error
GetPrivateDataValidationParameter(collection, key string) ([]byte, error)
为了帮助把背书策略序列化成有效的字节数组,shim提供了便利的函数供链码开发者,从组织 MSP 标示符的角度处理背书策略,详情见 键背书策略:
type KeyEndorsementPolicy interface {
// Policy returns the endorsement policy as bytes
Policy() ([]byte, error)
// AddOrgs adds the specified orgs to the list of orgs that are required
// to endorse
AddOrgs(roleType RoleType, organizations ...string) error
// DelOrgs delete the specified channel orgs from the existing key-level endorsement
// policy for this KVS key. If any org is not present, an error will be returned.
DelOrgs(organizations ...string) error
// ListOrgs returns an array of channel orgs that are required to endorse changes
ListOrgs() ([]string)
}
比如,当两个组织要求为键值的改变背书时,需要设置键背书策略,通过把 MSPIDs 传递给 AddOrgs() 然后调用 Policy() 来构建字节数组格式的背书策略,之后传递给 SetStateValidationParameter()。
把 shim 作为链码的依赖请参考 管理 Go 链码的扩展依赖。
验证
commit交易时,设置键值的过程和设置键的背书策略的过程是一样的,都会更新键的状态并且使用相同的规则进行验证。
| Validation | no validation parameter set | validation parameter set |
|---|---|---|
| modify value | check chaincode or collection ep | check key-level ep |
| modify key-level ep | check chaincode or collection ep | check key-level ep |
正如上面讨论的,如果一个键并改变了,并且没有键级别的背书策略,默认会使用链码级别或集合级别的背书策略。设置键级别背书策略的时候,也是使用链码级背书策略,即新的键级别背书策略必须使用已存在的链码背书策略。
如果某个键被修改了,并且键级别的背书策略已经设置,键级别的背书策略就会覆盖链码级别或集合级别背书策略。实际上,键级背书策略可以比链码级别或集合级别背书策略宽松或者严格,因为设置键级背书策略必须满足链码级别或集合级别背书策略,所以没有违反可信的假设。
如果某个键级背书策略被移除(或设为空),链码级别或集合级别背书策略再次变为默认策略。
如果某个交易修改了多个键,并且这些键关联了多个键级背书策略,交易需要满足所有的键级策略才会有效。
可插拔交易背书与交易验证
动机
交易在提交时会被验证,在应用交易带来的状态改变之前,节点会对交易进行以下检查:
- 验证交易签名者的身份;
- 验证交易背书者的签名;
- 确认交易满足对应链码命名空间的相关背书策略。
在某些情况下,需要自定义不同于 Fabric 默认的交易验证规则,例如:
- UTXO(未花费的交易输出): 当需要验证账户是否有双花的情况时;
- 匿名交易: 当背书中不包含节点身份,并且共享的签名和公钥也无法与节点的身份联系起来时。
可插拔的背书和验证逻辑
Fabric 支持以可插拔的方式在 Peer 节点中实现和部署与链码相关的自定义的背书和验证逻辑。这种逻辑既可作为可选逻辑内置到 Peer 节点中,也可作为一个 Golang 插件 与 Peer 节点一起编译和部署。
注解
Go plugins have a number of practical restrictions that require them to be compiled and linked in the same build environment as the peer. Differences in Go package versions, compiler versions, tags, and even GOPATH values will result in runtime failures when loading or executing the plugin logic.
默认情况下,链码将使用内置的背书和验证逻辑。不过,用户可以选择使用自定义的背书和验证插件来作为链码定义的一部分。管理员可通过自定义 Peer 节点的本地配置来扩展背书或验证逻辑。
配置
每个 Peer 节点都有一个本地配置(core.yaml),其中包括了背书或验证逻辑的名称与具体实现的映射关系。
默认的逻辑叫做 ESCC (其中“E”代表 endorsement,背书)和 VSCC (validation,验证), Peer 节点本地配置中的 handlers 部分包含了该默认逻辑:
handlers:
endorsers:
escc:
name: DefaultEndorsement
validators:
vscc:
name: DefaultValidation
当背书或验证的实现被编译到 Peer 节点中时,name 属性就代表了即将运行的初始化函数,以便获得生成背书或验证逻辑相关实例的工厂。
该函数是 core/handlers/library/library.go 中 HandlerLibrary 结构的实例方法,而且为了添加自定义的背书或验证逻辑,就需要额外的方法对该结构进行扩展。
If the custom code is built as a Go plugin, the library property must be
provided and set to the location of the shared library.
比如,我们以插件来实现自定义背书和验证逻辑,那么 core.yaml 的配置中就会有以下内容:
handlers:
endorsers:
escc:
name: DefaultEndorsement
custom:
name: customEndorsement
library: /etc/hyperledger/fabric/plugins/customEndorsement.so
validators:
vscc:
name: DefaultValidation
custom:
name: customValidation
library: /etc/hyperledger/fabric/plugins/customValidation.so
并且我们需要把 .so 插件文件放置在 Peer 节点的本地文件系统中。
自定义插件的名称需要在使用的链码定义中引用。如果你使用 CLI 来执行链码定义,请使用 --escc 和 --vscc 标识来选择自定义的背书或者验证库。如果使用 Fabric Node.js SDK,请访问 如何安装和启动你的链码 。更多信息查阅 chaincode4noah 。
注解
后边内容中,自定义背书和验证逻辑的实现都将表述为“插件”,即使被编译到 Peer 节点中。
背书插件的实现
要实现一个背书插件,用户必须实现 core/handlers/endorsement/api/endorsement.go 中的 Plugin 接口。
// Plugin endorses a proposal response
type Plugin interface {
// Endorse signs the given payload(ProposalResponsePayload bytes), and optionally mutates it.
// Returns:
// The Endorsement: A signature over the payload, and an identity that is used to verify the signature
// The payload that was given as input (could be modified within this function)
// Or error on failure
Endorse(payload []byte, sp *peer.SignedProposal) (*peer.Endorsement, []byte, error)
// Init injects dependencies into the instance of the Plugin
Init(dependencies ...Dependency) error
}
当 Peer 节点调用 PluginFactory 接口中的 New 方法时,会为每个通道创建给定类型(无论是 HandlerLibrary 示例方法的方法名还是 .so 文件路径)的背书插件实例,PluginFactory 接口需要由插件开发者实现:
// PluginFactory creates a new instance of a Plugin
type PluginFactory interface {
New() Plugin
}
Init 方法将接收 core/handlers/endorsement/api/ 中声明的所有依赖项作为输入,这些依赖项会被识别为内嵌 Dependency 接口。
创建了 Plugin 实例后,Peer 节点在实例上调用 Init 方法,并把 dependencies 作为参数传递。
目前,Fabric 存在以下背书插件的依赖项:
// SigningIdentity signs messages and serializes its public identity to bytes
type SigningIdentity interface {
// Serialize returns a byte representation of this identity which is used to verify
// messages signed by this SigningIdentity
Serialize() ([]byte, error)
// Sign signs the given payload and returns a signature
Sign([]byte) ([]byte, error)
}
StateFetcher:获取一个与世界状态交互的 状态 对象
// State defines interaction with the world state
type State interface {
// GetPrivateDataMultipleKeys gets the values for the multiple private data items in a single call
GetPrivateDataMultipleKeys(namespace, collection string, keys []string) ([][]byte, error)
// GetStateMultipleKeys gets the values for multiple keys in a single call
GetStateMultipleKeys(namespace string, keys []string) ([][]byte, error)
// GetTransientByTXID gets the values private data associated with the given txID
GetTransientByTXID(txID string) ([]*rwset.TxPvtReadWriteSet, error)
// Done releases resources occupied by the State
Done()
}
验证插件的实现
要实现一个验证插件,用户必须实现 core/handlers/validation/api/validation.go 中的 Plugin 接口:
// Plugin validates transactions
type Plugin interface {
// Validate returns nil if the action at the given position inside the transaction
// at the given position in the given block is valid, or an error if not.
Validate(block *common.Block, namespace string, txPosition int, actionPosition int, contextData ...ContextDatum) error
// Init injects dependencies into the instance of the Plugin
Init(dependencies ...Dependency) error
}
每个 ContextDatum 都是运行时派生的额外元数据,由节点负责传递给验证插件。目前,代表链码背书策略的 ContextDatum 是唯一被传递的数据 。
// SerializedPolicy defines a serialized policy
type SerializedPolicy interface {
validation.ContextDatum
// Bytes returns the bytes of the SerializedPolicy
Bytes() []byte
}
当 Peer 节点调用 PluginFactory 接口中的 New 方法时,会为每个通道创建给定类型(无论是 HandlerLibrary 示例方法的方法名还是 .so 文件路径)的验证插件实例,PluginFactory 接口需要由插件开发者实现。
// PluginFactory creates a new instance of a Plugin
type PluginFactory interface {
New() Plugin
}
Init 方法将接收 core/handlers/validation/api/ 中声明的所有依赖项作为输入,这些依赖项会被识别为内嵌 Dependency 接口。
创建了 Plugin 实例后,Peer 节点在实例上调用 Init 方法,并把 dependencies 作为参数传递。
目前,Fabric 存在以下验证插件的依赖项:
IdentityDeserializer:将表示身份的字节转换为Identity对象,该对象可用于验证由这些身份的签名,并根据各自的 MSP 对自身进行验证,以查看它们是否满足给定的 MSP 准则。core/handlers/validation/api/identities/identities.go中包含了全部的规范。PolicyEvaluator:评估是否满足给定的策略:
// PolicyEvaluator evaluates policies
type PolicyEvaluator interface {
validation.Dependency
// Evaluate takes a set of SignedData and evaluates whether this set of signatures satisfies
// the policy with the given bytes
Evaluate(policyBytes []byte, signatureSet []*common.SignedData) error
}
StateFetcher:获取一个与世界状态中的State对象:
// State defines interaction with the world state
type State interface {
// GetStateMultipleKeys gets the values for multiple keys in a single call
GetStateMultipleKeys(namespace string, keys []string) ([][]byte, error)
// GetStateRangeScanIterator returns an iterator that contains all the key-values between given key ranges.
// startKey is included in the results and endKey is excluded. An empty startKey refers to the first available key
// and an empty endKey refers to the last available key. For scanning all the keys, both the startKey and the endKey
// can be supplied as empty strings. However, a full scan should be used judiciously for performance reasons.
// The returned ResultsIterator contains results of type *KV which is defined in fabric-protos/ledger/queryresult.
GetStateRangeScanIterator(namespace string, startKey string, endKey string) (ResultsIterator, error)
// GetStateMetadata returns the metadata for given namespace and key
GetStateMetadata(namespace, key string) (map[string][]byte, error)
// GetPrivateDataMetadata gets the metadata of a private data item identified by a tuple <namespace, collection, key>
GetPrivateDataMetadata(namespace, collection, key string) (map[string][]byte, error)
// Done releases resources occupied by the State
Done()
}
重要提示
- 各节点上的验证插件保持一致: 在以后的版本中,Fabric 通道基础设施将确保在给定区块链高度上,通道内所有节点对给定链码使用相同的验证逻辑,以消除可能导致节点间状态分歧的错误配置风险,若发生错配置,则可能会致使节点运行不同的实现。但就目前来说,系统操作员和管理员的唯一责任就是确保以上问题不会发生。
- 验证插件错误处理: 当因发生某些暂时性执行问题(比如无法访问数据库)而导致验证插件不能确定一笔交易是否有效时,插件应返回
core/handlers/validation/api/validation.go中定义的 ExecutionFailureError 类型的错误。任何其他被返回的错误将被视为背书策略错误,并且被验证逻辑标记为无效。但是,如果返回的错误是ExecutionFailureError,链处理程序不会将该交易标志为无效,而是暂停处理。目的是防止不同节点之间发生状态分歧。 - 私有元数据索取的错误处理: 当一个插件利用
StateFetcher接口来为私有数据索取元数据时,错误处理需要按一下方式来处理:CollConfigNotDefinedError'' 和 ``InvalidCollNameError'',表明指定的集合不存在,应该按照确定性的错误来处理,而不是 ``ExecutionFailureError。 - 将 Fabric 代码导入插件: 强烈不建议将 Fabric 代码导入插件而不使用 protobufs,这样做会在 Fabric 代码更新时出现问题,或者当运行不同版本的节点时,引起操作问题。理想情况下,插件代码应该只使用提供的依赖,并除了 protobufs 之外的最小化导入项。
访问控制列表(ACL)
什么是访问控制列表
注意:这个主题在通道管理员级别处理访问控制和策略。学习链码的访问控制,请查看 chaincode for developers tutorial。
Fabric 使用权限控制列表(ACL)通过给资源关联的策略——给身份集合一个是或否的一个规则声明——来管理资源的访问权限。Fabric 包含很多默认的 ACL。在这篇文章中,我们将讨论他们是如何规定和如何覆盖默认值的。
但是在那之前,我们有必要理解一点资源和策略的内容。
资源
Fabric 的用户交互通过用户链码,系统链码,或者 事件流源来实现。因此,这些端点被视为应该在其上执行访问控制的“资源”。
应用开发者应该注意这些资源和与他们关联的默认策略。这些资源的完整列表可以在 configtx.yaml
中找到。你可以在这里找到 configtx.yaml 示例。
configtx.yaml 里边的资源名称详细的罗列了目前 Fabric 里边的资源。这里使用的不严格约定是
<component>/<resource>。所以 cscc/GetConfigBlock 是 CSCC 组件中调用的 GetConfigBlock
的资源。
策略
策略是 Fabric 运行的基础,因为它们允许根据与完成请求所需资源相关联的策略来检查与请求 关联的身份(或身份集)。背书策略用来决定一个交易是否被合适地背书。通道配置中定义的策 略被引用为修改策略以及访问控制,并且在通道配置本身中定义。
策略可以采用以下两种方式之一进行构造:作为 Signature 策略或者 ImplicitMeta 策略。
Signature 策略
这些策略标示了要满足策略而必须签名的用户。例如:
Policies:
MyPolicy:
Type: Signature
Rule: "OR('Org1.peer', 'Org2.peer')"
构造的这个策略可以被解释为: 一个名为 MyPolicy 的策略只有被 “ Org1 的节点”
或着 “ Org2 的节点”签名才可以通过。
签名策略支持 AND, OR 和 NOutOf 的任意组合,能够构造强大的规则,比如:“组
织 A 中的一个管理员和两个其他管理员,或者20个组织管理员中的11个”。
ImplicitMeta 策略
ImplicitMeta 策略聚合配置层次结构中更深层次的策略结果,这些策略最终由签名策略
定义。他们支持默认规则,比如“组织中大多数管理员”。这些策略使用的语法和 Signature
策略不同但是依旧很简单: <ALL|ANY|MAJORITY> <sub_policy> 。
比如: ANY Readers 或者 MAJORITY Admins 。
注意,在默认策略配置中 Admins 有操作员角色。指定只有管理员—或某些管理员子集—可
以访问资源的策略往往是针对网络的敏感或操作方面(例如在通道上实例化链代码)。Writers
表示可以提交账本更新,比如一个交易,但是不能拥有管理权限。Reader 拥有被动角色。他们
可以访问信息但是没有权利提交账本更新和执行管理任务。这些默认策略可以被添加,编辑或者补
充,比如通过新的 peer 或者 client 角色(如果你拥有 NodeOU 支持)
这是一个 ImplicitMeta 策略结构的例子:
Policies:
AnotherPolicy:
Type: ImplicitMeta
Rule: "MAJORITY Admins"
这里, AnotherPolicy 策略可以通过 MAJORITY Admins (大多数管理员同意)的方式
来满足。这里 Admins 是在通过更低级的 Signature 策略来满足的。
在哪里定义访问控制权限?
默认的访问控制在 configtx.yaml 中,这个文件由 configtxgen 用来编译通道配置。
访问控制可以通过两种方式中的一种来更新:编辑 configtx.yaml 自身,这会把 ACL 的
改变传递到所有新通道;或者通过特定通道的通道配置来更新访问控制。
如何在 configtx.yaml 中格式化 ACL
ACLs 被格式化为资源函数名称字符串的键值对。你可以在这里看到他们的样子示例 configtx.yaml 文件.
这个示例的两个摘录:
# ACL policy for invoking chaincodes on peer
peer/Propose: /Channel/Application/Writers
# ACL policy for sending block events
event/Block: /Channel/Application/Readers
这些 ACL 定义为对资源 peer/Propose 和 event/Block 的访问分别被限定为满足路径 /Channel/Application/Writers 和 /Channel/Application/Readers 中定义的策略的身份。
更新 configtx.yaml 中的默认 ACL
如果在引导网络时需要覆盖 ACL 默认值,或者在引导通道之前更改 ACL,最佳做法是更
新 configtx.yaml。
假如你想修改 peer/Propose 的默认 ACL — 为在节点上执行链码指定策略 — 从
/Channel/Application/Writers 到一个叫 MyPolicy 的策略。
这可以通过添加一个叫 MyPolicy(它可以是任何名字,但是在这个例子中我们称它为
MyPolicy)的策略来完成。这个策略定义在 configtx.yaml 中的 Application.Policies
部分,指定了一个用来检查允许或者拒绝一个用户的规则。在这个例子中,我们将创建
一个标示为 SampleOrg.admin 的 Signature 策略。
Policies: &ApplicationDefaultPolicies
Readers:
Type: ImplicitMeta
Rule: "ANY Readers"
Writers:
Type: ImplicitMeta
Rule: "ANY Writers"
Admins:
Type: ImplicitMeta
Rule: "MAJORITY Admins"
MyPolicy:
Type: Signature
Rule: "OR('SampleOrg.admin')"
然后,编辑 configtx.yaml 中的 Application: ACLs 部分来将 peer/Propose 从:
peer/Propose: /Channel/Application/Writers
改变为:
peer/Propose: /Channel/Application/MyPolicy
一旦 configtx.yaml 中的这些内容被改变了,configtxgen 工具就可以在创建交易的
时候使用这些策略和定义的 ACLs。当交易以合适的方式被联盟中的管理员签名和确认之后,
被定义了 ACLs 和策略的新通道就被创建了。
一旦 MyPolicy 被引导进通道配置,它就还可以被引用来覆盖其他默认的 ACL。例如:
SampleSingleMSPChannel:
Consortium: SampleConsortium
Application:
<<: *ApplicationDefaults
ACLs:
<<: *ACLsDefault
event/Block: /Channel/Application/MyPolicy
这将限制订阅区块事件到 SampleOrg.admin 的能力。
如果已经被创建的通道想使用这个 ACL,他们必须使用如下流程每次更新一个通道配置:
在通道配置中更新默认 ACL
如果已经创建的通道想使用 MyPolicy 来显示访问 peer/Propose——或者他们想创
建一个不想让其他通道知道的 ACL——他们将不得不通过配置更新交易来每次更新一个
通道。
注意:通道配置交易的过程我们在这里就不深究了。如果你想了解更多,请参考这篇文 章 channel configuration updates 和 “Adding an Org to a Channel” tutorial.
下边添加 MyPolicy,在这里 Admins,Writers, 和 Readers 都已经存在了。
"MyPolicy": {
"mod_policy": "Admins",
"policy": {
"type": 1,
"value": {
"identities": [
{
"principal": {
"msp_identifier": "SampleOrg",
"role": "ADMIN"
},
"principal_classification": "ROLE"
}
],
"rule": {
"n_out_of": {
"n": 1,
"rules": [
{
"signed_by": 0
}
]
}
},
"version": 0
}
},
"version": "0"
},
特别注意这里的 msp_identifer 和 role。
然后,在配置中的 ACL 部分,将 peer/Propose 的 ACL 从:
"peer/Propose": {
"policy_ref": "/Channel/Application/Writers"
改为:
"peer/Propose": {
"policy_ref": "/Channel/Application/MyPolicy"
注意:如果你不想在你的通道配置中定义 ACL,你就要添加完整的 ACL 结构。
一旦配置被更新了,它就需要通过常规的通道更新过程来提交。
满足需要访问多个资源的 ACL
如果一个成员生成了一个访问多个系统链码的请求,必须满足所有系统链码的
例如,peer/Propose 引用通道上的任何提案请求。如果特定提案请求访问需要满足 Writers
身份的两个系统链码和一个需要满足 MyPolicy 身份的系统链码,那提交这个提案的成员就必
须拥有 Writers 和 MyPolicy 都评估为 “true” 的身份。
在默认配置中,Writers 是一个 rule 为 SampleOrg.membe 的签名策略。换句话说就是,
“组织中的任何成员”。上边列出的 MyPolicy,拥有 SampleOrg.admin 或者 “组织中的任何
管理员”。为了满足这些 ACL,成员必须同时是一个管理员和 SampleOrg 中的成员。默认地,
所有管理员都是成员(尽管并非所有管理员都是成员),但可以将这些策略覆盖为你希望的任何
成员。因此,跟踪这些策略非常重要,以确保节点提案的 ACL 不是不可能满足的(除非是这样)。
使用身份混合器(Identity Mixer)的 MSP 实现
什么是 Idemix?
Idemix 是一个加密协议套件,提供了强大的身份验证和隐私保护功能,比如,匿名(anonymity),这是一个不用明示交易者的身份即可执行交易的功能;还有,不可链接性(unlinkability),该特性可以使一个身份发送多个交易时,不能显示出这些交易是由同一个身份发出的。
在 Idemix 流程中包括三中角色: 用户(user)、发布者(issuer) 和 验证者(verifier)。
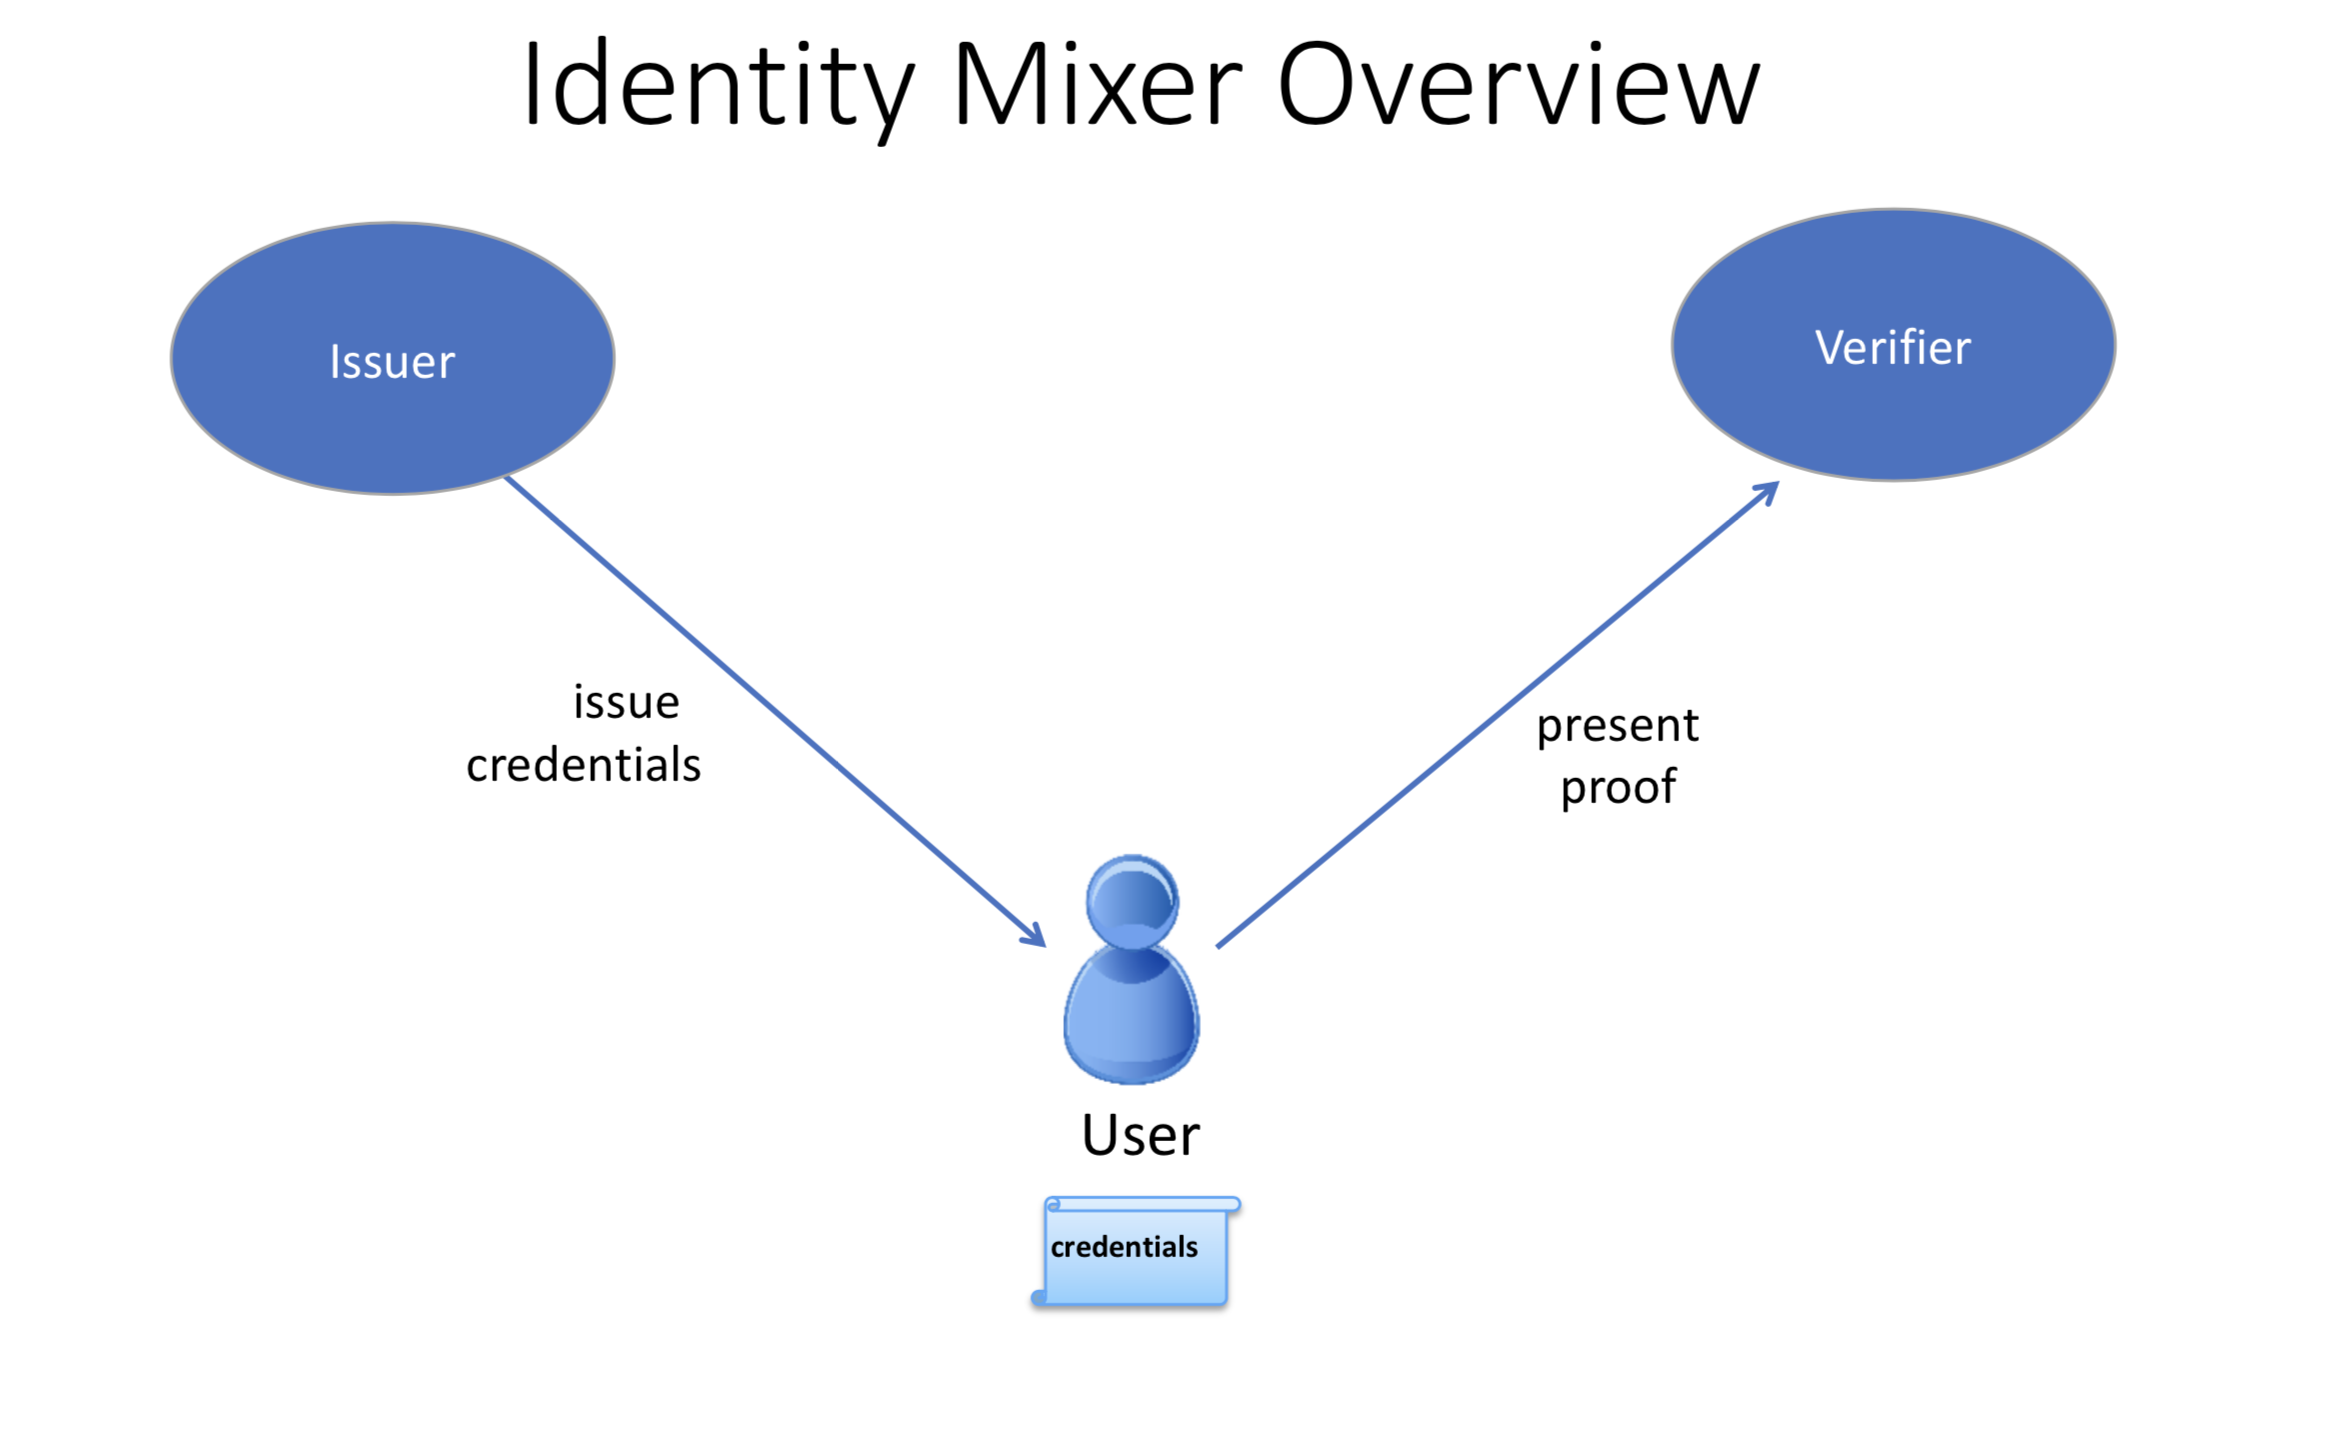
- 发布者以数字证书的形式发布一组用户属性,以下称此证书为“凭证(credential)”。
- 用户随后会生成一个 “零知识证明” 来证明自己拥有这个凭证,并且只选择性的公开自己想公开的属性。这个证明,因为是零知识的,所以不会向验证者、发布者或任何人透露任何额外信息。
例如,假设 “Alice” 需要向 Bob(商店职员)证明她有机动车管理局(DMV)发给她的驾照。
在这个场景中,Alice 是用户,机动车管理局是发布者,Bob 是验证者。为了向 Bob 证明 Alice 有驾驶执照,她可以给他看。但是,这样 Bob 就可以看到 Alice 的名字、地址、确切年龄等等,这比 Bob 有必要知道的信息多得多。
换句话说,Alice 可以使用 Idemix 为 Bob 生成一个“零知识证明”,该证明只显示她拥有有效的驾照,除此之外什么都没有。
所以,从这个证明中:
- Bob 只知道 Alice 有一个有效的执照,除此之外他没有了解到关于 Alice 的任何其他信息(匿名性)。
- 如果 Alice 多次访问商店并每次都为 Bob 生成一个证明,Bob 将无法从这些证明中看出这是同一个人(不可链接性)。
Idemix 身份验证技术提供了与标准 X.509 证书类似的信任模型和安全保证,但是使用了底层加密算法,有效地提供了高级隐私特性,包括上面描述的特性。在下面的技术部分中,我们将详细比较 Idemix 和 X.509 技术。
如何使用 Idemix
要了解如何在 Hyperledger Fabric 中使用 Idemix,我们需要查看哪些 Fabric 组件对应于 Idemix 中的用户、发布者和验证者。
Fabric Java SDK 是 用户 的 API 。在将来,其他 Fabric SDK 也会支持 Idemix 。
Fabric 提供了两种可能的 Idemix 发布者 :
- Fabric CA 支持生产环境和开发环境
- idemixgen 工具支持开发环境。
验证者 在 Fabric 中是 Idemix MSP 。
为了在超级账本 Fabric 中使用 Idemix ,需要以下三个基本步骤:
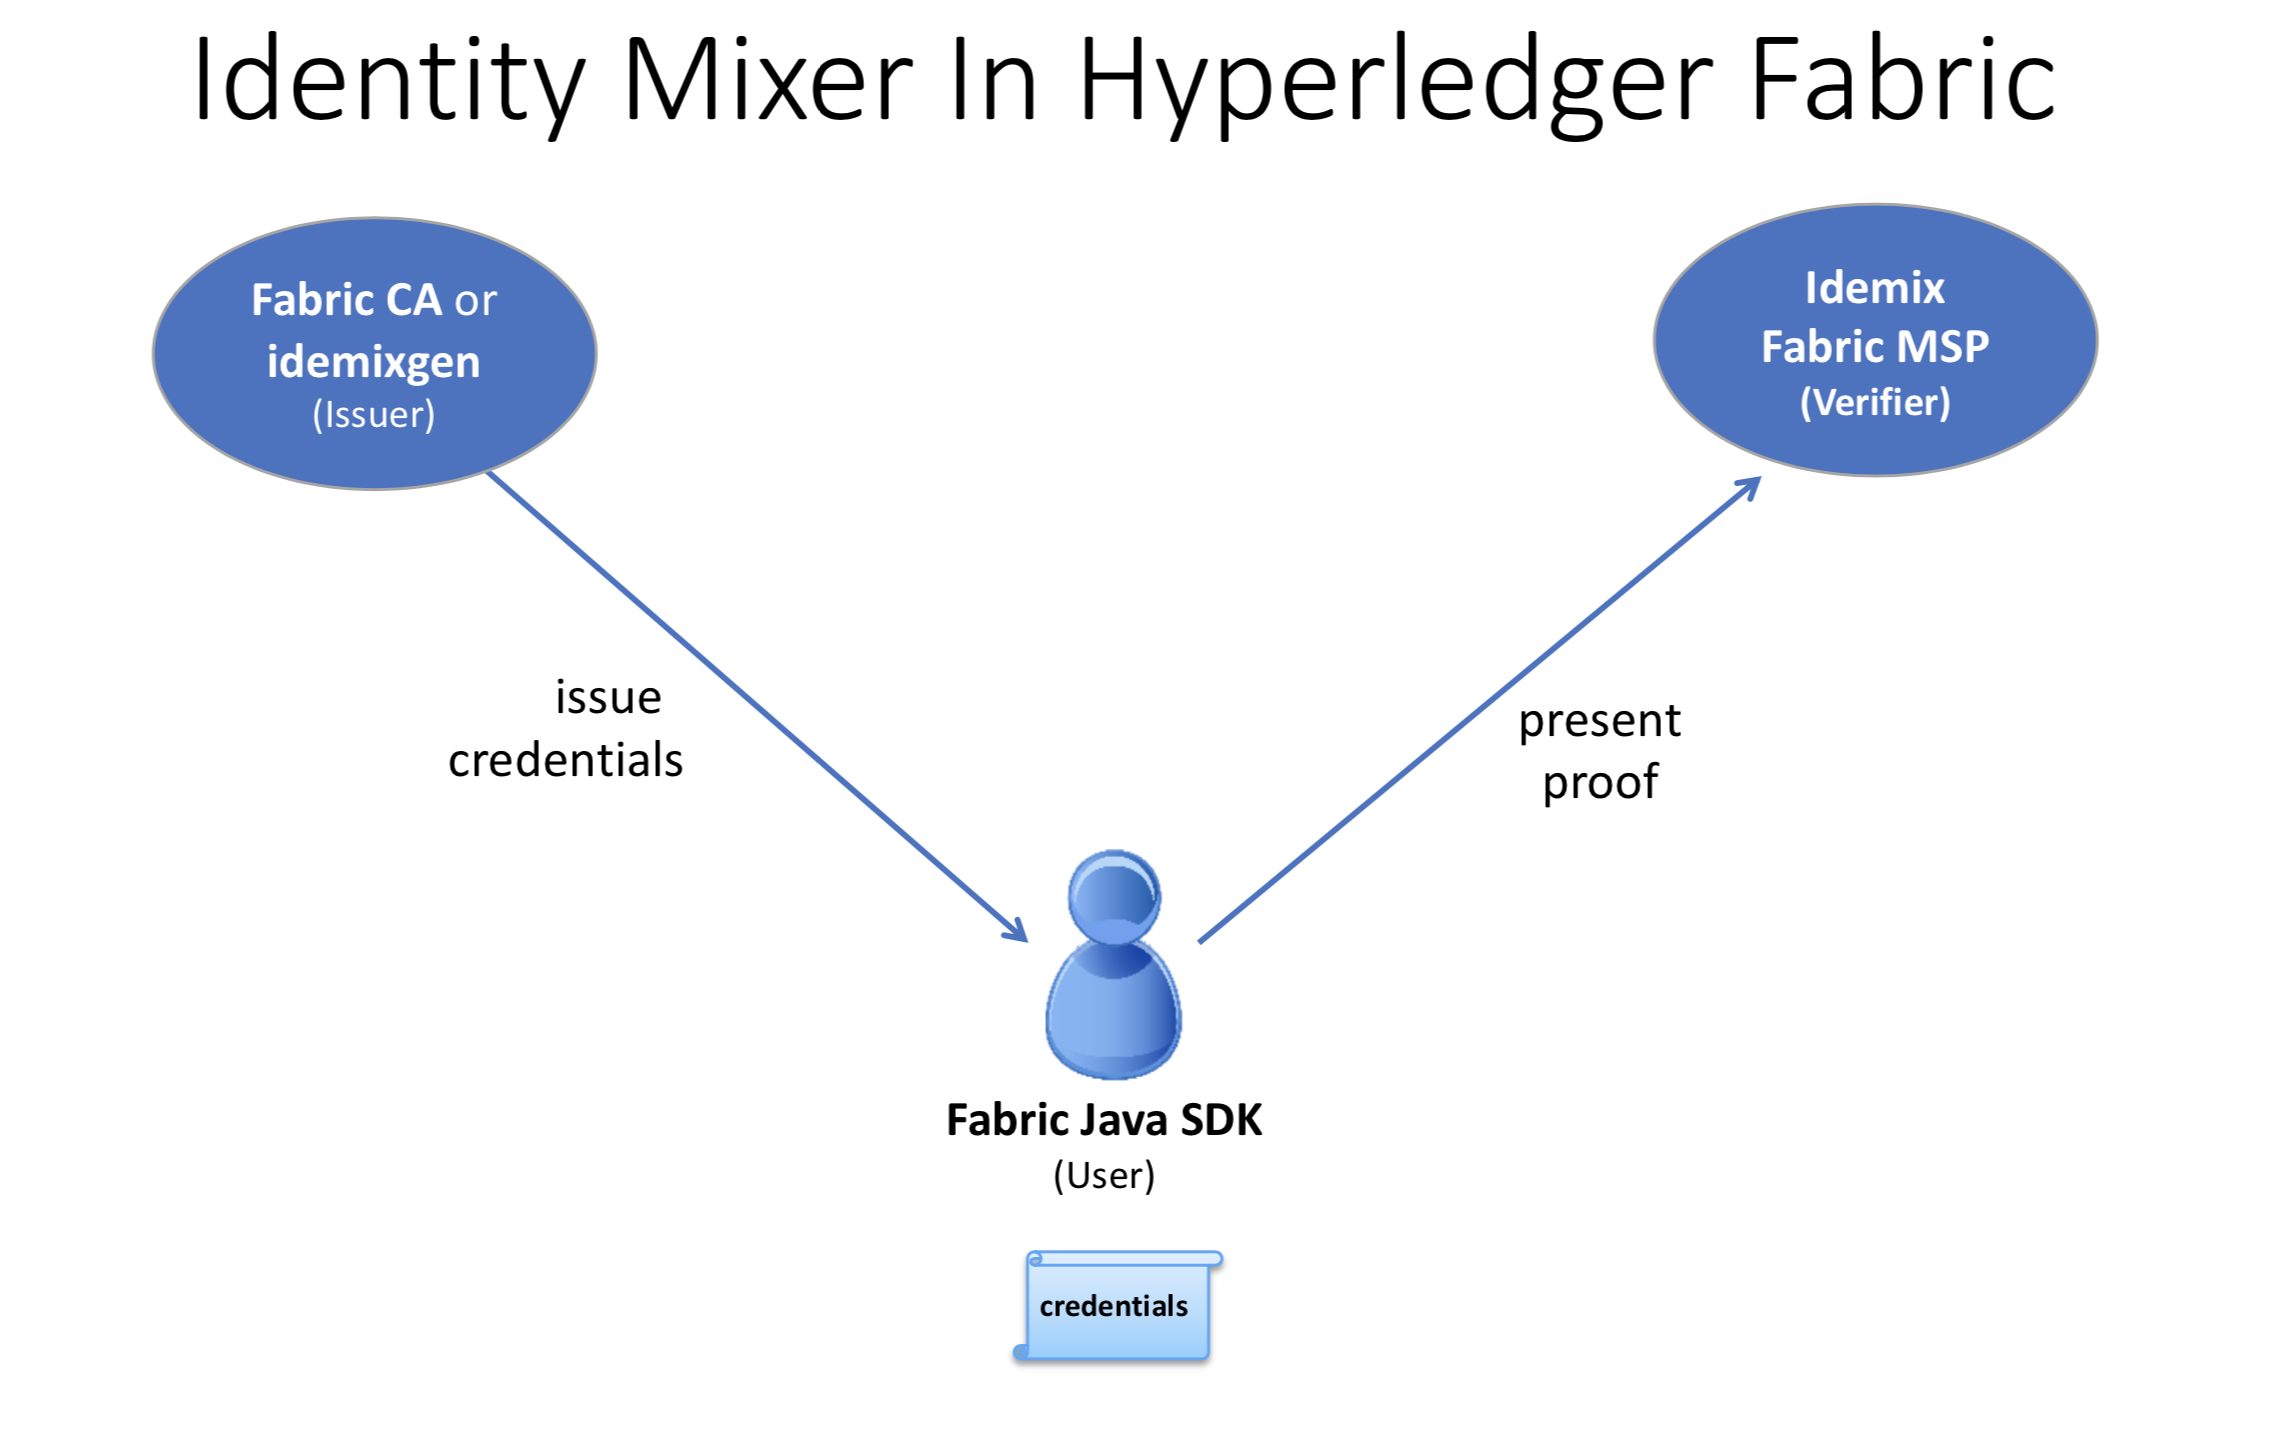
对比这个图和上面那个图中的角色。
考虑发布者。
Fabric CA(1.3 或更高版本)改进后可自动充当 Idemix 发布者。当启动
fabric-ca-server时(或通过fabric-ca-server init命令初始化时),将在fabric-ca-server的主目录中自动创建以下两个文件:IssuerPublicKey和IssuerRevocationPublicKey。步骤 2 需要这些文件。对于开发环境,如果你还没使用 Fabric CA,你可以使用
idemixgen创建这些文件。考虑验证者。
您需要使用步骤1中的
IssuerPublicKey和IssuerRevocationPublicKey创建 Idemix MSP。例如,考虑下面的这些摘自 Hyperledger Java SDK 示例中 configtx.yaml 的片段:
- &Org1Idemix # defaultorg defines the organization which is used in the sampleconfig # of the fabric.git development environment name: idemixMSP1 # id to load the msp definition as id: idemixMSPID1 msptype: idemix mspdir: crypto-config/peerOrganizations/org3.example.com
msptype设为idemix,并且目录mspdir``(本例中是 ``crypto-config/peerOrganizations/org3.example.com/msp)的内容包含IssuerPublicKey和IssuerRevocationPublicKey文件。注意,在本例中,
Org1Idemix代表Org1``(未显示)的 Idemix MSP,``Org1还有一个 X509 MSP 。考虑用户。回想一下,Java SDK 是用户的 API。
要使用 Java SDK 的 Idemix,只需要额外调用
org.hyperledger.fabric_ca.sdk.HFCAClient类中的idemixEnroll方法。例如,假设hfcaClient是你的 HFCAClient 对象,x509Enrollment是与你的 X509 证书相关联的org.hyperledger.fabric.sdk.Enrollment。下面的调用将会返回一个和你的 Idemix 凭证相关联的
org.hyperledger.fabric.sdk.Enrollment对象。IdemixEnrollment idemixEnrollment = hfcaClient.idemixEnroll(x509enrollment, "idemixMSPID1");
还需要注意,
IdemixEnrollment实现了org.hyperledger.fabric.sdk.Enrollment接口,因此可以像使用 X509 注册对象一样使用它,当然 Idemix 自动提供了改进的隐私保护功能。
Idemix 和链码
从验证者的角度来看,还有一个角色需要考虑:链码。当使用 Idemix 凭证时,链码可以获取有关交易参与者的哪些信息?
当使用 Idemix 凭证时,`cid (Client Identity) 库<https://godoc.org/github.com/hyperledger/fabric-chaincode-go/pkg/cid>`_ (只支持 golang )已扩展支持 GetAttributeValue 方法。但是,像下面“当前限制”模块提到的那样,在 Idemix 的情况下,只有两个展示出来的属性:ou 和 role。
如果 Fabric CA 是凭证发布者:
- ou 属性的值是身份的 **从属(affiliation)**(例如,“org1.department1”);
role属性的值将是 ‘member’ 或 ‘admin’。‘admin’ 表示该身份是 MSP 管理员。默认情况下,Fabric CA 创建的身份将返回 ‘member’ 角色。要创建一个 ‘admin’ 身份,使用值为2的role属性注册身份。
用 Java SDK 设置从属的例子,请查看 示例 。
在 go 链码中使用 CID 库来检索属性的例子,请查看 `go 链码<https://github.com/hyperledger/fabric-sdk-java/blob/master/src/test/fixture/sdkintegration/gocc/sampleIdemix/src/github.com/example_cc/example_cc.go#L88>`_ 。
Idemix organizations cannot be used to endorse a chaincode or approve a chaincode definition. This needs to be taken into account when you set the LifecycleEndorsement and Endorsement policies on your channels. For more information, see the limitations section below.
当前限制
Idemix 的当前版本有一些限制。
Idemix organizations and endorsement policies
Idemix organizations cannot be used to endorse a chaincode transaction or approve a chaincode definition. By default, the
Channel/Application/LifecycleEndorsementandChannel/Application/Endorsementpolicies will require signatures from a majority of organizations active on the channel. This implies that a channel that contains a large number of Idemix organizations may not be able to reach the majority needed to fulfill the default policy. For example, if a channel has two MSP Organizations and two Idemix organizations, the channel policy will require that three out of four organizations approve a chaincode definition to commit that definition to the channel. Because Idemix organizations cannot approve a chaincode definition, the policy will only be able to validate two out of four signatures.If your channel contains a sufficient number of Idemix organizations to affect the endorsement policy, you can use a signature policy to explicitly specify the required MSP organizations.
固定的属性集合
还不支持发布 Idemix 凭证的自定义属性。自定义属性在将来会支持。
下面的四个属性是支持的:
- 组织单元(Organizational Unit)属性(”ou”):
- 用法:和 X.509 一样
- 类型:String
- 显示(Revealed):总是
- 角色(Role) 属性(”role”):
- 用法:和 X.509 一样
- 类型:integer
- 显示(Revealed):总是
- 注册 ID(Enrollment ID)属性:
- 用法:用户的唯一身份,即属于同一用户的所有注册凭证都是相同的(在将来的版本中用于审计)
- 类型:BIG
- 显示(Revealed):不在签名中使用,只在为 Fabric CA 生成身份验证 token 时使用
- 撤销句柄(Revocation Handle)属性:
- 用法:唯一性身份凭证(在将来的版本中用于撤销)
- 类型:integer
- 显示:从不
还不支持撤销
尽管存在上面提到的撤销句柄属性,可以看出撤销框架的大部分已经就绪,但是还不支持撤销 Idemix 凭证。
节点背书时不使用 Idemix
目前 Idemix MSP 只被节点用来验证签名。只完成了在Client SDK 中使用 Idemix 签名。未来会支持更多角色(包括 ‘peer’ 角色)使用 Idemix MSP 。
技术总结
对比 Idemix 凭证和 X.509 证书
Idemix 和 X.509 中的证书/凭证的概念、颁发过程,非常相似:一组属性使用不能伪造的数字签名进行签名,并且有一个利用密码学绑定的密钥。
标准 X.509 证书和 Identity Mixer 证书之间的主要区别是用于验证属性的签名方案。Identity Mixer 系统下的签名能够使其有效地证明所有者拥有该签名和相应的属性,而无需揭示签名和(选择的)属性值本身。我们使用零知识证明来确保这些“知识”或“信息”不会被泄露,同时确保属性上的签名有效,并且确保用户拥有相应的凭证密钥。
这样的证明,比如 X.509 证书,可以使用最初签署证书的机构的公钥进行验证,并且无法成功伪造。只有知道凭证密钥的用户才能生成凭证及其属性的证明。
关于不可链接性,当提供 X.509 证书时,必须显示所有属性来验证证书签名。这意味着所有用于签署交易的证书的用法都是可链接的。
为了避免这种可链接性,每次都需要使用新的 X.509 证书,这会导致复杂的密钥管理、通信和存储开销。此外,在某些情况下,即使颁发证书的 CA 也不应该将所有交易链接到用户,这一点很重要。
Idemix 有助于避免 CA 和验证者之间的可链接性,因为即使是 CA 也不能将证明链接到原始凭证。发布者或验证者都不能分辨两种证明是否是来自同一凭证。
这篇文章详细介绍了 Identity Mixer 技术的概念和特点 `Concepts and Languages for Privacy-Preserving Attribute-Based Authentication<https://link.springer.com/chapter/10.1007%2F978-3-642-37282-7_4>`_ 。
扩展信息
鉴于上述限制,建议每个通道仅使用一个基于 Idemix 的 MSP,或者在极端情况下,每个网络使用一个基于 Idemix 的 MSP。实际上,如果每个通道有多个基于 Idemix 的 MSP,那么任意参与方读取该通道的账本,即可区分出来各个交易分别是由哪个 Idemix MSP 签署的。这是因为,每个交易都会泄漏签名者的 MSP-ID 。换句话说,Idemix 目前只提供同一组织(MSP)中客户端的匿名性。
将来,Idemix 可以扩展为支持基于 Idemix 的多层匿名结构的认证机构体系,这些机构认证的凭证可以通过使用唯一的公钥进行验证,从而实现跨组织的匿名性(MSP)。这将允许多个基于 Idemix 的 MSP 在同一个通道中共存。
在主体中,可以将通道配置为具有单个基于 Idemix 的 MSP 和多个基于 X.509 的 MSP。当然,这些 MSP 之间的交互可能会泄露信息。对泄露的信息需要逐案进行评估。
底层加密协议
Idemix 技术是建立在一个盲签名方案的基础上的,该方案支持签名拥有多个消息和有效的的零知识证明。Idemix 的所有密码构建模块都在顶级会议和期刊上发表了,并得到了科学界的验证。
Fabric 的这个特定 Idemix 实现使用了一个 pairing-based 的签名方案,该方案由 `Camenisch 和 Lysyanskaya https://link.springer.com/chapter/10.1007/978-3-540-28628-8_4>`_ 简要提出,并由 Au et al. 详细描述。使用了在零知识证明 Camenisch et al. 中证明签名的知识的能力。
身份混合器(Identity Mixer) MSP 配置生成器(idemixgen)
本文讲述了 idemixgen 工具的用法,它用来根据 MSP 为身份混合器创建配置文件。有两个可用的命令,一个用来创建新的 CA 密钥对,另一个用来根据之前生成的 CA 密钥创建 MSP 配置。
目录结构
idemixgen 工具将根据下边的结构创建目录:
- /ca/
IssuerSecretKey
IssuerPublicKey
RevocationKey
- /msp/
IssuerPublicKey
RevocationPublicKey
- /user/
SignerConfig
ca 目录包含发布者的私钥(包括已撤销的密钥)并且应该只代表一个 CA。msp 目录包含用于验证 idemix 签名的 MSP 信息。user 目录指定一个默认的签名者。
CA 密钥生成
身份混合器的 CA(发布者) 密钥套件可以使用 idemixgen ca-keygen 命令创建。这将会在工作目录创建 ca 和 msp 目录。
添加默认签名者
在使用 idemixgen ca-keygen 命令创建 ca 和 msp 目录后,可以使用 idemixgen signerconfig 向配制中添加 user 目录中的一个用户为默认签名者。
$ idemixgen signerconfig -h
usage: idemixgen signerconfig [<flags>]
Generate a default signer for this Idemix MSP
Flags:
-h, --help Show context-sensitive help (also try --help-long and --help-man).
-u, --org-unit=ORG-UNIT The Organizational Unit of the default signer
-a, --admin Make the default signer admin
-e, --enrollment-id=ENROLLMENT-ID
The enrollment id of the default signer
-r, --revocation-handle=REVOCATION-HANDLE
The handle used to revoke this signer
例如,我们可以创建组织单元 “OrgUnit1” 中的一个成员为默认签名者,他的注册身份是 “johndoe”, 撤销句柄为 “1234”,并且是一个管理员,创建的命令如下:
idemixgen signerconfig -u OrgUnit1 --admin -e "johndoe" -r 1234
操作服务
Peer 和 orderer 管理一个 HTTP 服务器,该服务器提供 RESTful “操作” API。此API与Fabric网络服务无关,旨在供操作人员使用,而非网络管理员或“用户”。
该 API 提供了以下功能:
- 日志级别管理
- 健康检查
- (当API被配置时)操作指标数据的Prometheus目标
配置操作服务
操作服务需要两层基本的配置
- 要监听的 地址 和 端口 。
- 用于身份验证和加密的 TLS(传输层安全协议)证书 和 密钥 。
注意,这些证书必须由另外一个专门的CA(证书授权中心)来生成,不能由已为某通道上的组织生成过证书的CA来生成。
节点
对每个 peer 来说,可在 core.yaml 部分的 operations 中配置操作服务器:
operations:
# host and port for the operations server
listenAddress: 127.0.0.1:9443
# TLS configuration for the operations endpoint
tls:
# TLS enabled
enabled: true
# path to PEM encoded server certificate for the operations server
cert:
file: tls/server.crt
# path to PEM encoded server key for the operations server
key:
file: tls/server.key
# most operations service endpoints require client authentication when TLS
# is enabled. clientAuthRequired requires client certificate authentication
# at the TLS layer to access all resources.
clientAuthRequired: false
# paths to PEM encoded ca certificates to trust for client authentication
clientRootCAs:
files: []
listenAddress 键定义了操作服务器将执行监听的主机和端口。如果服务器要监听所有地址,则可以忽略主机部分。
tls 部分用于指明是否为操作服务启用了TLS,还指明了该服务的证书和私钥的位置以及客户端身份验证应该信任的证书颁发机构根证书的位置。当 enabled 是真实的,多数操作服务端点会要要求客户验证,因此必须设定 clientRootCAs.files 。当 clientAuthRequired 是 true,TLS层将需要客户在每次请求时都提供一份证书以供验证。参考下面操作安全部分的内容来获取更多信息。
排序节点
对每个orderer来说,运行服务器都可配置在的 orderer.yaml 的 Operations 部分。
Operations:
# host and port for the operations server
ListenAddress: 127.0.0.1:8443
# TLS configuration for the operations endpoint
TLS:
# TLS enabled
Enabled: true
# PrivateKey: PEM-encoded tls key for the operations endpoint
PrivateKey: tls/server.key
# Certificate governs the file location of the server TLS certificate.
Certificate: tls/server.crt
# Paths to PEM encoded ca certificates to trust for client authentication
ClientRootCAs: []
# Most operations service endpoints require client authentication when TLS
# is enabled. ClientAuthRequired requires client certificate authentication
# at the TLS layer to access all resources.
ClientAuthRequired: false
ListenAddress 键定义了操作服务器将监听的主机和端口。如果服务器要监听所有地址,则可忽略主机部分。
TLS 部分用于指明是否为操作服务启用了TLS,还指明了该服务的证书和私钥的位置以及客户端身份验证应该信任的证书授权中心根证书的位置。当 Enabled 是真实的,多数操作服务端点会要要求客户验证,因此必须设定 RootCAs 。当 clientAuthRequired 是 true,TLS层将需要客户在每次请求时都提供一份证书以供验证。参考下面 操作安全部分的内容来获取更多信息。
操作安全
由于操作服务专注于操作,与 Fabric 网络无关,因此它不是用MSP(成员服务提供者)来进行访问控制,而是完全依赖于具有客户端证书身份验证功能的双向 TLS。
禁用TLS后,授权将被绕过,这样一来,任何能连接到运行端点的客户端都可以使用API(应用程序编程接口)。
启用TLS后,除非下面另有说明,否则必须提供有效的客户端证书才能访问所有资源。
若同时启用了 clientAuthRequired 时,无论访问的是什么资源,TLS 层都将需要有效的客户端证书。
日志级别管理
操作服务提供了 /logspec 资源,操作人员可用该资源来管理peer或orderer的活跃日志记录规范。该资源是常规的REST资源,支持 GET 和 PUT 请求。
当操作服务接收到 GET /logspec 请求时,它将使用包含当前日志记录规范的 JSON 有效负载进行响应:
{"spec":"info"}
当操作服务接收到 PUT /logspec 请求时,它将把 body 读取为 JASON 有效负载。有效负载必须包含名为 spec 的单个属性。
{"spec":"chaincode=debug:info"}
如果规范成功激活,服务将回复 204 "No Content" 。如果出现错误,服务将回复 400 "Bad Request" 以及一个错误有效负载:
{"error":"error message"}
健康检查
操作服务提供了 /healthz 资源,操作人员可用该资源来确定 peer 和 orderer 的活跃度及健康状况。该资源是支持GET请求的常规REST资源。它的实现旨在与 Kubernetes 使用的活跃度探针模型兼容,不过还可以在其他场景中进行。
当操作服务收到 GET/healthz 请求,它将调用所有已注册的运行状况检查程序来执行该流程。当所有运行状况检查程序都成功返回时,操作服务将以 200 "OK" 和 JSON body 进行回应:
{
"status": "OK",
"time": "2009-11-10T23:00:00Z"
}
如果运行状况检查程序中的一个或多个返回错误时,运行服务将响应 503 "Service Unavailable" 和一个包含未成功的运行状况检查程序的JASON body:
{
"status": "Service Unavailable",
"time": "2009-11-10T23:00:00Z",
"failed_checks": [
{
"component": "docker",
"reason": "failed to connect to Docker daemon: invalid endpoint"
}
]
}
在当前版本中,唯一注册的运行状况检查程序是针对Docker的。后期版本将增加额外的运行状况检查程序。
当启用TLS时,不需要提供有效的客户端证书就可以使用该服务,除非 clientAuthRequired 被设置为 true。
指标数据(Metrics)
Fabric的peer和orderer的某些组件获取metrics,这些metrics可帮助深入了解系统行为。通过这些信息,操作人员和管理人员可以更好地理解系统随着时间的推移是如何运行的。
配置 Metrics
Fabric提供了两种获取metrics的方法:一种是基于Prometheus的 拉式 模型,另一种是基于StatsD的 推式 模型。
Prometheus
典型的Prometheus部署通过从已检测目标公开的HTTP端点请求指标来获取指标数据。由于Prometheus负责请求metrics,因此它被看成是一种拉式系统。
当配置完成,Fabric的peer或orderer将在操作服务中展示 /metrics 资源。
节点
通过在 core.yaml 部分的 metrics 中将metrics获取方式设置为prometheus ,可对peer进行配置,从而获取 /metrics 端点,以供Prometheus使用。
metrics:
provider: prometheus
排序节点
通过在 orderer.yaml 部分的 Metrics 中将 metrics 获取方式设置为bprometheus ,可对orderer进行配置,从而获取 /metrics 端点,以供 Prometheus 使用。
Metrics:
Provider: prometheus
StatsD
StatsD是一个简单的统计聚合守护程序。Metrics被发送到 statsd 守护程序进行收集、汇总并推送至后端以进行可视化和警报。由于该模型需要辅助型流程来将metrics数据发送至StatsD,因此它被视为一种推式系统。
节点
通过在 core.yaml 部分的 metrics 中将metrics获取方式设置为 statsd,可对节点进行配置,从而使metrics被发送至StatsD. statsd 子节必须配置有StatsD守护程序的地址、要使用的网络类型( tcp or udp )以及发送metrics的频率。通过指定一个可选 prefix ,可帮助区分metrics的来源(例如,区分来自不同peer的metrics),这些metrics将被添加到所有已生成的metrics中。
metrics:
provider: statsd
statsd:
network: udp
address: 127.0.0.1:8125
writeInterval: 10s
prefix: peer-0
排序节点
通过在 orderer.yaml 部分的 Metrics 中将metrics获取方式设置为 statsd ,可对排序节点进行配置,使得metrics被发送至StatsD. Statsd 子节必须配置有StatsD守护程序的地址、要使用的网络类型( tcp or udp )以及发送metrics的频率。通过指定一个可选 prefix ,可帮助区分metrics的来源。
Metrics:
Provider: statsd
Statsd:
Network: udp
Address: 127.0.0.1:8125
WriteInterval: 30s
Prefix: org-orderer
想了解已生成的不同metrics,请参考 Metrics Reference
版本
The orderer and peer both expose a /version endpoint. This endpoint
serves a JSON document containing the orderer or peer version and the commit
SHA on which the release was created.
Metrics Reference
Orderer Metrics
Prometheus
The following orderer metrics are exported for consumption by Prometheus.
| Name | Type | Description | Labels | |
|---|---|---|---|---|
| blockcutter_block_fill_duration | histogram | The time from first transaction enqueing to the block being cut in seconds. | channel | |
| broadcast_enqueue_duration | histogram | The time to enqueue a transaction in seconds. | channel | |
| type | ||||
| status | ||||
| broadcast_processed_count | counter | The number of transactions processed. | channel | |
| type | ||||
| status | ||||
| broadcast_validate_duration | histogram | The time to validate a transaction in seconds. | channel | |
| type | ||||
| status | ||||
| cluster_comm_egress_queue_capacity | gauge | Capacity of the egress queue. | host | |
| msg_type | ||||
| channel | ||||
| cluster_comm_egress_queue_length | gauge | Length of the egress queue. | host | |
| msg_type | ||||
| channel | ||||
| cluster_comm_egress_queue_workers | gauge | Count of egress queue workers. | channel | |
| cluster_comm_egress_stream_count | gauge | Count of streams to other nodes. | channel | |
| cluster_comm_egress_tls_connection_count | gauge | Count of TLS connections to other nodes. | ||
| cluster_comm_ingress_stream_count | gauge | Count of streams from other nodes. | ||
| cluster_comm_msg_dropped_count | counter | Count of messages dropped. | host | |
| channel | ||||
| cluster_comm_msg_send_time | histogram | The time it takes to send a message in seconds. | host | |
| channel | ||||
| consensus_etcdraft_active_nodes | gauge | Number of active nodes in this channel. | channel | |
| consensus_etcdraft_cluster_size | gauge | Number of nodes in this channel. | channel | |
| consensus_etcdraft_committed_block_number | gauge | The block number of the latest block committed. | channel | |
| consensus_etcdraft_config_proposals_received | counter | The total number of proposals received for config type transactions. | channel | |
| consensus_etcdraft_data_persist_duration | histogram | The time taken for etcd/raft data to be persisted in storage (in seconds). | channel | |
| consensus_etcdraft_is_leader | gauge | The leadership status of the current node: 1 if it is the leader else 0. | channel | |
| consensus_etcdraft_leader_changes | counter | The number of leader changes since process start. | channel | |
| consensus_etcdraft_normal_proposals_received | counter | The total number of proposals received for normal type transactions. | channel | |
| consensus_etcdraft_proposal_failures | counter | The number of proposal failures. | channel | |
| consensus_etcdraft_snapshot_block_number | gauge | The block number of the latest snapshot. | channel | |
| consensus_kafka_batch_size | gauge | The mean batch size in bytes sent to topics. | topic | |
| consensus_kafka_compression_ratio | gauge | The mean compression ratio (as percentage) for topics. | topic | |
| consensus_kafka_incoming_byte_rate | gauge | Bytes/second read off brokers. | broker_id | |
| consensus_kafka_last_offset_persisted | gauge | The offset specified in the block metadata of the most recently committed block. | channel | |
| consensus_kafka_outgoing_byte_rate | gauge | Bytes/second written to brokers. | broker_id | |
| consensus_kafka_record_send_rate | gauge | The number of records per second sent to topics. | topic | |
| consensus_kafka_records_per_request | gauge | The mean number of records sent per request to topics. | topic | |
| consensus_kafka_request_latency | gauge | The mean request latency in ms to brokers. | broker_id | |
| consensus_kafka_request_rate | gauge | Requests/second sent to brokers. | broker_id | |
| consensus_kafka_request_size | gauge | The mean request size in bytes to brokers. | broker_id | |
| consensus_kafka_response_rate | gauge | Requests/second sent to brokers. | broker_id | |
| consensus_kafka_response_size | gauge | The mean response size in bytes from brokers. | broker_id | |
| deliver_blocks_sent | counter | The number of blocks sent by the deliver service. | channel | |
| filtered | ||||
| data_type | ||||
| deliver_requests_completed | counter | The number of deliver requests that have been completed. | channel | |
| filtered | ||||
| data_type | ||||
| success | ||||
| deliver_requests_received | counter | The number of deliver requests that have been received. | channel | |
| filtered | ||||
| data_type | ||||
| deliver_streams_closed | counter | The number of GRPC streams that have been closed for the deliver service. | ||
| deliver_streams_opened | counter | The number of GRPC streams that have been opened for the deliver service. | ||
| fabric_version | gauge | The active version of Fabric. | version | |
| grpc_comm_conn_closed | counter | gRPC connections closed. Open minus closed is the active number of connections. | ||
| grpc_comm_conn_opened | counter | gRPC connections opened. Open minus closed is the active number of connections. | ||
| grpc_server_stream_messages_received | counter | The number of stream messages received. | service | |
| method | ||||
| grpc_server_stream_messages_sent | counter | The number of stream messages sent. | service | |
| method | ||||
| grpc_server_stream_request_duration | histogram | The time to complete a stream request. | service | |
| method | ||||
| code | ||||
| grpc_server_stream_requests_completed | counter | The number of stream requests completed. | service | |
| method | ||||
| code | ||||
| grpc_server_stream_requests_received | counter | The number of stream requests received. | service | |
| method | ||||
| grpc_server_unary_request_duration | histogram | The time to complete a unary request. | service | |
| method | ||||
| code | ||||
| grpc_server_unary_requests_completed | counter | The number of unary requests completed. | service | |
| method | ||||
| code | ||||
| grpc_server_unary_requests_received | counter | The number of unary requests received. | service | |
| method | ||||
| ledger_blockchain_height | gauge | Height of the chain in blocks. | channel | |
| ledger_blockstorage_commit_time | histogram | Time taken in seconds for committing the block to storage. | channel | |
| logging_entries_checked | counter | Number of log entries checked against the active logging level | level | |
| logging_entries_written | counter | Number of log entries that are written | level | |
StatsD
The following orderer metrics are emitted for consumption by StatsD. The
%{variable_name} nomenclature represents segments that vary based on
context.
For example, %{channel} will be replaced with the name of the channel
associated with the metric.
| Bucket | Type | Description |
|---|---|---|
| blockcutter.block_fill_duration.%{channel} | histogram | The time from first transaction enqueing to the block being cut in seconds. |
| broadcast.enqueue_duration.%{channel}.%{type}.%{status} | histogram | The time to enqueue a transaction in seconds. |
| broadcast.processed_count.%{channel}.%{type}.%{status} | counter | The number of transactions processed. |
| broadcast.validate_duration.%{channel}.%{type}.%{status} | histogram | The time to validate a transaction in seconds. |
| cluster.comm.egress_queue_capacity.%{host}.%{msg_type}.%{channel} | gauge | Capacity of the egress queue. |
| cluster.comm.egress_queue_length.%{host}.%{msg_type}.%{channel} | gauge | Length of the egress queue. |
| cluster.comm.egress_queue_workers.%{channel} | gauge | Count of egress queue workers. |
| cluster.comm.egress_stream_count.%{channel} | gauge | Count of streams to other nodes. |
| cluster.comm.egress_tls_connection_count | gauge | Count of TLS connections to other nodes. |
| cluster.comm.ingress_stream_count | gauge | Count of streams from other nodes. |
| cluster.comm.msg_dropped_count.%{host}.%{channel} | counter | Count of messages dropped. |
| cluster.comm.msg_send_time.%{host}.%{channel} | histogram | The time it takes to send a message in seconds. |
| consensus.etcdraft.active_nodes.%{channel} | gauge | Number of active nodes in this channel. |
| consensus.etcdraft.cluster_size.%{channel} | gauge | Number of nodes in this channel. |
| consensus.etcdraft.committed_block_number.%{channel} | gauge | The block number of the latest block committed. |
| consensus.etcdraft.config_proposals_received.%{channel} | counter | The total number of proposals received for config type transactions. |
| consensus.etcdraft.data_persist_duration.%{channel} | histogram | The time taken for etcd/raft data to be persisted in storage (in seconds). |
| consensus.etcdraft.is_leader.%{channel} | gauge | The leadership status of the current node: 1 if it is the leader else 0. |
| consensus.etcdraft.leader_changes.%{channel} | counter | The number of leader changes since process start. |
| consensus.etcdraft.normal_proposals_received.%{channel} | counter | The total number of proposals received for normal type transactions. |
| consensus.etcdraft.proposal_failures.%{channel} | counter | The number of proposal failures. |
| consensus.etcdraft.snapshot_block_number.%{channel} | gauge | The block number of the latest snapshot. |
| consensus.kafka.batch_size.%{topic} | gauge | The mean batch size in bytes sent to topics. |
| consensus.kafka.compression_ratio.%{topic} | gauge | The mean compression ratio (as percentage) for topics. |
| consensus.kafka.incoming_byte_rate.%{broker_id} | gauge | Bytes/second read off brokers. |
| consensus.kafka.last_offset_persisted.%{channel} | gauge | The offset specified in the block metadata of the most recently committed block. |
| consensus.kafka.outgoing_byte_rate.%{broker_id} | gauge | Bytes/second written to brokers. |
| consensus.kafka.record_send_rate.%{topic} | gauge | The number of records per second sent to topics. |
| consensus.kafka.records_per_request.%{topic} | gauge | The mean number of records sent per request to topics. |
| consensus.kafka.request_latency.%{broker_id} | gauge | The mean request latency in ms to brokers. |
| consensus.kafka.request_rate.%{broker_id} | gauge | Requests/second sent to brokers. |
| consensus.kafka.request_size.%{broker_id} | gauge | The mean request size in bytes to brokers. |
| consensus.kafka.response_rate.%{broker_id} | gauge | Requests/second sent to brokers. |
| consensus.kafka.response_size.%{broker_id} | gauge | The mean response size in bytes from brokers. |
| deliver.blocks_sent.%{channel}.%{filtered}.%{data_type} | counter | The number of blocks sent by the deliver service. |
| deliver.requests_completed.%{channel}.%{filtered}.%{data_type}.%{success} | counter | The number of deliver requests that have been completed. |
| deliver.requests_received.%{channel}.%{filtered}.%{data_type} | counter | The number of deliver requests that have been received. |
| deliver.streams_closed | counter | The number of GRPC streams that have been closed for the deliver service. |
| deliver.streams_opened | counter | The number of GRPC streams that have been opened for the deliver service. |
| fabric_version.%{version} | gauge | The active version of Fabric. |
| grpc.comm.conn_closed | counter | gRPC connections closed. Open minus closed is the active number of connections. |
| grpc.comm.conn_opened | counter | gRPC connections opened. Open minus closed is the active number of connections. |
| grpc.server.stream_messages_received.%{service}.%{method} | counter | The number of stream messages received. |
| grpc.server.stream_messages_sent.%{service}.%{method} | counter | The number of stream messages sent. |
| grpc.server.stream_request_duration.%{service}.%{method}.%{code} | histogram | The time to complete a stream request. |
| grpc.server.stream_requests_completed.%{service}.%{method}.%{code} | counter | The number of stream requests completed. |
| grpc.server.stream_requests_received.%{service}.%{method} | counter | The number of stream requests received. |
| grpc.server.unary_request_duration.%{service}.%{method}.%{code} | histogram | The time to complete a unary request. |
| grpc.server.unary_requests_completed.%{service}.%{method}.%{code} | counter | The number of unary requests completed. |
| grpc.server.unary_requests_received.%{service}.%{method} | counter | The number of unary requests received. |
| ledger.blockchain_height.%{channel} | gauge | Height of the chain in blocks. |
| ledger.blockstorage_commit_time.%{channel} | histogram | Time taken in seconds for committing the block to storage. |
| logging.entries_checked.%{level} | counter | Number of log entries checked against the active logging level |
| logging.entries_written.%{level} | counter | Number of log entries that are written |
Peer Metrics
Prometheus
The following peer metrics are exported for consumption by Prometheus.
| Name | Type | Description | Labels | |
|---|---|---|---|---|
| chaincode_execute_timeouts | counter | The number of chaincode executions (Init or Invoke) that have timed out. | chaincode | |
| chaincode_launch_duration | histogram | The time to launch a chaincode. | chaincode | |
| success | ||||
| chaincode_launch_failures | counter | The number of chaincode launches that have failed. | chaincode | |
| chaincode_launch_timeouts | counter | The number of chaincode launches that have timed out. | chaincode | |
| chaincode_shim_request_duration | histogram | The time to complete chaincode shim requests. | type | |
| channel | ||||
| chaincode | ||||
| success | ||||
| chaincode_shim_requests_completed | counter | The number of chaincode shim requests completed. | type | |
| channel | ||||
| chaincode | ||||
| success | ||||
| chaincode_shim_requests_received | counter | The number of chaincode shim requests received. | type | |
| channel | ||||
| chaincode | ||||
| couchdb_processing_time | histogram | Time taken in seconds for the function to complete request to CouchDB | database | |
| function_name | ||||
| result | ||||
| deliver_blocks_sent | counter | The number of blocks sent by the deliver service. | channel | |
| filtered | ||||
| data_type | ||||
| deliver_requests_completed | counter | The number of deliver requests that have been completed. | channel | |
| filtered | ||||
| data_type | ||||
| success | ||||
| deliver_requests_received | counter | The number of deliver requests that have been received. | channel | |
| filtered | ||||
| data_type | ||||
| deliver_streams_closed | counter | The number of GRPC streams that have been closed for the deliver service. | ||
| deliver_streams_opened | counter | The number of GRPC streams that have been opened for the deliver service. | ||
| dockercontroller_chaincode_container_build_duration | histogram | The time to build a chaincode image in seconds. | chaincode | |
| success | ||||
| endorser_chaincode_instantiation_failures | counter | The number of chaincode instantiations or upgrade that have failed. | channel | |
| chaincode | ||||
| endorser_duplicate_transaction_failures | counter | The number of failed proposals due to duplicate transaction ID. | channel | |
| chaincode | ||||
| endorser_endorsement_failures | counter | The number of failed endorsements. | channel | |
| chaincode | ||||
| chaincodeerror | ||||
| endorser_proposal_acl_failures | counter | The number of proposals that failed ACL checks. | channel | |
| chaincode | ||||
| endorser_proposal_duration | histogram | The time to complete a proposal. | channel | |
| chaincode | ||||
| success | ||||
| endorser_proposal_simulation_failures | counter | The number of failed proposal simulations | channel | |
| chaincode | ||||
| endorser_proposal_validation_failures | counter | The number of proposals that have failed initial validation. | ||
| endorser_proposals_received | counter | The number of proposals received. | ||
| endorser_successful_proposals | counter | The number of successful proposals. | ||
| fabric_version | gauge | The active version of Fabric. | version | |
| gossip_comm_messages_received | counter | Number of messages received | ||
| gossip_comm_messages_sent | counter | Number of messages sent | ||
| gossip_comm_overflow_count | counter | Number of outgoing queue buffer overflows | ||
| gossip_leader_election_leader | gauge | Peer is leader (1) or follower (0) | channel | |
| gossip_membership_total_peers_known | gauge | Total known peers | channel | |
| gossip_payload_buffer_size | gauge | Size of the payload buffer | channel | |
| gossip_privdata_commit_block_duration | histogram | Time it takes to commit private data and the corresponding block (in seconds) | channel | |
| gossip_privdata_fetch_duration | histogram | Time it takes to fetch missing private data from peers (in seconds) | channel | |
| gossip_privdata_list_missing_duration | histogram | Time it takes to list the missing private data (in seconds) | channel | |
| gossip_privdata_pull_duration | histogram | Time it takes to pull a missing private data element (in seconds) | channel | |
| gossip_privdata_purge_duration | histogram | Time it takes to purge private data (in seconds) | channel | |
| gossip_privdata_reconciliation_duration | histogram | Time it takes for reconciliation to complete (in seconds) | channel | |
| gossip_privdata_retrieve_duration | histogram | Time it takes to retrieve missing private data elements from the ledger (in seconds) | channel | |
| gossip_privdata_send_duration | histogram | Time it takes to send a missing private data element (in seconds) | channel | |
| gossip_privdata_validation_duration | histogram | Time it takes to validate a block (in seconds) | channel | |
| gossip_state_commit_duration | histogram | Time it takes to commit a block in seconds | channel | |
| gossip_state_height | gauge | Current ledger height | channel | |
| grpc_comm_conn_closed | counter | gRPC connections closed. Open minus closed is the active number of connections. | ||
| grpc_comm_conn_opened | counter | gRPC connections opened. Open minus closed is the active number of connections. | ||
| grpc_server_stream_messages_received | counter | The number of stream messages received. | service | |
| method | ||||
| grpc_server_stream_messages_sent | counter | The number of stream messages sent. | service | |
| method | ||||
| grpc_server_stream_request_duration | histogram | The time to complete a stream request. | service | |
| method | ||||
| code | ||||
| grpc_server_stream_requests_completed | counter | The number of stream requests completed. | service | |
| method | ||||
| code | ||||
| grpc_server_stream_requests_received | counter | The number of stream requests received. | service | |
| method | ||||
| grpc_server_unary_request_duration | histogram | The time to complete a unary request. | service | |
| method | ||||
| code | ||||
| grpc_server_unary_requests_completed | counter | The number of unary requests completed. | service | |
| method | ||||
| code | ||||
| grpc_server_unary_requests_received | counter | The number of unary requests received. | service | |
| method | ||||
| ledger_block_processing_time | histogram | Time taken in seconds for ledger block processing. | channel | |
| ledger_blockchain_height | gauge | Height of the chain in blocks. | channel | |
| ledger_blockstorage_and_pvtdata_commit_time | histogram | Time taken in seconds for committing the block and private data to storage. | channel | |
| ledger_blockstorage_commit_time | histogram | Time taken in seconds for committing the block to storage. | channel | |
| ledger_statedb_commit_time | histogram | Time taken in seconds for committing block changes to state db. | channel | |
| ledger_transaction_count | counter | Number of transactions processed. | channel | |
| transaction_type | ||||
| chaincode | ||||
| validation_code | ||||
| logging_entries_checked | counter | Number of log entries checked against the active logging level | level | |
| logging_entries_written | counter | Number of log entries that are written | level | |
StatsD
The following peer metrics are emitted for consumption by StatsD. The
%{variable_name} nomenclature represents segments that vary based on
context.
For example, %{channel} will be replaced with the name of the channel
associated with the metric.
| Bucket | Type | Description |
|---|---|---|
| chaincode.execute_timeouts.%{chaincode} | counter | The number of chaincode executions (Init or Invoke) that have timed out. |
| chaincode.launch_duration.%{chaincode}.%{success} | histogram | The time to launch a chaincode. |
| chaincode.launch_failures.%{chaincode} | counter | The number of chaincode launches that have failed. |
| chaincode.launch_timeouts.%{chaincode} | counter | The number of chaincode launches that have timed out. |
| chaincode.shim_request_duration.%{type}.%{channel}.%{chaincode}.%{success} | histogram | The time to complete chaincode shim requests. |
| chaincode.shim_requests_completed.%{type}.%{channel}.%{chaincode}.%{success} | counter | The number of chaincode shim requests completed. |
| chaincode.shim_requests_received.%{type}.%{channel}.%{chaincode} | counter | The number of chaincode shim requests received. |
| couchdb.processing_time.%{database}.%{function_name}.%{result} | histogram | Time taken in seconds for the function to complete request to CouchDB |
| deliver.blocks_sent.%{channel}.%{filtered}.%{data_type} | counter | The number of blocks sent by the deliver service. |
| deliver.requests_completed.%{channel}.%{filtered}.%{data_type}.%{success} | counter | The number of deliver requests that have been completed. |
| deliver.requests_received.%{channel}.%{filtered}.%{data_type} | counter | The number of deliver requests that have been received. |
| deliver.streams_closed | counter | The number of GRPC streams that have been closed for the deliver service. |
| deliver.streams_opened | counter | The number of GRPC streams that have been opened for the deliver service. |
| dockercontroller.chaincode_container_build_duration.%{chaincode}.%{success} | histogram | The time to build a chaincode image in seconds. |
| endorser.chaincode_instantiation_failures.%{channel}.%{chaincode} | counter | The number of chaincode instantiations or upgrade that have failed. |
| endorser.duplicate_transaction_failures.%{channel}.%{chaincode} | counter | The number of failed proposals due to duplicate transaction ID. |
| endorser.endorsement_failures.%{channel}.%{chaincode}.%{chaincodeerror} | counter | The number of failed endorsements. |
| endorser.proposal_acl_failures.%{channel}.%{chaincode} | counter | The number of proposals that failed ACL checks. |
| endorser.proposal_duration.%{channel}.%{chaincode}.%{success} | histogram | The time to complete a proposal. |
| endorser.proposal_simulation_failures.%{channel}.%{chaincode} | counter | The number of failed proposal simulations |
| endorser.proposal_validation_failures | counter | The number of proposals that have failed initial validation. |
| endorser.proposals_received | counter | The number of proposals received. |
| endorser.successful_proposals | counter | The number of successful proposals. |
| fabric_version.%{version} | gauge | The active version of Fabric. |
| gossip.comm.messages_received | counter | Number of messages received |
| gossip.comm.messages_sent | counter | Number of messages sent |
| gossip.comm.overflow_count | counter | Number of outgoing queue buffer overflows |
| gossip.leader_election.leader.%{channel} | gauge | Peer is leader (1) or follower (0) |
| gossip.membership.total_peers_known.%{channel} | gauge | Total known peers |
| gossip.payload_buffer.size.%{channel} | gauge | Size of the payload buffer |
| gossip.privdata.commit_block_duration.%{channel} | histogram | Time it takes to commit private data and the corresponding block (in seconds) |
| gossip.privdata.fetch_duration.%{channel} | histogram | Time it takes to fetch missing private data from peers (in seconds) |
| gossip.privdata.list_missing_duration.%{channel} | histogram | Time it takes to list the missing private data (in seconds) |
| gossip.privdata.pull_duration.%{channel} | histogram | Time it takes to pull a missing private data element (in seconds) |
| gossip.privdata.purge_duration.%{channel} | histogram | Time it takes to purge private data (in seconds) |
| gossip.privdata.reconciliation_duration.%{channel} | histogram | Time it takes for reconciliation to complete (in seconds) |
| gossip.privdata.retrieve_duration.%{channel} | histogram | Time it takes to retrieve missing private data elements from the ledger (in seconds) |
| gossip.privdata.send_duration.%{channel} | histogram | Time it takes to send a missing private data element (in seconds) |
| gossip.privdata.validation_duration.%{channel} | histogram | Time it takes to validate a block (in seconds) |
| gossip.state.commit_duration.%{channel} | histogram | Time it takes to commit a block in seconds |
| gossip.state.height.%{channel} | gauge | Current ledger height |
| grpc.comm.conn_closed | counter | gRPC connections closed. Open minus closed is the active number of connections. |
| grpc.comm.conn_opened | counter | gRPC connections opened. Open minus closed is the active number of connections. |
| grpc.server.stream_messages_received.%{service}.%{method} | counter | The number of stream messages received. |
| grpc.server.stream_messages_sent.%{service}.%{method} | counter | The number of stream messages sent. |
| grpc.server.stream_request_duration.%{service}.%{method}.%{code} | histogram | The time to complete a stream request. |
| grpc.server.stream_requests_completed.%{service}.%{method}.%{code} | counter | The number of stream requests completed. |
| grpc.server.stream_requests_received.%{service}.%{method} | counter | The number of stream requests received. |
| grpc.server.unary_request_duration.%{service}.%{method}.%{code} | histogram | The time to complete a unary request. |
| grpc.server.unary_requests_completed.%{service}.%{method}.%{code} | counter | The number of unary requests completed. |
| grpc.server.unary_requests_received.%{service}.%{method} | counter | The number of unary requests received. |
| ledger.block_processing_time.%{channel} | histogram | Time taken in seconds for ledger block processing. |
| ledger.blockchain_height.%{channel} | gauge | Height of the chain in blocks. |
| ledger.blockstorage_and_pvtdata_commit_time.%{channel} | histogram | Time taken in seconds for committing the block and private data to storage. |
| ledger.blockstorage_commit_time.%{channel} | histogram | Time taken in seconds for committing the block to storage. |
| ledger.statedb_commit_time.%{channel} | histogram | Time taken in seconds for committing block changes to state db. |
| ledger.transaction_count.%{channel}.%{transaction_type}.%{chaincode}.%{validation_code} | counter | Number of transactions processed. |
| logging.entries_checked.%{level} | counter | Number of log entries checked against the active logging level |
| logging.entries_written.%{level} | counter | Number of log entries that are written |
外部构建器和启动器
在 Hyperledger Fabric 2.0 之前,构建和启动链码的过程都是 peer 实现的一部分,不能轻易自定义。Peer 节点上安装的所有链码都将使用 Peer 节点中硬编码的语言特定逻辑来“构建”。该构建过程将生成一个 Docker 容器镜像,该镜像将被启动为一个连接到 Peer 节点的客户端来执行链码。
该方法限制了链码只能由少数语言实现,需要 Docker 作为部署环境的一部分并且阻碍了将链码作为一个长期运行的服务进程。
从 Fabric 2.0 开始,外部构建器和启动器通过支持操作者使用可以构建、启动和发现链码的程序扩展 peer 从而解决了这些限制。要使用这个功能,你需要创建你自己的构建包并修改 peer 的 core.yaml 文件使其包含一个新的 externalBuilder 配置元素,该配置可以使 Peer 节点知道外部构建器是可用的。后边的章节详细介绍了这个过程。
注意,如果没有已配置的外部构建器声明链码包,peer 将尝试处理链码包,就好像链码包是由标准的 Fabric 打包工具(比如,peer CLI 或者 node SDK)创建的一样。
注意: 这是一个高级特性,可能会需要自定义的 peer 镜像包。例如,下面的示例中使用的 go 和 bash,这些并没有包含在官方 fabric-peer 镜像中。
外部构建模型
Hyperledger Fabric 外部构建器和启动器不严格地基于 Heroku Buildpacks。一个构件包的实现是简单的程序或脚本的集合,这些程序或脚本会将应用程序构件转换为可以运行的东西。构建包模型适用于链码包,并且扩展支持链码执行和发现。
外部构建器和启动器 API
外部构建器和启动器由四段代码或者脚本组成:
bin/detect: 决定该构建包是否用于构建链码包并启动它。bin/build: 将链码包转换为可执行链码。bin/release(可选): 向 peer 提供链码相关元数据。bin/run(可选): 运行链码。
bin/detect
bin/detect 脚本负责决定该构建包是否用于构建链码包并启动它。peer 调用 detect 需要两个参数:
bin/detect CHAINCODE_SOURCE_DIR CHAINCODE_METADATA_DIR
当调用 detect 的时候,CHAINCODE_SOURCE_DIR 目录下包含链码源码, CHAINCODE_METADATA_DIR 目录包含 metadata.json 文件,这些文件都来自 peer 上安装的链码包。CHAINCODE_SOURCE_DIR 和 CHAINCODE_METADATA_DIR 应该被视为只读输入。如果构建包要被应用到链码源码包,detect 必须返回退出代码 0;任何其他退出代码都表示构建包不能被应用。
下边是一个简单的 go 链码 detect 脚本示例:
#!/bin/bash
CHAINCODE_METADATA_DIR="$2"
# use jq to extract the chaincode type from metadata.json and exit with
# success if the chaincode type is golang
if [ "$(jq -r .type "$CHAINCODE_METADATA_DIR/metadata.json" | tr '[:upper:]' '[:lower:]')" = "golang" ]; then
exit 0
fi
exit 1
bin/build
bin/build 脚本负责构建、编译或者转换链码包的内容为可以让 release 和 run 使用的构件。peer 调用 build 需要三个参数:
bin/build CHAINCODE_SOURCE_DIR CHAINCODE_METADATA_DIR BUILD_OUTPUT_DIR
当调用 build 的时候,CHAINCODE_SOURCE_DIR 指向链码源码, CHAINCODE_METADATA_DIR 指向 metadata.json 文件,这些文件都来自 peer 上安装的链码包。BUILD_OUTPUT_DIR 是 build 必须放置 release 和 run 需要的构件的目录。构件脚本应该将 CHAINCODE_SOURCE_DIR 和 CHAINCODE_METADATA_DIR 看作是只读的,但 BUILD_OUTPUT_DIR 是可写的。
当 build 以退出代码 0 完成时,BUILD_OUTPUT_DIR 中的内容将被复制到 peer 管理的持久存储中;任何其他退出代码都认为是失败。
以下是一个简单的 go 链码 build 脚本示例:
#!/bin/bash
CHAINCODE_SOURCE_DIR="$1"
CHAINCODE_METADATA_DIR="$2"
BUILD_OUTPUT_DIR="$3"
# extract package path from metadata.json
GO_PACKAGE_PATH="$(jq -r .path "$CHAINCODE_METADATA_DIR/metadata.json")"
if [ -f "$CHAINCODE_SOURCE_DIR/src/go.mod" ]; then
cd "$CHAINCODE_SOURCE_DIR/src"
go build -v -mod=readonly -o "$BUILD_OUTPUT_DIR/chaincode" "$GO_PACKAGE_PATH"
else
GO111MODULE=off go build -v -o "$BUILD_OUTPUT_DIR/chaincode" "$GO_PACKAGE_PATH"
fi
# save statedb index metadata to provide at release
if [ -d "$CHAINCODE_SOURCE_DIR/META-INF" ]; then
cp -a "$CHAINCODE_SOURCE_DIR/META-INF" "$BUILD_OUTPUT_DIR/"
fi
bin/release
bin/release 脚本负责向 peer 节点提供链码元数据。bin/release 是可选的。如果没有提供,则跳过该步骤。peer 节点使用两个参数调用 release:
bin/release BUILD_OUTPUT_DIR RELEASE_OUTPUT_DIR
当调用 release 时,BUILD_OUTPUT_DIR 包含由 build 程序填充的构建,应该被视为只读输入。 RELEASE_OUTPUT_DIR 是 release 必须放置的由 peer 使用的构建的目录。
release 完成后,peer 节点将从 RELEASE_OUTPUT_DIR 中消耗两种类型的元数据:
- CouchDB 的状态数据库索引定义
- 外部链码服务器连接信息(
chaincode/server/connection.json)
如果链码需要 CouchDB 索引定义,release 负责将索引放置到 RELEASE_OUTPUT_DIR 下的 statedb/couchdb/indexes 目录中。索引必须有 .json 扩展。 有关详细信息,请参阅 CouchDB indexes 文档。
在使用链码服务器实现的情况下,release 负责用与链码服务器地址以及和链码通信所需的任何 TLS 资产来填充 chaincode/server/connection.json。当服务器连接信息提供给 peer 节点时,run 将不会被调用。 有关详细信息,请参阅 ChaincodeServer 文档。
以下是一个简单的 go 链码 release 脚本示例:
#!/bin/bash
BUILD_OUTPUT_DIR="$1"
RELEASE_OUTPUT_DIR="$2"
# copy indexes from META-INF/* to the output directory
if [ -d "$BUILD_OUTPUT_DIR/META-INF" ] ; then
cp -a "$BUILD_OUTPUT_DIR/META-INF/"* "$RELEASE_OUTPUT_DIR/"
fi
bin/run
bin/run 脚本负责运行链码。 peer 节点使用两个参数调用 run:
bin/run BUILD_OUTPUT_DIR RUN_METADATA_DIR
当 run 被调用时,BUILD_OUTPUT_DIR 包含由 build 程序填充的构建,以及一个名为 chaincode.json 的文件填充 RUN_METADATA_DIR,该文件包含了 chaincode 连接和注册 peer 节点所必需的信息。请注意,bin/run 脚本应该将这些 BUILD_OUTPUT_DIR 和 RUN_METADATA_DIR目录视为只读输入。 chaincode.json 中包含的密钥是:
chaincode_id:和链码包关联的唯一 ID。peer_address:被 peer 节点托管的ChaincodeSupport的 gRPC 服务器端点的以host:port为格式的地址。client_cert:当链码建立与 peer 节点的连接时,必须使用 peer 节点生成的 PEM 编码的 TLS 客户端证书。client_key:当链码建立与 peer 节点的连接时,必须使用 peer 节点生成的 PEM 编码的客户端密钥。root_cert:由 peer 服务器托管的ChaincodeSupport的 gRPC 服务器端点的 PEM 编码的 TLS 根证书。mspid:peer 节点的本地 mspid。
当 run 终止时,peer 节点认为链码终止。如果对链码的另一个请求到达,peer 节点将通过再次调用run 来尝试启动链码的另一个实例。在调用之间不得缓存 chaincode.json 的内容。
The following is an example of a simple run script for go chaincode:
以下是一个简单的 go 链码 run 脚本示例:
#!/bin/bash
BUILD_OUTPUT_DIR="$1"
RUN_METADATA_DIR="$2"
# setup the environment expected by the go chaincode shim
export CORE_CHAINCODE_ID_NAME="$(jq -r .chaincode_id "$RUN_METADATA_DIR/chaincode.json")"
export CORE_PEER_TLS_ENABLED="true"
export CORE_TLS_CLIENT_CERT_FILE="$RUN_METADATA_DIR/client.crt"
export CORE_TLS_CLIENT_KEY_FILE="$RUN_METADATA_DIR/client.key"
export CORE_PEER_TLS_ROOTCERT_FILE="$RUN_METADATA_DIR/root.crt"
export CORE_PEER_LOCALMSPID="$(jq -r .mspid "$RUN_METADATA_DIR/chaincode.json")"
# populate the key and certificate material used by the go chaincode shim
jq -r .client_cert "$RUN_METADATA_DIR/chaincode.json" > "$CORE_TLS_CLIENT_CERT_FILE"
jq -r .client_key "$RUN_METADATA_DIR/chaincode.json" > "$CORE_TLS_CLIENT_KEY_FILE"
jq -r .root_cert "$RUN_METADATA_DIR/chaincode.json" > "$CORE_PEER_TLS_ROOTCERT_FILE"
if [ -z "$(jq -r .client_cert "$RUN_METADATA_DIR/chaincode.json")" ]; then
export CORE_PEER_TLS_ENABLED="false"
fi
# exec the chaincode to replace the script with the chaincode process
exec "$BUILD_OUTPUT_DIR/chaincode" -peer.address="$(jq -r .peer_address "$ARTIFACTS/chaincode.json")"
配置外部构建器和启动器
配置 peer 节点以使用外部构建器涉及在定义外部构建器的 core.yaml 中的链码配置块下添加一个外部构建器元素。 每个外部构建器定义必须包括一个名称(用于日志记录)和包含构建器脚本的 bin 目录的父目录的路径。
还可以提供一个可选的环境变量名列表,以便在调用外部构建器脚本时从 peer 节点传播。
以下为定义了两个外部构建器的示例:
chaincode:
externalBuilders:
- name: my-golang-builder
path: /builders/golang
propagateEnvironment:
- GOPROXY
- GONOPROXY
- GOSUMDB
- GONOSUMDB
- name: noop-builder
path: /builders/binary
在此示例中,“my-golang-builder“的实现包含在 /builders/golang 目录中,其构建脚本位于 /builders/golang/bin 中。 当 peer 节点调用与“my-golang-builder”关联的任何构建脚本时,它将只传播在 propagateEnvironment 中环境变量的值。
注意:以下环境变量总是传播到外部构建器:
- LD_LIBRARY_PATH
- LIBPATH
- PATH
- TMPDIR
当存在 externalBuilder 配置时,peer 节点将按照提供的顺序遍历构建器列表,调用 bin/detect,直到成功完成为止。 如果没有构建器成功完成 detect,则 peer 节点将返回使用在 peer 节点中实现的遗留 Docker 构建过程。 这意味着外部构建器是完全可选的。
在上面的示例中,peer 节点将尝试使用“my-golang-builder”,其次是“noop-builder”,最后是 peer 内部构建过程。
链码包
作为 Fabric2.0 引入的新生命周期的一部分,链码包格式从序列化协议缓冲区消息更改为 gzip 压缩 POSIX 磁盘存档。 通过 peer lifecycle chaincode package 创建的链码包使用此新格式。
生命周期链码包内容
生命周期链码包包含两个文件。 第一个文件 code.tar.gz 是一个 gzip 压缩 POSIX 磁带存档。此文件包括链码的源构件。由 peer CLI 创建的包将链码实现源置于 src 目录下,链码元数据(如 CouchDB 索引)置于 META-INF 目录下。
第二个文件,metadata.json 是一个JSON文档,有三个键:
type: 链码类型(例如,GOLANG、JAVA、NODE)path: go 链码有关的,GOPATH 或者 GOMOD 到 main 链码包的相关的路径;其他类型合约不需要定义label:用于生成 包 id 的链码标签,新链码生命周期过程通过此包 id 来识别。
请注意,type 和 path 字段仅由 docker 平台构建使用。
链码包和外部构建器
当链码包安装到 peer 节点时,code.tar.gz 和 metadata.json 的内容在调用外部构建器之前不被处理,除了被新生命周期进程用来计算包 id 的 label 字段。 这为用户就如何打包外部构建器以及启动器处理的源文件和元数据提供了很大的灵活性。
例如,可以构建一个自定义链码包,该包包含 code.tar.gz 中的预编译链码实现以及一个 metadata.json 文件。 允许 binary buildpack 检测自定义包,验证二进制文件的 hash,并将程序运行为链码。
另一个例子是一个链码包,它只包含状态数据库索引定义和外部启动程序连接到正在运行的链码服务器所需的数据。 在这种情况下,build 进程只是从进程中提取元数据,并且 release 将它呈现给 peer 节点。
唯一的要求是 code.tar.gz 只能包含常规文件和目录条目,并且条目不能包含可能导致文件写入链码包逻辑根之外的路径。
将链码作为外部服务
Fabric v2.0支持将链码在Faric外部部署与执行以方便用户独立管理每个节点的代码运行环境。这有助于Kubernetes等Fabric云上部署链码。不再需要在每个节点构建和运行,链码现在可以作为一个服务运行,其生命周期在Fabric之外进行管理。此功能利用了Fabric v2.0外部构建器和启动器功能,使操作员能够通过程序扩展对等方来构建、启动和发现链码。在阅读本主题之前,您应该熟悉外部构建器和启动器 内容。
在外部构建器可用之前,链码包内容要求是一组特定语言的源代码文件,可以作为链码二进制文件构建和启动。新的外部构建和启动程序功能现在允许用户有选择地定制构建过程。为了将链码作为外部服务运行,构建过程允许您指定正在运行链码的服务器的端点信息。因此,该包只包含外部运行的链码服务器端点信息和用于安全连接的TLS构件。TLS是可选的,但强烈建议用于除简单测试环境以外的所有环境。
本主题的其余部分介绍如何将链码配置为外部服务:
注意: 这是一个需要定制封装peer镜像的高级功能。例如,接下来的示例需要用到的jq和bash并不包含在当前的fabric-peer官方镜像中。
打包链码
在Fabricv2.0的链码生命周期中,链码是被打包为.tar.gz的格式并安装的。下述myccpackage.tgz文件将展示所需要的结构。
$ tar xvfz myccpackage.tgz
metadata.json
code.tar.gz
链码包应向外部构建器和启动器进程提供两个信息
- 标记链码是否为外部服务。
bin/detect章节描述了使用metadata.json的要求。 - 在
connection.json中提供链码端点信息并放置在发布目录中。bin/run章节描述了connection.json文件。
收集上述信息可以有很多灵活的方法。[外部构建器和运行器示例脚本]示例脚本中展示了收集这些信息的简单方法。 作为一个灵活性的例子,考虑打包couchdb索引文件(参考将索引添加至你的链码文件夹)。下列示例脚本展示了打包文件到 code.tar.gz的方法。
tar cfz code.tar.gz connection.json metadata
tar cfz $1-pkg.tgz metadata.json code.tar.gz
设置一个节点来执行外部链码
在本章节中文名将介绍所需的配置
- 检测链码是否被标记为外部链码服务
- 在发布目录中创建
connection.json文件
修改 peer core.yaml文件以包含externalBuilder(外部构建器)
假设peer上的脚本被如下所示放置在bin文件夹下
<fully qualified path on the peer's env>
└── bin
├── build
├── detect
└── release
修改peer的 core.yaml 中chaincode段落以包含externalBuilders(外部构建器)配置元素:
externalBuilders:
- name: myexternal
path: <fully qualified path on the peer's env>
外部构建器和启动器示例脚本
为了帮助理解外部服务链码需要包含的每个脚本,本章节包含bin/detect bin/build, bin/release, 和 bin/run 脚本。
注意: 本示例使用了jq命令来分析json。你可以运行jq --version来检查你是否已安装。如果没有,则安装jq或适当调整脚本。
bin/detect
bin/detect script 负责确定是否应使用buildpack来生成链码包并启动它。对于作为外部服务的链码,示例脚本在metadata.json文件中设置type属性为external:
{"path":"","type":"external","label":"mycc"}
Peer调用detect需要两个参数:
bin/detect CHAINCODE_SOURCE_DIR CHAINCODE_METADATA_DIR
bin/detect示例脚本包含:
#!/bin/bash
set -euo pipefail
METADIR=$2
#check if the "type" field is set to "external"
if [ "$(jq -r .type "$METADIR/metadata.json")" == "external" ]; then
exit 0
fi
exit 1
bin/build
作为一个外部服务的链码,示例构建脚本假设链码包code.tar.gz 的文件内的connection.json仅简单复制BUILD_OUTPUT_DIR。节点需要三个参数调用构建脚本:
bin/build CHAINCODE_SOURCE_DIR CHAINCODE_METADATA_DIR BUILD_OUTPUT_DIR
bin/build示例脚本包含:
#!/bin/bash
set -euo pipefail
SOURCE=$1
OUTPUT=$3
#external chaincodes expect connection.json file in the chaincode package
if [ ! -f "$SOURCE/connection.json" ]; then
>&2 echo "$SOURCE/connection.json not found"
exit 1
fi
#simply copy the endpoint information to specified output location
cp $SOURCE/connection.json $OUTPUT/connection.json
if [ -d "$SOURCE/metadata" ]; then
cp -a $SOURCE/metadata $OUTPUT/metadata
fi
exit 0
bin/release
作为外部服务的链码,bin/release脚本负责将 connection.json放置在RELEASE_OUTPUT_DIR以提供给peer。connection.json 文件包含下列JSON结构
- address - 可供peer访问的链码服务端点. 必须写为 “
: ” 格式. - dial_timeout - 等待连接完成的间隔。指定为带有时间单位的字符串(例如,“10s”、“500ms”、“1m”)。如果未指定,默认值为“3s”。
- tls_required - true 或 false. 如果为 false, “client_auth_required”, “client_key”, “client_cert” 和 “root_cert” 则不需要填写. 默认 “true”.
- client_auth_required - 如果为 true, “client_key” and “client_cert” 需要填写. 默认 false. 它将忽略 tls_required 为 false.
- client_key - 客户端的私钥PEM 加密字串。
- client_cert - 客户端的PEM加密证书字串。
- root_cert - 服务器(peer)根节点证书的PEM加密字串。
例如:
{
"address": "your.chaincode.host.com:9999",
"dial_timeout": "10s",
"tls_required": "true",
"client_auth_required": "true",
"client_key": "-----BEGIN EC PRIVATE KEY----- ... -----END EC PRIVATE KEY-----",
"client_cert": "-----BEGIN CERTIFICATE----- ... -----END CERTIFICATE-----",
"root_cert": "-----BEGIN CERTIFICATE---- ... -----END CERTIFICATE-----"
}
如 bin/build章节提示的,本示例假设链码包的connection.json文件直接复制到BUILD_OUTPUT_DIR。节点使用两个参数调用发布脚本:
bin/release BUILD_OUTPUT_DIR RELEASE_OUTPUT_DIR
bin/release示例脚本包含:
#!/bin/bash
set -euo pipefail
BLD="$1"
RELEASE="$2"
if [ -d "$BLD/metadata" ]; then
cp -a "$BLD/metadata/"* "$RELEASE/"
fi
#external chaincodes expect artifacts to be placed under "$RELEASE"/chaincode/server
if [ -f $BLD/connection.json ]; then
mkdir -p "$RELEASE"/chaincode/server
cp $BLD/connection.json "$RELEASE"/chaincode/server
#if tls_required is true, copy TLS files (using above example, the fully qualified path for these fils would be "$RELEASE"/chaincode/server/tls)
exit 0
fi
exit 1
编写作为外部服务的链码
当前,外部服务模式的链码仅支持 GO chaincode shim.在Fabric v2.0中,GO shim API添加了ChaincodeServer 类型使开发者可以使用它来创建一个链码服务。Invoke and Query APIs 不受影响。开发者应将其写入shim.ChaincodeServer API,然后构建链码并运行在选择的外部环境中。下面是一个简单的链码程序示例来说明这个模式:
package main
import (
"fmt"
"github.com/hyperledger/fabric-chaincode-go/shim"
pb "github.com/hyperledger/fabric-protos-go/peer"
)
// SimpleChaincode example simple Chaincode implementation
type SimpleChaincode struct {
}
func (s *SimpleChaincode) Init(stub shim.ChaincodeStubInterface) pb.Response {
// init code
}
func (s *SimpleChaincode) Invoke(stub shim.ChaincodeStubInterface) pb.Response {
// invoke code
}
//NOTE - parameters such as ccid and endpoint information are hard coded here for illustration. This can be passed in in a variety of standard ways
func main() {
//The ccid is assigned to the chaincode on install (using the “peer lifecycle chaincode install <package>” command) for instance
ccid := "mycc:fcbf8724572d42e859a7dd9a7cd8e2efb84058292017df6e3d89178b64e6c831"
server := &shim.ChaincodeServer{
CCID: ccid,
Address: "myhost:9999"
CC: new(SimpleChaincode),
TLSProps: shim.TLSProperties{
Disabled: true,
},
}
err := server.Start()
if err != nil {
fmt.Printf("Error starting Simple chaincode: %s", err)
}
}
使用shim.ChaincodeServer是将链码作为外部服务的关键。新的shim API shim.ChaincodeServer服务配置参数的作用如下:
- CCID (string)- CCID 应匹配peer节点上链码的包名.这是
CCID关联链码并使用peer lifecycle chaincode install <package>命令获取返回值。这可以在安装后使用peer lifecycle chaincode queryinstalled命令获得。 - Address (string) - 是链码服务的监听地址
- CC (Chaincode) - CC 是初始化(Init)和调用(Invoke)的链码。
- TLSProps (TLSProperties) - TLSProps 是发送给链码服务的TLS属性
- KaOpts (keepalive.ServerParameters) - KaOpts keepalive 属性, 如果为空,则提供合理的默认值
然后构建适合您的GO环境的链码
部署链码
当GO链码可以被部署时,你可以如打包链码 章节描述的一样打包,并按照Fabric 链码生命周期 中说明的进行部署。
错误处理
概述
Hyperledger Fabric 代码应该使用 vendor 的包 github.com/pkg/errors 来代替 Go 提供的标准错误类型。该软件包允许生成和显示带有错误信息的堆栈跟踪。
## 使用说明
应该使用 github.com/pkg/errors 来代替对 fmt.Errorf() 或 errors.New() 的所有调用。使用此程序包将生成一个调用堆栈,该调用堆栈会被附加到错误信息上。
使用该程序包很简单,只需对您的代码做轻微调整。
首先,您需要引入 github.com/pkg/errors
然后,更新您的代码生成的所有错误,以使用其中一个错误创建函数(errors.New(), errors.Errorf(), errors.WithMessage(), errors.Wrap(), errors.Wrapf()).
注解
可用的错误创建方法的完整文档请查看 https://godoc.org/github.com/pkg/errors 。也可以参考下边通用指南的章节来了解在 Fabric 代码中使用该包的更多指南。
最后,将所有记录器或 fmt.Printf() 调用的格式指令从 %s 更改为 %+v ,以打印调用堆栈和错误信息。
Hyperledger Fabric 中错误处理的通用准则
- 若要处理用户请求,应记录并返回错误。
- 若错误来自外部来源(如 Go 依赖库或 vendor 的包),则用 errors.Wrap() 包装该错误,为其生成一个调用堆栈。
- 若错误来自另一个 Fabric 函数,当有需要时,在不影响调用堆栈的情况下使用 errors.WithMessage() 在错误信息中添加更多上下文。
- Panic 不应被传播给其他软件包。
示例程序
以下案列程序清楚地展示了如何使用软件包:
package main
import (
"fmt"
"github.com/pkg/errors"
)
func wrapWithStack() error {
err := createError()
// do this when error comes from external source (go lib or vendor)
return errors.Wrap(err, "wrapping an error with stack")
}
func wrapWithoutStack() error {
err := createError()
// do this when error comes from internal Fabric since it already has stack trace
return errors.WithMessage(err, "wrapping an error without stack")
}
func createError() error {
return errors.New("original error")
}
func main() {
err := createError()
fmt.Printf("print error without stack: %s\n\n", err)
fmt.Printf("print error with stack: %+v\n\n", err)
err = wrapWithoutStack()
fmt.Printf("%+v\n\n", err)
err = wrapWithStack()
fmt.Printf("%+v\n\n", err)
}
日志控制
概述
peer 和 orderer 中的日志是由 common/flogging 包提供的,这个包支持:
- 根据消息的严重性进行日志记录控制
- 根据生成消息的软件 记录器 的记录控制
- 根据消息的严重性,提供不同的漂亮的打印选项
目前所有日志都输出到 stderr。为用户和开发人员提供了按严重性对日志进行全局和日志级别的控制。目前没有针对每个严重性级别提供信息类型的正式规范。提交错误报告时,开发人员可能希望在 DEBUG 级别查看完整的日志
在正常打印的日志中,日志记录级别由不同颜色的四个字符的代码表示,例如,”ERRO” 表示错误(ERROR),”DEBU” 表示调试(DEBUG),等等。在日志记录上下文中,记录器 是由开发人员对相关消息组的命名(字符串)。在下面的正常打印的示例,记录器 ledgermgmt、kvledger 和 peer 都在生成日志。
2018-11-01 15:32:38.268 UTC [ledgermgmt] initialize -> INFO 002 Initializing ledger mgmt
2018-11-01 15:32:38.268 UTC [kvledger] NewProvider -> INFO 003 Initializing ledger provider
2018-11-01 15:32:38.342 UTC [kvledger] NewProvider -> INFO 004 ledger provider Initialized
2018-11-01 15:32:38.357 UTC [ledgermgmt] initialize -> INFO 005 ledger mgmt initialized
2018-11-01 15:32:38.357 UTC [peer] func1 -> INFO 006 Auto-detected peer address: 172.24.0.3:7051
2018-11-01 15:32:38.357 UTC [peer] func1 -> INFO 007 Returning peer0.org1.example.com:7051
可以在运行时创建任意数量的记录器,因此没有记录器的“主列表”,并且日志控件结构无法检查记录器是否确实存在或将生成。
日志规范
peer 和 orderer 命令的日志记录级别由日志记录规范控制,该规范是通过``FABRIC_LOGGING_SPEC`` 环境变量设置的。
完整的日志记录级别规范具有以下形式:
[<logger>[,<logger>...]=]<level>[:[<logger>[,<logger>...]=]<level>...]
日志记录严重性级别使用不区分大小写的字符串指定
FATAL | PANIC | ERROR | WARNING | INFO | DEBUG
日志记录级别有默认值。但是,可以使用如下语法来指定某个或某组记录器
<logger>[,<logger>...]=<level>
示例如下:
info - Set default to INFO
warning:msp,gossip=warning:chaincode=info - Default WARNING; Override for msp, gossip, and chaincode
chaincode=info:msp,gossip=warning:warning - Same as above
记录格式
peer和orderer命令的日志记录格式是通过FABRIC_LOGGING_FORMAT环境变量控制的。可以将其设置为格式化的字符串,例如默认打印为可读的控制台格式:
"%{color}%{time:2006-01-02 15:04:05.000 MST} [%{module}] %{shortfunc} -> %{level:.4s} %{id:03x}%{color:reset} %{message}"
也可以将其设置为 json,按照 JSON 格式输出日志。
链码
链码日志是链码开发人员的责任。
作为独立执行的程序,技术上用户提供的链码也可以在 stdout / stderr 上生成输出。这自然对 “devmode” 很有用,但在生产环境中通道一般会禁用该模式以减轻有破坏性或恶意代码的滥用。然而,可以通过配置 CORE_VM_DOCKER_ATTACHSTDOUT = true 选项,在每个 Peer 节点管理容器(例如,“netmode”)上启用此输出。
一旦启用,每个链码都将收到以其自身容器 ID 为键的日志记录通道。写入到 stdout 或 stderr 的任何输出都将逐行集成到 Peer 节点的日志中。不建议将其用于生产。
可以使用适用于容器平台的标准命令,从链码容器查看未转发到 Peer 容器的 stdout 和 stderr。
docker logs <chaincode_container_id>
kubectl logs -n <namespace> <pod_name>
oc logs -n <namespace> <pod_name>
使用 TLS(Transport Layer Security)保护通信
Fabric 支持节点之间使用 TLS 进行安全通信。TLS 通信可以使用单向(仅服务器)和双向(服务器和客户端)身份验证。
为 Peer 节点配置 TLS
Peer 节点既是 TLS 服务器又是 TLS 客户端。当另一个 Peer 节点、应用程序或客户端与其建立连接时,它是前者;而当它与另一个 Peer 节点或排序节点建立连接时,则是后者。
要在 Peer 节点上启用 TLS,需要设置以下配置:
peer.tls.enabled=truepeer.tls.cert.file= 包含 TLS 服务器证书文件的标准路径peer.tls.key.file= 包含 TLS 服务器私钥文件的标准路径peer.tls.rootcert.file= 包含颁发 TLS 服务器证书 CA 证书链的标准路径
默认情况下,在 Peer 节点上启用 TLS 时,TLS 客户端身份验证是关闭的。这意味着在 TLS 握手期间, Peer 节点将不会验证客户端(另一个 Peer 节点、应用程序或CLI)的证书。要在 Peer 节点上启用TLS客户端身份验证,需要将节点配置中的属性 peer.tls.clientAuthRequired 设置为 true ,并将``peer.tls.clientRootCAs.files`` 属性设置为为客户端发布 TLS 证书 CA 证书链文件。
默认情况下,Peer 节点在充当 TLS 服务器和客户端时将使用相同的证书和私钥对。要在客户端使用其他证书和私钥对,请将 peer.tls.clientCert.file 和 peer.tls.clientKey.file 配置属性分别设置为客户端证书和密钥文件的标准路径。
也可以通过设置以下环境变量来启用具有客户端身份验证的 TLS:
CORE_PEER_TLS_ENABLED=trueCORE_PEER_TLS_CERT_FILE= 服务器证书的标准路径CORE_PEER_TLS_KEY_FILE= 服务器私钥的标准路径CORE_PEER_TLS_ROOTCERT_FILE= CA 证书链文件的标准路径CORE_PEER_TLS_CLIENTAUTHREQUIRED=trueCORE_PEER_TLS_CLIENTROOTCAS_FILES= CA 证书链文件的标准路径CORE_PEER_TLS_CLIENTCERT_FILE= 客户证书的标准路径CORE_PEER_TLS_CLIENTKEY_FILE= 客户端密钥的标准路径
在 Peer 节点上启用客户端身份验证后,要求客户端在 TLS 握手期间发送其证书。如果客户端未发送其证书,则握手将失败,并且 Peer 节点将关闭连接。
当 Peer 节点加入通道时,将从通道的配置区块中读取通道成员的根 CA 的证书链,并将其添加到 TLS 客户端和服务端根 CA 的数据结构中。之后, Peer 节点间通信和 Peer 节点与排序节点间通信将会无缝地工作。
为排序节点配置 TLS
要在排序节点上启用 TLS,需要设置排序节点的配置:
General.TLS.Enabled=trueGeneral.TLS.PrivateKey= 包含服务器私钥的文件的标准路径General.TLS.Certificate= 包含服务器证书的文件的标准路径General.TLS.RootCAs= 包含颁发 TLS 服务器证书 CA 证书链的标准路径
默认情况下,与 Peer 节点一样,排序节点上的 TLS 客户端身份验证处于关闭状态。要启用 TLS 客户端身份验证,需要设置以下配置属性:
General.TLS.ClientAuthRequired=trueGeneral.TLS.ClientRootCAs= 包含颁发 TLS 服务器证书 CA 证书链的标准路径
也可以通过设置以下环境变量来启用具有客户端身份验证的 TLS :
ORDERER_GENERAL_TLS_ENABLED=trueORDERER_GENERAL_TLS_PRIVATEKEY= 包含服务器私钥的文件的标准路径ORDERER_GENERAL_TLS_CERTIFICATE= 包含服务器证书的文件的标准路径ORDERER_GENERAL_TLS_ROOTCAS= 包含颁发 TLS 服务器证书 CA 证书链的标准路径ORDERER_GENERAL_TLS_CLIENTAUTHREQUIRED=trueORDERER_GENERAL_TLS_CLIENTROOTCAS= 包含颁发 TLS 服务器证书 CA 证书链的标准路径
为节点 CLI 配置 TLS
针对启用了 TLS 的 Peer 节点运行 CLI 命令时,必须设置以下环境变量:
CORE_PEER_TLS_ENABLED=trueCORE_PEER_TLS_ROOTCERT_FILE= 包含颁发 TLS 服务器证书 CA 证书链的标准路径
如果在远程服务器上也启用了 TLS 客户端身份验证,则除上述变量外,还必须设置以下变量:
CORE_PEER_TLS_CLIENTAUTHREQUIRED=trueCORE_PEER_TLS_CLIENTCERT_FILE= 客户端证书的标准路径CORE_PEER_TLS_CLIENTKEY_FILE= 客户端私钥的标准路径
当运行连接到排序服务的命令时,例如 peer channel <create|update|fetch> 或 peer chaincode <invoke>,如果在排序节点上启用了 TLS ,则还必须指定以下命令行参数:
- –tls
- –cafile <包含排序节点 CA 证书链的文件的标准路径>
如果在排序节点上启用了 TLS 客户端身份验证,则还必须指定以下参数:
- –clientauth
- –keyfile <包含客户端私钥的文件的标准路径>
- –certfile <包含客户端证书的文件的标准路径>
调试 TLS 问题
在调试 TLS 问题之前,建议同时在 TLS 客户端和服务器端启用 GRPC debug 以获取附加信息。要启用 GRPC debug,需要在环境变量``FABRIC_LOGGING_SPEC`` 中加入 grpc=debug 。例如,如要将默认日志记录级别设置为 INFO,将 GRPC 日志记录级别设置为 DEBUG,则需先将日志记录规范设置为 grpc=debug:info。
如果您在客户端看到错误消息 remote error: tls: bad certificate,则通常表示 TLS 服务器已启用客户端身份验证,并且该服务器未收到正确的客户端证书,或者收到了不信任的客户端证书。请确保客户端正在发送其证书,并且该证书已被 Peer 节点或排序节点信任的 CA 证书所签名。
如果在链码日志中看到错误消息 remote error: tls: bad certificate,请确保链码是使用 Fabric v1.1 或更高版本的程序构建的。
配置并使用 Raft 排序服务
受众: Raft 排序节点管理员
概述
有关排序概念的整体概述以及排序服务(包括 Raft)是如何工作的,请查看我们关于排序服务的概念文档。
要了解设置排序节点的过程(包括创建本地 MSP 和创建初始区块),请查看我们关于设置排序节点的文档。
配置
虽然必须将每个 Raft 节点添加到系统通道,但不需要将节点添加到每个应用程序通道。此外,您可以动态地从通道中删除和添加节点,而不会影响其他节点,下面的重新配置部分中描述了该过程。
Raft 节点使用 TLS pinning 技术互相识别,因此要假冒 Raft 节点,攻击者需要获取其 TLS 证书的私钥。所以如果没有有效的 TLS 配置,就无法运行 Raft 节点。
Raft 集群要在两个部分进行配置:
- 本地配置:主要用于配置节点控制方面,如 TLS 通信、复制行为和文件存储。
- 通道配置:定义相应通道的 Raft 集群成员,以及协议指定的参数,如心跳频率、领导节点超时等。
回想一下,每个通道都有自己的 Raft 协议实例运行。因此,必须在其所属的每个通道的配置中引用 Raft 节点,方法是将其服务器和客户端 TLS 证书(以 PEM 格式)添加到通道配置中。这确保了当其他节点接收到该节点的消息时,它们可以安全地确认发送消息的节点的身份。
下边是 configtx.yaml 中的一部分内容,展示了通道中三个 Raft 节点(也就是所谓的“共识者”)的配置:
Consenters:
- Host: raft0.example.com
Port: 7050
ClientTLSCert: path/to/ClientTLSCert0
ServerTLSCert: path/to/ServerTLSCert0
- Host: raft1.example.com
Port: 7050
ClientTLSCert: path/to/ClientTLSCert1
ServerTLSCert: path/to/ServerTLSCert1
- Host: raft2.example.com
Port: 7050
ClientTLSCert: path/to/ClientTLSCert2
ServerTLSCert: path/to/ServerTLSCert2
注意:排序节点将被列为系统通道以及他们加入的任何应用程序通道的共识者。
当创建通道配置区块时,configtxgen 工具读取到 TLS 证书的路径,并将路径替换为相应的证书。
本地配置
orderer.yaml 中有两个部分和 Raft 排序节点的配置有关:
Cluster,决定了 TLS 通信的配置;和 consensus,决定了预写式日志和快照的存储位置。
Cluster 参数:
默认情况下,Raft 服务与面向客户端的服务器(用于发送交易或拉取区块)运行在同一个 gRPC 服务器上,但它可以配置为单独的具有独立端口的 gRPC 服务器。
这对于希望组织 CA 颁发的 TLS 证书仅用于群集节点的相互通信,而公共 TLS CA 颁发的 TLS 证书用于面向客户端的 API 的情况是非常有用的。
ClientCertificate,ClientPrivateKey:客户端 TLS 证书和相关私钥的文件路径。ListenPort:集群监听的端口。如果为空,该端口就和排序节点通用端口(general.listenPort)一致 。ListenAddress:集群服务监听的地址。ServerCertificate,ServerPrivateKey:TLS 服务器证书密钥对,当集群服务运行在单独的 gRPC 服务器(不同端口)上时使用。SendBufferSize:调节出口缓冲区中的消息数。
注意: ListenPort、ListenAddress、ServerCertificate 和 ServerPrivateKey 必须同时设置或都不设置,如果没有设置它们,它们就会从 general TLS 部分继承,例如 general.tls.{privateKey, certificate}。
general.cluster 还有隐藏的配置参数,可用于进一步微调集群通信或复制机制:
DialTimeout,RPCTimeout:指定创建连接和建立流的超时时间。ReplicationBufferSize:可以为从其他群集节点进行块复制的每个内存缓冲区分配的最大字节数。每个通道都有自己的内存缓冲区。默认为20971520,即20 MB。PullTimeout:排序节点等待接收区块的最长时间。默认为五秒。ReplicationBackgroundRefreshInterval:节点连续两次尝试复制其加入的通道,或无法复制通道的时间间隔。默认为五分钟。TLSHandshakeTimeShift:如果排序节点的 TLS 证书已过期且没有被及时替换(参见下文的 TLS 证书替换),那么节点之间的通信就无法建立,也不可能向排序服务传输新的交易。要从这种场景中恢复,可以让排序节点间的 TLS 握手认为时间向后移动了给定的时长,这个时长配置为TLSHandshakeTimeShift。这只对为集群内部通信使用了独立 gRPC 服务器的排序节点有效(通过general.cluster.ListenPort和general.cluster.ListenAddress)。TLSHandshakeTimeShift:如果ordering节点的TLS证书过期且没有按时更换(参见下面的TLS证书轮换),它们之间就不能建立交流,也不能向ordering服务发送新的交易。 为了从这种情况下恢复,可以考虑在ordering节点间进行TLS握手并使用TLSHandshakeTimeShift来配置一个回溯的时间。 为保证尽可能的不受外部影响,这个设置只在使用独立gRPC服务的ordering节点集群内有效。 如果您的集群使用同一个gRPC服务来响应客户端和peer,您首先需要重新配置您的orderer,添加general.cluster.ListenPort,general.cluster.ListenAddress,ServerCertificate和ServerPrivateKey,然后重启orderer以让新配置生效。
Consensus 参数:
WALDir:指定etcd/raft预写式日志的存储位置。每个通道都会有以通道 ID 为名的子目录。- SnapDir
:指定etcd/raft` 快照的存储位置。每个通道都会有以通道 ID 为名的子目录。
还有一个隐藏配置参数可以加入到 orderer.yaml 的共识部分:
EvictionSuspicion:通道驱逐嫌疑节点的时间,这会触发节点从其他节点拉取区块并查看它是否被通道驱逐以此来确认它的嫌疑。如果确认了它的嫌疑(被检查的区块没有包含节点 TLS 证书),该节点将终止对通道的操作。当一个节点不知道任何被选举的领导节点或者不能被选举为该通道中的领导节点时,它就有可能是被通道逐出了。默认十分钟。
通道配置
除(已经讨论过的)共识者之外,Raft 通道配置中还有一个 Options 部分和协议有关。目前,在节点运行的时候不能动态地修改这些值。只能重新修改配置并重启节点。
只有 SnapshotIntervalSize 是例外,它可以在节点运行的时候修改。
注意:建议不要修改下面的这些配置,因为错误的配置可能会导致领导节点选举失败(比如,TickInterval 和 ElectionTick 设置得过小)。不能选举领导节点的情况是无法解决的,因为领导节点是做变更所必需的。由于这些危险,我们建议一般不要调整这些参数。
TickInterval:两次Node.Tick之间的时间间隔。ElectionTick:两次选举之间必须度过的Node.Tick次数。就是说,如果一个跟随节点在经过ElectionTick次的时间后仍没有从当前一轮的领导节点接收到任何消息,它就会变为候选节点,并且开始新一轮选举。ElectionTick必须大于HeartbeatTick。ElectionTick必须大于HeartbeatTick。HeartbeatTick:两次心跳之间必须度过的Node.Tick次数。就是说,领导节点每经过HeartbeatTick次的时间就会发送心跳消息来维持其领导地位。MaxInflightBlocks:限制乐观复制阶段在途新增区块的最大数量。SnapshotIntervalSize:定义每次创建的快照字节数。
重新配置
Raft 排序节点支持动态地(意思是,当通道正在使用时)添加和移除节点,只是一次只能添加或移除一个节点。在你尝试重新配置之前,请注意你的集群必须可以维护,并且能够获得共识。举个例子,如果你有 3 个节点,然后 2 个节点宕机了,你就不能重新配置你的集群来移除那些节点。同样地,如果你在一个有着三个节点的通道内有一个宕机的节点,那么不应该尝试替换证书,因为这会造成二次错误。作为一个准则,除非所有共识者都在线且健康,你永远都不应该尝试对 Raft 共识者做配置变更,如添加或删除共识者,或替换共识者的证书等。
如果你决定修改这些参数,我们建议只在维护周期内进行尝试。修改配置的问题绝大多数都发生在只有少量节点的集群中且有一个节点宕机之时。比如,如果你有三个节点的共识者,其中有一个宕机,这意味着你只有两个节点存活。如果你在这个状态下将集群扩展到 4 个节点,你仍然只有 2 个节点存活,这无法达到法定人数。第四个节点不能上线,因为节点只能加入到运作中的集群(除非集群总大小是 1 或 2)。
因此,在扩展一个(只有两个节点存活的)三节点集群为四节点时,你完全会被卡住,直到原先离线的节点恢复。
添加一个新节点到 Raft 集群需要通过以下步骤完成:
- 通过一个通道配置更新交易将新节点的 TLS 证书添加到通道中。注意:新节点在加入一个或更多应用通道前,必须先加入到系统通道。
- 从一个排序节点中获取最新的系统通道配置区块,这是系统通道的一部分。
- 通过验证配置区块是否包含(即将)加入的节点证书来确保此节点是系统通道的一部分。
- 使用在
General.BootstrapFile配置参数中指定的配置区块路径启动新的 Raft 节点。 - 等待 Raft 节点从已有节点复制其证书所加入的通道中的区块。在这一步完成后,节点开始服务于通道。
- 将新增的 Raft 节点端点加入所有通道的配置。
可以将已经运行(且已经加入某些通道)的节点在运行时加入到通道中。要做到这点,只需添加该节点的证书到通道的通道配置中。节点会自动检测其加入到新的通道(默认值是 5 分钟,但如果你想让节点更快检测新通道,可以重启节点),然后从通道中的 orderer 拉取通道区块,最后为该链启动 Raft 实例。
在成功完成以上步骤后,就能更新通道配置以纳入新 Raft orderer 的端点。
从一个 Raft 集群中移除一个节点需要通过以下步骤完成:
- 从所有通道的通道配置中移除其端点,包括由 orderer 管理员控制的系统通道。
- 从所有通道的通道配置中移除该节点(由证书识别)的记录。再次强调,这也包括系统通道。
- 关闭节点。
从一个指定的通道中移除节点,但仍维持其服务于其他通道需要通过以下步骤完成:
- 从该通道的通道配置中移除其端点。
- 从该通道的配置中移除该节点(由证书识别)的记录。
- 第二个阶段会导致:
- 通道中剩余的 orderer 节点在被移除的通道上下文中停止与被移除的 orderer 节点通信。它们仍会在其他通道上通信。
- 从通道中移出的节点会立即或在度过
EvictionSuspicion的时间(默认 10 分钟)之后自动检测它的移除,然后停止其 Raft 实例。
Orderer 节点的 TLS 证书替换
所有 TLS 证书都有一个由颁发者决定的过期日期。这些过期日期从颁发日期算起,长至 10 年,短则数月,所以请与颁发者确认。在过期日期到来前,你需要更换节点的证书以及节点所加入的每一个通道,包括系统通道。
对于每一个节点加入的通道:
- 使用新证书更新通道配置。
- 替换节点文件系统上的证书。
- 重启节点。
因为一个节点只能有一对 TLS 证书私钥,因此在更新过程中,节点不能在新证书加入前服务通道,从而降低了容错的能力。由于这个原因,证书替换的过程一旦开始,就应该尽快完成。
如果因为某些原因,TLS 证书的替换已经开始但不能在所有通道上完成,建议回退到原先的 TLS 证书,并在以后再尝试替换。
证书过期的相关身份验证
如果一个客户端的标识含有过期日期(如基于X509证书的标识),当它发送给orderer一笔交易时,orderer会首先检查标识是否过期,如果是,拒绝这笔交易的提交。
然而,你可以通过打开General.Authentication.NoExpirationChecks配置来让orderer忽略过期日期,相关配置在 orderer.yaml中。
这仅限于在极端情况下使用,当一个管理员的证书过期,就会导致没有办法发送新的配置文件来更新管理员证书,因为配置文件的签名由当前管理员证书进行,但它因为已经过期而会被拒绝。 更新通道之后建议将配置文件改回默认配置,即强制标识进行过期检测。
Metrics
关于维护服务的描述和如何配置启动,参见我们关于维护服务的文档。
关于维护服务收集的指标列表,参考我们的指标参考文档。
当你为特定的用例为指标排列优先级而做大量配置工作的时候,有两个特别的指标可能是你想要监控的:
consensus_etcdraft_is_leader:识别集群中的哪个节点是当前的领导者。如果没有设置任何节点,你就是丢失了法定人数。consensus_etcdraft_data_persist_duration:指示写入 Raft 集群持久化预写式日志所持续的时间。从协议安全性考虑,消息必须在被共享给共识者集合之前适当地调用fsync来持续持久化。如果这个值开始攀升,这个节点可能无法参与到共识中(这会导致此节点或者网络的服务中断)。
排错
- 你越是给节点更大的压力,就越可能需要修改相关参数。对于任何系统来说,电脑或机器,压力会导致性能的拖累。正如我们在概念文档中所述,Raft 中的领导者选举会发生在跟随者节点在一段时间内未接收到来自领导者的“心跳”消息或带有数据的“附加”消息时。因为 Raft 节点在通道间共享相同的通信层(这不代表他们共享数据——他们不共享!),如果一个 Raft 节点在许多通道中都属于共识者集合的部分,你会想增加它触发选举所需的时间长度来避免无意的领导者选举。
从 Kafka 迁移到 Raft
注意:这篇文章面向的是已熟练掌握通道配置更新交易的读者。由于迁移会涉及到几次通道配置升级交易,因此我们建议您先熟悉 向通道添加组织 教程,该教程详细讲述了通道更新的流程,熟练掌握后再尝试进行迁移。
对于想把通道从使用基于Kafka的排序服务转换成使用基于Raft的排序服务的用户,v1.4.2通过在网络各通道上进行一系列配置更新交易,使得这一点得到实现。
该教程将从宏观层面来讲述迁移流程,指出一些必要的细节,不会详细讲述每个命令。
假设与思考
尝试迁移之前,要考虑以下几点:
- 该流程只针对从Kafka迁移到Raft,暂不支持其他类型orderer共识之间的迁移。
- 迁移是单方向的。一旦排序服务被迁移成Raft并开始提交交易时,就没有办法再恢复成Kafka。
- 因为排序节点必须关闭然后重新启动,所以在迁移期间必须允许停机。
- 若迁移失败,只有当在本文后面规定的迁移点进行了备份,才可能对其恢复,如果未进行备份,则无法恢复至初始状态。
- 必须在同一维护窗口对所有通道完成迁移。若只迁移部分通道则不可能恢复正常操作。
- 在迁移过程结束时,每个通道都将拥有相同的Raft节点共识者集,与将出现在排序系统通道上的共识者集一样。这样就可以判断出成功的迁移。
- 利用已部署的排序节点的现有账本就能完成迁移,orderer的增加或移除应在迁移完成后进行。
整体迁移流程
迁移共分为五个步骤。
- 将系统置于维护模式,该模式拒绝应用程序交易,只有排序服务管理员能改动通道配置。
- 关闭系统,当迁移过程中发生错误,进行备份。
- 启动系统,每个通道都有自己的共识类型,各自的元数据都已修改。
- 重启系统后系统开始用Raft共识运行;检查各通道以确保达到规定人数。
- 将系统移出维护模式,重启正常功能。
准备迁移
准备迁移前还需进行以下步骤。
- 设计Raft部署,决定在Raft共识者者保留哪些排序服务节点。至少需要部署三个排序节点,但要注意的是,部署包含五个以上排序节点的共识者集能保证即使其中一个节点关闭,依然能维持高可用度,而对于只包含三个排序节点的共识者集,一旦由于某些原因(例如,正处于维护期间)导致其中一节点关闭,则极大降低了节点的可用度。
- 准备搭建Raft
Metadata配置的材料。注意:所有通道都需收到相同的RaftMetadata配置。. 访问 Raft配置指南 获取更多相关信息。注意:你或许会发现最简单的方法就是用Raft共识协议来引导新的排序网络,然后从其配置中复制并修改共识元数据部分。无论使用哪种方法,都需要(对每个排序节点):hostnameportserver certificateclient certificate
- 编译系统中所有通道(系统和应用程序)的列表。确保你有对配置更新签名的正确证书。例如,相关的排序服务管理员身份。
- 确保所有的排序服务节点运行的Fabric版本相同,都是v1.4.2或该版之后的版本。
- 确保所有节点运行的Fabric版本不低于v1.4.2。确保所有通道都配置了支持迁移的通道能力。
- orderer能力
V1_4_2(或之后的版本) - 通道能力
V1_4_2(或之后的版本)
- orderer能力
维护模式的入口
建议在维护模式中设置排序服务之前关闭网络的节点和客户端。虽然让节点或客户端继续运行是安全的。但由于排序服务将拒绝所有请求,因此它们的日志将充满良性但会让人误解的故障。
参照 向通道添加组织
教程中的步骤来pull,翻译并检查每个通道的配置,从系统通道开始。该步中唯一需要你改动的地方是/Channel/Orderer/ConsensusType中的通道配置。在通道配置的一个JSON代表中需要改动的可能是.channel_group.groups.Orderer.values.ConsensusType。
ConsensusType由三个值代表:Type,Metadata和State,其中:
Type要么是kafka要么是etcdraft(Raft)。该值只能在维护模式中才能修改。- 如果
Type是Kafka,那么Metadata就是空的,但是如果·ConsensusType是etcdraft,那就必须包含有效Raft元数据。下文中还会详细谈到。 - 当通道正在处理交易时
State是STATE_NORMAL,当通道正处于迁移过程中时则为STATE_MAINTENANCE。
在通道配置更新的第一步,只用将State 从 Normal 改成 MAINTENANCE 。暂且先不要改Type 或 Metadata 区域。要注意的是,当前Type 应该是 Kafka。
当处于维护模式时,正常交易,与迁移无关的配置更新,peer用来索取新区块而发出的请求,这些都会被拒绝。这样做是为了避免在迁移过程中需要对节点进行备份和(如果需要的话)恢复,因为节点只有在成功完成迁移时才会收到更新。换句话来说,我们想把排序服务备份点(下一步的内容)放置在节点的账本之前,以期能够在需要的时候撤销操作。不过,排序节点管理员能发出Deliver 请求(管理员需要该功能以继续迁移流程)。
验证每个排序服务节点在各自通道是否已进入维护模式。要想完成验证,可通过获取最后一个配置区块,确保每个通道上的 Type, Metadata, State 分别是 kafka ,空(上文中我们刚谈到Kafka没有元数据), STATE_MAINTENANCE。
当通道成功更新后,就可以备份排序服务了。
备份文件和关闭服务器
关闭所有的排序节点,Kafka服务器和Zookeeper服务器。先关闭排序服务节点至关重要。随后,在允许Kafka服务将其日志刷新到磁盘(一般耗时30秒,但可能会更久,具体时间取决于你的系统情况)后,应关闭Kafka服务器。在关闭orderer的同时关闭Kafka服务器会导致orderer的文件系统状态比Kafka服务器的新,这可能会阻止你的系统启动。
为这些服务器的文件系统创建一个备份。随后重启Kafka服务,紧接着再重启排序服务节点。
在维护模式中切换成Raft
迁移流程的下一步是为各通道进行通道配置更新。在配置更新中,将Type 切换成 etcdraft (Raft) 的同时保持 State 为STATE_MAINTENANCE,填写 Metadata 配置。我们强烈建议让所有通道上的 Metadata 配置保持一致。如果你想用不同的节点组建不同的共识者集,你就能在系统被重启为 etcdraft 模式后重新配置 Metadata 的配置。因此,提供一个完全相同的元数据对象并因此提供相同的共识者集就意味着,当重启节点时,如果系统通道组成仲裁并且能够退出维护模式时,那么其他通道也可能会执行相同的操作。为各通道提供不同的共识者集会导致有一个通道成功形成集合而另一个通道失败了。
随后,验证每个排序服务是否都通过拉取和检测每个通道的配置来提交了 ConsensusType 改变配置更新。
注意:对于每一个通道,改变 ConsensusType 的交易必须是重启节点(下一步会谈到)之前的最后一次配置交易。如果这一步之后发生其他配置交易,那么节点最有可能会在重启时崩溃,或者导致未定义的行为。
重启和验证主节点
注意:重启后必须退出维护模式。
在每个通道都完成 ConsensusType 更新后,关闭所有排序服务节点,关闭所有Kafka服务器和Zookeeper,然后仅重启排序服务节点。重启和Raft节点一样,在每个通道上组成一个集合,选出每个通道上的主节点。
Note: Since the Raft-based ordering service uses client and server TLS certificates for authentication between orderer nodes, additional configurations are required before you start them again, see Section: Local Configuration for more details.
重启完成后, 确保通过检测节点日志来验证各通道上都已选出各自的主节点(下文中指出了你需检测的内容)。这将证实迁移流程顺利完成。
When a leader is elected, the log will show, for each channel:
"Raft leader changed: 0 -> node-number channel=channel-name
node=node-number "
例如:
2019-05-26 10:07:44.075 UTC [orderer.consensus.etcdraft] serveRequest ->
INFO 047 Raft leader changed: 0 -> 1 channel=testchannel1 node=2
在这个例子中 node 2 指明了主节点由通道 testchannel1的集合选举出来(主节点是node 1)。
切出维护模式
在各通道上执行另一项通道配置更新(向截止目前你已发送过配置更新的排序节点发送配置更新),从而将 State 从 STATE_MAINTENANCE 切换成 STATE_NORMAL。如正常一样,从系统通道先开始。如果在排序系统通道上成功了,有可能所有通道上的迁移都成功了。要进行验证,请从排序节点中获取系统通道的最后一个配置区块,验证当前 State 为 STATE_NORMAL 。为了完整性,请在各排序节点上进行验证。
当流程完成时,所有通道上的排序服务就能接受所有交易了。如果你像我们建议的那样关闭了节点和应用程序,现在你可以重启它们了。
中止和恢复
如果在迁移过程中还未退出维护模式时出现一个问题,只需执行以下恢复步骤:
- 关闭排序节点和Kafka服务(服务器和Zookeeper的整体)。
- 在改变
ConsensusType之前将这些服务器的文件系统恢复成维护模式下进行的备份。 - 重启这些服务器,排序节点将在维护模式下引导至Kafka。
- 发送退出维护模式的配置更新,以继续使用Kafka来作为你的共识机制,或者在备份后恢复这些指令,修补阻碍形成Raft仲裁的错误,用修正过的Raft配置
Metadata重新进行迁移。
若出现以下状态,则表明迁移可能未成功:
- 某些节点崩溃或关闭。
- 日志中没有关于各通道上成功选举出一个主节点的记录。
- 尝试在系统通道上切换成
STATE_NORMAL模式,但是失败了。
启用基于 Kafka 的排序服务
郑重声明
本文档假设读者知道怎么配置 Kafka 和 ZooKeeper 集群,并阻止了非授权访问以保证它们在使用过程中的安全性。本指南的唯一目的是说明如何配置你的 Hyperledger Fabric 排序服务节点(OSN,ordering service node)使用 Kafka 集群为你的区块链网络提供排序服务的步骤。
关于排序节点的角色以及它在网络和交易流程中的作用的信息,请参考 排序服务 。
关于如何设置排序节点的信息,请参考 设置排序节点 。
关于配置 Raft 排序服务的信息,请参考 配置并使用 Raft 排序服务 。
概览
每个通道映射到 Kafka 中一个单独的单分区主题(topic)。当一个 OSN 通过 Broadcast RPC 接收到交易时,它会进行检查以确认广播的客户端有写入通道的权限,然后将交易转发(或者说是生产)到 Kafka 中合适的分区中。这个分区被 OSN 消费,将接受到的交易打包到本地区块,持久化保存在他们的本地账本,然后通过 Deliver RPC 将他们发送给接收客户端。底层的细节请参考 the document that describes how we came to this design ,图表 8 阐述了上述过程。
步骤
使用 K 和 Z 表示 Kafka 和 ZooKeeperer 集群中的节点数量:
K的最小值为4。(我们将在第4步中解释,这是崩溃错误容忍的最小节点数量,比如,有4个 broker,当有1个 broker 宕机的时候,仍然可以继续读写和创建新通道。)Z可以是3、5或者7。它应该是奇数个以防止脑裂的发生,并且多余1个以防止单点故障。多余7个 ZooKeeper 服务器就没有必要了。
具体过程如下:
- Orderers: Kafka 相关的信息编码在网络的创世区块中。 如果你使用了
configtxgen, 编辑configtx.yaml,或者使用一个系统通道创世区块的预配置文件,然后:
Orderer.OrdererType设置为kafka。Orderer.Kafka.Brokers包含 至少两个 你集群中的 Kafka broker 的IP:port。列表中不需要是所有的节点。(这些是你的引导 broker 。)
Orderers: 设置最小区块大小。 每个区块最大为 Orderer.AbsoluteMaxBytes 个字节(不包含头部),这个值你可以在
configtx.yaml中设置。我们使用A来代表它,它将影响到我们在第6步对 Kafka broker 的配置。Orderers: 创建创世区块。 使用
configtxgen。在第3步和第4步的设置是系统层级的设计,将影响到网络中所有的 OSN。记下创世区块的位置。Kafka 集群: 合理的配置你的 Kafka brokers。 确保每一个 Kafka broker 配置了这些关键项:
unclean.leader.election.enable = false— 数据持久化是区块链环境中的重要环节。我们不能在同步复制集合之外选择一个领导通道,或者我们冒着覆盖上一个领队产生的偏移量的风险,并因此重写排序节点产生的区块。min.insync.replicas = M— 这里的值M设为1 < M < N(查看下边的default.replication.factor)。 数据写入至少M个副本之后才认为被提交。其他情况下,写操作返回一个错误。然后:- 如果写入的
N个副本中有N-M个不可用,操作仍可正常运行。 - 如果有更多的副本不可用,Kafka 就不能维护 ISR 集合中的
M个,所以它就会停止接受写入。读取是没有问题的。当重新同步到M个副本的时候,通道可以恢复写的功能。
- 如果写入的
default.replication.factor = N— 这里的值N设为N < K。N个副本意味着每个通道都会将它的数据备份到N个 broker。 这些是一个通道 ISR 集合的备份。就像我们在上边提到的min.insync.replicas section不是所有的节点一直都是可用的。N的值要设置的小于K,因为当少于N个 broker 运行的时候就不能创建通道了。所以,如果你设置为N = K,那么只要有一个 broker 宕机了,就意味着区块链网络就不能创建通道了,也就是说排序服务的崩溃容错就不存在了。基于我们上边所说的,
M和N的最小值分别为2和3。这样的配置可以保证新通道的创建,并且所有的通道都持续可写。message.max.bytes和replica.fetch.max.bytes的值应该设A的值大,在上边你在Orderer.AbsoluteMaxBytes中将A的值设为了4。再为头部数据增加一些空间(多余 1 MiB 就够了)。以下条件适用:Orderer.AbsoluteMaxBytes < replica.fetch.max.bytes <= message.max.bytes (为了完备性的考虑,我们要求 ``message.max.bytes`` 的值小于 ``socket.request.max.bytes`` , ``socket.request.max.bytes`` 的默认值是 100 MiB。如果你希望区块容量大于100 MiB,你需要修改源码 ``fabric/orderer/kafka/config.go`` 中 ``brokerConfig.Producer.MaxMessageBytes`` 的值,然后重新编译。不建议这样的操作。)
log.retention.ms = -1. Until the ordering service adds support for pruning of the Kafka logs, you should disable time-based retention and prevent segments from expiring. (Size-based retention — seelog.retention.bytes— is disabled by default in Kafka at the time of this writing, so there’s no need to set it explicitly.)
Orderers: 将每一个 OSN 指向创世区块。 编辑
orderer.yaml中的General.BootstrapFile来指定 Orderer 指向步骤5中创建的创世区块。(同时,要确保 YAML 文件中的其他键合理的配置。)Orderers: 调整轮询间隔和超时。 (可选步骤。)
orderer.yaml文件中的Kafka.Retry部分可以让你调整 metadata/producer/consumer 请求的频率和 socket 超时时间。(这里有你希望看到的 Kafka 生产者和消费者的全部信息。)另外,当创建一个新通道时,或者重新加载一个存在的通道时(比如重启一个排序节点),排序节点和 Kafka 集群的交互过程如下:
- 排序节点为该通道相关的 Kafka 分区创建一个 Kafka 生产者(写入者)。
- 排序节点使用生产者向分区发送一个无操作的
CONNECT消息。 - 排序节点为分区创建一个 Kafka 消费者(读取者)。
- 即使任意一个步骤失败了,你也可以通过调整重试的频率重复上边的步骤。他们将会每隔
Kafka.Retry.ShortInterval所设置的时间进行Kafka.Retry.ShortTotal次尝试,和每隔Kafka.Retry.LongInterval所设置的时间进行Kafka.Retry.LongTotal次尝试,直到成功为止。注意,排序节点只有在上述步骤成功完成后才可以进行读写。
设置 OSN 和 Kafka 之间的 SSL 通信。 (可选步骤,但是强烈建议。)参考 the Confluent guide 配置 Kafka 集群的设置,然后在每一个相关的 OSN 中设置
orderer.yaml中Kafka.TLS的键值。以如下顺序启动节点:ZooKeeper 集群,Kafka 集群,排序服务节点。
其他注意事项
- 首选消息容量。 在上边第4步中(查看 `Steps`_ 部分)你可以通过设置
Orderer.Batchsize.PreferredMaxBytes来设定默认区块大小。Kafka 对于相对较小的消息有较高的吞吐量;所以该值不要大于1 MiB。 - 使用环境变量覆盖设置。 当使用 Fabric 提供的示例 Kafka 和 ZooKeeper Docker 镜像时(请查看
images/kafka和images/zookeeper相关信息),你可以通过环境变量来覆盖 Kafka broker 或者 ZooKeeper 服务器的设置。将配置文件中的点替换为下划线,例如KAFKA_UNCLEAN_LEADER_ELECTION_ENABLE=false将覆盖unclean.leader.election.enable的值。这将和 OSN 本地 配置文件的效果是一样的,例如在orderer.yaml中的设置。例如ORDERER_KAFKA_RETRY_SHORTINTERVAL=1s将覆盖Orderer.Kafka.Retry.ShortInterval所设置的值。
Kafka 协议版本兼容性
Fabric 使用 sarama client library 支持 Kafka 0.10 到 1.0 的版本,同样还支持较老的版本。
使用 orderer.yaml 中的 Kafka.Version 键,你可以配置你使用哪个 Kafka 协议版本和 Kafka 集群的 brokers 通信。使用老协议版本的 Kafka 代理向后兼容。因为 Kafka 代理对老协议版本的向后兼容性,升级你的 Kafka 代理版本时不需要升级 Kafka.Version 的键值,但是 Kafka 集群使用老协议版本可能会出现 性能损失 。
调试
将环境变量 FABRIC_LOGGING_SPEC 设置为 DEBUG 和 orderer.yaml 中的 Kafka.Verbose` 设置为 true 。
升级到最新版本
如果你熟悉 Hyperledger Fabric 以前的版本,那么你会知道,将节点和通道升级到 Fabric 的最新版本,总体来说,有四步。
- 备份账本和 MSP。
- 以滚动的方式将 orderer 二进制文件升级到最新版本。
- 以滚动方式将 peer 二进制文件升级到最新版本。
- 在可用的情况下,将 orderer 系统通道和所有应用通道更新到最新功能。需要注意,某些版本在所有组中将具有功能,而其他版本可能几乎没有甚至根本没有新功能。
有关功能的更多信息,请查看 Channel capabilities 。
有关如何完成这些升级的信息,请查询这些教程:
- Considerations for getting to v2.0. This topic discusses the important considerations for getting to the latest release from the previous release as well as from the most recent long term support (LTS) release.
- Upgrading your components. Components should be upgraded to the latest version before updating any capabilities.
- Updating the capability level of a channel. Completed after updating the versions of all nodes.
- 启用新的链码生命周期. Necessary to add organization specific endorsement policies central to the new chaincode lifecycle for Fabric v2.x.
由于现在节点升级和提高通道的功能级别是 Fabric 的标准过程,因此我们将不展示升级到最新版本的具体命令。同样,fabric-samples 仓库中也没有将示例网络从以前的版本升级到该版本,之前的版本中是有的。
As the upgrading of nodes and increasing the capability levels of channels is by
now considered a standard Fabric process, we will not show the specific commands
for upgrading to the newest release. Similarly, there is no script in the fabric-samples
repo that will upgrade a sample network from the previous release to this one,
as there has been for previous releases.
注解
最佳做法是将 SDK 升级到最新版本,这是网络常规升级的一部分。虽然 SDK 始终与相应版本和更低的 Fabric 版本兼容,但可能有必要升级到最新的 SDK 以利用最新的 Fabric 功能。有关如何升级的信息,请查阅所用 Fabric SDK 的文档。
Considerations for getting to v2.0
Considerations for getting to v2.x
Chaincode lifecycle
In this topic we’ll cover recommendations for upgrading to the newest release from the previous release as well as from the most recent long term support (LTS) release.
The new chaincode lifecycle that debuts in v2.0 allows multiple organizations to agree on how a chaincode will be operated before it can be used on a channel. For more information about the new chaincode lifecycle, check out Chaincode for operators.
Upgrading from 2.1 to 2.2
It is a best practice to upgrade all of the peers on a channel before enabling the Channel and Application capabilities that enable the new chaincode lifecycle (the Channel capability is not strictly required, but it makes sense to update it at this time). Note that any peers that are not at v2.0 will crash after enabling either capability, while any ordering nodes that are not at v2.0 will crash after the Channel capability has been enabled. This crashing behavior is intentional, as the peer or orderer cannot safely participate in the channel if it does not support the required capabilities.
The 2.1 and 2.2 releases of Fabric are stabilization releases, featuring bug fixes and other forms of code hardening. As such there are no particular considerations needed for upgrade, and no new capability levels requiring particular image versions or channel configuration updates.
After the Application capability has been updated to V2_0 on a channel, you must use the v2.0 lifecycle procedures to package, install, approve, and commit new chaincodes on the channel. As a result, make sure to be prepared for the new lifecycle before updating the capability.
Upgrading to 2.2 from the 1.4.x long term support release
The new lifecycle defaults to using the endorsement policy configured in the channel config (e.g., a MAJORITY of orgs). Therefore this endorsement policy should be added to the channel configuration when enabling capabilities on the channel.
Before attempting to upgrade from v1.4.x to v2.2, make sure to consider the following:
For information about how to edit the relevant channel configurations to enable the new lifecycle by adding an endorsement policy for each organization, check out Enabling the new chaincode lifecycle.
Chaincode lifecycle
Chaincode shim changes (Go chaincode only)
The new chaincode lifecycle that debuted in v2.0 allows multiple organizations to agree on how a chaincode will be operated before it can be used on a channel. For more information about the new chaincode lifecycle, check out Fabric chaincode lifecycle concept topic.
The recommended approach is to vendor the shim in your v1.4 Go chaincode before making upgrades to the peers and channels. If you do this, you do not need to make any additional changes to your chaincode.
It is a best practice to upgrade all of the peers on a channel before enabling the Channel and Application capabilities that enable the new chaincode lifecycle (the Channel capability is not strictly required, but it makes sense to update it at this time). Note that any peers that are not at v2.x will crash after enabling either capability, while any ordering nodes that are not at v2.x will crash after the Channel capability has been enabled. This crashing behavior is intentional, as the peer or orderer cannot safely participate in the channel if it does not support the required capabilities.
If you did not vendor the shim in your v1.4 chaincode, the old v1.4 chaincode images will still technically work after upgrade, but you are in a risky state. If the chaincode image gets deleted from your environment for whatever reason, the next invoke on v2.0 peer will try to rebuild the chaincode image and you’ll get an error that the shim cannot be found.
After the Application capability has been updated to V2_0 on a channel, you must use the v2.x lifecycle procedures to package, install, approve, and commit new chaincodes on the channel. As a result, make sure to be prepared for the new lifecycle before updating the capability.
At this point, you have two options:
The new lifecycle defaults to using the endorsement policy configured in the channel config (e.g., a MAJORITY of orgs). Therefore this endorsement policy should be added to the channel configuration when enabling capabilities on the channel.
- If the entire channel is ready to upgrade chaincode, you can upgrade the chaincode on all peers and on the channel (using either the old or new lifecycle depending on the
Applicationcapability level you have enabled). The best practice at this point would be to vendor the new Go chaincode shim using modules.
For information about how to edit the relevant channel configurations to enable the new lifecycle by adding an endorsement policy for each organization, check out Enabling the new chaincode lifecycle.
- If the entire channel is not yet ready to upgrade the chaincode, you can use peer environment variables to specify the v1.4 chaincode environment
ccenvbe used to rebuild the chaincode images. This v1.4ccenvshould still work with a v2.0 peer.
Chaincode shim changes (Go chaincode only)
Chaincode logger (Go chaincode only)
The recommended approach is to vendor the shim in your v1.4 Go chaincode before making upgrades to the peers and channels. If you do this, you do not need to make any additional changes to your chaincode.
Support for user chaincodes to utilize the chaincode shim’s logger via NewLogger() has been removed. Chaincodes that used the shim’s NewLogger() must now shift to their own preferred logging mechanism.
If you did not vendor the shim in your v1.4 chaincode, the old v1.4 chaincode images will still technically work after upgrade, but you are in a risky state. If the chaincode image gets deleted from your environment for whatever reason, the next invoke on v2.x peer will try to rebuild the chaincode image and you’ll get an error that the shim cannot be found.
For more information, check out Logging control.
At this point, you have two options:
Peer databases upgrade
- If the entire channel is ready to upgrade chaincode, you can upgrade the chaincode on all peers and on the channel (using either the old or new lifecycle depending on the
Applicationcapability level you have enabled). The best practice at this point would be to vendor the new Go chaincode shim using modules.
The databases of all peers (which include not just the state database but the history database and other internal databases for the peer) must be rebuilt using the v2.0 data format as part of the upgrade to v2.0. To trigger the rebuild, the databases must be dropped before the peer is started.
- If the entire channel is not yet ready to upgrade the chaincode, you can use peer environment variables to specify the v1.4 chaincode environment
ccenvbe used to rebuild the chaincode images. This v1.4ccenvshould still work with a v2.x peer.
For information about how to upgrade peers, check out our documentation on upgrading components. During the process for upgrading your peers, you will need to pass a peer node upgrade-dbs command to drop the databases of the peer.
Chaincode logger (Go chaincode only)
Follow the commands to upgrade a peer until the docker run command you see to launch the new peer container (you can skip the step where you set an IMAGE_TAG, since the upgrade dbs command is for the v2.0 release of Fabric only, but you will need to set the PEER_CONTAINER and LEDGERS_BACKUP environment variables). Instead of the docker run command to launch the peer, run this one instead:
Support for user chaincodes to utilize the chaincode shim’s logger via NewLogger() has been removed. Chaincodes that used the shim’s NewLogger() must now shift to their own preferred logging mechanism.
docker run --rm -v /opt/backup/$PEER_CONTAINER/:/var/hyperledger/production/ \
-v /opt/msp/:/etc/hyperledger/fabric/msp/ \
--env-file ./env<name of node>.list \
--name $PEER_CONTAINER \
hyperledger/fabric-peer:2.0 peer node upgrade-dbs
For more information, check out Logging control.
This will drop the databases of the peer. Then issue this command to start the peer using the 2.0 tag:
Peer databases upgrade
docker run -d -v /opt/backup/$PEER_CONTAINER/:/var/hyperledger/production/ \
-v /opt/msp/:/etc/hyperledger/fabric/msp/ \
--env-file ./env<name of node>.list \
--name $PEER_CONTAINER \
hyperledger/fabric-peer:2.0 peer node start
For information about how to upgrade peers, check out our documentation on upgrading components. During the process for upgrading your peers, you will need to perform one additional step to upgrade the peer databases. The databases of all peers (which include not just the state database but the history database and other internal databases for the peer) must be rebuilt using the v2.x data format as part of the upgrade to v2.x. To trigger the rebuild, the databases must be dropped before the peer is started. The instructions below utilize the peer node upgrade-dbs command to drop the local databases managed by the peer and prepare them for upgrade, so that they can be rebuilt the first time the v2.x peer starts. If you are using CouchDB as the state database, the peer has support to automatically drop this database as of v2.2. To leverage the support, you must configure the peer with CouchDB as the state database and start CouchDB before running the upgrade-dbs command. In v2.0 and v2.1, the peer does not automatically drop the CouchDB state database; therefore you must drop it yourself.
Because rebuilding the databases can be a lengthy process (several hours, depending on the size of your databases), monitor the peer logs to check the status of the rebuild. Every 1000th block you will see a message like [lockbasedtxmgr] CommitLostBlock -> INFO 041 Recommitting block [1000] to state database indicating the rebuild is ongoing.
Follow the commands to upgrade a peer until the docker run command to launch the new peer container (you can skip the step where you set an IMAGE_TAG, since the upgrade-dbs command is for the v2.x release of Fabric only, but you will need to set the PEER_CONTAINER and LEDGERS_BACKUP environment variables). Instead of the docker run command to launch the peer, run this command instead to drop and prepare the local databases managed by the peer (substitute 2.1 for 2.0 in these commands if you are upgrading to that binary version from the 1.4.x LTS):
If the database is not dropped as part of the upgrade process, the peer start will return an error message stating that its databases are in the old format and must be dropped using the peer node upgrade-dbs command above. The node will then need to be restarted.
docker run --rm -v /opt/backup/$PEER_CONTAINER/:/var/hyperledger/production/ \
-v /opt/msp/:/etc/hyperledger/fabric/msp/ \
--env-file ./env<name of node>.list \
--name $PEER_CONTAINER \
hyperledger/fabric-peer:2.0 peer node upgrade-dbs
Capabilities
In v2.0 and v2.1, if you are using CouchDB as the state database, also drop the CouchDB database. This can be done by removing the CouchDB /data volume directory.
As can be expected for a 2.0 release, there is a full complement of new capabilities for 2.0.
Then issue this command to start the peer using the 2.0 tag:
- Application
V2_0: enables the new chaincode lifecycle as described in Chaincode for Operators.
docker run -d -v /opt/backup/$PEER_CONTAINER/:/var/hyperledger/production/ \
-v /opt/msp/:/etc/hyperledger/fabric/msp/ \
--env-file ./env<name of node>.list \
--name $PEER_CONTAINER \
hyperledger/fabric-peer:2.0 peer node start
- Channel
V2_0: this capability has no changes, but is used for consistency with the application and orderer capability levels.
The peer will rebuild the databases using the v2.x data format the first time it starts. Because rebuilding the databases can be a lengthy process (several hours, depending on the size of your databases), monitor the peer logs to check the status of the rebuild. Every 1000th block you will see a message like [lockbasedtxmgr] CommitLostBlock -> INFO 041 Recommitting block [1000] to state database indicating the rebuild is ongoing.
- Orderer
V2_0: controlsUseChannelCreationPolicyAsAdmins, changing the way that channel creation transactions are validated. When combined with the-baseProfileoption of configtxgen, values which were previously inherited from the orderer system channel may now be overridden.
If the database is not dropped as part of the upgrade process, the peer start will return an error message stating that its databases are in the old format and must be dropped using the peer node upgrade-dbs command above (or dropped manually if using CouchDB state database). The node will then need to be restarted again.
As with any update of the capability levels, make sure to upgrade your peer binaries before updating the Application and Channel capabilities, and make sure to upgrade your orderer binaries before updating the Orderer and Channel capabilities.
Capabilities
For information about how to set new capabilities, check out Updating the capability level of a channel.
The 2.0 release featured three new capabilities.
Define ordering node endpoint per org (recommend)
- Application
V2_0: enables the new chaincode lifecycle as described in Fabric chaincode lifecycle concept topic.
Starting with version v1.4.2, it was recommended to define orderer endpoints in both the system channel and in all application channels at the organization level by adding a new OrdererEndpoints stanza within the channel configuration of an organization, replacing the the global OrdererAddresses section of channel configuration. If at least one organization has an ordering service endpoint defined at an organizational level, all orderers and peers will ignore the channel level endpoints when connecting to ordering nodes.
- Channel
V2_0: this capability has no changes, but is used for consistency with the application and orderer capability levels.
Utilizing organization level orderer endpoints is required when using service discovery with ordering nodes provided by multiple organizations. This allows clients to provide the correct organization TLS certificates.
- Orderer
V2_0: controlsUseChannelCreationPolicyAsAdmins, changing the way that channel creation transactions are validated. When combined with the-baseProfileoption of configtxgen, values which were previously inherited from the orderer system channel may now be overridden.
If your channel configuration does not yet include OrdererEndpoints per org, you will need to perform a channel configuration update to add them to the config. First, create a JSON file that includes the new configuration stanza.
As with any update of the capability levels, make sure to upgrade your peer binaries before updating the Application and Channel capabilities, and make sure to upgrade your orderer binaries before updating the Orderer and Channel capabilities.
In this example, we will create a stanza for a single org called OrdererOrg. Note that if you have multiple ordering service organizations, they will all have to be updated to include endpoints. Let’s call our JSON file orglevelEndpoints.json.
For information about how to set new capabilities, check out Updating the capability level of a channel.
{
"OrdererOrgEndpoint": {
"Endpoints": {
"mod_policy": "Admins",
"value": {
"addresses": [
"127.0.0.1:30000"
]
}
}
}
}
Define ordering node endpoint per org (recommend)
Then, export the following environment variables:
Starting with version v1.4.2, it was recommended to define orderer endpoints in both the system channel and in all application channels at the organization level by adding a new OrdererEndpoints stanza within the channel configuration of an organization, replacing the global OrdererAddresses section of channel configuration. If at least one organization has an ordering service endpoint defined at an organizational level, all orderers and peers will ignore the channel level endpoints when connecting to ordering nodes.
CH_NAME: the name of the channel being updated. Note that all system channels and application channels should contain organization endpoints for ordering nodes.CORE_PEER_LOCALMSPID: the MSP ID of the organization proposing the channel update. This will be the MSP of one of the orderer organizations.CORE_PEER_MSPCONFIGPATH: the absolute path to the MSP representing your organization.TLS_ROOT_CA: the absolute path to the root CA certificate of the organization proposing the system channel update.ORDERER_CONTAINER: the name of an ordering node container. When targeting the ordering service, you can target any particular node in the ordering service. Your requests will be forwarded to the leader automatically.ORGNAME: The name of the organization you are currently updating. For example,OrdererOrg.
Utilizing organization level orderer endpoints is required when using service discovery with ordering nodes provided by multiple organizations. This allows clients to provide the correct organization TLS certificates.
Once you have set the environment variables, navigate to Step 1: Pull and translate the config.
If your channel configuration does not yet include OrdererEndpoints per org, you will need to perform a channel configuration update to add them to the config. First, create a JSON file that includes the new configuration stanza.
Once you have a modified_config.json, add the lifecycle organization policy (as listed in orglevelEndpoints.json) using this command:
In this example, we will create a stanza for a single org called OrdererOrg. Note that if you have multiple ordering service organizations, they will all have to be updated to include endpoints. Let’s call our JSON file orglevelEndpoints.json.
jq -s ".[0] * {\"channel_group\":{\"groups\":{\"Orderer\": {\"groups\": {\"$ORGNAME\": {\"values\": .[1].${ORGNAME}Endpoint}}}}}}" config.json ./orglevelEndpoints.json > modified_config.json
{
"OrdererOrgEndpoint": {
"Endpoints": {
"mod_policy": "Admins",
"value": {
"addresses": [
"127.0.0.1:30000"
]
}
}
}
}
Then, follow the steps at Step 3: Re-encode and submit the config.
Then, export the following environment variables:
If every ordering service organization performs their own channel edit, they can edit the configuration without needing further signatures (by default, the only signature needed to edit parameters within an organization is an admin of that organization). If a different organization proposes the update, then the organization being edited will need to sign the channel update request.
CH_NAME: the name of the channel being updated. Note that all system channels and application channels should contain organization endpoints for ordering nodes.CORE_PEER_LOCALMSPID: the MSP ID of the organization proposing the channel update. This will be the MSP of one of the orderer organizations.CORE_PEER_MSPCONFIGPATH: the absolute path to the MSP representing your organization.TLS_ROOT_CA: the absolute path to the root CA certificate of the organization proposing the system channel update.ORDERER_CONTAINER: the name of an ordering node container. When targeting the ordering service, you can target any particular node in the ordering service. Your requests will be forwarded to the leader automatically.ORGNAME: The name of the organization you are currently updating. For example,OrdererOrg.
Once you have set the environment variables, navigate to Step 1: Pull and translate the config.
Then, add the lifecycle organization policy (as listed in orglevelEndpoints.json) to a file called modified_config.json using this command:
jq -s ".[0] * {\"channel_group\":{\"groups\":{\"Orderer\": {\"groups\": {\"$ORGNAME\": {\"values\": .[1].${ORGNAME}Endpoint}}}}}}" config.json ./orglevelEndpoints.json > modified_config.json
Then, follow the steps at Step 3: Re-encode and submit the config.
If every ordering service organization performs their own channel edit, they can edit the configuration without needing further signatures (by default, the only signature needed to edit parameters within an organization is an admin of that organization). If a different organization proposes the update, then the organization being edited will need to sign the channel update request.
Upgrading your components
Audience: network administrators, node administrators
For information about special considerations for the latest release of Fabric, check out Upgrading to the latest release of Fabric.
This topic will only cover the process for upgrading components. For information about how to edit a channel to change the capability level of your channels, check out Updating a channel capability.
Note: when we use the term “upgrade” in Hyperledger Fabric, we’re referring to changing the version of a component (for example, going from one version of a binary to the next version). The term “update,” on the other hand, refers not to versions but to configuration changes, such as updating a channel configuration or a deployment script. As there is no data migration, technically speaking, in Fabric, we will not use the term “migration” or “migrate” here.
Overview
At a high level, upgrading the binary level of your nodes is a two step process:
- Backup the ledger and MSPs.
- Upgrade binaries to the latest version.
If you own both ordering nodes and peers, it is a best practice to upgrade the ordering nodes first. If a peer falls behind or is temporarily unable to process certain transactions, it can always catch up. If enough ordering nodes go down, by comparison, a network can effectively cease to function.
This topic presumes that these steps will be performed using Docker CLI commands. If you are utilizing a different deployment method (Rancher, Kubernetes, OpenShift, etc) consult their documentation on how to use their CLI.
For native deployments, note that you will also need to update the YAML configuration file for the nodes (for example, the orderer.yaml file) with the one from the release artifacts.
To do this, backup the orderer.yaml or core.yaml file (for the peer) and replace it with the orderer.yaml or core.yaml file from the release artifacts. Then port any modified variables from the backed up orderer.yaml or core.yaml to the new one. Using a utility like diff may be helpful. Note that updating the YAML file from the release rather than updating your old YAML file is the recommended way to update your node YAML files, as it reduces the likelihood of making errors.
This tutorial assumes a Docker deployment where the YAML files will be baked into the images and environment variables will be used to overwrite the defaults in the configuration files.
Environment variables for the binaries
When you deploy a peer or an ordering node, you had to set a number of environment variables relevant to its configuration. A best practice is to create a file for these environment variables, give it a name relevant to the node being deployed, and save it somewhere on your local file system. That way you can be sure that when upgrading the peer or ordering node you are using the same variables you set when creating it.
Here’s a list of some of the peer environment variables (with sample values — as you can see from the addresses, these environment variables are for a network deployed locally) that can be set that be listed in the file. Note that you may or may not need to set all of these environment variables:
CORE_PEER_TLS_ENABLED=true
CORE_PEER_GOSSIP_USELEADERELECTION=true
CORE_PEER_GOSSIP_ORGLEADER=false
CORE_PEER_PROFILE_ENABLED=true
CORE_PEER_TLS_CERT_FILE=/etc/hyperledger/fabric/tls/server.crt
CORE_PEER_TLS_KEY_FILE=/etc/hyperledger/fabric/tls/server.key
CORE_PEER_TLS_ROOTCERT_FILE=/etc/hyperledger/fabric/tls/ca.crt
CORE_PEER_ID=peer0.org1.example.com
CORE_PEER_ADDRESS=peer0.org1.example.com:7051
CORE_PEER_LISTENADDRESS=0.0.0.0:7051
CORE_PEER_CHAINCODEADDRESS=peer0.org1.example.com:7052
CORE_PEER_CHAINCODELISTENADDRESS=0.0.0.0:7052
CORE_PEER_GOSSIP_BOOTSTRAP=peer0.org1.example.com:7051
CORE_PEER_GOSSIP_EXTERNALENDPOINT=peer0.org1.example.com:7051
CORE_PEER_LOCALMSPID=Org1MSP
Here are some ordering node variables (again, these are sample values) that might be listed in the environment variable file for a node. Again, you may or may not need to set all of these environment variables:
ORDERER_GENERAL_LISTENADDRESS=0.0.0.0
ORDERER_GENERAL_GENESISMETHOD=file
ORDERER_GENERAL_GENESISFILE=/var/hyperledger/orderer/orderer.genesis.block
ORDERER_GENERAL_LOCALMSPID=OrdererMSP
ORDERER_GENERAL_LOCALMSPDIR=/var/hyperledger/orderer/msp
ORDERER_GENERAL_TLS_ENABLED=true
ORDERER_GENERAL_TLS_PRIVATEKEY=/var/hyperledger/orderer/tls/server.key
ORDERER_GENERAL_TLS_CERTIFICATE=/var/hyperledger/orderer/tls/server.crt
ORDERER_GENERAL_TLS_ROOTCAS=[/var/hyperledger/orderer/tls/ca.crt]
ORDERER_GENERAL_CLUSTER_CLIENTCERTIFICATE=/var/hyperledger/orderer/tls/server.crt
ORDERER_GENERAL_CLUSTER_CLIENTPRIVATEKEY=/var/hyperledger/orderer/tls/server.key
ORDERER_GENERAL_CLUSTER_ROOTCAS=[/var/hyperledger/orderer/tls/ca.crt]
However you choose to set your environment variables, note that they will have to be set for each node you want to upgrade.
Ledger backup and restore
While we will demonstrate the process for backing up ledger data in this tutorial, it is not strictly required to backup the ledger data of a peer or an ordering node (assuming the node is part of a larger group of nodes in an ordering service). This is because, even in the worst case of catastrophic failure of a peer (such as a disk failure), the peer can be brought up with no ledger at all. You can then have the peer re-join the desired channels and as a result, the peer will automatically create a ledger for each of the channels and will start receiving the blocks via regular block transfer mechanism from either the ordering service or the other peers in the channel. As the peer processes blocks, it will also build up its state database.
However, backing up ledger data enables the restoration of a peer without the time and computational costs associated with bootstrapping from the genesis block and reprocessing all transactions, a process that can take hours (depending on the size of the ledger). In addition, ledger data backups may help to expedite the addition of a new peer, which can be achieved by backing up the ledger data from one peer and starting the new peer with the backed up ledger data.
This tutorial presumes that the file path to the ledger data has not been changed from the default value of /var/hyperledger/production/ (for peers) or /var/hyperledger/production/orderer (for ordering nodes). If this location has been changed for your nodes, enter the path to the data on your ledgers in the commands below.
Note that there will be data for both the ledger and chaincodes at this file location. While it is a best practice to backup both, it is possible to skip the stateLeveldb, historyLeveldb, chains/index folders at /var/hyperledger/production/ledgersData. While skipping these folders reduces the storage needed for the backup, the peer recovery from the backed up data may take more time as these ledger artifacts will be re-constructed when the peer starts.
If using CouchDB as state database, there will be no stateLeveldb directory, as the state database data would be stored within CouchDB instead. But similarly, if peer starts up and finds CouchDB databases are missing or at lower block height (based on using an older CouchDB backup), the state database will be automatically re-constructed to catch up to current block height. Therefore, if you backup peer ledger data and CouchDB data separately, ensure that the CouchDB backup is always older than the peer backup.
Upgrade ordering nodes
Orderer containers should be upgraded in a rolling fashion (one at a time). At a high level, the ordering node upgrade process goes as follows:
- Stop the ordering node.
- Back up the ordering node’s ledger and MSP.
- Remove the ordering node container.
- Launch a new ordering node container using the relevant image tag.
Repeat this process for each node in your ordering service until the entire ordering service has been upgraded.
Set command environment variables
Export the following environment variables before attempting to upgrade your ordering nodes.
ORDERER_CONTAINER: the name of your ordering node container. Note that you will need to export this variable for each node when upgrading it.LEDGERS_BACKUP: the place in your local filesystem where you want to store the ledger being backed up. As you will see below, each node being backed up will have its own subfolder containing its ledger. You will need to create this folder.IMAGE_TAG: the Fabric version you are upgrading to. For example,2.0.
Note that you will have to set an image tag to ensure that the node you are starting using the correct images. The process you use to set the tag will depend on your deployment method.
Upgrade containers
Let’s begin the upgrade process by bringing down the orderer:
docker stop $ORDERER_CONTAINER
Once the orderer is down, you’ll want to backup its ledger and MSP:
docker cp $ORDERER_CONTAINER:/var/hyperledger/production/orderer/ ./$LEDGERS_BACKUP/$ORDERER_CONTAINER
Then remove the ordering node container itself (since we will be giving our new container the same name as our old one):
docker rm -f $ORDERER_CONTAINER
Then you can launch the new ordering node container by issuing:
docker run -d -v /opt/backup/$ORDERER_CONTAINER/:/var/hyperledger/production/orderer/ \
-v /opt/msp/:/etc/hyperledger/fabric/msp/ \
--env-file ./env<name of node>.list \
--name $ORDERER_CONTAINER \
hyperledger/fabric-orderer:$IMAGE_TAG orderer
Once all of the ordering nodes have come up, you can move on to upgrading your peers.
Upgrade the peers
Peers should, like the ordering nodes, be upgraded in a rolling fashion (one at a time). As mentioned during the ordering node upgrade, ordering nodes and peers may be upgraded in parallel, but for the purposes of this tutorial we’ve separated the processes out. At a high level, we will perform the following steps:
- Stop the peer.
- Back up the peer’s ledger and MSP.
- Remove chaincode containers and images.
- Remove the peer container.
- Launch a new peer container using the relevant image tag.
Set command environment variables
Export the following environment variables before attempting to upgrade your peers.
PEER_CONTAINER: the name of your peer container. Note that you will need to set this variable for each node.LEDGERS_BACKUP: the place in your local filesystem where you want to store the ledger being backed up. As you will see below, each node being backed up will have its own subfolder containing its ledger. You will need to create this folder.IMAGE_TAG: the Fabric version you are upgrading to. For example,2.0.
Note that you will have to set an image tag to ensure that the node you are starting is using the correct images. The process you use to set the tag will depend on your deployment method.
Repeat this process for each of your peers until every node has been upgraded.
Upgrade containers
Let’s bring down the first peer with the following command:
docker stop $PEER_CONTAINER
We can then backup the peer’s ledger and MSP:
docker cp $PEER_CONTAINER:/var/hyperledger/production ./$LEDGERS_BACKUP/$PEER_CONTAINER
With the peer stopped and the ledger backed up, remove the peer chaincode containers:
CC_CONTAINERS=$(docker ps | grep dev-$PEER_CONTAINER | awk '{print $1}')
if [ -n "$CC_CONTAINERS" ] ; then docker rm -f $CC_CONTAINERS ; fi
And the peer chaincode images:
CC_IMAGES=$(docker images | grep dev-$PEER | awk '{print $1}')
if [ -n "$CC_IMAGES" ] ; then docker rmi -f $CC_IMAGES ; fi
Then remove the peer container itself (since we will be giving our new container the same name as our old one):
docker rm -f $PEER_CONTAINER
Then you can launch the new peer container by issuing:
docker run -d -v /opt/backup/$PEER_CONTAINER/:/var/hyperledger/production/ \
-v /opt/msp/:/etc/hyperledger/fabric/msp/ \
--env-file ./env<name of node>.list \
--name $PEER_CONTAINER \
hyperledger/fabric-peer:$IMAGE_TAG peer node start
You do not need to relaunch the chaincode container. When the peer gets a request for a chaincode, (invoke or query), it first checks if it has a copy of that chaincode running. If so, it uses it. Otherwise, as in this case, the peer launches the chaincode (rebuilding the image if required).
Verify peer upgrade completion
It’s a best practice to ensure the upgrade has been completed properly with a chaincode invoke. Note that it should be possible to verify that a single peer has been successfully updated by querying one of the ledgers hosted on the peer. If you want to verify that multiple peers have been upgraded, and are updating your chaincode as part of the upgrade process, you should wait until peers from enough organizations to satisfy the endorsement policy have been upgraded.
Before you attempt this, you may want to upgrade peers from enough organizations to satisfy your endorsement policy. However, this is only mandatory if you are updating your chaincode as part of the upgrade process. If you are not updating your chaincode as part of the upgrade process, it is possible to get endorsements from peers running at different Fabric versions.
Upgrade your CAs
To learn how to upgrade your Fabric CA server, click over to the CA documentation.
Upgrade Node SDK clients
Upgrade Fabric and Fabric CA before upgrading Node SDK clients. Fabric and Fabric CA are tested for backwards compatibility with older SDK clients. While newer SDK clients often work with older Fabric and Fabric CA releases, they may expose features that are not yet available in the older Fabric and Fabric CA releases, and are not tested for full compatibility.
Use NPM to upgrade any Node.js client by executing these commands in the root directory of your application:
npm install fabric-client@latest
npm install fabric-ca-client@latest
These commands install the new version of both the Fabric client and Fabric-CA client and write the new versions to package.json.
Upgrading CouchDB
If you are using CouchDB as state database, you should upgrade the peer’s CouchDB at the same time the peer is being upgraded.
To upgrade CouchDB:
- Stop CouchDB.
- Backup CouchDB data directory.
- Install the latest CouchDB binaries or update deployment scripts to use a new Docker image.
- Restart CouchDB.
Upgrade Node chaincode shim
To move to the new version of the Node chaincode shim a developer would need to:
- Change the level of
fabric-shimin their chaincodepackage.jsonfrom their old level to the new one. - Repackage this new chaincode package and install it on all the endorsing peers in the channel.
- Perform an upgrade to this new chaincode. To see how to do this, check out Peer chaincode commands.
Upgrade Chaincodes with vendored shim
For information about upgrading the Go chaincode shim specific to the v2.0 release, check out Chaincode shim changes.
A number of third party tools exist that will allow you to vendor a chaincode shim. If you used one of these tools, use the same one to update your vendored chaincode shim and re-package your chaincode.
If your chaincode vendors the shim, after updating the shim version, you must install it to all peers which already have the chaincode. Install it with the same name, but a newer version. Then you should execute a chaincode upgrade on each channel where this chaincode has been deployed to move to the new version.
Updating the capability level of a channel
Audience: network administrators, node administrators
If you’re not familiar with capabilities, check out Capabilities before proceeding, paying particular attention to the fact that peers and orderers that belong to the channel must be upgraded before enabling capabilities.
For information about any new capability levels in the latest release of Fabric, check out Upgrading your components.
Note: when we use the term “upgrade” in Hyperledger Fabric, we’re referring to changing the version of a component (for example, going from one version of a binary to the next version). The term “update,” on the other hand, refers not to versions but to configuration changes, such as updating a channel configuration or a deployment script. As there is no data migration, technically speaking, in Fabric, we will not use the term “migration” or “migrate” here.
Prerequisites and considerations
If you haven’t already done so, ensure you have all of the dependencies on your machine as described in Prerequisites. This will ensure that you have the latest versions of the tools required to make a channel configuration update.
Although Fabric binaries can and should be upgraded in a rolling fashion, it is important to finish upgrading binaries before enabling capabilities. Any binaries which are not upgraded to at least the level of the relevant capabilities will crash to indicate a misconfiguration which could otherwise result in a ledger fork.
Once a capability has been enabled, it becomes part of the permanent record for that channel. This means that even after disabling the capability, old binaries will not be able to participate in the channel because they cannot process beyond the block which enabled the capability to get to the block which disables it. As a result, once a capability has been enabled, disabling it is neither recommended nor supported.
For this reason, think of enabling channel capabilities as a point of no return. Please experiment with the new capabilities in a test setting and be confident before proceeding to enable them in production.
Overview
In this tutorial, we will show the process for updating capabilities in all of the parts of the configuration of both the ordering system channel and any application channels.
Whether you will need to update every part of the configuration for all of your channels will depend on the contents of the latest release as well as your own use case. For more information, check out Upgrading to the latest version of Fabric. Note that it may be necessary to update to the newest capability levels before using the features in the latest release, and it is considered a best practice to always be at the latest binary versions and capability levels.
Because updating the capability level of a channel involves the configuration update transaction process, we will be relying on our Updating a channel configuration topic for many of the commands.
As with any channel configuration update, updating capabilities is, at a high level, a three step process (for each channel):
- Get the latest channel config
- Create a modified channel config
- Create a config update transaction
We will enable these capabilities in the following order:
- Orderer group
- Channel group
- Orderer group
- Channel group
- Application group
While it is possible to edit multiple parts of the configuration of a channel at the same time, in this tutorial we will show how this process is done incrementally. In other words, we will not bundle a change to the Orderer group and the Channel group of the system channel into one configuration change. This is because not every release will have both a new Orderer group capability and a Channel group capability.
Note that in production networks, it will not be possible or desirable for one user to be able to update all of these channels (and parts of configurations) unilaterally. The orderer system channel, for example, is administered exclusively by ordering organization admins (though it is possible to add peer organizations as ordering service organizations). Similarly, updating either the Orderer or Channel groups of a channel configuration requires the signature of an ordering service organization in addition to peer organizations. Distributed systems require collaborative management.
Create a capabilities config file
Note that this tutorial presumes that a file called capabilities.json has been created and includes the capability updates you want to make to the various sections of the config. It also uses jq to apply the edits to the modified config file.
Note that you are not obligated to create a file like capabilities.json or to use a tool like jq. The modified config can also be edited manually (after it has been pulled, translated, and scoped). Check out this sample channel configuration for reference.
However, the process described here (using a JSON file and a tool like jq) does have the advantage of being scriptable, making it suitable for proposing configuration updates to a large number of channels. This is why it is the recommended way to update channels.
In this example, the capabilities.json file looks like this (note: if you are updating your channel as part of Upgrading to the latest version of Fabric you will need to set the capabilities to the levels appropriate to that release):
{
"channel": {
"mod_policy": "Admins",
"value": {
"capabilities": {
"V2_0": {}
}
},
"version": "0"
},
"orderer": {
"mod_policy": "Admins",
"value": {
"capabilities": {
"V2_0": {}
}
},
"version": "0"
},
"application": {
"mod_policy": "Admins",
"value": {
"capabilities": {
"V2_0": {}
}
},
"version": "0"
}
}
Note that by default peer organizations are not admins of the orderer system channel and will therefore be unable to propose configuration updates to it. An orderer organization admin would have to create a file like this (without the application group capability, which does not exist in the system channel) to propose updating the system channel configuration. Note that because application channel copy the system channel configuration by default, unless a different channel profile is created which specifies capability levels, the Channel and Orderer group capabilities for the application channel will be the same as those in the network’s system channel.
Orderer system channel capabilities
Because application channels copy the configuration of the orderer system channel by default, it is considered a best practice to update the capabilities of the system channel before any application channels. This mirrors the process of updating ordering nodes to the newest version before peers, as described in Upgrading your components.
Note that the orderer system channel is administered by ordering service organizations. By default this will be a single organization (the organization that created the initial nodes in the ordering service), but more organizations can be added here (for example, if multiple organizations have contributed nodes to the ordering service).
Make sure all of the ordering nodes in your ordering service have been upgraded to the required binary level before updating the Orderer and Channel capability. If an ordering node is not at the required level, it will be unable to process the config block with the capability and will crash. Similarly, note that if a new channel is created on this ordering service, all of the peers that will be joined to it must be at least to the node level corresponding to the Channel and Application capabilities, otherwise they will also crash when attempting to process the config block. For more information, check out Capabilities.
Set environment variables
You will need to export the following variables:
CH_NAME: the name of the system channel being updated.CORE_PEER_LOCALMSPID: the MSP ID of the organization proposing the channel update. This will be the MSP of one of the orderer organizations.TLS_ROOT_CA: the absolute path to the TLS cert of your ordering node(s).CORE_PEER_MSPCONFIGPATH: the absolute path to the MSP representing your organization.ORDERER_CONTAINER: the name of an ordering node container. When targeting the ordering service, you can target any particular node in the ordering service. Your requests will be forwarded to the leader automatically.
Orderer group
For the commands on how to pull, translate, and scope the channel config, navigate to Step 1: Pull and translate the config. Once you have a modified_config.json, add the capabilities to the Orderer group of the config (as listed in capabilities.json) using this command:
jq -s '.[0] * {"channel_group":{"groups":{"Orderer": {"values": {"Capabilities": .[1].orderer}}}}}' config.json ./capabilities.json > modified_config.json
Then, follow the steps at Step 3: Re-encode and submit the config.
Note that because you are updating the system channel, the mod_policy for the system channel will only require the signature of ordering service organization admins.
Channel group
Once again, navigate to Step 1: Pull and translate the config. Once you have a modified_config.json, add the capabilities to the Channel group of the config (as listed in capabilities.json) using this command:
jq -s '.[0] * {"channel_group":{"values": {"Capabilities": .[1].channel}}}' config.json ./capabilities.json > modified_config.json
Then, follow the steps at Step 3: Re-encode and submit the config.
Note that because you are updating the system channel, the mod_policy for the system channel will only require the signature of ordering service organization admins. In an application channel, as you’ll see, you would normally need to satisfy both the MAJORITY Admins policy of both the Application group (consisting of the MSPs of peer organizations) and the Orderer group (consisting of ordering service organizations), assuming you have not changed the default values.
Enable capabilities on existing channels
Now that we have updating the capabilities on the orderer system channel, we need to updating the configuration of any existing application channels you want to update.
As you will see, the configuration of application channels is very similar to that of the system channel. This is what allows us to re-use capabilities.json and the same commands we used for updating the system channel (using different environment variables which we will discuss below).
Make sure all of the ordering nodes in your ordering service and peers on the channel have been upgraded to the required binary level before updating capabilities. If a peer or an ordering node is not at the required level, it will be unable to process the config block with the capability and will crash. For more information, check out Capabilities.
Set environment variables
You will need to export the following variables:
CH_NAME: the name of the application channel being updated. You will have to reset this variable for every channel you update.CORE_PEER_LOCALMSPID: the MSP ID of the organization proposing the channel update. This will be the MSP of your peer organization.TLS_ROOT_CA: the absolute path to the TLS cert of your peer organization.CORE_PEER_MSPCONFIGPATH: the absolute path to the MSP representing your organization.ORDERER_CONTAINER: the name of an ordering node container. When targeting the ordering service, you can target any particular node in the ordering service. Your requests will be forwarded to the leader automatically.
Orderer group
Navigate to Step 1: Pull and translate the config. Once you have a modified_config.json, add the capabilities to the Orderer group of the config (as listed in capabilities.json) using this command:
jq -s '.[0] * {"channel_group":{"groups":{"Orderer": {"values": {"Capabilities": .[1].orderer}}}}}' config.json ./capabilities.json > modified_config.json
Then, follow the steps at Step 3: Re-encode and submit the config.
Note the mod_policy for this capability defaults to the MAJORITY of the Admins of the Orderer group (in other words, a majority of the admins of the ordering service). Peer organizations can propose an update to this capability, but their signatures will not satisfy the relevant policy in this case.
Channel group
Navigate to Step 1: Pull and translate the config. Once you have a modified_config.json, add the capabilities to the Channel group of the config (as listed in capabilities.json) using this command:
jq -s '.[0] * {"channel_group":{"values": {"Capabilities": .[1].channel}}}' config.json ./capabilities.json > modified_config.json
Then, follow the steps at Step 3: Re-encode and submit the config.
Note that the mod_policy for this capability defaults to requiring signatures from both the MAJORITY of Admins in the Application and Orderer groups. In other words, both a majority of the peer organization admins and ordering service organization admins must sign this request.
Application group
Navigate to Step 1: Pull and translate the config. Once you have a modified_config.json, add the capabilities to the Application group of the config (as listed in capabilities.json) using this command:
jq -s '.[0] * {"channel_group":{"groups":{"Application": {"values": {"Capabilities": .[1].application}}}}}' config.json ./capabilities.json > modified_config.json
Then, follow the steps at Step 3: Re-encode and submit the config.
Note that the mod_policy for this capability defaults to requiring signatures from the MAJORITY of Admins in the Application group. In other words, a majority of peer organizations will need to approve. Ordering service admins have no say in this capability.
As a result, be very careful to not change this capability to a level that does not exist. Because ordering nodes neither understand nor validate Application capabilities, they will approve a configuration to any level and send the new config block to the peers to be committed to their ledgers. However, the peers will be unable to process the capability and will crash. And even it was possible to drive a corrected configuration change to a valid capability level, the previous config block with the faulty capability would still exist on the ledger and cause peers to crash when trying to process it.
This is one reason why a file like capabilities.json can be useful. It prevents a simple user error — for example, setting the Application capability to V20 when the intent was to set it to V2_0 — that can cause a channel to be unusable and unrecoverable.
Verify a transaction after capabilities have been enabled
It’s a best practice to ensure that capabilities have been enabled successfully with a chaincode invoke on all channels. If any nodes that do not understand new capabilities have not been upgraded to a sufficient binary level, they will crash. You will have to upgrade their binary level before they can be successfully restarted.
启用新的链码生命周期
Enabling the new chaincode lifecycle
从1.4升级到2.0的用户将需要修改通道配置以启用新的生命周期特性。这个过程涉及到一系列相关用户必须要执行的通道配置更新。
Users upgrading from v1.4.x to v2.x will have to edit their channel configurations to enable the new lifecycle features. This process involves a series of channel configuration updates the relevant users will have to perform.
需要注意的是,你的应用通道的 Channel 和 Application 能力(capabilities) 需要更新到 V2_0,以确保新的链码生命周期正常工作。 更多详情请参考 获取2.0的注意事项。
Note that the Channel and Application capabilities of your application channels will have to be updated to V2_0 for the new chaincode lifecycle to work. Check out Considerations for getting to 2.0 for more information.
整体来看,每一个通道配置升级需要执行三个步骤:
Updating a channel configuration is, at a high level, a three step process (for each channel):
- 获取最新的通道配置
- 创建一个修改后的通道配置
- 创建一个配置更新交易
- Get the latest channel config
- Create a modified channel config
- Create a config update transaction
我们将借助文件 enable_lifecycle.json 来执行这些通道配置更新, 这个文件包含了我们需要做的所有通道配置更新。需要注意的是,在生产配置中很可能多个用户都会发出这些通道更新请求。但是,为了简单起见,我们将在一个文件中表示所有用户的更新。
We will be performing these channel configuration updates by leveraging a file called enable_lifecycle.json, which contains all of the updates we will be making in the channel configurations. Note that in a production setting it is likely that multiple users would be making these channel update requests. However, for the sake of simplicity, we are presenting all of the updates as how they would appear in a single file.
创建 enable_lifecycle.json
Create enable_lifecycle.json
注意,除了 enable_lifecycle.json, 还需要使用 jq 对修改后的配置文件进行编辑。修改后的配置文件也可以手动修改(在文件被拉取、翻译和检查后)。详情请参考通道配置示例。
Note that in addition to using enable_lifecycle.json, this tutorial also uses jq to apply the edits to the modified config file. The modified config can also be edited manually (after it has been pulled, translated, and scoped). Check out this sample channel configuration for reference.
但是,这里描述的过程(使用一个 JSON 文件和一个像 jq 这样的工具)确实具备可编写脚本的优势,适合提交大批量的通道配置更新,也是编辑一个通道配置的推荐过程。
However, the process described here (using a JSON file and a tool like jq) does have the advantage of being scriptable, making it suitable for proposing configuration updates to a large number of channels, and is the recommended process for editing a channel configuration.
需要注意的是 enable_lifecycle.json 使用的是示例值,比如说 org1Policies 和 Org1ExampleCom, 当你部署时需将值特殊处理:
Note that the enable_lifecycle.json uses sample values, for example org1Policies and the Org1ExampleCom, which will be specific to your deployment):
{
"org1Policies": {
"Endorsement": {
"mod_policy": "Admins",
"policy": {
"type": 1,
"value": {
"identities": [
{
"principal": {
"msp_identifier": "Org1ExampleCom",
"role": "PEER"
},
"principal_classification": "ROLE"
}
],
"rule": {
"n_out_of": {
"n": 1,
"rules": [
{
"signed_by": 0
}
]
}
},
"version": 0
}
},
"version": "0"
}
},
"org2Policies": {
"Endorsement": {
"mod_policy": "Admins",
"policy": {
"type": 1,
"value": {
"identities": [
{
"principal": {
"msp_identifier": "Org2ExampleCom",
"role": "PEER"
},
"principal_classification": "ROLE"
}
],
"rule": {
"n_out_of": {
"n": 1,
"rules": [
{
"signed_by": 0
}
]
}
},
"version": 0
}
},
"version": "0"
}
},
"appPolicies": {
"Endorsement": {
"mod_policy": "Admins",
"policy": {
"type": 3,
"value": {
"rule": "MAJORITY",
"sub_policy": "Endorsement"
}
},
"version": "0"
},
"LifecycleEndorsement": {
"mod_policy": "Admins",
"policy": {
"type": 3,
"value": {
"rule": "MAJORITY",
"sub_policy": "Endorsement"
}
},
"version": "0"
}
},
"acls": {
"_lifecycle/CheckCommitReadiness": {
"policy_ref": "/Channel/Application/Writers"
},
"_lifecycle/CommitChaincodeDefinition": {
"policy_ref": "/Channel/Application/Writers"
},
"_lifecycle/QueryChaincodeDefinition": {
"policy_ref": "/Channel/Application/Readers"
},
"_lifecycle/QueryChaincodeDefinitions": {
"policy_ref": "/Channel/Application/Readers"
}
}
}
注意:如果这个组织启用了 NodeOUs 并且不属于 'MEMBER' 的话,这些新策略中的 “role” 字段应该设置成 'PEER' 。
Note: the “role” field of these new policies should say 'PEER' if NodeOUs are enabled for the org, and 'MEMBER' if they are not.
编辑通道配置
Edit the channel configurations
系统通道更新
System channel updates
因为使用新生命周期的系统通道配置修改,仅会涉及到系统通道配置内的节点组织配置参数,所以被编辑的每个节点组织都需要对相关的通道配置进行签名更新。
Because configuration changes to the system channel to enable the new lifecycle only involve parameters inside the configuration of the peer organizations within the channel configuration, each peer organization being edited will have to sign the relevant channel configuration update.
然而, 在默认情况下, 系统通道只能被系统管理员编辑(通常这些人是排序服务组织的管理员,而不是节点组织的管理员), 也就是说联盟中的节点组织的配置更新只能由系统通道的管理员提议和发送到相关节点组织进行签名。
However, by default, the system channel can only be edited by system channel admins (typically these are admins of the ordering service organizations and not peer organizations), which means that the configuration updates to the peer organizations in the consortium will have to be proposed by a system channel admin and sent to the relevant peer organization to be signed.
你需要导出以下变量:
You will need to export the following variables:
CH_NAME: 将要被更新的系统通道名称。CORE_PEER_LOCALMSPID: 提交的通道更新组织的 MSP ID。这是排序服务组织中一员的MSP。CORE_PEER_MSPCONFIGPATH: 代表组织 MSP 的绝对路径。TLS_ROOT_CA: 提交的系统通道更新的组织的根 CA 证书的绝对路径。ORDERER_CONTAINER: 一个排序节点容器的名称。当定位排序服务时,你可以在排序服务中定位任意一个特定节点。而你的请求会被自动推送至领导者节点。ORGNAME: 你正在更新的组织名称。CONSORTIUM_NAME: 被更新联盟的名称。
环境变量设置完毕后,导航至 步骤 1:拉取和翻译配置。
CH_NAME: the name of the system channel being updated.CORE_PEER_LOCALMSPID: the MSP ID of the organization proposing the channel update. This will be the MSP of one of the ordering service organizations.CORE_PEER_MSPCONFIGPATH: the absolute path to the MSP representing your organization.TLS_ROOT_CA: the absolute path to the root CA certificate of the organization proposing the system channel update.ORDERER_CONTAINER: the name of an ordering node container. When targeting the ordering service, you can target any particular node in the ordering service. Your requests will be forwarded to the leader automatically.ORGNAME: the name of the organization you are currently updating.CONSORTIUM_NAME: the name of the consortium being updated.
modified_config.json 设置完毕后,使用以下命令添加生命周期组织策略(如 enable_lifecycle.json 文件中所展示的):
jq -s ".[0] * {\"channel_group\":{\"groups\":{\"Consortiums\":{\"groups\": {\"$CONSORTIUM_NAME\": {\"groups\": {\"$ORGNAME\": {\"policies\": .[1].${ORGNAME}Policies}}}}}}}}" config.json ./enable_lifecycle.json > modified_config.json
Once you have set the environment variables, navigate to Step 1: Pull and translate the config.
紧接着, 按照步骤[步骤 3:重编码和提交配置]进行操作(./config_update.html#step-3-re-encode-and-submit-the-config)。
Then, add the lifecycle organization policy (as listed in enable_lifecycle.json) to a file called modified_config.json using this command:
综上所述, 这些变更需要由系统通道管理员提议并发送到相关节点组织进行签名。
jq -s ".[0] * {\"channel_group\":{\"groups\":{\"Consortiums\":{\"groups\": {\"$CONSORTIUM_NAME\": {\"groups\": {\"$ORGNAME\": {\"policies\": .[1].${ORGNAME}Policies}}}}}}}}" config.json ./enable_lifecycle.json > modified_config.json
应用通道更新
Then, follow the steps at Step 3: Re-encode and submit the config.
编辑节点组织
As stated above, these changes will have to be proposed by a system channel admin and sent to the relevant peer organization for signature.
我们需要针对所有应用通道上的组织,执行一系列类似的编辑。
Application channel updates
需要说明的是,不像系统通道,节点组织能够针对应用通道进行配置更新生成请求。如果你是针对你自己的组织进行配置变更,将不需要其他企业组织的签名确认。 但是,如果你要对其他组织进行配置变更,则那个组织将需要批准这次变更。
Edit the peer organizations
你需要导出以下变量:
We need to perform a similar set of edits to all of the organizations on all application channels.
CH_NAME: 被更新的应用通道名称。ORGNAME: 你正在更新的组织名称。TLS_ROOT_CA: 排序节点TLS证书的绝对路径。CORE_PEER_MSPCONFIGPATH: 代表组织的MSP的绝对路径。CORE_PEER_LOCALMSPID: 提交的通道更新组织的MSP ID。这是节点服务组织中一员的MSP。ORDERER_CONTAINER: 一个排序节点容器的名称。当定位排序服务时,你可以在排序服务中定位任意一个特定节点。你的请求将会被自动推送至领导者。
环境变量设置完毕后,导航至 步骤 1:拉取和翻译配置。
Note that unlike the system channel, peer organizations are able to make configuration update requests to application channels. If you are making a configuration change to your own organization, you will be able to make these changes without needing the signature of other organizations. However, if you are attempting to make a change to a different organization, that organization will have to approve the change.
modified_config.json 设置完毕后, 添加生命周期组织策略(比如 enable_lifecycle.json 文件中所展示的)使用以下命令:
You will need to export the following variables:
jq -s ".[0] * {\"channel_group\":{\"groups\":{\"Application\": {\"groups\": {\"$ORGNAME\": {\"policies\": .[1].${ORGNAME}Policies}}}}}}" config.json ./enable_lifecycle.json > modified_config.json
CH_NAME: the name of the application channel being updated.ORGNAME: The name of the organization you are currently updating.TLS_ROOT_CA: the absolute path to the TLS cert of your ordering node.CORE_PEER_MSPCONFIGPATH: the absolute path to the MSP representing your organization.CORE_PEER_LOCALMSPID: the MSP ID of the organization proposing the channel update. This will be the MSP of one of the peer organizations.ORDERER_CONTAINER: the name of an ordering node container. When targeting the ordering service, you can target any particular node in the ordering service. Your requests will be forwarded to the leader automatically.
紧接着, 按照步骤[步骤 3:重编码和提交配置]进行操作(./config_update.html#step-3-re-encode-and-submit-the-config)。
Once you have set the environment variables, navigate to Step 1: Pull and translate the config.
编辑应用通道
Then, add the lifecycle organization policy (as listed in enable_lifecycle.json) to a file called modified_config.json using this command:
待所有应用通道更新至2.0更新包含 V2_0 的能力,新链码生命周期的背书策略必须被添加到每个通道。
jq -s ".[0] * {\"channel_group\":{\"groups\":{\"Application\": {\"groups\": {\"$ORGNAME\": {\"policies\": .[1].${ORGNAME}Policies}}}}}}" config.json ./enable_lifecycle.json > modified_config.json
你可以设置和你更新节点组织时设置的一样的环境变量。在这种情况下,需要注意的是你不需要更新配置中的组织配置,所以不需要使用 ORGNAME 变量。
Then, follow the steps at Step 3: Re-encode and submit the config.
环境变量设置完毕后,导航至 Step 1: 拉取和翻译配置。
Edit the application channels
modified_config.json 设置完毕后, 添加通道背书策略(比如 enable_lifecycle.json 文件中所展示的)使用以下命令:
After all of the application channels have been updated to include V2_0 capabilities, endorsement policies for the new chaincode lifecycle must be added to each channel.
jq -s '.[0] * {"channel_group":{"groups":{"Application": {"policies": .[1].appPolicies}}}}' config.json ./enable_lifecycle.json > modified_config.json
You can set the same environment you set when updating the peer organizations. Note that in this case you will not be updating the configuration of an org in the configuration, so the ORGNAME variable will not be used.
紧接着, 按照步骤Step 3: 重编码和提交配置进行操作。
Once you have set the environment variables, navigate to Step 1: Pull and translate the config.
若想要通道更新被批准,需要满足修改配置中 Channel/Application 部分的策略。默认情况下,这是通道中节点组织的 MAJORITY。
Then, add the lifecycle organization policy (as listed in enable_lifecycle.json) to a file called modified_config.json using this command:
编辑通道访问控制列表(可选)
jq -s '.[0] * {"channel_group":{"groups":{"Application": {"policies": .[1].appPolicies}}}}' config.json ./enable_lifecycle.json > modified_config.json
对于新生命周期,下面的 访问控制列表(ACL) 在enable_lifecycle.json 展示的是默认值,但是你可以根据你的用例选择是否更改他们。
Then, follow the steps at Step 3: Re-encode and submit the config.
"acls": {
"_lifecycle/CheckCommitReadiness": {
"policy_ref": "/Channel/Application/Writers"
},
"_lifecycle/CommitChaincodeDefinition": {
"policy_ref": "/Channel/Application/Writers"
},
"_lifecycle/QueryChaincodeDefinition": {
"policy_ref": "/Channel/Application/Readers"
},
"_lifecycle/QueryChaincodeDefinitions": {
"policy_ref": "/Channel/Application/Readers"
For this channel update to be approved, the policy for modifying the Channel/Application section of the configuration must be satisfied. By default, this is a MAJORITY of the peer organizations on the channel.
您可以保留与以前编辑应用程序通道时相同的环境。
Edit channel ACLs (optional)
环境变量设置完毕后,导航至 Step 1: Pull and translate the config.
The following Access Control List (ACL) in enable_lifecycle.json are the default values for the new lifecycle, though you have the option to change them depending on your use case.
modified_config.json 设置完毕后, 添加 ACL(比如 enable_lifecycle.json 文件中所展示的)使用以下命令:
"acls": {
"_lifecycle/CheckCommitReadiness": {
"policy_ref": "/Channel/Application/Writers"
},
"_lifecycle/CommitChaincodeDefinition": {
"policy_ref": "/Channel/Application/Writers"
},
"_lifecycle/QueryChaincodeDefinition": {
"policy_ref": "/Channel/Application/Readers"
},
"_lifecycle/QueryChaincodeDefinitions": {
"policy_ref": "/Channel/Application/Readers"
jq -s '.[0] * {"channel_group":{"groups":{"Application": {"values": {"ACLs": {"value": {"acls": .[1].acls}}}}}}}' config.json ./scripts/policies.json > modified_config.json
You can leave the same environment in place as when you previously edited application channels.
紧接着, 按照步骤[Step 3: 重编码和提交配置]进行操作(./config_update.html#step-3-re-encode-and-submit-the-config)。
Once you have the environment variables set, navigate to Step 1: Pull and translate the config.
若想要通道更新被批准,需要满足修改配置中 Channel/Application 部分的策略。默认情况下,这是通道中节点组织的 MAJORITY。
Then, add the ACLs (as listed in enable_lifecycle.json) and create a file called modified_config.json using this command:
在 core.yaml 使用新生命周期
jq -s '.[0] * {"channel_group":{"groups":{"Application": {"values": {"ACLs": {"value": {"acls": .[1].acls}}}}}}}' config.json ./enable_lifecycle.json > modified_config.json
若按照推荐流程 中使用一个像 diff 的工具以二进制来对比 core.yaml 的新版与旧版, 你将不需要将 _lifecycle: enable 加入白名单因为新的 core.yaml 已经加入到了 chaincode/system。
Then, follow the steps at Step 3: Re-encode and submit the config.
但是,如果你直接更新旧节点的 YAML 文件,你需要将 _lifecycle: enable 添加至系统链码白名单。
For this channel update to be approved, the policy for modifying the Channel/Application section of the configuration must be satisfied. By default, this is a MAJORITY of the peer organizations on the channel.
如果想了解关于节点升级的更多信息,请参考升级你的组件
Enable new lifecycle in core.yaml
If you follow the recommended process for using a tool like diff to compare the new version of core.yaml packaged with the binaries with your old one, you will not need to add _lifecycle: enable to the list of enabled system chaincodes because the new core.yaml has added it under chaincode/system.
However, if you are updating your old node YAML file directly, you will have to add _lifecycle: enable to the list of enabled system chaincodes.
For more information about upgrading nodes, check out Upgrading your components.
命令参考
peer
描述
peer 命令有5个不同的子命令,每个命令都可以让指定的 peer 节点执行特定的一组任务。比如,你可以使用子命令 peer channel 让一个 peer 节点加入通道,或者使用 peer chaincode 命令把智能合约链码部署到 peer 节点上。
语法
peer 命令的4个子命令如下:
peer chaincode [option] [flags]
peer channel [option] [flags]
peer node [option] [flags]
peer version [option] [flags]
每一个子命令拥有不同的选项 (option),并且会在它们专属的章节进行介绍。为了简便起见,我们说一个命令的时候,通常包含了 peer 命令,channel 子命令,以及 fetch 子命令选项。
如果使用子命令没有指定选项,会打印更高一级的帮助信息,下文的 --help 标记会进行描述。
标记
peer 的每个子命令都有一组标记,由于一些标记可以被所有子命令使用,所以它们被设置为全局性的。这些标记会在 peer 的子命令中进行介绍。
顶层的 peer 命令有如下标记:
--help使用
--help可以获得peer命令的简要帮助信息。--help标记非常有用,它可以被用来获取命令、子命令甚至是选项的帮助信息。比如
peer --help peer channel --help peer channel list --help
各子命令的帮助信息细节见
peer的个子命令。
用法
这是展示 peer 命令标记用法的样例:
在
peer channel join命令上使用--help标记。peer channel join --help Joins the peer to a channel. Usage: peer channel join [flags] Flags: -b, --blockpath string Path to file containing genesis block -h, --help help for join Global Flags: --cafile string Path to file containing PEM-encoded trusted certificate(s) for the ordering endpoint --certfile string Path to file containing PEM-encoded X509 public key to use for mutual TLS communication with the orderer endpoint --clientauth Use mutual TLS when communicating with the orderer endpoint --connTimeout duration Timeout for client to connect (default 3s) --keyfile string Path to file containing PEM-encoded private key to use for mutual TLS communication with the orderer endpoint -o, --orderer string Ordering service endpoint --ordererTLSHostnameOverride string The hostname override to use when validating the TLS connection to the orderer. --tls Use TLS when communicating with the orderer endpoint
这展示了
peer channel join命令的简要帮助信息。
peer chaincode
peer chaincode命令允许管理员执行与一个节点上运行有关的链码,例如安装,实例化,调用,包装,查询和升级链码。
语法
peer chaincode命令有以下子命令:
- install
- instantiate
- invoke
- list
- package
- query
- signpackage
- upgrade
不同的子命令选项(安装,实例化)牵涉到与一个peer相关的不同链码操作。例如,用peer chaincode install子命令选项在节点上安装一个链码,或者用peer chaincode query子命令选项为一节点上账本的当前值查询链码。
本主题将描述每个节点链码子命令以及它们的选项。
参数
每个子命令都有一套专门对应各子命令的参数,以及一套涉及到所有peer chaincode子命令的全局参数。但并不是所有的子命令都会使用这些参数。比如,query子命令就不需要--orderer参数。
每个参数都会和与其相关的子命令一起来解析。全局参数包括
*--cafile <string>
是通往一文件的路径,该文件包含了用于排序端点的PEM编码受信任证书
*--certfile <string>
是通往一文件的路径,该文件包含了用于和orderer端点进行相互TLS通信的PEM编码X509公钥。
*--keyfile <string>
是通往一文件的路径,该文件包含了用于和orderer端点进行相互TLS通信的PEM编码私钥
*-oor--orderer <string>
排序服务端点被指明为<hostname or IP address>:<port>
*--ordererTLSHostnameOverride <string>
验证与orderer的TLS连接时要用到的主机名覆盖
*--tls
当与orderer端点通信时用TLS
*--transient <string>
JSON编码中的参数的瞬时映射
peer chaincode install
Install a chaincode on a peer. This installs a chaincode deployment spec package (if provided) or packages the specified chaincode before subsequently installing it.
Usage:
peer chaincode install [flags]
Flags:
--connectionProfile string Connection profile that provides the necessary connection information for the network. Note: currently only supported for providing peer connection information
-c, --ctor string Constructor message for the chaincode in JSON format (default "{}")
-h, --help help for install
-l, --lang string Language the chaincode is written in (default "golang")
-n, --name string Name of the chaincode
-p, --path string Path to chaincode
--peerAddresses stringArray The addresses of the peers to connect to
--tlsRootCertFiles stringArray If TLS is enabled, the paths to the TLS root cert files of the peers to connect to. The order and number of certs specified should match the --peerAddresses flag
-v, --version string Version of the chaincode specified in install/instantiate/upgrade commands
Global Flags:
--cafile string Path to file containing PEM-encoded trusted certificate(s) for the ordering endpoint
--certfile string Path to file containing PEM-encoded X509 public key to use for mutual TLS communication with the orderer endpoint
--clientauth Use mutual TLS when communicating with the orderer endpoint
--connTimeout duration Timeout for client to connect (default 3s)
--keyfile string Path to file containing PEM-encoded private key to use for mutual TLS communication with the orderer endpoint
-o, --orderer string Ordering service endpoint
--ordererTLSHostnameOverride string The hostname override to use when validating the TLS connection to the orderer.
--tls Use TLS when communicating with the orderer endpoint
--transient string Transient map of arguments in JSON encoding
peer chaincode instantiate
Deploy the specified chaincode to the network.
Usage:
peer chaincode instantiate [flags]
Flags:
-C, --channelID string The channel on which this command should be executed
--collections-config string The fully qualified path to the collection JSON file including the file name
--connectionProfile string Connection profile that provides the necessary connection information for the network. Note: currently only supported for providing peer connection information
-c, --ctor string Constructor message for the chaincode in JSON format (default "{}")
-E, --escc string The name of the endorsement system chaincode to be used for this chaincode
-h, --help help for instantiate
-l, --lang string Language the chaincode is written in (default "golang")
-n, --name string Name of the chaincode
--peerAddresses stringArray The addresses of the peers to connect to
-P, --policy string The endorsement policy associated to this chaincode
--tlsRootCertFiles stringArray If TLS is enabled, the paths to the TLS root cert files of the peers to connect to. The order and number of certs specified should match the --peerAddresses flag
-v, --version string Version of the chaincode specified in install/instantiate/upgrade commands
-V, --vscc string The name of the verification system chaincode to be used for this chaincode
Global Flags:
--cafile string Path to file containing PEM-encoded trusted certificate(s) for the ordering endpoint
--certfile string Path to file containing PEM-encoded X509 public key to use for mutual TLS communication with the orderer endpoint
--clientauth Use mutual TLS when communicating with the orderer endpoint
--connTimeout duration Timeout for client to connect (default 3s)
--keyfile string Path to file containing PEM-encoded private key to use for mutual TLS communication with the orderer endpoint
-o, --orderer string Ordering service endpoint
--ordererTLSHostnameOverride string The hostname override to use when validating the TLS connection to the orderer.
--tls Use TLS when communicating with the orderer endpoint
--transient string Transient map of arguments in JSON encoding
peer chaincode invoke
Invoke the specified chaincode. It will try to commit the endorsed transaction to the network.
Usage:
peer chaincode invoke [flags]
Flags:
-C, --channelID string The channel on which this command should be executed
--connectionProfile string Connection profile that provides the necessary connection information for the network. Note: currently only supported for providing peer connection information
-c, --ctor string Constructor message for the chaincode in JSON format (default "{}")
-h, --help help for invoke
-I, --isInit Is this invocation for init (useful for supporting legacy chaincodes in the new lifecycle)
-n, --name string Name of the chaincode
--peerAddresses stringArray The addresses of the peers to connect to
--tlsRootCertFiles stringArray If TLS is enabled, the paths to the TLS root cert files of the peers to connect to. The order and number of certs specified should match the --peerAddresses flag
--waitForEvent Whether to wait for the event from each peer's deliver filtered service signifying that the 'invoke' transaction has been committed successfully
--waitForEventTimeout duration Time to wait for the event from each peer's deliver filtered service signifying that the 'invoke' transaction has been committed successfully (default 30s)
Global Flags:
--cafile string Path to file containing PEM-encoded trusted certificate(s) for the ordering endpoint
--certfile string Path to file containing PEM-encoded X509 public key to use for mutual TLS communication with the orderer endpoint
--clientauth Use mutual TLS when communicating with the orderer endpoint
--connTimeout duration Timeout for client to connect (default 3s)
--keyfile string Path to file containing PEM-encoded private key to use for mutual TLS communication with the orderer endpoint
-o, --orderer string Ordering service endpoint
--ordererTLSHostnameOverride string The hostname override to use when validating the TLS connection to the orderer.
--tls Use TLS when communicating with the orderer endpoint
--transient string Transient map of arguments in JSON encoding
peer chaincode list
Get the instantiated chaincodes in the channel if specify channel, or get installed chaincodes on the peer
Usage:
peer chaincode list [flags]
Flags:
-C, --channelID string The channel on which this command should be executed
--connectionProfile string Connection profile that provides the necessary connection information for the network. Note: currently only supported for providing peer connection information
-h, --help help for list
--installed Get the installed chaincodes on a peer
--instantiated Get the instantiated chaincodes on a channel
--peerAddresses stringArray The addresses of the peers to connect to
--tlsRootCertFiles stringArray If TLS is enabled, the paths to the TLS root cert files of the peers to connect to. The order and number of certs specified should match the --peerAddresses flag
Global Flags:
--cafile string Path to file containing PEM-encoded trusted certificate(s) for the ordering endpoint
--certfile string Path to file containing PEM-encoded X509 public key to use for mutual TLS communication with the orderer endpoint
--clientauth Use mutual TLS when communicating with the orderer endpoint
--connTimeout duration Timeout for client to connect (default 3s)
--keyfile string Path to file containing PEM-encoded private key to use for mutual TLS communication with the orderer endpoint
-o, --orderer string Ordering service endpoint
--ordererTLSHostnameOverride string The hostname override to use when validating the TLS connection to the orderer.
--tls Use TLS when communicating with the orderer endpoint
--transient string Transient map of arguments in JSON encoding
peer chaincode package
Package a chaincode and write the package to a file.
Usage:
peer chaincode package [outputfile] [flags]
Flags:
-s, --cc-package create CC deployment spec for owner endorsements instead of raw CC deployment spec
-c, --ctor string Constructor message for the chaincode in JSON format (default "{}")
-h, --help help for package
-i, --instantiate-policy string instantiation policy for the chaincode
-l, --lang string Language the chaincode is written in (default "golang")
-n, --name string Name of the chaincode
-p, --path string Path to chaincode
-S, --sign if creating CC deployment spec package for owner endorsements, also sign it with local MSP
-v, --version string Version of the chaincode specified in install/instantiate/upgrade commands
Global Flags:
--cafile string Path to file containing PEM-encoded trusted certificate(s) for the ordering endpoint
--certfile string Path to file containing PEM-encoded X509 public key to use for mutual TLS communication with the orderer endpoint
--clientauth Use mutual TLS when communicating with the orderer endpoint
--connTimeout duration Timeout for client to connect (default 3s)
--keyfile string Path to file containing PEM-encoded private key to use for mutual TLS communication with the orderer endpoint
-o, --orderer string Ordering service endpoint
--ordererTLSHostnameOverride string The hostname override to use when validating the TLS connection to the orderer.
--tls Use TLS when communicating with the orderer endpoint
--transient string Transient map of arguments in JSON encoding
peer chaincode query
Get endorsed result of chaincode function call and print it. It won't generate transaction.
Usage:
peer chaincode query [flags]
Flags:
-C, --channelID string The channel on which this command should be executed
--connectionProfile string Connection profile that provides the necessary connection information for the network. Note: currently only supported for providing peer connection information
-c, --ctor string Constructor message for the chaincode in JSON format (default "{}")
-h, --help help for query
-x, --hex If true, output the query value byte array in hexadecimal. Incompatible with --raw
-n, --name string Name of the chaincode
--peerAddresses stringArray The addresses of the peers to connect to
-r, --raw If true, output the query value as raw bytes, otherwise format as a printable string
--tlsRootCertFiles stringArray If TLS is enabled, the paths to the TLS root cert files of the peers to connect to. The order and number of certs specified should match the --peerAddresses flag
Global Flags:
--cafile string Path to file containing PEM-encoded trusted certificate(s) for the ordering endpoint
--certfile string Path to file containing PEM-encoded X509 public key to use for mutual TLS communication with the orderer endpoint
--clientauth Use mutual TLS when communicating with the orderer endpoint
--connTimeout duration Timeout for client to connect (default 3s)
--keyfile string Path to file containing PEM-encoded private key to use for mutual TLS communication with the orderer endpoint
-o, --orderer string Ordering service endpoint
--ordererTLSHostnameOverride string The hostname override to use when validating the TLS connection to the orderer.
--tls Use TLS when communicating with the orderer endpoint
--transient string Transient map of arguments in JSON encoding
peer chaincode signpackage
Sign the specified chaincode package
Usage:
peer chaincode signpackage [flags]
Flags:
-h, --help help for signpackage
Global Flags:
--cafile string Path to file containing PEM-encoded trusted certificate(s) for the ordering endpoint
--certfile string Path to file containing PEM-encoded X509 public key to use for mutual TLS communication with the orderer endpoint
--clientauth Use mutual TLS when communicating with the orderer endpoint
--connTimeout duration Timeout for client to connect (default 3s)
--keyfile string Path to file containing PEM-encoded private key to use for mutual TLS communication with the orderer endpoint
-o, --orderer string Ordering service endpoint
--ordererTLSHostnameOverride string The hostname override to use when validating the TLS connection to the orderer.
--tls Use TLS when communicating with the orderer endpoint
--transient string Transient map of arguments in JSON encoding
peer chaincode upgrade
Upgrade an existing chaincode with the specified one. The new chaincode will immediately replace the existing chaincode upon the transaction committed.
Usage:
peer chaincode upgrade [flags]
Flags:
-C, --channelID string The channel on which this command should be executed
--collections-config string The fully qualified path to the collection JSON file including the file name
--connectionProfile string Connection profile that provides the necessary connection information for the network. Note: currently only supported for providing peer connection information
-c, --ctor string Constructor message for the chaincode in JSON format (default "{}")
-E, --escc string The name of the endorsement system chaincode to be used for this chaincode
-h, --help help for upgrade
-l, --lang string Language the chaincode is written in (default "golang")
-n, --name string Name of the chaincode
-p, --path string Path to chaincode
--peerAddresses stringArray The addresses of the peers to connect to
-P, --policy string The endorsement policy associated to this chaincode
--tlsRootCertFiles stringArray If TLS is enabled, the paths to the TLS root cert files of the peers to connect to. The order and number of certs specified should match the --peerAddresses flag
-v, --version string Version of the chaincode specified in install/instantiate/upgrade commands
-V, --vscc string The name of the verification system chaincode to be used for this chaincode
Global Flags:
--cafile string Path to file containing PEM-encoded trusted certificate(s) for the ordering endpoint
--certfile string Path to file containing PEM-encoded X509 public key to use for mutual TLS communication with the orderer endpoint
--clientauth Use mutual TLS when communicating with the orderer endpoint
--connTimeout duration Timeout for client to connect (default 3s)
--keyfile string Path to file containing PEM-encoded private key to use for mutual TLS communication with the orderer endpoint
-o, --orderer string Ordering service endpoint
--ordererTLSHostnameOverride string The hostname override to use when validating the TLS connection to the orderer.
--tls Use TLS when communicating with the orderer endpoint
--transient string Transient map of arguments in JSON encoding
使用示例
peer chaincode instantiate 示例
以下是peer chaincode instantiate命令的一些例子,它们在1.0版本中mychannel通道上将名为mycc的链码实例化:
用
--tls和--cafile全局变量来对网络中的链码实例化,其中TLS被启用:export ORDERER_CA=/opt/gopath/src/github.com/hyperledger/fabric/peer/crypto/ordererOrganizations/example.com/orderers/orderer.example.com/msp/tlscacerts/tlsca.example.com-cert.pem peer chaincode instantiate -o orderer.example.com:7050 --tls --cafile $ORDERER_CA -C mychannel -n mycc -v 1.0 -c '{"Args":["init","a","100","b","200"]}' -P "AND ('Org1MSP.peer','Org2MSP.peer')" 2018-02-22 16:33:53.324 UTC [chaincodeCmd] checkChaincodeCmdParams -> INFO 001 Using default escc 2018-02-22 16:33:53.324 UTC [chaincodeCmd] checkChaincodeCmdParams -> INFO 002 Using default vscc 2018-02-22 16:34:08.698 UTC [main] main -> INFO 003 Exiting.....仅用命令专门选项来将网络中的链码实例化,其中TLS未被启用:
peer chaincode instantiate -o orderer.example.com:7050 -C mychannel -n mycc -v 1.0 -c '{"Args":["init","a","100","b","200"]}' -P "AND ('Org1MSP.peer','Org2MSP.peer')" 2018-02-22 16:34:09.324 UTC [chaincodeCmd] checkChaincodeCmdParams -> INFO 001 Using default escc 2018-02-22 16:34:09.324 UTC [chaincodeCmd] checkChaincodeCmdParams -> INFO 002 Using default vscc 2018-02-22 16:34:24.698 UTC [main] main -> INFO 003 Exiting.....
peer chaincode invoke 示例
以下是peer chaincode invoke命令的一个范例:
调用版本
1.0名为mycc的链码,该链码位于peer0.org1.example.com:7051和peer0.org2.example.com:9051(节点由 –peerAddresses 上的通道mychannel中,请求从变量a中转移10个单位到变量b中:peer chaincode invoke -o orderer.example.com:7050 -C mychannel -n mycc --peerAddresses peer0.org1.example.com:7051 --peerAddresses peer0.org2.example.com:9051 -c '{"Args":["invoke","a","b","10"]}' 2018-02-22 16:34:27.069 UTC [chaincodeCmd] checkChaincodeCmdParams -> INFO 001 Using default escc 2018-02-22 16:34:27.069 UTC [chaincodeCmd] checkChaincodeCmdParams -> INFO 002 Using default vscc . . . 2018-02-22 16:34:27.106 UTC [chaincodeCmd] chaincodeInvokeOrQuery -> DEBU 00a ESCC invoke result: version:1 response:<status:200 message:"OK" > payload:"\n \237mM\376? [\214\002 \332\204\035\275q\227\2132A\n\204&\2106\037W|\346#\3413\274\022Y\nE\022\024\n\004lscc\022\014\n\n\n\004mycc\022\002\010\003\022-\n\004mycc\022%\n\007\n\001a\022\002\010\003\n\007\n\001b\022\002\010\003\032\007\n\001a\032\00290\032\010\n\001b\032\003210\032\003\010\310\001\"\013\022\004mycc\032\0031.0" endorsement:<endorser:"\n\007Org1MSP\022\262\006-----BEGIN CERTIFICATE-----\nMIICLjCCAdWgAwIBAgIRAJYomxY2cqHA/fbRnH5a/bwwCgYIKoZIzj0EAwIwczEL\nMAkGA1UEBhMCVVMxEzARBgNVBAgTCkNhbGlmb3JuaWExFjAUBgNVBAcTDVNhbiBG\ncmFuY2lzY28xGTAXBgNVBAoTEG9yZzEuZXhhbXBsZS5jb20xHDAaBgNVBAMTE2Nh\nLm9yZzEuZXhhbXBsZS5jb20wHhcNMTgwMjIyMTYyODE0WhcNMjgwMjIwMTYyODE0\nWjBwMQswCQYDVQQGEwJVUzETMBEGA1UECBMKQ2FsaWZvcm5pYTEWMBQGA1UEBxMN\nU2FuIEZyYW5jaXNjbzETMBEGA1UECxMKRmFicmljUGVlcjEfMB0GA1UEAxMWcGVl\ncjAub3JnMS5leGFtcGxlLmNvbTBZMBMGByqGSM49AgEGCCqGSM49AwEHA0IABDEa\nWNNniN3qOCQL89BGWfY39f5V3o1pi//7JFDHATJXtLgJhkK5KosDdHuKLYbCqvge\n46u3AC16MZyJRvKBiw6jTTBLMA4GA1UdDwEB/wQEAwIHgDAMBgNVHRMBAf8EAjAA\nMCsGA1UdIwQkMCKAIN7dJR9dimkFtkus0R5pAOlRz5SA3FB5t8Eaxl9A7lkgMAoG\nCCqGSM49BAMCA0cAMEQCIC2DAsO9QZzQmKi8OOKwcCh9Gd01YmWIN3oVmaCRr8C7\nAiAlQffq2JFlbh6OWURGOko6RckizG8oVOldZG/Xj3C8lA==\n-----END CERTIFICATE-----\n" signature:"0D\002 \022_\342\350\344\231G&\237\n\244\375\302J\220l\302\345\210\335D\250y\253P\0214:\221e\332@\002 \000\254\361\224\247\210\214L\277\370\222\213\217\301\r\341v\227\265\277\336\256^\217\336\005y*\321\023\025\367" > 2018-02-22 16:34:27.107 UTC [chaincodeCmd] chaincodeInvokeOrQuery -> INFO 00b Chaincode invoke successful. result: status:200 2018-02-22 16:34:27.107 UTC [main] main -> INFO 00c Exiting.....
现在你就能看到该调用在日志信息的基础上被成功上传了:
2018-02-22 16:34:27.107 UTC [chaincodeCmd] chaincodeInvokeOrQuery -> INFO 00b Chaincode invoke successful. result: status:200
一个成功的回复反映了该交易被成功提交至排序服务。随后,该交易会被添加至区块中,最后,接受通道上每个节点的验证,若不通过则被视为无效。
peer chaincode list 示例
以下是peer chaincode list命令的一些例子:
用
--installedflag来对安装在节点上的链码进行列表。peer chaincode list --installed Get installed chaincodes on peer: Name: mycc, Version: 1.0, Path: github.com/hyperledger/fabric-samples/chaincode/abstore/go, Id: 8cc2730fdafd0b28ef734eac12b29df5fc98ad98bdb1b7e0ef96265c3d893d61 2018-02-22 17:07:13.476 UTC [main] main -> INFO 001 Exiting.....
可以看到该节点安装了一个名为
mycc的链码,它是版本1.0的。用
--instantiated和-C(通道ID)flag一起来对通道上被实例化的链码进行列表。peer chaincode list --instantiated -C mychannel Get instantiated chaincodes on channel mychannel: Name: mycc, Version: 1.0, Path: github.com/hyperledger/fabric-samples/chaincode/abstore/go, Escc: escc, Vscc: vscc 2018-02-22 17:07:42.969 UTC [main] main -> INFO 001 Exiting.....
现在你能看到版本
1.0的链码mycc被在mychannel通道上实例化了。
peer chaincode package 示例
以下是peer chaincode package命令的一个例子,它打包了版本为1.0名为mycc的链码,生成了链码部署规定,用本地MSP签署了该包装,同时还将其输出为ccpack.out:
peer chaincode package ccpack.out -n mycc -p github.com/hyperledger/fabric-samples/chaincode/abstore/go -v 1.1 -s -S
.
.
.
2018-02-22 17:27:01.404 UTC [chaincodeCmd] checkChaincodeCmdParams -> INFO 003 Using default escc
2018-02-22 17:27:01.405 UTC [chaincodeCmd] checkChaincodeCmdParams -> INFO 004 Using default vscc
.
.
.
2018-02-22 17:27:01.879 UTC [chaincodeCmd] chaincodePackage -> DEBU 011 Packaged chaincode into deployment spec of size <3426>, with args = [ccpack.out]
2018-02-22 17:27:01.879 UTC [main] main -> INFO 012 Exiting.....
peer chaincode query 示例
以下是peer chaincode query命令的示例,该命令在节点账本上查询版本1.0名为mycc的链码,查询变量a的值:
从输出中可看出变量
a在查询时有一个值是90。peer chaincode query -C mychannel -n mycc -c '{"Args":["query","a"]}' 2018-02-22 16:34:30.816 UTC [chaincodeCmd] checkChaincodeCmdParams -> INFO 001 Using default escc 2018-02-22 16:34:30.816 UTC [chaincodeCmd] checkChaincodeCmdParams -> INFO 002 Using default vscc Query Result: 90
peer chaincode signpackage 示例
以下是peer chaincode signpackage命令的示例,它接受了现存的签名包,还创建了一个新的签名包,上面有本地MSP追加的一个签名。
peer chaincode signpackage ccwith1sig.pak ccwith2sig.pak
Wrote signed package to ccwith2sig.pak successfully
2018-02-24 19:32:47.189 EST [main] main -> INFO 002 Exiting.....
peer chaincode upgrade 示例
以下是peer chaincode upgrade命令的示例,它在通道mychannel上将版本1.1名为mycc的链码升级成版本1.2,其中包含了一个新的变量c:
启用TLS,用
--tls和--cafileglobal flags来升级网络中的链码:export ORDERER_CA=/opt/gopath/src/github.com/hyperledger/fabric/peer/crypto/ordererOrganizations/example.com/orderers/orderer.example.com/msp/tlscacerts/tlsca.example.com-cert.pem peer chaincode upgrade -o orderer.example.com:7050 --tls --cafile $ORDERER_CA -C mychannel -n mycc -v 1.2 -c '{"Args":["init","a","100","b","200","c","300"]}' -P "AND ('Org1MSP.peer','Org2MSP.peer')" . . . 2018-02-22 18:26:31.433 UTC [chaincodeCmd] checkChaincodeCmdParams -> INFO 003 Using default escc 2018-02-22 18:26:31.434 UTC [chaincodeCmd] checkChaincodeCmdParams -> INFO 004 Using default vscc 2018-02-22 18:26:31.435 UTC [chaincodeCmd] getChaincodeSpec -> DEBU 005 java chaincode enabled 2018-02-22 18:26:31.435 UTC [chaincodeCmd] upgrade -> DEBU 006 Get upgrade proposal for chaincode <name:"mycc" version:"1.1" > . . . 2018-02-22 18:26:46.687 UTC [chaincodeCmd] upgrade -> DEBU 009 endorse upgrade proposal, get response <status:200 message:"OK" payload:"\n\004mycc\022\0031.1\032\004escc\"\004vscc*,\022\014\022\n\010\001\022\002\010\000\022\002\010\001\032\r\022\013\n\007Org1MSP\020\003\032\r\022\013\n\007Org2MSP\020\0032f\n \261g(^v\021\220\240\332\251\014\204V\210P\310o\231\271\036\301\022\032\205fC[|=\215\372\223\022 \311b\025?\323N\343\325\032\005\365\236\001XKj\004E\351\007\247\265fu\305j\367\331\275\253\307R\032 \014H#\014\272!#\345\306s\323\371\350\364\006.\000\356\230\353\270\263\215\217\303\256\220i^\277\305\214: \375\200zY\275\203}\375\244\205\035\340\226]l!uE\334\273\214\214\020\303\3474\360\014\234-\006\315B\031\022\010\022\006\010\001\022\002\010\000\032\r\022\013\n\007Org1MSP\020\001" > . . . 2018-02-22 18:26:46.693 UTC [chaincodeCmd] upgrade -> DEBU 00c Get Signed envelope 2018-02-22 18:26:46.693 UTC [chaincodeCmd] chaincodeUpgrade -> DEBU 00d Send signed envelope to orderer 2018-02-22 18:26:46.908 UTC [main] main -> INFO 00e Exiting.....- 不启用TLS,仅用命令专门选项来升级网络中的链码:
peer chaincode upgrade -o orderer.example.com:7050 -C mychannel -n mycc -v 1.2 -c '{"Args":["init","a","100","b","200","c","300"]}' -P "AND ('Org1MSP.peer','Org2MSP.peer')" . . . 2018-02-22 18:28:31.433 UTC [chaincodeCmd] checkChaincodeCmdParams -> INFO 003 Using default escc 2018-02-22 18:28:31.434 UTC [chaincodeCmd] checkChaincodeCmdParams -> INFO 004 Using default vscc 2018-02-22 18:28:31.435 UTC [chaincodeCmd] getChaincodeSpec -> DEBU 005 java chaincode enabled 2018-02-22 18:28:31.435 UTC [chaincodeCmd] upgrade -> DEBU 006 Get upgrade proposal for chaincode <name:"mycc" version:"1.1" > . . . 2018-02-22 18:28:46.687 UTC [chaincodeCmd] upgrade -> DEBU 009 endorse upgrade proposal, get response <status:200 message:"OK" payload:"\n\004mycc\022\0031.1\032\004escc\"\004vscc*,\022\014\022\n\010\001\022\002\010\000\022\002\010\001\032\r\022\013\n\007Org1MSP\020\003\032\r\022\013\n\007Org2MSP\020\0032f\n \261g(^v\021\220\240\332\251\014\204V\210P\310o\231\271\036\301\022\032\205fC[|=\215\372\223\022 \311b\025?\323N\343\325\032\005\365\236\001XKj\004E\351\007\247\265fu\305j\367\331\275\253\307R\032 \014H#\014\272!#\345\306s\323\371\350\364\006.\000\356\230\353\270\263\215\217\303\256\220i^\277\305\214: \375\200zY\275\203}\375\244\205\035\340\226]l!uE\334\273\214\214\020\303\3474\360\014\234-\006\315B\031\022\010\022\006\010\001\022\002\010\000\032\r\022\013\n\007Org1MSP\020\001" > . . . 2018-02-22 18:28:46.693 UTC [chaincodeCmd] upgrade -> DEBU 00c Get Signed envelope 2018-02-22 18:28:46.693 UTC [chaincodeCmd] chaincodeUpgrade -> DEBU 00d Send signed envelope to orderer 2018-02-22 18:28:46.908 UTC [main] main -> INFO 00e Exiting.....

This work is licensed under a Creative Commons Attribution 4.0 International License.
peer lifecycle chaincode
The peer lifecycle chaincode subcommand allows administrators to use the
Fabric chaincode lifecycle to package a chaincode, install it on your peers,
approve a chaincode definition for your organization, and then commit the
definition to a channel. The chaincode is ready to be used after the definition
has been successfully committed to the channel. For more information, visit
Fabric chaincode lifecycle.
Note: These instructions use the Fabric chaincode lifecycle introduced in the v2.0 release. If you would like to use the old lifecycle to install and instantiate a chaincode, visit the peer chaincode command reference.
Syntax
The peer lifecycle chaincode command has the following subcommands:
- package
- install
- queryinstalled
- getinstalledpackage
- approveformyorg
- queryapproved
- checkcommitreadiness
- commit
- querycommitted
Each peer lifecycle chaincode subcommand is described together with its options in its own section in this topic.
peer lifecycle
Perform _lifecycle operations
Usage:
peer lifecycle [command]
Available Commands:
chaincode Perform chaincode operations: package|install|queryinstalled|getinstalledpackage|approveformyorg|queryapproved|checkcommitreadiness|commit|querycommitted
Flags:
-h, --help help for lifecycle
Use "peer lifecycle [command] --help" for more information about a command.
peer lifecycle chaincode
Perform chaincode operations: package|install|queryinstalled|getinstalledpackage|approveformyorg|queryapproved|checkcommitreadiness|commit|querycommitted
Usage:
peer lifecycle chaincode [command]
Available Commands:
approveformyorg Approve the chaincode definition for my org.
checkcommitreadiness Check whether a chaincode definition is ready to be committed on a channel.
commit Commit the chaincode definition on the channel.
getinstalledpackage Get an installed chaincode package from a peer.
install Install a chaincode.
package Package a chaincode
queryapproved Query an org's approved chaincode definition from its peer.
querycommitted Query the committed chaincode definitions by channel on a peer.
queryinstalled Query the installed chaincodes on a peer.
Flags:
--cafile string Path to file containing PEM-encoded trusted certificate(s) for the ordering endpoint
--certfile string Path to file containing PEM-encoded X509 public key to use for mutual TLS communication with the orderer endpoint
--clientauth Use mutual TLS when communicating with the orderer endpoint
--connTimeout duration Timeout for client to connect (default 3s)
-h, --help help for chaincode
--keyfile string Path to file containing PEM-encoded private key to use for mutual TLS communication with the orderer endpoint
-o, --orderer string Ordering service endpoint
--ordererTLSHostnameOverride string The hostname override to use when validating the TLS connection to the orderer.
--tls Use TLS when communicating with the orderer endpoint
Use "peer lifecycle chaincode [command] --help" for more information about a command.
peer lifecycle chaincode package
Package a chaincode and write the package to a file.
Usage:
peer lifecycle chaincode package [outputfile] [flags]
Flags:
--connectionProfile string The fully qualified path to the connection profile that provides the necessary connection information for the network. Note: currently only supported for providing peer connection information
-h, --help help for package
--label string The package label contains a human-readable description of the package
-l, --lang string Language the chaincode is written in (default "golang")
-p, --path string Path to the chaincode
--peerAddresses stringArray The addresses of the peers to connect to
--tlsRootCertFiles stringArray If TLS is enabled, the paths to the TLS root cert files of the peers to connect to. The order and number of certs specified should match the --peerAddresses flag
Global Flags:
--cafile string Path to file containing PEM-encoded trusted certificate(s) for the ordering endpoint
--certfile string Path to file containing PEM-encoded X509 public key to use for mutual TLS communication with the orderer endpoint
--clientauth Use mutual TLS when communicating with the orderer endpoint
--connTimeout duration Timeout for client to connect (default 3s)
--keyfile string Path to file containing PEM-encoded private key to use for mutual TLS communication with the orderer endpoint
-o, --orderer string Ordering service endpoint
--ordererTLSHostnameOverride string The hostname override to use when validating the TLS connection to the orderer.
--tls Use TLS when communicating with the orderer endpoint
peer lifecycle chaincode install
Install a chaincode on a peer.
Usage:
peer lifecycle chaincode install [flags]
Flags:
--connectionProfile string The fully qualified path to the connection profile that provides the necessary connection information for the network. Note: currently only supported for providing peer connection information
-h, --help help for install
--peerAddresses stringArray The addresses of the peers to connect to
--targetPeer string When using a connection profile, the name of the peer to target for this action
--tlsRootCertFiles stringArray If TLS is enabled, the paths to the TLS root cert files of the peers to connect to. The order and number of certs specified should match the --peerAddresses flag
Global Flags:
--cafile string Path to file containing PEM-encoded trusted certificate(s) for the ordering endpoint
--certfile string Path to file containing PEM-encoded X509 public key to use for mutual TLS communication with the orderer endpoint
--clientauth Use mutual TLS when communicating with the orderer endpoint
--connTimeout duration Timeout for client to connect (default 3s)
--keyfile string Path to file containing PEM-encoded private key to use for mutual TLS communication with the orderer endpoint
-o, --orderer string Ordering service endpoint
--ordererTLSHostnameOverride string The hostname override to use when validating the TLS connection to the orderer.
--tls Use TLS when communicating with the orderer endpoint
peer lifecycle chaincode queryinstalled
Query the installed chaincodes on a peer.
Usage:
peer lifecycle chaincode queryinstalled [flags]
Flags:
--connectionProfile string The fully qualified path to the connection profile that provides the necessary connection information for the network. Note: currently only supported for providing peer connection information
-h, --help help for queryinstalled
-O, --output string The output format for query results. Default is human-readable plain-text. json is currently the only supported format.
--peerAddresses stringArray The addresses of the peers to connect to
--targetPeer string When using a connection profile, the name of the peer to target for this action
--tlsRootCertFiles stringArray If TLS is enabled, the paths to the TLS root cert files of the peers to connect to. The order and number of certs specified should match the --peerAddresses flag
Global Flags:
--cafile string Path to file containing PEM-encoded trusted certificate(s) for the ordering endpoint
--certfile string Path to file containing PEM-encoded X509 public key to use for mutual TLS communication with the orderer endpoint
--clientauth Use mutual TLS when communicating with the orderer endpoint
--connTimeout duration Timeout for client to connect (default 3s)
--keyfile string Path to file containing PEM-encoded private key to use for mutual TLS communication with the orderer endpoint
-o, --orderer string Ordering service endpoint
--ordererTLSHostnameOverride string The hostname override to use when validating the TLS connection to the orderer.
--tls Use TLS when communicating with the orderer endpoint
peer lifecycle chaincode getinstalledpackage
Get an installed chaincode package from a peer.
Usage:
peer lifecycle chaincode getinstalledpackage [outputfile] [flags]
Flags:
--connectionProfile string The fully qualified path to the connection profile that provides the necessary connection information for the network. Note: currently only supported for providing peer connection information
-h, --help help for getinstalledpackage
--output-directory string The output directory to use when writing a chaincode install package to disk. Default is the current working directory.
--package-id string The identifier of the chaincode install package
--peerAddresses stringArray The addresses of the peers to connect to
--targetPeer string When using a connection profile, the name of the peer to target for this action
--tlsRootCertFiles stringArray If TLS is enabled, the paths to the TLS root cert files of the peers to connect to. The order and number of certs specified should match the --peerAddresses flag
Global Flags:
--cafile string Path to file containing PEM-encoded trusted certificate(s) for the ordering endpoint
--certfile string Path to file containing PEM-encoded X509 public key to use for mutual TLS communication with the orderer endpoint
--clientauth Use mutual TLS when communicating with the orderer endpoint
--connTimeout duration Timeout for client to connect (default 3s)
--keyfile string Path to file containing PEM-encoded private key to use for mutual TLS communication with the orderer endpoint
-o, --orderer string Ordering service endpoint
--ordererTLSHostnameOverride string The hostname override to use when validating the TLS connection to the orderer.
--tls Use TLS when communicating with the orderer endpoint
peer lifecycle chaincode approveformyorg
Approve the chaincode definition for my organization.
Usage:
peer lifecycle chaincode approveformyorg [flags]
Flags:
--channel-config-policy string The endorsement policy associated to this chaincode specified as a channel config policy reference
-C, --channelID string The channel on which this command should be executed
--collections-config string The fully qualified path to the collection JSON file including the file name
--connectionProfile string The fully qualified path to the connection profile that provides the necessary connection information for the network. Note: currently only supported for providing peer connection information
-E, --endorsement-plugin string The name of the endorsement plugin to be used for this chaincode
-h, --help help for approveformyorg
--init-required Whether the chaincode requires invoking 'init'
-n, --name string Name of the chaincode
--package-id string The identifier of the chaincode install package
--peerAddresses stringArray The addresses of the peers to connect to
--sequence int The sequence number of the chaincode definition for the channel
--signature-policy string The endorsement policy associated to this chaincode specified as a signature policy
--tlsRootCertFiles stringArray If TLS is enabled, the paths to the TLS root cert files of the peers to connect to. The order and number of certs specified should match the --peerAddresses flag
-V, --validation-plugin string The name of the validation plugin to be used for this chaincode
-v, --version string Version of the chaincode
--waitForEvent Whether to wait for the event from each peer's deliver filtered service signifying that the transaction has been committed successfully (default true)
--waitForEventTimeout duration Time to wait for the event from each peer's deliver filtered service signifying that the 'invoke' transaction has been committed successfully (default 30s)
Global Flags:
--cafile string Path to file containing PEM-encoded trusted certificate(s) for the ordering endpoint
--certfile string Path to file containing PEM-encoded X509 public key to use for mutual TLS communication with the orderer endpoint
--clientauth Use mutual TLS when communicating with the orderer endpoint
--connTimeout duration Timeout for client to connect (default 3s)
--keyfile string Path to file containing PEM-encoded private key to use for mutual TLS communication with the orderer endpoint
-o, --orderer string Ordering service endpoint
--ordererTLSHostnameOverride string The hostname override to use when validating the TLS connection to the orderer.
--tls Use TLS when communicating with the orderer endpoint
peer lifecycle chaincode queryapproved
Query an organization's approved chaincode definition from its peer.
Usage:
peer lifecycle chaincode queryapproved [flags]
Flags:
-C, --channelID string The channel on which this command should be executed
--connectionProfile string The fully qualified path to the connection profile that provides the necessary connection information for the network. Note: currently only supported for providing peer connection information
-h, --help help for queryapproved
-n, --name string Name of the chaincode
-O, --output string The output format for query results. Default is human-readable plain-text. json is currently the only supported format.
--peerAddresses stringArray The addresses of the peers to connect to
--sequence int The sequence number of the chaincode definition for the channel
--tlsRootCertFiles stringArray If TLS is enabled, the paths to the TLS root cert files of the peers to connect to. The order and number of certs specified should match the --peerAddresses flag
Global Flags:
--cafile string Path to file containing PEM-encoded trusted certificate(s) for the ordering endpoint
--certfile string Path to file containing PEM-encoded X509 public key to use for mutual TLS communication with the orderer endpoint
--clientauth Use mutual TLS when communicating with the orderer endpoint
--connTimeout duration Timeout for client to connect (default 3s)
--keyfile string Path to file containing PEM-encoded private key to use for mutual TLS communication with the orderer endpoint
-o, --orderer string Ordering service endpoint
--ordererTLSHostnameOverride string The hostname override to use when validating the TLS connection to the orderer.
--tls Use TLS when communicating with the orderer endpoint
peer lifecycle chaincode checkcommitreadiness
Check whether a chaincode definition is ready to be committed on a channel.
Usage:
peer lifecycle chaincode checkcommitreadiness [flags]
Flags:
--channel-config-policy string The endorsement policy associated to this chaincode specified as a channel config policy reference
-C, --channelID string The channel on which this command should be executed
--collections-config string The fully qualified path to the collection JSON file including the file name
--connectionProfile string The fully qualified path to the connection profile that provides the necessary connection information for the network. Note: currently only supported for providing peer connection information
-E, --endorsement-plugin string The name of the endorsement plugin to be used for this chaincode
-h, --help help for checkcommitreadiness
--init-required Whether the chaincode requires invoking 'init'
-n, --name string Name of the chaincode
-O, --output string The output format for query results. Default is human-readable plain-text. json is currently the only supported format.
--peerAddresses stringArray The addresses of the peers to connect to
--sequence int The sequence number of the chaincode definition for the channel
--signature-policy string The endorsement policy associated to this chaincode specified as a signature policy
--tlsRootCertFiles stringArray If TLS is enabled, the paths to the TLS root cert files of the peers to connect to. The order and number of certs specified should match the --peerAddresses flag
-V, --validation-plugin string The name of the validation plugin to be used for this chaincode
-v, --version string Version of the chaincode
Global Flags:
--cafile string Path to file containing PEM-encoded trusted certificate(s) for the ordering endpoint
--certfile string Path to file containing PEM-encoded X509 public key to use for mutual TLS communication with the orderer endpoint
--clientauth Use mutual TLS when communicating with the orderer endpoint
--connTimeout duration Timeout for client to connect (default 3s)
--keyfile string Path to file containing PEM-encoded private key to use for mutual TLS communication with the orderer endpoint
-o, --orderer string Ordering service endpoint
--ordererTLSHostnameOverride string The hostname override to use when validating the TLS connection to the orderer.
--tls Use TLS when communicating with the orderer endpoint
peer lifecycle chaincode commit
Commit the chaincode definition on the channel.
Usage:
peer lifecycle chaincode commit [flags]
Flags:
--channel-config-policy string The endorsement policy associated to this chaincode specified as a channel config policy reference
-C, --channelID string The channel on which this command should be executed
--collections-config string The fully qualified path to the collection JSON file including the file name
--connectionProfile string The fully qualified path to the connection profile that provides the necessary connection information for the network. Note: currently only supported for providing peer connection information
-E, --endorsement-plugin string The name of the endorsement plugin to be used for this chaincode
-h, --help help for commit
--init-required Whether the chaincode requires invoking 'init'
-n, --name string Name of the chaincode
--peerAddresses stringArray The addresses of the peers to connect to
--sequence int The sequence number of the chaincode definition for the channel
--signature-policy string The endorsement policy associated to this chaincode specified as a signature policy
--tlsRootCertFiles stringArray If TLS is enabled, the paths to the TLS root cert files of the peers to connect to. The order and number of certs specified should match the --peerAddresses flag
-V, --validation-plugin string The name of the validation plugin to be used for this chaincode
-v, --version string Version of the chaincode
--waitForEvent Whether to wait for the event from each peer's deliver filtered service signifying that the transaction has been committed successfully (default true)
--waitForEventTimeout duration Time to wait for the event from each peer's deliver filtered service signifying that the 'invoke' transaction has been committed successfully (default 30s)
Global Flags:
--cafile string Path to file containing PEM-encoded trusted certificate(s) for the ordering endpoint
--certfile string Path to file containing PEM-encoded X509 public key to use for mutual TLS communication with the orderer endpoint
--clientauth Use mutual TLS when communicating with the orderer endpoint
--connTimeout duration Timeout for client to connect (default 3s)
--keyfile string Path to file containing PEM-encoded private key to use for mutual TLS communication with the orderer endpoint
-o, --orderer string Ordering service endpoint
--ordererTLSHostnameOverride string The hostname override to use when validating the TLS connection to the orderer.
--tls Use TLS when communicating with the orderer endpoint
peer lifecycle chaincode querycommitted
Query the committed chaincode definitions by channel on a peer. Optional: provide a chaincode name to query a specific definition.
Usage:
peer lifecycle chaincode querycommitted [flags]
Flags:
-C, --channelID string The channel on which this command should be executed
--connectionProfile string The fully qualified path to the connection profile that provides the necessary connection information for the network. Note: currently only supported for providing peer connection information
-h, --help help for querycommitted
-n, --name string Name of the chaincode
-O, --output string The output format for query results. Default is human-readable plain-text. json is currently the only supported format.
--peerAddresses stringArray The addresses of the peers to connect to
--tlsRootCertFiles stringArray If TLS is enabled, the paths to the TLS root cert files of the peers to connect to. The order and number of certs specified should match the --peerAddresses flag
Global Flags:
--cafile string Path to file containing PEM-encoded trusted certificate(s) for the ordering endpoint
--certfile string Path to file containing PEM-encoded X509 public key to use for mutual TLS communication with the orderer endpoint
--clientauth Use mutual TLS when communicating with the orderer endpoint
--connTimeout duration Timeout for client to connect (default 3s)
--keyfile string Path to file containing PEM-encoded private key to use for mutual TLS communication with the orderer endpoint
-o, --orderer string Ordering service endpoint
--ordererTLSHostnameOverride string The hostname override to use when validating the TLS connection to the orderer.
--tls Use TLS when communicating with the orderer endpoint
Example Usage
peer lifecycle chaincode package example
A chaincode needs to be packaged before it can be installed on your peers.
This example uses the peer lifecycle chaincode package command to package
a Go chaincode.
Use the
--pathflag to indicate the location of the chaincode. The path must be a fully qualified path or a path relative to your present working directory.Use the
--labelflag to provide a chaincode package label ofmyccv1that your organization will use to identify the package.peer lifecycle chaincode package mycc.tar.gz --path $CHAINCODE_DIR --lang golang --label myccv1
peer lifecycle chaincode install example
After the chaincode is packaged, you can use the peer chaincode install command
to install the chaincode on your peers.
Install the
mycc.tar.gzpackage onpeer0.org1.example.com:7051(the peer defined by--peerAddresses).peer lifecycle chaincode install mycc.tar.gz --peerAddresses peer0.org1.example.com:7051
If successful, the command will return the package identifier. The package ID is the package label combined with a hash of the chaincode package taken by the peer.
2019-03-13 13:48:53.691 UTC [cli.lifecycle.chaincode] submitInstallProposal -> INFO 001 Installed remotely: response:<status:200 payload:"\nEmycc:ebd89878c2bbccf62f68c36072626359376aa83c36435a058d453e8dbfd894cc" > 2019-03-13 13:48:53.691 UTC [cli.lifecycle.chaincode] submitInstallProposal -> INFO 002 Chaincode code package identifier: mycc:a7ca45a7cc85f1d89c905b775920361ed089a364e12a9b6d55ba75c965ddd6a9
peer lifecycle chaincode queryinstalled example
You need to use the chaincode package identifier to approve a chaincode
definition for your organization. You can find the package ID for the
chaincodes you have installed by using the
peer lifecycle chaincode queryinstalled command:
peer lifecycle chaincode queryinstalled --peerAddresses peer0.org1.example.com:7051
A successful command will return the package ID associated with the package label.
Get installed chaincodes on peer:
Package ID: myccv1:a7ca45a7cc85f1d89c905b775920361ed089a364e12a9b6d55ba75c965ddd6a9, Label: myccv1
You can also use the
--outputflag to have the CLI format the output as JSON.peer lifecycle chaincode queryinstalled --peerAddresses peer0.org1.example.com:7051 --output json
If successful, the command will return the chaincodes you have installed as JSON.
{ "installed_chaincodes": [ { "package_id": "mycc_1:aab9981fa5649cfe25369fce7bb5086a69672a631e4f95c4af1b5198fe9f845b", "label": "mycc_1", "references": { "mychannel": { "chaincodes": [ { "name": "mycc", "version": "1" } ] } } } ] }
peer lifecycle chaincode getinstalledpackage example
You can retrieve an installed chaincode package from a peer using the
peer lifecycle chaincode getinstalledpackage command. Use the package
identifier returned by queryinstalled.
- Use the
--package-idflag to pass in the chaincode package identifier. Use the--output-directoryflag to specify where to write the chaincode package. If the output directory is not specified, the chaincode package will be written in the current directory.
peer lifecycle chaincode getinstalledpackage --package-id myccv1:a7ca45a7cc85f1d89c905b775920361ed089a364e12a9b6d55ba75c965ddd6a9 --output-directory /tmp --peerAddresses peer0.org1.example.com:7051
peer lifecycle chaincode approveformyorg example
Once the chaincode package has been installed on your peers, you can approve a chaincode definition for your organization. The chaincode definition includes the important parameters of chaincode governance, including the chaincode name, version and the endorsement policy.
Here is an example of the peer lifecycle chaincode approveformyorg command,
which approves the definition of a chaincode named mycc at version 1.0 on
channel mychannel.
Use the
--package-idflag to pass in the chaincode package identifier. Use the--signature-policyflag to define an endorsement policy for the chaincode. Use theinit-requiredflag to request the execution of theInitfunction to initialize the chaincode.export ORDERER_CA=/opt/gopath/src/github.com/hyperledger/fabric/peer/crypto/ordererOrganizations/example.com/orderers/orderer.example.com/msp/tlscacerts/tlsca.example.com-cert.pem peer lifecycle chaincode approveformyorg -o orderer.example.com:7050 --tls --cafile $ORDERER_CA --channelID mychannel --name mycc --version 1.0 --init-required --package-id myccv1:a7ca45a7cc85f1d89c905b775920361ed089a364e12a9b6d55ba75c965ddd6a9 --sequence 1 --signature-policy "AND ('Org1MSP.peer','Org2MSP.peer')" 2019-03-18 16:04:09.046 UTC [cli.lifecycle.chaincode] InitCmdFactory -> INFO 001 Retrieved channel (mychannel) orderer endpoint: orderer.example.com:7050 2019-03-18 16:04:11.253 UTC [chaincodeCmd] ClientWait -> INFO 002 txid [efba188ca77889cc1c328fc98e0bb12d3ad0abcda3f84da3714471c7c1e6c13c] committed with status (VALID) at peer0.org1.example.com:7051You can also use the
--channel-config-policyflag use a policy inside the channel configuration as the chaincode endorsement policy. The default endorsement policy isChannel/Application/Endorsementexport ORDERER_CA=/opt/gopath/src/github.com/hyperledger/fabric/peer/crypto/ordererOrganizations/example.com/orderers/orderer.example.com/msp/tlscacerts/tlsca.example.com-cert.pem peer lifecycle chaincode approveformyorg -o orderer.example.com:7050 --tls --cafile $ORDERER_CA --channelID mychannel --name mycc --version 1.0 --init-required --package-id myccv1:a7ca45a7cc85f1d89c905b775920361ed089a364e12a9b6d55ba75c965ddd6a9 --sequence 1 --channel-config-policy Channel/Application/Admins 2019-03-18 16:04:09.046 UTC [cli.lifecycle.chaincode] InitCmdFactory -> INFO 001 Retrieved channel (mychannel) orderer endpoint: orderer.example.com:7050 2019-03-18 16:04:11.253 UTC [chaincodeCmd] ClientWait -> INFO 002 txid [efba188ca77889cc1c328fc98e0bb12d3ad0abcda3f84da3714471c7c1e6c13c] committed with status (VALID) at peer0.org1.example.com:7051
peer lifecycle chaincode queryapproved example
You can query an organization’s approved chaincode definition by using the peer lifecycle chaincode queryapproved command.
You can use this command to see the details (including package ID) of approved chaincode definitions.
Here is an example of the
peer lifecycle chaincode queryapprovedcommand, which queries the approved definition of a chaincode namedmyccat sequence number1on channelmychannel.peer lifecycle chaincode queryapproved -C mychannel -n mycc --sequence 1 Approved chaincode definition for chaincode 'mycc' on channel 'mychannel': sequence: 1, version: 1, init-required: true, package-id: mycc_1:d02f72000e7c0f715840f51cb8d72d70bc1ba230552f8445dded0ec8b6e0b830, endorsement plugin: escc, validation plugin: vscc
If NO package is specified for the approved definition, this command will display an empty package ID.
You can also use this command without specifying the sequence number in order to query the latest approved definition (latest: the newer of the currently defined sequence number and the next sequence number).
peer lifecycle chaincode queryapproved -C mychannel -n mycc Approved chaincode definition for chaincode 'mycc' on channel 'mychannel': sequence: 3, version: 3, init-required: false, package-id: mycc_1:d02f72000e7c0f715840f51cb8d72d70bc1ba230552f8445dded0ec8b6e0b830, endorsement plugin: escc, validation plugin: vscc
You can also use the
--outputflag to have the CLI format the output as JSON.When querying an approved chaincode definition for which package is specified
peer lifecycle chaincode queryapproved -C mychannel -n mycc --sequence 1 --output json
If successful, the command will return a JSON that has the approved chaincode definition for chaincode
myccat sequence number1on channelmychannel.{ "sequence": 1, "version": "1", "endorsement_plugin": "escc", "validation_plugin": "vscc", "validation_parameter": "EiAvQ2hhbm5lbC9BcHBsaWNhdGlvbi9FbmRvcnNlbWVudA==", "collections": {}, "init_required": true, "source": { "Type": { "LocalPackage": { "package_id": "mycc_1:d02f72000e7c0f715840f51cb8d72d70bc1ba230552f8445dded0ec8b6e0b830" } } } }
When querying an approved chaincode definition for which package is NOT specified
peer lifecycle chaincode queryapproved -C mychannel -n mycc --sequence 2 --output json
If successful, the command will return a JSON that has the approved chaincode definition for chaincode
myccat sequence number2on channelmychannel.{ "sequence": 2, "version": "2", "endorsement_plugin": "escc", "validation_plugin": "vscc", "validation_parameter": "EiAvQ2hhbm5lbC9BcHBsaWNhdGlvbi9FbmRvcnNlbWVudA==", "collections": {}, "source": { "Type": { "Unavailable": {} } } }
peer lifecycle chaincode checkcommitreadiness example
You can check whether a chaincode definition is ready to be committed using the
peer lifecycle chaincode checkcommitreadiness command, which will return
successfully if a subsequent commit of the definition is expected to succeed. It
also outputs which organizations have approved the chaincode definition. If an
organization has approved the chaincode definition specified in the command, the
command will return a value of true. You can use this command to learn whether enough
channel members have approved a chaincode definition to meet the
Application/Channel/Endorsement policy (a majority by default) before the
definition can be committed to a channel.
Here is an example of the
peer lifecycle chaincode checkcommitreadinesscommand, which checks a chaincode namedmyccat version1.0on channelmychannel.export ORDERER_CA=/opt/gopath/src/github.com/hyperledger/fabric/peer/crypto/ordererOrganizations/example.com/orderers/orderer.example.com/msp/tlscacerts/tlsca.example.com-cert.pem peer lifecycle chaincode checkcommitreadiness -o orderer.example.com:7050 --channelID mychannel --tls --cafile $ORDERER_CA --name mycc --version 1.0 --init-required --sequence 1
If successful, the command will return the organizations that have approved the chaincode definition.
Chaincode definition for chaincode 'mycc', version '1.0', sequence '1' on channel 'mychannel' approval status by org: Org1MSP: true Org2MSP: true
You can also use the
--outputflag to have the CLI format the output as JSON.export ORDERER_CA=/opt/gopath/src/github.com/hyperledger/fabric/peer/crypto/ordererOrganizations/example.com/orderers/orderer.example.com/msp/tlscacerts/tlsca.example.com-cert.pem peer lifecycle chaincode checkcommitreadiness -o orderer.example.com:7050 --channelID mychannel --tls --cafile $ORDERER_CA --name mycc --version 1.0 --init-required --sequence 1 --output json
If successful, the command will return a JSON map that shows if an organization has approved the chaincode definition.
{ "Approvals": { "Org1MSP": true, "Org2MSP": true } }
peer lifecycle chaincode commit example
Once a sufficient number of organizations approve a chaincode definition for
their organizations (a majority by default), one organization can commit the
definition the channel using the peer lifecycle chaincode commit command:
This command needs to target the peers of other organizations on the channel to collect their organization endorsement for the definition.
export ORDERER_CA=/opt/gopath/src/github.com/hyperledger/fabric/peer/crypto/ordererOrganizations/example.com/orderers/orderer.example.com/msp/tlscacerts/tlsca.example.com-cert.pem peer lifecycle chaincode commit -o orderer.example.com:7050 --channelID mychannel --name mycc --version 1.0 --sequence 1 --init-required --tls --cafile $ORDERER_CA --peerAddresses peer0.org1.example.com:7051 --peerAddresses peer0.org2.example.com:9051 2019-03-18 16:14:27.258 UTC [chaincodeCmd] ClientWait -> INFO 001 txid [b6f657a14689b27d69a50f39590b3949906b5a426f9d7f0dcee557f775e17882] committed with status (VALID) at peer0.org2.example.com:9051 2019-03-18 16:14:27.321 UTC [chaincodeCmd] ClientWait -> INFO 002 txid [b6f657a14689b27d69a50f39590b3949906b5a426f9d7f0dcee557f775e17882] committed with status (VALID) at peer0.org1.example.com:7051
peer lifecycle chaincode querycommitted example
You can query the chaincode definitions that have been committed to a channel by
using the peer lifecycle chaincode querycommitted command. You can use this
command to query the current definition sequence number before upgrading a
chaincode.
You need to supply the chaincode name and channel name in order to query a specific chaincode definition and the organizations that have approved it.
export ORDERER_CA=/opt/gopath/src/github.com/hyperledger/fabric/peer/crypto/ordererOrganizations/example.com/orderers/orderer.example.com/msp/tlscacerts/tlsca.example.com-cert.pem peer lifecycle chaincode querycommitted -o orderer.example.com:7050 --channelID mychannel --name mycc --tls --cafile $ORDERER_CA --peerAddresses peer0.org1.example.com:7051 Committed chaincode definition for chaincode 'mycc' on channel 'mychannel': Version: 1, Sequence: 1, Endorsement Plugin: escc, Validation Plugin: vscc Approvals: [Org1MSP: true, Org2MSP: true]
You can also specify just the channel name in order to query all chaincode definitions on that channel.
export ORDERER_CA=/opt/gopath/src/github.com/hyperledger/fabric/peer/crypto/ordererOrganizations/example.com/orderers/orderer.example.com/msp/tlscacerts/tlsca.example.com-cert.pem peer lifecycle chaincode querycommitted -o orderer.example.com:7050 --channelID mychannel --tls --cafile $ORDERER_CA --peerAddresses peer0.org1.example.com:7051 Committed chaincode definitions on channel 'mychannel': Name: mycc, Version: 1, Sequence: 1, Endorsement Plugin: escc, Validation Plugin: vscc Name: yourcc, Version: 2, Sequence: 3, Endorsement Plugin: escc, Validation Plugin: vscc
You can also use the
--outputflag to have the CLI format the output as JSON.For querying a specific chaincode definition
export ORDERER_CA=/opt/gopath/src/github.com/hyperledger/fabric/peer/crypto/ordererOrganizations/example.com/orderers/orderer.example.com/msp/tlscacerts/tlsca.example.com-cert.pem peer lifecycle chaincode querycommitted -o orderer.example.com:7050 --channelID mychannel --name mycc --tls --cafile $ORDERER_CA --peerAddresses peer0.org1.example.com:7051 --output json
If successful, the command will return a JSON that has committed chaincode definition for chaincode ‘mycc’ on channel ‘mychannel’.
{ "sequence": 1, "version": "1", "endorsement_plugin": "escc", "validation_plugin": "vscc", "validation_parameter": "EiAvQ2hhbm5lbC9BcHBsaWNhdGlvbi9FbmRvcnNlbWVudA==", "collections": {}, "init_required": true, "approvals": { "Org1MSP": true, "Org2MSP": true } }
The
validation_parameteris base64 encoded. An example of the command to decode it is as follows.echo EiAvQ2hhbm5lbC9BcHBsaWNhdGlvbi9FbmRvcnNlbWVudA== | base64 -d /Channel/Application/Endorsement
For querying all chaincode definitions on that channel
export ORDERER_CA=/opt/gopath/src/github.com/hyperledger/fabric/peer/crypto/ordererOrganizations/example.com/orderers/orderer.example.com/msp/tlscacerts/tlsca.example.com-cert.pem peer lifecycle chaincode querycommitted -o orderer.example.com:7050 --channelID mychannel --tls --cafile $ORDERER_CA --peerAddresses peer0.org1.example.com:7051 --output json
If successful, the command will return a JSON that has committed chaincode definitions on channel ‘mychannel’.
{ "chaincode_definitions": [ { "name": "mycc", "sequence": 1, "version": "1", "endorsement_plugin": "escc", "validation_plugin": "vscc", "validation_parameter": "EiAvQ2hhbm5lbC9BcHBsaWNhdGlvbi9FbmRvcnNlbWVudA==", "collections": {}, "init_required": true }, { "name": "yourcc", "sequence": 3, "version": "2", "endorsement_plugin": "escc", "validation_plugin": "vscc", "validation_parameter": "EiAvQ2hhbm5lbC9BcHBsaWNhdGlvbi9FbmRvcnNlbWVudA==", "collections": {} } ] }
This work is licensed under a Creative Commons Attribution 4.0 International License.
peer channel
peer channel 命令允许管理员在 Peer 上执行通道相关的操作,比如加入通道,或者列出当前 Peer 加入的通道。
peer channel
Operate a channel: create|fetch|join|list|update|signconfigtx|getinfo.
Usage:
peer channel [command]
Available Commands:
create Create a channel
fetch Fetch a block
getinfo get blockchain information of a specified channel.
join Joins the peer to a channel.
list List of channels peer has joined.
signconfigtx Signs a configtx update.
update Send a configtx update.
Flags:
--cafile string Path to file containing PEM-encoded trusted certificate(s) for the ordering endpoint
--certfile string Path to file containing PEM-encoded X509 public key to use for mutual TLS communication with the orderer endpoint
--clientauth Use mutual TLS when communicating with the orderer endpoint
--connTimeout duration Timeout for client to connect (default 3s)
-h, --help help for channel
--keyfile string Path to file containing PEM-encoded private key to use for mutual TLS communication with the orderer endpoint
-o, --orderer string Ordering service endpoint
--ordererTLSHostnameOverride string The hostname override to use when validating the TLS connection to the orderer.
--tls Use TLS when communicating with the orderer endpoint
Use "peer channel [command] --help" for more information about a command.
peer channel create
Create a channel and write the genesis block to a file.
Usage:
peer channel create [flags]
Flags:
-c, --channelID string In case of a newChain command, the channel ID to create. It must be all lower case, less than 250 characters long and match the regular expression: [a-z][a-z0-9.-]*
-f, --file string Configuration transaction file generated by a tool such as configtxgen for submitting to orderer
-h, --help help for create
--outputBlock string The path to write the genesis block for the channel. (default ./<channelID>.block)
-t, --timeout duration Channel creation timeout (default 10s)
Global Flags:
--cafile string Path to file containing PEM-encoded trusted certificate(s) for the ordering endpoint
--certfile string Path to file containing PEM-encoded X509 public key to use for mutual TLS communication with the orderer endpoint
--clientauth Use mutual TLS when communicating with the orderer endpoint
--connTimeout duration Timeout for client to connect (default 3s)
--keyfile string Path to file containing PEM-encoded private key to use for mutual TLS communication with the orderer endpoint
-o, --orderer string Ordering service endpoint
--ordererTLSHostnameOverride string The hostname override to use when validating the TLS connection to the orderer.
--tls Use TLS when communicating with the orderer endpoint
peer channel fetch
Fetch a specified block, writing it to a file.
Usage:
peer channel fetch <newest|oldest|config|(number)> [outputfile] [flags]
Flags:
--bestEffort Whether fetch requests should ignore errors and return blocks on a best effort basis
-c, --channelID string In case of a newChain command, the channel ID to create. It must be all lower case, less than 250 characters long and match the regular expression: [a-z][a-z0-9.-]*
-h, --help help for fetch
Global Flags:
--cafile string Path to file containing PEM-encoded trusted certificate(s) for the ordering endpoint
--certfile string Path to file containing PEM-encoded X509 public key to use for mutual TLS communication with the orderer endpoint
--clientauth Use mutual TLS when communicating with the orderer endpoint
--connTimeout duration Timeout for client to connect (default 3s)
--keyfile string Path to file containing PEM-encoded private key to use for mutual TLS communication with the orderer endpoint
-o, --orderer string Ordering service endpoint
--ordererTLSHostnameOverride string The hostname override to use when validating the TLS connection to the orderer.
--tls Use TLS when communicating with the orderer endpoint
peer channel getinfo
get blockchain information of a specified channel. Requires '-c'.
Usage:
peer channel getinfo [flags]
Flags:
-c, --channelID string In case of a newChain command, the channel ID to create. It must be all lower case, less than 250 characters long and match the regular expression: [a-z][a-z0-9.-]*
-h, --help help for getinfo
Global Flags:
--cafile string Path to file containing PEM-encoded trusted certificate(s) for the ordering endpoint
--certfile string Path to file containing PEM-encoded X509 public key to use for mutual TLS communication with the orderer endpoint
--clientauth Use mutual TLS when communicating with the orderer endpoint
--connTimeout duration Timeout for client to connect (default 3s)
--keyfile string Path to file containing PEM-encoded private key to use for mutual TLS communication with the orderer endpoint
-o, --orderer string Ordering service endpoint
--ordererTLSHostnameOverride string The hostname override to use when validating the TLS connection to the orderer.
--tls Use TLS when communicating with the orderer endpoint
peer channel join
Joins the peer to a channel.
Usage:
peer channel join [flags]
Flags:
-b, --blockpath string Path to file containing genesis block
-h, --help help for join
Global Flags:
--cafile string Path to file containing PEM-encoded trusted certificate(s) for the ordering endpoint
--certfile string Path to file containing PEM-encoded X509 public key to use for mutual TLS communication with the orderer endpoint
--clientauth Use mutual TLS when communicating with the orderer endpoint
--connTimeout duration Timeout for client to connect (default 3s)
--keyfile string Path to file containing PEM-encoded private key to use for mutual TLS communication with the orderer endpoint
-o, --orderer string Ordering service endpoint
--ordererTLSHostnameOverride string The hostname override to use when validating the TLS connection to the orderer.
--tls Use TLS when communicating with the orderer endpoint
peer channel list
List of channels peer has joined.
Usage:
peer channel list [flags]
Flags:
-h, --help help for list
Global Flags:
--cafile string Path to file containing PEM-encoded trusted certificate(s) for the ordering endpoint
--certfile string Path to file containing PEM-encoded X509 public key to use for mutual TLS communication with the orderer endpoint
--clientauth Use mutual TLS when communicating with the orderer endpoint
--connTimeout duration Timeout for client to connect (default 3s)
--keyfile string Path to file containing PEM-encoded private key to use for mutual TLS communication with the orderer endpoint
-o, --orderer string Ordering service endpoint
--ordererTLSHostnameOverride string The hostname override to use when validating the TLS connection to the orderer.
--tls Use TLS when communicating with the orderer endpoint
peer channel signconfigtx
Signs the supplied configtx update file in place on the filesystem. Requires '-f'.
Usage:
peer channel signconfigtx [flags]
Flags:
-f, --file string Configuration transaction file generated by a tool such as configtxgen for submitting to orderer
-h, --help help for signconfigtx
Global Flags:
--cafile string Path to file containing PEM-encoded trusted certificate(s) for the ordering endpoint
--certfile string Path to file containing PEM-encoded X509 public key to use for mutual TLS communication with the orderer endpoint
--clientauth Use mutual TLS when communicating with the orderer endpoint
--connTimeout duration Timeout for client to connect (default 3s)
--keyfile string Path to file containing PEM-encoded private key to use for mutual TLS communication with the orderer endpoint
-o, --orderer string Ordering service endpoint
--ordererTLSHostnameOverride string The hostname override to use when validating the TLS connection to the orderer.
--tls Use TLS when communicating with the orderer endpoint
peer channel update
Signs and sends the supplied configtx update file to the channel. Requires '-f', '-o', '-c'.
Usage:
peer channel update [flags]
Flags:
-c, --channelID string In case of a newChain command, the channel ID to create. It must be all lower case, less than 250 characters long and match the regular expression: [a-z][a-z0-9.-]*
-f, --file string Configuration transaction file generated by a tool such as configtxgen for submitting to orderer
-h, --help help for update
Global Flags:
--cafile string Path to file containing PEM-encoded trusted certificate(s) for the ordering endpoint
--certfile string Path to file containing PEM-encoded X509 public key to use for mutual TLS communication with the orderer endpoint
--clientauth Use mutual TLS when communicating with the orderer endpoint
--connTimeout duration Timeout for client to connect (default 3s)
--keyfile string Path to file containing PEM-encoded private key to use for mutual TLS communication with the orderer endpoint
-o, --orderer string Ordering service endpoint
--ordererTLSHostnameOverride string The hostname override to use when validating the TLS connection to the orderer.
--tls Use TLS when communicating with the orderer endpoint
使用示例
peer channel create 示例
本样例展示了 peer channel create 使用全局标识 --orderer 的用法。
使用
./createchannel.tx中的配置交易创建样例通道mychannel。使用排序节点orderer.example.com:7050。peer channel create -c mychannel -f ./createchannel.tx --orderer orderer.example.com:7050 2018-02-25 08:23:57.548 UTC [channelCmd] InitCmdFactory -> INFO 003 Endorser and orderer connections initialized 2018-02-25 08:23:57.626 UTC [channelCmd] InitCmdFactory -> INFO 019 Endorser and orderer connections initialized 2018-02-25 08:23:57.834 UTC [channelCmd] readBlock -> INFO 020 Received block: 0 2018-02-25 08:23:57.835 UTC [main] main -> INFO 021 Exiting.....
返回区块 0 代表已经成功创建通道。
下一个例子展示使用 peer channel create 的命令选项。
使用
orderer.example.com:7050创建新的通道mychannel,配置交易同样定义在./createchannel.tx文件中。但多了通道创建等待30s的选项。peer channel create -c mychannel --orderer orderer.example.com:7050 -f ./createchannel.tx -t 30s 2018-02-23 06:31:58.568 UTC [channelCmd] InitCmdFactory -> INFO 003 Endorser and orderer connections initialized 2018-02-23 06:31:58.669 UTC [channelCmd] InitCmdFactory -> INFO 019 Endorser and orderer connections initialized 2018-02-23 06:31:58.877 UTC [channelCmd] readBlock -> INFO 020 Received block: 0 2018-02-23 06:31:58.878 UTC [main] main -> INFO 021 Exiting..... ls -l -rw-r--r-- 1 root root 11982 Feb 25 12:24 mychannel.block
你可以看到输出了区块0,证明了
mychannel创建成功了,区块0存在了本地目录,名字为mychanenl.block。区块0通常被长尾 创世块,因为它包含了通道的初始配置。所有对通道的更新,都会创建配置区块存在通道的区块链上,并且新配置区块中的配置会取代老的配置。
peer channel fetch 样例
以下是 peer channel fetch 命令的样例.
使用
newest选项获取指定通道的最新区块,并把区块保存到mychanenl.block文件中。peer channel fetch newest mychannel.block -c mychannel --orderer orderer.example.com:7050 2018-02-25 13:10:16.137 UTC [channelCmd] InitCmdFactory -> INFO 003 Endorser and orderer connections initialized 2018-02-25 13:10:16.144 UTC [channelCmd] readBlock -> INFO 00a Received block: 32 2018-02-25 13:10:16.145 UTC [main] main -> INFO 00b Exiting..... ls -l -rw-r--r-- 1 root root 11982 Feb 25 13:10 mychannel.block
你可以看到获取的区块高度是32,并且区块已经被写入到
mychanenl.block文件中。使用
(block number)获取指定的区块,并且保存到默认的区块文件,本例中区块号是16。peer channel fetch 16 -c mychannel --orderer orderer.example.com:7050 2018-02-25 13:46:50.296 UTC [channelCmd] InitCmdFactory -> INFO 003 Endorser and orderer connections initialized 2018-02-25 13:46:50.302 UTC [channelCmd] readBlock -> INFO 00a Received block: 16 2018-02-25 13:46:50.302 UTC [main] main -> INFO 00b Exiting..... ls -l -rw-r--r-- 1 root root 11982 Feb 25 13:10 mychannel.block -rw-r--r-- 1 root root 4783 Feb 25 13:46 mychannel_16.block
你可以看到获取的区块高度是16,并且区块已经被写入到
mychanenl.block文件中。对于配置区块,可以使用
configtxlator命令解析区块文件。请查看该命令的帮助信息获取解析样例。用户交易区块同样可以被解析,但需要写一个专门的程序做这件事。
peer channel getinfo example
如下是 peer channel getinfo 命令的使用样例。
获取当前 Peer 节点上
mychannel通道的信息。peer channel getinfo -c mychannel 2018-02-25 15:15:44.135 UTC [channelCmd] InitCmdFactory -> INFO 003 Endorser and orderer connections initialized Blockchain info: {"height":5,"currentBlockHash":"JgK9lcaPUNmFb5Mp1qe1SVMsx3o/22Ct4+n5tejcXCw=","previousBlockHash":"f8lZXoAn3gF86zrFq7L1DzW2aKuabH9Ow6SIE5Y04a4="} 2018-02-25 15:15:44.139 UTC [main] main -> INFO 006 Exiting.....
你可以看到
mychannel最新的区块是5,以及当前通道中,最近区块的加密哈希值。
peer channel join example
如下是 peer channel join 命令的例子.
把一个 Peer 加入到
./mychannel.genesis.block定义的通道。本例中,通道配置块是之前通过peer channel fetch命令获取的区块。peer channel join -b ./mychannel.genesis.block 2018-02-25 12:25:26.511 UTC [channelCmd] InitCmdFactory -> INFO 003 Endorser and orderer connections initialized 2018-02-25 12:25:26.571 UTC [channelCmd] executeJoin -> INFO 006 Successfully submitted proposal to join channel 2018-02-25 12:25:26.571 UTC [main] main -> INFO 007 Exiting.....
你可以看到 Peer 已成功创建了加入通道的交易。
peer channel list example
如下是 peer channel list 命令的样例。
列出 Peer 加入的通道。
peer channel list 2018-02-25 14:21:20.361 UTC [channelCmd] InitCmdFactory -> INFO 003 Endorser and orderer connections initialized Channels peers has joined: mychannel 2018-02-25 14:21:20.372 UTC [main] main -> INFO 006 Exiting.....
你可以看到 Peer 加入了
mychannel通道.
peer channel signconfigtx example
如下是 peer channel signconfigtx 命令的样例。
为定义在
./updatechannel.txn中的channel update交易进行签名。样例在执行命令前后列出了配置交易文件。ls -l -rw-r--r-- 1 anthonyodowd staff 284 25 Feb 18:16 updatechannel.tx peer channel signconfigtx -f updatechannel.tx 2018-02-25 18:16:44.456 GMT [channelCmd] InitCmdFactory -> INFO 001 Endorser and orderer connections initialized 2018-02-25 18:16:44.459 GMT [main] main -> INFO 002 Exiting..... ls -l -rw-r--r-- 1 anthonyodowd staff 2180 25 Feb 18:16 updatechannel.tx
你可以看到配置交易文件
updatechannel.tx的大小从 284 字节增加到 2180 字节,说明 Peer 成功对配置交易文件进行了签名。
peer channel update example
如下是 peer channel update 命令的样例.
使用
./updatechannel.tx中定义的配置交易更新mychannel的配置。使用orderer.example.com:7050作为排序节点,把配置交易发送给在通道中的所有 Peer,让它们更新本地通道的配置。peer channel update -c mychannel -f ./updatechannel.tx -o orderer.example.com:7050 2018-02-23 06:32:11.569 UTC [channelCmd] InitCmdFactory -> INFO 003 Endorser and orderer connections initialized 2018-02-23 06:32:11.626 UTC [main] main -> INFO 010 Exiting.....
可以看到通道
mychannel成功被更新。
This work is licensed under a Creative Commons Attribution 4.0 International License.
peer version
peer version 命令可以查看 peer 的版本信息。它会显示版本号、Commit SHA、Go 的版本、操作系统及架构和链码信息。例如:
peer:
Version: 2.1.0
Commit SHA: b78d79b
Go version: go1.14.1
OS/Arch: linux/amd64
Chaincode:
Base Docker Label: org.hyperledger.fabric
Docker Namespace: hyperledger
语法
peer version 命令没有参数。
peer version
Print current version of the fabric peer server.
Usage:
peer version [flags]
Flags:
-h, --help help for version
This work is licensed under a Creative Commons Attribution 4.0 International License.
peer node
管理员可以通过 peer node 命令来启动 Peer 节点,将节点中的所有通道重置为创世区块,或者将某个通道回滚到给定区块号。
peer node start
启动一个和网络交互的节点。
Starts a node that interacts with the network.
Usage:
peer node start [flags]
Flags:
-h, --help help for start
--peer-chaincodedev start peer in chaincode development mode
peer node reset
将通道重置到创世区块。执行该命令时,节点必须是离线的。当节点在重置之后启动时,它将会从排序节点或者其他 Peer 节点从1号区块开始获取区块,并重建区块存储和状态数据库。
Usage:
peer node reset [flags]
Flags:
-h, --help reset 的帮助
peer node rollback
从指定的区块号回滚通道。执行该命令时,节点必须是离线的。当节点在回滚之后启动时,它将会从排序节点或者其他 Peer 节点获取回滚过程中删除的区块,并重建区块存储和状态数据库。
Usage:
peer node rollback [flags]
Flags:
-b, --blockNumber uint 通道要回滚的区块序号
-c, --channelID string 要回滚的通道
-h, --help rollback 的帮助
示例用法
peer node start 示例
下边的命令:
peer node start --peer-chaincodedev
以开发者模式启动 Peer 节点。一般来说链码容器由 Peer 节点启动和维护。但是在链码的开发者模式下,链码通过用户来编译和启动。这个模式在链码开发阶段很有帮助。
peer node reset 示例
peer node reset
resets all channels in the peer to the genesis block, i.e., the first block in the channel. The command also records the pre-reset height of each channel in the file system. Note that the peer process should be stopped while executing this command. If the peer process is running, this command detects that and returns an error instead of performing the reset. When the peer is started after performing the reset, the peer will fetch the blocks for each channel which were removed by the reset command (either from other peers or orderers) and commit the blocks up to the pre-reset height. Until all channels reach the pre-reset height, the peer will not endorse any transactions.
peer node rollback 示例
The following command:
peer node rollback -c ch1 -b 150
rolls back the channel ch1 to block number 150. The command also records the pre-rolled back height of channel ch1 in the file system. Note that the peer should be stopped while executing this command. If the peer process is running, this command detects that and returns an error instead of performing the rollback. When the peer is started after performing the rollback, the peer will fetch the blocks for channel ch1 which were removed by the rollback command (either from other peers or orderers) and commit the blocks up to the pre-rolled back height. Until the channel ch1 reaches the pre-rolled back height, the peer will not endorse any transaction for any channel.
This work is licensed under a Creative Commons Attribution 4.0 International License.
configtxgen
configtxgen 命令允许用户创建和查看通道配置相关构件。所生成的构件取决于 configtx.yaml 的内容。
The configtxgen command allows users to create and inspect channel config
related artifacts. The content of the generated artifacts is dictated by the
contents of configtx.yaml.
语法
configtxgen 工具没有子命令,但是支持标识(flag),通过设置标识可以完成不同的任务。
configtxgen
Usage of configtxgen:
-asOrg string
以特定组织(按名称)执行配置生成,仅包括组织(可能)有权设置的写集中的值。
-channelCreateTxBaseProfile string
指定要视为排序系统通道当前状态的轮廓(profile),以允许在通道创建交易生成期间修改非应用程序参数。仅在与 “outputCreateChannelTX” 结合时有效。
-channelID string
配置交易中使用的通道 ID。
-configPath string
包含所用的配置的路径。(如果设置的话)
-inspectBlock string
打印指定路径的区块中包含的配置。
-inspectChannelCreateTx string
打印指定路径的交易中包含的配置。
-outputAnchorPeersUpdate string
创建一个更新锚节点的配置更新(仅在默认通道创建时有效,并仅用于第一次更新)。
-outputBlock string
写入创世区块的路径。(如果设置的话)
-outputCreateChannelTx string
写入通道创建交易的路径。(如果设置的话)
-printOrg string
以 JSON 方式打印组织的定义。(手动向通道中添加组织时很有用)
-profile string
configtx.yaml 中用于生成的轮廓。
-version
显示版本信息。
用法
输出初始区块
将通道 orderer-system-channel 和轮廓(Profile) SampleSingleMSPRaftV1_1 的创世区块写入 genesis_block.pb 。
configtxgen -outputBlock genesis_block.pb -profile SampleSingleMSPRaftV1_1 -channelID orderer-system-channel
输出创建通道的交易
将轮廓 SampleSingleMSPChannelV1_1 的通道创建交易写入 create_chan_tx.pb。
configtxgen -outputCreateChannelTx create_chan_tx.pb -profile SampleSingleMSPChannelV1_1 -channelID application-channel-1
查看创建通道交易
将通道创建交易 create_chan_tx.pb 以 JSON 的格式打印到屏幕上。
configtxgen -inspectChannelCreateTx create_chan_tx.pb
打印组织定义
基于 configtx.yaml 的配置项(比如 MSPdir)来构建组织并以 JSON 格式打印到屏幕。(常用于创建通道时的重新配置,例如添加成员)
configtxgen -printOrg Org1
输出锚节点交易(弃用)
将配置更新交易输出到 anchor_peer_tx.pb,就是将组织 Org1 的锚节点设置成 configtx.yaml 中轮廓 SampleSingleMSPChannelV1_1 所定义的。
configtxgen -outputAnchorPeersUpdate anchor_peer_tx.pb -profile SampleSingleMSPChannelV1_1 -asOrg Org1
The -outputAnchorPeersUpdate output flag has been deprecated. To set anchor
peers on the channel, use configtxlator to update the
channel configuration.
配置
configtxgen 工具的输出依赖于 configtx.yaml。configtx.yaml 可在 FABRIC_CFG_PATH 下找到,且在 configtxgen 执行时必须存在。
Refer to the sample configtx.yaml shipped with Fabric for all possible
configuration options. You may find this file in the config directory of
the release artifacts tar, or you may find it under the sampleconfig folder
if you are building from source.
This work is licensed under a Creative Commons Attribution 4.0 International License.
configtxlator
configtxlator 命令允许用户在 protobuf 和 JSON 版本的 fabric 数据结构之间进行转换,并创建配置更新。该命令可以启动 REST 服务器并通过 HTTP 公开,也可以直接用作命令行工具。
configtxlator start
usage: configtxlator start [<flags>]
启动 configtxlator REST 服务
Flags:
--help 查看完整的帮助(可以尝试 --help-long 和 --help-man)。
--hostname="0.0.0.0" REST 服务器监听的主机名或者 IP。
--port=7059 REST 服务器监听的端口。
--CORS=CORS ... 允许跨域的域名, 例如 ‘*’ 或者 ‘www.example.com’ (可能是重复的)。
configtxlator proto_encode
usage: configtxlator proto_encode --type=TYPE [<flags>]
将 JSON 文档转换为 protobuf。
Flags:
--help 查看完整的帮助(可以尝试 --help-long 和 --help-man)。
--type=TYPE 要将 protobuf 编码成的类型。例如‘common.Config’。
--input=/dev/stdin 包含 JSON 文档的文件。
--output=/dev/stdout 要将输出写入的文件。
configtxlator proto_decode
usage: configtxlator proto_decode --type=TYPE [<flags>]
将 proto 消息转换为 JSON。
Converts a proto message to JSON.
Flags:
--help 查看完整的帮助(可以尝试 --help-long 和 --help-man)。
--type=TYPE 要将 protobuf 解码成的类型。例如‘common.Config’。
--input=/dev/stdin 包含 proto 消息的文件。
--output=/dev/stdout 要将 JSON 文档写入的文件。
configtxlator compute_update
usage: configtxlator compute_update --channel_id=CHANNEL_ID [<flags>]
比较两个编码(marshaled)的 common.Config 信息,并计算它们的更新。
Flags:
--help 查看完整的帮助(可以尝试 --help-long 和 --help-man)。
--original=ORIGINAL 原始配置信息。
--updated=UPDATED 更新的配置信息。
--channel_id=CHANNEL_ID 本次更新的通道名。
--output=/dev/stdout 要将 JSON 文档写入的文件。
configtxlator version
usage: configtxlator version
显示版本信息。
Flags:
--help 查看完整的帮助(可以尝试 --help-long 和 --help-man)。
示例
解码
将一个名为 fabric_block.pb 的块解码为 JSON 并打印到标准输出。
configtxlator proto_decode --input fabric_block.pb --type common.Block
或者,在启动 REST 服务器之后,使用下面的 curl 命令通过 REST API 执行相同的操作。
curl -X POST --data-binary @fabric_block.pb "${CONFIGTXLATOR_URL}/protolator/decode/common.Block"
编码
将策略的 JSON 文档从标准输入转换为名为 policy.pb 的文件。
configtxlator proto_encode --type common.Policy --output policy.pb
或者,在启动 REST 服务器之后,使用下面的 curl 命令通过 REST API 执行相同的操作。
curl -X POST --data-binary /dev/stdin "${CONFIGTXLATOR_URL}/protolator/encode/common.Policy" > policy.pb
Pipelines
从 original_config.pb 和 modified_config.pb 计算配置更新,然后将其解码为 JSON,再将其打印到标准输出。
configtxlator compute_update --channel_id testchan --original original_config.pb --updated modified_config.pb | configtxlator proto_decode --type common.ConfigUpdate
或者,在启动 REST 服务器之后,使用下面的 curl 命令通过 REST API 执行相同的操作。
curl -X POST -F channel=testchan -F "original=@original_config.pb" -F "updated=@modified_config.pb" "${CONFIGTXLATOR_URL}/configtxlator/compute/update-from-configs" | curl -X POST --data-binary /dev/stdin "${CONFIGTXLATOR_URL}/protolator/decode/common.ConfigUpdate"
附加笔记
该工具名称是 configtx 和 translator 的组合,旨在表示该工具只是在不同的等效数据表示之间进行转换。它不生成配置。它不提交或检索配置。它不修改配置本身,只是在 configtx 格式的不同视图之间提供一些双射操作。
对于 REST 服务器,既没有配置文件 configtxlator,也没有包含任何身份验证或授权工具。因为 configtxlator 不能访问任何可能被认为敏感的数据、关键材料或其他信息,所以服务器的所有者将其暴露给其他客户端没有风险。但是,由于用户发送到 REST 服务器的数据可能是机密的,所以用户应该信任服务器的管理员、运行本地实例或者通过 CLI 进行操作。
This work is licensed under a Creative Commons Attribution 4.0 International License.
cryptogen
cryptogen 是用来生成 Hyperledger Fabric 密钥材料的工具。它为测试提供了一种预配置网络的工具。通常它不应使用在生产环境中。
cryptogen help
usage: cryptogen [<flags>] <command> [<args> ...]
生成 Hyperledger Fabric 密钥材料的工具。
Flags:
--help 查看完整的帮助(可以尝试 --help-long 和 --help-man)。
Commands:
help [<command>...]
显示帮助。
generate [<flags>]
生成密钥材料。
showtemplate
显示默认配置模板。
version
显示版本信息。
extend [<flags>]
扩展现有网络。
cryptogen generate
usage: cryptogen generate [<flags>]
生成密钥材料
Flags:
--help 查看完整的帮助(可以尝试 --help-long 和 --help-man)。
--output="crypto-config" 用来存放构件的输出目录。
--config=CONFIG 使用的配置模板。
cryptogen showtemplate
usage: cryptogen showtemplate
Show the default configuration template
Flags:
--help Show context-sensitive help (also try --help-long and --help-man).
cryptogen extend
usage: cryptogen extend [<flags>]
扩展现有网络。
Flags:
--help 查看完整的帮助(可以尝试 --help-long 和 --help-man)。
--input="crypto-config" 存放现有网络的输入目录。、existing network place
--config=CONFIG 使用的配置模板。
cryptogen version
usage: cryptogen version
显示版本信息。
Flags:
--help 查看完整的帮助(可以尝试 --help-long 和 --help-man)。
用法
这里有一个例子,在 cryptogen extend 命令上使用不同的标识(flag)。
cryptogen extend --input="crypto-config" --config=config.yaml
org3.example.com
这里 config.yaml 添加了一个新组织 org3.example.com。
This work is licensed under a Creative Commons Attribution 4.0 International License.
服务发现命令行界面
Service Discovery CLI
发现服务有自己的命令行界面(CLI),它用YAML配置文件来对包括证书和私钥路径以及成员服务提供者身份证(MSP ID)在内的属性进行维持。
The discovery service has its own Command Line Interface (CLI) which uses a YAML configuration file to persist properties such as certificate and private key paths, as well as MSP ID.
discover 命令有以下子命令:
The discover command has the following subcommands:
- saveConfig
- peers
- config
- endorsers
- saveConfig
- peers
- config
- endorsers
And the usage of the command is shown below:
下面展示的是该命令的用法:
usage: discover [<flags>] <command> [<args> ...]
~~~~ {.sourceCode .shell}
usage: discover [<flags>] <command> [<args> ...]
Command line client for fabric discovery service
Command line client for fabric discovery service
Flags:
--help Show context-sensitive help (also try --help-long and --help-man).
--configFile=CONFIGFILE Specifies the config file to load the configuration from
--peerTLSCA=PEERTLSCA Sets the TLS CA certificate file path that verifies the TLS peer's certificate
--tlsCert=TLSCERT (Optional) Sets the client TLS certificate file path that is used when the peer enforces client authentication
--tlsKey=TLSKEY (Optional) Sets the client TLS key file path that is used when the peer enforces client authentication
--userKey=USERKEY Sets the user's key file path that is used to sign messages sent to the peer
--userCert=USERCERT Sets the user's certificate file path that is used to authenticate the messages sent to the peer
--MSP=MSP Sets the MSP ID of the user, which represents the CA(s) that issued its user certificate
Commands:
help [<command>...]
Show help.
Commands:
help [<command>...]
Show help.
peers [<flags>]
Discover peers
peers [<flags>]
Discover peers
config [<flags>]
Discover channel config
config [<flags>]
Discover channel config
endorsers [<flags>]
Discover chaincode endorsers
endorsers [<flags>]
Discover chaincode endorsers
saveConfig
Save the config passed by flags into the file specified by --configFile
saveConfig Save the config passed by flags into the file specified by –configFile
Configuring external endpoints
------------------------------
配置外部端点
------------------------------
Currently, to see peers in service discovery they need to have `EXTERNAL_ENDPOINT`
to be configured for them. Otherwise, Fabric assumes the peer should not be
disclosed.
当前,若想在服务发现中看到节点,需要在其上配置 `EXTERNAL_ENDPOINT`。否则,Fabric假定该节点不应被揭露。
To define these endpoints, you need to specify them in the `core.yaml` of the
peer, replacing the sample endpoint below with the ones of your peer.
要定义这些端点,就得在peer的 `core.yaml `字段指明端点,把下面的样本端点换成你peer上的端点。
```
CORE_PEER_GOSSIP_EXTERNALENDPOINT=peer1.org1.example.com:8051
```
```
CORE_PEER_GOSSIP_EXTERNALENDPOINT=peer1.org1.example.com:8051
```
Persisting configuration
------------------------
维持配置
------------------------
To persist the configuration, a config file name should be supplied via
the flag `--configFile`, along with the command `saveConfig`:
要想维持配置,需要通过`—configFile` flag和 `saveConfig`命令来提供一个配置文件名:
```
discover --configFile conf.yaml --peerTLSCA tls/ca.crt --userKey msp/keystore/ea4f6a38ac7057b6fa9502c2f5f39f182e320f71f667749100fe7dd94c23ce43_sk --userCert msp/signcerts/User1\@org1.example.com-cert.pem --MSP Org1MSP saveConfig
```
~~~~ {.sourceCode .shell}
discover --configFile conf.yaml --peerTLSCA tls/ca.crt --userKey msp/keystore/ea4f6a38ac7057b6fa9502c2f5f39f182e320f71f667749100fe7dd94c23ce43_sk --userCert msp/signcerts/User1\@org1.example.com-cert.pem --MSP Org1MSP saveConfig
By executing the above command, configuration file would be created:
通过执行以上命令可创建配置文件:
$ cat conf.yaml
version: 0
tlsconfig:
certpath: ""
keypath: ""
peercacertpath: /opt/gopath/src/github.com/hyperledger/fabric/peer/crypto/peerOrganizations/org1.example.com/users/User1@org1.example.com/tls/ca.crt
timeout: 0s
signerconfig:
mspid: Org1MSP
identitypath: /opt/gopath/src/github.com/hyperledger/fabric/peer/crypto/peerOrganizations/org1.example.com/users/User1@org1.example.com/msp/signcerts/User1@org1.example.com-cert.pem
keypath: /opt/gopath/src/github.com/hyperledger/fabric/peer/crypto/peerOrganizations/org1.example.com/users/User1@org1.example.com/msp/keystore/ea4f6a38ac7057b6fa9502c2f5f39f182e320f71f667749100fe7dd94c23ce43_sk
When the peer runs with TLS enabled, the discovery service on the peer
requires the client to connect to it with mutual TLS, which means it
needs to supply a TLS certificate. The peer is configured by default to
request (but not to verify) client TLS certificates, so supplying a TLS
certificate isn’t needed (unless the peer’s tls.clientAuthRequired is
set to true).
当TLS(安全传输层协议)启动时运行peer,peer上的发现服务需要客户端凭借相互的TLS证书来与之相连,这就意味着,发现服务需要提供一个TLS证书。peer的默认配置为请求(但不验证)客户端的TLS证书,因此并不需要提供TLS证书(除非peer的tls.clientAuthRequired 被设置为true)。
When the discovery CLI’s config file has a certificate path for
peercacertpath, but the certpath and keypath aren’t configured as
in the above - the discovery CLI generates a self-signed TLS certificate
and uses this to connect to the peer.
当发现CLI的配置文件有 peercacertpath的证书路径,但是 certpath和keypath 没有按以上方式进行配置——发现CLI生成一个自签名的TLS证书并用该证书与节点连接。
When the peercacertpath isn’t configured, the discovery CLI connects
without TLS , and this is highly not recommended, as the information is
sent over plaintext, un-encrypted.
当未配置peercacertpath ,发现CLI与节点连接没有用到TLS证书。但由于信息是以纯文本形式进行传送,未经加密,因此极不推荐这种操作。
Querying the discovery service
查询发现服务
The discoveryCLI acts as a discovery client, and it needs to be executed
against a peer. This is done via specifying the --server flag. In
addition, the queries are channel-scoped, so the --channel flag must
be used.
发现CLI作为一个发现客户端,需要在peer上执行。此过程通过指明 --server flag来实现。除此之外,查询是在通道范围内进行的,所以必须使用 --channel flag。
The only query that doesn’t require a channel is the local membership peer query, which by default can only be used by administrators of the peer being queried.
唯一不需要通道的的查询是本地成员节点查询,默认情况下,本地成员节点查询只能由被查询节点的管理员使用。
The discover CLI supports all server-side queries:
发现CLI支持所有服务器端的查询:
- Peer membership query
- Configuration query
- Endorsers query
- 节点成员查询
Let’s go over them and see how they should be invoked and parsed:
- 配置查询
Peer membership query:
- 背书者查询
$ discover --configFile conf.yaml peers --channel mychannel --server peer0.org1.example.com:7051
[
{
"MSPID": "Org2MSP",
"LedgerHeight": 5,
"Endpoint": "peer0.org2.example.com:9051",
"Identity": "-----BEGIN CERTIFICATE-----\nMIICKTCCAc+gAwIBAgIRANK4WBck5gKuzTxVQIwhYMUwCgYIKoZIzj0EAwIwczEL\nMAkGA1UEBhMCVVMxEzARBgNVBAgTCkNhbGlmb3JuaWExFjAUBgNVBAcTDVNhbiBG\ncmFuY2lzY28xGTAXBgNVBAoTEG9yZzIuZXhhbXBsZS5jb20xHDAaBgNVBAMTE2Nh\nLm9yZzIuZXhhbXBsZS5jb20wHhcNMTgwNjE3MTM0NTIxWhcNMjgwNjE0MTM0NTIx\nWjBqMQswCQYDVQQGEwJVUzETMBEGA1UECBMKQ2FsaWZvcm5pYTEWMBQGA1UEBxMN\nU2FuIEZyYW5jaXNjbzENMAsGA1UECxMEcGVlcjEfMB0GA1UEAxMWcGVlcjAub3Jn\nMi5leGFtcGxlLmNvbTBZMBMGByqGSM49AgEGCCqGSM49AwEHA0IABJa0gkMRqJCi\nzmx+L9xy/ecJNvdAV2zmSx5Sf2qospVAH1MYCHyudDEvkiRuBPgmCdOdwJsE0g+h\nz0nZdKq6/X+jTTBLMA4GA1UdDwEB/wQEAwIHgDAMBgNVHRMBAf8EAjAAMCsGA1Ud\nIwQkMCKAIFZMuZfUtY6n2iyxaVr3rl+x5lU0CdG9x7KAeYydQGTMMAoGCCqGSM49\nBAMCA0gAMEUCIQC0M9/LJ7j3I9NEPQ/B1BpnJP+UNPnGO2peVrM/mJ1nVgIgS1ZA\nA1tsxuDyllaQuHx2P+P9NDFdjXx5T08lZhxuWYM=\n-----END CERTIFICATE-----\n",
"Chaincodes": [
"mycc"
]
},
{
"MSPID": "Org2MSP",
"LedgerHeight": 5,
"Endpoint": "peer1.org2.example.com:10051",
"Identity": "-----BEGIN CERTIFICATE-----\nMIICKDCCAc+gAwIBAgIRALnNJzplCrYy4Y8CjZtqL7AwCgYIKoZIzj0EAwIwczEL\nMAkGA1UEBhMCVVMxEzARBgNVBAgTCkNhbGlmb3JuaWExFjAUBgNVBAcTDVNhbiBG\ncmFuY2lzY28xGTAXBgNVBAoTEG9yZzIuZXhhbXBsZS5jb20xHDAaBgNVBAMTE2Nh\nLm9yZzIuZXhhbXBsZS5jb20wHhcNMTgwNjE3MTM0NTIxWhcNMjgwNjE0MTM0NTIx\nWjBqMQswCQYDVQQGEwJVUzETMBEGA1UECBMKQ2FsaWZvcm5pYTEWMBQGA1UEBxMN\nU2FuIEZyYW5jaXNjbzENMAsGA1UECxMEcGVlcjEfMB0GA1UEAxMWcGVlcjEub3Jn\nMi5leGFtcGxlLmNvbTBZMBMGByqGSM49AgEGCCqGSM49AwEHA0IABNDopAkHlDdu\nq10HEkdxvdpkbs7EJyqv1clvCt/YMn1hS6sM+bFDgkJKalG7s9Hg3URF0aGpy51R\nU+4F9Muo+XajTTBLMA4GA1UdDwEB/wQEAwIHgDAMBgNVHRMBAf8EAjAAMCsGA1Ud\nIwQkMCKAIFZMuZfUtY6n2iyxaVr3rl+x5lU0CdG9x7KAeYydQGTMMAoGCCqGSM49\nBAMCA0cAMEQCIAR4fBmIBKW2jp0HbbabVepNtl1c7+6++riIrEBnoyIVAiBBvWmI\nyG02c5hu4wPAuVQMB7AU6tGSeYaWSAAo/ExunQ==\n-----END CERTIFICATE-----\n",
"Chaincodes": [
"mycc"
]
},
{
"MSPID": "Org1MSP",
"LedgerHeight": 5,
"Endpoint": "peer0.org1.example.com:7051",
"Identity": "-----BEGIN CERTIFICATE-----\nMIICKDCCAc6gAwIBAgIQP18LeXtEXGoN8pTqzXTHZTAKBggqhkjOPQQDAjBzMQsw\nCQYDVQQGEwJVUzETMBEGA1UECBMKQ2FsaWZvcm5pYTEWMBQGA1UEBxMNU2FuIEZy\nYW5jaXNjbzEZMBcGA1UEChMQb3JnMS5leGFtcGxlLmNvbTEcMBoGA1UEAxMTY2Eu\nb3JnMS5leGFtcGxlLmNvbTAeFw0xODA2MTcxMzQ1MjFaFw0yODA2MTQxMzQ1MjFa\nMGoxCzAJBgNVBAYTAlVTMRMwEQYDVQQIEwpDYWxpZm9ybmlhMRYwFAYDVQQHEw1T\nYW4gRnJhbmNpc2NvMQ0wCwYDVQQLEwRwZWVyMR8wHQYDVQQDExZwZWVyMC5vcmcx\nLmV4YW1wbGUuY29tMFkwEwYHKoZIzj0CAQYIKoZIzj0DAQcDQgAEKeC/1Rg/ynSk\nNNItaMlaCDZOaQvxJEl6o3fqx1PVFlfXE4NarY3OO1N3YZI41hWWoXksSwJu/35S\nM7wMEzw+3KNNMEswDgYDVR0PAQH/BAQDAgeAMAwGA1UdEwEB/wQCMAAwKwYDVR0j\nBCQwIoAgcecTOxTes6rfgyxHH6KIW7hsRAw2bhP9ikCHkvtv/RcwCgYIKoZIzj0E\nAwIDSAAwRQIhAKiJEv79XBmr8gGY6kHrGL0L3sq95E7IsCYzYdAQHj+DAiBPcBTg\nRuA0//Kq+3aHJ2T0KpKHqD3FfhZZolKDkcrkwQ==\n-----END CERTIFICATE-----\n",
"Chaincodes": [
"mycc"
]
},
{
"MSPID": "Org1MSP",
"LedgerHeight": 5,
"Endpoint": "peer1.org1.example.com:8051",
"Identity": "-----BEGIN CERTIFICATE-----\nMIICJzCCAc6gAwIBAgIQO7zMEHlMfRhnP6Xt65jwtDAKBggqhkjOPQQDAjBzMQsw\nCQYDVQQGEwJVUzETMBEGA1UECBMKQ2FsaWZvcm5pYTEWMBQGA1UEBxMNU2FuIEZy\nYW5jaXNjbzEZMBcGA1UEChMQb3JnMS5leGFtcGxlLmNvbTEcMBoGA1UEAxMTY2Eu\nb3JnMS5leGFtcGxlLmNvbTAeFw0xODA2MTcxMzQ1MjFaFw0yODA2MTQxMzQ1MjFa\nMGoxCzAJBgNVBAYTAlVTMRMwEQYDVQQIEwpDYWxpZm9ybmlhMRYwFAYDVQQHEw1T\nYW4gRnJhbmNpc2NvMQ0wCwYDVQQLEwRwZWVyMR8wHQYDVQQDExZwZWVyMS5vcmcx\nLmV4YW1wbGUuY29tMFkwEwYHKoZIzj0CAQYIKoZIzj0DAQcDQgAEoII9k8db/Q2g\nRHw5rk3SYw+OMFw9jNbsJJyC5ttJRvc12Dn7lQ8ZR9hW1vLQ3NtqO/couccDJcHg\nt47iHBNadaNNMEswDgYDVR0PAQH/BAQDAgeAMAwGA1UdEwEB/wQCMAAwKwYDVR0j\nBCQwIoAgcecTOxTes6rfgyxHH6KIW7hsRAw2bhP9ikCHkvtv/RcwCgYIKoZIzj0E\nAwIDRwAwRAIgGHGtRVxcFVeMQr9yRlebs23OXEECNo6hNqd/4ChLwwoCIBFKFd6t\nlL5BVzVMGQyXWcZGrjFgl4+fDrwjmMe+jAfa\n-----END CERTIFICATE-----\n",
"Chaincodes": null
}
]
我们一起来看看这些查询,了解一下它们是如何被调用和语法分析的:
As seen, this command outputs a JSON containing membership information about all the peers in the channel that the peer queried possesses.
节点成员查询:
The Identity that is returned is the enrollment certificate of the
peer, and it can be parsed with a combination of jq and openssl:
$ discover --configFile conf.yaml peers --channel mychannel --server peer0.org1.example.com:7051
[
{
"MSPID": "Org2MSP",
"LedgerHeight": 5,
"Endpoint": "peer0.org2.example.com:9051",
"Identity": "-----BEGIN CERTIFICATE-----\nMIICKTCCAc+gAwIBAgIRANK4WBck5gKuzTxVQIwhYMUwCgYIKoZIzj0EAwIwczEL\nMAkGA1UEBhMCVVMxEzARBgNVBAgTCkNhbGlmb3JuaWExFjAUBgNVBAcTDVNhbiBG\ncmFuY2lzY28xGTAXBgNVBAoTEG9yZzIuZXhhbXBsZS5jb20xHDAaBgNVBAMTE2Nh\nLm9yZzIuZXhhbXBsZS5jb20wHhcNMTgwNjE3MTM0NTIxWhcNMjgwNjE0MTM0NTIx\nWjBqMQswCQYDVQQGEwJVUzETMBEGA1UECBMKQ2FsaWZvcm5pYTEWMBQGA1UEBxMN\nU2FuIEZyYW5jaXNjbzENMAsGA1UECxMEcGVlcjEfMB0GA1UEAxMWcGVlcjAub3Jn\nMi5leGFtcGxlLmNvbTBZMBMGByqGSM49AgEGCCqGSM49AwEHA0IABJa0gkMRqJCi\nzmx+L9xy/ecJNvdAV2zmSx5Sf2qospVAH1MYCHyudDEvkiRuBPgmCdOdwJsE0g+h\nz0nZdKq6/X+jTTBLMA4GA1UdDwEB/wQEAwIHgDAMBgNVHRMBAf8EAjAAMCsGA1Ud\nIwQkMCKAIFZMuZfUtY6n2iyxaVr3rl+x5lU0CdG9x7KAeYydQGTMMAoGCCqGSM49\nBAMCA0gAMEUCIQC0M9/LJ7j3I9NEPQ/B1BpnJP+UNPnGO2peVrM/mJ1nVgIgS1ZA\nA1tsxuDyllaQuHx2P+P9NDFdjXx5T08lZhxuWYM=\n-----END CERTIFICATE-----\n",
"Chaincodes": [
"mycc"
]
},
{
"MSPID": "Org2MSP",
"LedgerHeight": 5,
"Endpoint": "peer1.org2.example.com:10051",
"Identity": "-----BEGIN CERTIFICATE-----\nMIICKDCCAc+gAwIBAgIRALnNJzplCrYy4Y8CjZtqL7AwCgYIKoZIzj0EAwIwczEL\nMAkGA1UEBhMCVVMxEzARBgNVBAgTCkNhbGlmb3JuaWExFjAUBgNVBAcTDVNhbiBG\ncmFuY2lzY28xGTAXBgNVBAoTEG9yZzIuZXhhbXBsZS5jb20xHDAaBgNVBAMTE2Nh\nLm9yZzIuZXhhbXBsZS5jb20wHhcNMTgwNjE3MTM0NTIxWhcNMjgwNjE0MTM0NTIx\nWjBqMQswCQYDVQQGEwJVUzETMBEGA1UECBMKQ2FsaWZvcm5pYTEWMBQGA1UEBxMN\nU2FuIEZyYW5jaXNjbzENMAsGA1UECxMEcGVlcjEfMB0GA1UEAxMWcGVlcjEub3Jn\nMi5leGFtcGxlLmNvbTBZMBMGByqGSM49AgEGCCqGSM49AwEHA0IABNDopAkHlDdu\nq10HEkdxvdpkbs7EJyqv1clvCt/YMn1hS6sM+bFDgkJKalG7s9Hg3URF0aGpy51R\nU+4F9Muo+XajTTBLMA4GA1UdDwEB/wQEAwIHgDAMBgNVHRMBAf8EAjAAMCsGA1Ud\nIwQkMCKAIFZMuZfUtY6n2iyxaVr3rl+x5lU0CdG9x7KAeYydQGTMMAoGCCqGSM49\nBAMCA0cAMEQCIAR4fBmIBKW2jp0HbbabVepNtl1c7+6++riIrEBnoyIVAiBBvWmI\nyG02c5hu4wPAuVQMB7AU6tGSeYaWSAAo/ExunQ==\n-----END CERTIFICATE-----\n",
"Chaincodes": [
"mycc"
]
},
{
"MSPID": "Org1MSP",
"LedgerHeight": 5,
"Endpoint": "peer0.org1.example.com:7051",
"Identity": "-----BEGIN CERTIFICATE-----\nMIICKDCCAc6gAwIBAgIQP18LeXtEXGoN8pTqzXTHZTAKBggqhkjOPQQDAjBzMQsw\nCQYDVQQGEwJVUzETMBEGA1UECBMKQ2FsaWZvcm5pYTEWMBQGA1UEBxMNU2FuIEZy\nYW5jaXNjbzEZMBcGA1UEChMQb3JnMS5leGFtcGxlLmNvbTEcMBoGA1UEAxMTY2Eu\nb3JnMS5leGFtcGxlLmNvbTAeFw0xODA2MTcxMzQ1MjFaFw0yODA2MTQxMzQ1MjFa\nMGoxCzAJBgNVBAYTAlVTMRMwEQYDVQQIEwpDYWxpZm9ybmlhMRYwFAYDVQQHEw1T\nYW4gRnJhbmNpc2NvMQ0wCwYDVQQLEwRwZWVyMR8wHQYDVQQDExZwZWVyMC5vcmcx\nLmV4YW1wbGUuY29tMFkwEwYHKoZIzj0CAQYIKoZIzj0DAQcDQgAEKeC/1Rg/ynSk\nNNItaMlaCDZOaQvxJEl6o3fqx1PVFlfXE4NarY3OO1N3YZI41hWWoXksSwJu/35S\nM7wMEzw+3KNNMEswDgYDVR0PAQH/BAQDAgeAMAwGA1UdEwEB/wQCMAAwKwYDVR0j\nBCQwIoAgcecTOxTes6rfgyxHH6KIW7hsRAw2bhP9ikCHkvtv/RcwCgYIKoZIzj0E\nAwIDSAAwRQIhAKiJEv79XBmr8gGY6kHrGL0L3sq95E7IsCYzYdAQHj+DAiBPcBTg\nRuA0//Kq+3aHJ2T0KpKHqD3FfhZZolKDkcrkwQ==\n-----END CERTIFICATE-----\n",
"Chaincodes": [
"mycc"
]
},
{
"MSPID": "Org1MSP",
"LedgerHeight": 5,
"Endpoint": "peer1.org1.example.com:8051",
"Identity": "-----BEGIN CERTIFICATE-----\nMIICJzCCAc6gAwIBAgIQO7zMEHlMfRhnP6Xt65jwtDAKBggqhkjOPQQDAjBzMQsw\nCQYDVQQGEwJVUzETMBEGA1UECBMKQ2FsaWZvcm5pYTEWMBQGA1UEBxMNU2FuIEZy\nYW5jaXNjbzEZMBcGA1UEChMQb3JnMS5leGFtcGxlLmNvbTEcMBoGA1UEAxMTY2Eu\nb3JnMS5leGFtcGxlLmNvbTAeFw0xODA2MTcxMzQ1MjFaFw0yODA2MTQxMzQ1MjFa\nMGoxCzAJBgNVBAYTAlVTMRMwEQYDVQQIEwpDYWxpZm9ybmlhMRYwFAYDVQQHEw1T\nYW4gRnJhbmNpc2NvMQ0wCwYDVQQLEwRwZWVyMR8wHQYDVQQDExZwZWVyMS5vcmcx\nLmV4YW1wbGUuY29tMFkwEwYHKoZIzj0CAQYIKoZIzj0DAQcDQgAEoII9k8db/Q2g\nRHw5rk3SYw+OMFw9jNbsJJyC5ttJRvc12Dn7lQ8ZR9hW1vLQ3NtqO/couccDJcHg\nt47iHBNadaNNMEswDgYDVR0PAQH/BAQDAgeAMAwGA1UdEwEB/wQCMAAwKwYDVR0j\nBCQwIoAgcecTOxTes6rfgyxHH6KIW7hsRAw2bhP9ikCHkvtv/RcwCgYIKoZIzj0E\nAwIDRwAwRAIgGHGtRVxcFVeMQr9yRlebs23OXEECNo6hNqd/4ChLwwoCIBFKFd6t\nlL5BVzVMGQyXWcZGrjFgl4+fDrwjmMe+jAfa\n-----END CERTIFICATE-----\n",
"Chaincodes": null
}
]
$ discover --configFile conf.yaml peers --channel mychannel --server peer0.org1.example.com:7051 | jq .[0].Identity | sed "s/\\\n/\n/g" | sed "s/\"//g" | openssl x509 -text -noout
Certificate:
Data:
Version: 3 (0x2)
Serial Number:
55:e9:3f:97:94:d5:74:db:e2:d6:99:3c:01:24:be:bf
Signature Algorithm: ecdsa-with-SHA256
Issuer: C=US, ST=California, L=San Francisco, O=org2.example.com, CN=ca.org2.example.com
Validity
Not Before: Jun 9 11:58:28 2018 GMT
Not After : Jun 6 11:58:28 2028 GMT
Subject: C=US, ST=California, L=San Francisco, OU=peer, CN=peer0.org2.example.com
Subject Public Key Info:
Public Key Algorithm: id-ecPublicKey
Public-Key: (256 bit)
pub:
04:f5:69:7a:11:65:d9:85:96:65:b7:b7:1b:08:77:
43:de:cb:ad:3a:79:ec:cc:2a:bc:d7:93:68:ae:92:
1c:4b:d8:32:47:d6:3d:72:32:f1:f1:fb:26:e4:69:
c2:eb:c9:45:69:99:78:d7:68:a9:77:09:88:c6:53:
01:2a:c1:f8:c0
ASN1 OID: prime256v1
NIST CURVE: P-256
X509v3 extensions:
X509v3 Key Usage: critical
Digital Signature
X509v3 Basic Constraints: critical
CA:FALSE
X509v3 Authority Key Identifier:
keyid:8E:58:82:C9:0A:11:10:A9:0B:93:03:EE:A0:54:42:F4:A3:EF:11:4C:82:B6:F9:CE:10:A2:1E:24:AB:13:82:A0
如上可见,该命令输出了一个JSON,其中包含了被查询节点所在通道上所有节点的成员信息。
Signature Algorithm: ecdsa-with-SHA256
30:44:02:20:29:3f:55:2b:9f:7b:99:b2:cb:06:ca:15:3f:93:
a1:3d:65:5c:7b:79:a1:7a:d1:94:50:f0:cd:db:ea:61:81:7a:
02:20:3b:40:5b:60:51:3c:f8:0f:9b:fc:ae:fc:21:fd:c8:36:
a3:18:39:58:20:72:3d:1a:43:74:30:f3:56:01:aa:26
被返回的 Identity 是节点的成员增加证书,可被jq 和 openssl的组合进行语法分析:
Configuration query:
$ discover --configFile conf.yaml peers --channel mychannel --server peer0.org1.example.com:7051 | jq .[0].Identity | sed "s/\\\n/\n/g" | sed "s/\"//g" | openssl x509 -text -noout
Certificate:
Data:
Version: 3 (0x2)
Serial Number:
55:e9:3f:97:94:d5:74:db:e2:d6:99:3c:01:24:be:bf
Signature Algorithm: ecdsa-with-SHA256
Issuer: C=US, ST=California, L=San Francisco, O=org2.example.com, CN=ca.org2.example.com
Validity
Not Before: Jun 9 11:58:28 2018 GMT
Not After : Jun 6 11:58:28 2028 GMT
Subject: C=US, ST=California, L=San Francisco, OU=peer, CN=peer0.org2.example.com
Subject Public Key Info:
Public Key Algorithm: id-ecPublicKey
Public-Key: (256 bit)
pub:
04:f5:69:7a:11:65:d9:85:96:65:b7:b7:1b:08:77:
43:de:cb:ad:3a:79:ec:cc:2a:bc:d7:93:68:ae:92:
1c:4b:d8:32:47:d6:3d:72:32:f1:f1:fb:26:e4:69:
c2:eb:c9:45:69:99:78:d7:68:a9:77:09:88:c6:53:
01:2a:c1:f8:c0
ASN1 OID: prime256v1
NIST CURVE: P-256
X509v3 extensions:
X509v3 Key Usage: critical
Digital Signature
X509v3 Basic Constraints: critical
CA:FALSE
X509v3 Authority Key Identifier:
keyid:8E:58:82:C9:0A:11:10:A9:0B:93:03:EE:A0:54:42:F4:A3:EF:11:4C:82:B6:F9:CE:10:A2:1E:24:AB:13:82:A0
The configuration query returns a mapping from MSP IDs to orderer
endpoints, as well as the `FabricMSPConfig` which can be used to verify
all peer and orderer nodes by the SDK:
Signature Algorithm: ecdsa-with-SHA256
30:44:02:20:29:3f:55:2b:9f:7b:99:b2:cb:06:ca:15:3f:93:
a1:3d:65:5c:7b:79:a1:7a:d1:94:50:f0:cd:db:ea:61:81:7a:
02:20:3b:40:5b:60:51:3c:f8:0f:9b:fc:ae:fc:21:fd:c8:36:
a3:18:39:58:20:72:3d:1a:43:74:30:f3:56:01:aa:26
$ discover --configFile conf.yaml config --channel mychannel --server peer0.org1.example.com:7051
{
"msps": {
"OrdererOrg": {
"name": "OrdererMSP",
"root_certs": [
"LS0tLS1CRUdJTiBDRVJUSUZJQ0FURS0tLS0tCk1JSUNMekNDQWRhZ0F3SUJBZ0lSQU1pWkxUb3RmMHR6VTRzNUdIdkQ0UjR3Q2dZSUtvWkl6ajBFQXdJd2FURUwKTUFrR0ExVUVCaE1DVlZNeEV6QVJCZ05WQkFnVENrTmhiR2xtYjNKdWFXRXhGakFVQmdOVkJBY1REVk5oYmlCRwpjbUZ1WTJselkyOHhGREFTQmdOVkJBb1RDMlY0WVcxd2JHVXVZMjl0TVJjd0ZRWURWUVFERXc1allTNWxlR0Z0CmNHeGxMbU52YlRBZUZ3MHhPREEyTURreE1UVTRNamhhRncweU9EQTJNRFl4TVRVNE1qaGFNR2t4Q3pBSkJnTlYKQkFZVEFsVlRNUk13RVFZRFZRUUlFd3BEWVd4cFptOXlibWxoTVJZd0ZBWURWUVFIRXcxVFlXNGdSbkpoYm1OcApjMk52TVJRd0VnWURWUVFLRXd0bGVHRnRjR3hsTG1OdmJURVhNQlVHQTFVRUF4TU9ZMkV1WlhoaGJYQnNaUzVqCmIyMHdXVEFUQmdjcWhrak9QUUlCQmdncWhrak9QUU1CQndOQ0FBUW9ySjVSamFTQUZRci9yc2xoMWdobnNCWEQKeDVsR1lXTUtFS1pDYXJDdkZBekE0bHUwb2NQd0IzNWJmTVN5bFJPVmdVdHF1ZU9IcFBNc2ZLNEFrWjR5bzE4dwpYVEFPQmdOVkhROEJBZjhFQkFNQ0FhWXdEd1lEVlIwbEJBZ3dCZ1lFVlIwbEFEQVBCZ05WSFJNQkFmOEVCVEFECkFRSC9NQ2tHQTFVZERnUWlCQ0JnbmZJd0pzNlBaWUZCclpZVkRpU05vSjNGZWNFWHYvN2xHL3QxVUJDbVREQUsKQmdncWhrak9QUVFEQWdOSEFEQkVBaUE5NGFkc21UK0hLalpFVVpnM0VkaWdSM296L3pEQkNhWUY3TEJUVXpuQgpEZ0lnYS9RZFNPQnk1TUx2c0lSNTFDN0N4UnR2NUM5V05WRVlmWk5SaGdXRXpoOD0KLS0tLS1FTkQgQ0VSVElGSUNBVEUtLS0tLQo="
],
"admins": [
"LS0tLS1CRUdJTiBDRVJUSUZJQ0FURS0tLS0tCk1JSUNDVENDQWJDZ0F3SUJBZ0lRR2wzTjhaSzRDekRRQmZqYVpwMVF5VEFLQmdncWhrak9QUVFEQWpCcE1Rc3cKQ1FZRFZRUUdFd0pWVXpFVE1CRUdBMVVFQ0JNS1EyRnNhV1p2Y201cFlURVdNQlFHQTFVRUJ4TU5VMkZ1SUVaeQpZVzVqYVhOamJ6RVVNQklHQTFVRUNoTUxaWGhoYlhCc1pTNWpiMjB4RnpBVkJnTlZCQU1URG1OaExtVjRZVzF3CmJHVXVZMjl0TUI0WERURTRNRFl3T1RFeE5UZ3lPRm9YRFRJNE1EWXdOakV4TlRneU9Gb3dWakVMTUFrR0ExVUUKQmhNQ1ZWTXhFekFSQmdOVkJBZ1RDa05oYkdsbWIzSnVhV0V4RmpBVUJnTlZCQWNURFZOaGJpQkdjbUZ1WTJsegpZMjh4R2pBWUJnTlZCQU1NRVVGa2JXbHVRR1Y0WVcxd2JHVXVZMjl0TUZrd0V3WUhLb1pJemowQ0FRWUlLb1pJCnpqMERBUWNEUWdBRWl2TXQybVdiQ2FHb1FZaWpka1BRM1NuTGFkMi8rV0FESEFYMnRGNWthMTBteG1OMEx3VysKdmE5U1dLMmJhRGY5RDQ2TVROZ2gycnRhUitNWXFWRm84Nk5OTUVzd0RnWURWUjBQQVFIL0JBUURBZ2VBTUF3RwpBMVVkRXdFQi93UUNNQUF3S3dZRFZSMGpCQ1F3SW9BZ1lKM3lNQ2JPajJXQlFhMldGUTRramFDZHhYbkJGNy8rCjVSdjdkVkFRcGt3d0NnWUlLb1pJemowRUF3SURSd0F3UkFJZ2RIc0pUcGM5T01DZ3JPVFRLTFNnU043UWk3MWIKSWpkdzE4MzJOeXFQZnJ3Q0lCOXBhSlRnL2R5ckNhWUx1ZndUbUtFSnZZMEtXVzcrRnJTeG5CTGdzZjJpCi0tLS0tRU5EIENFUlRJRklDQVRFLS0tLS0K"
],
"crypto_config": {
"signature_hash_family": "SHA2",
"identity_identifier_hash_function": "SHA256"
},
"tls_root_certs": [
"LS0tLS1CRUdJTiBDRVJUSUZJQ0FURS0tLS0tCk1JSUNORENDQWR1Z0F3SUJBZ0lRZDdodzFIaHNZTXI2a25ETWJrZThTakFLQmdncWhrak9QUVFEQWpCc01Rc3cKQ1FZRFZRUUdFd0pWVXpFVE1CRUdBMVVFQ0JNS1EyRnNhV1p2Y201cFlURVdNQlFHQTFVRUJ4TU5VMkZ1SUVaeQpZVzVqYVhOamJ6RVVNQklHQTFVRUNoTUxaWGhoYlhCc1pTNWpiMjB4R2pBWUJnTlZCQU1URVhSc2MyTmhMbVY0CllXMXdiR1V1WTI5dE1CNFhEVEU0TURZd09URXhOVGd5T0ZvWERUSTRNRFl3TmpFeE5UZ3lPRm93YkRFTE1Ba0cKQTFVRUJoTUNWVk14RXpBUkJnTlZCQWdUQ2tOaGJHbG1iM0p1YVdFeEZqQVVCZ05WQkFjVERWTmhiaUJHY21GdQpZMmx6WTI4eEZEQVNCZ05WQkFvVEMyVjRZVzF3YkdVdVkyOXRNUm93R0FZRFZRUURFeEYwYkhOallTNWxlR0Z0CmNHeGxMbU52YlRCWk1CTUdCeXFHU000OUFnRUdDQ3FHU000OUF3RUhBMElBQk9ZZGdpNm53a3pYcTBKQUF2cTIKZU5xNE5Ybi85L0VRaU13Tzc1dXdpTWJVbklYOGM1N2NYU2dQdy9NMUNVUGFwNmRyMldvTjA3RGhHb1B6ZXZaMwp1aFdqWHpCZE1BNEdBMVVkRHdFQi93UUVBd0lCcGpBUEJnTlZIU1VFQ0RBR0JnUlZIU1VBTUE4R0ExVWRFd0VCCi93UUZNQU1CQWY4d0tRWURWUjBPQkNJRUlCcW0xZW9aZy9qSW52Z1ZYR2cwbzVNamxrd2tSekRlalAzZkplbW8KU1hBek1Bb0dDQ3FHU000OUJBTUNBMGNBTUVRQ0lEUG9FRkF5bFVYcEJOMnh4VEo0MVplaS9ZQWFvN29aL0tEMwpvTVBpQ3RTOUFpQmFiU1dNS3UwR1l4eXdsZkFwdi9CWitxUEJNS0JMNk5EQ1haUnpZZmtENEE9PQotLS0tLUVORCBDRVJUSUZJQ0FURS0tLS0tCg=="
]
},
"Org1MSP": {
"name": "Org1MSP",
"root_certs": [
"LS0tLS1CRUdJTiBDRVJUSUZJQ0FURS0tLS0tCk1JSUNSRENDQWVxZ0F3SUJBZ0lSQU1nN2VETnhwS0t0ZGl0TDRVNDRZMUl3Q2dZSUtvWkl6ajBFQXdJd2N6RUwKTUFrR0ExVUVCaE1DVlZNeEV6QVJCZ05WQkFnVENrTmhiR2xtYjNKdWFXRXhGakFVQmdOVkJBY1REVk5oYmlCRwpjbUZ1WTJselkyOHhHVEFYQmdOVkJBb1RFRzl5WnpFdVpYaGhiWEJzWlM1amIyMHhIREFhQmdOVkJBTVRFMk5oCkxtOXlaekV1WlhoaGJYQnNaUzVqYjIwd0hoY05NVGd3TmpBNU1URTFPREk0V2hjTk1qZ3dOakEyTVRFMU9ESTQKV2pCek1Rc3dDUVlEVlFRR0V3SlZVekVUTUJFR0ExVUVDQk1LUTJGc2FXWnZjbTVwWVRFV01CUUdBMVVFQnhNTgpVMkZ1SUVaeVlXNWphWE5qYnpFWk1CY0dBMVVFQ2hNUWIzSm5NUzVsZUdGdGNHeGxMbU52YlRFY01Cb0dBMVVFCkF4TVRZMkV1YjNKbk1TNWxlR0Z0Y0d4bExtTnZiVEJaTUJNR0J5cUdTTTQ5QWdFR0NDcUdTTTQ5QXdFSEEwSUEKQk41d040THpVNGRpcUZSWnB6d3FSVm9JbWw1MVh0YWkzbWgzUXo0UEZxWkhXTW9lZ0ovUWRNKzF4L3RobERPcwpnbmVRcndGd216WGpvSSszaHJUSmRuU2pYekJkTUE0R0ExVWREd0VCL3dRRUF3SUJwakFQQmdOVkhTVUVDREFHCkJnUlZIU1VBTUE4R0ExVWRFd0VCL3dRRk1BTUJBZjh3S1FZRFZSME9CQ0lFSU9CZFFMRitjTVdhNmUxcDJDcE8KRXg3U0hVaW56VnZkNTVoTG03dzZ2NzJvTUFvR0NDcUdTTTQ5QkFNQ0EwZ0FNRVVDSVFDQyt6T1lHcll0ZTB4SgpSbDVYdUxjUWJySW9UeHpsRnJLZWFNWnJXMnVaSkFJZ0NVVGU5MEl4aW55dk4wUkh4UFhoVGNJTFdEZzdLUEJOCmVrNW5TRlh3Y0lZPQotLS0tLUVORCBDRVJUSUZJQ0FURS0tLS0tCg=="
],
"admins": [
"LS0tLS1CRUdJTiBDRVJUSUZJQ0FURS0tLS0tCk1JSUNLakNDQWRDZ0F3SUJBZ0lRRTRFK0tqSHgwdTlzRSsxZUgrL1dOakFLQmdncWhrak9QUVFEQWpCek1Rc3cKQ1FZRFZRUUdFd0pWVXpFVE1CRUdBMVVFQ0JNS1EyRnNhV1p2Y201cFlURVdNQlFHQTFVRUJ4TU5VMkZ1SUVaeQpZVzVqYVhOamJ6RVpNQmNHQTFVRUNoTVFiM0puTVM1bGVHRnRjR3hsTG1OdmJURWNNQm9HQTFVRUF4TVRZMkV1CmIzSm5NUzVsZUdGdGNHeGxMbU52YlRBZUZ3MHhPREEyTURreE1UVTRNamhhRncweU9EQTJNRFl4TVRVNE1qaGEKTUd3eEN6QUpCZ05WQkFZVEFsVlRNUk13RVFZRFZRUUlFd3BEWVd4cFptOXlibWxoTVJZd0ZBWURWUVFIRXcxVApZVzRnUm5KaGJtTnBjMk52TVE4d0RRWURWUVFMRXdaamJHbGxiblF4SHpBZEJnTlZCQU1NRmtGa2JXbHVRRzl5Clp6RXVaWGhoYlhCc1pTNWpiMjB3V1RBVEJnY3Foa2pPUFFJQkJnZ3Foa2pPUFFNQkJ3TkNBQVFqK01MZk1ESnUKQ2FlWjV5TDR2TnczaWp4ZUxjd2YwSHo1blFrbXVpSnFETjRhQ0ZwVitNTTVablFEQmx1dWRyUS80UFA1Sk1WeQpreWZsQ3pJa2NCNjdvMDB3U3pBT0JnTlZIUThCQWY4RUJBTUNCNEF3REFZRFZSMFRBUUgvQkFJd0FEQXJCZ05WCkhTTUVKREFpZ0NEZ1hVQ3hmbkRGbXVudGFkZ3FUaE1lMGgxSXA4MWIzZWVZUzV1OE9yKzlxREFLQmdncWhrak8KUFFRREFnTklBREJGQWlFQXlJV21QcjlQakdpSk1QM1pVd05MRENnNnVwMlVQVXNJSzd2L2h3RVRra01DSUE0cQo3cHhQZy9VVldiamZYeE0wUCsvcTEzbXFFaFlYaVpTTXpoUENFNkNmCi0tLS0tRU5EIENFUlRJRklDQVRFLS0tLS0K"
],
"crypto_config": {
"signature_hash_family": "SHA2",
"identity_identifier_hash_function": "SHA256"
},
"tls_root_certs": [
"LS0tLS1CRUdJTiBDRVJUSUZJQ0FURS0tLS0tCk1JSUNTVENDQWUrZ0F3SUJBZ0lRZlRWTE9iTENVUjdxVEY3Z283UXgvakFLQmdncWhrak9QUVFEQWpCMk1Rc3cKQ1FZRFZRUUdFd0pWVXpFVE1CRUdBMVVFQ0JNS1EyRnNhV1p2Y201cFlURVdNQlFHQTFVRUJ4TU5VMkZ1SUVaeQpZVzVqYVhOamJ6RVpNQmNHQTFVRUNoTVFiM0puTVM1bGVHRnRjR3hsTG1OdmJURWZNQjBHQTFVRUF4TVdkR3h6ClkyRXViM0puTVM1bGVHRnRjR3hsTG1OdmJUQWVGdzB4T0RBMk1Ea3hNVFU0TWpoYUZ3MHlPREEyTURZeE1UVTQKTWpoYU1IWXhDekFKQmdOVkJBWVRBbFZUTVJNd0VRWURWUVFJRXdwRFlXeHBabTl5Ym1saE1SWXdGQVlEVlFRSApFdzFUWVc0Z1JuSmhibU5wYzJOdk1Sa3dGd1lEVlFRS0V4QnZjbWN4TG1WNFlXMXdiR1V1WTI5dE1SOHdIUVlEClZRUURFeFowYkhOallTNXZjbWN4TG1WNFlXMXdiR1V1WTI5dE1Ga3dFd1lIS29aSXpqMENBUVlJS29aSXpqMEQKQVFjRFFnQUVZbnp4bmMzVUpHS0ZLWDNUNmR0VGpkZnhJTVYybGhTVzNab0lWSW9mb04rWnNsWWp0d0g2ZXZXYgptTkZGQmRaYWExTjluaXRpbmxxbVVzTU1NQ2JieXFOZk1GMHdEZ1lEVlIwUEFRSC9CQVFEQWdHbU1BOEdBMVVkCkpRUUlNQVlHQkZVZEpRQXdEd1lEVlIwVEFRSC9CQVV3QXdFQi96QXBCZ05WSFE0RUlnUWdlVTAwNlNaUllUNDIKN1Uxb2YwL3RGdHUvRFVtazVLY3hnajFCaklJakduZ3dDZ1lJS29aSXpqMEVBd0lEU0FBd1JRSWhBSWpvcldJTwpRNVNjYjNoZDluRi9UamxWcmk1UHdTaDNVNmJaMFdYWEsxYzVBaUFlMmM5QmkyNFE1WjQ0aXQ1MkI5cm1hU1NpCkttM2NZVlY0cWJ6RFhMOHZYUT09Ci0tLS0tRU5EIENFUlRJRklDQVRFLS0tLS0K"
],
"fabric_node_ous": {
"enable": true,
"client_ou_identifier": {
"certificate": "LS0tLS1CRUdJTiBDRVJUSUZJQ0FURS0tLS0tCk1JSUNSRENDQWVxZ0F3SUJBZ0lSQU1nN2VETnhwS0t0ZGl0TDRVNDRZMUl3Q2dZSUtvWkl6ajBFQXdJd2N6RUwKTUFrR0ExVUVCaE1DVlZNeEV6QVJCZ05WQkFnVENrTmhiR2xtYjNKdWFXRXhGakFVQmdOVkJBY1REVk5oYmlCRwpjbUZ1WTJselkyOHhHVEFYQmdOVkJBb1RFRzl5WnpFdVpYaGhiWEJzWlM1amIyMHhIREFhQmdOVkJBTVRFMk5oCkxtOXlaekV1WlhoaGJYQnNaUzVqYjIwd0hoY05NVGd3TmpBNU1URTFPREk0V2hjTk1qZ3dOakEyTVRFMU9ESTQKV2pCek1Rc3dDUVlEVlFRR0V3SlZVekVUTUJFR0ExVUVDQk1LUTJGc2FXWnZjbTVwWVRFV01CUUdBMVVFQnhNTgpVMkZ1SUVaeVlXNWphWE5qYnpFWk1CY0dBMVVFQ2hNUWIzSm5NUzVsZUdGdGNHeGxMbU52YlRFY01Cb0dBMVVFCkF4TVRZMkV1YjNKbk1TNWxlR0Z0Y0d4bExtTnZiVEJaTUJNR0J5cUdTTTQ5QWdFR0NDcUdTTTQ5QXdFSEEwSUEKQk41d040THpVNGRpcUZSWnB6d3FSVm9JbWw1MVh0YWkzbWgzUXo0UEZxWkhXTW9lZ0ovUWRNKzF4L3RobERPcwpnbmVRcndGd216WGpvSSszaHJUSmRuU2pYekJkTUE0R0ExVWREd0VCL3dRRUF3SUJwakFQQmdOVkhTVUVDREFHCkJnUlZIU1VBTUE4R0ExVWRFd0VCL3dRRk1BTUJBZjh3S1FZRFZSME9CQ0lFSU9CZFFMRitjTVdhNmUxcDJDcE8KRXg3U0hVaW56VnZkNTVoTG03dzZ2NzJvTUFvR0NDcUdTTTQ5QkFNQ0EwZ0FNRVVDSVFDQyt6T1lHcll0ZTB4SgpSbDVYdUxjUWJySW9UeHpsRnJLZWFNWnJXMnVaSkFJZ0NVVGU5MEl4aW55dk4wUkh4UFhoVGNJTFdEZzdLUEJOCmVrNW5TRlh3Y0lZPQotLS0tLUVORCBDRVJUSUZJQ0FURS0tLS0tCg==",
"organizational_unit_identifier": "client"
},
"peer_ou_identifier": {
"certificate": "LS0tLS1CRUdJTiBDRVJUSUZJQ0FURS0tLS0tCk1JSUNSRENDQWVxZ0F3SUJBZ0lSQU1nN2VETnhwS0t0ZGl0TDRVNDRZMUl3Q2dZSUtvWkl6ajBFQXdJd2N6RUwKTUFrR0ExVUVCaE1DVlZNeEV6QVJCZ05WQkFnVENrTmhiR2xtYjNKdWFXRXhGakFVQmdOVkJBY1REVk5oYmlCRwpjbUZ1WTJselkyOHhHVEFYQmdOVkJBb1RFRzl5WnpFdVpYaGhiWEJzWlM1amIyMHhIREFhQmdOVkJBTVRFMk5oCkxtOXlaekV1WlhoaGJYQnNaUzVqYjIwd0hoY05NVGd3TmpBNU1URTFPREk0V2hjTk1qZ3dOakEyTVRFMU9ESTQKV2pCek1Rc3dDUVlEVlFRR0V3SlZVekVUTUJFR0ExVUVDQk1LUTJGc2FXWnZjbTVwWVRFV01CUUdBMVVFQnhNTgpVMkZ1SUVaeVlXNWphWE5qYnpFWk1CY0dBMVVFQ2hNUWIzSm5NUzVsZUdGdGNHeGxMbU52YlRFY01Cb0dBMVVFCkF4TVRZMkV1YjNKbk1TNWxlR0Z0Y0d4bExtTnZiVEJaTUJNR0J5cUdTTTQ5QWdFR0NDcUdTTTQ5QXdFSEEwSUEKQk41d040THpVNGRpcUZSWnB6d3FSVm9JbWw1MVh0YWkzbWgzUXo0UEZxWkhXTW9lZ0ovUWRNKzF4L3RobERPcwpnbmVRcndGd216WGpvSSszaHJUSmRuU2pYekJkTUE0R0ExVWREd0VCL3dRRUF3SUJwakFQQmdOVkhTVUVDREFHCkJnUlZIU1VBTUE4R0ExVWRFd0VCL3dRRk1BTUJBZjh3S1FZRFZSME9CQ0lFSU9CZFFMRitjTVdhNmUxcDJDcE8KRXg3U0hVaW56VnZkNTVoTG03dzZ2NzJvTUFvR0NDcUdTTTQ5QkFNQ0EwZ0FNRVVDSVFDQyt6T1lHcll0ZTB4SgpSbDVYdUxjUWJySW9UeHpsRnJLZWFNWnJXMnVaSkFJZ0NVVGU5MEl4aW55dk4wUkh4UFhoVGNJTFdEZzdLUEJOCmVrNW5TRlh3Y0lZPQotLS0tLUVORCBDRVJUSUZJQ0FURS0tLS0tCg==",
"organizational_unit_identifier": "peer"
}
}
},
"Org2MSP": {
"name": "Org2MSP",
"root_certs": [
"LS0tLS1CRUdJTiBDRVJUSUZJQ0FURS0tLS0tCk1JSUNSRENDQWVxZ0F3SUJBZ0lSQUx2SWV2KzE4Vm9LZFR2V1RLNCtaZ2d3Q2dZSUtvWkl6ajBFQXdJd2N6RUwKTUFrR0ExVUVCaE1DVlZNeEV6QVJCZ05WQkFnVENrTmhiR2xtYjNKdWFXRXhGakFVQmdOVkJBY1REVk5oYmlCRwpjbUZ1WTJselkyOHhHVEFYQmdOVkJBb1RFRzl5WnpJdVpYaGhiWEJzWlM1amIyMHhIREFhQmdOVkJBTVRFMk5oCkxtOXlaekl1WlhoaGJYQnNaUzVqYjIwd0hoY05NVGd3TmpBNU1URTFPREk0V2hjTk1qZ3dOakEyTVRFMU9ESTQKV2pCek1Rc3dDUVlEVlFRR0V3SlZVekVUTUJFR0ExVUVDQk1LUTJGc2FXWnZjbTVwWVRFV01CUUdBMVVFQnhNTgpVMkZ1SUVaeVlXNWphWE5qYnpFWk1CY0dBMVVFQ2hNUWIzSm5NaTVsZUdGdGNHeGxMbU52YlRFY01Cb0dBMVVFCkF4TVRZMkV1YjNKbk1pNWxlR0Z0Y0d4bExtTnZiVEJaTUJNR0J5cUdTTTQ5QWdFR0NDcUdTTTQ5QXdFSEEwSUEKQkhUS01aall0TDdnSXZ0ekN4Y2pMQit4NlZNdENzVW0wbExIcGtIeDFQaW5LUU1ybzFJWWNIMEpGVmdFempvSQpCcUdMYURyQmhWQkpoS1kwS21kMUJJZWpYekJkTUE0R0ExVWREd0VCL3dRRUF3SUJwakFQQmdOVkhTVUVDREFHCkJnUlZIU1VBTUE4R0ExVWRFd0VCL3dRRk1BTUJBZjh3S1FZRFZSME9CQ0lFSUk1WWdza0tFUkNwQzVNRDdxQlUKUXZTajd4Rk1ncmI1emhDaUhpU3JFNEtnTUFvR0NDcUdTTTQ5QkFNQ0EwZ0FNRVVDSVFDWnNSUjVBVU5KUjdJbwpQQzgzUCt1UlF1RmpUYS94eitzVkpZYnBsNEh1Z1FJZ0QzUlhuQWFqaGlPMU1EL1JzSC9JN2FPL1RuWUxkQUl6Cnd4VlNJenhQbWd3PQotLS0tLUVORCBDRVJUSUZJQ0FURS0tLS0tCg=="
],
"admins": [
"LS0tLS1CRUdJTiBDRVJUSUZJQ0FURS0tLS0tCk1JSUNLVENDQWRDZ0F3SUJBZ0lRU1lpeE1vdmpoM1N2c25WMmFUOXl1REFLQmdncWhrak9QUVFEQWpCek1Rc3cKQ1FZRFZRUUdFd0pWVXpFVE1CRUdBMVVFQ0JNS1EyRnNhV1p2Y201cFlURVdNQlFHQTFVRUJ4TU5VMkZ1SUVaeQpZVzVqYVhOamJ6RVpNQmNHQTFVRUNoTVFiM0puTWk1bGVHRnRjR3hsTG1OdmJURWNNQm9HQTFVRUF4TVRZMkV1CmIzSm5NaTVsZUdGdGNHeGxMbU52YlRBZUZ3MHhPREEyTURreE1UVTRNamhhRncweU9EQTJNRFl4TVRVNE1qaGEKTUd3eEN6QUpCZ05WQkFZVEFsVlRNUk13RVFZRFZRUUlFd3BEWVd4cFptOXlibWxoTVJZd0ZBWURWUVFIRXcxVApZVzRnUm5KaGJtTnBjMk52TVE4d0RRWURWUVFMRXdaamJHbGxiblF4SHpBZEJnTlZCQU1NRmtGa2JXbHVRRzl5Clp6SXVaWGhoYlhCc1pTNWpiMjB3V1RBVEJnY3Foa2pPUFFJQkJnZ3Foa2pPUFFNQkJ3TkNBQVJFdStKc3l3QlQKdkFYUUdwT2FuS3ZkOVhCNlMxVGU4NTJ2L0xRODVWM1Rld0hlYXZXeGUydUszYTBvRHA5WDV5SlJ4YXN2b2hCcwpOMGJIRWErV1ZFQjdvMDB3U3pBT0JnTlZIUThCQWY4RUJBTUNCNEF3REFZRFZSMFRBUUgvQkFJd0FEQXJCZ05WCkhTTUVKREFpZ0NDT1dJTEpDaEVRcVF1VEErNmdWRUwwbys4UlRJSzIrYzRRb2g0a3F4T0NvREFLQmdncWhrak8KUFFRREFnTkhBREJFQWlCVUFsRStvbFBjMTZBMitmNVBRSmdTZFp0SjNPeXBieG9JVlhOdi90VUJ2QUlnVGFNcgo1K2k2TUxpaU9FZ0wzcWZSWmdkcG1yVm1SbHlIdVdabWE0NXdnaE09Ci0tLS0tRU5EIENFUlRJRklDQVRFLS0tLS0K"
],
"crypto_config": {
"signature_hash_family": "SHA2",
"identity_identifier_hash_function": "SHA256"
},
"tls_root_certs": [
"LS0tLS1CRUdJTiBDRVJUSUZJQ0FURS0tLS0tCk1JSUNTakNDQWZDZ0F3SUJBZ0lSQUtoUFFxUGZSYnVpSktqL0JRanQ3RXN3Q2dZSUtvWkl6ajBFQXdJd2RqRUwKTUFrR0ExVUVCaE1DVlZNeEV6QVJCZ05WQkFnVENrTmhiR2xtYjNKdWFXRXhGakFVQmdOVkJBY1REVk5oYmlCRwpjbUZ1WTJselkyOHhHVEFYQmdOVkJBb1RFRzl5WnpJdVpYaGhiWEJzWlM1amIyMHhIekFkQmdOVkJBTVRGblJzCmMyTmhMbTl5WnpJdVpYaGhiWEJzWlM1amIyMHdIaGNOTVRnd05qQTVNVEUxT0RJNFdoY05Namd3TmpBMk1URTEKT0RJNFdqQjJNUXN3Q1FZRFZRUUdFd0pWVXpFVE1CRUdBMVVFQ0JNS1EyRnNhV1p2Y201cFlURVdNQlFHQTFVRQpCeE1OVTJGdUlFWnlZVzVqYVhOamJ6RVpNQmNHQTFVRUNoTVFiM0puTWk1bGVHRnRjR3hsTG1OdmJURWZNQjBHCkExVUVBeE1XZEd4elkyRXViM0puTWk1bGVHRnRjR3hsTG1OdmJUQlpNQk1HQnlxR1NNNDlBZ0VHQ0NxR1NNNDkKQXdFSEEwSUFCRVIrMnREOWdkME9NTlk5Y20rbllZR2NUeWszRStCMnBsWWxDL2ZVdGdUU0QyZUVyY2kyWmltdQo5N25YeUIrM0NwNFJwVjFIVHdaR0JMbmNnbVIyb1J5alh6QmRNQTRHQTFVZER3RUIvd1FFQXdJQnBqQVBCZ05WCkhTVUVDREFHQmdSVkhTVUFNQThHQTFVZEV3RUIvd1FGTUFNQkFmOHdLUVlEVlIwT0JDSUVJUEN0V01JRFRtWC8KcGxseS8wNDI4eFRXZHlhazQybU9tbVNJSENCcnAyN0tNQW9HQ0NxR1NNNDlCQU1DQTBnQU1FVUNJUUNtN2xmVQpjbG91VHJrS2Z1YjhmdmdJTTU3QS85bW5IdzhpQnAycURtamZhUUlnSjkwcnRUV204YzVBbE93bFpyYkd0NWZMCjF6WXg5QW5DMTJBNnhOZDIzTG89Ci0tLS0tRU5EIENFUlRJRklDQVRFLS0tLS0K"
],
"fabric_node_ous": {
"enable": true,
"client_ou_identifier": {
"certificate": "LS0tLS1CRUdJTiBDRVJUSUZJQ0FURS0tLS0tCk1JSUNSRENDQWVxZ0F3SUJBZ0lSQUx2SWV2KzE4Vm9LZFR2V1RLNCtaZ2d3Q2dZSUtvWkl6ajBFQXdJd2N6RUwKTUFrR0ExVUVCaE1DVlZNeEV6QVJCZ05WQkFnVENrTmhiR2xtYjNKdWFXRXhGakFVQmdOVkJBY1REVk5oYmlCRwpjbUZ1WTJselkyOHhHVEFYQmdOVkJBb1RFRzl5WnpJdVpYaGhiWEJzWlM1amIyMHhIREFhQmdOVkJBTVRFMk5oCkxtOXlaekl1WlhoaGJYQnNaUzVqYjIwd0hoY05NVGd3TmpBNU1URTFPREk0V2hjTk1qZ3dOakEyTVRFMU9ESTQKV2pCek1Rc3dDUVlEVlFRR0V3SlZVekVUTUJFR0ExVUVDQk1LUTJGc2FXWnZjbTVwWVRFV01CUUdBMVVFQnhNTgpVMkZ1SUVaeVlXNWphWE5qYnpFWk1CY0dBMVVFQ2hNUWIzSm5NaTVsZUdGdGNHeGxMbU52YlRFY01Cb0dBMVVFCkF4TVRZMkV1YjNKbk1pNWxlR0Z0Y0d4bExtTnZiVEJaTUJNR0J5cUdTTTQ5QWdFR0NDcUdTTTQ5QXdFSEEwSUEKQkhUS01aall0TDdnSXZ0ekN4Y2pMQit4NlZNdENzVW0wbExIcGtIeDFQaW5LUU1ybzFJWWNIMEpGVmdFempvSQpCcUdMYURyQmhWQkpoS1kwS21kMUJJZWpYekJkTUE0R0ExVWREd0VCL3dRRUF3SUJwakFQQmdOVkhTVUVDREFHCkJnUlZIU1VBTUE4R0ExVWRFd0VCL3dRRk1BTUJBZjh3S1FZRFZSME9CQ0lFSUk1WWdza0tFUkNwQzVNRDdxQlUKUXZTajd4Rk1ncmI1emhDaUhpU3JFNEtnTUFvR0NDcUdTTTQ5QkFNQ0EwZ0FNRVVDSVFDWnNSUjVBVU5KUjdJbwpQQzgzUCt1UlF1RmpUYS94eitzVkpZYnBsNEh1Z1FJZ0QzUlhuQWFqaGlPMU1EL1JzSC9JN2FPL1RuWUxkQUl6Cnd4VlNJenhQbWd3PQotLS0tLUVORCBDRVJUSUZJQ0FURS0tLS0tCg==",
"organizational_unit_identifier": "client"
},
"peer_ou_identifier": {
"certificate": "LS0tLS1CRUdJTiBDRVJUSUZJQ0FURS0tLS0tCk1JSUNSRENDQWVxZ0F3SUJBZ0lSQUx2SWV2KzE4Vm9LZFR2V1RLNCtaZ2d3Q2dZSUtvWkl6ajBFQXdJd2N6RUwKTUFrR0ExVUVCaE1DVlZNeEV6QVJCZ05WQkFnVENrTmhiR2xtYjNKdWFXRXhGakFVQmdOVkJBY1REVk5oYmlCRwpjbUZ1WTJselkyOHhHVEFYQmdOVkJBb1RFRzl5WnpJdVpYaGhiWEJzWlM1amIyMHhIREFhQmdOVkJBTVRFMk5oCkxtOXlaekl1WlhoaGJYQnNaUzVqYjIwd0hoY05NVGd3TmpBNU1URTFPREk0V2hjTk1qZ3dOakEyTVRFMU9ESTQKV2pCek1Rc3dDUVlEVlFRR0V3SlZVekVUTUJFR0ExVUVDQk1LUTJGc2FXWnZjbTVwWVRFV01CUUdBMVVFQnhNTgpVMkZ1SUVaeVlXNWphWE5qYnpFWk1CY0dBMVVFQ2hNUWIzSm5NaTVsZUdGdGNHeGxMbU52YlRFY01Cb0dBMVVFCkF4TVRZMkV1YjNKbk1pNWxlR0Z0Y0d4bExtTnZiVEJaTUJNR0J5cUdTTTQ5QWdFR0NDcUdTTTQ5QXdFSEEwSUEKQkhUS01aall0TDdnSXZ0ekN4Y2pMQit4NlZNdENzVW0wbExIcGtIeDFQaW5LUU1ybzFJWWNIMEpGVmdFempvSQpCcUdMYURyQmhWQkpoS1kwS21kMUJJZWpYekJkTUE0R0ExVWREd0VCL3dRRUF3SUJwakFQQmdOVkhTVUVDREFHCkJnUlZIU1VBTUE4R0ExVWRFd0VCL3dRRk1BTUJBZjh3S1FZRFZSME9CQ0lFSUk1WWdza0tFUkNwQzVNRDdxQlUKUXZTajd4Rk1ncmI1emhDaUhpU3JFNEtnTUFvR0NDcUdTTTQ5QkFNQ0EwZ0FNRVVDSVFDWnNSUjVBVU5KUjdJbwpQQzgzUCt1UlF1RmpUYS94eitzVkpZYnBsNEh1Z1FJZ0QzUlhuQWFqaGlPMU1EL1JzSC9JN2FPL1RuWUxkQUl6Cnd4VlNJenhQbWd3PQotLS0tLUVORCBDRVJUSUZJQ0FURS0tLS0tCg==",
"organizational_unit_identifier": "peer"
}
}
},
"Org3MSP": {
"name": "Org3MSP",
"root_certs": [
"CgJPVQoEUm9sZQoMRW5yb2xsbWVudElEChBSZXZvY2F0aW9uSGFuZGxlEkQKIKoEXcq/psdYnMKCiT79N+dS1hM8k+SuzU1blOgTuN++EiBe2m3E+FjWLuQGMNRGRrEVTMqTvC4A/5jvCLv2ja1sZxpECiDBbI0kwetxAwFzHwb1hi8TlkGW3OofvuVzfFt9VlewcRIgyvsxG5/THdWyKJTdNx8Gle2hoCbVF0Y1/DQESBjGOGciRAog25fMyWps+FLOjzj1vIsGUyO457ri3YMvmUcycIH2FvQSICTtzaFvSPUiDtNtAVz+uetuB9kfmjUdUSQxjyXULOm2IkQKIO8FKzwoWwu8Mo77GNqnKFGCZaJL9tlrkdTuEMu9ujzbEiA4xtzo8oo8oEhFVsl6010mNoj1VuI0Wmz4tvUgXolCIiJECiDZcZPuwk/uaJMuVph7Dy/icgnAtVYHShET41O0Eh3Q5BIgy5q9VMQrch9VW5yajhY8dH1uA593gKd5kBqGdLfiXzAiRAogAnUYq/kwKzFfmIm/W4nZxi1kjG2C8NRjsYYBkeAOQ6wSIGyX5GGmwgvxgXXehNWBfijyNIJALGRVhO8YtBqr+vnrKogBCiDHR1XQsDbpcBoZFJ09V97zsIKNVTxjUow7/wwC+tq3oBIgSWT/peiO2BI0DecypKfgMpVR8DWXl8ZHSrPISsL3Mc8aINem9+BOezLwFKCbtVH1KAHIRLyyiNP+TkIKW6x9RkThIiAbIJCYU6O02EB8uX6rqLU/1lHxV0vtWdIsKCTLx2EZmDJECiCPXeyUyFzPS3iFv8CQUOLCPZxf6buZS5JlM6EE/gCRaxIgmF9GKPLLmEoA77+AU3J8Iwnu9pBxnaHtUlyf/F9p30c6RAogG7ENKWlOZ4aF0HprqXAjl++Iao7/iE8xeVcKRlmfq1ASIGtmmavDAVS2bw3zClQd4ZBD2DrqCBO9NPOcLNB0IWeIQiCjxTdbmcuBNINZYWe+5fWyI1oY9LavKzDVkdh+miu26EogY2uJtJGfKrQQjy+pgf9FdPMUk+8PNUBtH9LCD4bos7JSIPl6m5lEP/PRAmBaeTQLXdbMxIthxM2gw+Zkc5+IJEWX"
],
"intermediate_certs": [
"CtgCCkQKIP0UVivtH8NlnRNrZuuu6jpaj2ZbEB4/secGS57MfbINEiDSJweLUMIQSW12jugBQG81lIQflJWvi7vi925u+PU/+xJECiDgOGdNbAiGSoHmTjKhT22fqUqYLIVh+JBHetm4kF4skhIg9XTWRkUqtsfYKENzPgm7ZUSmCHNF8xH7Vnhuc1EpAUgaINwSnJKofiMoyDRZwUBhgfwMH9DJzMccvRVW7IvLMe/cIiCnlRj+mfNVAJGKthLgQBB/JKM14NbUeutyJtTgrmDDiCogme25qGvxJfgQNnzldMMicVyiI6YMfnoThAUyqsTzyXkqIAAAAAAAAAAAAAAAAAAAAAAAAAAAAAAAAAAAAAAAAAAAKiCZ7bmoa/El+BA2fOV0wyJxXKIjpgx+ehOEBTKqxPPJeSogAAAAAAAAAAAAAAAAAAAAAAAAAAAAAAAAAAAAAAAAAAESIFYUenRvjbmEh+37YHJrvFJt4lGq9ShtJ4kEBrfHArPjGgNPVTEqA09VMTL0ARKIAQog/gwzULTJbCAoVg9XfCiROs4cU5oSv4Q80iYWtonAnvsSIE6mYFdzisBU21rhxjfYE7kk3Xjih9A1idJp7TSjfmorGiBwIEbnxUKjs3Z3DXUSTj5R78skdY1hWEjpCbSBvtwn/yIgBVTjvNOIwpBC7qZJKX6yn4tMvoCCGpiz4BKBEUqtBJsaZzBlAjBwZ4WXYOttkhsNA2r94gBfLUdx/4VhW4hwUImcztlau1T14UlNzJolCNkdiLc9CqsCMQD6OBkgDWGq9UlhkK9dJBzU+RElcZdSfVV1hDbbqt+lFRWOzzEkZ+BXCR1k3xybz+o="
],
"admins": [
"LS0tLS1CRUdJTiBQVUJMSUMgS0VZLS0tLS0KTUhZd0VBWUhLb1pJemowQ0FRWUZLNEVFQUNJRFlnQUVUYk13SEZteEpEMWR3SjE2K0hnVnRDZkpVRzdKK2FTYgorbkVvVmVkREVHYmtTc1owa1lraEpyYkx5SHlYZm15ZWV0ejFIUk1rWjRvMjdxRlMzTlVFb1J2QlM3RHJPWDJjCnZLaDRnbWhHTmlPbzRiWjFOVG9ZL2o3QnpqMFlMSXNlCi0tLS0tRU5EIFBVQkxJQyBLRVktLS0tLQo="
]
}
},
"orderers": {
"OrdererOrg": {
"endpoint": [
{
"host": "orderer.example.com",
"port": 7050
}
]
}
}
}
配置查询:
It’s important to note that the certificates here are base64 encoded, and thus should decoded in a manner similar to the following:
配置查询返回了从MSP(成员服务提供者)ID到orderer端点的映射,还返回了FabricMSPConfig ,它可被用来通过SDK验证所有peer和orderer:
$ discover --configFile conf.yaml config --channel mychannel --server peer0.org1.example.com:7051 | jq .msps.OrdererOrg.root_certs[0] | sed "s/\"//g" | base64 --decode | openssl x509 -text -noout
Certificate:
Data:
Version: 3 (0x2)
Serial Number:
c8:99:2d:3a:2d:7f:4b:73:53:8b:39:18:7b:c3:e1:1e
Signature Algorithm: ecdsa-with-SHA256
Issuer: C=US, ST=California, L=San Francisco, O=example.com, CN=ca.example.com
Validity
Not Before: Jun 9 11:58:28 2018 GMT
Not After : Jun 6 11:58:28 2028 GMT
Subject: C=US, ST=California, L=San Francisco, O=example.com, CN=ca.example.com
Subject Public Key Info:
Public Key Algorithm: id-ecPublicKey
Public-Key: (256 bit)
pub:
04:28:ac:9e:51:8d:a4:80:15:0a:ff:ae:c9:61:d6:
08:67:b0:15:c3:c7:99:46:61:63:0a:10:a6:42:6a:
b0:af:14:0c:c0:e2:5b:b4:a1:c3:f0:07:7e:5b:7c:
c4:b2:95:13:95:81:4b:6a:b9:e3:87:a4:f3:2c:7c:
ae:00:91:9e:32
ASN1 OID: prime256v1
NIST CURVE: P-256
X509v3 extensions:
X509v3 Key Usage: critical
Digital Signature, Key Encipherment, Certificate Sign, CRL Sign
X509v3 Extended Key Usage:
Any Extended Key Usage
X509v3 Basic Constraints: critical
CA:TRUE
X509v3 Subject Key Identifier:
60:9D:F2:30:26:CE:8F:65:81:41:AD:96:15:0E:24:8D:A0:9D:C5:79:C1:17:BF:FE:E5:1B:FB:75:50:10:A6:4C
Signature Algorithm: ecdsa-with-SHA256
30:44:02:20:3d:e1:a7:6c:99:3f:87:2a:36:44:51:98:37:11:
d8:a0:47:7a:33:ff:30:c1:09:a6:05:ec:b0:53:53:39:c1:0e:
02:20:6b:f4:1d:48:e0:72:e4:c2:ef:b0:84:79:d4:2e:c2:c5:
1b:6f:e4:2f:56:35:51:18:7d:93:51:86:05:84:ce:1f
$ discover --configFile conf.yaml config --channel mychannel --server peer0.org1.example.com:7051
{
"msps": {
"OrdererOrg": {
"name": "OrdererMSP",
"root_certs": [
"LS0tLS1CRUdJTiBDRVJUSUZJQ0FURS0tLS0tCk1JSUNMekNDQWRhZ0F3SUJBZ0lSQU1pWkxUb3RmMHR6VTRzNUdIdkQ0UjR3Q2dZSUtvWkl6ajBFQXdJd2FURUwKTUFrR0ExVUVCaE1DVlZNeEV6QVJCZ05WQkFnVENrTmhiR2xtYjNKdWFXRXhGakFVQmdOVkJBY1REVk5oYmlCRwpjbUZ1WTJselkyOHhGREFTQmdOVkJBb1RDMlY0WVcxd2JHVXVZMjl0TVJjd0ZRWURWUVFERXc1allTNWxlR0Z0CmNHeGxMbU52YlRBZUZ3MHhPREEyTURreE1UVTRNamhhRncweU9EQTJNRFl4TVRVNE1qaGFNR2t4Q3pBSkJnTlYKQkFZVEFsVlRNUk13RVFZRFZRUUlFd3BEWVd4cFptOXlibWxoTVJZd0ZBWURWUVFIRXcxVFlXNGdSbkpoYm1OcApjMk52TVJRd0VnWURWUVFLRXd0bGVHRnRjR3hsTG1OdmJURVhNQlVHQTFVRUF4TU9ZMkV1WlhoaGJYQnNaUzVqCmIyMHdXVEFUQmdjcWhrak9QUUlCQmdncWhrak9QUU1CQndOQ0FBUW9ySjVSamFTQUZRci9yc2xoMWdobnNCWEQKeDVsR1lXTUtFS1pDYXJDdkZBekE0bHUwb2NQd0IzNWJmTVN5bFJPVmdVdHF1ZU9IcFBNc2ZLNEFrWjR5bzE4dwpYVEFPQmdOVkhROEJBZjhFQkFNQ0FhWXdEd1lEVlIwbEJBZ3dCZ1lFVlIwbEFEQVBCZ05WSFJNQkFmOEVCVEFECkFRSC9NQ2tHQTFVZERnUWlCQ0JnbmZJd0pzNlBaWUZCclpZVkRpU05vSjNGZWNFWHYvN2xHL3QxVUJDbVREQUsKQmdncWhrak9QUVFEQWdOSEFEQkVBaUE5NGFkc21UK0hLalpFVVpnM0VkaWdSM296L3pEQkNhWUY3TEJUVXpuQgpEZ0lnYS9RZFNPQnk1TUx2c0lSNTFDN0N4UnR2NUM5V05WRVlmWk5SaGdXRXpoOD0KLS0tLS1FTkQgQ0VSVElGSUNBVEUtLS0tLQo="
],
"admins": [
"LS0tLS1CRUdJTiBDRVJUSUZJQ0FURS0tLS0tCk1JSUNDVENDQWJDZ0F3SUJBZ0lRR2wzTjhaSzRDekRRQmZqYVpwMVF5VEFLQmdncWhrak9QUVFEQWpCcE1Rc3cKQ1FZRFZRUUdFd0pWVXpFVE1CRUdBMVVFQ0JNS1EyRnNhV1p2Y201cFlURVdNQlFHQTFVRUJ4TU5VMkZ1SUVaeQpZVzVqYVhOamJ6RVVNQklHQTFVRUNoTUxaWGhoYlhCc1pTNWpiMjB4RnpBVkJnTlZCQU1URG1OaExtVjRZVzF3CmJHVXVZMjl0TUI0WERURTRNRFl3T1RFeE5UZ3lPRm9YRFRJNE1EWXdOakV4TlRneU9Gb3dWakVMTUFrR0ExVUUKQmhNQ1ZWTXhFekFSQmdOVkJBZ1RDa05oYkdsbWIzSnVhV0V4RmpBVUJnTlZCQWNURFZOaGJpQkdjbUZ1WTJsegpZMjh4R2pBWUJnTlZCQU1NRVVGa2JXbHVRR1Y0WVcxd2JHVXVZMjl0TUZrd0V3WUhLb1pJemowQ0FRWUlLb1pJCnpqMERBUWNEUWdBRWl2TXQybVdiQ2FHb1FZaWpka1BRM1NuTGFkMi8rV0FESEFYMnRGNWthMTBteG1OMEx3VysKdmE5U1dLMmJhRGY5RDQ2TVROZ2gycnRhUitNWXFWRm84Nk5OTUVzd0RnWURWUjBQQVFIL0JBUURBZ2VBTUF3RwpBMVVkRXdFQi93UUNNQUF3S3dZRFZSMGpCQ1F3SW9BZ1lKM3lNQ2JPajJXQlFhMldGUTRramFDZHhYbkJGNy8rCjVSdjdkVkFRcGt3d0NnWUlLb1pJemowRUF3SURSd0F3UkFJZ2RIc0pUcGM5T01DZ3JPVFRLTFNnU043UWk3MWIKSWpkdzE4MzJOeXFQZnJ3Q0lCOXBhSlRnL2R5ckNhWUx1ZndUbUtFSnZZMEtXVzcrRnJTeG5CTGdzZjJpCi0tLS0tRU5EIENFUlRJRklDQVRFLS0tLS0K"
],
"crypto_config": {
"signature_hash_family": "SHA2",
"identity_identifier_hash_function": "SHA256"
},
"tls_root_certs": [
"LS0tLS1CRUdJTiBDRVJUSUZJQ0FURS0tLS0tCk1JSUNORENDQWR1Z0F3SUJBZ0lRZDdodzFIaHNZTXI2a25ETWJrZThTakFLQmdncWhrak9QUVFEQWpCc01Rc3cKQ1FZRFZRUUdFd0pWVXpFVE1CRUdBMVVFQ0JNS1EyRnNhV1p2Y201cFlURVdNQlFHQTFVRUJ4TU5VMkZ1SUVaeQpZVzVqYVhOamJ6RVVNQklHQTFVRUNoTUxaWGhoYlhCc1pTNWpiMjB4R2pBWUJnTlZCQU1URVhSc2MyTmhMbVY0CllXMXdiR1V1WTI5dE1CNFhEVEU0TURZd09URXhOVGd5T0ZvWERUSTRNRFl3TmpFeE5UZ3lPRm93YkRFTE1Ba0cKQTFVRUJoTUNWVk14RXpBUkJnTlZCQWdUQ2tOaGJHbG1iM0p1YVdFeEZqQVVCZ05WQkFjVERWTmhiaUJHY21GdQpZMmx6WTI4eEZEQVNCZ05WQkFvVEMyVjRZVzF3YkdVdVkyOXRNUm93R0FZRFZRUURFeEYwYkhOallTNWxlR0Z0CmNHeGxMbU52YlRCWk1CTUdCeXFHU000OUFnRUdDQ3FHU000OUF3RUhBMElBQk9ZZGdpNm53a3pYcTBKQUF2cTIKZU5xNE5Ybi85L0VRaU13Tzc1dXdpTWJVbklYOGM1N2NYU2dQdy9NMUNVUGFwNmRyMldvTjA3RGhHb1B6ZXZaMwp1aFdqWHpCZE1BNEdBMVVkRHdFQi93UUVBd0lCcGpBUEJnTlZIU1VFQ0RBR0JnUlZIU1VBTUE4R0ExVWRFd0VCCi93UUZNQU1CQWY4d0tRWURWUjBPQkNJRUlCcW0xZW9aZy9qSW52Z1ZYR2cwbzVNamxrd2tSekRlalAzZkplbW8KU1hBek1Bb0dDQ3FHU000OUJBTUNBMGNBTUVRQ0lEUG9FRkF5bFVYcEJOMnh4VEo0MVplaS9ZQWFvN29aL0tEMwpvTVBpQ3RTOUFpQmFiU1dNS3UwR1l4eXdsZkFwdi9CWitxUEJNS0JMNk5EQ1haUnpZZmtENEE9PQotLS0tLUVORCBDRVJUSUZJQ0FURS0tLS0tCg=="
]
},
"Org1MSP": {
"name": "Org1MSP",
"root_certs": [
"LS0tLS1CRUdJTiBDRVJUSUZJQ0FURS0tLS0tCk1JSUNSRENDQWVxZ0F3SUJBZ0lSQU1nN2VETnhwS0t0ZGl0TDRVNDRZMUl3Q2dZSUtvWkl6ajBFQXdJd2N6RUwKTUFrR0ExVUVCaE1DVlZNeEV6QVJCZ05WQkFnVENrTmhiR2xtYjNKdWFXRXhGakFVQmdOVkJBY1REVk5oYmlCRwpjbUZ1WTJselkyOHhHVEFYQmdOVkJBb1RFRzl5WnpFdVpYaGhiWEJzWlM1amIyMHhIREFhQmdOVkJBTVRFMk5oCkxtOXlaekV1WlhoaGJYQnNaUzVqYjIwd0hoY05NVGd3TmpBNU1URTFPREk0V2hjTk1qZ3dOakEyTVRFMU9ESTQKV2pCek1Rc3dDUVlEVlFRR0V3SlZVekVUTUJFR0ExVUVDQk1LUTJGc2FXWnZjbTVwWVRFV01CUUdBMVVFQnhNTgpVMkZ1SUVaeVlXNWphWE5qYnpFWk1CY0dBMVVFQ2hNUWIzSm5NUzVsZUdGdGNHeGxMbU52YlRFY01Cb0dBMVVFCkF4TVRZMkV1YjNKbk1TNWxlR0Z0Y0d4bExtTnZiVEJaTUJNR0J5cUdTTTQ5QWdFR0NDcUdTTTQ5QXdFSEEwSUEKQk41d040THpVNGRpcUZSWnB6d3FSVm9JbWw1MVh0YWkzbWgzUXo0UEZxWkhXTW9lZ0ovUWRNKzF4L3RobERPcwpnbmVRcndGd216WGpvSSszaHJUSmRuU2pYekJkTUE0R0ExVWREd0VCL3dRRUF3SUJwakFQQmdOVkhTVUVDREFHCkJnUlZIU1VBTUE4R0ExVWRFd0VCL3dRRk1BTUJBZjh3S1FZRFZSME9CQ0lFSU9CZFFMRitjTVdhNmUxcDJDcE8KRXg3U0hVaW56VnZkNTVoTG03dzZ2NzJvTUFvR0NDcUdTTTQ5QkFNQ0EwZ0FNRVVDSVFDQyt6T1lHcll0ZTB4SgpSbDVYdUxjUWJySW9UeHpsRnJLZWFNWnJXMnVaSkFJZ0NVVGU5MEl4aW55dk4wUkh4UFhoVGNJTFdEZzdLUEJOCmVrNW5TRlh3Y0lZPQotLS0tLUVORCBDRVJUSUZJQ0FURS0tLS0tCg=="
],
"admins": [
"LS0tLS1CRUdJTiBDRVJUSUZJQ0FURS0tLS0tCk1JSUNLakNDQWRDZ0F3SUJBZ0lRRTRFK0tqSHgwdTlzRSsxZUgrL1dOakFLQmdncWhrak9QUVFEQWpCek1Rc3cKQ1FZRFZRUUdFd0pWVXpFVE1CRUdBMVVFQ0JNS1EyRnNhV1p2Y201cFlURVdNQlFHQTFVRUJ4TU5VMkZ1SUVaeQpZVzVqYVhOamJ6RVpNQmNHQTFVRUNoTVFiM0puTVM1bGVHRnRjR3hsTG1OdmJURWNNQm9HQTFVRUF4TVRZMkV1CmIzSm5NUzVsZUdGdGNHeGxMbU52YlRBZUZ3MHhPREEyTURreE1UVTRNamhhRncweU9EQTJNRFl4TVRVNE1qaGEKTUd3eEN6QUpCZ05WQkFZVEFsVlRNUk13RVFZRFZRUUlFd3BEWVd4cFptOXlibWxoTVJZd0ZBWURWUVFIRXcxVApZVzRnUm5KaGJtTnBjMk52TVE4d0RRWURWUVFMRXdaamJHbGxiblF4SHpBZEJnTlZCQU1NRmtGa2JXbHVRRzl5Clp6RXVaWGhoYlhCc1pTNWpiMjB3V1RBVEJnY3Foa2pPUFFJQkJnZ3Foa2pPUFFNQkJ3TkNBQVFqK01MZk1ESnUKQ2FlWjV5TDR2TnczaWp4ZUxjd2YwSHo1blFrbXVpSnFETjRhQ0ZwVitNTTVablFEQmx1dWRyUS80UFA1Sk1WeQpreWZsQ3pJa2NCNjdvMDB3U3pBT0JnTlZIUThCQWY4RUJBTUNCNEF3REFZRFZSMFRBUUgvQkFJd0FEQXJCZ05WCkhTTUVKREFpZ0NEZ1hVQ3hmbkRGbXVudGFkZ3FUaE1lMGgxSXA4MWIzZWVZUzV1OE9yKzlxREFLQmdncWhrak8KUFFRREFnTklBREJGQWlFQXlJV21QcjlQakdpSk1QM1pVd05MRENnNnVwMlVQVXNJSzd2L2h3RVRra01DSUE0cQo3cHhQZy9VVldiamZYeE0wUCsvcTEzbXFFaFlYaVpTTXpoUENFNkNmCi0tLS0tRU5EIENFUlRJRklDQVRFLS0tLS0K"
],
"crypto_config": {
"signature_hash_family": "SHA2",
"identity_identifier_hash_function": "SHA256"
},
"tls_root_certs": [
"LS0tLS1CRUdJTiBDRVJUSUZJQ0FURS0tLS0tCk1JSUNTVENDQWUrZ0F3SUJBZ0lRZlRWTE9iTENVUjdxVEY3Z283UXgvakFLQmdncWhrak9QUVFEQWpCMk1Rc3cKQ1FZRFZRUUdFd0pWVXpFVE1CRUdBMVVFQ0JNS1EyRnNhV1p2Y201cFlURVdNQlFHQTFVRUJ4TU5VMkZ1SUVaeQpZVzVqYVhOamJ6RVpNQmNHQTFVRUNoTVFiM0puTVM1bGVHRnRjR3hsTG1OdmJURWZNQjBHQTFVRUF4TVdkR3h6ClkyRXViM0puTVM1bGVHRnRjR3hsTG1OdmJUQWVGdzB4T0RBMk1Ea3hNVFU0TWpoYUZ3MHlPREEyTURZeE1UVTQKTWpoYU1IWXhDekFKQmdOVkJBWVRBbFZUTVJNd0VRWURWUVFJRXdwRFlXeHBabTl5Ym1saE1SWXdGQVlEVlFRSApFdzFUWVc0Z1JuSmhibU5wYzJOdk1Sa3dGd1lEVlFRS0V4QnZjbWN4TG1WNFlXMXdiR1V1WTI5dE1SOHdIUVlEClZRUURFeFowYkhOallTNXZjbWN4TG1WNFlXMXdiR1V1WTI5dE1Ga3dFd1lIS29aSXpqMENBUVlJS29aSXpqMEQKQVFjRFFnQUVZbnp4bmMzVUpHS0ZLWDNUNmR0VGpkZnhJTVYybGhTVzNab0lWSW9mb04rWnNsWWp0d0g2ZXZXYgptTkZGQmRaYWExTjluaXRpbmxxbVVzTU1NQ2JieXFOZk1GMHdEZ1lEVlIwUEFRSC9CQVFEQWdHbU1BOEdBMVVkCkpRUUlNQVlHQkZVZEpRQXdEd1lEVlIwVEFRSC9CQVV3QXdFQi96QXBCZ05WSFE0RUlnUWdlVTAwNlNaUllUNDIKN1Uxb2YwL3RGdHUvRFVtazVLY3hnajFCaklJakduZ3dDZ1lJS29aSXpqMEVBd0lEU0FBd1JRSWhBSWpvcldJTwpRNVNjYjNoZDluRi9UamxWcmk1UHdTaDNVNmJaMFdYWEsxYzVBaUFlMmM5QmkyNFE1WjQ0aXQ1MkI5cm1hU1NpCkttM2NZVlY0cWJ6RFhMOHZYUT09Ci0tLS0tRU5EIENFUlRJRklDQVRFLS0tLS0K"
],
"fabric_node_ous": {
"enable": true,
"client_ou_identifier": {
"certificate": "LS0tLS1CRUdJTiBDRVJUSUZJQ0FURS0tLS0tCk1JSUNSRENDQWVxZ0F3SUJBZ0lSQU1nN2VETnhwS0t0ZGl0TDRVNDRZMUl3Q2dZSUtvWkl6ajBFQXdJd2N6RUwKTUFrR0ExVUVCaE1DVlZNeEV6QVJCZ05WQkFnVENrTmhiR2xtYjNKdWFXRXhGakFVQmdOVkJBY1REVk5oYmlCRwpjbUZ1WTJselkyOHhHVEFYQmdOVkJBb1RFRzl5WnpFdVpYaGhiWEJzWlM1amIyMHhIREFhQmdOVkJBTVRFMk5oCkxtOXlaekV1WlhoaGJYQnNaUzVqYjIwd0hoY05NVGd3TmpBNU1URTFPREk0V2hjTk1qZ3dOakEyTVRFMU9ESTQKV2pCek1Rc3dDUVlEVlFRR0V3SlZVekVUTUJFR0ExVUVDQk1LUTJGc2FXWnZjbTVwWVRFV01CUUdBMVVFQnhNTgpVMkZ1SUVaeVlXNWphWE5qYnpFWk1CY0dBMVVFQ2hNUWIzSm5NUzVsZUdGdGNHeGxMbU52YlRFY01Cb0dBMVVFCkF4TVRZMkV1YjNKbk1TNWxlR0Z0Y0d4bExtTnZiVEJaTUJNR0J5cUdTTTQ5QWdFR0NDcUdTTTQ5QXdFSEEwSUEKQk41d040THpVNGRpcUZSWnB6d3FSVm9JbWw1MVh0YWkzbWgzUXo0UEZxWkhXTW9lZ0ovUWRNKzF4L3RobERPcwpnbmVRcndGd216WGpvSSszaHJUSmRuU2pYekJkTUE0R0ExVWREd0VCL3dRRUF3SUJwakFQQmdOVkhTVUVDREFHCkJnUlZIU1VBTUE4R0ExVWRFd0VCL3dRRk1BTUJBZjh3S1FZRFZSME9CQ0lFSU9CZFFMRitjTVdhNmUxcDJDcE8KRXg3U0hVaW56VnZkNTVoTG03dzZ2NzJvTUFvR0NDcUdTTTQ5QkFNQ0EwZ0FNRVVDSVFDQyt6T1lHcll0ZTB4SgpSbDVYdUxjUWJySW9UeHpsRnJLZWFNWnJXMnVaSkFJZ0NVVGU5MEl4aW55dk4wUkh4UFhoVGNJTFdEZzdLUEJOCmVrNW5TRlh3Y0lZPQotLS0tLUVORCBDRVJUSUZJQ0FURS0tLS0tCg==",
"organizational_unit_identifier": "client"
},
"peer_ou_identifier": {
"certificate": "LS0tLS1CRUdJTiBDRVJUSUZJQ0FURS0tLS0tCk1JSUNSRENDQWVxZ0F3SUJBZ0lSQU1nN2VETnhwS0t0ZGl0TDRVNDRZMUl3Q2dZSUtvWkl6ajBFQXdJd2N6RUwKTUFrR0ExVUVCaE1DVlZNeEV6QVJCZ05WQkFnVENrTmhiR2xtYjNKdWFXRXhGakFVQmdOVkJBY1REVk5oYmlCRwpjbUZ1WTJselkyOHhHVEFYQmdOVkJBb1RFRzl5WnpFdVpYaGhiWEJzWlM1amIyMHhIREFhQmdOVkJBTVRFMk5oCkxtOXlaekV1WlhoaGJYQnNaUzVqYjIwd0hoY05NVGd3TmpBNU1URTFPREk0V2hjTk1qZ3dOakEyTVRFMU9ESTQKV2pCek1Rc3dDUVlEVlFRR0V3SlZVekVUTUJFR0ExVUVDQk1LUTJGc2FXWnZjbTVwWVRFV01CUUdBMVVFQnhNTgpVMkZ1SUVaeVlXNWphWE5qYnpFWk1CY0dBMVVFQ2hNUWIzSm5NUzVsZUdGdGNHeGxMbU52YlRFY01Cb0dBMVVFCkF4TVRZMkV1YjNKbk1TNWxlR0Z0Y0d4bExtTnZiVEJaTUJNR0J5cUdTTTQ5QWdFR0NDcUdTTTQ5QXdFSEEwSUEKQk41d040THpVNGRpcUZSWnB6d3FSVm9JbWw1MVh0YWkzbWgzUXo0UEZxWkhXTW9lZ0ovUWRNKzF4L3RobERPcwpnbmVRcndGd216WGpvSSszaHJUSmRuU2pYekJkTUE0R0ExVWREd0VCL3dRRUF3SUJwakFQQmdOVkhTVUVDREFHCkJnUlZIU1VBTUE4R0ExVWRFd0VCL3dRRk1BTUJBZjh3S1FZRFZSME9CQ0lFSU9CZFFMRitjTVdhNmUxcDJDcE8KRXg3U0hVaW56VnZkNTVoTG03dzZ2NzJvTUFvR0NDcUdTTTQ5QkFNQ0EwZ0FNRVVDSVFDQyt6T1lHcll0ZTB4SgpSbDVYdUxjUWJySW9UeHpsRnJLZWFNWnJXMnVaSkFJZ0NVVGU5MEl4aW55dk4wUkh4UFhoVGNJTFdEZzdLUEJOCmVrNW5TRlh3Y0lZPQotLS0tLUVORCBDRVJUSUZJQ0FURS0tLS0tCg==",
"organizational_unit_identifier": "peer"
}
}
},
"Org2MSP": {
"name": "Org2MSP",
"root_certs": [
"LS0tLS1CRUdJTiBDRVJUSUZJQ0FURS0tLS0tCk1JSUNSRENDQWVxZ0F3SUJBZ0lSQUx2SWV2KzE4Vm9LZFR2V1RLNCtaZ2d3Q2dZSUtvWkl6ajBFQXdJd2N6RUwKTUFrR0ExVUVCaE1DVlZNeEV6QVJCZ05WQkFnVENrTmhiR2xtYjNKdWFXRXhGakFVQmdOVkJBY1REVk5oYmlCRwpjbUZ1WTJselkyOHhHVEFYQmdOVkJBb1RFRzl5WnpJdVpYaGhiWEJzWlM1amIyMHhIREFhQmdOVkJBTVRFMk5oCkxtOXlaekl1WlhoaGJYQnNaUzVqYjIwd0hoY05NVGd3TmpBNU1URTFPREk0V2hjTk1qZ3dOakEyTVRFMU9ESTQKV2pCek1Rc3dDUVlEVlFRR0V3SlZVekVUTUJFR0ExVUVDQk1LUTJGc2FXWnZjbTVwWVRFV01CUUdBMVVFQnhNTgpVMkZ1SUVaeVlXNWphWE5qYnpFWk1CY0dBMVVFQ2hNUWIzSm5NaTVsZUdGdGNHeGxMbU52YlRFY01Cb0dBMVVFCkF4TVRZMkV1YjNKbk1pNWxlR0Z0Y0d4bExtTnZiVEJaTUJNR0J5cUdTTTQ5QWdFR0NDcUdTTTQ5QXdFSEEwSUEKQkhUS01aall0TDdnSXZ0ekN4Y2pMQit4NlZNdENzVW0wbExIcGtIeDFQaW5LUU1ybzFJWWNIMEpGVmdFempvSQpCcUdMYURyQmhWQkpoS1kwS21kMUJJZWpYekJkTUE0R0ExVWREd0VCL3dRRUF3SUJwakFQQmdOVkhTVUVDREFHCkJnUlZIU1VBTUE4R0ExVWRFd0VCL3dRRk1BTUJBZjh3S1FZRFZSME9CQ0lFSUk1WWdza0tFUkNwQzVNRDdxQlUKUXZTajd4Rk1ncmI1emhDaUhpU3JFNEtnTUFvR0NDcUdTTTQ5QkFNQ0EwZ0FNRVVDSVFDWnNSUjVBVU5KUjdJbwpQQzgzUCt1UlF1RmpUYS94eitzVkpZYnBsNEh1Z1FJZ0QzUlhuQWFqaGlPMU1EL1JzSC9JN2FPL1RuWUxkQUl6Cnd4VlNJenhQbWd3PQotLS0tLUVORCBDRVJUSUZJQ0FURS0tLS0tCg=="
],
"admins": [
"LS0tLS1CRUdJTiBDRVJUSUZJQ0FURS0tLS0tCk1JSUNLVENDQWRDZ0F3SUJBZ0lRU1lpeE1vdmpoM1N2c25WMmFUOXl1REFLQmdncWhrak9QUVFEQWpCek1Rc3cKQ1FZRFZRUUdFd0pWVXpFVE1CRUdBMVVFQ0JNS1EyRnNhV1p2Y201cFlURVdNQlFHQTFVRUJ4TU5VMkZ1SUVaeQpZVzVqYVhOamJ6RVpNQmNHQTFVRUNoTVFiM0puTWk1bGVHRnRjR3hsTG1OdmJURWNNQm9HQTFVRUF4TVRZMkV1CmIzSm5NaTVsZUdGdGNHeGxMbU52YlRBZUZ3MHhPREEyTURreE1UVTRNamhhRncweU9EQTJNRFl4TVRVNE1qaGEKTUd3eEN6QUpCZ05WQkFZVEFsVlRNUk13RVFZRFZRUUlFd3BEWVd4cFptOXlibWxoTVJZd0ZBWURWUVFIRXcxVApZVzRnUm5KaGJtTnBjMk52TVE4d0RRWURWUVFMRXdaamJHbGxiblF4SHpBZEJnTlZCQU1NRmtGa2JXbHVRRzl5Clp6SXVaWGhoYlhCc1pTNWpiMjB3V1RBVEJnY3Foa2pPUFFJQkJnZ3Foa2pPUFFNQkJ3TkNBQVJFdStKc3l3QlQKdkFYUUdwT2FuS3ZkOVhCNlMxVGU4NTJ2L0xRODVWM1Rld0hlYXZXeGUydUszYTBvRHA5WDV5SlJ4YXN2b2hCcwpOMGJIRWErV1ZFQjdvMDB3U3pBT0JnTlZIUThCQWY4RUJBTUNCNEF3REFZRFZSMFRBUUgvQkFJd0FEQXJCZ05WCkhTTUVKREFpZ0NDT1dJTEpDaEVRcVF1VEErNmdWRUwwbys4UlRJSzIrYzRRb2g0a3F4T0NvREFLQmdncWhrak8KUFFRREFnTkhBREJFQWlCVUFsRStvbFBjMTZBMitmNVBRSmdTZFp0SjNPeXBieG9JVlhOdi90VUJ2QUlnVGFNcgo1K2k2TUxpaU9FZ0wzcWZSWmdkcG1yVm1SbHlIdVdabWE0NXdnaE09Ci0tLS0tRU5EIENFUlRJRklDQVRFLS0tLS0K"
],
"crypto_config": {
"signature_hash_family": "SHA2",
"identity_identifier_hash_function": "SHA256"
},
"tls_root_certs": [
"LS0tLS1CRUdJTiBDRVJUSUZJQ0FURS0tLS0tCk1JSUNTakNDQWZDZ0F3SUJBZ0lSQUtoUFFxUGZSYnVpSktqL0JRanQ3RXN3Q2dZSUtvWkl6ajBFQXdJd2RqRUwKTUFrR0ExVUVCaE1DVlZNeEV6QVJCZ05WQkFnVENrTmhiR2xtYjNKdWFXRXhGakFVQmdOVkJBY1REVk5oYmlCRwpjbUZ1WTJselkyOHhHVEFYQmdOVkJBb1RFRzl5WnpJdVpYaGhiWEJzWlM1amIyMHhIekFkQmdOVkJBTVRGblJzCmMyTmhMbTl5WnpJdVpYaGhiWEJzWlM1amIyMHdIaGNOTVRnd05qQTVNVEUxT0RJNFdoY05Namd3TmpBMk1URTEKT0RJNFdqQjJNUXN3Q1FZRFZRUUdFd0pWVXpFVE1CRUdBMVVFQ0JNS1EyRnNhV1p2Y201cFlURVdNQlFHQTFVRQpCeE1OVTJGdUlFWnlZVzVqYVhOamJ6RVpNQmNHQTFVRUNoTVFiM0puTWk1bGVHRnRjR3hsTG1OdmJURWZNQjBHCkExVUVBeE1XZEd4elkyRXViM0puTWk1bGVHRnRjR3hsTG1OdmJUQlpNQk1HQnlxR1NNNDlBZ0VHQ0NxR1NNNDkKQXdFSEEwSUFCRVIrMnREOWdkME9NTlk5Y20rbllZR2NUeWszRStCMnBsWWxDL2ZVdGdUU0QyZUVyY2kyWmltdQo5N25YeUIrM0NwNFJwVjFIVHdaR0JMbmNnbVIyb1J5alh6QmRNQTRHQTFVZER3RUIvd1FFQXdJQnBqQVBCZ05WCkhTVUVDREFHQmdSVkhTVUFNQThHQTFVZEV3RUIvd1FGTUFNQkFmOHdLUVlEVlIwT0JDSUVJUEN0V01JRFRtWC8KcGxseS8wNDI4eFRXZHlhazQybU9tbVNJSENCcnAyN0tNQW9HQ0NxR1NNNDlCQU1DQTBnQU1FVUNJUUNtN2xmVQpjbG91VHJrS2Z1YjhmdmdJTTU3QS85bW5IdzhpQnAycURtamZhUUlnSjkwcnRUV204YzVBbE93bFpyYkd0NWZMCjF6WXg5QW5DMTJBNnhOZDIzTG89Ci0tLS0tRU5EIENFUlRJRklDQVRFLS0tLS0K"
],
"fabric_node_ous": {
"enable": true,
"client_ou_identifier": {
"certificate": "LS0tLS1CRUdJTiBDRVJUSUZJQ0FURS0tLS0tCk1JSUNSRENDQWVxZ0F3SUJBZ0lSQUx2SWV2KzE4Vm9LZFR2V1RLNCtaZ2d3Q2dZSUtvWkl6ajBFQXdJd2N6RUwKTUFrR0ExVUVCaE1DVlZNeEV6QVJCZ05WQkFnVENrTmhiR2xtYjNKdWFXRXhGakFVQmdOVkJBY1REVk5oYmlCRwpjbUZ1WTJselkyOHhHVEFYQmdOVkJBb1RFRzl5WnpJdVpYaGhiWEJzWlM1amIyMHhIREFhQmdOVkJBTVRFMk5oCkxtOXlaekl1WlhoaGJYQnNaUzVqYjIwd0hoY05NVGd3TmpBNU1URTFPREk0V2hjTk1qZ3dOakEyTVRFMU9ESTQKV2pCek1Rc3dDUVlEVlFRR0V3SlZVekVUTUJFR0ExVUVDQk1LUTJGc2FXWnZjbTVwWVRFV01CUUdBMVVFQnhNTgpVMkZ1SUVaeVlXNWphWE5qYnpFWk1CY0dBMVVFQ2hNUWIzSm5NaTVsZUdGdGNHeGxMbU52YlRFY01Cb0dBMVVFCkF4TVRZMkV1YjNKbk1pNWxlR0Z0Y0d4bExtTnZiVEJaTUJNR0J5cUdTTTQ5QWdFR0NDcUdTTTQ5QXdFSEEwSUEKQkhUS01aall0TDdnSXZ0ekN4Y2pMQit4NlZNdENzVW0wbExIcGtIeDFQaW5LUU1ybzFJWWNIMEpGVmdFempvSQpCcUdMYURyQmhWQkpoS1kwS21kMUJJZWpYekJkTUE0R0ExVWREd0VCL3dRRUF3SUJwakFQQmdOVkhTVUVDREFHCkJnUlZIU1VBTUE4R0ExVWRFd0VCL3dRRk1BTUJBZjh3S1FZRFZSME9CQ0lFSUk1WWdza0tFUkNwQzVNRDdxQlUKUXZTajd4Rk1ncmI1emhDaUhpU3JFNEtnTUFvR0NDcUdTTTQ5QkFNQ0EwZ0FNRVVDSVFDWnNSUjVBVU5KUjdJbwpQQzgzUCt1UlF1RmpUYS94eitzVkpZYnBsNEh1Z1FJZ0QzUlhuQWFqaGlPMU1EL1JzSC9JN2FPL1RuWUxkQUl6Cnd4VlNJenhQbWd3PQotLS0tLUVORCBDRVJUSUZJQ0FURS0tLS0tCg==",
"organizational_unit_identifier": "client"
},
"peer_ou_identifier": {
"certificate": "LS0tLS1CRUdJTiBDRVJUSUZJQ0FURS0tLS0tCk1JSUNSRENDQWVxZ0F3SUJBZ0lSQUx2SWV2KzE4Vm9LZFR2V1RLNCtaZ2d3Q2dZSUtvWkl6ajBFQXdJd2N6RUwKTUFrR0ExVUVCaE1DVlZNeEV6QVJCZ05WQkFnVENrTmhiR2xtYjNKdWFXRXhGakFVQmdOVkJBY1REVk5oYmlCRwpjbUZ1WTJselkyOHhHVEFYQmdOVkJBb1RFRzl5WnpJdVpYaGhiWEJzWlM1amIyMHhIREFhQmdOVkJBTVRFMk5oCkxtOXlaekl1WlhoaGJYQnNaUzVqYjIwd0hoY05NVGd3TmpBNU1URTFPREk0V2hjTk1qZ3dOakEyTVRFMU9ESTQKV2pCek1Rc3dDUVlEVlFRR0V3SlZVekVUTUJFR0ExVUVDQk1LUTJGc2FXWnZjbTVwWVRFV01CUUdBMVVFQnhNTgpVMkZ1SUVaeVlXNWphWE5qYnpFWk1CY0dBMVVFQ2hNUWIzSm5NaTVsZUdGdGNHeGxMbU52YlRFY01Cb0dBMVVFCkF4TVRZMkV1YjNKbk1pNWxlR0Z0Y0d4bExtTnZiVEJaTUJNR0J5cUdTTTQ5QWdFR0NDcUdTTTQ5QXdFSEEwSUEKQkhUS01aall0TDdnSXZ0ekN4Y2pMQit4NlZNdENzVW0wbExIcGtIeDFQaW5LUU1ybzFJWWNIMEpGVmdFempvSQpCcUdMYURyQmhWQkpoS1kwS21kMUJJZWpYekJkTUE0R0ExVWREd0VCL3dRRUF3SUJwakFQQmdOVkhTVUVDREFHCkJnUlZIU1VBTUE4R0ExVWRFd0VCL3dRRk1BTUJBZjh3S1FZRFZSME9CQ0lFSUk1WWdza0tFUkNwQzVNRDdxQlUKUXZTajd4Rk1ncmI1emhDaUhpU3JFNEtnTUFvR0NDcUdTTTQ5QkFNQ0EwZ0FNRVVDSVFDWnNSUjVBVU5KUjdJbwpQQzgzUCt1UlF1RmpUYS94eitzVkpZYnBsNEh1Z1FJZ0QzUlhuQWFqaGlPMU1EL1JzSC9JN2FPL1RuWUxkQUl6Cnd4VlNJenhQbWd3PQotLS0tLUVORCBDRVJUSUZJQ0FURS0tLS0tCg==",
"organizational_unit_identifier": "peer"
}
}
},
"Org3MSP": {
"name": "Org3MSP",
"root_certs": [
"CgJPVQoEUm9sZQoMRW5yb2xsbWVudElEChBSZXZvY2F0aW9uSGFuZGxlEkQKIKoEXcq/psdYnMKCiT79N+dS1hM8k+SuzU1blOgTuN++EiBe2m3E+FjWLuQGMNRGRrEVTMqTvC4A/5jvCLv2ja1sZxpECiDBbI0kwetxAwFzHwb1hi8TlkGW3OofvuVzfFt9VlewcRIgyvsxG5/THdWyKJTdNx8Gle2hoCbVF0Y1/DQESBjGOGciRAog25fMyWps+FLOjzj1vIsGUyO457ri3YMvmUcycIH2FvQSICTtzaFvSPUiDtNtAVz+uetuB9kfmjUdUSQxjyXULOm2IkQKIO8FKzwoWwu8Mo77GNqnKFGCZaJL9tlrkdTuEMu9ujzbEiA4xtzo8oo8oEhFVsl6010mNoj1VuI0Wmz4tvUgXolCIiJECiDZcZPuwk/uaJMuVph7Dy/icgnAtVYHShET41O0Eh3Q5BIgy5q9VMQrch9VW5yajhY8dH1uA593gKd5kBqGdLfiXzAiRAogAnUYq/kwKzFfmIm/W4nZxi1kjG2C8NRjsYYBkeAOQ6wSIGyX5GGmwgvxgXXehNWBfijyNIJALGRVhO8YtBqr+vnrKogBCiDHR1XQsDbpcBoZFJ09V97zsIKNVTxjUow7/wwC+tq3oBIgSWT/peiO2BI0DecypKfgMpVR8DWXl8ZHSrPISsL3Mc8aINem9+BOezLwFKCbtVH1KAHIRLyyiNP+TkIKW6x9RkThIiAbIJCYU6O02EB8uX6rqLU/1lHxV0vtWdIsKCTLx2EZmDJECiCPXeyUyFzPS3iFv8CQUOLCPZxf6buZS5JlM6EE/gCRaxIgmF9GKPLLmEoA77+AU3J8Iwnu9pBxnaHtUlyf/F9p30c6RAogG7ENKWlOZ4aF0HprqXAjl++Iao7/iE8xeVcKRlmfq1ASIGtmmavDAVS2bw3zClQd4ZBD2DrqCBO9NPOcLNB0IWeIQiCjxTdbmcuBNINZYWe+5fWyI1oY9LavKzDVkdh+miu26EogY2uJtJGfKrQQjy+pgf9FdPMUk+8PNUBtH9LCD4bos7JSIPl6m5lEP/PRAmBaeTQLXdbMxIthxM2gw+Zkc5+IJEWX"
],
"intermediate_certs": [
"CtgCCkQKIP0UVivtH8NlnRNrZuuu6jpaj2ZbEB4/secGS57MfbINEiDSJweLUMIQSW12jugBQG81lIQflJWvi7vi925u+PU/+xJECiDgOGdNbAiGSoHmTjKhT22fqUqYLIVh+JBHetm4kF4skhIg9XTWRkUqtsfYKENzPgm7ZUSmCHNF8xH7Vnhuc1EpAUgaINwSnJKofiMoyDRZwUBhgfwMH9DJzMccvRVW7IvLMe/cIiCnlRj+mfNVAJGKthLgQBB/JKM14NbUeutyJtTgrmDDiCogme25qGvxJfgQNnzldMMicVyiI6YMfnoThAUyqsTzyXkqIAAAAAAAAAAAAAAAAAAAAAAAAAAAAAAAAAAAAAAAAAAAKiCZ7bmoa/El+BA2fOV0wyJxXKIjpgx+ehOEBTKqxPPJeSogAAAAAAAAAAAAAAAAAAAAAAAAAAAAAAAAAAAAAAAAAAESIFYUenRvjbmEh+37YHJrvFJt4lGq9ShtJ4kEBrfHArPjGgNPVTEqA09VMTL0ARKIAQog/gwzULTJbCAoVg9XfCiROs4cU5oSv4Q80iYWtonAnvsSIE6mYFdzisBU21rhxjfYE7kk3Xjih9A1idJp7TSjfmorGiBwIEbnxUKjs3Z3DXUSTj5R78skdY1hWEjpCbSBvtwn/yIgBVTjvNOIwpBC7qZJKX6yn4tMvoCCGpiz4BKBEUqtBJsaZzBlAjBwZ4WXYOttkhsNA2r94gBfLUdx/4VhW4hwUImcztlau1T14UlNzJolCNkdiLc9CqsCMQD6OBkgDWGq9UlhkK9dJBzU+RElcZdSfVV1hDbbqt+lFRWOzzEkZ+BXCR1k3xybz+o="
],
"admins": [
"LS0tLS1CRUdJTiBQVUJMSUMgS0VZLS0tLS0KTUhZd0VBWUhLb1pJemowQ0FRWUZLNEVFQUNJRFlnQUVUYk13SEZteEpEMWR3SjE2K0hnVnRDZkpVRzdKK2FTYgorbkVvVmVkREVHYmtTc1owa1lraEpyYkx5SHlYZm15ZWV0ejFIUk1rWjRvMjdxRlMzTlVFb1J2QlM3RHJPWDJjCnZLaDRnbWhHTmlPbzRiWjFOVG9ZL2o3QnpqMFlMSXNlCi0tLS0tRU5EIFBVQkxJQyBLRVktLS0tLQo="
]
}
},
"orderers": {
"OrdererOrg": {
"endpoint": [
{
"host": "orderer.example.com",
"port": 7050
}
]
}
}
}
Endorsers query:
值得注意的是,这里的证书是base64编码的,所以应该用类似以下的方法对其进行解码。
To query for the endorsers of a chaincode call, additional flags need to be supplied:
$ discover --configFile conf.yaml config --channel mychannel --server peer0.org1.example.com:7051 | jq .msps.OrdererOrg.root_certs[0] | sed "s/\"//g" | base64 --decode | openssl x509 -text -noout
Certificate:
Data:
Version: 3 (0x2)
Serial Number:
c8:99:2d:3a:2d:7f:4b:73:53:8b:39:18:7b:c3:e1:1e
Signature Algorithm: ecdsa-with-SHA256
Issuer: C=US, ST=California, L=San Francisco, O=example.com, CN=ca.example.com
Validity
Not Before: Jun 9 11:58:28 2018 GMT
Not After : Jun 6 11:58:28 2028 GMT
Subject: C=US, ST=California, L=San Francisco, O=example.com, CN=ca.example.com
Subject Public Key Info:
Public Key Algorithm: id-ecPublicKey
Public-Key: (256 bit)
pub:
04:28:ac:9e:51:8d:a4:80:15:0a:ff:ae:c9:61:d6:
08:67:b0:15:c3:c7:99:46:61:63:0a:10:a6:42:6a:
b0:af:14:0c:c0:e2:5b:b4:a1:c3:f0:07:7e:5b:7c:
c4:b2:95:13:95:81:4b:6a:b9:e3:87:a4:f3:2c:7c:
ae:00:91:9e:32
ASN1 OID: prime256v1
NIST CURVE: P-256
X509v3 extensions:
X509v3 Key Usage: critical
Digital Signature, Key Encipherment, Certificate Sign, CRL Sign
X509v3 Extended Key Usage:
Any Extended Key Usage
X509v3 Basic Constraints: critical
CA:TRUE
X509v3 Subject Key Identifier:
60:9D:F2:30:26:CE:8F:65:81:41:AD:96:15:0E:24:8D:A0:9D:C5:79:C1:17:BF:FE:E5:1B:FB:75:50:10:A6:4C
Signature Algorithm: ecdsa-with-SHA256
30:44:02:20:3d:e1:a7:6c:99:3f:87:2a:36:44:51:98:37:11:
d8:a0:47:7a:33:ff:30:c1:09:a6:05:ec:b0:53:53:39:c1:0e:
02:20:6b:f4:1d:48:e0:72:e4:c2:ef:b0:84:79:d4:2e:c2:c5:
1b:6f:e4:2f:56:35:51:18:7d:93:51:86:05:84:ce:1f
- The
--chaincodeflag is mandatory and it provides the chaincode name(s). To query for a chaincode-to-chaincode invocation, one needs to repeat the--chaincodeflag with all the chaincodes. - The
--collectionis used to specify private data collections that are expected to used by the chaincode(s). To map from thechaincodes passed via--chaincodeto the collections, the following syntax should be used:collection=CC:Collection1,Collection2,.... - The
--noPrivateReadsis used to indicate that the transaction is not expected to read private data for a certain chaincode. This is useful for private data “blind writes”, among other things.
背书者查询:
For example, to query for a chaincode invocation that results in both
cc1 and cc2 to be invoked, as well as writes to private data collection
col1 by cc2, one needs to specify:
--chaincode=cc1 --chaincode=cc2 --collection=cc2:col1
要想查询一个链码调用的背书者,必须提供额外的flag:
If chaincode cc2 is not expected to read from collection col1 then --noPrivateReads=cc2 should be used.
--chaincodeflag是必需的,它提供了链码名。要查询多链码的调用,必须对所有相关链码重复提供–chaincodeflag。
Below is the output of an endorsers query for chaincode mycc when
the endorsement policy is AND('Org1.peer', 'Org2.peer'):
--collection被用来指明链码预计将使用的私有数据集合。若要把--chaincode通过的链码映射到数据集合中,应使用以下语法:collection=CC:Collection1,Collection2,...。
$ discover --configFile conf.yaml endorsers --channel mychannel --server peer0.org1.example.com:7051 --chaincode mycc
[
{
"Chaincode": "mycc",
"EndorsersByGroups": {
"G0": [
{
"MSPID": "Org1MSP",
"LedgerHeight": 5,
"Endpoint": "peer0.org1.example.com:7051",
"Identity": "-----BEGIN CERTIFICATE-----\nMIICKDCCAc+gAwIBAgIRANTiKfUVHVGnrYVzEy1ZSKIwCgYIKoZIzj0EAwIwczEL\nMAkGA1UEBhMCVVMxEzARBgNVBAgTCkNhbGlmb3JuaWExFjAUBgNVBAcTDVNhbiBG\ncmFuY2lzY28xGTAXBgNVBAoTEG9yZzEuZXhhbXBsZS5jb20xHDAaBgNVBAMTE2Nh\nLm9yZzEuZXhhbXBsZS5jb20wHhcNMTgwNjA5MTE1ODI4WhcNMjgwNjA2MTE1ODI4\nWjBqMQswCQYDVQQGEwJVUzETMBEGA1UECBMKQ2FsaWZvcm5pYTEWMBQGA1UEBxMN\nU2FuIEZyYW5jaXNjbzENMAsGA1UECxMEcGVlcjEfMB0GA1UEAxMWcGVlcjAub3Jn\nMS5leGFtcGxlLmNvbTBZMBMGByqGSM49AgEGCCqGSM49AwEHA0IABD8jGz1l5Rrw\n5UWqAYnc4JrR46mCYwHhHFgwydccuytb00ouD4rECiBsCaeZFr5tODAK70jFOP/k\n/CtORCDPQ02jTTBLMA4GA1UdDwEB/wQEAwIHgDAMBgNVHRMBAf8EAjAAMCsGA1Ud\nIwQkMCKAIOBdQLF+cMWa6e1p2CpOEx7SHUinzVvd55hLm7w6v72oMAoGCCqGSM49\nBAMCA0cAMEQCIC3bacbDYphXfHrNULxpV/zwD08t7hJxNe8MwgP8/48fAiBiC0cr\nu99oLsRNCFB7R3egyKg1YYao0KWTrr1T+rK9Bg==\n-----END CERTIFICATE-----\n"
}
],
"G1": [
{
"MSPID": "Org2MSP",
"LedgerHeight": 5,
"Endpoint": "peer1.org2.example.com:10051",
"Identity": "-----BEGIN CERTIFICATE-----\nMIICKDCCAc+gAwIBAgIRAIs6fFxk4Y5cJxSwTjyJ9A8wCgYIKoZIzj0EAwIwczEL\nMAkGA1UEBhMCVVMxEzARBgNVBAgTCkNhbGlmb3JuaWExFjAUBgNVBAcTDVNhbiBG\ncmFuY2lzY28xGTAXBgNVBAoTEG9yZzIuZXhhbXBsZS5jb20xHDAaBgNVBAMTE2Nh\nLm9yZzIuZXhhbXBsZS5jb20wHhcNMTgwNjA5MTE1ODI4WhcNMjgwNjA2MTE1ODI4\nWjBqMQswCQYDVQQGEwJVUzETMBEGA1UECBMKQ2FsaWZvcm5pYTEWMBQGA1UEBxMN\nU2FuIEZyYW5jaXNjbzENMAsGA1UECxMEcGVlcjEfMB0GA1UEAxMWcGVlcjEub3Jn\nMi5leGFtcGxlLmNvbTBZMBMGByqGSM49AgEGCCqGSM49AwEHA0IABOVFyWVmKZ25\nxDYV3xZBDX4gKQ7rAZfYgOu1djD9EHccZhJVPsdwSjbRsvrfs9Z8mMuwEeSWq/cq\n0cGrMKR93vKjTTBLMA4GA1UdDwEB/wQEAwIHgDAMBgNVHRMBAf8EAjAAMCsGA1Ud\nIwQkMCKAII5YgskKERCpC5MD7qBUQvSj7xFMgrb5zhCiHiSrE4KgMAoGCCqGSM49\nBAMCA0cAMEQCIDJmxseFul1GZ26djKa6jZ6zYYf6hchNF5xxMRWXpCnuAiBMf6JZ\njZjVM9F/OidQ2SBR7OZyMAzgXc5nAabWZpdkuQ==\n-----END CERTIFICATE-----\n"
},
{
"MSPID": "Org2MSP",
"LedgerHeight": 5,
"Endpoint": "peer0.org2.example.com:9051",
"Identity": "-----BEGIN CERTIFICATE-----\nMIICJzCCAc6gAwIBAgIQVek/l5TVdNvi1pk8ASS+vzAKBggqhkjOPQQDAjBzMQsw\nCQYDVQQGEwJVUzETMBEGA1UECBMKQ2FsaWZvcm5pYTEWMBQGA1UEBxMNU2FuIEZy\nYW5jaXNjbzEZMBcGA1UEChMQb3JnMi5leGFtcGxlLmNvbTEcMBoGA1UEAxMTY2Eu\nb3JnMi5leGFtcGxlLmNvbTAeFw0xODA2MDkxMTU4MjhaFw0yODA2MDYxMTU4Mjha\nMGoxCzAJBgNVBAYTAlVTMRMwEQYDVQQIEwpDYWxpZm9ybmlhMRYwFAYDVQQHEw1T\nYW4gRnJhbmNpc2NvMQ0wCwYDVQQLEwRwZWVyMR8wHQYDVQQDExZwZWVyMC5vcmcy\nLmV4YW1wbGUuY29tMFkwEwYHKoZIzj0CAQYIKoZIzj0DAQcDQgAE9Wl6EWXZhZZl\nt7cbCHdD3sutOnnszCq815NorpIcS9gyR9Y9cjLx8fsm5GnC68lFaZl412ipdwmI\nxlMBKsH4wKNNMEswDgYDVR0PAQH/BAQDAgeAMAwGA1UdEwEB/wQCMAAwKwYDVR0j\nBCQwIoAgjliCyQoREKkLkwPuoFRC9KPvEUyCtvnOEKIeJKsTgqAwCgYIKoZIzj0E\nAwIDRwAwRAIgKT9VK597mbLLBsoVP5OhPWVce3mhetGUUPDN2+phgXoCIDtAW2BR\nPPgPm/yu/CH9yDajGDlYIHI9GkN0MPNWAaom\n-----END CERTIFICATE-----\n"
}
]
},
"Layouts": [
{
"quantities_by_group": {
"G0": 1,
"G1": 1
}
}
]
}
]
例如,某项链码调用导致了cc1和cc2被调用,同时cc2将该链码调用写入私有数据集合cc1,要想查询该项链码调用,必须指明:--chaincode=cc1 --chaincode=cc2 --collection=cc2:col1
Not using a configuration file
以下显示的是当背书策略为 AND('Org1.peer', 'Org2.peer')时,链码mycc的背书者查询的输出:
It is possible to execute the discovery CLI without having a configuration file, and just passing all needed configuration as commandline flags. The following is an example of a local peer membership query which loads administrator credentials:
$ discover --configFile conf.yaml endorsers --channel mychannel --server peer0.org1.example.com:7051 --chaincode mycc
[
{
"Chaincode": "mycc",
"EndorsersByGroups": {
"G0": [
{
"MSPID": "Org1MSP",
"LedgerHeight": 5,
"Endpoint": "peer0.org1.example.com:7051",
"Identity": "-----BEGIN CERTIFICATE-----\nMIICKDCCAc+gAwIBAgIRANTiKfUVHVGnrYVzEy1ZSKIwCgYIKoZIzj0EAwIwczEL\nMAkGA1UEBhMCVVMxEzARBgNVBAgTCkNhbGlmb3JuaWExFjAUBgNVBAcTDVNhbiBG\ncmFuY2lzY28xGTAXBgNVBAoTEG9yZzEuZXhhbXBsZS5jb20xHDAaBgNVBAMTE2Nh\nLm9yZzEuZXhhbXBsZS5jb20wHhcNMTgwNjA5MTE1ODI4WhcNMjgwNjA2MTE1ODI4\nWjBqMQswCQYDVQQGEwJVUzETMBEGA1UECBMKQ2FsaWZvcm5pYTEWMBQGA1UEBxMN\nU2FuIEZyYW5jaXNjbzENMAsGA1UECxMEcGVlcjEfMB0GA1UEAxMWcGVlcjAub3Jn\nMS5leGFtcGxlLmNvbTBZMBMGByqGSM49AgEGCCqGSM49AwEHA0IABD8jGz1l5Rrw\n5UWqAYnc4JrR46mCYwHhHFgwydccuytb00ouD4rECiBsCaeZFr5tODAK70jFOP/k\n/CtORCDPQ02jTTBLMA4GA1UdDwEB/wQEAwIHgDAMBgNVHRMBAf8EAjAAMCsGA1Ud\nIwQkMCKAIOBdQLF+cMWa6e1p2CpOEx7SHUinzVvd55hLm7w6v72oMAoGCCqGSM49\nBAMCA0cAMEQCIC3bacbDYphXfHrNULxpV/zwD08t7hJxNe8MwgP8/48fAiBiC0cr\nu99oLsRNCFB7R3egyKg1YYao0KWTrr1T+rK9Bg==\n-----END CERTIFICATE-----\n"
}
],
"G1": [
{
"MSPID": "Org2MSP",
"LedgerHeight": 5,
"Endpoint": "peer1.org2.example.com:10051",
"Identity": "-----BEGIN CERTIFICATE-----\nMIICKDCCAc+gAwIBAgIRAIs6fFxk4Y5cJxSwTjyJ9A8wCgYIKoZIzj0EAwIwczEL\nMAkGA1UEBhMCVVMxEzARBgNVBAgTCkNhbGlmb3JuaWExFjAUBgNVBAcTDVNhbiBG\ncmFuY2lzY28xGTAXBgNVBAoTEG9yZzIuZXhhbXBsZS5jb20xHDAaBgNVBAMTE2Nh\nLm9yZzIuZXhhbXBsZS5jb20wHhcNMTgwNjA5MTE1ODI4WhcNMjgwNjA2MTE1ODI4\nWjBqMQswCQYDVQQGEwJVUzETMBEGA1UECBMKQ2FsaWZvcm5pYTEWMBQGA1UEBxMN\nU2FuIEZyYW5jaXNjbzENMAsGA1UECxMEcGVlcjEfMB0GA1UEAxMWcGVlcjEub3Jn\nMi5leGFtcGxlLmNvbTBZMBMGByqGSM49AgEGCCqGSM49AwEHA0IABOVFyWVmKZ25\nxDYV3xZBDX4gKQ7rAZfYgOu1djD9EHccZhJVPsdwSjbRsvrfs9Z8mMuwEeSWq/cq\n0cGrMKR93vKjTTBLMA4GA1UdDwEB/wQEAwIHgDAMBgNVHRMBAf8EAjAAMCsGA1Ud\nIwQkMCKAII5YgskKERCpC5MD7qBUQvSj7xFMgrb5zhCiHiSrE4KgMAoGCCqGSM49\nBAMCA0cAMEQCIDJmxseFul1GZ26djKa6jZ6zYYf6hchNF5xxMRWXpCnuAiBMf6JZ\njZjVM9F/OidQ2SBR7OZyMAzgXc5nAabWZpdkuQ==\n-----END CERTIFICATE-----\n"
},
{
"MSPID": "Org2MSP",
"LedgerHeight": 5,
"Endpoint": "peer0.org2.example.com:9051",
"Identity": "-----BEGIN CERTIFICATE-----\nMIICJzCCAc6gAwIBAgIQVek/l5TVdNvi1pk8ASS+vzAKBggqhkjOPQQDAjBzMQsw\nCQYDVQQGEwJVUzETMBEGA1UECBMKQ2FsaWZvcm5pYTEWMBQGA1UEBxMNU2FuIEZy\nYW5jaXNjbzEZMBcGA1UEChMQb3JnMi5leGFtcGxlLmNvbTEcMBoGA1UEAxMTY2Eu\nb3JnMi5leGFtcGxlLmNvbTAeFw0xODA2MDkxMTU4MjhaFw0yODA2MDYxMTU4Mjha\nMGoxCzAJBgNVBAYTAlVTMRMwEQYDVQQIEwpDYWxpZm9ybmlhMRYwFAYDVQQHEw1T\nYW4gRnJhbmNpc2NvMQ0wCwYDVQQLEwRwZWVyMR8wHQYDVQQDExZwZWVyMC5vcmcy\nLmV4YW1wbGUuY29tMFkwEwYHKoZIzj0CAQYIKoZIzj0DAQcDQgAE9Wl6EWXZhZZl\nt7cbCHdD3sutOnnszCq815NorpIcS9gyR9Y9cjLx8fsm5GnC68lFaZl412ipdwmI\nxlMBKsH4wKNNMEswDgYDVR0PAQH/BAQDAgeAMAwGA1UdEwEB/wQCMAAwKwYDVR0j\nBCQwIoAgjliCyQoREKkLkwPuoFRC9KPvEUyCtvnOEKIeJKsTgqAwCgYIKoZIzj0E\nAwIDRwAwRAIgKT9VK597mbLLBsoVP5OhPWVce3mhetGUUPDN2+phgXoCIDtAW2BR\nPPgPm/yu/CH9yDajGDlYIHI9GkN0MPNWAaom\n-----END CERTIFICATE-----\n"
}
]
},
"Layouts": [
{
"quantities_by_group": {
"G0": 1,
"G1": 1
}
}
]
}
]
未使用配置文件
在没有配置文件的情况下也可以执行发现CLI,仅将所有需要的配置通过为命令行flag。以下是一个有关载入了管理员证书的本地节点成员查询的例子:
Fabric-CA 命令
Hyperledger Fabric CA 是 Hyperledger Fabric 的证书授权中心(Certificate Authority)。fabric-ca 客户端和服务端可以使用的命令如下:
架构参考
Hyperledger Fabric SDK
Hyperledger Fabric 提供多种编程语言的 SDK。目前提供了 Node.js 和 Java 两种 SDK。我们希望在后续的版本中提供 Python、 REST 和 Go SDK。
交易流程
本文讲解在一个标准的资产交换中的交易机制。该场景包含两个客户端 A 和 B,他们分别代表萝卜的买方和卖方。他们在网络上都有一个 Peer 节点,他们通过该节点来发送交易和与账本交互。

假设
该流程中,假设已经设置了一个通道,并且该通道正常运行。应用程序的用户已经使用组织的 CA 注册和登记完成,并且拿到了用于在网络中用确认身份的加密材料。
链码(包含了萝卜商店初始状态的键值对)已经安装在 Peer 节点上并在通道上完成了实例化。链码中的逻辑定义了萝卜的交易和定价规则。链码也设置了一个背书策略,该策略是每一笔交易都必须被 peerA 和 peerB 都签名。
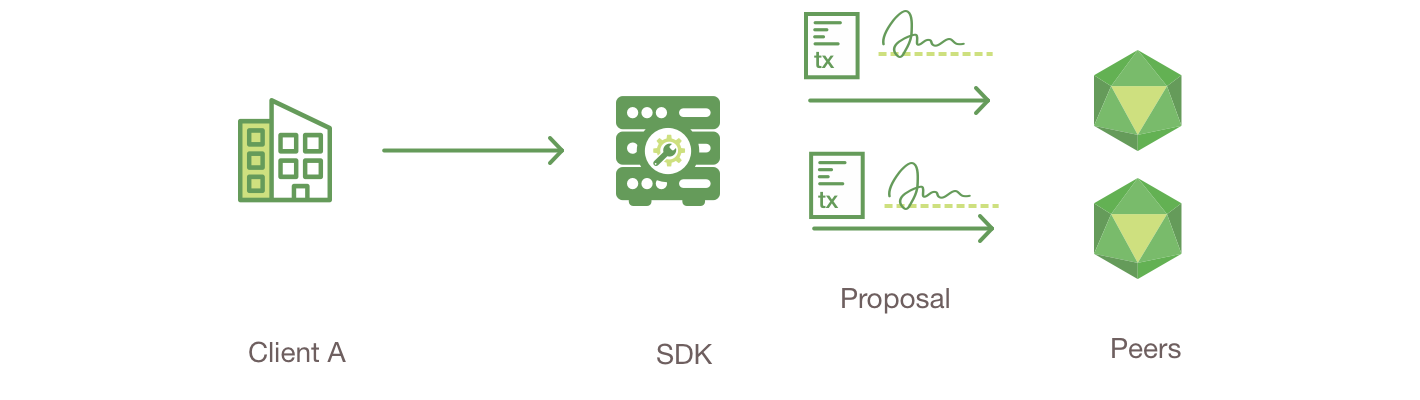
- 客户端 A 发起一笔交易
将会发生什么?客户端 A 发送一个采购萝卜的请求。该请求会到达 peerA 和 peerB,他们分别代表客户端 A 和客户端 B。背书策略要求所有交易都要两个节点背书,因此请求要到经过 peerA 和 peerB。
然后,要构建一个交易提案。应用程序使用所支持的 SDK(Node,Java,Python)中的 API 生成一个交易提案。提案是带有确定输入参数的调用链码方法的请求,该请求的作用是读取或者更新账本。
SDK 的作用是将交易提案打包成合适的格式(gRPC 使用的 protocol buffer)以及根据用户的密钥对交易提案生成签名。
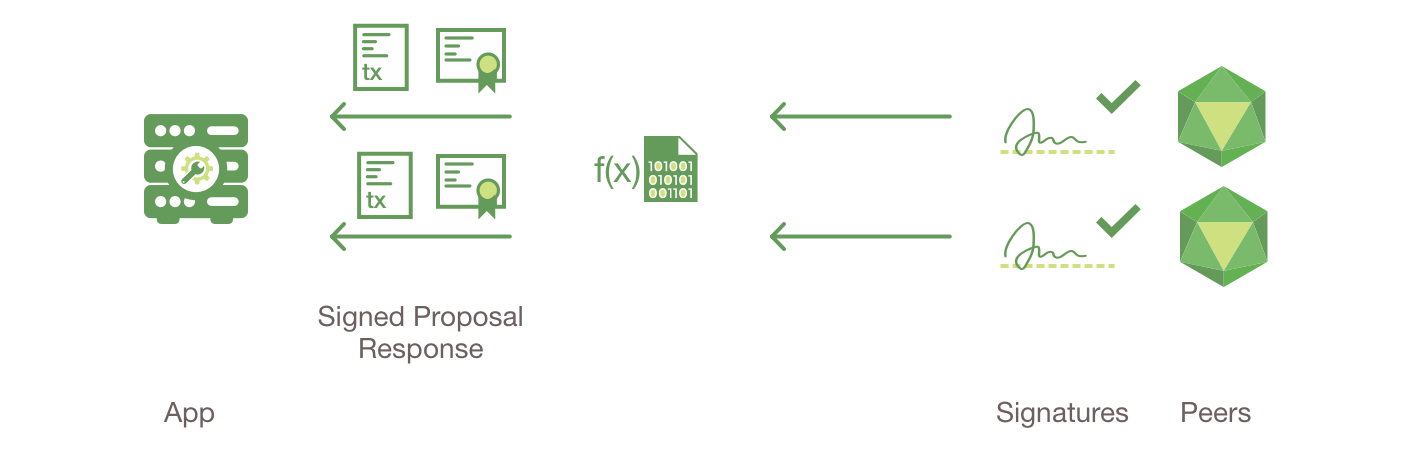
- 背书节点验证签名并执行交易
背书节点验证(1)交易提案的格式完整,(2)且验证该交易提案之前没有被提交过(重放攻击保护),(3)验证签名是有效的(使用 MSP),(4)验证发起者(在这个例子中是客户端 A)有权在该通道上执行该操作(也就是说,每个背书节点确保发起者满足通道 Writers 策略)。背书节点将交易提案输入作为调用的链码函数的参数。然后根据当前状态数据库执行链码,生成交易结果,包括响应值、读集和写集(即表示要创建或更新的资产的键值对)。目前没有对账本进行更新。这些值以及背书节点的签名会一起作为“提案响应”返回到 SDK,SDK 会为应用程序解析该响应。
注解
MSP 是节点的组件,它允许 Peer 节点验证来自客户端的交易请求,并签署交易结果(即背书)。写入策略在通道创建时就会定义,用来确定哪些用户有权向该通道提交交易。有关成员关系的更多信息,请查看 Membership Service Provider (MSP) 文档。

- 检查提案响应
应用程序验证背书节点的签名,并比较这些提案响应,以确定其是否相同。如果链码只查询账本,应用程序将检查查询响应,并且通常不会将交易提交给排序服务。如果客户端应用程序打算向排序服务提交交易以更新账本,则应用程序在提交之前需确定是否已满足指定的背书策略(即 peerA 和 peerB 都要背书)。该结构是这样的,即使应用程序选择不检查响应或以其他方式转发未背书的交易,节点仍会执行背书策略,并在提交验证阶段遵守该策略。
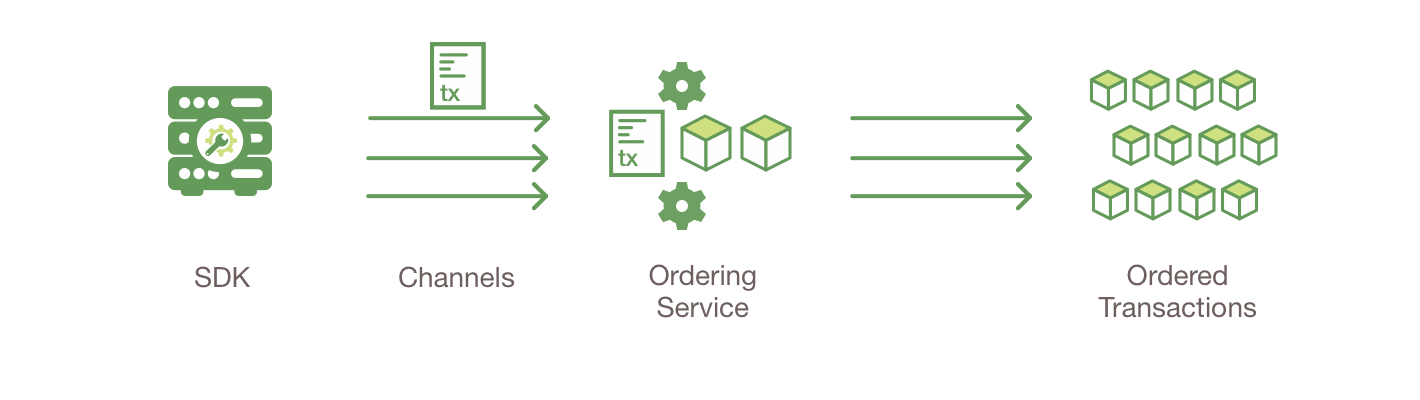
- 客户端将背书结果封装进交易
应用程序将交易提案和“交易消息”中的交易响应“广播”给排序服务。交易会包含读写集,背书节点的签名和通道 ID。排序服务不需要为了执行其操作而检查交易的整个内容,它只是从网络中的所有通道接收交易,将它们按时间按通道排序,并将每个通道的交易打包成区块。
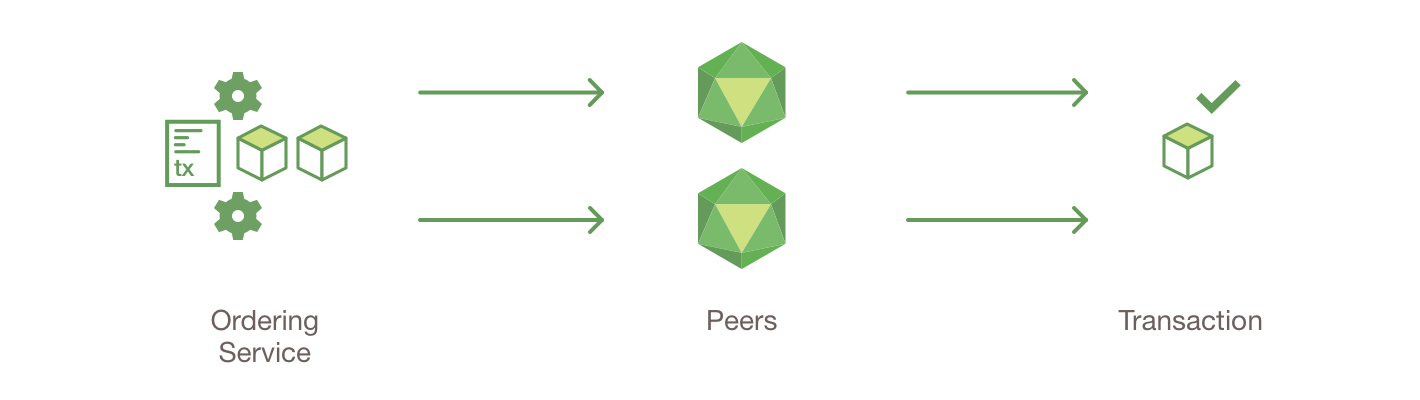
- 验证和提交交易
交易区块被“发送”给通道上的所有 Peer 节点。对区块内的交易进行验证,以确保满足背书策略,并确保自交易执行生成读集以来,读集中变量的账本状态没有变化。块中的交易会被标记为有效或无效。

- 账本更新
- Ledger updated
每个 Peer 节点都将区块追加到通道的链上,对于每个有效的交易,写集都提交到当前状态数据库。系统会发出一个事件,通知客户端应用程序本次交易(调用)已被不可更改地附加到链上,同时还会通知交易验证结果是有效还是无效。
注解
应用程序应该在提交交易后监听交易事件,例如使用 submitTransaction API,它会自动监听交易事件。如果不监听交易事件,您将不知道您的交易是否已经被排序、验证并提交到账本。
查看下边的泳道图来更好的理解交易流程。

服务发现
为什么我们需要服务发现?
为了在 Peer 节点上执行链码,将交易提交给排序节点,并更新交易状态,应用程序需要连接 SDK 中开放的 API。
然而,为了让应用程序连接到相关的网络节点,SDK 需要大量信息。除了通道上排序节点和 Peer 节点的 CA 证书和 TLS 证书及其 IP 地址和端口号之外,它还必须知道相关的背书策略以及安装了链码的 Peer 节点(这样应用程序才能知道将链码提案发送给哪个 Peer 节点)。
在 v1.2 之前,这些信息是静态编码的。然而,这种实现不能动态响应网络的更改(例如添加已安装相关链码的 Peer 节点或 Peer 节点临时离线)。静态配置也不能让应用程序对背书策略本身的更改做出反应(比如通道中加入了新的组织)。
此外,客户端应用程序无法知道哪些 Peer 节点已更新账本,哪些未更新。因此该应用程序可能向网络中尚未同步账本的 Peer 节点提交提案,从而导致事务在提交时失效并浪费资源。
服务发现 通过让 Peer 节点动态计算所需信息,并以可消耗的方式将其提供给 SDK,从而改善了此过程。
Fabric 中的服务发现是如何工作的
应用程序启动时会通过设置得知应用程序开发人员或者管理员所信任的一组 Peer 节点,以便为发现查询提供可信的响应。客户端应用程序所使用的候选节点也在该组织中。请注意,为了被服务发现所识别,Peer 节点必须定义一个 EXTERNAL_ENDPOINT 。想了解如何执行此操作,请查看我们的文档 服务发现命令行界面
应用程序向发现服务发出配置查询并获取它所拥有的所有静态配置,否则就需要与网络的其余节点通信。继续向 Peer 节点的发现服务发送查询,就可以随时刷新此信息。
该服务在 Peer 节点(而不是应用程序)上运行,并使用 gossip 通信层维护的网络元数据信息来找出哪些 Peer 节点在线。它还从 Peer 节点的状态数据库中获取信息,例如相关的签名策略等。
通过服务发现,应用程序不再需要指定为他们背书的 Peer 节点。给定通道和链码 ID,SDK 就可以通过发现服务查询其所对应的 Peer 节点。然后,发现服务会计算出由两个对象组成的描述符:
- 布局(Layouts): Peer 组的列表,以及每个组中应当选取的 Peer 节点数。
- 组到 Peer 的映射: 布局中的组和通道的 Peer 节点的对应。实际上,一个组很可能是代表一个组织的 Peer 节点,但是由于服务 API 是通用的并且与组织无关,因此这只是一个“组”。
下面是一个``AND(Org1, Org2)``策略的描述符示例,其中每个组织中有两个 Peer 节点。
The following is an example of a descriptor from the evaluation of a policy of
AND(Org1, Org2) where there are two peers in each of the organizations.
Layouts: [
QuantitiesByGroup: {
“Org1”: 1,
“Org2”: 1,
}
],
EndorsersByGroups: {
“Org1”: [peer0.org1, peer1.org1],
“Org2”: [peer0.org2, peer1.org2]
}
换言之,背书策略需要两个分别来自 Org1 和 Org2 的 Peer 节点的签名。它提供了组织中可以背书的(Org1 和 Org2 中都有 peer0 和 peer1) Peer 节点的名称。
之后 SDK 会随机从列表中选择一个布局。在上边的例子中的背书策略是 Org1 AND Org2。如果换成 OR 策略,SDK 就会随机选择 Org1 或 Org2,因为任意一个节点的签名都可以满足背书策略。
SDK 选择布局后,会根据客户端指定的标准对布局中的 Peer 节点进行选择(SDK 可以这样做是因为它能够访问元数据,比如账本高度)。例如,SDK 可以根据布局中每个组的 Peer 节点的数量,优先选择具有更高的账本高度的 Peer 节点,或者排除应用程序发现的处于脱机状态的 Peer 节点。如果无法根据标准选定一个 Peer 节点, SDK 将从最符合标准的 Peer 节点中随机选择。
发现服务的功能
发现服务可以响应以下查询:
- 配置查询: 从通道的排序节点返回通道中所有组织的
MSPConfig。 - Peer 成员查询: 返回已加入通道的 Peer 节点。
- 背书查询: 返回通道中给定链码的背书描述符。
- 本地 Peer 成员查询: 返回响应查询的 Peer 节点的本地成员信息。默认情况下,客户端需要是 Peer 节点的管理员才能响应此查询。
特殊要求
当 Peer 节点在启用 TLS 的情况下运行时,客户端在连接到 Peer 节点时必须提供 TLS 证书。如果未将 Peer 节点配置为验证客户端证书(clientAuthRequired 为 false),则此 TLS 证书可以是自签名的。
定义功能需求
如文档 Channel capabilities 中所述,在通道配置(在通道的最新配置区块中找到)中,为每个通道定义了功能需求。通道配置包含三个位置,每个位置定义了不同类型的功能。
| Capability Type | Canonical Path | JSON Path |
|---|---|---|
| Channel | /Channel/Capabilities | .channel_group.values.Capabilities |
| Orderer | /Channel/Orderer/Capabilities | .channel_group.groups.Orderer.values.Capabilities |
| Application | /Channel/Application/Capabilities | .channel_group.groups.Application.values. Capabilities |
功能设置
功能设置是通道配置的一部分(要么作为初始配置,要么作为重新配置的一部分)。
注解
有关如何更新通道配置的更多信息,请查看 doc:channel_update_tutorial。要了解不同的通道更新类型,请查看 更新通道配置。
默认情况下,新通道将复制排序系统通道的配置,因此新通道将被自动配置为和排序系统通道中的排序节点、通道功能以及通道创建交易是指定的应用功能一起工作。通道已经存在了,但是必须被重新配置。
功能的值在 protobuf 定义如下:
message Capabilities {
map<string, Capability> capabilities = 1;
}
message Capability { }
JSON 格式如下:
{
"capabilities": {
"V1_1": {}
}
}
初始配置中的功能
在发布的构件中 config 目录下的 configtx.yaml 文件中,有一个 Capabilities 部分,列举了每种功能类型(通道、排序节点和应用程序)的可能功能。
使用功能最简答的方法就是将 v1.1 中的示例结构复制过来并修改。例如:
SampleSingleMSPRaftV1_1:
Capabilities:
<<: *GlobalCapabilities
Orderer:
<<: *OrdererDefaults
Organizations:
- *SampleOrg
Capabilities:
<<: *OrdererCapabilities
Consortiums:
SampleConsortium:
Organizations:
- *SampleOrg
请注意, Capabilities 在根级别(用于通道功能)和 Orderer 级别(用于排序节点功能)各有一个定义部分。上边的示例使用 YAML 引用了在 YAML 文件底部定义的功能。
定义排序服务通道的时候没有 Application 部分,它在创建应用通道的时候会被创建。要在创建通道的时候定义新通道中应用的功能,应用程序管理员需要在
SampleSingleMSPChannelV1_1结构后边定义他们的通道创建交易。SampleSingleMSPChannelV1_1: Consortium: SampleConsortium Application: Organizations: - *SampleOrg Capabilities: <<: *ApplicationCapabilities
这里,Application 部分有一个新元素 Capabilities,引用了 YAML 最后部分的 ApplicationCapabilities。
注解
Channel 和 Orderer 部分的功能继承了排序系统通道的定义,并被在创建通道时自动包含到了排序节点中。
通道
Hyperledger Fabric 的 通道 是两个或多个特定网络成员之间通信的专用“子网”,用于进行私有和机密的交易。通道由成员(组织)、每个成员的锚点节点、共享账本、链码应用程序和排序服务节点定义。网络上的每个交易都在一个通道上执行,在这个通道上,每一方都必须经过身份认证和授权才能在该通道上进行交易。加入通道的每个 Peer 节点都有 MSP 提供的身份,MSP 为每个节点授权访问通道中的其他节点和服务。
要创建一个新通道,客户端 SDK 调用配置系统链码并引用属性,如“锚点节点”和成员(组织)。这个请求为通道账本创建一个“创世区块”,它存储关于通道策略、成员和锚点节点的配置信息。当将新成员添加到现有通道时,可以与新成员共享这个创世区块,也可以共享最近的重配置区块。
注解
有关配置事务的属性和原型结构的更多信息,请参见:doc:configtx
为通道上的每个成员选择一个“主节点”,确定哪个节点代表该成员与排序服务通信。如果没有标识出主,可以使用算法来标识。共识服务对交易进行排序,并将它们以区块的形式交付给每个主节点,然后由每个主节点将该区块分发给它的成员节点,并使用 gossip 协议分发到整个通道。
尽管任何一个锚节点都可以属于多个通道,因此可以维护多个账本,但是账本数据不可以从一个通道传递到另一个通道。这种基于通道的账本隔离,是由配置链码、MSP 服务和 gossip 协议定义和实现的。数据的分发(包括交易信息,账本状态和通道成员信息)仅限于通道上身份可验证的节点。基于通道的节点及账本数据的隔离,使得需要私有和机密交易的网络成员与其业务竞争者和其他受限成员可以在同一区块链网络上共存。
使用 CouchDB 作为状态数据库
状态数据库选项
The current options for the peer state database are LevelDB and CouchDB. LevelDB is the default key-value state database embedded in the peer process. CouchDB is an alternative external state database. Like the LevelDB key-value store, CouchDB can store any binary data that is modeled in chaincode (CouchDB attachments are used internally for non-JSON data). As a document object store, CouchDB allows you to store data in JSON format, issue rich queries against your data, and use indexes to support your queries.
Both LevelDB and CouchDB support core chaincode operations such as getting and setting a key
(asset), and querying based on keys. Keys can be queried by range, and composite keys can be
modeled to enable equivalence queries against multiple parameters. For example a composite
key of owner,asset_id can be used to query all assets owned by a certain entity. These key-based
queries can be used for read-only queries against the ledger, as well as in transactions that
update the ledger.
Modeling your data in JSON allows you to issue rich queries against the values of your data, instead of only being able to query the keys. This makes it easier for your applications and chaincode to read the data stored on the blockchain ledger. Using CouchDB can help you meet auditing and reporting requirements for many use cases that are not supported by LevelDB. If you use CouchDB and model your data in JSON, you can also deploy indexes with your chaincode. Using indexes makes queries more flexible and efficient and enables you to query large datasets from chaincode.
CouchDB runs as a separate database process alongside the peer, therefore there are additional considerations in terms of setup, management, and operations. You may consider starting with the default embedded LevelDB, and move to CouchDB if you require the additional complex rich queries. It is a good practice to model asset data as JSON, so that you have the option to perform complex rich queries if needed in the future.
注解
CouchDB JSON 文档只能包含合法的 UTF-8 字符串并且不能以下划线开头(“_”)。无论你使用 CouchDB 还是 LevelDB 都不要在键中使用 U+0000 (空字节)。
CouchDB JSON 文档中不能使用一下值作为顶字段的名字。这些名字为内部保留字段。
- 任何以下划线开头的字段,“_”
- ~version
从链码中使用 CouchDB
链码查询
链码 API 中大部分方法在 LevelDB 或者 CouchDB 状态数据库中都可用,例如 GetState、PutState、GetStateByRange、GetStateByPartialCompositeKey。另外当你使用 CouchDB 作为状态数据库并且在链码中以 JSON 建模资产的时候,你可以使用 GetQueryResult 通过向 CouchDB 发送查询字符串的方式使用富查询。查询字符串请参考 CouchDB JSON 查询语法 。
marbles02 示例 演示了如何从链码中使用 CouchDB 查询。它包含了一个 queryMarblesByOwner() 方法,通过向链码传递所有者 id 来演示如何通过参数查询。它还使用 JSON 查询语法在状态数据中查询符合 “docType” 的弹珠的所有者 id:
{"selector":{"docType":"marble","owner":<OWNER_ID>}}
The responses to rich queries are useful for understanding the data on the ledger. However, there is no guarantee that the result set for a rich query will be stable between the chaincode execution and commit time. As a result, you should not use a rich query and update the channel ledger in a single transaction. For example, if you perform a rich query for all assets owned by Alice and transfer them to Bob, a new asset may be assigned to Alice by another transaction between chaincode execution time and commit time.
CouchDB 分页
Fabric 支持对富查询和范围查询结果的分页。API 支持范围查询和富查询使用页大小和书签进行分页。要支持高效的分页,必须使用 Fabric 的分页 API。特别地,CouchDB 不支持 limit 关键字,分页是由 Fabric 来管理并隐式地按照 pageSize 的设置进行分页。
如果是通过查询 API (GetStateByRangeWithPagination()、GetStateByPartialCompositeKeyWithPagination()、和 GetQueryResultWithPagination())来指定 pageSize 的,返回给链码的结果(以 pageSize 为范围)会带有一个书签。该书签会返回给调用链码的客户端,客户端可以根据这个书签来查询结果的下一“页”。
分页 API 只能用于只读交易中,查询结果旨在支持客户端分页的需求。对于需要读和写的交易,请使用不带分页的链码查询 API。在链码中,您通过迭代的方式来获取你想要的深度。
无论是否使用了分页 API,所有链码查询都受限于 core.yaml 中的 totalQueryLimit (默认 100000)。这是链码将要迭代并返回给客户端最多的结果数量,以防意外或者恶意地长时间查询。
注解
无论链码中是否使用了分页,节点都会根据 core.yaml 中的 ``internalQueryLimit``(默认 1000) 来查询 CouchDB。 这样就保证了在执行链码的时候有合理大小的结果在节点和 CouchDB 之间,以及链码和客户端之间传播。
在 使用 CouchDB 教程中有一个使用分页的示例。
CouchDB 索引
CouchDB 中的索引用来提升 JSON 查询的效率以及按顺序的 JSON 查询。索引可以让你在账本中有大量数据时进行查询。 索引可以在 /META-INF/statedb/couchdb/indexes 文件夹中和链码打包在一起。每一个索引文件必须定义在一个扩展名为 *.json 的文本文件中,文件内容符合 CouchDB 索引 JSON 语法 。例如,要想支持上边提到的弹珠查询,提供了一个 docType 和 owner 字段的简单索引文件:
{"index":{"fields":["docType","owner"]},"ddoc":"indexOwnerDoc", "name":"indexOwner","type":"json"}
索引文件可以在 这里 找到。
Any index in the chaincode’s META-INF/statedb/couchdb/indexes directory
will be packaged up with the chaincode for deployment. The index will be deployed
to a peers channel and chaincode specific database when the chaincode package is
installed on the peer and the chaincode definition is committed to the channel. If you
install the chaincode first and then commit the the chaincode definition to the
channel, the index will be deployed at commit time. If the chaincode has already
been defined on the channel and the chaincode package subsequently installed on
a peer joined to the channel, the index will be deployed at chaincode
installation time.
部署之后,调用链码查询的时候会自动使用索引。CouchDB 会根据查询的字段选择使用哪个索引。或者,在查询选择器中通过 use_index 关键字指定要使用的索引。
安装的不同版本的链码可能会有相同版本的索引。要更改索引,需要使用相同的索引名称但是不同的索引定义。在安装或者实例化完成的时候,索引就会重新被部署到 Peer 节点的状态数据库了。
如果你已经有了大量的数据,然后才安装或者初始化链码,在安装或初始化的过程中索引的创建可能会花费一些时间。 同样,如果你已经有了大量的数据,然后提交后续版本的链码定义,也会花费一些时间创建索引。. 在索引创建的过程中请不要调用来嘛查询状态数据库。在交易的过程中,区块提交到账本后索引会自动更新。如果安装链码的过程中 Peer 节点崩溃了,couchdb 的索引可能就没有创建成功。这种情况下,你需要重新安装链码来创建索引。
CouchDB 配置
通过在 stateDatabase 状态选项中将 goleveldb 切换为 CouchDB 可以启用 CouchDB 状态数据库。另外配置 couchDBAddress 来指向 Peer 节点所使用的 CouchDB。如果 CouchDB 设置了用户名和密码,也需要在配置中指定。其他的配置选项在 couchDBConfig 部分也都有相关说明。重启 Peer 节点就可以使 core.yaml 文件立马生效。
你也可以使用环境变量来覆盖 core.yaml 中的值,例如 CORE_LEDGER_STATE_STATEDATABASE 和 CORE_LEDGER_STATE_COUCHDBCONFIG_COUCHDBADDRESS 。
下边是 core.yaml 中的 stateDatabase 部分:
state:
# stateDatabase - options are "goleveldb", "CouchDB"
# goleveldb - default state database stored in goleveldb.
# CouchDB - store state database in CouchDB
stateDatabase: goleveldb
# Limit on the number of records to return per query
totalQueryLimit: 10000
couchDBConfig:
# It is recommended to run CouchDB on the same server as the peer, and
# not map the CouchDB container port to a server port in docker-compose.
# Otherwise proper security must be provided on the connection between
# CouchDB client (on the peer) and server.
couchDBAddress: couchdb:5984
# This username must have read and write authority on CouchDB
username:
# The password is recommended to pass as an environment variable
# during start up (e.g. LEDGER_COUCHDBCONFIG_PASSWORD).
# If it is stored here, the file must be access control protected
# to prevent unintended users from discovering the password.
password:
# Number of retries for CouchDB errors
maxRetries: 3
# Number of retries for CouchDB errors during peer startup
maxRetriesOnStartup: 10
# CouchDB request timeout (unit: duration, e.g. 20s)
requestTimeout: 35s
# Limit on the number of records per each CouchDB query
# Note that chaincode queries are only bound by totalQueryLimit.
# Internally the chaincode may execute multiple CouchDB queries,
# each of size internalQueryLimit.
internalQueryLimit: 1000
# Limit on the number of records per CouchDB bulk update batch
maxBatchUpdateSize: 1000
# Warm indexes after every N blocks.
# This option warms any indexes that have been
# deployed to CouchDB after every N blocks.
# A value of 1 will warm indexes after every block commit,
# to ensure fast selector queries.
# Increasing the value may improve write efficiency of peer and CouchDB,
# but may degrade query response time.
warmIndexesAfterNBlocks: 1
Hyperledger Fabric 提供的 CouchDB docker 镜像可以通过 Docker Compose 脚本来定义 COUCHDB_USER 和 COUCHDB_PASSWORD 环境变量,从而设置 CouchDB 管理员的用户名和密码。
如果没有使用 Fabric 提供的 docker 镜像安装 CouchDB,必须编辑 local.ini 文件 来设置管理员的用户名和密码。
Docker Compose 脚本只能在创建容器的时候设置用户名和密码。在容器创建之后,必须使用 local.ini 文件来修改用户名和密码。
If you choose to map the fabric-couchdb container port to a host port, make sure you are aware of the security implications. Mapping the CouchDB container port in a development environment exposes the CouchDB REST API and allows you to visualize the database via the CouchDB web interface (Fauxton). In a production environment you should refrain from mapping the host port to restrict access to the CouchDB container. Only the peer will be able to access the CouchDB container.
注解
每次 Peer 节点启动的时候都会读取 CouchDB 节点的选项。
查询练习
避免对将导致扫描整个 CouchDB 数据库的;链码查询。全长数据库扫描将导致较长的响应时间,并将降低您的网络性能。您可以采取以下一些步骤来避免长时间查询:
使用 JSON 查询:
- 确保在链码包中创建了索引。
- 不要使用
$or、$in和$regex之类会扫描整个数据库的操作。
对于范围查询、复合键查询和 JSON 查询:
- 使用分页查询,不要使用一个大的查询结果。
如果在您的应用中想创建一个仪表盘(dashboard)或者聚合数据,您可以将区块链数据复制到链下的数据库中,通过链下数据库来查询或分析区块链数据,以此来优化数据存储,并防止网络性能的降低或交易的终端。要实现这个功能,可以通过区块或链码事件将交易数据写入链下数据库或者分析引擎。对于每一个接收到的区块,区块监听应用将遍历区块中的每一个交易并根据每一个有效交易的
读写集中的键值对构建一个数据存储。文档 基于通道的 Peer 节点事件服务 提供了可重放事件,以确保下游数据存储的完整性。
基于通道的 Peer 节点事件服务
概述
在 Fabric 的早期版本中,Peer 事件服务被称为事件中心。每当添加新区块到 Peer 节点的帐本中时,该服务都会发送事件,而不管该通道是不是涉及该区块,并且只有运行事件 Peer 的组织成员才能访问该事件(即,与该事件相关联的成员) )。
从v1.1开始,有了提供事件的新服务。这些服务使用完全不同的设计来按通道提供事件。这意味着事件的注册发生在通道级别而不是 Peer 节点端,从而可以对 Peer 节点的数据访问进行精细控制。接收事件的请求是从 Peer 节点组织外部的身份接受的(由通道配置进行定义)。这还提供了更高的可靠性,以及一种接收可能错过的事件的方式(无论是由于连接问题还是由于 Peer 节点正在加入已经运行的网络而导致的事件遗漏)。
可用的服务
Deliver
该服务将已提交到帐本的整个区块发送出去。如果链码有事件设置,则可以在区块的 ChaincodeActionPayload 中找到。
DeliverWithPrivateData
该服务发送与 Deliver 服务相同的数据,以及来自客户组织的的任何授权访问的私有数据。
DeliverFiltered
该服务发送“已过滤”的区块,这是有关已提交到账本的区块的最小信息集。它主要针对 Peer 节点拥有者希望外部客户端接收关于他们的交易和交易状态的主要数据的情况。用于在 Peer 所有者希望外部客户主要接收有关其交易和交易状态信息的网络中。如果链码中有事件设置,则可以在过滤后的区块的 FilteredChaincodeAction 中找到。
注解
链码事件的有效负载将不包含在已过滤的区块中。
如何注册事件
事件的注册是通过将包含消息的信封发送到 Peer 节点来完成的,该信封包含所需的开始和停止位置,寻找行为定义(一直阻塞到准备就绪,还是直接失败)。辅助变量 SeekOldest 和 SeekNewest 可以用于指示最老的(即第一个)区块或账本的最新的(即最后一个)区块。要使服务无限期发送事件,SeekInfo 消息应包含停止位置 MAXINT64。
注解
如果在 Peer 节点上启用了双向 TLS ,则必须在信封的通道头中设置 TLS 证书哈希。
默认情况下,事件服务使用“Channel Readers”策略来确定是否授权客户端的事件请求。
传递响应消息概述
事件服务发送 DeliverResponse 消息作为回应。
每条消息应该包含如下内容之一:
- 状态 – HTTP 状态代码。如果发生任何故障,每个服务将返回相应的故障代码;否则,一旦服务完成
SeekInfo请求的所有信息,它将返回200 - SUCCESS。- 区块 – 仅由
Deliver服务返回。- 区块和私有数据 – 仅由
DeliverWithPrivateData服务返回。- 已过滤的区块 – 仅由
DeliverFiltered服务返回。
过滤后的区块包含:
通道ID
编号(如区块高度)
过滤交易的数组。
交易ID。
- 类型 (e.g.
ENDORSER_TRANSACTION,CONFIG。)- 交易验证代码。
- 过滤的交易行为。
- 过滤后的链码行为数组。
- 交易的链码事件(除去负载)
SDK事件文档
有关使用事件服务的更多详细信息,请参阅 SDK documentation。
私有数据
注解
本主题假设你已经理解了在 私有数据文档 中所描述概念。
私有数据集合定义
一个集合定义包含了一个或者多个集合,每个集合具有一个策略列出了在集合中的所有组织,还包括用来控制在背书阶段私有数据的传播所使用的属性,另外还有一个可选项来决定数据是否会被删除。
Beginning with the Fabric chaincode lifecycle introduced with Fabric v2.0, the
collection definition is part of the chaincode definition. The collection is
approved by channel members, and then deployed when the chaincode definition
is committed to the channel. The collection file needs to be the same for all
channel members. If you are using the peer CLI to approve and commit the
chaincode definition, use the --collections-config flag to specify the path
to the collection definition file. If you are using the Fabric SDK for Node.js,
visit How to install and start your chaincode.
To use the previous lifecycle process to deploy a private data collection,
use the --collections-config flag when instantiating your chaincode.
集合定义由下边的属性组成:
name: 集合的名字.policy: 私有数据集合分发策略,它通过Signature策略语法定义了允许哪些组织的 Peer 节点持久化集合数据。为了支持读/写交易,私有数据的分发策略必须要定义一个比链码背书策略更大范围的一个组织的集合,因为 Peer 节点必须要拥有这些私有数据才能来对这些交易提案进行背书。比如,在一个具有10个组织的通道中,其中5个组织可能会被包含在一个私有数据集合的分发策略中,但是背书策略可能会调用其中任意的3个组织来进行背书。requiredPeerCount: 在节点为背书签名并将提案响应返回给客户端前,每个背书节点必须将私有数据分发到的节点(在被授权的组织当中)的最小数量。将传播作为背书的一个条件可以确保即使背书背书不可用,私有数据在网络中也还是可用的。requiredPeerCount设为0代表分发并不是 必须 的,但是如果maxPeerCount比0大的话,就需要分发。通常不建议requiredPeerCount设为0通常,因为那会造成在背书节点不可用的时候,网络中的私有数据可能会丢失。通常在背书的时候你会希望分发私有数据到多个节点以保证网络中私有数据的冗余存储。maxPeerCount: 为了数据的冗余存储,每个背书节点将会尝试将私有数据分发到的其他节点(在被授权的组织中) 的最大数量。如果在背书和提交之间一个背书节点不可用了,其他节点就可以在背书的时候从已经收到私有数据的节点拉取私有数据。如果这个值被设置为0,私有数据在背书的时候就不会被分发,这会在提交的时候强制节点从授权的背书节点上拉取私有数据。blockToLive: 代表了数据应该以区块的形式在私有数据库中存在多久。数据会在私有数据库上存在指定数量个区块,然后它会被删除,然后链码就无法查询到该数据,其他节点也无法请求到该数据。如果要无限期的保持私有数据,也就是从来不删除私有数据的话,将blockToLive设置为0。memberOnlyRead:true值表示节点自动会强制只有属于这些集合的组织的客户端才可以读取私有数据。如果一个非成员组织的客户端试图执行一个链码方法来读取私有数据的话,会结束链码的调用并产生错误。如果你想在单独的链码方法中进行更细粒度的访问控制的话,可以使用false值。memberOnlyWrite: a value oftrueindicates that peers automatically enforce that only clients belonging to one of the collection member organizations are allowed to write private data from chaincode. If a client from a non-member org attempts to execute a chaincode function that performs a write on a private data key, the chaincode invocation is terminated with an error. Utilize a value offalseif you would like to encode more granular access control within individual chaincode functions, for example you may want certain clients from non-member organization to be able to create private data in a certain collection.endorsementPolicy: An optional endorsement policy to utilize for the collection that overrides the chaincode level endorsement policy. A collection level endorsement policy may be specified in the form of asignaturePolicyor may be achannelConfigPolicyreference to an existing policy from the channel configuration. TheendorsementPolicymay be the same as the collection distributionpolicy, or may require fewer or additional organization peers.
下边是一个集合定义的 JSON 文件示例,一个包含了两个集合定义的数组:
[
{
"name": "collectionMarbles",
"policy": "OR('Org1MSP.member', 'Org2MSP.member')",
"requiredPeerCount": 0,
"maxPeerCount": 3,
"blockToLive":1000000,
"memberOnlyRead": true,
"memberOnlyWrite": true
},
{
"name": "collectionMarblePrivateDetails",
"policy": "OR('Org1MSP.member')",
"requiredPeerCount": 0,
"maxPeerCount": 3,
"blockToLive":3,
"memberOnlyRead": true,
"memberOnlyWrite":true,
"endorsementPolicy": {
"signaturePolicy": "OR('Org1MSP.member')"
}
}
]
This example uses the organizations from the Fabric test network, Org1 and
Org2. The policy in the collectionMarbles definition authorizes both
organizations to the private data. This is a typical configuration when the
chaincode data needs to remain private from the ordering service nodes. However,
the policy in the collectionMarblePrivateDetails definition restricts access
to a subset of organizations in the channel (in this case Org1 ). Additionally,
writing to this collection requires endorsement from an Org1 peer, even
though the chaincode level endorsement policy may require endorsement from
Org1 or Org2. And since “memberOnlyWrite” is true, only clients from
Org1 may invoke chaincode that writes to the private data collection.
In this way you can control which organizations are entrusted to write to certain
private data collections.
私有数据分发
由于私有数据不会被包含在提交到排序服务的交易中,因此也就不会被包含在区块中,背书节点扮演着将私有数据分发给其他授权组织的节点的重要角色。这确保了私有数据在背书节点完成背书之后变成不可用的时候的可用性。为了辅助分发,在集合定义中的 maxPeerCount 和 requiredPeerCount 属性控制了在背书的时候分发的数量。
如果背书节点不能够成功地将私有数据分发到至少 requiredPeerCount 的要求,它将会返回一个错误给客户端。背书节点会尝试将私有数据分发到不同组织的节点,来确保每个被授权的组织具有私有数据的一个副本。因为交易在链码执行期间还没有被提交,背书节点和接收节点除了在它们的区块链之外,还在一个本地的 临时存储(transient store) 中存储了一个私有数据副本,直到交易被提交。
当一个被授权的节点在提交的时候,如果他们的临时存储中没有私有数据的副本(或者是因为他们不是一个背书节点,或者是因为他们在背书的时候没有接收到私有数据),他们会尝试从其他的被授权的节点那里拉取私有数据,尝试会*持续一个可配置的时间长度* ,在时间可以通过节点配置文件 core.yaml 中的属性 peer.gossip.pvtData.pullRetryThreshold 进行配置。
注解
只有当提出请求的节点是私有数据分发策略定义的集合中的一员的时候,被询问的节点才会返回私有数据。
当使用 pullRetryThreshold 时候需要考虑的问题:
- 如果提出请求的节点能够在
pullRetryThreshold时间内拿到私有数据的话,它将会把交易提交到自己的账本(包括私有数据的哈希值),并且将私有数据存储在与其他的通道状态数据进行了逻辑隔离的状态数据库中。 - 如果提出请求的节点没能在
pullRetryThreshold时间内拿到私有数据的话,它将会把交易提交到自己的账本(包括私有数据的哈希值),但是不会存储私有数据。 - 如果某个节点有资格拥有私有数据,却没有得到的话,这个节点就无法为将来会引用这个丢失的私有数据的交易进行背书,背书时会发现无法查询到键 (基于在状态数据库中主键的哈希值),并且链码将会收到一个错误。
因此,将 requiredPeerCount 和 maxPeerCount 设置成足够大的值来确保在你的通道中的私有数据的可用性是非常重要的。比如,如果在交易提交之前,每个背书节点都不可用了,requiredPeerCount 和 maxPeerCount 属性将会确保私有数据在其他的节点上是可用的。
注解
为了让集合能够工作,正确配置跨组织的 gossip 非常重要的。请阅读 Gossip 数据传播协议,尤其注意“锚节点”和“外部端点”配置。
从链码中引用集合
我们可以用 shim API 设置和取回私有数据。
相同的链码数据操作也可以应用到通道状态数据和私有数据上,但是对于私有数据,要在链码 API 中指定和数据相关的集合的名字,比如 PutPrivateData(collection,key,value) 和 GetPrivateData(collection,key)。
一个链码可以引用多个集合。
Referencing implicit collections from chaincode
Starting in v2.0, an implicit private data collection can be used for each organization in a channel, so that you don’t have to define collections if you’d like to utilize per-organization collections. Each org-specific implicit collection has a distribution policy and endorsement policy of the matching organization. You can therefore utilize implicit collections for use cases where you’d like to ensure that a specific organization has written to a collection key namespace. The v2.0 chaincode lifecycle uses implicit collections to track which organizations have approved a chaincode definition. Similarly, you can use implicit collections in application chaincode to track which organizations have approved or voted for some change in state.
To write and read an implicit private data collection key, in the PutPrivateData
and GetPrivateData chaincode APIs, specify the collection parameter as
"_implicit_org_<MSPID>", for example "_implicit_org_Org1MSP".
注解
Application defined collection names are not allowed to start with an underscore, therefore there is no chance for an implicit collection name to collide with an application defined collection name.
How to pass private data in a chaincode proposal
因为链码提案被存储在区块链上,不要把私有数据包含在链码提案中也是非常重要的。在链码提案中有一个特殊的字段 transient,可以用它把私有数据来从客户端(或者链码将用来生成私有数据的数据)传递给节点上的链码调用。链码可以通过调用 GetTransient() API 来获取 transient 字段。这个 transient 字段会从通道交易中被排除。
Protecting private data content
If the private data is relatively simple and predictable (e.g. transaction dollar amount), channel members who are not authorized to the private data collection could try to guess the content of the private data via brute force hashing of the domain space, in hopes of finding a match with the private data hash on the chain. Private data that is predictable should therefore include a random “salt” that is concatenated with the private data key and included in the private data value, so that a matching hash cannot realistically be found via brute force. The random “salt” can be generated at the client side (e.g. by sampling a secure pseudo-random source) and then passed along with the private data in the transient field at the time of chaincode invocation.
私有数据的访问控制
Until version 1.3, access control to private data based on collection membership
was enforced for peers only. Access control based on the organization of the
chaincode proposal submitter was required to be encoded in chaincode logic.
Collection configuration options memberOnlyRead (since version v1.4) and
memberOnlyWrite (since version v2.0) can automatically enforce that the chaincode
proposal submitter must be from a collection member in order to read or write
private data keys. For more information about collection
configuration definitions and how to set them, refer back to the
`Private data collection definition`_ section of this topic.
注解
If you would like more granular access control, you can set
memberOnlyRead and memberOnlyWrite to false. You can then apply your
own access control logic in chaincode, for example by calling the GetCreator()
chaincode API or using the client identity
chaincode library .
查询私有数据
私有集合数据能够像常见的通道数据那样使用 shim API 来进行查询:
GetPrivateDataByRange(collection, startKey, endKey string)GetPrivateDataByPartialCompositeKey(collection, objectType string, keys []string)
对于 CouchDB 状态数据库,可以使用 shim API 查询 JSON 内容:
And for the CouchDB state database, JSON content queries can be passed using the shim API:
GetPrivateDataQueryResult(collection, query string)
限制:
- 客户端调用执行范围查询或者富查询链码的时候应该知道,根据上边关于私有数据分发部分的解释,如果他们查询的节点有丢失的私有数据的话,他们可能会接收到结果集的一个子集。客户端可以查询多个节点并且比较返回的结果,以确定一个节点是否丢失了结果集中的部分数据。
- 不支持在单个交易中既执行范围查询或者富查询并且更新数据,因为查询结果无法在以下类型的节点上进行验证:不能访问私有数据的节点或者对于那些他们可以访问相关的私有数据但是私有数据是丢失的。如果一个链码的调用既查询又更新私有数据的话,这个提案请求将会返回一个错误。如果你的应用程序能够容忍在链码执行和验证/提交阶段结果集的变动,那么你可以调用一个链码方法来执行这个查询,然后再调用第二个链码方法来执行变更。注意,调用 GetPrivateData() 来获取单独的键值可以跟 PutPrivateData() 调用放在同一个交易中,因为所有的节点都能够基于键版本的哈希来验证键的读取。
在集合中使用索引
使用 CouchDB 作为状态数据库 章节讲解了可以在安装阶段,通过将索引打包在一个 META-INF/statedb/couchdb/indexes 的路径下的方式,将索引应用到通道的状态数据库。类似的,也可以通过将索引打包在一个 META-INF/statedb/couchdb/collections/<collection_name>/indexes 路径下的方式将索引应用到私有数据集合中。一个索引的实例可以查看 这里。
使用私有数据时的思考
私有数据的删除
Peer 可以周期性地删除私有数据。更多细节请查看上边集合定义属性中的 blockToLive 。
另外,重申一下,在提交之前,私有数据存储在 Peer 节点的本地临时数据存储中。这些数据在交易提交之后会自动被删除。但是如果交易没有被提交,私有数据就会一直保存在临时数据存储中。Peer 节点会根据配置文件 core.yaml 中的 peer.gossip.pvtData.transientstoreMaxBlockRetention 的配置周期性的删除临时存储中的数据。
Updating a collection definition
To update a collection definition or add a new collection, you can update
the chaincode definition and pass the new collection configuration
in the chaincode approve and commit transactions, for example using the --collections-config
flag if using the CLI. If a collection configuration is specified when updating
the chaincode definition, a definition for each of the existing collections must be
included.
When updating a chaincode definition, you can add new private data collections, and update existing private data collections, for example to add new members to an existing collection or change one of the collection definition properties. Note that you cannot update the collection name or the blockToLive property, since a consistent blockToLive is required regardless of a peer’s block height.
Collection updates becomes effective when a peer commits the block with the updated chaincode definition. Note that collections cannot be deleted, as there may be prior private data hashes on the channel’s blockchain that cannot be removed.
私有数据对账
从 v1.4 开始,加入到已存在的集合中的 Peer 节点在私有数据加入到集合之前,可以自动获取提交到集合的私有数据。
私有数据“对账”也应用在 Peer 节点上,用于确认该接收却未接收到的私有数据,比如由于网络原因没有收到的。以此来追踪在区块提交期间“丢失”的私有数据。
私有数据对账根据 core.yaml 文件中的属性 peer.gossip.pvtData.reconciliationEnabled 和 peer.gossip.pvtData.reconcileSleepInterval 周期性的发生。Peer 节点会从集合成员节点中定期获取私有数据。
注意私有数据对账特性只适用于 v1.4 以上的 Fabric 节点。
读写集语义
本文档讨论有关读写集语义实现的详细信息。
交易模拟和读写集
背书节点在模拟交易期间,会为交易准备一个读写集。读集包含了模拟期间交易读取的键和键的版本的列表。写集包含了交易写入键(可以与读取集中的键重叠)的新值。如果交易是删除一个键,该键就会被增加一个删除标识(在新值的位置)。
如果交易多次向同一个键写入数据,只有最后写入的数据会记录下来。同样,如果交易读取一个键的值,就会返回这个键的已提交状态的值,即使读取之前在同一个交易中更新了键值。换句话说,不支持“读你所写”的语义。
就像前面所说的,键的版本只记录在读集中;写集只包含键和交易设置的键的最新值。
版本的实现有很多种。版本设计的基本需求是,键不能有重复的版本号。例如单调递增的数字。在目前的实现中,我们使用交易所在的区块高度来作为交易中所有修改的键的版本号。这样区块中交易的高度通过一个元组来表示(txNumber 是区块中交易的高度)。这种方式比递增的数字有更多好处,主要有,它可以让其他组件比如状态数据库、交易模拟和验证有更多的设计选择。
下边是为模拟一个交易所准备的读写集示例。为了简化说明,我们使用了一个递增的数字来表示版本。
<TxReadWriteSet>
<NsReadWriteSet name="chaincode1">
<read-set>
<read key="K1", version="1">
<read key="K2", version="1">
</read-set>
<write-set>
<write key="K1", value="V1">
<write key="K3", value="V2">
<write key="K4", isDelete="true">
</write-set>
</NsReadWriteSet>
<TxReadWriteSet>
另外,如果交易在模拟中执行的是一个范围查询,范围查询和它的结果都会被记录在读写集的 查询信息(query-info) 中。
交易验证和使用读写集更新世界状态
提交节点 使用读写集中的读集来验证交易,使用写集来更新受影响的键的版本和值。
在验证阶段,如果读集中键的版本和世界状态中键的版本一致就认为该交易是 有效的 ,这里我们假设所有之前 有效 的交易(同一个区块中该交易之前的交易)都会被提交(提交状态)。当读写集中包含一个或多个查询信息(query-info)时,需要执行额外的验证。
这种额外的验证需要确保在根据查询信息获得的结果的超集(多个范围的合并)中没有插入、删除或者更新键。换句话说,如果我们在模拟执行交易期间重新执行任何一个范围,我们应该得到相同的结果。这个检查保证了如果交易在提交期间出了虚项,该交易就会被标记为无效的。这种检查只存在于范围查询中(例如链码中的 GetStateByRange 方法)其他查询中没有实现(例如链码中的 GetQueryResult 方法)。其他查询仍会存在出现虚项的风险,我们应该只在不向排序服务提交的只读交易中使用查询,除非应用程序能保证模拟的结果和验证/提交时的结果一致。
如果交易通过了有效性验证,提交节点就会根据写集更新世界状态。在更新阶段,会根据写集更新世界状态中对应的键的值。然后,世界状态中键的版本会更新到最新的版本。
模拟和验证示例
本章节通过示例场景帮助你理解读写集语义。在本例中,k 表示键,在世界状态中表示一个元组 (k,ver,val) , ver 是键 k 的版本, val 是值。
现在假设有五个交易 T1,T2,T3,T4 和 T5 ,所有的交易模拟都基于同一个世界状态的快照。下边的步骤展示了世界状态和模拟这些交易时的读写活动。
World state: (k1,1,v1), (k2,1,v2), (k3,1,v3), (k4,1,v4), (k5,1,v5)
T1 -> Write(k1, v1'), Write(k2, v2')
T2 -> Read(k1), Write(k3, v3')
T3 -> Write(k2, v2'')
T4 -> Write(k2, v2'''), read(k2)
T5 -> Write(k6, v6'), read(k5)
现在,假设这些交易的顺序是从 T1 到 T5(他们可以在同一个区块,也可以在不同区块)
T1通过了验证,因为它没有执行任何读操作。然后世界状态中的键k1和k2被更新为(k1,2,v1'), (k2,2,v2')T2没有通过验证,因为它读了键k1,但是交易T1改变了k1T3通过了验证,因为它没有执行任何读操作。然后世界状态中的键k2被更新为(k2,3,v2'')T4没有通过验证,因为它读了键k2,但是交易T1改变了k2T5通过了验证,因为它读了键k5,但是k5没有被其他任何交易改变
Note: 不支持有多个读写集的交易。
Gossip 数据传播协议
Hyperledger Fabric 通过将工作负载拆分为交易执行(背书和提交)节点和交易排序节点的方式来优化区块链网络的性能、安全性和可扩展性。这样对网络的分割就需要一个安全、可靠和可扩展的数据传播协议来保证数据的完整性和一致性。为了满足这个需求,Fabric 实现了 Gossip 数据传播协议 。
Gossip 协议
Peer 节点通过 gossip 协议来传播账本和通道数据。Gossip 消息是持续的,通道中的每一个 Peer 节点不断地从多个节点接收当前一致的账本数据。每一个 gossip 消息都是带有签名的,因此拜占庭成员发送的伪造消息很容易就会被识别,并且非目标节点也不会接受与其无关的消息。Peer 节点会受到延迟、网络分区或者其他原因影响而丢失区块,这时节点会通过从其他拥有这些丢失区块的节点处同步账本。
基于 gossip 的数据传播协议在 Fabric 网络中有三个主要功能:
- 通过持续的识别可用的成员节点来管理节点发现和通道成员,还有检测离线节点。
- 向通道中的所有节点传播账本数据。所有没有和当前通道的数据同步的节点会识别丢失的区块,并将正确的数据复制过来以使自己同步。
- 通过点对点的数据传输方式,使新节点以最快速度连接到网络中并同步账本数据。
Peer 节点基于 gossip 的数据广播操作接收通道中其他的节点的信息,然后将这些信息随机发送给通道上的一些其他节点,随机发送的节点数量是一个可配置的常量。Peer 节点可以用“拉”的方式获取信息而不用一直等待。这是一个重复的过程,以使通道中的成员、账本和状态信息同步并保持最新。在分发新区块的时候,通道中 主 节点从排序服务拉取数据然后分发给它所在组织的节点。
主节点选举
主节点的选举机制用于在每一个组织中 选举 出一个用于链接排序服务和开始分发新区块的节点。主节点选举使得系统可以有效地利用排序服务的带宽。主节点选举模型有两种模式可供选择:
- 静态模式:系统管理员手动配置一个节点为组织的主节点。
- 动态模式:组织中的节点自己选举出一个主节点。
静态主节点选举
静态主节点选举允许你手动设置组织中的一个或多个节点节点为主节点。请注意,太多的节点连接到排序服务可能会影响带宽使用效率。要开启静态主节点选举模式,需要配置 core.yaml 中的如下部分:
peer:
# Gossip related configuration
gossip:
useLeaderElection: false
orgLeader: true
另外,这些配置的参数可以通过环境变量覆盖:
export CORE_PEER_GOSSIP_USELEADERELECTION=false
export CORE_PEER_GOSSIP_ORGLEADER=true
注解
下边的设置会使节点进入 旁观者 模式,也就是说,它不会试图成为一个主节点:
export CORE_PEER_GOSSIP_USELEADERELECTION=false
export CORE_PEER_GOSSIP_ORGLEADER=false
不要将 CORE_PEER_GOSSIP_USELEADERELECTION 和 CORE_PEER_GOSSIP_ORGLEADER 都设置为 true,这将会导致错误。
使用静态配置时,主节点失效或者崩溃都需要管理员进行处理。
动态主节点选举
动态主节点选举使组织中的节点可以 选举 一个节点来连接排序服务并拉取新区块。这个主节点由每个组织单独选举。
动态选举出的主节点通过向其他节点发送 心跳 信息来证明自己处于存活状态。如果一个或者更多的节点在一个段时间内没有收到 心跳 信息,它们就会选举出一个新的主节点。
在网络比较差有多个网络分区存在的情况下,组织中会存在多个主节点以保证组织中节点的正常工作。在网络恢复正常之后,其中一个主节点会放弃领导权。在一个没有网络分区的稳定状态下,会只有 唯一 一个活动的主节点和排序服务相连。
下边的配置控制主节点 心跳 信息的发送频率:
peer:
# Gossip related configuration
gossip:
election:
leaderAliveThreshold: 10s
开启动态节点选举,需要配置 core.yaml 中的以下参数:
peer:
# Gossip related configuration
gossip:
useLeaderElection: true
orgLeader: false
同样,这些配置的参数可以通过环境变量覆盖:
export CORE_PEER_GOSSIP_USELEADERELECTION=true
export CORE_PEER_GOSSIP_ORGLEADER=false
锚节点
gossip 利用锚节点来保证不同组织间的互相通信。
当提交了一个包含锚节点更新的配置区块时,Peer 节点会连接到锚节点并获取它所知道的所有节点信息。一个组织中至少有一个节点连接到了锚节点,锚节点就可以获取通道中所有节点的信息。因为 gossip 的通信是固定的,而且 Peer 节点总会被告知它们不知道的节点,所以可以建立起一个通道上成员的视图。
例如,假设我们在一个通道有三个组织 A、B 和 C,组织 C 定义了锚节点 peer0.orgC。当 peer1.orgA 连接到 peer0.orgC 时,它将会告诉 peer0.orgC 有关 peer0.orgA 的信息。稍后等 peer1.orgB 连接到 peer0.orgC 时,后者也会告诉前者关于 peer0.orgA 的信息。在这之后,组织 A 和组织 B 可以开始直接交换成员信息而无需借助 peer0.orgC 了。
由于组织间的通信依赖于 gossip,所以在通道配置中必须至少有一个锚节点。为了系统的可用性和冗余性,我们强烈建议每个组织都提供自己的一些锚节点。注意,锚节点不一定和主节点是同一个节点。
外部和内部端点(endpoint)
为了让 gossip 高效地工作,Peer 节点需要包含其所在组织以及其他组织的端点信息。
当 Peer 节点启动的时候,它会使用 core.yaml 文件中的 peer.gossip.bootstrap 来宣传自己并交换成员信息,同时建立所属组织中可用节点的视图。
core.yaml 文件中的 peer.gossip.bootstrap 属性用于在 一个组织内部 启动 gossip。如果你要使用 gossip,通常要为组织中的所有节点配置一组启动节点(使用空格隔开的节点列表)。内部端点通常是由 Peer 节点自动计算的,或者在 core.yaml 中的 core.peer.address 指明。如果你要覆盖该值,你可以设置环境变量 CORE_PEER_GOSSIP_ENDPOINT。
启动信息也同样需要建立 跨组织 的通信。初始的跨组织启动信息通过上面所说的“锚节点”设置提供。如果想让其他组织知道你所在组织中的其他节点,你需要设置 core.yaml 文件中的 peer.gossip.externalendpoint。如果没有设置,节点的端点信息就不会广播到其他组织的 Peer 节点。
这些属性的设置如下:
export CORE_PEER_GOSSIP_BOOTSTRAP=<a list of peer endpoints within the peer's org>
export CORE_PEER_GOSSIP_EXTERNALENDPOINT=<the peer endpoint, as known outside the org>
Gossip 消息
在线的节点通过持续广播“存活”消息来表明其处于可用状态,每一条消息都包含了“公钥基础设施(PKI)” ID 和发送者的签名。节点通过收集这些存活的消息来维护通道成员。如果没有节点收到某个节点的存活信息,这个“死亡”的节点会被从通道成员关系中剔除。因为“存活”的消息是经过签名的,恶意节点无法假冒其他节点,因为他们没有根 CA 签发的密钥。
除了自动转发接收到的消息之外,状态协调进程还会在每个通道上的 Peer 节点之间同步 世界状态。每个 Peer 节点都持续从通道中的其他节点拉取区块,来修复他们缺失的状态。因为基于 gossip 的数据分发不需要固定的连接,所以该过程可以可靠地提供共享账本的一致性和完整性,包括对节点崩溃的容忍。
因为通道是隔离的,所以一个通道中的节点无法和其他通道通信或者共享信息。尽管节点可以加入多个通道,但是分区消息传递通过基于 Peer 节点所在通道的应用消息的路由策略,来防止区块被分发到其他通道的 Peer 节点。
注解
- 通过 Peer 节点 TLS 层来处理点对点消息的安全性,不需要使用签名。Peer 节点通过 CA 签发的证书来授权。尽管没有使用 TLS 证书,但在 gossip 层使用了经过授权的 Peer 节点证书。账本区块经过排序服务签名,然后被分发到通道上的主节点。
- 通过 Peer 节点的成员服务提供者来管理授权。当 Peer 节点第一次连接到通道时,TLS 会话将与成员身份绑定。这就利用网络和通道中成员的身份来验证了与 Peer 节点相连的节点的身份。
常见问题
背书
背书架构:
| 问题: | 在一个网络中需要多少个 Peer 节点来对一笔交易进行背书? |
|---|---|
| 回答: | 为一笔交易进行背书所需 Peer 节点的数量取决于链码定义中所指定的背书策略。 |
| 问题: | 一个应用程序客户端需要连接所有的 Peer 节点吗? |
| 回答: | 客户端只需要连接链码的背书策略所需数量的 Peer 节点即可。 |
安全和访问控制
| 问题: | 我如何来确保数据隐私? |
|---|---|
| 回答: | 对于数据隐私,这里有很多个方面。首先,你可以使用通道来隔离你的网络,每个通道代表网络成员的一个子集,这些成员查看部署到该通道上的链码的相关数据。 其次,你可以使用 私有数据 来保护组织的数据隐私。一个私有数据集合规定了通道中的一部分组织可以背书、提交或者查询私有数据,而不需要额外创建一个通道。在这个通道上其他的参与者只会收到数据的哈希值。更多信息可以参考 在 Fabric 中使用私有数据 教程。注意,在本文档的“关键概念”章节也解释了 什么时候应该使用私有数据而不是通道 。 第三,作为 Fabric 使用私有数据来对于数据进行哈希的替代方案,客户端应用可以在调用链码之前将数据进行哈希或者加密。如果你将数据进行哈希运算的话,那么你需要提供一个方式来共享原始的数据。如果你将信息进行加密的话,那么你需要提供一个方式来共享解密秘钥。 第四,你可以通过在链码逻辑中增加访问控制的方式,将数据的访问权限限制在你的组织中的某些角色上。 第五,账本数据还可以通过在 Peer 节点上的文件系统加密的方式来进行加密,在数据在交换的过程中是通过 TLS 来进行加密的。 |
| 问题: | 排序节点能够看到交易数据吗? |
| 回答: | 不,排序节点仅仅对交易进行排序,他们不会打开交易。如果你不想让数据经过排序节点,那么应该使用 Fabric 的私有数据功能。或者,你可以在调用链码之前在客户端应用中对数据进行哈希运算或加密。如果你对数据进行加密的话,那么你需要提供一种方式来共享解密的秘钥。 |
应用程序端编程模型
| 问题: | 应用程序客户端如何知道一笔交易的结果? |
|---|---|
| 回答: | 模拟交易的结果会在提案响应中通过背书节点返回给客户端。如果有多个背书节点,那么客户端会检查所有的反馈是否一样,并且提交结果和背书来进行交易的排序和提交。最终提交节点将会验证这笔交易是否有效,并且客户端会通过 SDK 获取交易的最终结果。 |
| 问题: | 我应该如何查询账本的数据? |
| 回答: | 在链码中,你可以基于键来查询。键可以按照范围来查询,复合键还可以通过多参数的组合进行查询。比如可以用一个复合键(owner, asset_id)查询所有某个实体拥有的资产。这些基于键的查询可以用来对于账本进行只读查询,也可以在更新账本的交易中使用。 如果你将资产数据在链码中定义为 JSON 格式并且使用 CouchDB 作为状态数据库的话,你也可以在链码中使用 CouchDB JSON 查询语句来对链码的数据进行富查询。应用程序客户端可以进行只读查询,这些反馈通常不会作为交易的一部分被提交到排序服务。 |
| 问题: | 我应该如何查询历史数据来了解数据的来源? |
| 回答: | 链码 API |
| 问题: | 如何保证查询的结果是正确的,尤其是当被查询的 Peer 节点可能正在恢复并且在获取缺失的区块? |
| 回答: | 客户端可以查询多个 Peer 节点,比较他们的区块高度、查询结果,选择具有更高的区块高度的节点。 |
链码(智能合约和数字资产)
| 问题: | Hyperledger Fabric 支持智能合约吗? |
|---|---|
| 回答: | 是的。我们将这个功能称为链码。它是我们对于智能合约的实现,并且带有一些额外的功能。 链码是部署在网络上的程序代码,它会在共识过程中被链的验证者执行并验证。开发者可以使用链码来开发业务合约、资产定义以及共同管理的去中心化的应用。 |
| 问题: | 我如何创建一个业务合约? |
| 回答: | 通常有两种方式开发业务合约:第一种方式是将单独的合约编码到独立的链码实例中。第二种方式,也可能是更有效率的一种方式,是使用链码来创建去中心化的应用,来管理一个或者多个类型的业务合约的生命周期,并且让用户在这些应用中实例化这些合约的实例。 |
| 问题: | 我应该如何创建资产? |
| 回答: | 用户可以使用链码(对于业务规则)和成员服务(对于数字通证)来设计资产,以及管理这些资产的逻辑。 在大多区块链解决方案中由两种流行的方式来定义资产:无状态的 UTXO 模型,账户余额会被编码到过去的交易记录中;账户模型,账户的余额会被保存在账本的状态存储空间中。 每种方式都带有他们自己的好处及坏处。本区块链技术不主张任何一种方式。相反,我们的第一个需求就是确保两种方式都能够被轻松实现。 |
| 问题: | 支持哪些语言的链码开发? |
| 回答: | 链码能够使用任何的编程语言来编写并且在容器中执行。当前,支持 Golang、node.js 和 java 链码。 也可以使用 Hyperledger Composer 来构建 Hyperledger Fabric 应用。 |
| 问题: | Hyperledger 有原生的货币吗? |
| 回答: | 没有。然而,如果你的网络真的需要一个原生的货币的话,你可以通过链码来开发你自己的原生货币。对于原生货币的一个常用属性就是交易会引起余额的变动。 |
近期发布版本中的不同
| 问题: | 我在哪里能够看到在不同的发布版本中都有哪些变动? |
|---|---|
| 回答: | 发布版本中的变动记录在 版本发布 中。 |
| 问题: | 如果还要其他问题的话,我在哪里可以获得技术上的帮助? |
| 回答: | 请使用 StackOverflow 。 |
排序服务
| 问题: | 我有一个正在运行的排序服务,如果我想要转换共识算法,我该怎么做? |
|---|---|
| 回答: | 这个是不支持的。 |
| 问题: | 什么是排序节点系统通道? |
|---|
| 回答: | 排序节点系统通道(有时被称为排序服务系统通道)是排序节点初始化时被启动的通道。它被用来编排通道的创建。排序节点系统通道定义了联盟以及新通道的初始配置信息。在通道被创建的时候,在联盟中定义的组织、/Channel 组中的值和策略以及 /Channel/Orderer 组中的值和策略,会被合并到一起来形成一个新的初始的通道定义。 |
|---|
| 问题: | 如果我更新了我的应用程序通道,我是否需要更新我的排序系统通道? |
|---|---|
| 回答: | 一旦一个应用程序通道被创建,它的管理独立于其他任何的通道(包括排序节点系统通道)。基于所做的改动,变动可能需要也可能不需要被放置到其他的通道。一般来说,MSP 的变动应该被同步到所有的通道,而策略的变动一般是针对一个特定通道的。 |
| 问题: | 我可以有一个既作为一个排序节点又作为应用程序角色的组织吗? |
|---|---|
| 回答: | 尽管这是可能的,但是我们强烈不建议这样配置。默认的 /Channel/Orderer/BlockValidation 策略允许任何具有有效的证书的排序组织来为区块签名。如果一个组织既是排序节点又是应用程序的话,那么这个策略就应该被更新为只有被授权来排序的证书的子集才可以为区块签名。 |
| 问题: | 我想要实现一个针对于 Fabric 的共识,我应该如何开始? |
|---|---|
| 回答: | 一个共识的插件需要实现在 consensus包 中定义 Consenter 和 Chain 接口。有一个基于 raft 的插件。你可以学习更多的内容帮助你实现。排序服务的代码可以在 orderer包 中找到。 |
| 问题: | 我想要改变我的排序服务配置,比如批处理的超时时间,当我启动了网络之后,我该如何做? |
|---|---|
| 回答: | 这属于网络的配置。请参考 configtxlator 。 |
BFT
| 问题: | 什么时候会有 BFT 版本的排序服务? |
|---|---|
| 回答: | 目前还没有具体的时间。 We are working towards a release during the 2.x cycle, i.e. it will come with a minor version upgrade in Fabric. |
欢迎贡献!
我们欢迎以各种形式来为 Hyperledger 做贡献,这里有很多事可以做!
参与之前,请先回顾一下 行为准则 。保证文明合法是很重要的。
注解
如果你想贡献此文档,请查看 贡献者文档格式 。
贡献的方法
不管作为用户还是开发者,这里都有很多为 Hyperledger Fabric 做贡献的方法。
作为一个用户:
- 提出功能或改进的建议
- 报告错误
- 帮助测试在 发布路线 上即将发布的史诗(Epic)。通过 Jira 或者 RocketChat 联系分配到史诗的人。
作为一个作者或者文档编写者:
- 运用你在Fabric的经验更新文档,改进已存在的话题,创建新的话题。修改文档是开始成为贡献者的捷径, 让其它用户更好的理解Fabric,和增加您开源贡献历史的好方法。
- 参与一个您选择语言的翻译以保持Fabric文档的更新。Fabric文档支持许多种语言,英语、中文、 马拉雅拉姆语和巴西葡萄牙语–为什么不加入一个团队让你喜欢的文档保持最新的版本呢?你能 发现一个用户,作者和开发者协同合作的友好社区。
- 开始翻译Fabric文档还未支持的一门语言。中国团队、马拉雅姆团队、使用葡萄牙语的巴西团 队都是这样开始的,你也可以! 这需要更多工作,你需要建立一个作者社区,组织投稿;但是 真的很高兴见到Fabric文档支持您的语言。
跳转至`贡献文档`_开始你的旅途。
作为一个开发者:
- 如果你的时间不多,可以考虑选择一些 “help-wanted” (需要帮助的)任务,参考 修复问题和认领正在进行的故事 (Story)。
- 如果你是全职开发,可以提出一个新的特性(参考 提出功能或改进的建议 )并带领一个团队来实现它,或者加入已存在的史诗的团队。如果你在 发布路线 发现了一个你感兴趣的史诗,请及时通过 Jira 或者 RocketChat 联系分配到任务的人,和他们一起完成这个史诗。
获取 Linux Foundation 账号
为了参与到 Hyperledger Fabric 项目开发中来,你首先需要一个 Linux 基金会账号。然后你要使用你的 LF ID 来访问所有 Hyperledger 社区的工具,包括 Jira issue 管理, RocketChat, 和 Wiki (仅用于编辑)。
按照如下步骤创建 Linux 基金会账号,如果你没有的话。
- 前往 Linux Foundation ID 网站 。
- 在出现的表单中选择
I need to create a Linux Foundation ID。 - 等几分钟,然后查看带有如下主题的邮件:”Validate your Linux Foundation ID email”。
- 打开接收到的 URL 来验证你的邮箱地址。
- 确定你的浏览器显示了如下信息
You have successfully validated your e-mail address。 - 访问 Jira issue 管理,或 RocketChat。
贡献文档
将文档编写作为您的第一次变更是一个好主意。它很快也很容易,能帮助您检查机器是否配置正确(包括需预装的软件), 也能让您熟悉贡献的流程。下述主题能帮助您开始:
Making a documentation change
Audience: Anyone who would like to contribute to the Fabric documentation.
This short guide describes how the Fabric documentation is structured, built and published, as well as a few conventions one should be aware of before making changes to the Fabric documentation.
In this topic, we’re going to cover:
- An introduction to the documentation
- Repository structure
- Testing your changes
- Building the documentation locally
- Building the documentation on GitHub and ReadTheDocs
- Making a change to Commands Reference
- Adding a new CLI command
Introduction
The Fabric documentation is written in a combination of Markdown and reStructuredText, and as a new author you can use either or both. We recommend you use Markdown as an easy and powerful way to get started; though if you have a background in Python, you may prefer to use RST.
As part of the build process, the documentation source files are converted to
HTML using Sphinx, and published
here. There is a GitHub hook for the
main Fabric repository such that any
new or changed content in docs/source will trigger a new build and subsequent
publication of the doc.
Translations of the fabric documentation are available in different languages:
- Chinese documentation
- Malayalam documentation
- Brazilian Portuguese documentation – coming soon
These are each built from their language-specific repository in the Hyperledger Labs organization.
For example:
- Chinese language repository
- Malayalam language repository
- Brazilian Portuguese language repository – coming soon
Once a language repository is nearly complete, it can contribute to the main Fabric publication site. For example, the Chinese language docs are available on the main documentation site.
Repository structure
In each of these repositories, the Fabric docs are always kept under the /docs
top level folder.
(docs) bash-3.2$ ls -l docs
total 56
-rw-r--r-- 1 user staff 2107 4 Jun 09:42 Makefile
-rw-r--r-- 1 user staff 199 4 Jun 09:42 Pipfile
-rw-r--r-- 1 user staff 10924 4 Jun 09:42 Pipfile.lock
-rw-r--r--@ 1 user staff 288 4 Jun 14:50 README.md
drwxr-xr-x 4 user staff 128 4 Jun 10:10 build
drwxr-xr-x 3 user staff 96 4 Jun 09:42 custom_theme
-rw-r--r-- 1 user staff 283 4 Jun 09:42 requirements.txt
drwxr-xr-x 103 user staff 3296 4 Jun 12:32 source
drwxr-xr-x 18 user staff 576 4 Jun 09:42 wrappers
The files in this top level directory are largely configuration files for the
build process. All the documentation is contained within the /source folder:
(docs) bash-3.2$ ls -l docs/source
total 2576
-rw-r--r-- 1 user staff 20045 4 Jun 12:33 CONTRIBUTING.rst
-rw-r--r-- 1 user staff 1263 4 Jun 09:42 DCO1.1.txt
-rw-r--r-- 1 user staff 10559 4 Jun 09:42 Fabric-FAQ.rst
drwxr-xr-x 4 user staff 128 4 Jun 09:42 _static
drwxr-xr-x 4 user staff 128 4 Jun 09:42 _templates
-rw-r--r-- 1 user staff 10995 4 Jun 09:42 access_control.md
-rw-r--r-- 1 user staff 353 4 Jun 09:42 architecture.rst
-rw-r--r-- 1 user staff 11020 4 Jun 09:42 blockchain.rst
-rw-r--r-- 1 user staff 75552 4 Jun 09:42 build_network.rst
-rw-r--r-- 1 user staff 9115 4 Jun 09:42 capabilities_concept.md
-rw-r--r-- 1 user staff 2851 4 Jun 09:42 capability_requirements.rst
...
These files and directories map directly to the documentation structure you see
in the published docs.
Specifically, the table of contents has
index.rst
as its root file, which links every other file in /docs/source.
Spend some time navigating these directories and files to see how they are linked together.
To update the documentation, you simply change one or more of these files using git, build the change locally to check it’s OK, and then submit a Pull Request (PR) to the main Fabric repository. If the change is accepted by the maintainers, it will be merged into the main Fabric repository and become part of the documentation that is published. It really is that easy!
You can learn how to make a PR here, but before you do that, read on to see how to build your change locally first. Moreover, if you are new to git and GitHub, you will find the Git book invaluable.
Testing your changes
You are strongly encouraged to test your changes to the documentation before you submit a PR. You should start by building the docs on your own machine, and subsequently push your changes to your own GitHub staging repo where they can populate your ReadTheDocs publication website. Once you are happy with your change, you can submit it via a PR for inclusion in the main Fabric repository.
The following sections cover first how to build the docs locally, and then use your own Github fork to publish on ReadTheDocs.
Building locally
Once you’ve cloned the Fabric repository to your local machine, use these quick steps to build the Fabric documentation on your local machine. Note: you may need to adjust depending on your OS.
Prereqs:
cd fabric/docs
pipenv install
pipenv shell
make html
This will generate all Fabric documentation html files in docs/build/html
which you can then start browsing locally using your browser; simply navigate to
the index.html file.
Make a small change to a file, and rebuild the documentation to verify that your
change was built locally. Every time you make a change to the documentation you
will of course need to rerun make html.
In addition, if you’d like, you may also run a local web server with the following commands (or equivalent depending on your OS):
sudo apt-get install apache2
cd build/html
sudo cp -r * /var/www/html/
You can then access the html files at http://localhost/index.html.
Building on GitHub
It can often be helpful to use your fork of the Fabric repository to build the Fabric documentation in a public site, available to others. The following instructions show you how to use ReadTheDocs to do this.
- Go to http://readthedocs.org and sign up for an account.
- Create a project. Your username will preface the URL and you may want to
append
-fabricto ensure that you can distinguish between this and other docs that you need to create for other projects. So for example:YOURGITHUBID-fabric.readthedocs.io/en/latest. - Click
Admin, clickIntegrations, clickAdd integration, chooseGitHub incoming webhook, then clickAdd integration. - Fork Fabric on GitHub.
- From your fork, go to
Settingsin the upper right portion of the screen. - Click
Webhooks. - Click
Add webhook. - Add the ReadTheDocs’s URL into
Payload URL. - Choose
Let me select individual events:Pushes、Branch or tag creation、Branch or tag deletion. - Click
Add webhook.
Now anytime you modify or add documentation content to your fork, this URL will automatically get updated with your changes!
Commands Reference updates
Updating content in the Commands Reference topic requires additional steps. Because the information in the Commands Reference topic is generated content, you cannot simply update the associated markdown files.
- Instead you need to update the
_preamble.mdor_postscript.mdfiles undersrc/github.com/hyperledger/fabric/docs/wrappersfor the command. - To update the command help text, you need to edit the associated
.gofile for the command that is located under/fabric/internal/peer. - Then, from the
fabricfolder, you need to run the commandmake help-docswhich generates the updated markdown files underdocs/source/commands.
Remember that when you push the changes to GitHub, you need to include the
_preamble.md, _postscript.md or _.go file that was modified as well as the
generated markdown file.
This process only applies to English language translations. Command Reference translation is currently not possible in international languages.
Adding a new CLI command
To add a new CLI command, perform the following steps:
- Create a new folder under
/fabric/internal/peerfor the new command and the associated help text. Seeinternal/peer/versionfor a simple example to get started. - Add a section for your CLI command in
src/github.com/hyperledger/fabric/scripts/generateHelpDoc.sh. - Create two new files under
/src/github.com/hyperledger/fabric/docs/wrapperswith the associated content:<command>_preamble.md(Command name and syntax)<command>_postscript.md(Example usage)
- Run
make help-docsto generate the markdown content and push all of the changed files to GitHub.
This process only applies to English language translations. CLI command translation is currently not possible in international languages.
International languages
Audience: Anyone who would like to contribute to the Fabric documentation in a language other than English.
This short guide describes how you can make a change to one of the many languages that Fabric supports. If you’re just getting started, this guide will show you how to join an existing language translation workgroup, or how to start a new workgroup if your chosen language is not available.
In this topic, we’re going to cover:
- An introduction to Fabric language support
- How to join an existing language workgroup
- How to starting a new language workgroup
- Getting connected to other language contributors
Introduction
The main Fabric repository is located
in GitHub under the Hyperledger organization. It contains an English translation
of the documentation in the /docs/source folder. When built, the files in this
folder result contribute to the in the documentation
website.
This website has other language translations available, such as Chinese. However, these languages are built from specific language repositories hosted in the HL Labs organization. For example, the Chinese language documentation is stored in this repository.
Language repositories have a cut-down structure; they just contain documentation related folders and files:
(base) user/git/fabric-docs-ml ls -l
total 48
-rw-r--r-- 1 user staff 11357 14 May 10:47 LICENSE
-rw-r--r-- 1 user staff 3228 14 May 17:01 README.md
drwxr-xr-x 12 user staff 384 15 May 07:40 docs
Because this structure is a subset of the main Fabric repo, you can use the same tools and processes to contribute to any language translation; you simply work against the appropriate repository.
Joining a workgroup
While the default Hyperledger Fabric language is English, as we’ve seen, other translations are available. The Chinese language documentation is well progressed, and other languages such as Brazilian Portuguese and Malayalam are in progress.
You can find a list of all current international language groups in the Hyperledger wiki. These groups have lists of active members that you can connect with. They hold regular meetings that you are welcome to join.
Feel free to follow these instructions to contribute a documentation change to any of the language repositories. Here’s a list of current language repositories:
- English
- Chinese
- Malayalam
- Brazilian Portuguese – coming soon.
Starting a workgroup
If your chosen language is not available, then why not start a new language translation? It’s relatively easy to get going. A workgroup can help you organize and share the work to translate, maintain, and manage a language repository. Working with other contributors and maintainers on a language translation can be a very satisfying activity for you and other Fabric users.
Follow these instructions to create your own language repository. Our instructions will use the Sanskrit language as an example:
Identify the ISO 639-1 two letter international language code for your language. Sanskrit has the two letter code
sa.Clone the main Fabric repository to your local machine, renaming the repository during the clone:
git clone git@github.com:hyperledger/fabric.git fabric-docs-sa
Select the Fabric version you are going to use as a baseline. We recommend that you start with at least Fabric 2.1, and ideally a Long Term Support version such as 2.2. You can add other releases later.
cd fabric-docs-sa git fetch origin git checkout release-2.1Remove all folders from the root directory except
/doc. Likewise, remove all files (including hidden ones) exceptLICENCEandREADME.md, so that you are left with the following:ls -l total 40 -rw-r--r-- 1 user staff 11358 5 Jun 14:38 LICENSE -rw-r--r-- 1 user staff 4822 5 Jun 15:09 README.md drwxr-xr-x 11 user staff 352 5 Jun 14:38 docs
Update the
README.mdfile to using this one as an example.Customize the
README.mdfile for your new language.Add a
.readthedocs.ymlfile like this one to the top level folder. This file is configured to disable ReadTheDocs PDF builds which may fail if you use non-latin character sets. Your top level repository folder will now look like this:(base) anthonyodowd/git/fabric-docs-sa ls -al total 96 ... -rw-r--r-- 1 anthonyodowd staff 574 5 Jun 15:49 .readthedocs.yml -rw-r--r-- 1 anthonyodowd staff 11358 5 Jun 14:38 LICENSE -rw-r--r-- 1 anthonyodowd staff 4822 5 Jun 15:09 README.md drwxr-xr-x 11 anthonyodowd staff 352 5 Jun 14:38 docs
Commit these changes locally to your local repository:
git add . git commit -s -m "Initial commit"Create a new repository on your GitHub account called
fabric-docs-sa. In the description field typeHyperledger Fabric documentation in Sanskrit language.Update your local git
originto point to this repository, replacingYOURGITHUBIDwith your GitHub ID:git remote set-url origin git@github.com:YOURGITHUBID/fabric-docs-sa.git
At this stage in the process, an
upstreamcannot be set because thefabric-docs-sarepository hasn’t yet been created in the HL Labs organization; we’ll do this a little later.For now, confirm that the
originis set:git remote -v origin git@github.com:ODOWDAIBM/fabric-docs-sa.git (fetch) origin git@github.com:ODOWDAIBM/fabric-docs-sa.git (push)
Push your
release-2.1branch to be themasterbranch in this repository:git push origin release-2.1:master Enumerating objects: 6, done. Counting objects: 100% (6/6), done. Delta compression using up to 8 threads Compressing objects: 100% (4/4), done. Writing objects: 100% (4/4), 1.72 KiB | 1.72 MiB/s, done. Total 4 (delta 1), reused 0 (delta 0) remote: Resolving deltas: 100% (1/1), completed with 1 local object. To github.com:ODOWDAIBM/fabric-docs-sa.git b3b9389be..7d627aeb0 release-2.1 -> master
Verify that your new repository
fabric-docs-sais correctly populated on GitHub under themasterbranch.Connect your repository to ReadTheDocs using these instructions. Verify that your documentation builds correctly.
You can now perform translation updates in
fabric-docs-sa.We recommend that you translate at least the Fabric front page and Introduction before proceeding. This way, users will be clear on your intention to translate the Fabric documentation, which will help you gain contributors. More on this later.
When you are happy with your repository, create a request to make an equivalent repository in the Hyperledger Labs organization, following these instructions.
Here’s an example PR to show you the process at work.
Once your repository has been approved, you can now add an
upstream:git remote add upstream git@github.com:hyperledger-labs/fabric-docs-sa.git
Confirm that your
originandupstreamremotes are now set:git remote -v origin git@github.com:ODOWDAIBM/fabric-docs-sa.git (fetch) origin git@github.com:ODOWDAIBM/fabric-docs-sa.git (push) upstream git@github.com:hyperledger-labs/fabric-docs-sa.git (fetch) upstream git@github.com:hyperledger-labs/fabric-docs-sa.git (push)
Congratulations! You’re now ready to build a community of contributors for your newly-created international language repository.
Get connected
Here’s a few ways to connected with other people interested in international language translations:
Rocket chat
Read the conversation or ask a question on the Fabric documentation rocket channel. You’ll find beginners and experts sharing information on the documentation.
There also a dedicated channel for issues specific to internationalization.
Join a documentation workgroup call
A great place to meet people working on documentation is on a workgroup call. These are held regularly at a time convenient for both the Easten and Western hemispheres. The agenda is published in advance, and there are minutes and recordings of each session. Find out more.
Join a language translation workgroup
Each of the international languages has a workgroup that welcome and encouraged to join. View the list of international workgroups. See what your favourite workgroup is doing, and get connected with them; each workgroup has a list of members and their contact information.
Create a language translation workgroup page
If you’ve decided to create a new language translation, then add a new workgroup to the list of internationl workgroups, using one of the existing workgroup pages as an exemplar.
It’s worth documentating how your workgroup will collaborate; meetings, chat and mailing lists can all be very effective. Making these mechanisms clear on your workgroup page can help build a community of translators.
- Use one of the many other Fabric mechanisms such as mailing list, contributor meetings, maintainer meetings. Read more here.
Good luck and thank you for contributing to Hyperledger Fabric.
贡献者文档格式
受众: 文档作者和编辑
虽然此样式指南还将参考使用ReStructured Text(也称为RST)的最佳实践,但总体而言,我们建议使用Markdown编写文档,因为这是一种更普遍被接受的文档标准。但是,这两种格式都是可用的,如果您决定在RST中编写主题(或者正在编辑RST主题),请务必参考本样式指南。
如果有疑问,请使用文档本身来指导如何修改内容格式
如果您只想查看内容的格式,可以通过单击页面右上角的Edit on Github链接导航到Fabric repo查看原始文件。然后单击Raw选项卡。这将显示文档的格式。不要试图在Github上编辑文件。如果要进行更改,请克隆仓库并按照[贡献](./CONTRIBUTING.html)来创建PR。
措辞
避免使用 “白名单(whitelist)”, “黑名单(blacklist)”, “主(master)”, or “从(slave)”.
除非使用这些词是绝对必要的(例如,在引用使用它们的代码部分时),否则不要使用这些词。要么更加明确(例如,描述“白名单”的实际作用),要么找到替代词,如“allowlist”或“blocklist”。
教程的顶部应该有一个步骤列表。
教程开头的步骤列表(带有指向相应部分的链接)可以帮助用户找到他们感兴趣的特定步骤。例如,查看在Fabric上使用私有数据。
“Fabric”, “Hyperledger Fabric” 还是 “HLF”?
优先使用“Hyperledger Fabric”,次选“Fabric”。不要使用HLF且不要单独使用Hyperledger。
Chaincode vs. Chaincodes?
单独一个链码是 “chaincode”. 如果你想谈论多个链码, 使用 “chaincodes”.
Smart contracts(智能合约)?
通俗地说,智能合约被视为等同于链码,但在技术层面上,更正确的说法是“Smart contract(智能合约)”是链码内部的业务逻辑,它包含更大的封装和实现。
JSON vs .json?
使用 “JSON”。 其它文件格式同理 (例如, YAML)。
curl vs cURL.
那个工具叫 “cURL”. 而那条命令是 “curl”。
Fabric CA.
不要叫它 “fabric-CA”, “fabricCA”, 或 FabricCA。 它应该是 Fabric CA。 然而 Fabric CA 二进制客户端可以被成为 fabric-ca-client。
Raft and RAFT.
“Raft” 不是首字母缩写。 不要叫它 “RAFT ordering service”。
提及读者.
最好使用 “你” 或者 “我们”. 避免使用 “我”.
和号 (&).
不能代替“和”这个词。除非您有理由使用它(例如在包含它的代码片段中),否则请避免使用它们。
缩写.
首字母缩略词的第一个用法应该详细说明,除非它是一个使用广泛的首字母缩略词,否则不要这么使用。例如,第一次使用“软件开发工具包(SDK)”。然后使用“SDK”。
尽量不要使用一个词过于频繁
如果你能避免一个词在一个句子中重复使用,请尽量这样做。在一个段落中不要使用一个词两次以上更好。当然,有时可能无法避免这一点——一份关于正在使用的状态数据库的文档可能会充满“数据库”或“账本”一词。但是过度使用任何一个词都会让读者感觉麻木。
文件如何命名?
在单词之间使用下划线。另外,教程也应该这样命名。例如,identity_use_case_tutorial.md. 虽然并非所有文件都使用此标准,但新文件应遵守该标准。
格式和标点符号
列长.
如果您查看文档的原始版本,您将看到许多主题符合大约70个字符的行长度。这个规则不再是必需遵守的了,所以您愿意写多长都可以。
何时加粗?
别太常用就行。最好的用法是作为一个总结,或者作为一种方式,提醒读者注意你想谈论的概念。“区块链网络包含一个账本、至少一个链码和Peers”,尤其是如果你要在那一段中谈论这些事情。避免仅仅为了强调一个词而使用它们,比如“区块链网络必须使用适当的安全协议”。
什么时候把文字框起来 nnn?
这有助于提醒人们注意那些在纯英语中没有意义的单词,或者在引用部分代码时(尤其是在文档中放了代码片段的情况下)。例如,当谈到fabric samples目录时,用back tics(~键下面那个符号)包围fabric samples。代码函数一样hf.Revoke. 如果您在代码上下文中引用的话,将那些在纯英语中有意义的单词放回原处也可能是有意义的。例如,当使用attribute作为访问控制列表的一部分时。
使用破折号是否合适?
破折号可能非常有用,但在技术层面上不一定合适于分割陈述句。让我们来看看这个例句:
这给我们留下了一个精简的JSON对象--- config.json,位于first network内的fabric samples文件夹中---它将作为配置更新的基线。
有很多方法可以表示相同的信息,但在这种情况下,破折号会将信息分解,同时将其作为同一句话的一部分。如果使用破折号,请确保使用“em”破折号,它比连字符长三倍。这些破折号前后应该有一个空格。
何时使用连字符?
连字符通常用作“复合形容词”的一部分。例如,“喷气式-汽车(jet-powered car)”。注意复合形容词必须紧跟在被修饰名词之前。换句话说,“jet powered”本身不需要连字符。如果有疑问,可以使用Google,因为复合形容词很棘手,而且是语法论坛上的热门讨论。
(译者注:这里说的是英文拼写规则,选择性遵守)
句号后有多少空格?
一个
数字应该如何呈现?
数字0到9应该由文字表示。一、二、三、四等。10后的数字表示为数字。
例外情况是来自代码的用法。在这种情况下,使用代码中的任何内容。还有Org1之类的例子。别把它写成OrgOne。 (译者注:这里说的是英文拼写规则,选择性遵守)
文档标题大小写规则
应遵循句子大写的标准规则。换句话说,除非一个词是标题中的第一个词或专有名词,否则不要将其首字母大写。例如,”Understanding Identities in Fabric”(“理解Fabric中的身份”)应该是”Understanding identities in Fabric”。虽然并不是每个文档都遵循这个标准,但它是我们正在转向的标准,对于新的主题应该遵循这个标准。
主题内的标题应遵循相同的标准。
(译者注:这里说的是英文规则,中文语境下选择性遵守)
用牛津逗号?
是的,它更好
经典例子是, “我想感谢我的父母,安·兰德和上帝(I’d like to thank my parents, Ayn Rand and God)”, 更应该写成: “我想感谢我的父母,安·兰德,和上帝(I’d like to thank my parents, Ayn Rand, and God)”
标题.
这些应该是斜体字,这是我们文档中斜体字唯一真正有效的用法。
计算机命令.
通常,将每个计算机命令放在自己的代码段中。它读起来更好,尤其是当命令很长的时候。除了解释一大串环境变量的时候。
代码段.
在Markdown中,如果要发布示例代码,请使用三个back tics来分隔代码段。例如:
Code goes here.
Even more code goes here.
And still more.
在RST中,您需要使用类似于以下格式的格式设置代码段:
.. code:: bash
Code goes here.
在适当的情况下,可以用bash代替Java或Go之类的语言。
markdown中的列表枚举
注意,在Markdown中,如果用空格分隔数字,则列表枚举将不起作用。Markdown认为这是一个新列表的开始,而不是旧列表的延续(每个数字都是1.)。如果需要枚举列表,则必须使用RST。Markdwon中子标题最好使用无序列表,并且被推荐作为列表标记。
链接.
当链接到另一个文档时,使用相对链接,而不是直接链接。当命名一个链接时,不要只称它为“链接”。使用更具创造性和描述性的名称。出于可访问性的原因,链接名称还应清楚地表明它是一个链接。
所有文档都必须以许可证声明结尾。
在RST应该用:
.. Licensed under Creative Commons Attribution 4.0 International License
https://creativecommons.org/licenses/by/4.0/
在markdown中:
<!--- Licensed under Creative Commons Attribution 4.0 International License
https://creativecommons.org/licenses/by/4.0/ -->
缩进有多少空格?
这将取决于用途。通常需要缩进两个空格,尤其是在RST中,尤其是在代码块中。在一个RTD的.. note::中,您必须缩进到注释后冒号后面的空格,如下所示:
.. note:: Some words and stuff etc etc etc (line continues until the 70 character limit line)
the line directly below has to start at the same space as the one above.
何时使用哪种类型的标题。
在RST应该用:
Chapter 1 Title
===============
Section 1.1 Title
-----------------
Subsection 1.1.1 Title
~~~~~~~~~~~~~~~~~~~~~~
Section 1.2 Title
-----------------
请注意,标题下的内容长度必须与标题本身的长度相同。这在Atom中不是问题,Atom默认情况下为每个字符指定相同的宽度(这称为“monospacing”,如果您遇到问题的话!)需要这些信息。
在markdown中更简单,你可以这么用:
# The Name of the Doc (this will get pulled for the TOC).
## First subsection
## Second subsection
两种文件都不太支持不合规则的排序格式。例如,你想用####作为#标题后的第一行。Markdown不支持这样做。同样的,RTS将会默认将以你给定的格式排序(它会出现在你文档的第一行)。
应尽可能使用相对链接。
对于RST,建议遵循的语法是:
:doc:`anchor text <relativepath>`
不要将.rst后缀放在文件路径的末尾。
对于Markdown,建议遵循的语法是:
[anchor text](<relativepath>)
对于其他文件(如文本或YAML文件),请使用指向中的文件的直接链接,以github为例:
https://github.com/hyperledger/fabric/blob/master/docs/README.md
遗憾的是,在浏览RST文件时,github上的相对链接不起作用。
项目治理
正如我们的 章程 中所说,Hyperledger Fabric 是在一个开放治理的模型下管理的。项目和子项目由维护者主导。新的子项目可以指定一组初始的维护人员,这些维护人员将在项目首次批准时由顶级项目的现有维护人员批准。
成为一名维护者
项目的维护者会时不时地根据以下标准来考虑添加或者删除维护者:
- 提供(足质足量的)PR记录
- 在项目中表现出足够的领导能力
- 展现出引导项目工作和贡献者的能力
现有的维护者可以提交变更到 维护者 文件中。一个提名的维护者可以由大多数现有的维护者批准通过成为正式的维护者。一旦批准通过,变更就会被合并同时该维护者也会被添加到维护者组中。
维护者可能会因为明确的辞职、长时间的不活动(超过3个月或者更长的时间),或者因为违反相关的 行为准则 或持续表现出糟糕的判断而被移出维护者的队列。移除维护者的提案也需要大多数人同意。在恢复贡献和评审(一个月或更长时间)之后,应恢复因不活动而被移除的维护人员。
发布节奏
Fabric 的维护者已经确定了每个季度大致的发布节奏(请参考 发布说明)。我们会不定时创建稳定的 LTS(long term support,长期支持版本)release 分支,同时 master 分支会持续增加新的特性。我们会在 RocketChat 的 #fabric-release 频道讨论这些内容。
提出功能或改进的建议
首先,请查看 JIRA 确保之前没有开启或者关闭的相同功能的提案。如果没有,为了开启一个提案,我们建议创建一个 Jira 的史诗(Epic)或者故事(Story),选择一个最合适的环境,并附上一个链接或者内嵌一个提案的页面,说明这个特性是做什么的,如果可能的话,描述一下它应该如何实现。这有助于说明为什么应该添加这个特性,例如确定需要该特性的特定用例,以及如果实现该特性的好处。一旦 Jira 的 issue 被创建了,并且描述中添加了附加的或者内嵌的页面或者一个公开的可访问的文档链接,就可以向 fabric@lists.hyperledger.org 邮件列表发送介绍性的电子邮件,邮件中附上 Jira issue 的链接,并等待反馈。
对建议性的特性的讨论应该在 JIRA issue 本身中进行,这样我们就可以在社区中有一个统一的方式来找到这个设计的讨论。
获得3个或者更多的维护者对新特性的支持将会大大提高该特性相关的变更申请被合并到下一次发布的可能性。
维护者会议
维护者会定期举行维护者会议。会议的目的是计划和审核发布进程,以及讨论项目和子项目的技术和维护方向。
维护者会议详情请查看 wiki 。
如上所述新特性或增强的建议应该在维护者的会议上进行探讨、反馈和接受。
交流
我们使用 RocketChat 来进行交流或者使用 Google Hangouts™ 进行屏幕分享。我们的开发计划和优先级在 JIRA 上进行发布,同时我们也花大量的时间在 mailing list 上进行讨论才做决定。
贡献指南
安装准备
在我们开始之前,如果你还没有这样做那你可能需要检查一下您是否已经在将要开发区块链应用或者运行 Hyperledger Fabric 的平台上安装了运行所需的环境。
获得帮助
如果你试图寻找一种途径来寻找专家援助或者解决一些问题,我们的 社区 会为您提供帮助。我们在 Chat ,IRC(#hyperledger on freenode.net)以及 mailing lists 中都可以找到。我们大多数人都很乐意提供帮助。唯一愚蠢的是你不去问。问题实际上是帮助改进项目很好的方法,因为它们使我们的文档更加清晰。
报告错误
如果你是一个用户,并且发现了错误,请使用 JIRA 来提交问题。在您创建新的 JIRA 问题之前,请尝试搜索是否有人已经提过类似的问题,确保之前没有人报告过。如果之前有人报告过,那么你可以添加评论表明你也期望这个问题被修复。
注解
如果缺陷与安全相关,请遵循 Hyperledger 安全问题处理流程 。
如果以前没有报告过,你可以提交一个 PR 并在提交信息里描述问题和修复措施,或者你也可以创建一个新的 JIRA。请尝试为其他人提供足够多的信息以重现该问题。该项目的维护人员会在24小时之内回复您的问题。如果没有,请通过评论提出问题,并要求对其进行评审。您还可以在 Hyperledger Chat 中将问题发布到相关的 Hyperledger Fabric 频道中。比如,可以将文档问题在 #fabric-documentation 中进行广播,数据存储问题可以在 #fabric-ledger 中广播,以此类推。
提交你的修复
如果你在 JIRA 上提交了你发现的问题,并希望修复它,我们很乐意并且非常欢迎。请将 JIRA 问题分配给自己,然后您可以提交 PR。详细流程请参考 GitHub Contributions。
修复问题和认领正在进行的故事
查看 问题列表 找到你感兴趣的内容。您也可以从 “求助” 列表中寻找。明智的做法是从相对直接和可实现的任务开始,并且这个任务是未被分配的。如果没有分配给别人,请将问题分配给自己。如果你无法在合理的时间内完成,请加以考虑并且取消认领,如果你需要更多的时间,请添加评论加以说明,你正在积极处理问题。
审核提交的 PR
另一种贡献和了解 Hyperledger Fabric 的方法是帮助维护人员审查开放的 PR。实际上维护者的工作很辛苦,他们需要审查所有正在提交的 PR 并且评估他们是否应该被合并。您可以查看代码或者修改文档,测试更改的内容,并告知提交者和维护者您的想法。完成审核或测试后,只需要添加评论和投票,即可完成回复 PR。评论“我在系统 X 上尝试过这个 PR,是正确的”或者“我在系统 X 上运行这个 PR 发现了一些错误”将帮助维护者进行评估。因此,维护人员也能够更快地处理 PR,并且每个人都能从中获益。
从浏览 GitHub 上开放的 PR 开始你的贡献。
PR 过期
随着 Fabric 项目的壮大,开放的 PR 积压也开始增多。几乎所有项目都面临的一个问题是如何高效的管理积压,Fabric 也不例外。为了便于 Fabric 相关项目积压的 PR 的管理,我们将介绍由机器人(bots)程序强制执行的过期策略。这和其他大型项目管理他们的 PR 积压是一样的。
PR 过期策略
Fabric 项目管理员将自动监控所有拖延着的活动的 PR。如果一个 PR 两周没有更新,就会为该 PR 增加一条表示提醒的评论,要求更新 PR 以完成任何未完成的评论,或者在放弃撤销 PR。如果拖延的 PR 继续两周没有更新,它就会被自动取消。如果一个 PR 从最初提交起已经超过两个月了,尽管还是活跃状态,它也将被标记为供维护者审核。
如果一个提交的 PR 通过了所有的检查但是超过 72 小时(3天)还没有被审核,它将会每天被推送到 #fabric-pr-review 频道,直到收到一个审核评论。
该策略适用于所有 Fabric 官方项目(fabric、fabric-ca、fabric-samples、fabric-test、fabric-sdk-node、fabric-sdk-java、fabric-gateway-java、fabric-chaincode-node、fabric-chaincode-java、fabric-chaincode-evm、fabric-baseimage 和 fabric-amcl)。
什么是好的 PR?
- 一次只包含一个变更。不是5个,3个,或者10个。仅仅一个变更。为什么呢?因为它限定了问题的范围。如果我们有一个回归,相对影响了很多代码的复杂更改,我们更容易识别错误的提交。
- 在 JIRA 的故事中包含一个链接。为什么?因为 a)我们希望追踪你的进度以便更好地判断我们可以传递什么信息。 b) 因为我们可以证明这次变更是有效的。在很多情况下,会有很多围绕提交变更的讨论,我们希望将它链接到它的本身。
- 每次变更都包含单元或者集成测试(或者对已有测试的修改)。不仅仅是正确的测试。同样也要包括一些异常测试来捕获错误。在你写代码的时候,你有责任去测试它并且证明你的变更是正确的。为什么呢?因为没有这些,我们无法知道你的代码是否真的正确地工作。
- 单元测试不要有额外的依赖。你应该使用
go test或者等价的语言测试方式来运行单元测试。任何需要额外依赖的测试(例如需要用脚本来运行另一个组件)需要适当的 mocking。任何除了单元测试以外的测试根据定义都是集成测试。为什么?因为很多开源软件开发者都实用测试驱动的开发方式。他们关注一个目录下的测试用例,一旦代码变更了他们采用测试去判断他们的代码是否正确。相比当代码变更后运行整个项目来说,这是非常高效的。请参考 单元测试的定义 在脑海中建立单元测试的标准,以此来写出高效的单元测试。 - 最小化每个 PR 的代码行数。为什么?因为维护者每天同样也有工作。如果你发送1000或者2000行代码,你认为维护者需要多久才能审查完你的代码?尽可能地保证你的变更在200-300行左右。如果你有一个比较大的变更,可以将它分解为比较小的几个独立的变更。如果要添加一组新功能来满足一个需求,请在测试中分别添加它们,然后编写满足需求的代码。当然,总会有意外。如果你增加一些小变动然后添加了300行测试,你将会被宽恕;-)如果你需要做一个变更,而且影响比较广或者生成了很多代码(protobufs 等)。同样,也是个例外。
注解
大的 PR,例如那些大于300行的 CR 将有可能不会通过,并且你可能被要求重构以符合本指南。
- 写一个有意义的提交信息。包括55个或者更少字符的标题,后面跟一行空行,然后跟上更全面的关于变更的描述。每个变更必须包括对应的变更的 JIRA 编号(例如[FAB-1234])。这个可以在标题中,但是同样需要包括在消息正文中。
注解
示例提交信息:
[FAB-1234] fix foobar() panic
Fix [FAB-1234] added a check to ensure that when foobar(foo string)
is called, that there is a non-empty string argument.
最后,要有回应。不要让一个 PR 因为评审意见而不了了之,这样会导致它需要进行 rebase。这只会进一步延迟合并,给你带来更多的工作,比如修复合并冲突。
法律材料
Note: 每一个源文件必须包括 Apache Software License 2.0。可以参考 license header.
我们尽可能努力让贡献变得简单。这个协议为我们提供了贡献相关的法律相关的知识。我们使用和 Linux® Kernel 社区 一样的管理贡献的方法 Developer’s Certificate of Origin 1.1 (DCO) 来管理 Hyperledger Fabric。
我们只要求在提交要审查的补丁时,开发者在 commit 消息中带上他们的离线签名即可。
这里是一个离线签名的签名例子,表示提交者接受 DCO 约定:
Signed-off-by: John Doe <john.doe@example.com>
你可以使用 git commit -s 在提交的时候自动带上你的签名。
相关主题
Using Jira to understand current work items
This document has been created to give further insight into the work in progress towards the Hyperledger Fabric v1 architecture based on the community roadmap. The requirements for the roadmap are being tracked in Jira.
It was determined to organize in sprints to better track and show a prioritized order of items to be implemented based on feedback received. We’ve done this via boards. To see these boards and the priorities click on Boards -> Manage Boards:
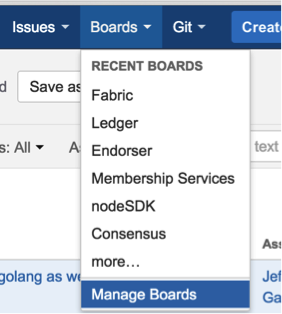
Jira boards
Now on the left side of the screen click on All boards:

Jira boards
On this page you will see all the public (and restricted) boards that have been created. If you want to see the items with current sprint focus, click on the boards where the column labeled Visibility is All Users and the column Board type is labeled Scrum. For example the Board Name Consensus:

Jira boards
When you click on Consensus under Board name you will be directed to a page that contains the following columns:

Jira boards
The meanings to these columns are as follows:
- Backlog – list of items slated for the current sprint (sprints are defined in 2 week iterations), but are not currently in progress
- In progress – items currently being worked by someone in the community.
- In Review – items waiting to be reviewed and merged in GitHub
- Done – items merged and complete in the sprint.
If you want to see all items in the backlog for a given feature set, click on the stacked rows on the left navigation of the screen:

Jira boards
This shows you items slated for the current sprint at the top, and all items in the backlog at the bottom. Items are listed in priority order.
If there is an item you are interested in working on, want more information or have questions, or if there is an item that you feel needs to be in higher priority, please add comments directly to the Jira item. All feedback and help is very much appreciated.
Setting up the development environment
Prerequisites
- Git client, Go, and Docker as described at 准备阶段
- (macOS) Xcode must be installed
- (macOS) you may need to install gnutar, as macOS comes with bsdtar as the default, but the build uses some gnutar flags. You can use Homebrew to install it as follows:
- Git client
- Go version 1.14.x
- Docker version 18.03 or later
- (macOS) Xcode Command Line Tools
- SoftHSM
- jq
brew install gnu-tar
Steps
- (macOS) If you install gnutar, you should prepend the “gnubin” directory to the $PATH environment variable with something like:
Install the Prerequisites
For macOS, we recommend using Homebrew to manage the development prereqs. The Xcode command line tools will be installed as part of the Homebrew installation.
export PATH=/usr/local/opt/gnu-tar/libexec/gnubin:$PATH
Once Homebrew is ready, installing the necessary prerequisites is very easy:
- (macOS) Libtool. You can use Homebrew to install it as follows:
::
brew install git go jq softhsm brew cask install –appdir=”/Applications” docker
brew install libtool
Docker Desktop must be launched to complete the installation so be sure to open the application after installing it:
- (only if using Vagrant) - Vagrant - 1.9 or later
- (only if using Vagrant) - VirtualBox - 5.0 or later
- BIOS Enabled Virtualization - Varies based on hardware
- Note: The BIOS Enabled Virtualization may be within the CPU or
Security settings of the BIOS
open /Applications/Docker.app
Developing on Windows
Steps
On Windows 10 you should use the native Docker distribution and you
may use the Windows PowerShell. However, for the binaries
command to succeed you will still need to have the uname command
available. You can get it as part of Git but beware that only the
64bit version is supported.
Set your GOPATH
Before running any git clone commands, run the following commands:
Make sure you have properly setup your Host’s GOPATH environment variable. This allows for both building within the Host and the VM.
In case you installed Go into a different location from the standard one your Go distribution assumes, make sure that you also set GOROOT environment variable.
git config –global core.autocrlf false git config –global core.longpaths true
Note to Windows users
You can check the setting of these parameters with the following commands:
If you are running Windows, before running any git clone commands,
run the following command.
::
git config –get core.autocrlf git config –get core.longpaths
git config –get core.autocrlf
These need to be false and true respectively.
If core.autocrlf is set to true, you must set it to false by
running
The curl command that comes with Git and Docker Toolbox is old and
does not handle properly the redirect used in
入门. Make sure you have and use a newer version
which can be downloaded from the cURL downloads page
Clone the Hyperledger Fabric source
git config –global core.autocrlf false
First navigate to https://github.com/hyperledger/fabric and fork the fabric repository using the fork button in the top-right corner. After forking, clone the repository.
If you continue with core.autocrlf set to true, the
vagrant up command will fail with the error:
``./setup.sh: /bin/bash^M: bad interpreter: No such file or directory``
mkdir -p github.com/<your_github_userid> cd github.com/<your_github_userid> git clone https://github.com/<your_github_userid>/fabric
Cloning the Hyperledger Fabric source
注解
If you are running Windows, before cloning the repository, run the following command:
First navigate to https://github.com/hyperledger/fabric and fork the fabric repository using the fork button in the top-right corner
Since Hyperledger Fabric is written in Go, you’ll need to
clone the forked repository to your $GOPATH/src directory. If your $GOPATH
has multiple path components, then you will want to use the first one.
There’s a little bit of setup needed:
git config –get core.autocrlf
If ``core.autocrlf`` is set to ``true``, you must set it to ``false`` by
running:
cd $GOPATH/src
mkdir -p github.com/<your_github_userid>
cd github.com/<your_github_userid>
git clone https://github.com/<your_github_userid>/fabric
::
git config --global core.autocrlf false
Configure SoftHSM
A PKCS #11 cryptographic token implementation is required to run the unit tests. The PKCS #11 API is used by the bccsp component of Fabric to interact with hardware security modules (HSMs) that store cryptographic information and perform cryptographic computations. For test environments, SoftHSM can be used to satisfy this requirement.
SoftHSM generally requires additional configuration before it can be used. For example, the default configuration will attempt to store token data in a system directory that unprivileged users are unable to write to.
SoftHSM configuration typically involves copying /etc/softhsm2.conf to
$HOME/.config/softhsm2/softhsm2.conf and changing directories.tokendir
to an appropriate location. Please see the man page for softhsm2.conf for
details.
After SoftHSM has been configured, the following command can be used to initialize the token required by the unit tests:
softhsm2-util --init-token --slot 0 --label "ForFabric" --so-pin 1234 --pin 98765432
If tests are unable to locate the libsofthsm2.so library in your environment, specify the library path, the PIN, and the label of your token in the appropriate environment variables. For example, on macOS:
export PKCS11_LIB="/usr/local/Cellar/softhsm/2.6.1/lib/softhsm/libsofthsm2.so"
export PKCS11_PIN=98765432
export PKCS11_LABEL="ForFabric"
Install the development tools
Once the repository is cloned, you can use make to install some of the
tools used in the development environment. By default, these tools will be
installed into $HOME/go/bin. Please be sure your PATH includes that
directory.
make gotools
After installing the tools, the build environment can be verified by running a few commands.
make basic-checks integration-test-prereqs
ginkgo -r ./integration/nwo
If those commands completely successfully, you’re ready to Go!
If you plan to use the Hyperledger Fabric application SDKs then be sure to check out their prerequisites in the Node.js SDK README and Java SDK README.
Building Hyperledger Fabric
The following instructions assume that you have already set up your development environment.
To build Hyperledger Fabric:
cd $GOPATH/src/github.com/hyperledger/fabric
make dist-clean all
make dist-clean all
Building the documentation
If you are contributing to the documentation, you can build the Fabric documentation on your local machine. This allows you to check the formatting of your changes using your web browser before you open a pull request.
You need to download the following prerequisites before you can build the documentation:
After you make your updates to the documentation source files, you can generate a build that includes your changes by running the following commands:
cd fabric/docs
pipenv install
pipenv shell
make html
This will generate all the html files in the docs/build/html folder. You can
open any file to start browsing the updated documentation using your browser. If you
want to make additional edits to the documentation, you can rerun make html
to incorporate the changes.
Running the unit tests
Before running the unit tests, a PKCS #11 cryptographic token implementation must be installed and configured. The PKCS #11 API is used by the bccsp component of Fabric to interact with devices, such as hardware security modules (HSMs), that store cryptographic information and perform cryptographic computations. For test environments, SoftHSM can be used to satisfy this requirement.
Use the following command to run all unit tests:
SoftHSM can be installed with the following commands:
::
make unit-test
sudo apt install libsofthsm2 # Ubuntu sudo yum install softhsm # CentOS brew install softhsm # macOS
To run a subset of tests, set the TEST_PKGS environment variable. Specify a list of packages (separated by space), for example:
Once SoftHSM is installed, additional configuration may be required. For example, the default configuration file stores token data in a system directory that unprivileged users are unable to write to.
Configuration typically involves copying /etc/softhsm2.conf to
$HOME/.config/softhsm2/softhsm2.conf and changing directories.tokendir
to an appropriate location. Please see the man page for softhsm2.conf for
details.
export TEST_PKGS=”github.com/hyperledger/fabric/core/ledger/…” make unit-test
After SoftHSM has been configured, the following command can be used to initialize the required token:
To run a specific test use the -run RE flag where RE is a regular
expression that matches the test case name. To run tests with verbose
output use the -v flag. For example, to run the TestGetFoo test
case, change to the directory containing the foo_test.go and
call/execute
softhsm2-util --init-token --slot 0 --label "ForFabric" --so-pin 1234 --pin 98765432
go test -v -run=TestGetFoo
If the test cannot find libsofthsm2.so in your environment, specify its path, the PIN and the label of the token through environment variables. For example, on macOS:
Running Node.js Client SDK Unit Tests
export PKCS11_LIB=”/usr/local/Cellar/softhsm/2.5.0/lib/softhsm/libsofthsm2.so” export PKCS11_PIN=98765432 export PKCS11_LABEL=”ForFabric”
You must also run the Node.js unit tests to ensure that the Node.js client SDK is not broken by your changes. To run the Node.js unit tests, follow the instructions here.
Use the following sequence to run all unit tests:
Configuration
Configuration utilizes the viper and cobra libraries.
cd $GOPATH/src/github.com/hyperledger/fabric make unit-test
There is a core.yaml file that contains the configuration for the peer process. Many of the configuration settings can be overridden on the command line by setting ENV variables that match the configuration setting, but by prefixing with ‘CORE_’. For example, setting peer.networkId can be accomplished with:
To run a subset of tests, set the TEST_PKGS environment variable. Specify a list of packages (separated by space), for example:
::
CORE_PEER_NETWORKID=custom-network-id peer
export TEST_PKGS=”github.com/hyperledger/fabric/core/ledger/…” make unit-test
To run a specific test use the -run RE flag where RE is a regular
expression that matches the test case name. To run tests with verbose
output use the -v flag. For example, to run the TestGetFoo test
case, change to the directory containing the foo_test.go and
call/execute
go test -v -run=TestGetFoo
Configuration
Configuration utilizes the viper and cobra libraries.
There is a core.yaml file that contains the configuration for the peer process. Many of the configuration settings can be overridden on the command line by setting ENV variables that match the configuration setting, but by prefixing with ‘CORE_’. For example, setting peer.networkId can be accomplished with:
CORE_PEER_NETWORKID=custom-network-id peer
Coding guidelines
Coding Golang
Coding in Go
We code in Go™ and try to follow the best practices and style outlined in Effective Go and the supplemental rules from the Go Code Review Comments wiki.
We also recommend new contributors review the following before submitting pull requests:
The following tools are executed against all pull requests. Any errors flagged by these tools must be addressed before the code will be merged:
Testing
Unit tests are expected to accompany all production code changes. These tests should be fast, provide very good coverage for new and modified code, and support parallel execution.
Two matching libraries are commonly used in our tests. When modifying code, please use the matching library that has already been chosen for the package.
Any fixtures or data required by tests should generated or placed under version
control. When fixtures are generated, they must be placed in a temporary
directory created by ioutil.TempDir and cleaned up when the test
terminates. When fixtures are placed under version control, they should be
created inside a testdata folder; documentation that describes how to
regenerate the fixtures should be provided in the tests or a README.txt.
Sharing fixtures across packages is strongly discouraged.
When fakes or mocks are needed, they must be generated. Bespoke, hand-coded
mocks are a maintenance burden and tend to include simulations that inevitably
diverge from reality. Within Fabric, we use go generate directives to
manage the generation with the following tools:
Adding or updating Go packages
Generating gRPC code
Hyperledger Fabric uses go modules to manage and vendor its dependencies. This
means that all of the external packages required to build our binaries reside
in the vendor folder at the top of the repository. Go uses the packages in
this folder instead of the module cache when go commands are executed.
If you modify any .proto files, run the following command to
generate/update the respective .pb.go files.
If a code change results in a new or updated dependency, please be sure to run
go mod tidy and go mod vendor to keep the vendor folder and
dependency metadata up to date.
See the Go Modules Wiki for additional information.
cd $GOPATH/src/github.com/hyperledger/fabric make protos
Adding or updating Go packages
Hyperledger Fabric vendors dependencies. This means that all required packages
reside in the $GOPATH/src/github.com/hyperledger/fabric/vendor folder. Go
will use packages in this folder instead of the GOPATH when the go install
or go build commands are executed. To manage the packages in the vendor
folder, we use dep.
术语表
专业术语很重要,因为所有 Hyperledger Fabric 项目的用户和开发人员都要一致的理解我们所说的每个术语的含义。比如什么是链码。本文档将会按需引用这些术语,如果你愿意的话也可以阅读整个文档,这会非常有启发!
锚节点
gossip 用来确保在不同组织中的 Peer 节点能够知道彼此。
当提交一个包含锚节点更新的配置区块时,Peer 节点会联系锚节点并从它们那里获取该节点知道的所有 Peer 节点的信息。一旦每个组织中至少有一个 Peer 节点已经联系到一个或多个锚节点的话,锚节点就会知道这个通道中的每个 Peer 节点。因为 gossip 通信是不变的,并且 Peer 节点总是会要求告知他们不知道的 Peer 节点,这样就建立起了一个通道成员的通用视图。
比如,我们可以假设在通道中有三个组织:A、B、C,有一个为组织 C 定义的锚节点 peer0.orgC。当 peer1.orgA (来自组织 A)联系 peer0.orgC 的时候,它会告诉 peer0.orgC 关于 peer0.orgA 的信息。然后当 peer1.orgB 联系 peer0.orgC 的时候,后者会告诉前者关于 peer0.orgA 的信息。之后,组织 A 和 B 就可以开始直接地交换成员信息而不需要任何来自 peer0.orgC 的帮助了。
由于组织间的通信要基于 gossip 来工作,所以在通道配置中至少要定义一个锚节点。为了高可用和冗余,非常建议每个组织提供他们自己的一组锚节点。
ACL
ACL(Access Control List,访问控制列表)将特定节点资源(例如系统链代码 API 或事件服务)的访问与 策略_ (指定需要多少和哪些类型的组织或角色)关联在一起。ACL 是通道配置的一部分。因此,它会保留在通道的配置区块中,并可使用标准的配置更新机制进行更新。
ACL 的格式为键值对列表,其中键标识我们希望控制其访问的资源,值标识允许访问它的通道策略(组)。 例如, lscc/GetDeploymentSpec: /Channel/Application/Readers 定义对生命周期链代码 GetDeploymentSpec API(资源)的访问可由满足 /Channel/Application/Readers 策略的身份访问。
configtx.yaml 文件中提供了一组默认 ACL,configtxgen 使用该文件来构建通道配置。可以在 configtx.yaml 的顶级 “Application” 部分中设置默认值,也可以在 “Profiles” 部分中按每个配置文件覆盖默认值。
区块
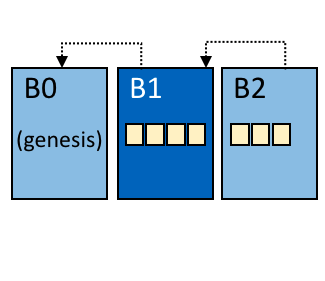
区块 B1 是连接到区块 B0 的。区块 B2 是连接到区块 B1 的。
一个区块包含了一组有序的交易。他们以加密的方式与前一个区块相连,并且他们也会跟后续的区块相连。在这个链条中的第一个区块被称为 创世区块。区块是由排序服务创建的,并且由 Peer 节点进行验证和提交。
链
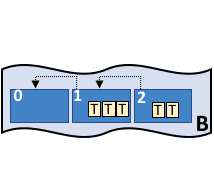
区块链 B 包含了区块 0, 1, 2
账本的链是交易区块经过哈希连接结构化的交易日志。Peer 节点从排序服务收到交易区块,基于背书策略和并发冲突来标注区块的交易为有效或者无效状态,并且将区块追加到 Peer 节点文件系统的哈希链中。
通道
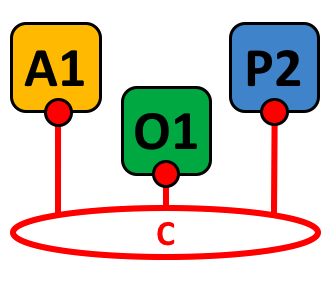
通道 C 连接了应用程序 A1,Peer 节点 P2 和排序服务 O1。
通道是基于数据隔离和保密构建的一个私有区块链。特定通道的账本在该通道中的所有 Peer 节点共享,交易方必须通过该通道的正确验证才能与账本进行交互。通道是由“ 配置区块 ”来定义的。
并发控制版本检查
并发控制版本检查(Concurrency Control Version Check,CCVC)是保持通道中各节点间状态同步的一种方法。Peer 节点并行的执行交易,在交易提交至账本之前,节点会检查交易在执行期间读到的数据是否被修改。如果读取的数据在执行和提交之间被改变,就会引发 CCVC 冲突,该交易就会在账本中被标记为无效,而且值不会更新到状态数据库中。
配置区块
包含为系统链(排序服务)或通道定义成员和策略的配置数据。对某个通道或整个网络的配置修改(比如,成员离开或加入)都将导致生成一个新的配置区块并追加到适当的链上。这个配置区块会包含创始区块的内容,再加上增量。
共识
贯串交易流程的一个广泛的概念,用于对区块中的交易生成一致的顺序和确保其正确性。
共识者集合
Raft 排序服务中,在一个通道的共识机制中会有多个活动的排序节点参与其中。如果其他排序节点存在于系统通道,但是没有加入通道,它就不属于这个通道的共识者集合。
联盟
联盟是区块链网络上非定序的组织集合。这些是组建和加入通道及拥有节点的组织。虽然区块链网络可以有多个联盟,但大多数区块链网络都只有一个联盟。在通道创建时,添加到通道的所有组织都必须是联盟的一部分。但是,未在联盟中定义的组织可能会被添加到现有通道中。
链码定义
链码定义用于组织在将链码应用在通道之前协商链码参数。每个想使用链码背书交易或者查询账本的通道成员都需要为他们的组织批准链码定义。一旦有足够多的通道成员批准了链码定义,使其满足了生命周期背书策略(默认是通道中的多数组织),链码定义就可以提交到通道中了。定义提交之后,链码的第一个调用(或者,必要的话调用 Init 方法)就会在通道上启动链码。
动态成员
Hyperledger Fabric 支持成员、节点、排序服务节点的添加或移除,而不影响整个网络的操作性。当业务关系调整或因各种原因需添加或移除实体时,动态成员至关重要。
背书
背书是指特定节点执行链码交易并返回一个提案响应给客户端应用的过程。提案响应包含链码执行后返回的消息、结果(读写集)和事件,同时也包含证明该节点执行链码的签名。链码应用具有相应的背书策略,其中指定了背书节点。
背书策略
定义了通道上必须执行依赖于特定链码的交易的节点,和必要的组合响应(背书)。背书策略可指定特定链码应用交易背书的最小背书节点数、百分比或全部节点。背书策略可以基于应用程序和节点对于抵御(有意无意)不良行为的期望水平来组织管理。提交的交易在被执行节点标记成有效前,必须符合背书策略。
跟随者
在基于领导者的共识协议中,比如 Raft,有一些节点复制领导者生产的日志条目。在 Raft中,跟随者也接受领导者的“心跳”信息。当领导者停止发送这些信息达到配置中的时间是,跟随者会初始化一个领导者选举并选举出一个领导者。
初始区块
初始化排序服务的的配置区块,也是链上的第一个区块。
Gossip 协议
Gossip数据传输协议有三项功能: 1)管理节点发现和通道成员; 2)在通道上的所有节点间广播账本数据; 3)在通道上的所有节点间同步账本数据。 详情参考 Gossip 话题。
Hyperledger Fabric CA
Hyperledger Fabric CA 是默认的证书授权组件,用于向网络成员组织和他们的用户发行基于 PKI 的证书。CA 向每一个成员发行一个根证书(rootCert)并向每一个授权的用户发行一个注册证书(ECert)。
初始化
初始化链码应用的方法。所有的链码都需要有一个 Init 方法。默认情况下,该方法不会被执行。但是你可以在链码定义中请求执行 Init 方法来初始化链码。
安装
将链码放到 Peer 节点文件系统的过程。
实例化
在特定通道上启动和初始化链码应用的过程。实例化完成后,装有链码的节点可以接受链码调用。
NOTE: This method i.e. Instantiate was used in the 1.4.x and older versions of the chaincode lifecycle. For the current procedure used to start a chaincode on a channel with the new Fabric chaincode lifecycle introduced as part of Fabric v2.0, see Chaincode-definition_.
调用
用于调用链码内的函数。客户端应用通过向节点发送交易提案来调用链码。节点会执行链码并向客户端应用返回一个背书提案。客户端应用会收集充足的提案响应来判断是否符合背书策略,之后再将交易结果递交到排序、验证和提交。客户端应用可以选择不提交交易结果。比如,调用只查询账本,通常情况下,客户端应用是不会提交这种只读性交易的,除非基于审计目的,需要记录访问账本的日志。调用包含了通道标识符,调用的链码函数,以及一个包含参数的数组。
Leader
In a leader based consensus protocol, like Raft, the leader is responsible for ingesting new log entries, replicating them to follower ordering nodes, and managing when an entry is considered committed. This is not a special type of orderer. It is only a role that an orderer may have at certain times, and then not others, as circumstances determine.
Leading Peer
每一个“组织 Organization ”在其订阅的通道上可以拥有多个节点,其中一个节点会作为通道的主导节点,代表该成员与网络排序服务节点通信。排序服务将区块传递给通道上的主导节点,主导节点再将此区块分发给同一成员集群下的其他节点。
Ledger

A Ledger, ‘L’
账本由两个不同但相关的部分组成——“区块链”和“状态数据库”,也称为“世界状态”。与其他账本不同,区块链是 不可变 的——也就是说,一旦将一个区块添加到链中,它就无法更改。相反,“世界状态”是一个数据库,其中包含已由区块链中的一组经过验证和提交的交易添加,修改或删除的键值对集合的当前值。
认为网络中每个通道都有一个 逻辑 账本是有帮助的。实际上,通道中的每个节点都维护着自己的账本副本——通过称为共识的过程与所有其他节点的副本保持一致。术语 分布式账本技术 (DLT)通常与这种账本相关联——这种账本在逻辑上是单一的,但在一组网络节点(节点和排序服务)上分布有许多相同的副本。
Log entry
The primary unit of work in a Raft ordering service, log entries are distributed from the leader orderer to the followers. The full sequence of such entries known as the “log”. The log is considered to be consistent if all members agree on the entries and their order.
Member
参见 Organization 。
Membership Service Provider

An MSP, ‘ORG.MSP’
成员服务提供者(MSP)是指为客户端和节点加入超级账本Fabric网络,提供证书的系统抽象组件。客户端用证书来认证他们的交易;节点用证书认证交易处理结果(背书)。该接口与系统的交易处理组件密切相关,旨在定义成员服务组件,以这种方式可选实现平滑接入,而不用修改系统的交易处理组件核心。
Membership Services
成员服务在许可的区块链网络上做认证、授权和身份管理。运行于节点和排序服务的成员服务代码均会参与认证和授权区块链操作。它是基于PKI的抽象成员服务提供者(MSP)的实现。
Ordering Service
Also known as orderer. A defined collective of nodes that orders transactions into a block and then distributes blocks to connected peers for validation and commit. The ordering service exists independent of the peer processes and orders transactions on a first-come-first-serve basis for all channels on the network. It is designed to support pluggable implementations beyond the out-of-the-box Kafka and Raft varieties. It is a common binding for the overall network; it contains the cryptographic identity material tied to each Member.
Organization

An organization, ‘ORG’
也被称为“成员”,组织被区块链服务提供者邀请加入区块链网络。通过将成员服务提供程序( MSP )添加到网络,组织加入网络。MSP定义了网络的其他成员如何验证签名(例如交易上的签名)是由该组织颁发的有效身份生成的。MSP中身份的特定访问权限由策略控制,这些策略在组织加入网络时也同意。组织可以像跨国公司一样大,也可以像个人一样小。 组织的交易终端点是节点 Peer 。 一组组织组成了一个联盟 Consortium_ 。虽然网络上的所有组织都是成员,但并非每个组织都会成为联盟的一部分。

Policy
策略是由数字身份的属性组成的表达式,例如: Org1.Peer OR Org2.Peer 。 它们用于限制对区块链网络上的资源的访问。例如,它们决定谁可以读取或写入某个通道,或者谁可以通过ACL使用特定的链码API。在引导排序服务或创建通道之前,可以在 configtx.yaml 中定义策略,或者可以在通道上实例化链码时指定它们。示例 configtx.yaml 中提供了一组默认策略,适用于大多数网络。
Private Data
存储在每个授权节点的私有数据库中的机密数据,在逻辑上与通道账本数据分开。通过私有数据收集定义,对数据的访问仅限于通道上的一个或多个组织。未经授权的组织将在通道账本上拥有私有数据的哈希作为交易数据的证据。此外,为了进一步保护隐私,私有数据的哈希值通过排序服务 Ordering-Service 而不是私有数据本身,因此这使得私有数据对排序者保密。
Private Data Collection (Collection)
用于管理通道上的两个或多个组织希望与该通道上的其他组织保持私密的机密数据。集合定义描述了有权存储一组私有数据的通道上的组织子集,这通过扩展意味着只有这些组织才能与私有数据进行交易。
Proposal
一种通道中针对特定节点的背书请求。每个提案要么是链码的实例化,要么是链码的调用(读写)请求。
Query
A query is a chaincode invocation which reads the ledger current state but does not write to the ledger. The chaincode function may query certain keys on the ledger, or may query for a set of keys on the ledger. Since queries do not change ledger state, the client application will typically not submit these read-only transactions for ordering, validation, and commit. Although not typical, the client application can choose to submit the read-only transaction for ordering, validation, and commit, for example if the client wants auditable proof on the ledger chain that it had knowledge of specific ledger state at a certain point in time.
Quorum
This describes the minimum number of members of the cluster that need to affirm a proposal so that transactions can be ordered. For every consenter set, this is a majority of nodes. In a cluster with five nodes, three must be available for there to be a quorum. If a quorum of nodes is unavailable for any reason, the cluster becomes unavailable for both read and write operations and no new logs can be committed.
Raft
New for v1.4.1, Raft is a crash fault tolerant (CFT) ordering service implementation based on the etcd library of the Raft protocol. Raft follows a “leader and follower” model, where a leader node is elected (per channel) and its decisions are replicated by the followers. Raft ordering services should be easier to set up and manage than Kafka-based ordering services, and their design allows organizations to contribute nodes to a distributed ordering service.
Software Development Kit (SDK)
超级账本Fabric客户端软件开发包(SDK)为开发人员提供了一个结构化的库环境,用于编写和测试链码应用程序。SDK完全可以通过标准接口实现配置和扩展。它的各种组件:签名加密算法、日志框架和状态存储,都可以轻松地被替换。SDK提供APIs进行交易处理,成员服务、节点遍历以及事件处理。
目前,两个官方支持的SDK用于Node.js和Java,而另外两个——Python和Go——尚非正式,但仍可以下载和测试。
智能合约
智能合约是代码——由区块链网络外部的客户端应用程序调用——管理对 World State 中的一组键值对的访问和修改。在超级账本Fabric中,智能合约被称为链码。智能合约链码安装在节点上并实例化为一个或多个通道。
State Database
为了从链码中高效的读写查询,当前状态数据存储在状态数据库中。支持的数据库包括levelDB和couchDB。
System Chain
一个在系统层面定义网络的配置区块。系统链存在于排序服务中,与通道类似,具有包含以下信息的初始配置:MSP(成员服务提供者)信息、策略和配置详情。全网中的任何变化(例如新的组织加入或者新的排序节点加入)将导致新的配置区块被添加到系统链中。
系统链可看做是一个或一组通道的公用绑定。例如,金融机构的集合可以形成一个财团(表现为系统链), 然后根据其相同或不同的业务计划创建通道。
Transaction
A transaction, ‘T’
Transactions are created when a chaincode is invoked from a client application to read or write data from the ledger. Fabric application clients submit transaction proposals to endorsing peers for execution and endorsement, gather the signed (endorsed) responses from those endorsing peers, and then package the results and endorsements into a transaction that is submitted to the ordering service. The ordering service orders and places transactions in a block that is broadcast to the peers which validate and commit the transactions to the ledger and update world state.
World State
The World State, ‘W’
世界状态也称为“当前状态”,是 HyperLedger Fabric Ledger 的一个组件。世界状态表示链交易日志中包含的所有键的最新值。链码针对世界状态数据执行交易提案,因为世界状态提供对这些密钥的最新值的直接访问,而不是通过遍历整个交易日志来计算它们。每当键的值发生变化时(例如,当汽车的所有权——“钥匙”——从一个所有者转移到另一个——“值”)或添加新键(创造汽车)时,世界状态就会改变。因此,世界状态对交易流程至关重要,因为键值对的当前状态必须先知道才能更改。对于处理过的区块中包含的每个有效事务,节点将最新值提交到账本世界状态。
版本发布
Hyperledger Fabric 的版本发布记录在 Fabric 的 github 页面。
仍有问题?
我们维护的是一个面向大多数读者的综合性的文档。但是我们发现,经常会有一些我们不能覆盖到的问题。关于 Hyperledger Fabric 技术性的问题我们不会在这里回答,请使用 StackOverflow 。也可以把你的问题发送到 邮件列表 (hyperledger-fabric@lists.hyperledger.org),或者在 RocketChat 的 #fabric 或 #fabric-questions 频道中提问。
注解
请在您提问的时候,描述清楚您的问题发生的操作环境,包括操作系统、使用的 Docker 版本等。
注解
如果您的问题没在本文档中找到解决方案,或者运行教程时有任何问题,请访问 仍有问题? 页面查找答案或者请求额外帮助。